
![]()
In this chapter, you learn how to customize the house bank in financial (FI).
At the end of this chapter, you will be able to:
- Describe what a house bank is
- Identify the components of a master record in a house bank
- Define a house bank
- Use a house bank ID and an account ID
- Identify bank statements supported by SAP
- Assign global settings for an electronic bank statement
- Configure a manual bank statement
- Define posting keys and posting rules for check deposits
- Define variants for check deposits
House Bank
The banks that hold your company code bank account are referred to as house banks in SAP ERP (for example City Bank, Bank of America, etc.). A company code can have more than one house bank assigned to it. Figure 9-1 shows how house banks are structured in SAP ERP.

Figure 9-1. The structure of a house bank in SAP R/3
Each house bank has its own master record that’s stored centrally in the bank directory. The master data that’s stored in the bank directory is made up of the following sections:
- Bank Account Data section: This section contains your company code bank account number, which is a unique account number issued by your bank to you. Your company code IBAN (International Bank Account Number) is an internationally recognized account number used for international transaction payments. Your company code local currency is the currency used by your company code. A G/L account number is assigned to your bank’s G/L account.
- House Bank Data section: Contains bank currency, which is the currency used by your bank. A bank key, which is sometime referred to as your bank sort code, is a unique identification code for your bank.
- Communication Data section: Contains telephone and contact persons at your bank.
- Address section: Contains your bank address details, including your bank name, region, street, and city.
- Control Data section: Contains a Bank Account Number, SWIFT (Society for World-Wide Interbank Financial Telecommunication) code, and so on. The SWIFT code is used for identifying banks in international payment transactions. The first four characters contain the bank code (alphabetical characters only). The next two characters contain the ISO (in numeric digits) and two alpha digits for the country code.
- EDI section: EDI stands for Electronic Data Interchange and is used to process electronic business transactions between different applications.
- Data Medium Exchange (DME) section: Enter general data for data medium exchange in this section. These are predefined file formats that meet the requirements of your financial institution. DME allows the system to send and receive data in DME format.
A combination of the house bank ID and the account ID makes up the bank account in the SAP R/3 system. You enter the house bank ID and the account ID in the G/L account so that the system can recognize the appropriate G/L account during bank transactions. The bank group is used for classifying banks. The concept of an account group is helpful when you use the same bank as your business partners. For example, all the business partners might belong to the HSBC bank group. The aim of the classification is to group banks together in such a way that payment transactions within a group can be carried out as fast as possible (this is referred to as payment optimization).
![]() Note When a business partner (customer/vendor) has more than one bank account for payment, the bank type in the customer master record is used to distinguish between different banks. During invoice processing, the SAP ERP user can decide which bank to use by choosing a matchcode in the partner bank field in the partner’s master data. The matchcode is a user-friendly tool in SAP that assists you in searching for data stored in the system. Matchcode maintenance is outside the scope of this book, as it requires technical knowledge of the ABAP4 (the programmers).
Note When a business partner (customer/vendor) has more than one bank account for payment, the bank type in the customer master record is used to distinguish between different banks. During invoice processing, the SAP ERP user can decide which bank to use by choosing a matchcode in the partner bank field in the partner’s master data. The matchcode is a user-friendly tool in SAP that assists you in searching for data stored in the system. Matchcode maintenance is outside the scope of this book, as it requires technical knowledge of the ABAP4 (the programmers).
Before proceeding with your house bank configuration, go to “Appendix A, Chapter 18, House Bank” to create the appropriate G/L accounts needed for your house bank configuration.
The next section explains how to define house banks for your bank accounts in SAP ERP.
Define House Banks
As mentioned, banks used by company codes in the SAP ERP system are called house banks. A combination of the house bank ID and the account ID makes up the bank account in SAP R/3 system. The house bank ID and the account ID you define are used by the payment program to determine the banks to use during invoice payment.
![]() Note The SAP ERP system comes with examples of standard house banks. If you are not confident in configuring a house bank, take a look at them as a guide.
Note The SAP ERP system comes with examples of standard house banks. If you are not confident in configuring a house bank, take a look at them as a guide.
Problem: Company C900 Plc has two bank accounts (Barclays Bank and HSBC Bank). You need to define the house banks for both bank accounts.
To define house banks, use the menu path: IMG: Financial Accounting (New) ![]() Financial Accounting Global IMG: Financial Accounting (New)
Financial Accounting Global IMG: Financial Accounting (New) ![]() Bank Accounting
Bank Accounting ![]() Bank Accounts
Bank Accounts ![]() Define House Bank. Or you can use the transaction code F112.
Define House Bank. Or you can use the transaction code F112.
The Determine Work Area: Entry screen pops up and requests your company code. When you enter your company code in the Company Code field, the system will automatically determine your company code house bank work area. Enter your company code in the Company Code field on the screen and click the Enter ![]() button at the bottom of the screen or press Enter on your keyboard. The Change View “House Banks” Overview screen, where you start the customizing your house bank, is displayed (Figure 9-2).
button at the bottom of the screen or press Enter on your keyboard. The Change View “House Banks” Overview screen, where you start the customizing your house bank, is displayed (Figure 9-2).
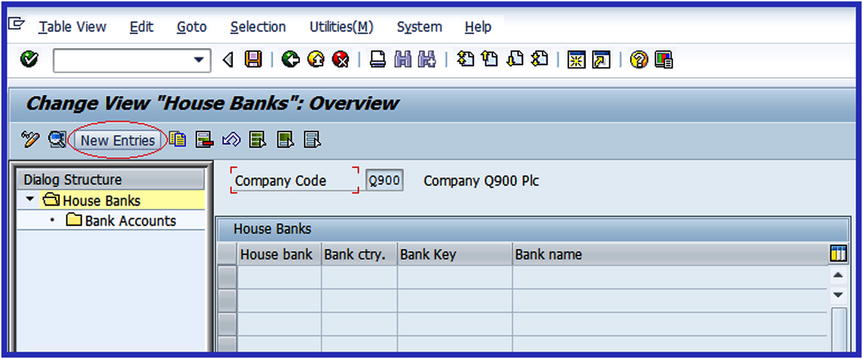
Figure 9-2. The initial screen where you start customizing your house bank
Click the ![]() button on the top-left side of the screen (circled red in Figure 9-2). This will take you to the screen in Figure 9-3, where you will define the house bank for your company code.
button on the top-left side of the screen (circled red in Figure 9-2). This will take you to the screen in Figure 9-3, where you will define the house bank for your company code.

Figure 9-3. The screen where you create the house bank for your company code
Update the following fields:
- Company Code: Since you have entered it when you determined work area for your company code earlier, the system will enter your company code as the default.
- House Bank: Enter your house bank ID in this field. You can enter up to five digits as your house bank ID. This ID will enable you to identify this bank account, especially when you have multiple house banks. The house bank ID is also entered in the bank account G/L account master data and customer/vendor master record for the automatic payment program.
- Bank Country: Enter your country ID (for example, for Great Britain, you would enter GB). This is a predefined key supplied by SAP in the system. The importance of the bank country ID is that it allows you to identfy your house bank country. The country ID also forms part of the IBAN and SWIFT numbers for international payments.
- Bank Key: Enter your bank sort code. This helps identify your bank and the branch. This key is very important as it forms part of the IBAN and SWIFT numbers used for international payments.
- Telephone: Enter the bank’s telephone number.
- Contact Person: Enter your account manager or other bank staff member who is designated by the bank to your account.
After updating the preceding fields, click the ![]() button on the right side of the screen. This will call up the Bank Data screen, where you can enter more information about your house bank. For example, you can enter your bank address, region, and so on. Once you have added your entries, click Continue
button on the right side of the screen. This will call up the Bank Data screen, where you can enter more information about your house bank. For example, you can enter your bank address, region, and so on. Once you have added your entries, click Continue ![]() on the bottom-right side of the screen to confirm your entries and save
on the bottom-right side of the screen to confirm your entries and save ![]() your house bank.
your house bank.
The next step in this activity is to define your bank account. This is found in the on the left side of the screen in Figure 9-3, circled in red.
Define Bank Accounts for Your House Banks
Since you want to define the bank account for your house bank, double-click the ![]() folder on the left side of the New Entries: Details of Added Entries screen (see Figure 9-3). The Change View “Bank Accounts”: Overview screen is displayed; this is the initial screen where you will select the house bank you want to define a bank account for. If this is the first house bank you have created, the screen will be blank.
folder on the left side of the New Entries: Details of Added Entries screen (see Figure 9-3). The Change View “Bank Accounts”: Overview screen is displayed; this is the initial screen where you will select the house bank you want to define a bank account for. If this is the first house bank you have created, the screen will be blank.
Click the ![]() button on the top-left side of the screen. The New Entries: Details of Added Entries screen is displayed (Figure 9-4). This is where you specify your bank account data.
button on the top-left side of the screen. The New Entries: Details of Added Entries screen is displayed (Figure 9-4). This is where you specify your bank account data.
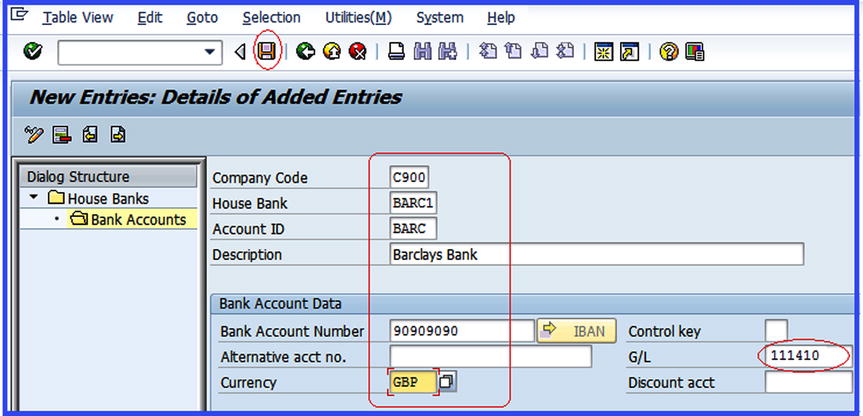
Figure 9-4. The bank details entry screen
Update the following fields using your company’s bank data, or you can use the data on the screen for this activity:
- Company Code and House Bank: The system automatically uses the data you entered when you defined your house bank earlier.
- Account ID: This is a unique account ID that you enter in your G/L account for your bank account. You can enter up to five digits as your account ID.
- Description: Enter a short text describing your bank account. This is usually the name of your bank.
- Currency: Usually, companies use different bank accounts for different currencies. Enter the currency that your company uses for this bank account.
- G/L: Enter the G/L account for your bank account in this field. This is the G/L account you created for your bank account in “Appendix A, Chapter 9, House Bank” before you started your configuration.
![]() Note When you want to enable e-banking, click the EDI partner profiles (see Figure 9-3) to attach the EDI partner to your house bank. EDI provides standard formats that allow business partners to exchange data electronically.
Note When you want to enable e-banking, click the EDI partner profiles (see Figure 9-3) to attach the EDI partner to your house bank. EDI provides standard formats that allow business partners to exchange data electronically.
You have just created your house bank. You can now save it by clicking the Save ![]() button.
button.
Following the steps in Define Bank Accounts for your House Banks section earlier and using the information in Table 9-1, define another bank account and house bank for the HSBC bank.
Table 9-1. Data to Define the HSBC Bank Account and House Bank
|
Field Name |
Bank Data |
|---|---|
|
Company Code |
Enter your company code in this field. |
|
House Bank |
HSBC1 |
|
Bank Country |
Enter your country code in this field. For example, for Britain use GB or for Germany, use DE. |
|
Bank Key |
Enter your bank unique sort code in this field. |
|
Address Section |
Enter your bank address. |
|
Account ID |
HSBC |
|
Description |
HSBC Bank |
|
Bank Account Number |
Enter your bank account in this field. |
|
Currency |
Enter your country currency code in this field. For example, the currency code for United States is USD and for Germany, it’s EUR. |
|
G/L |
Enter the G/L account you want to post your bank transactions in this field. |
A bank statement is a summary of financial transactions, such as incoming and outgoing payments that took place during a given period on an account. This is the state of your cash position. SAP ERP supports two types of bank statements: electronic bank statements and manual bank statements.
Before you create your electronic and manual bank statements, it is recommended that you first create the following clearing accounts (refer to “Appendix A, Chapter 9, House Bank”), which your bank transactions will be posted to:
- Main Bank Account: As the name suggests, this is the general bank account entered in the house bank master data. This account serves as a reconciliation account that holds the bank account balance.
- Checks Received: The checks you received for invoice amounts from your customers or business partners for supplying them goods or for providing services are posted to this account.
- Other Interim Posting: Reconciliation items are posted to this account.
- Check Issued out: Check payments made by your company to its creditors or business partners for goods/services received are posted to this account.
- Outgoing Wire Transfer: This is an electronic method of funds transfer from your company to a business partner to mitigate due invoice(s). This is a very fast way of transferring money from one person to another or from one company to another.
- Incoming Cash: Cash received by your company from business partners for a business transaction are posted to this account.
- Outgoing Cash: Cash payments made by your company relating to business transactions to business partners are posted to this account.
![]() Note We have provided information in “Appendix A, Chapter 9 Bank Statement” that will enable you to create the G/L account that you will need to customize your bank statement. We recommend that you first create the necessary G/L account before creating your bank statement.
Note We have provided information in “Appendix A, Chapter 9 Bank Statement” that will enable you to create the G/L account that you will need to customize your bank statement. We recommend that you first create the necessary G/L account before creating your bank statement.
The next section defines an electronic bank statement and explains how to set up an electronic bank statement (EBS) framework. Later in this chapter, you will define manual bank statements.
Electronic Bank Statement
An electronic bank statement is simply a bank statement generated by your bank in an electronic format. It provides detailed information about the movement of funds in your bank account created at the house bank during any given period. With SAP R/3 it is possible to retrieve bank statements electronically using bank communication management. Bank communication management manages multiple bank communication interfaces that allow you to connect to your bank using a defined standard protocol. When a bank statement is uploaded to SAP ERP, it can serve the following purposes:
- Clears all bank clearing accounts in the system to the bank main account (this is the general bank account entered in the house bank master data).
- Uses the bank statement to perform automatic bank reconciliations in the system.
SAP R/3 supports various electronic bank statement formats, including Multicash, SWIFT, BAI, BAI2, and others:
- Multicash: Invented by Omikron a German Company, Multicash is an electronic bank statement format that allows the SAP ERP system to communicate with the bank system. The format is split into two file formats. AUSZUG.TXT holds the bank statement header information and UMSATZ.TXT contains the bank account transactions information.
- SWIFT (Society for World-Wide Interbank Financial Telecommunication): This is a computer-based switching system used by banks for making payments related to international transactions.
- BAI (Bank Administration Institute): This is a standardized electronic file format used for cash management between the bank and the account holder. The bank transmits BAI file formats to the account holder who in turns downloads or inputs the file into the system, generates a bank statement, and performs bank reconciliation.
- BAI2: This is the latest release of a cash management balance report. It is very similar to BAI in functionality. The only difference is that BAI2 contains more detailed information.
Make Global Settings for Electronic Bank Statements
In this activity, you will configure seven global settings for your electronic bank statement. The list of these settings is displayed on the left side of the Change View “Create Account Symbols”: Overview screen.
Four of the settings that you will be customizing are also applicable to manual bank statements, so you don’t need to define them again during the manual bank statement configuration:
- Create Account Symbols: The accounts symbols that you create as part of your electronic bank customizing will specify the G/L accounts and subledgers that the bank statement transactions are posted to.
- Assign Accounts to Account Symbols: This allows you to assign or map account symbols to appropriate G/L accounts and subledgers.
- Create Keys for Posting Rules: Posting keys determine the posting rules applicable to the general ledger and subledgers.
- Define Posting Rules: Posting rules represent how business transactions in the bank statement use appropriate posting keys, document types, and posting types. For example, incoming checks, checks out, bank transfers, bank charges, and so on.
Problem: The accounting team at company C900 Plc wants to upload their bank statements electronically using the defined bank communication standard. SAP supports various electronic bank statement formats, including Multicash, BAI, BAI2, SWIFT, and so on. It is your responsibility to define the appropriate settings needed to allow the accounting team to upload bank statements electronically so they can clear several bank clearing accounts and carry out automatic bank reconciliation.
To go to the screen where you will customize the electronic bank statement, follow this menu path: IMG: Financial Accounting (New) ![]() Bank Accounting
Bank Accounting ![]() Business Transactions
Business Transactions ![]() Payment Transactions
Payment Transactions ![]() Electronic Bank Statement
Electronic Bank Statement ![]() Make Global Settings for Electronic Bank Statement. Or you can use transaction code OT83.
Make Global Settings for Electronic Bank Statement. Or you can use transaction code OT83.
The Determine Work Area: Entry dialog box pops up. Enter your company code in the Company Code field on the screen and click the Enter ![]() button at the bottom of the screen or press enter on your keyboard. The Change View “Create Account Symbols:” Overview screen is displayed (Figure 9-5). This is the initial screen for customizing electronic bank statements. The left pane of this screen shows all the nodes you will need to customize.
button at the bottom of the screen or press enter on your keyboard. The Change View “Create Account Symbols:” Overview screen is displayed (Figure 9-5). This is the initial screen for customizing electronic bank statements. The left pane of this screen shows all the nodes you will need to customize.

Figure 9-5. The initial screen for global settings for an electronic bank statement—Create Account Symbols
![]() Tip To ensure that your configuration is complete, work through the folders on the left side of the screen systematically from the top down.
Tip To ensure that your configuration is complete, work through the folders on the left side of the screen systematically from the top down.
Step 1: Create Account Symbols
The first step in this activity is to create account symbols for these accounts. Notice that the Create Account Symbol folder on the left pane of the screen is open. This is the first item on the list.
![]() Note An open folder indicates that this is the current item you want to customize; all other folders remain closed. If the folder you want to work on is not open, double-click it.
Note An open folder indicates that this is the current item you want to customize; all other folders remain closed. If the folder you want to work on is not open, double-click it.
Click the ![]() button. The New Entries: Overview of Added Entries screen is displayed (Figure 9-6). This screen will allow you to create your own account symbols for your electronic bank statement. Update the New Entries screen with your account symbol.
button. The New Entries: Overview of Added Entries screen is displayed (Figure 9-6). This screen will allow you to create your own account symbols for your electronic bank statement. Update the New Entries screen with your account symbol.

Figure 9-6. The input screen for global settings for an electronic bank statement—Create Account Symbols
![]() Tip If New Entries button is not displayed, it means that screen is set to display mode. Click the Display/Change
Tip If New Entries button is not displayed, it means that screen is set to display mode. Click the Display/Change ![]() button on the top-left side of the screen to set the screen to change mode.
button on the top-left side of the screen to set the screen to change mode.
There is no hard rule for creating account symbols. You don’t necessarily have to use the account symbols used here. You can formulate your own. If you are using your own account symbols, make sure that you use meaningful descriptions. The account symbols you create in this activity will be assigned to the subledgers and the general ledger you created in your house bank in Step 2.
![]() Note Once someone else has used an account symbol, the system will not allow you to use that same symbol, so you might have to get creative.
Note Once someone else has used an account symbol, the system will not allow you to use that same symbol, so you might have to get creative.
Once you have updated the screen in Figure 9-6 with your account symbols, click the Enter ![]() button on the top-left side of the screen to ensure that the system accepted your entries. Save
button on the top-left side of the screen to ensure that the system accepted your entries. Save ![]() your account symbols.
your account symbols.
The next step is to assign the G/L accounts to the accounts symbols you just created.
Step 2: Assign Accounts to Account Symbols
By assigning accounts to the account symbols, the system will automatically map the subledgers and the G/L account that transactions are posted to when users retrieve bank statements electronically. For example, checks received are posted to the Incoming Checks account, charges are posted to the Bank Charges account, and so on.
To go the next screen where you will assign accounts to account sysmbols, double-click the ![]() folder on the left side of the screen. The Change View “Assign Accounts to Account Symbol”: Overview screen is displayed. This is where you will assign accounts to account symbols.
folder on the left side of the screen. The Change View “Assign Accounts to Account Symbol”: Overview screen is displayed. This is where you will assign accounts to account symbols.
Click the ![]() button on the top-left side of the screen to display the New Entries: Overview of Added Entries screen. This is where you assign the account symbols to your system account.
button on the top-left side of the screen to display the New Entries: Overview of Added Entries screen. This is where you assign the account symbols to your system account.
Enter each of your account symbols in the Acct. Symbol fields. If you cannot remember your account symbols, you can look for them using the Search function ![]() button. The Bank Statement: Account Symbol screen contains lists of all the account symbols in the system, including the ones you created for your electronic bank statement (Figure 9-7).
button. The Bank Statement: Account Symbol screen contains lists of all the account symbols in the system, including the ones you created for your electronic bank statement (Figure 9-7).
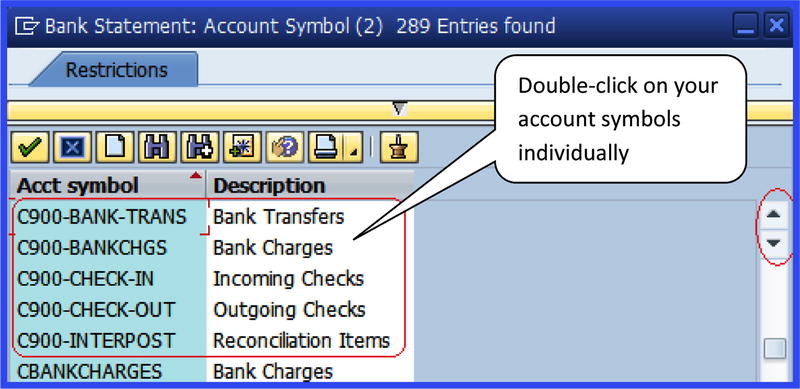
Figure 9-7. Global settings for an electronic bank statement—the list of account symbols
Click the Scroll ![]() button to search for your account symbols and assign them to the system account symbols appropriately on the New Entries: Overview of Added Entries screen (Figure 9-8).
button to search for your account symbols and assign them to the system account symbols appropriately on the New Entries: Overview of Added Entries screen (Figure 9-8).

Figure 9-8. Global settings for an electronic bank statement—Assign External Transaction Types
In order to avoid defining separate account symbols for each house bank account, enter a plus sign (+) in the Account Modification and Currency fields. Also, if you want to avoid having to define separate account symbols and different G/L accounts for every house bank in the system, we advise that you mask the G/L account field.
By masking your G/L accounts with + signs, you won’t have to keep defining a symbol for every house bank when a new G/L is defined. When you mask your G/L accounts with ++++++++++, the system will automatically recognize the G/L account for your house bank. Masking also helps you avoid input errors when you’re maintaining G/L accounts.
Enter the last number of each G/L account at the end of the account sign ++++++++n in the G/L account fields in Figure 9-8. n is the last number of your G/L account. For example, the G/L account for Check Issued with Account Symbol C900-CHECK-OUT is 111412, so the masking for your G/L account would be +++++++++2. This same principle applies to all your G/L accounts, with the exception of your main house bank G/L account, as shown in Figure 9-8.
When you have updated the screen with the appropriate account symbols and G/L accounts, click the Enter ![]() button to confirm that the system accepted your entries. Save
button to confirm that the system accepted your entries. Save ![]() your work.
your work.
The next step is to create keys for posting rules. The posting keys are handy when you are defining posting rules in Step 4.
Step 3: Create Keys for Posting Rules
To create keys for posting rules, double-click the ![]() folder. This is the third item on the Dialog Structure. Create Keys for Posting Rules Overview screen. This is the initial screen for creating the keys for posting rules. To proceed to the New Entries: Overview of Added Entries screen (Figure 9-9), where you will define the keys for posting rules, click the
folder. This is the third item on the Dialog Structure. Create Keys for Posting Rules Overview screen. This is the initial screen for creating the keys for posting rules. To proceed to the New Entries: Overview of Added Entries screen (Figure 9-9), where you will define the keys for posting rules, click the ![]() button on the top-left side of the screen.
button on the top-left side of the screen.
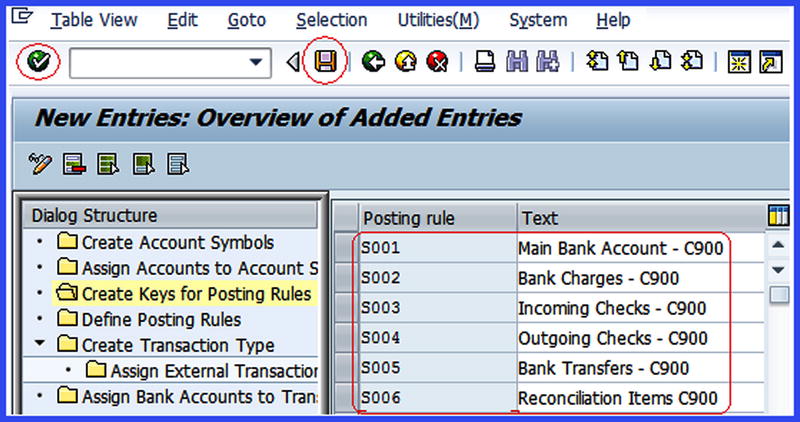
Figure 9-9. Global settings for an electronic bank statement—Create Keys for Posting Rules
![]() Note You can use the posting keys supplied by SAP or you can create your own posting keys from scratch. In this activity, we recommend that you create your own posting keys so you’ll know how to do so.
Note You can use the posting keys supplied by SAP or you can create your own posting keys from scratch. In this activity, we recommend that you create your own posting keys so you’ll know how to do so.
Using the data on the New Entries: Overview of Added Entries screen, create posting rules for each of your account symbols. In this activity, we created six keys for posting rules and described the keys for posting rules in the Text section (see Figure 9-9).
![]() Tip The system allows a maximum of six digits for a posting rule key.
Tip The system allows a maximum of six digits for a posting rule key.
Update the screen as shown in Figure 9-9. Click the Enter ![]() button on the top-left side of the screen to confirm your entries and save
button on the top-left side of the screen to confirm your entries and save ![]() your keys for posting rules.
your keys for posting rules.
![]() Note The posting keys for posting rules used in this activity are for illustration only. You can use any keys and any descriptions of your choice.
Note The posting keys for posting rules used in this activity are for illustration only. You can use any keys and any descriptions of your choice.
In Step 4, you will define the posting rules that are assigned to related external transactions.
Step 4: Define Posting Rules
To go to the screen where you will define posting rules for your electronic bank statement, double-click the ![]() folder. This is the fourth item on the list of displayed nodes. The Define Posting Rules Overview screen comes up. Click the
folder. This is the fourth item on the list of displayed nodes. The Define Posting Rules Overview screen comes up. Click the ![]() button to go to the screen (Figure 9-10) where you specify the definitions of the posting rules. Figure 9-10 defines posting rules for incoming checks.
button to go to the screen (Figure 9-10) where you specify the definitions of the posting rules. Figure 9-10 defines posting rules for incoming checks.

Figure 9-10. Global settings for an electronic bank statement—Define Posting Rules for Check-In
Update the following fields:
- Posting Rule: Enter the keys for posting rules that you defined in Step 3 in the Posting Rule fields. Posting rules are used by the system to determine which G/L accounts and subledgers to post transactions to. For example, the key S003 was created for incoming checks.
- Posting Area: The SAP ERP system comes with two standard values for the posting area (1-Bank Accounting and 2–Subledger Accounting). The posting area allows the system to post to either of the specified areas based on your specification.
- Posting Key: Enter the appropriate posting key in this field. Posting key allows the system to determine whether a line item should be treated as debit or credit and the account type to post transactions to. It also controls the field status for document entry.
- Acct Symbol: You have already defined a number of accounts symbols. Enter the appropriate account symbol in this field. The account symbol you enter here will allow the system to determine which account the related transaction is posted to when users retrieve bank statements electronically.
- Document Type: Allows you to differentiate between transactions and allows the system to determine which business transaction to be posted to.
- Posting Type: It is mandatory that you enter one posting type in the Posting Type field. The posting type is used during account clearing. For example, Posting Type 5-clears the credit G/L account. This can be found by using the Search icon next to the posting type field (see Figure 9-10).
![]() Note This configuration is for incoming checks. The accounting entries for check receipt is to debit your bank account using the Debit Posting key 40, since money is coming in. Likewise, it will credit a corresponding incoming check clearing account.
Note This configuration is for incoming checks. The accounting entries for check receipt is to debit your bank account using the Debit Posting key 40, since money is coming in. Likewise, it will credit a corresponding incoming check clearing account.
Similarly, the configuration for outgoing checks is the reverse. They credit your bank account using posting key 50 and debit the corresponding outgoing check clearing account.
After updating the screen in Figure 9-10, click the Enter ![]() button to confirm your entries. Save
button to confirm your entries. Save ![]() your work.
your work.
Next, you need to define the posting rules for the remaining business transactions (S004-Check in, S005-Wire Transfer-out, S002-Bank Charges, and S006-Other Interim Post).
Click the Back ![]() button to return to the previous screen, called Change View “Define Posting Rules”: Overview, where you will define more posting rules.
button to return to the previous screen, called Change View “Define Posting Rules”: Overview, where you will define more posting rules.
Follow Step 4 to define posting rules for the remaining business transactions for your electronic bank statement, but this time use the information in Tables 9-2 through 9-5.
Table 9-2. Define Posting Rules for Issued Checks
|
Field Name |
Data to Enter |
||
|---|---|---|---|
|
Posting Rule |
Enter the key for the posting rule you defined for checks (S004). |
||
|
Posting Area |
Enter the bank accounting (1). |
||
|
Acct Symbol |
Debit |
Enter the account symbol you defined for checks issued (C900-CHECK-OUT). | |
|
Posting Key |
Credit |
Enter the posting key (50) for credit posting. | |
|
Acct Symbol |
Enter the account symbol you defined for your main bank account (C900-BANK). |
||
|
Document Type |
Enter the bank statement document type (SA) for the G/L account posting. |
||
|
Posting Type |
Enter the bank statement posting type (4) for the debt clearing G/L account. |
|
Field Name |
Data to Enter |
||
|---|---|---|---|
|
Posting Rule |
Enter the key for the posting rule you defined for the wire transfer-out (S005). |
||
|
Posting Area |
Enter the bank accounting (1). |
||
|
Acct Symbol |
Debit |
Enter the account symbol you defined for the wire transfer-out (C900-BANK TRANS). | |
|
Posting Key |
Credit |
Enter the posting key (50) for credit posting. | |
|
Acct Symbol |
Enter the account symbol you defined for your main bank account (C900-BANK). |
||
|
Document Type |
Enter the bank statement document type (SA) for G/L account posting. |
||
|
Posting Type |
Enter the bank statement posting type (4) for the debt clearing G/L account. |
|
Field Name |
Data to Enter | ||
|---|---|---|---|
|
Posting Rule |
Enter the key for posting rule you defined for bank charges (S002). |
||
|
Posting Area |
Enter the bank accounting (1). |
||
|
Acct Symbol |
Debit |
Enter the account symbol you defined for bank charges (C900- BANKCHGS). | |
|
Posting Key |
Credit |
Enter the posting key (50) for credit posting. | |
|
Acct Symbol |
Enter the account symbol you defined for your main bank account (C900-BANK). |
||
|
Document Type |
Enter the bank statement document type (SA) for the G/L account posting. |
||
|
Posting Type |
Enter the bank statement posting type (1) for post to the G/L account. |
Table 9-5. Other Interim Posts
Field Name |
Data to Enter |
||
|---|---|---|---|
|
Posting Rule |
Enter the key for the posting rule you defined for INTERPOST (S006). |
||
|
Posting Area |
Enter the bank accounting (1). |
||
|
Acct Symbol |
Debit |
Enter the account symbol you defined for Other INTERPOST (C900- BANKCHGS). | |
|
Posting Key |
Credit |
Enter the posting key (50) for credit posting. | |
|
Acct Symbol |
Enter the account symbol you defined for your main bank account (C900-BANK). |
||
|
Document Type |
Enter the bank statement document type (SA) for the G/L account posting. |
||
|
Posting Type |
Enter the bank statement posting type (1) for posting to the G/L account. |
The next step is to create transaction types to customize your electronic bank statements. This transaction type will be assigned to the external posting rules in Step 6.
You’ll create the names and descriptions of the various transaction types you require. House banks that use identical lists of business transaction codes (external transactions) can be assigned to the same transaction type in Step 6.
Step 5: Create Transaction Type
When creating transaction types, you define the transaction type key and provide a name that describes your transaction types. The transaction types you create are assigned to external transactions. The benefit of a transaction type is that it will allow you to group house banks with the same lists of external transaction keys and assign them to the same business transaction. The idea behind this concept is that you assign external transaction codes of house banks once per transaction type rather than doing this individually per house bank.
Before assigning external transaction types to posting rules, you must first create the transaction type. Double-click on the ![]() button to call up the Define Posting Rules Overview screen, where you will create your transaction type. Then click the
button to call up the Define Posting Rules Overview screen, where you will create your transaction type. Then click the ![]() button on the top-left side of the screen to create a transaction type. Update the following fields (Figure 9-11):
button on the top-left side of the screen to create a transaction type. Update the following fields (Figure 9-11):
- Trans. Type: Enter a code of your choice in this field as your transaction type. This field can accept up to eight digits. In this activity, we used the company code C900 to make it easy for us to identify the code.
- Name: Enter a short description for your transaction type.

Figure 9-11. Global settings for an electronic bank statement—Create Transaction Type
After updating the screen, click the Enter ![]() button to confirm your entries and save
button to confirm your entries and save ![]() your configuration.
your configuration.
In the next step, you assign external business transaction codes to the internal posting rules you created in Step 4.
Step 6: Assign External Transaction Types to Posting Rules
You assign external business transaction codes to internal posting rules so you can use the same specifications you configured for different business transaction codes in house banks.
To go to the screen where you will assign business transactions to posting rules, select the transaction type (Electronic Bank Statement) you created (Figure 9-12) and double-click the ![]() folder.
folder.

Figure 9-12. Assigning external transaction types to posting rules initial screen
The Change View “Assign External Transaction Types to Posting Rules” Overview screen is displayed. Click the ![]() button on the top-left of the screen to assign external transaction types to posting rules (Figure 9-13).
button on the top-left of the screen to assign external transaction types to posting rules (Figure 9-13).

Figure 9-13. Assigned external transaction types to posting rules
Update the following fields:
- External Transaction: Enter your external transaction codes in this field. This can be up to four digits for each transaction type using the system-posting rule. Use meaningful transaction codes, preferably in sequence to avoid ambiguity, such as 0002, 0003, 0004, 0005, and 0006.
- +/- Sign: Use these signs to further differentiate external transactions. The plus (+) sign in the front of external transaction code indicates receipt and the minus (-) sign indicates payment.
- Posting Rule: Enter the posting rules you defined in Step 4.
Click the Enter ![]() on the top-left side of the screen to confirm that the system accepted your entries and save
on the top-left side of the screen to confirm that the system accepted your entries and save ![]() your work.
your work.
Finally, you’ll assign the transaction types you just created to the bank account you defined for your house bank.
Step 7: Assign Bank Accounts to Transaction Types
It is not uncommon when you have multiple house banks to use individual transaction types to differentiate business types. In this case, each house bank must be assigned its own transaction type. In this activity only one transaction type was created (C900 in Step 5). You can define more than one transaction type on your own. The number of transaction types you create depends on your client’s requirements.
On the left side of the screen, double-click the Assign Bank Account to Transaction Types folder to call up the Assign Bank Account to Transaction Types Overview screen. This is where you assign bank accounts to transaction types. Click the ![]() button on the top-left side of the screen to assign bank accounts to transaction types (Figure 9-14).
button on the top-left side of the screen to assign bank accounts to transaction types (Figure 9-14).
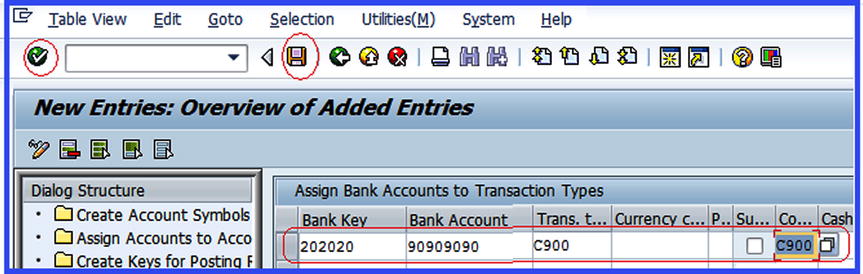
Figure 9-14. Assigning bank accounts to transaction types
Update the following fields:
- Bank Key: Enter your bank key in this field. This is your bank key or sort code that you created when you customized your house bank.
- Bank Account: Enter your bank account number in this field. This is your house bank account number and your company’s real bank account number.
- Transaction Type: Enter the transaction type you created in Step 5.
![]() Note Although you created two house banks—Barclays Bank and HSBC Bank—in this activity, you will be assigning only one house bank (Barclays Bank) to your transaction type. However, there is no restriction to the number of banks you can assign to a transaction type.
Note Although you created two house banks—Barclays Bank and HSBC Bank—in this activity, you will be assigning only one house bank (Barclays Bank) to your transaction type. However, there is no restriction to the number of banks you can assign to a transaction type.
The bank key and the bank account used here are obtained from the house bank you created earlier.
Click the Enter ![]() button to confirm your specifications and save
button to confirm your specifications and save ![]() your work.
your work.
You have now customized an electronic bank statement. Next, you’ll configure a manual bank statement.
Configure a Manual Bank Statement
Most of the settings you configured as part of your electronic bank statement are applicable to a manual bank statement, so you will not be creating them again. Hence you will customize only the following nodes:
- Create and assign business transactions
- Define variants for manual bank statements
Create and Assign Business Transactions
In this activity, you will create business transactions, assign them to individual posting keys, and allocating them to posting rules for the following items:
- Bank charges
- Bank transfers
- Incoming checks
- Outgoing checks
- Reconciliation items
![]() Note You don’t need to create new posting rules for the manual bank statement; you can use the posting rules you created for the electronic bank statement.
Note You don’t need to create new posting rules for the manual bank statement; you can use the posting rules you created for the electronic bank statement.
Follow this menu path to customize your manual bank statement: IMG: Financial Accounting (New) ![]() Bank Accounting
Bank Accounting ![]() Business Transaction
Business Transaction ![]() Payment Transactions
Payment Transactions ![]() Manual Bank Statement
Manual Bank Statement ![]() Create and Assign Business Transaction. Or use transaction code OT52.
Create and Assign Business Transaction. Or use transaction code OT52.
The initial screen where you will specify the manual bank statement, called Change View: Manual Bank Statement Transactions”: Overview, appears. Click the ![]() button on the top-left side of the screen. The New Entries: Overview of Added Entries screen is displayed (Figure 9-15). This is where you create new business transactions for your manual bank statement and assign them to the posting rules you defined previously.
button on the top-left side of the screen. The New Entries: Overview of Added Entries screen is displayed (Figure 9-15). This is where you create new business transactions for your manual bank statement and assign them to the posting rules you defined previously.

Figure 9-15. Creating and assigning business transactions
Update the following items:
- Transaction: Enter the transaction codes that you want to use for your manual bank statement. You can enter a maximum of four digits for each transaction type for the system-posting rule. For example, in this activity we used MCHG for Manual Bank Charges, MTRN (Manual Transfer for Bank Transfer), MICK (Manual Incoming Checks for Incoming Checks), MOCK (Manual Out Going Checks) for outgoing checks, and MRIT (Manual Reconciliation Items) for reconciliation Items.
![]() Note You can use any transaction code as long as it makes sense to you.
Note You can use any transaction code as long as it makes sense to you.
- +/- Sign: This field allows you to further differentiate your business transactions. The plus (+) sign in front of a business transaction code indicates receipt and the minus sign (-)indicates payment.
- Int algthm: Enter 011 in the outgoing check field only.
- Text: Enter short texts that describes each item transaction here.
![]() Note The algorithm you can use for outgoing checks are listed here:
Note The algorithm you can use for outgoing checks are listed here:
- 011 – This algorithm is used for outgoing checks when the check number is different from the payment document number. This is the case when the bank uses prenumbered checks. The check numbers are therefore obtained from the bank statement in the house bank, and the appropriate document numbers are identified by the algorithm using the check number.
- 012 – This algorithm is used when the same document number is used as a check number. Check forms not containing numbers are printed with the document numbers in the system when making check payments. This number is therefore used to reference the payments.
- 013 – This algorithm can be used in both cases described in the preceding 011 and 012 items.
After updating the fields, click Enter ![]() to confirm and then click save
to confirm and then click save ![]() to save your work.
to save your work.
In the next activity, you will define variants for manual bank statements by copying the standard variant supplied by SAP and modifying it to meet your requirements. In SAP ERP, only one variant can be activated at a time. You will learn how to deactivate the variant you are not using and then activate a variant you want to use.
Define Variants for Manual Bank Statements
SAP supplies a standard variant (SAP01) as the default. A variant allows you to adapt the selection of account assignment fields supplied by SAP to your company code-specific requirements. Only minimum modification is allowed for this standard variant, but you can use it for your manual bank statement. You can copy the standard variant (SAP01) and modify it to meet your company’s specific requirements. To customize these variants, follow this menu path: Financial Accounting (New) ![]() Bank Accounting
Bank Accounting ![]() Business Transaction
Business Transaction ![]() Payment Transactions
Payment Transactions ![]() Manual Bank Statement
Manual Bank Statement ![]() Define Variants for Manual Bank Statement. Or you can use transaction code OT43.
Define Variants for Manual Bank Statement. Or you can use transaction code OT43.
![]() Note If you choose not to use the standard variant supplied by SAP, but instead decide to create your own, you must deactivate the standard variant SAP01 and then activate your own variant. You will learn how to activate and deactivate variants later in this chapter.
Note If you choose not to use the standard variant supplied by SAP, but instead decide to create your own, you must deactivate the standard variant SAP01 and then activate your own variant. You will learn how to activate and deactivate variants later in this chapter.
The Maintain Screen Variant: List screen is displayed. This is where you define variants for manual bank statement. Since you are copying the standard variant supplied by SAP in the system, click the Copy ![]() button at the top of the screen. The Copy Variant screen pops up (Figure 9-16). Enter the variant you want to copy (SAP01) in the From Variant field and enter your own variant identifier key in the To Variant field. Then click the Enter
button at the top of the screen. The Copy Variant screen pops up (Figure 9-16). Enter the variant you want to copy (SAP01) in the From Variant field and enter your own variant identifier key in the To Variant field. Then click the Enter ![]() button to confirm your request. This action will allow you to copy the properties of the standard variant (SAP01) to your variant (C900).
button to confirm your request. This action will allow you to copy the properties of the standard variant (SAP01) to your variant (C900).

Figure 9-16. The Copy Variant dialog box
An information screen with a warning (“Field FEBMKA-MEHRW is Missing on Reference Screen”) pops up. Ignore this warning and confirm the copy by clicking the Enter ![]() button. Once the copy is confirmed, the system will automatically copy the standard variant’s properties to your variant code. The Maintain Screen Variant Fields screen is displayed (Figure 9-17) showing the inherited properties of the standard variant that you copied. Modify the items on this screen to meet your requirements by deleting the items that you do not need.
button. Once the copy is confirmed, the system will automatically copy the standard variant’s properties to your variant code. The Maintain Screen Variant Fields screen is displayed (Figure 9-17) showing the inherited properties of the standard variant that you copied. Modify the items on this screen to meet your requirements by deleting the items that you do not need.

Figure 9-17. Maintain variants for manual bank statement with all properties copied
As part of the customizing process in this activity, delete the following items not needed in your manual bank statement:
- Document number
- Customer matchcode
- Foreign currency
- Foreign currency amt
Click on the item you want to delete from the list—for example, select Document Number to mark it for deletion—and click the Delete ![]() button on the top-left side of the screen (circled in red in Figure 9-17).
button on the top-left side of the screen (circled in red in Figure 9-17).
After clicking on Delete button, the document number disappears from the list of items on the screen. Repeat the same steps to delete the other items (that is, Customer Matchcode, Foreign Currency, and Foreign Currency Amt). Your variant will then look like the one shown in Figure 9-18.

Figure 9-18. Maintain variants for manual bank statement after deleting unneeded properties
Next, you need to move Allocation Number and Bank Reference from the Possible Fields list to the Current Fields list. The Allocation Number field will record incoming check numbers and the Bank Reference field will record outgoing checks.
To include the Allocation Number in the Current Fields section of the screen, double-click on ![]() in the Possible Fields list on the right side of the screen. The Specify Output Length dialog box pops up with the default output length for recording incoming checks (Figure 9-19). Replace the default length with your desired length.
in the Possible Fields list on the right side of the screen. The Specify Output Length dialog box pops up with the default output length for recording incoming checks (Figure 9-19). Replace the default length with your desired length.

Figure 9-19. Output length for allocation number
Click the Continue ![]() button to confirm your output length specification. The Allocation Number (Ass) will now appear in the Current Fields list under Amount (Figure 9-20).
button to confirm your output length specification. The Allocation Number (Ass) will now appear in the Current Fields list under Amount (Figure 9-20).
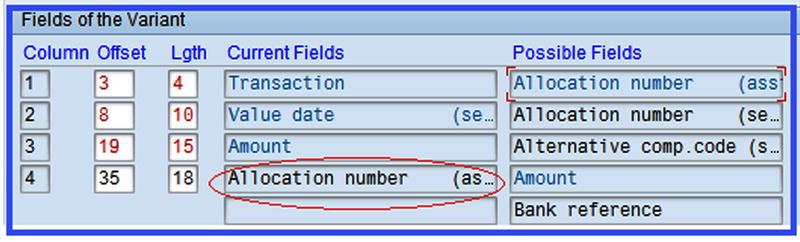
Figure 9-20. Maintaining variant for manual bank statements— recording incoming checks
Next, include the Bank Reference in your Current Fields list. Double-click Bank Reference in the Possible Fields list. The Specify Output Length dialog box pops up with a default length. Enter the desired length in the Output Length field and click the Enter button to confirm your changes. Your variant screen will now look like the screen in Figure 9-21.
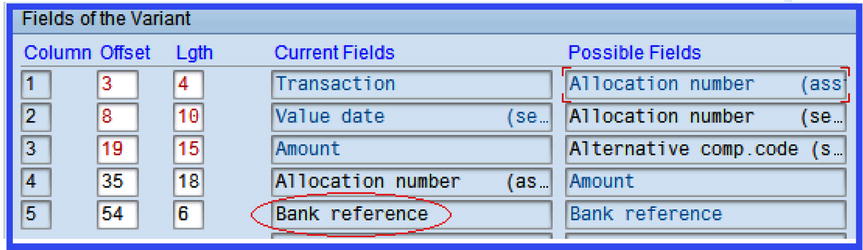
Figure 9-21. Maintaining variants for manual bank statements—recording outgoing checks
Save ![]() your work. The next step is to change the variant name to your own. Click the Back
your work. The next step is to change the variant name to your own. Click the Back ![]() button to return to the Maintain Screen Variant List screen (Figure 9-22). Search for your variant (C900) among the displayed variant names and change the copied variant name to your own. In this activity, we used Manual Bank Statement – C900 as our variant name.
button to return to the Maintain Screen Variant List screen (Figure 9-22). Search for your variant (C900) among the displayed variant names and change the copied variant name to your own. In this activity, we used Manual Bank Statement – C900 as our variant name.
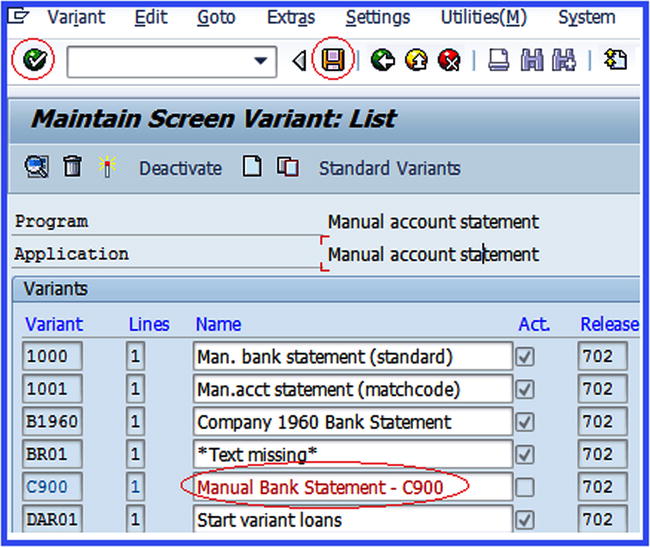
Figure 9-22. Changing the copied variant name to your own variant name
Click the Enter ![]() button to confirm your changes and save
button to confirm your changes and save ![]() your variant.
your variant.
Now you need to activate the variant for your manual bank statement for it to work effectively. Make sure that your variant is selected. You will notice that your variant name turns red. Click the Activate ![]() icon on the top-left corner of the screen to activate your variant.
icon on the top-left corner of the screen to activate your variant.
![]() Note After you activate your variant, the Act. (activate) checkbox will be selected, indicating that your variant is active. The system will notify you on the status bar at the bottom of the screen.
Note After you activate your variant, the Act. (activate) checkbox will be selected, indicating that your variant is active. The system will notify you on the status bar at the bottom of the screen.
Save ![]() your variant.
your variant.
Check deposit is the last configuration you need to make when customizing your house bank. Normally, a business receives checks as forms of payment on a daily basis, and these checks are logged or deposited into the company’s bank account. In the next activity, you will look at the various steps involved in customizing check deposits for check management in the SAP ERP.
Check Deposits
Check deposit customization is useful in an environment where large volumes of checks are deposited and processed simultaneously in the system. The settings carried out here will allow checks received by your company to be entered and processed in the SAP ERP system.
When customizing check deposits, the following steps are involved:
- Define posting keys and posting rules for check deposits.
- Create and assign business transactions.
- Define variants for check deposits.
![]() Note The reason you define posting keys and posting rules for check deposits before you create and assign business transactions to posting rules is that the accounting symbols needed to specify business transactions are defined in posting keys and posting rules for check deposit customizing.
Note The reason you define posting keys and posting rules for check deposits before you create and assign business transactions to posting rules is that the accounting symbols needed to specify business transactions are defined in posting keys and posting rules for check deposit customizing.
Define Posting Keys and Posting Rules for Check Deposits
You will go through the following four steps as part of this activity:
- Create account symbols.
- Assign accounts to an account symbol.
- Create keys for posting rules.
- Define posting rules.
To customize these options, follow this menu path: IMG: Financial Accounting (New) ![]() Bank Accounting
Bank Accounting ![]() Business Transactions
Business Transactions ![]() Check Deposit
Check Deposit ![]() Define Posting Keys and Posting Rules for Check Deposit.
Define Posting Keys and Posting Rules for Check Deposit.
The Determine Work Area Entry dialog box is displayed. Enter your chart of accounts in the Chart of Accounts field and click the Enter ![]() button. The Change View: “Create Account Symbols”: Overview screen is displayed. This is where you will customize the settings. You will work through the displayed nodes on the left side of the screen using a top-down approach from Steps 1 to 4 to avoid missing anything.
button. The Change View: “Create Account Symbols”: Overview screen is displayed. This is where you will customize the settings. You will work through the displayed nodes on the left side of the screen using a top-down approach from Steps 1 to 4 to avoid missing anything.
Create Account Symbols
Account symbols are useful for grouping similar business transactions such as check receipts/deposits together and they determine which accounts transactions are posted based on the criteria you specify in your house bank.
On the Change View: “Create Account Symbols” Overview screen, notice that a list of nodes is displayed on the left side of the screen and that the Create Account Symbols yellow folder is open. This indicates the item you want to customize.
![]() Tip Make sure that the folder of the item you are customizing is open. If that folder is not open, double-click on it to open it.
Tip Make sure that the folder of the item you are customizing is open. If that folder is not open, double-click on it to open it.
Click the ![]() button to go to the screen where you will create account symbols for your check deposits (Figure 9-23). Update the following fields:
button to go to the screen where you will create account symbols for your check deposits (Figure 9-23). Update the following fields:
- Account: Enter your account symbol identifier key in the account field and enter a description of your account symbol in the text field. There is no hard rule about the account symbol/description to use. It’s best to use meaningful account symbols and descriptions here.
- Text: Enter a short text description that best describes your account symbol.
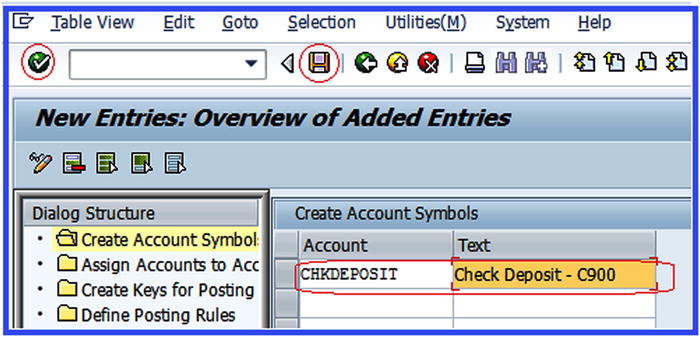
Figure 9-23. Creating an account symbol for check deposits
Click the Enter ![]() button to confirm your entries and save
button to confirm your entries and save ![]() your account symbols.
your account symbols.
Assign Accounts to an Account Symbol
To assign G/L accounts to the account symbol, select the account deposit symbol that you just created from the list of account symbols displayed and then double-click on the Assign Accounts to Account Symbol folder (Figure 9-24).
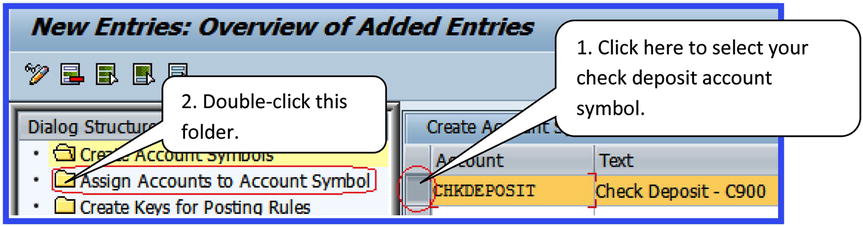
Figure 9-24. The inital screen for assigning accounts to an account symbol
You don’t need to create another account symbol. You have already done this when customizing your electronic bank statement. When you double-click Assign Accounts to Account Symbol on the left side of the screen in Figure 9-25, the system will automatically display the accounts and the account symbols you created for your check deposits.
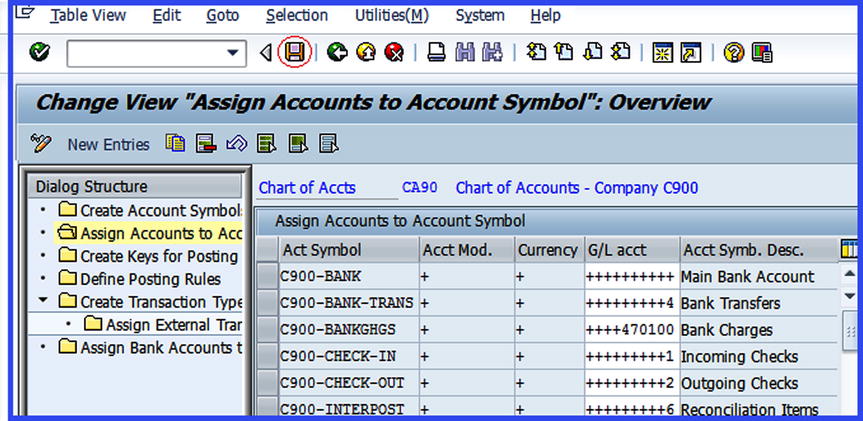
Figure 9-25. Assigned accounts to an account symbol for check deposits
Save ![]() your work.
your work.
![]() Tip If the system did not assign your accounts to the account symbols, you have to assign them manually.
Tip If the system did not assign your accounts to the account symbols, you have to assign them manually.
Create Keys for Posting Rules
Posting rules are representations of business transactions related to check deposits. This includes check receipts to clear accounts, check clearing for customers, and so on. The key you define here will automatically determine the posting rule applicable to the general ledger and subledgers.
On the Change View “Assign Accounts to Account Symbol”: Overview screen, double-click the ![]() folder. The Create Keys for Posting Rules Overview screen appears.
folder. The Create Keys for Posting Rules Overview screen appears.
Click the ![]() button on the top-left side of the screen to go to the New Entries: Overview of Added Entries screen (Figure 9-26) to create posting keys for posting rules. Enter a new key of your choice in the Posting Rule field and enter a short text in the Text field that best describes the posting rule for your check deposits.
button on the top-left side of the screen to go to the New Entries: Overview of Added Entries screen (Figure 9-26) to create posting keys for posting rules. Enter a new key of your choice in the Posting Rule field and enter a short text in the Text field that best describes the posting rule for your check deposits.
After updating the screen, click Save ![]() to save the key for posting rules.
to save the key for posting rules.
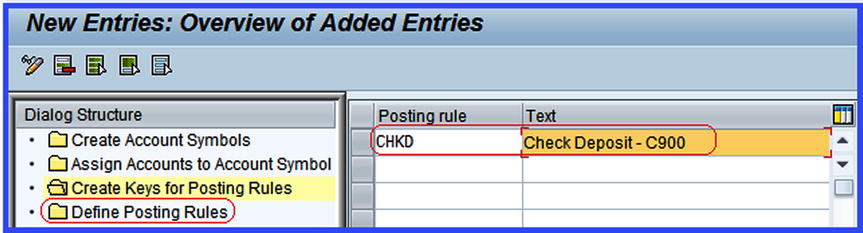
Figure 9-26. Defining your posting rules
Define Posting Rules
You define posting rules that determine how transactions are posted to your G/L account and subledger.
To go to the screen where you will define posting rules for your check deposits, select the key for posting rule you defined in Step 3 and double-click ![]() . The Change View: “Define Posting Rules”: Overview screen is displayed. This screen contains a list of defined posting rules in the system. Click the
. The Change View: “Define Posting Rules”: Overview screen is displayed. This screen contains a list of defined posting rules in the system. Click the ![]() button on the top-left side of the screen to go to the New Entries: Details of Added Entries screen (Figure 9-27), where you will define the posting rules.
button on the top-left side of the screen to go to the New Entries: Details of Added Entries screen (Figure 9-27), where you will define the posting rules.
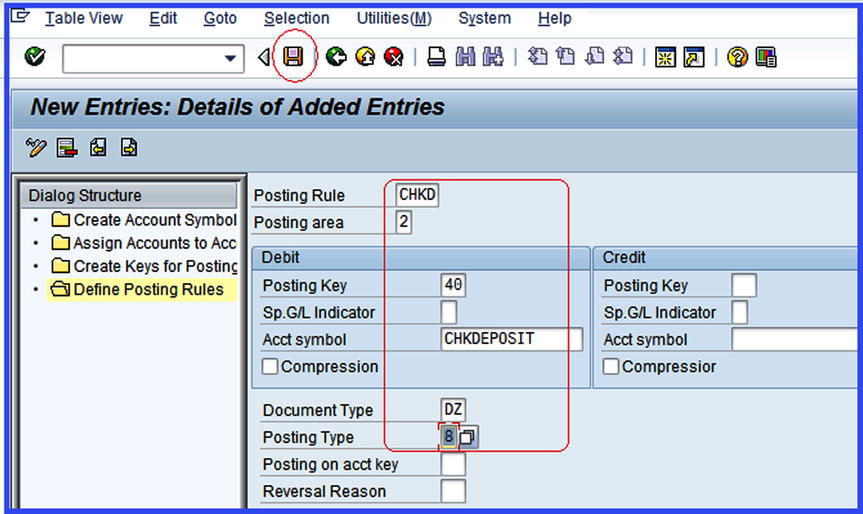
Figure 9-27. Specifying the settings for the posting rules
Update the following fields:
- Posting Rule: Enter the posting rule for your check deposits that you defined in Step 3.
- Posting Area: Specify the posting area for your check deposits. For example, 1 - Bank accounting for posting transactions that affect the general ledger only or 2 - Subledger Accounting for posting transactions to the subledger.
- Posting Key: The standard posting keys in SAP ERP are 40 – Debit Posting and 50 – Credit Posting. The posting key you specify here will determine whether, for example, incoming checks are posted to the debit or credit side of the general ledger account or subledgers.
- Account Symbol: Enter your check deposit account symbol. The specification made here groups together similar business transactions.
- Document Type: Determines document storage in the system and the account types to be posted. For example, document type DZ is for customer payments. A document type can be found using the Search function in the document type field.
- Posting Type: Allows you to specify how postings should be treated by the system. For example, when you click the Search icon in the Posting Type field, the standard list of posting type is displayed, as shown in Figure 9-28.
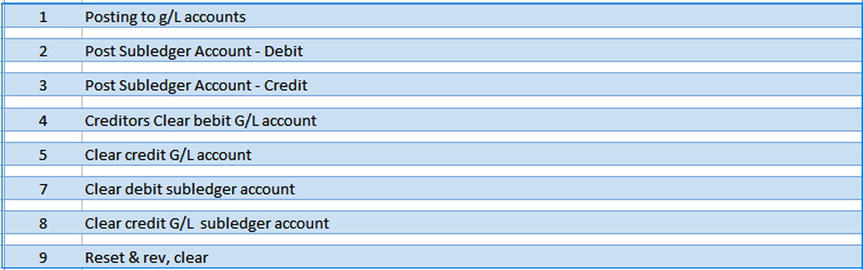
Figure 9-28. A list of standard posting types supplied by SAP
![]() Note SAP comes with predefined standard posting rules that you can copy and modify. You can also create your own posting rules from scratch. Standard posting rules can be found on the Change View: “Define Posting Rules”: Overview screen.
Note SAP comes with predefined standard posting rules that you can copy and modify. You can also create your own posting rules from scratch. Standard posting rules can be found on the Change View: “Define Posting Rules”: Overview screen.
After updating the New Entries: Details of Added Entries screen, click the Enter ![]() button on the top-left side of the screen to confirm. Save
button on the top-left side of the screen to confirm. Save ![]() your posting rules.
your posting rules.
Now you can create and assign business transactions, which will assign your account symbol for check deposits.
Create and Assign Business Transactions
In this activity, you will create and assign business transactions by specifying indicators for your check deposits and allocating the indicators to the defined posting rules. To go to the Change View “Check Deposit Transactions”: Overview screen, follow the menu path: IMG: Financial Accounting (New) ![]() Bank Accounting
Bank Accounting ![]() Business Transactions
Business Transactions ![]() Check Deposit
Check Deposit ![]() Create and Assign Business Transactions. Or you can use the transaction code OT53.
Create and Assign Business Transactions. Or you can use the transaction code OT53.
The Change View “Check Deposit Transactions”: Overview screen is displayed. Click the ![]() button to go to the New Entries: Overview of Added Entries screen (Figure 9-29). To specify the account symbol and business transaction for your check deposits, update the following fields:
button to go to the New Entries: Overview of Added Entries screen (Figure 9-29). To specify the account symbol and business transaction for your check deposits, update the following fields:
- Transaction Indicator: In this field you specify a transaction indicator for check deposits and allocate it to a posting rule. You can use a maximum of four characters as your transaction indicator.
- +/-: Specify whether your business transaction is a positive (+) value or a negative (-) value using the plus and minus signs (the + sign indicates an incoming payment and the - sign indicates an outgoing payment).
- Post. Rule: Assign your predefined posting rule to the transaction indicator you defined earlier in the “Define Posting Rules” section.

Figure 9-29. Check deposit transactions
Click the Enter ![]() button and save
button and save ![]() your check deposit transactions.
your check deposit transactions.
Finally, as part of customizing the check deposits, you will define variants for check deposits.
Define Variants for Check Deposits
SAP comes with standard variants so you don’t have to define another variant. On the other hand, you can create your own variant if you choose not to use the standard variant supplied by SAP.
In this activity, you will use the standard variant supplied by SAP for check deposits, which you will modify to determine the input fields for check deposits during data entry.
You will define variants for check deposits by copying the standard variant (SAP01), because it is easier to copy a standard variant and modify it to meet your requirements. This will save you the time of having to create your variant afresh. To go to the screen where you will define variants for check deposits, follow this menu path: IMG: Financial Accounting (New) ![]() Bank Accounting
Bank Accounting ![]() Business Transactions → Check Deposit
Business Transactions → Check Deposit ![]() Define Variants for Check Deposit. Or use the transaction code OT45.
Define Variants for Check Deposit. Or use the transaction code OT45.
The Maintain Screen Variant: List screen is displayed. This screen contains a list of exisitng variants. Since you are copying the standard variant, click the Copy ![]() icon at the top of the screen. The Copy Variant dialog box pops up. Enter the variant you want to copy (SAP01) in the From Variant field and the key you want to use for your variant in To Variant field. We advise that you use your company code as your variant key or code. Click the Enter
icon at the top of the screen. The Copy Variant dialog box pops up. Enter the variant you want to copy (SAP01) in the From Variant field and the key you want to use for your variant in To Variant field. We advise that you use your company code as your variant key or code. Click the Enter ![]() button to confirm that you want to copy the variant. An information dialog box with a warning (Field FEBMKA-MEHRW is Missing on Reference Screen) pops up. Ignore the warning and click the Enter
button to confirm that you want to copy the variant. An information dialog box with a warning (Field FEBMKA-MEHRW is Missing on Reference Screen) pops up. Ignore the warning and click the Enter ![]() button to copy. The system will automatically copy the standard variant to your variant code.
button to copy. The system will automatically copy the standard variant to your variant code.
Next, the Maintain Screen Variant Fields screen for the variant you copied is displayed. Modify the content of this screen to meet your company’s requirement. Delete the items you do not need and include the items you want to include in your variant.
The items in the Current Field section of the screen are active and the items in the Possible Field section are items you can include in your variant as input fields.
Delete the following items, as you don’t need them in your check deposit variant. You do this by selecting the item you want to delete in the Current Field section and clicking the Delete ![]() button on the top of the screen.
button on the top of the screen.
- Three-digit check number
- Eight-digit bank key
- Bank account number
- Document number
As part of this process, you should include the 10-digit check number in the Possible Field section as an input field for the check deposits. Double-click on that item to move it from the Possible Field section to the Current Field section (Figure 9-30).
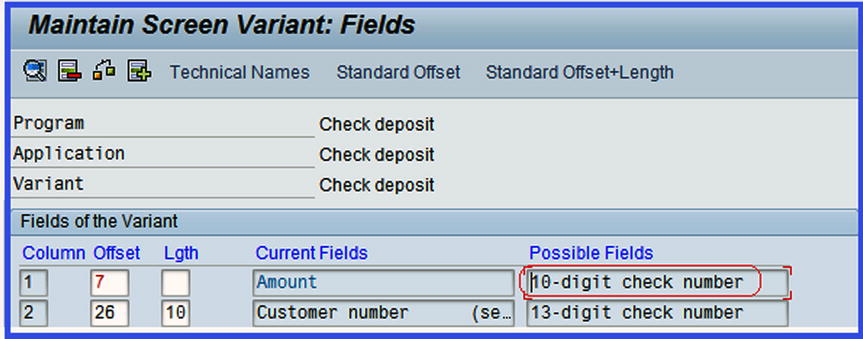
Figure 9-30. Maintaining variants for check deposits
The Specify Output Length dialog box pops up with a default output length. Enter 10 in the Output Length field and click the Enter ![]() button to confirm the changes. The 10-digit check number will appear in the Current Fields List under Customer Number. Save
button to confirm the changes. The 10-digit check number will appear in the Current Fields List under Customer Number. Save ![]() your variant. Click the Back
your variant. Click the Back ![]() button on the top-center of the screen to return to the Maintain Screen Variant: List screen. Search for the variant you copied among the displayed variants. Change the default variant name (Check Deposit) to your own variant name. We used Check Deposit-C900.
button on the top-center of the screen to return to the Maintain Screen Variant: List screen. Search for the variant you copied among the displayed variants. Change the default variant name (Check Deposit) to your own variant name. We used Check Deposit-C900.
The final step is to activate your check deposit variant. To do this, click the Activation ![]() icon on the top-left side of the screen.
icon on the top-left side of the screen.
The final aspect of the house bank customization is the cash journal, which is covered in Chapter 11.
![]() Note Cash journal configuration is deliberately covered in Chapter 11 so that you can first complete the configuration for tax on sales/purchases in Chapter 10. You will need the sales and purchases tax code in order to customize the cash journal.
Note Cash journal configuration is deliberately covered in Chapter 11 so that you can first complete the configuration for tax on sales/purchases in Chapter 10. You will need the sales and purchases tax code in order to customize the cash journal.
Summary
This chapter explained what a house bank is and demonstrated how house banks are maintained in SAP ERP. You learned about each specification when configuring your house bank and learned what each does. As part of customizing the house bank, you defined a bank ID and an account ID, which are the key aspects of your house bank configuration, and learned how to apply them to the G/L account where your bank account transactions are posted.
You went on to learn about various house banks represented in SAP ERP. You defined the accounts that bank statement transactions are posted to and learned how to customize electronic and manual bank statements. You went through the stages involved in customizing global settings for electronic and manual bank statements. In doing so, you created account symbols that the system uses to determine the G/L accounts and created subledgers, where the bank statement transactions are posted. You then looked at how to assign accounts to account symbols and how to create keys for posting rules. You learned how to define posting rules that are assigned to appropriated transactions (for example, for checks in, checks out, bank transfers, and bank charges). You then learned how to define variants to meet your company code-specific account requirements.
You learned how to customize settings for check deposits. You also learned how to create account symbols, create keys for posting rules for check deposits, and assign accounts to the account symbols you created.
Chapter 10 looks at how to define taxes on sales and purchases in SAP ERP. As part of those exercises, you will look at the basic settings, learn the calculation procedures, and define tax codes for sales and purchases.