
![]()
End User - Accounting Document Posting
This chapter explains how to enter information about business transactions in the form of documents in the user side of the system. You will see how the customizations you made in Chapters 1-16 work on the user side.
At the end of this chapter, you will be able to:
- Create a vendor/customer master record
- Post invoices
- Post credit memos
- Hold and park documents
- Post incoming and outgoing payments
- Post down payments
- Display balance/line items
- Print correspondence
- Execute dunning
- Process manual outgoing payments/automatic payments
- Perform Cash Journal postings
Customer/ Vendor Master Record
In this exercise, you create some vendor/customer master records for your business partner and enter some invoices to test the settings you configured in earlier chapters.
Vendor/customer master data contains information about your business partners (customers and vendors). The information related to a vendor or a customer is stored in their individual master record. A typical vendor’s master record contains the vendor’s name, address, terms of payment, and so on.
Problem: Your task is to create customer and vendor master records.
Create Customer Master Record
To create a customer master record, follow this menu path: Accounting ![]() Financial Accounting
Financial Accounting ![]() Accounts Receivable
Accounts Receivable ![]() Master Records
Master Records ![]() Create. Or use transaction code FD01.
Create. Or use transaction code FD01.
The Customer Create: Initial Screen is displayed. Select your Account Group (Foreign Customer – C900) in the Account Group field using the pull-down arrow. Then enter your company code (C900) in the Company Code field (Figure 17-1).

Figure 17-1. Selecting a customer account group
Click the ![]() Enter button on the bottom-right side of the screen. The Create Customer: General Data screen appears (Figure 17-2).
Enter button on the bottom-right side of the screen. The Create Customer: General Data screen appears (Figure 17-2).

Figure 17-2. The screen where you update the customer’s address details
Update the following fields:
- Name: Enter the customer’s name.
- Search Term 1/2: Enter the search code. Preferably use part of the customer name.
- Street Address: Enter your customer’s address in this section.
- Specify: Enter the GB (Great Britain) country code.
- Region: This is your customer’s region. Enter KE (Kent) in this field.
The next step is to update the company code data. Click the ![]() button at the top of the screen. The Create Customer: Company Code Data screen is displayed. In the Account Management section of the screen, update the following fields:
button at the top of the screen. The Create Customer: Company Code Data screen is displayed. In the Account Management section of the screen, update the following fields:
- Recon. Account: Enter your customer reconciliation account (1190000) in this field. All postings in the subledger are automatically updated in the reconciliation account.
- Sort Key: Enter the sort key (01) in this field.
The next step is to enter the payment transactions in the customer master record. Click the ![]() tab at the top of the screen to go to the payment transaction data. Update the following fields:
tab at the top of the screen to go to the payment transaction data. Update the following fields:
- Terms of Payment: Enter the payment terms key (CUS1) you defined. This key holds information about the terms of trade agreed upon for settling prompt invoice payments with your business partner.
- Payment Method: Specify the payment methods CT (Check/Transfer) you want to use to make payments to business partners. For example, when you use automatic payments, the system will use check/bank transfer in the payment program.
- House Bank: Enter the house bank you want to use for making payments in the field. For example, BARC1.
For the final step in creating your customer general data, click the ![]() tab at the top of the screen to go to the screen where you will enter your customer correspondence data. Update the dunning data by entering C900 in the Dunning Procedure field.
tab at the top of the screen to go to the screen where you will enter your customer correspondence data. Update the dunning data by entering C900 in the Dunning Procedure field.
Click the Enter ![]() button on the top-left side of the screen and save
button on the top-left side of the screen and save ![]() your customer master record. A message box pops up with the question, “Do you want to save customer data to file?” Click the
your customer master record. A message box pops up with the question, “Do you want to save customer data to file?” Click the ![]() button on the pop-up screen to confirm that you want to save your master record. The system will notify you on the status bar that your customer has been created.
button on the pop-up screen to confirm that you want to save your master record. The system will notify you on the status bar that your customer has been created.
Before continuing, create more customer master records using your own discretion.
Create Vendor Master Record
To create a vendor master record, follow this menu path: Accounting ![]() Financial Accounting
Financial Accounting ![]() Accounts Payable
Accounts Payable ![]() Master Records
Master Records ![]() Create. Or use transaction code FK01.
Create. Or use transaction code FK01.
The Create Vendor: Initial Screen is displayed (Figure 17-3). Enter your company code (C900) in the Company Code field and enter the Vendor Account group (FVDR for foreign vendor) in the Account Group field.

Figure 17-3. The Create Vendor Master Record initial screen
When you click Enter ![]() or press Enter on the keyboard, the Create Vendor: Address screen is displayed (Figure 17-4). This is where you will update your vendor’s address.
or press Enter on the keyboard, the Create Vendor: Address screen is displayed (Figure 17-4). This is where you will update your vendor’s address.
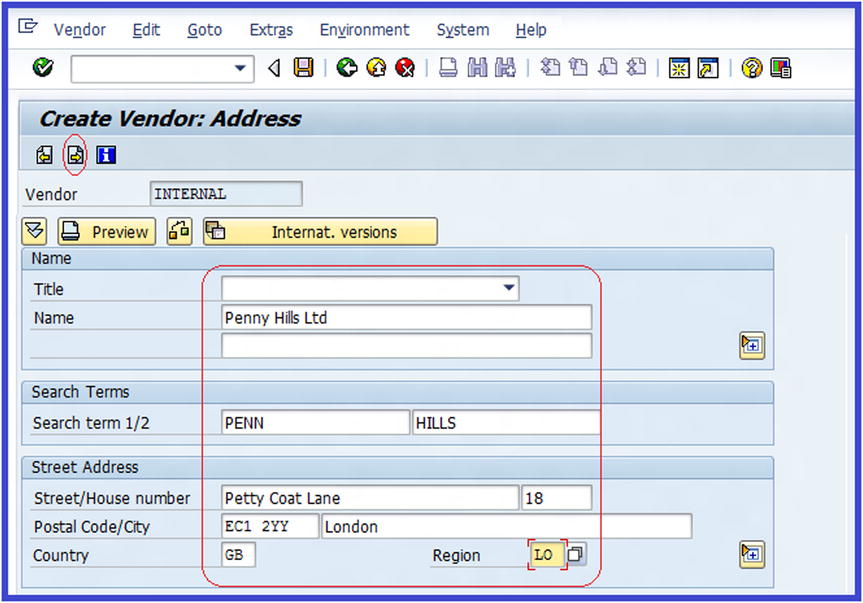
Figure 17-4. Update the vendor’s address here
Update the following fields:
- Name: Enter your vendor’s name in the name field.
- Search Term 1/2: Enter the search code. It’s best to use part of the customer’s name.
- Street Address: Enter your customer’s address in this section.
- Country: Enter the GB (Great Britain) country code.
- Region: Enter Lo (London)
After updating the Create Vendor: Address screen, you need to update your vendor’s accounting information. To specify your vendor’s account details, click the Next Screen ![]() button on the top-left side of the screen about four times or so until you get to the Create Vendor: Accounting Information Accounting screen. Update the following fields:
button on the top-left side of the screen about four times or so until you get to the Create Vendor: Accounting Information Accounting screen. Update the following fields:
- Recon. Account: Enter your vendor reconciliation account (213000).
- Sort Key: Enter the sort key (01).
The final step in creating a vendor’s master record is to update the vendor’s financial transaction. Click the Next Screen ![]() icon to go to the next screen, called Change Vendor: Payment Transactions Accounting. Update following fields:
icon to go to the next screen, called Change Vendor: Payment Transactions Accounting. Update following fields:
- Terms of Payment: Enter the code VDR1 for the terms of payment.
- Payment Method: Enter the method you want to use for automatic payment. This example uses CT (Check/Transfer).
- House Bank: Enter the house bank you want to use in making payment in your payment program in this field. This example uses Barc1.
Click the Enter ![]() button to confirm your entries and then save
button to confirm your entries and then save ![]() your vendor master record.
your vendor master record.
Before continuing, create more vendor master records using your discretion.
Accounts Receivable—Document Entry
In this exercise, you will learn how to enter a customer document (invoice), display the document, and post the document to the system, as well as how to post credit memos.
Problem: Account receivable clerks want to know how to enter and post basic invoices to the system.
To enter invoice receipts and post invoices, follow this menu path: Accounting ![]() Financial Accounting
Financial Accounting ![]() Accounts Receivable
Accounts Receivable ![]() Document Entry
Document Entry ![]() Invoice. Or use transaction code FB70.
Invoice. Or use transaction code FB70.
![]() Tip The system will normally display the last Customer Invoice Company Code screen you used for posting invoices as the default screen. To avoid posting invoices to the wrong company, make sure that the correct company code is displayed on top of the screen. Otherwise, click the Company Code button on top of the screen and enter the details. The Enter Company Code dialog box pops up. In the Company Code field, enter your company code (C900) and click the Continue
Tip The system will normally display the last Customer Invoice Company Code screen you used for posting invoices as the default screen. To avoid posting invoices to the wrong company, make sure that the correct company code is displayed on top of the screen. Otherwise, click the Company Code button on top of the screen and enter the details. The Enter Company Code dialog box pops up. In the Company Code field, enter your company code (C900) and click the Continue ![]() button. The system will display the appropriate customer invoice screen for invoice posting.
button. The system will display the appropriate customer invoice screen for invoice posting.
The Enter Customer Invoice: Company Code C900 screen appears. Click the ![]() button at the top of the screen. The Enter Company Code dialog box pops up. This screen will allow you to specify the company code you want to post invoices to. Enter your company code (C900) in the Company Code field and click the Continue
button at the top of the screen. The Enter Company Code dialog box pops up. This screen will allow you to specify the company code you want to post invoices to. Enter your company code (C900) in the Company Code field and click the Continue ![]() button at the bottom of the screen to proceed to the screen where you will input and post the invoice, which is the Enter Customer Invoice: Company Code C900 screen (Figure 17-5). Your company code is displayed at the top of the screen.
button at the bottom of the screen to proceed to the screen where you will input and post the invoice, which is the Enter Customer Invoice: Company Code C900 screen (Figure 17-5). Your company code is displayed at the top of the screen.
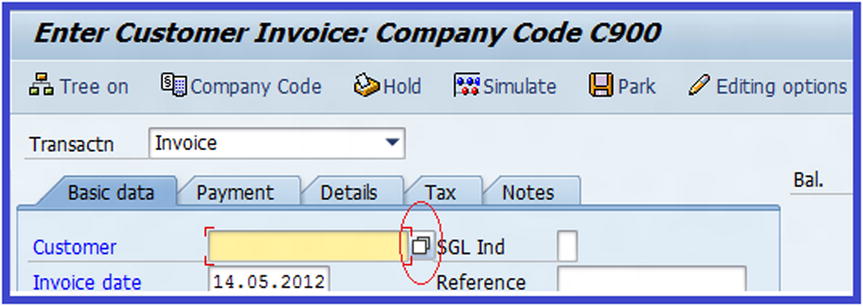
Figure 17-5. Initial Customer Invoice Basic screen for invoice input
Use the matchcode or the Search function ![]() in the Customer Field to search for the customer account you want to post invoices to. When you click the matchcode on the customer field, the Account or Matchcode for the Next Line Item (1) screen pops up. Enter your company code (C900; this is usually the default) in the Company Code field and then click the Continue
in the Customer Field to search for the customer account you want to post invoices to. When you click the matchcode on the customer field, the Account or Matchcode for the Next Line Item (1) screen pops up. Enter your company code (C900; this is usually the default) in the Company Code field and then click the Continue ![]() button on the bottom-right side of the screen. The Account or Matchcode for the Next Line Item (1) screen is displayed (Figure 17-6).
button on the bottom-right side of the screen. The Account or Matchcode for the Next Line Item (1) screen is displayed (Figure 17-6).
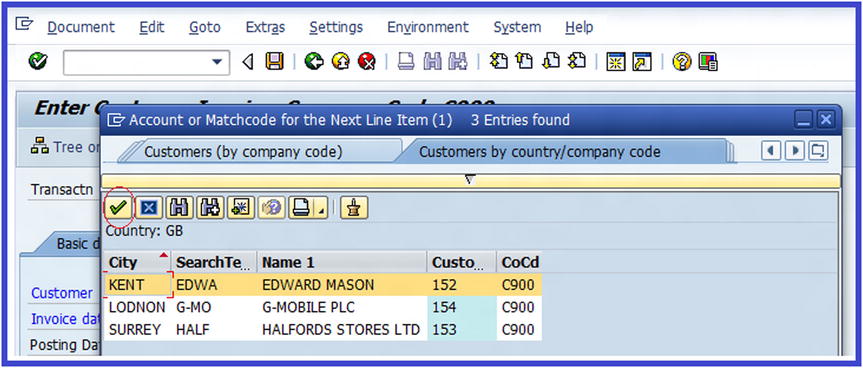
Figure 17-6. This Account screen is displaying a list of customers for your company code
Choose the customer whose invoice you want to process by double-clicking on it from the customer displayed list (or you can click the name and then double-click the Enter ![]() button). For example, if you click on the Customer Account Number 152 from the Customer list, that customer is entered into the Customer field (Figure 17-7).
button). For example, if you click on the Customer Account Number 152 from the Customer list, that customer is entered into the Customer field (Figure 17-7).

Figure 17-7. Customer Invoice Basic screen where you enter customer invoice details and the G/L account to which the invoice is posted
Update the remaining fields in the screen:
- Invoice Date: This is the date on the document (the date the invoice was issued).
- Posting Date: The date you posted the document. This will usually be today’s date, although it is possible to back-date a post.
- Amount: Enter the document amount (2000). This is the amount on the customer’s invoice.
- Calculate Tax: If you want the system to calculate the tax on the invoice amount, select the Calculate Tax checkbox. Then specify your output tax code (A2) in the field below this one. The system will apply the percentage rate assigned to this tax code and will calculate the tax amount for your invoice.
- G/L Acct: Enter the G/L account (800000) where you want the invoice to be posted to.
- DC: Specify the accounting treatment of the Credit or Debit transaction. This will determine how the transaction is posted in the account.
- Amount in Doc. Curr.: Enter an * sign in this field. This will allow the system to automatically copy the amount in the amount field into this field. It is also possible for you to enter the invoice amount yourself. We recommend that you use the * sign in this field, because this will help you avoid entering different amounts. It’s also faster when processing large volume of invoices.
- Tax Code: The system will use the tax code you entered in the Calculate Tax field above in this field. Otherwise, you have to enter it yourself.
Click the Enter ![]() button on the top-left side of the screen to confirm your entries. To display the invoice you entered for your customer, click the
button on the top-left side of the screen to confirm your entries. To display the invoice you entered for your customer, click the ![]() button at the top of the screen. The Document Overview screen is displayed (Figure 17-8) and shows the line item of your customer invoice.
button at the top of the screen. The Document Overview screen is displayed (Figure 17-8) and shows the line item of your customer invoice.

Figure 17-8. The Document Overview screen shows the documents posted to the system
If you are satisfied with your entries, post your entries by clicking the Post ![]() button at the top of the screen. Upon posting/saving, the system will notify you from the status bar that your document was posted in your company code C900.
button at the top of the screen. Upon posting/saving, the system will notify you from the status bar that your document was posted in your company code C900.
![]() Note When you post the customer invoice, the system will automatically debit the customer account and post the invoice amount to the credit side of the sales revenue account.
Note When you post the customer invoice, the system will automatically debit the customer account and post the invoice amount to the credit side of the sales revenue account.
Posting a Credit Memo
A credit memo is a systematic reduction of the original invoice amount arising for a number of reasons. You might reduce an invoice because the customer was accidentally overcharged, or the product delivered was defective, or there was complaint about product delivered or service rendered, and so on.
When an invoice is posted to the system, the customer’s account is debited. On the other hand, when a credit memo is posted, the customer’s account is credited to reduce the account balance by the credit memo amount.
Problem: Your company invoiced a customer for the amount of $2000 for goods supplied, but they complained that the goods had light damage on transit. You have been asked to raise a credit memo to reduce the original invoice amount by $200. Your task is to post a credit amount of $200 to the system to reduce the invoice amount from $2000 to $1800.
To post a credit memo, follow this menu path: Accounting ![]() Financial Accounting
Financial Accounting ![]() Account Receivable
Account Receivable ![]() Document Entry
Document Entry ![]() Credit Memo. Or use transaction code FB75. The Enter Customer Credit Memo: Company Code C900 screen comes up (Figure 17-9).
Credit Memo. Or use transaction code FB75. The Enter Customer Credit Memo: Company Code C900 screen comes up (Figure 17-9).

Figure 17-9. The Customer Credit Memo screen, where you can enter a credit memo to reduce a customer’s account and the G/L account against an invoice amount posted
Update the following fields:
- Transaction: This is the nature of transaction: Credit Memo. This is set by default.
- Customer: Enter your customer number account (152) that you want to post credit memo to.
- Document Date: This is the credit memo date.
- Posting Date: The date to post the credit memo. This is usually today’s date.
- Amount: This is the credit memo amount (200).
- Calculate Tax: Check this option to include the credit memo amount for output tax amount calculation.
- G/L Acct: This is the G/L 800000 account you want to post the credit memo amount to. This will be debited against the sales revenue account and credited to the customer account to reduce the original invoice.
- Short Text: This is set by default when you enter the G/L account in the G/L account field and click Enter or press Enter on your keyboard.
- D/C: Specify whether the transaction should be treated as debit or credit. Since this is a customer credit memo, enter debit in this field.
- Amount in Doc. Curr: Enter the credit memo amount in this field or use the * sign.
- Tax: The tax code application to your credit memo is set by default by the system. Otherwise, enter it manually.
Click the Enter ![]() button on the top-left side of the screen to confirm your entries. To display the credit memo you entered, click the
button on the top-left side of the screen to confirm your entries. To display the credit memo you entered, click the ![]() button at the top of the screen. The Document Overview screen is displayed (Figure 17-10) showing the line item of your customer credit memo.
button at the top of the screen. The Document Overview screen is displayed (Figure 17-10) showing the line item of your customer credit memo.

Figure 17-10. The Document Overview screen showing the credit memo posted to the system
Post your entries by clicking the Save ![]() button.
button.
During document processing, some information that’s needed to complete a transaction may not be readily available. As a result, the document cannot be posted properly. The important thing about SAP is that it gives you the flexibility to save incomplete documents without performing proper FI posting. In other words, you don’t have terminate your processing; you can come back later to complete the document and perform proper FI posting when you have the information required to complete the document. You can post it later without having to interrupt your document processing.
In SAP ERP, there are two ways to save an incomplete document without performing proper FI posting:
- Holding documents: This process allows incomplete documents to be held in the system temporarily until the document is completed. In this case, the document being held is not available for evaluation. That means no account balance is updated and no document number is assigned.
- Parking documents: Parked documents are just an extension of held documents. Incomplete documents can be saved temporarily for further processing at a later time. Unlike withheld documents, when a document is parked, the document is available for real-time evaluation. Like held documents, parked documents can be completed at a later time to form part of a completed financial accounting posting. Parked documents can be deleted like held documents when they are no longer required.
You can perform document parking for vendor accounts (this includes invoices and credit memos), for customer accounts (this includes invoices and credit memos), and for G/L accounts.
Holding Documents
Problem: Company C900 Plc’s accounting clerks have heard of the hold document function, but they are not sure exactly how it works.
Your task is to explain to the account clerks how to perform document holding without having to terminate the document processing.
In this exercise, let’s assume that you are not sure which general ledger account to use when entering a customer invoice and you want to use the hold function until you find out which G/L account to use. To go to the customer invoice input screen, follow this menu path: Accounting ![]() Financial Accounting
Financial Accounting ![]() Accounts Receivable
Accounts Receivable ![]() Document Entry
Document Entry ![]() Invoice. Or use transaction code FB70. The Enter Customer Invoice: Company Code C900 screen is displayed (Figure 17-11).
Invoice. Or use transaction code FB70. The Enter Customer Invoice: Company Code C900 screen is displayed (Figure 17-11).
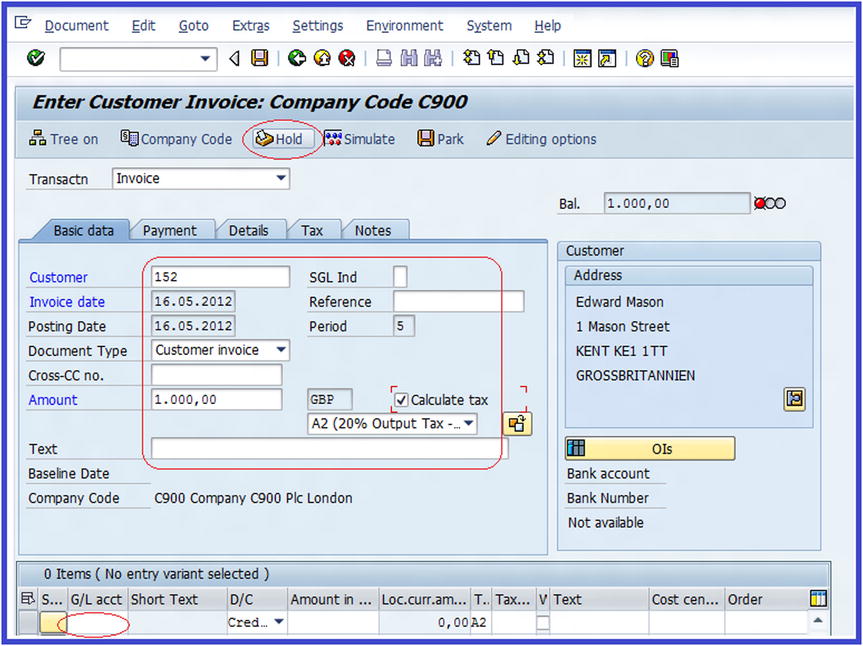
Figure 17-11. The Customer Invoice Basic screen, where you will use the hold function
Update the screen using the data shown in Figure 17-11. Leave the G/L account field blank and click the ![]() button to temporarily hold the document until you can ascertain the proper G/L account to use. The Hold Document dialog box pops up. Enter a number such as H001 (a meaningful number of your choice that you can remember easily) in the Temporary Document Number field. This number will enable you to identify the held document among others. Click the
button to temporarily hold the document until you can ascertain the proper G/L account to use. The Hold Document dialog box pops up. Enter a number such as H001 (a meaningful number of your choice that you can remember easily) in the Temporary Document Number field. This number will enable you to identify the held document among others. Click the ![]() button on the bottom-left side of the screen. The Hold Document screen disappears and the system will notify you on the massage bar that
button on the bottom-left side of the screen. The Hold Document screen disappears and the system will notify you on the massage bar that ![]() on Enter Customer Invoice: Company Code C900.
on Enter Customer Invoice: Company Code C900.
Problem: You have now obtained the right G/L account from a colleague and you want to find and open your held document to complete it and post it.
To display the held document, click the ![]() button on the top-left side of the Enter Customer Invoice: Company Code C900 screen. The Tree section of the screen opens on the left side. It contains a Held Documents folder (Figure 17-12).
button on the top-left side of the Enter Customer Invoice: Company Code C900 screen. The Tree section of the screen opens on the left side. It contains a Held Documents folder (Figure 17-12).

Figure 17-12. The Enter Customer Invoice: Company Code C900 screen with the Tree pane displaying the Held Documents folder
Double-click the Held Documents folder to display the contents. A list of held documents is displayed, including your held document, called ![]() . To display the held document, double-click on H001 from the displayed list. The held document is called up in the Enter Customer Invoice: Company code C900 dialog. Complete the document by adding the missing G/L account (800000); then click the
. To display the held document, double-click on H001 from the displayed list. The held document is called up in the Enter Customer Invoice: Company code C900 dialog. Complete the document by adding the missing G/L account (800000); then click the ![]() button to hide the Tree pane.
button to hide the Tree pane.
To check the completed document before posting, click the ![]() button at the top of the screen. The Document Overview screen appears and displays the completed document. Check the displayed documents to make sure that you are satisfied with your completed document before posting. Click the Post
button at the top of the screen. The Document Overview screen appears and displays the completed document. Check the displayed documents to make sure that you are satisfied with your completed document before posting. Click the Post ![]() button at the top of the screen to post your document.
button at the top of the screen to post your document.
Parking Documents
Problem: An accounting clerk want to know if it is possible to park an incomplete document that will be available for real-time evaluation and come back later after obtaining the right information, all without interrupting document processing. The accounting clerk is not sure which tax code to use and wants to park the documents so he can come back later with the right tax code.
To go to the Enter Customer Invoice: Company Code C900 screen, use this menu path: Accounting ![]() Financial Accounting
Financial Accounting ![]() Accounts Receivable
Accounts Receivable ![]() Document Entry
Document Entry ![]() Invoice. Or use transaction code FB70.
Invoice. Or use transaction code FB70.
Use the information in Table 17-1 to update the screen.
Table 17-1. The Information to Complete the Enter Customer Invoice Screen for a Parked Document
|
Field |
Value |
|---|---|
|
Customer |
Enter your customer number |
|
Invoice Date |
Today’s date |
|
Posting Date |
Set by default by the system |
|
Amount |
Enter the invoice amount (4000 in this example) |
|
G/L Account |
800000 |
|
Amount in Doc. Curr |
1000 |
|
Tax Code |
Leave this blank |
Click the ![]() button at the top of the screen to park your document.
button at the top of the screen to park your document.
The system will notify you on the status bar that that document C90018000000082012 was parked.
![]() Tip Take note of the parked document number. You will need it to identify your document when you want to return to it.
Tip Take note of the parked document number. You will need it to identify your document when you want to return to it.
Problem: Assume that tax code A2 is what you need for the parked document. Your task is to advise the accounting clerk on how to complete the parked document and post it as a complete document.
To go to the Enter Customer Invoice: Company Code C900 screen, click the ![]() button on the top-left side of the screen. The tree section is expanded.
button on the top-left side of the screen. The tree section is expanded.
Click the ![]() folder to open it; a list of parked document numbers is displayed.
folder to open it; a list of parked document numbers is displayed.
Select the appropriate parked document number (C90018000000082012 in this example) that you want to process from the list. The parked document is called up. Complete the document by updating the Tax field on the Edit Parked Customer Invoice screen. Click the ![]() button on the top of the screen to display your completed document and check your entries. If you are satisfied with your entries, click the
button on the top of the screen to display your completed document and check your entries. If you are satisfied with your entries, click the ![]() button to post the completed document.
button to post the completed document.
In this exercise, you learn three methods for manually posting incoming customer payments in SAP ERP:
Posting a Standard Incoming Payment
Posting a standard incoming payment is when a customer pays an outstanding invoice and you post the incoming payment and clear it against the billing document. The balancing figure in the customer account becomes nil.
Problem: A billing document of $2000 less discount of $40 was posted and the customer made payment of $1960 toward the outstanding invoice to clear the account.
To post the incoming payment and clear it against the open items, follow this menu path: Accounting ![]() Financial Accounting
Financial Accounting ![]() Account Receivable
Account Receivable ![]() Document Entry
Document Entry![]() Incoming Payment. Or use transaction code F-28. The Post Incoming Payments: Header Data screen is displayed (Figure 17-13).
Incoming Payment. Or use transaction code F-28. The Post Incoming Payments: Header Data screen is displayed (Figure 17-13).
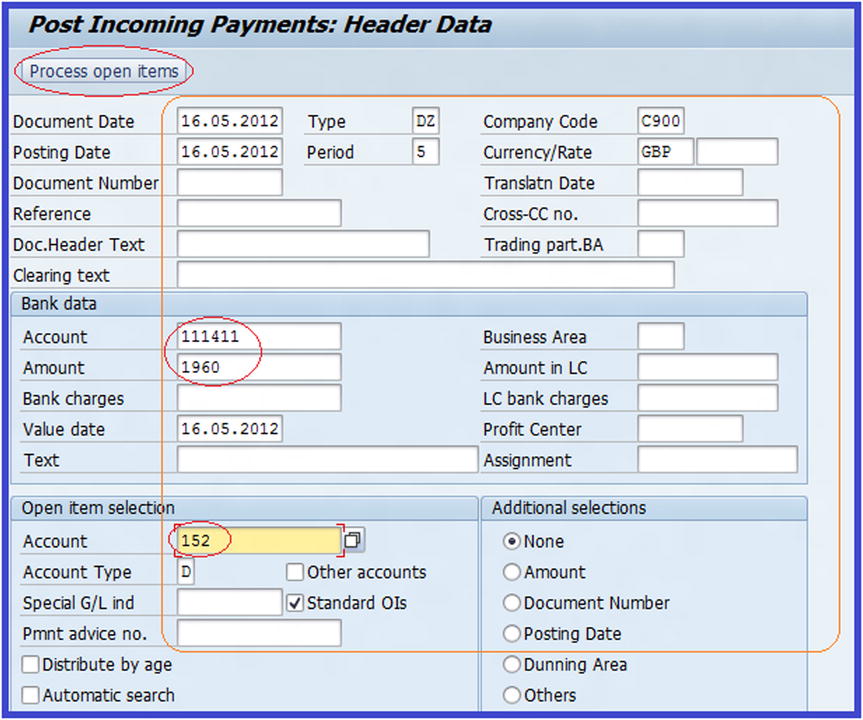
Figure 17-13. The screen where incoming payments are posted
Update the following fields:
- Document Date: Enter the document date. Use today’s date.
- Posting Date: Preferably, use today’s date as your posting date.
- Document Number: (optional) Enter the document number. This number is usually on top of the document.
- Doc.Header Text: (optional) The text you enter in this field describes the document.
- Clearing Text: (optional) The text you enter in this field provides a short description of the clearing document.
- Type: The document type is set automatically by the system.
- Period: This is set by default by the system. This is the accounting period derived from your fiscal year measured in months. For example, month five is displayed as period 5 by the system.
- Currency/Rate: Your company code’s local currency type is set by default by the system. For example, GBP (British pounds).
In the Bank Data section of the screen, update the following fields:
- Account: Using the matchcode, enter the G/L account 111411 for incoming checks.
- Amount: Enter the incoming payment amount of $1960.
- Bank Charges: (Optional) you can enter any charges arising from bank transactions.
- Value Date: This defaults to today’s date. This is the number of days that have passed between the posting date of the payment run and the bank value date.
In the Open Item Selection Section of the screen, update the following fields:
- Account: Using the matchcode, enter the customer account number 152.
- Account Type: The system defaults account type D for customer.
To display any outstanding customer account you want to clear, click the ![]() button on the top-left side of the screen. The Post Incoming Payments Process Open Items screen appears (Figure 17-14). This is where you clear incoming payments against outstanding invoices.
button on the top-left side of the screen. The Post Incoming Payments Process Open Items screen appears (Figure 17-14). This is where you clear incoming payments against outstanding invoices.
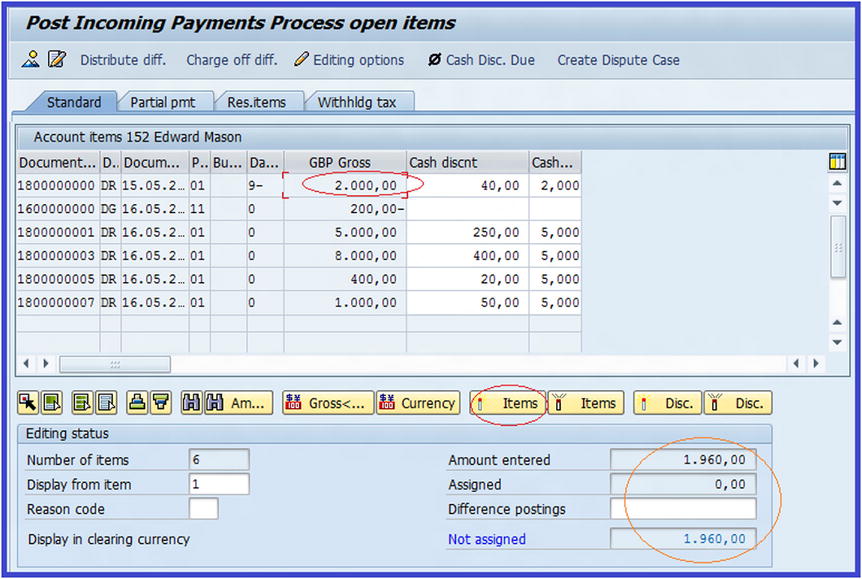
Figure 17-14. The Clearing Incoming Payments with Open Items screen
The open items on the customer account are displayed. Notice that the amount balances are activated (blue). Since the payment received is only for an item on the account and not the entire open item balance, you must deactivate all the activated items. To deactivate the activated items, click the Click the Select All ![]() button below the Account items on the left side of the screen to select all the displayed open items on the account. Click the Deactivate
button below the Account items on the left side of the screen to select all the displayed open items on the account. Click the Deactivate ![]() button to deactivate all the activated open items. All the open items will turn black to indicate they are deactivated.
button to deactivate all the activated open items. All the open items will turn black to indicate they are deactivated.
To process the open items you will now have to activate the line item that you want to clear with the incoming payment. Click the line item that you want to clear—2000—(this is the first item on the account item on the screen). Notice that the Amount Entered and Not Assigned fields on the bottom-right side of the screen in Editing Status section below the account item have reduced to 1960 and the Assigned field is now zero. The reduction in the entered amount is due to the discount offered to the customer as part of terms of payment.
Click the Activate ![]() button to activate the line item that you want to use to clear the incoming payment. The Amount Entered and Assigned fields show the amount you are clearing, and the Not Assigned field is set to zero (Figure 17-15).
button to activate the line item that you want to use to clear the incoming payment. The Amount Entered and Assigned fields show the amount you are clearing, and the Not Assigned field is set to zero (Figure 17-15).

Figure 17-15. The Posting Incoming Payment Processing Open Items screen shows the amount entered against a payment
To display the open item you want to clear with the incoming payment, click the ![]() button on the menu bar and then click
button on the menu bar and then click ![]() from the pull-down menu. The Post Incoming Payments Display Overview screen is displayed.
from the pull-down menu. The Post Incoming Payments Display Overview screen is displayed.
If you’re satisfied with your payment clearing, click the Post ![]() button to automatically clear the open item. After you click the Post button, the system will notify you that
button to automatically clear the open item. After you click the Post button, the system will notify you that ![]() .
.
Now let’s look at how a partial payment is treated.
Posting a Partial Payment
Partial payment is when you make an incomplete payment toward an outstanding amount or open item. In other words, only a fraction of the outstanding amount has been settled. In SAP, partial payments are treated differently from standard payments. Since the outstanding amount is not settled in full, it is treated as payment on account (i.e., both the open item and partial payment remain open in the account).
Problem: Assume that you have an open item of $4900 and you receive a partial payment of $3000.
Post an incoming partial payment of 3000 in the Post Incoming Payment: Header Data screen using the menu path: Accounting ![]() Financial Accounting
Financial Accounting ![]() Account Receivable
Account Receivable ![]() Document Entry
Document Entry![]() Incoming Payment. Or use transaction code F-28. Click the
Incoming Payment. Or use transaction code F-28. Click the ![]() button on the top-left side of the screen to proceed to the Post Incoming Payments Process Open Items screen to clear the incoming payment against outstanding invoices.
button on the top-left side of the screen to proceed to the Post Incoming Payments Process Open Items screen to clear the incoming payment against outstanding invoices.
Since you want to process a partial payment, deactivate all active open items and click the ![]() tab at the top of the screen. The Post Incoming Payments Enter Partial Payment screen appears. Activate the open item that you want to post partial payment to. For this exercise, click the open item with the amount of $4900 and click the Activate
tab at the top of the screen. The Post Incoming Payments Enter Partial Payment screen appears. Activate the open item that you want to post partial payment to. For this exercise, click the open item with the amount of $4900 and click the Activate ![]() button below the account items. The open item you have activated turns blue. The Payment Amount field will be ready for input. Enter the partial amount (3000) in the Payment Amount field against the open item (4900).
button below the account items. The open item you have activated turns blue. The Payment Amount field will be ready for input. Enter the partial amount (3000) in the Payment Amount field against the open item (4900).
Notice that in the Editing Status section at the bottom of the screen, the Amount Entered and Amount Assigned fields will equal 3000 and the Not Assigned Amount field will be zero (Figure 17-16).
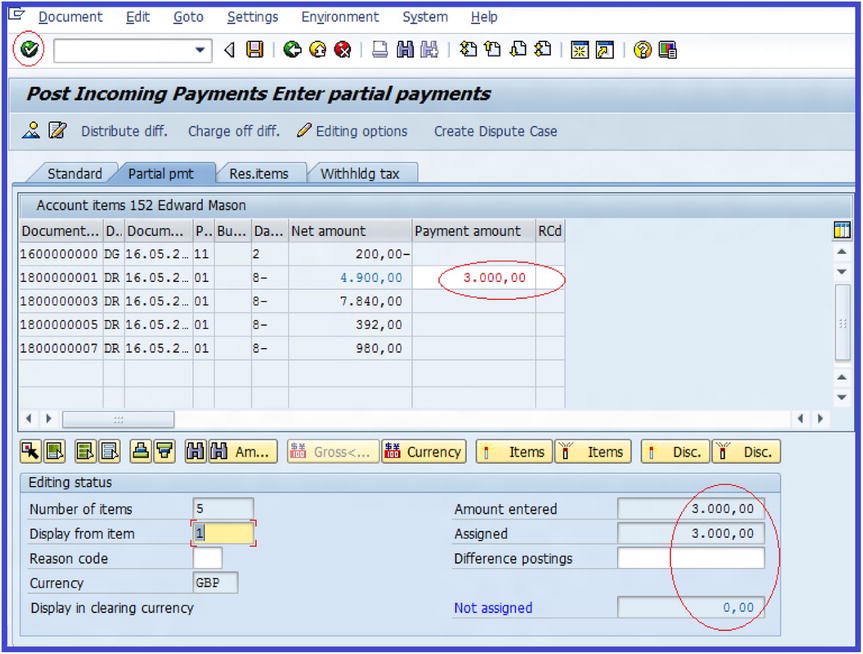
Figure 17-16. The screen where you post match open item against open items with a partial payment
Click the Post ![]() button.
button.
Now let’s look at how residual items are treated.
Posting Residual Items
Residual items arise when you are prepared to receive payment less than the original invoice amount as final settlement of an open item.
![]() Note When posting residual items, you must specify a reason code. The reason code contains the reason for the reduction in incoming payment as compared to the original billing document.
Note When posting residual items, you must specify a reason code. The reason code contains the reason for the reduction in incoming payment as compared to the original billing document.
Problem: Assume that Company C900 Plc has agreed with a business partner to accept $10,000 as full settlement for an invoice of $12,000 due to slight damage in goods during transit. Therefore, your residual item amount is $1760 ($12,000 less discount of $240 = $11,760 less $10,000).
Post an incoming payment of $10,000 from the Post Incoming Payment: Header Data screen using this menu path: Accounting ![]() Financial Accounting
Financial Accounting ![]() Account Receivable
Account Receivable ![]() Document Entry
Document Entry ![]() Incoming Payment. Or use transaction code F-28. Click the
Incoming Payment. Or use transaction code F-28. Click the ![]() button on the top-left side of the screen to proceed to the Post Incoming Payments Process Open Items screen. Since you want to process residual items, deactivate all the open items that are activated and click the
button on the top-left side of the screen to proceed to the Post Incoming Payments Process Open Items screen. Since you want to process residual items, deactivate all the open items that are activated and click the ![]() tab on the top of the screen. The Post Incoming Payments Create residual items screen appears displaying the open items on the account (Figure 17-17).
tab on the top of the screen. The Post Incoming Payments Create residual items screen appears displaying the open items on the account (Figure 17-17).

Figure 17-17. The Post Incoming Payments: Create Residual Items screen
Activate the open item from which you want to create a residual item. For this exercise, click the open item with the amount of $11,760 ($12,000 less the cash discount of $240) to select it for activation and then click the Activate ![]() button below account items. The open item you have activated turns blue, indicating that the item is activated. The Residual Item and RCd (Reason code) fields are ready for input. Enter the residual item 1760 in the Residual Item field and then enter the Reason Code DMG in the RCd field. You can access the reason code using the matchcode by the RCd field.
button below account items. The open item you have activated turns blue, indicating that the item is activated. The Residual Item and RCd (Reason code) fields are ready for input. Enter the residual item 1760 in the Residual Item field and then enter the Reason Code DMG in the RCd field. You can access the reason code using the matchcode by the RCd field.
Notice that in the Editing Status section, the Amount Entered field is $10,000 (less the residual amount of $2,000) and Amount Assigned field is $1760 ($2000 less the cash discount of $240).
To check the residual item you have processed, click the ![]() button on the menu bar and then click
button on the menu bar and then click ![]() . The payment overview shows your entries. Click the Post
. The payment overview shows your entries. Click the Post ![]() button on the top of the screen to post your entries. The system will notify you that
button on the top of the screen to post your entries. The system will notify you that ![]() .
.
In this exercise, you learn how to post customer down payment requests, post customer down payments, and clear customer down payments.
Posting a Customer Down Payment Request
It is a normal business practice to request an advance payment from a customer once an order is placed, prior to delivery. This is referred to as down payment request. Let’s see how this is represented in SAP.
Problem: The accounting team wants to know how to post a down payment request and you have been assigned to teach them.
To go to the Customer Down Payment Request Header Data screen to enter the data for the customer down payment, follow this menu path: Accounting ![]() Financial Accounting
Financial Accounting ![]() Account receivable
Account receivable ![]() Document Entry
Document Entry ![]() Down Payment
Down Payment ![]() Request. Or use transaction code F-37. Using the information in Table 17-2, update the fields in the Customer Down Payment Request Header Data screen.
Request. Or use transaction code F-37. Using the information in Table 17-2, update the fields in the Customer Down Payment Request Header Data screen.
Table 17-2. The Information to Update Customer Down Payment Request Header Data Screen
|
Field |
Value |
Description |
|---|---|---|
|
Document Date |
Today’s date |
This is the date on your document (invoice) you are processing. For illustration purposes, we used the current date. |
|
Posting Date |
Today’s date |
The date the document is posted to the system. This should usually be today’s date, but is also possible to back-date a post. It all depends on what you are trying to achieve. |
|
Type |
DZ |
Document type is set by default. |
|
Company Code |
C900 |
Enter your company code. |
|
Currency/Rate |
GBP |
Document currency |
|
Account |
152 |
Customer account |
|
Teg.sp.G/L ind. |
A |
The special G/L indicator for down payment is set by the system based on setting made in IMG. |
Click the ![]() button on the top-left side of the screen to proceed to the Customer Down Payment Request Add Customer Item screen to complete your down payment request data input. Using the information in Table 17-3, update the fields.
button on the top-left side of the screen to proceed to the Customer Down Payment Request Add Customer Item screen to complete your down payment request data input. Using the information in Table 17-3, update the fields.
Table 17-3. The Information to Add Customer Items to the Customer Down Payment Request
|
Field |
Value |
Description |
|---|---|---|
|
Amount |
5000 |
Down payment request you made to your customer. |
|
Calculate Tax |
Select |
Click the Calculate Tax checkbox to have the system calculate the tax amount. |
|
Tax Code |
A2 |
This tax code holds the percentage rate for the output tax that will be used by the system to the calculate tax amount. |
|
Due date |
Future date |
This is the date the down payment request is due (for illustration purposes, enter any date after the current date). |
Click Enter ![]() on the top-left side the screen to confirm your entries and then click the Overview
on the top-left side the screen to confirm your entries and then click the Overview ![]() button to display your down payment request. The Down Payment Request Display Overview screen appears containing a one-line item for your customer down payment request. If you are satisfied with your down payment request entries, click Post
button to display your down payment request. The Down Payment Request Display Overview screen appears containing a one-line item for your customer down payment request. If you are satisfied with your down payment request entries, click Post ![]() to post your down payment request.
to post your down payment request.
![]() Note A down payment request is a noted item and consequently does not impact the G/L. No posting is made to the G/L. Noted items are for information purposes only. Hence, the one-line item display on the Down Payment Request Display Overview screen.
Note A down payment request is a noted item and consequently does not impact the G/L. No posting is made to the G/L. Noted items are for information purposes only. Hence, the one-line item display on the Down Payment Request Display Overview screen.
Posting Customer Down Payments
Customer down payments are payments received in advance and in anticipation of providing goods or rendering services to a business partner. To go to the down payment screen, follow this menu path: Easy: Financial Accounting ![]() Account receivable
Account receivable ![]() Document Entry
Document Entry ![]() Down Payment
Down Payment ![]() Down Payment. Or use transaction code F-29.
Down Payment. Or use transaction code F-29.
The Post Customer Down Payment: Header Data screen is displayed. Update the screen using the data in Figure 17-18.
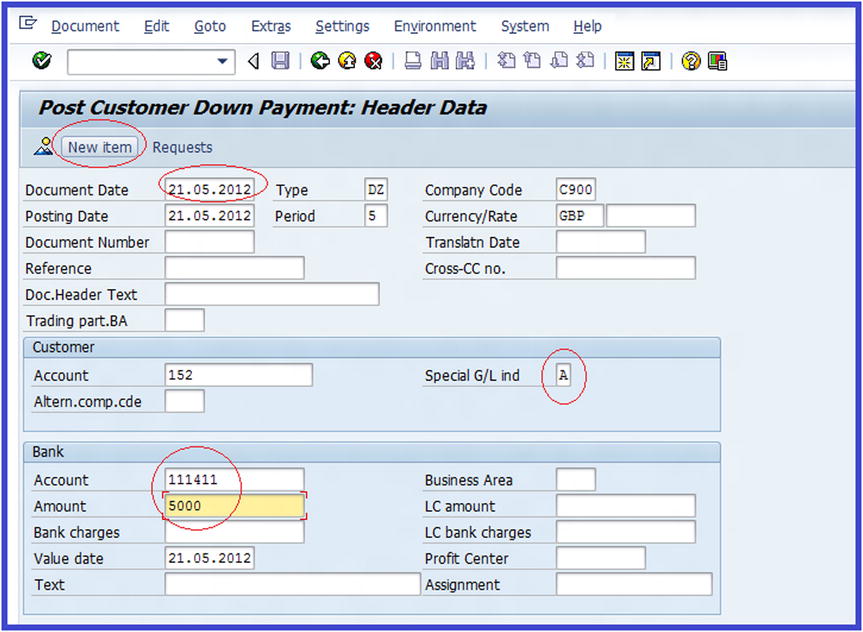
Figure 17-18. The screen where you enter the header data for the down payment
Click the ![]() button to proceed to the Post Customer Down Payment Added Customer Item screen, where you enter data for your down payment. Use the data in Table 17-4 to update the fields on the screen.
button to proceed to the Post Customer Down Payment Added Customer Item screen, where you enter data for your down payment. Use the data in Table 17-4 to update the fields on the screen.
Table 17-4. The Data to Update Additional Customer Items for Down Payment
|
Field |
Value |
Description |
|---|---|---|
|
Amount |
5000 |
Enter the down payment document amount in this field. |
|
Tax Code |
A2 |
This is your tax code for output tax. |
|
Calculate Tax |
Select |
Click this checkbox to allow the system to automatically calculate output tax amount for your down payment. |
Click the Overview ![]() button to go to the Post Customer Down payment Display Overview screen. This screen will show the down payment line items. Post
button to go to the Post Customer Down payment Display Overview screen. This screen will show the down payment line items. Post ![]() your down payment.
your down payment.
![]() Note The down payment received is an example of a free offsetting entry. Free offsetting entries allow proper posting in the general ledger. The special G/L reconciliation account is automatically debited or credited.
Note The down payment received is an example of a free offsetting entry. Free offsetting entries allow proper posting in the general ledger. The special G/L reconciliation account is automatically debited or credited.
Clearing Customer Down Payments
Problem: The finance team heard that it is possible to clear down payment requests with a down payment received. You have been asked to demonstrate how this is done.
To go to the Clear Customer Down Payment: Header Data screen (Figure 17-19) to carry out down payment clearing, follow this menu path: Financial Accounting ![]() Account receivable
Account receivable ![]() Document Entry
Document Entry ![]() Down Payment
Down Payment ![]() Clearing. Or use transaction code F-39.
Clearing. Or use transaction code F-39.
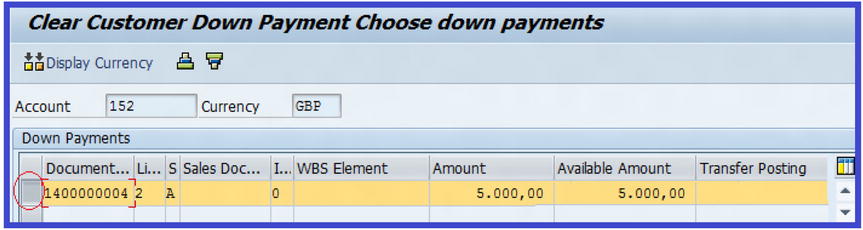
Figure 17-19. Clearing a down payment request with a down payment received
Update the following fields:
- Document Date: Use today’s date.
- Posting Date: This date is set by the system. This usually defaults to today’s date.
- Account: Enter your customer account number (152) that the down payment relates to.
- Invoice Ref.: Make sure that the invoice reference is blank, because the system will default to the last document number.
- Fiscal Year: This is your company code accounting year. This is set by default by the system.
Click Enter ![]() on the top-left side of the screen to confirm your entries, and then click the
on the top-left side of the screen to confirm your entries, and then click the ![]() button on the top-left side of the screen. The Clear Customer Down Payment Choose Down Payments screen appears, where you clear with the down payment request with down payment received (see Figure 17-19).
button on the top-left side of the screen. The Clear Customer Down Payment Choose Down Payments screen appears, where you clear with the down payment request with down payment received (see Figure 17-19).
Select the down payment line item you want to clear with this down payment request. Then, on the menu bar, click ![]() and then click
and then click ![]() . The Clear Customer Down Payment Display Overview screen (Figure 17-20) is displayed showing the breakdown of the down payment clearing.
. The Clear Customer Down Payment Display Overview screen (Figure 17-20) is displayed showing the breakdown of the down payment clearing.

Figure 17-20. The Down Payment Overview screen shows the down payment request clearing with the down payment received
Click the Post ![]() button.
button.
![]() Note When you post the customer down payment, the system will automatically clear the down payment request made against the down payment received. During this process, the down payment request is cancelled.
Note When you post the customer down payment, the system will automatically clear the down payment request made against the down payment received. During this process, the down payment request is cancelled.
In this exercise, you learn how to display the balance of the following account types:
- Customer accounts
- Vendor accounts
- G/L accounts
![]() Note In order for the system to display an account balance, you must set the account indicator called Open Item Management in the account’s master data.
Note In order for the system to display an account balance, you must set the account indicator called Open Item Management in the account’s master data.
Problem: A new finance staff member wants to display a customer account balance and wants to display line items. He has approached you as the SAP consultant to take him through the steps involved.
Display Customer Account Balances
This exercise will allow you to display the account balances of customers. To display balances, follow this menu path: Accounting ![]() Financial Accounting
Financial Accounting ![]() Account Receivable
Account Receivable ![]() Account
Account ![]() Display Balances. Or use transaction code FD10N.
Display Balances. Or use transaction code FD10N.
The Customer Balance Display screen is displayed. Update the following fields:
- Customer: Enter the customer account number that you want to display. If you are not sure of the customer account number, you can use the matchcode function to search for your customer.
- Company Code: Enter the company code the customer belongs to.
- Fiscal Year: Enter your company code accounting year related to the customer transactions.
Click the Execute button ![]() on the top-left side of the screen to go to the Customer Balance Display screen. It shows your customer account balance (Figure 17-21).
on the top-left side of the screen to go to the Customer Balance Display screen. It shows your customer account balance (Figure 17-21).

Figure 17-21. The Customer Account Balance Display screen shows the account balance of the customer you specified
It is also possible to display line items or a particular document directly from this report. To do this, select any period from the list of balances by clicking on the balance you want to display. For this exercise, we are using period five (circled in Figure 17-21) to illustrate how to display the customer line item. Select period five’s balance from the list of balances and click the Call Up Line Item Report ![]() button (this button will allow you to display the customer line item) on the top-left side of the screen. Alternatively, you can double-click on the balance you want to display. The Customer Line Item Display (Figure 17-22) displays all the line items.
button (this button will allow you to display the customer line item) on the top-left side of the screen. Alternatively, you can double-click on the balance you want to display. The Customer Line Item Display (Figure 17-22) displays all the line items.
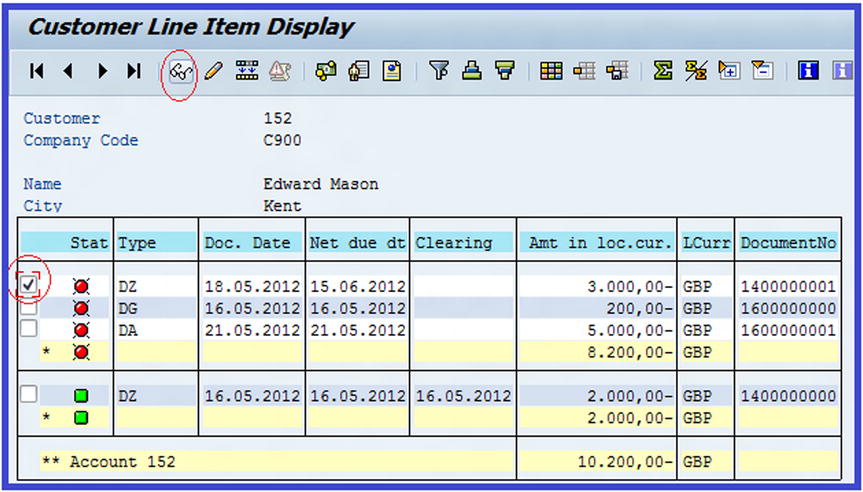
Figure 17-22. The Customer Line Item Display screen
![]() Note The drawback to displaying a line item using the Customer Balance Display is that it does not give you the flexibility to define your line item display criteria.
Note The drawback to displaying a line item using the Customer Balance Display is that it does not give you the flexibility to define your line item display criteria.
It is possible for you to make some changes in a document displayed in the line item on the screen (Figure 17-22). To do this, select the document you want to make changes to (circled) and click the Display Document ![]() button at the top left of the screen. The Display Document: Line Item 1 screen is displayed. Click the Change Display
button at the top left of the screen. The Display Document: Line Item 1 screen is displayed. Click the Change Display ![]() button at the top of the screen. The Change Document: Line Item 1 screen is displayed. This is the screen where you can make changes to your document. After making the appropriate changes, save
button at the top of the screen. The Change Document: Line Item 1 screen is displayed. This is the screen where you can make changes to your document. After making the appropriate changes, save ![]() your work.
your work.
![]() Note You can only make minimum changes in certain fields, for example, the Assignment and Text fields. It is also possible to change the discount/payment terms, as well as the payment block and dunning block.
Note You can only make minimum changes in certain fields, for example, the Assignment and Text fields. It is also possible to change the discount/payment terms, as well as the payment block and dunning block.
Display Line Items
The Line Item Display function enables you to display all the document line items posted to a given account. In order to display these line items, you must set the indicator for line item display in the account’s master data.
Line item display is applicable to the following account types:
- Customer accounts (the line item setting is mandatory)
- Vendor accounts (the line item setting is mandatory)
- G/L accounts (this setting is found in the G/L master data)
You can display the following items in your line item display:
- Open items: These are outstanding items in the account at the specified period.
- Cleared items: The items payment have been received and cleared.
- All items: Open and cleared items.
Display/Change Customer Line Items
To go to the Display Line Items screen, follow this menu path: Accounting ![]() Financial Accounting
Financial Accounting ![]() Account Receivable
Account Receivable ![]() Account
Account ![]() Display/Change Line Items. Or use transaction code FBL5N.
Display/Change Line Items. Or use transaction code FBL5N.
Using the information in Table 17-5, update the Customer Line Item Display screen.
Table 17-5. The Fields to Update for Line Items Display
|
Field |
Value |
Description |
|---|---|---|
|
Customer Account |
152 |
Enter the Customer Account number that you want to display line items for. You can display single or multiple customer line items by entering the appropriate customer number(s) in this filed. You can access the customer number using the matchcode by the customer account field. |
|
Company Code |
C900 |
Enter your company code in this field. It is also possible to include a single or multiple company code in your line item display. |
|
Open items |
Select |
You have the option to display open or cleared items separately by selecting the appropriate radio button. It is also possible to display all items (both open and cleared items simultaneously) by clicking the All Items radio button. |
Click Enter ![]() and then click the Execute
and then click the Execute ![]() button on the top-left side of the screen. The system will display the line items for open items, depending on your selection (Figure 17-23).
button on the top-left side of the screen. The system will display the line items for open items, depending on your selection (Figure 17-23).

Figure 17-23. The selected customer line item display
Correspondence
In this exercise, you learn how to generate and output correspondence requests for individual customers by using print reports. To print correspondence, you must first request correspondence by specifying the correspondence type for the company code. SAP comes with predefined correspondence types. For this exercise, we will request an account statement. Once the correspondence is generated, the correspondence requests are deleted. For pending correspondence requests, the print program is scheduled daily.
Request Correspondence
To request correspondence, follow this menu path: Accounting ![]() Financial Accounting
Financial Accounting ![]() Account receivable
Account receivable ![]() Account
Account ![]() Correspondence
Correspondence ![]() Request. Or use transaction code FB12.
Request. Or use transaction code FB12.
The Request Correspondence screen is displayed. Enter your company code in the company code field (C900) and click the Enter ![]() button on top of the screen or press the Enter button on the keyboard. The Correspondence Selection screen with list of correspondence types appears. In this exercise, you will be looking at how correspondence requests for customers’ account statements are carried out. Therefore, select the SAP06-Account Statement type from the displayed account list and click
button on top of the screen or press the Enter button on the keyboard. The Correspondence Selection screen with list of correspondence types appears. In this exercise, you will be looking at how correspondence requests for customers’ account statements are carried out. Therefore, select the SAP06-Account Statement type from the displayed account list and click ![]() on the top-left side of the screen. The Detail Specifications for Correspondence screen pops up (Figure 17-24).
on the top-left side of the screen. The Detail Specifications for Correspondence screen pops up (Figure 17-24).
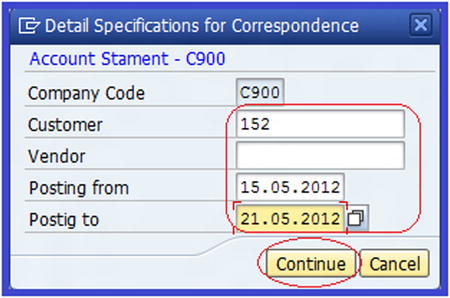
Figure 17-24. Specifying correspondence for a correspondence request
Update the following fields:
- Company Code: Your company code is the default.
- Customer: Enter the customer account you want to include in your correspondence request.
- Posting from: Enter the date you want your customer account statement to start from in this field.
- Posting to: Enter the date you want your customer account statement to end.
Click the ![]() button. Then click the Enter button. The system will display the
button. Then click the Enter button. The system will display the ![]() message on the message bar.
message on the message bar.
After completing the correspondence request, you can go on to perform print correspondence.
Print Correspondence
To print correspondence, follow this menu path: Accounting ![]() Financial Accounting
Financial Accounting ![]() Account Receivable
Account Receivable ![]() Periodic Processing
Periodic Processing ![]() Print Correspondence
Print Correspondence ![]() As Per Requests. Or use transaction code F.61.
As Per Requests. Or use transaction code F.61.
The Trigger for Correspondence screen is displayed. Update the fields using the information in Table 17-6.
Table 17-6. Data to Update the Trigger for Correspondence Screen
|
Field |
Value |
Description |
|---|---|---|
|
Correspondence |
ACS1 |
Enter the corresponded type for the Account Statement identifier. It is also possible to search for the appropriate correspondence type, by using the Search icon by the field if you are not sure of the appropriate correspondence number. If you want to generate more than one correspondence type, you can do so by specifying the correspondence type range. |
|
Company Code |
C900 |
Enter your company code. It is also possible to generate and print correspondence for a range of company codes. To do this, you have to specify the company code range. This is possible when you have more than one company code. |
|
Account Type |
D |
Specify the appropriate account type. |
Click the Execute ![]() button on the top-left side of the screen to print the correspondence. The Information screen pops up with the message, “1 correspondence requests carried out were deleted”. Confirm the deletion by clicking the Confirm
button on the top-left side of the screen to print the correspondence. The Information screen pops up with the message, “1 correspondence requests carried out were deleted”. Confirm the deletion by clicking the Confirm ![]() button on the bottom-right side of the screen. The Correspondence Requests screen pops up with the message, “A correspondence request was selected,” and the question, “Would you like to issue the request?” Click the
button on the bottom-right side of the screen. The Correspondence Requests screen pops up with the message, “A correspondence request was selected,” and the question, “Would you like to issue the request?” Click the ![]() button on the bottom-left side of the pop-up screen to confirm that you want to issue this correspondence request. The Output Parameter dialog box pops up. Enter your output print device (LP01) in the Output Device field and click the
button on the bottom-left side of the pop-up screen to confirm that you want to issue this correspondence request. The Output Parameter dialog box pops up. Enter your output print device (LP01) in the Output Device field and click the ![]() button to confirm. The Trigger for Correspondence Log is displayed (Figure 17-25).
button to confirm. The Trigger for Correspondence Log is displayed (Figure 17-25).
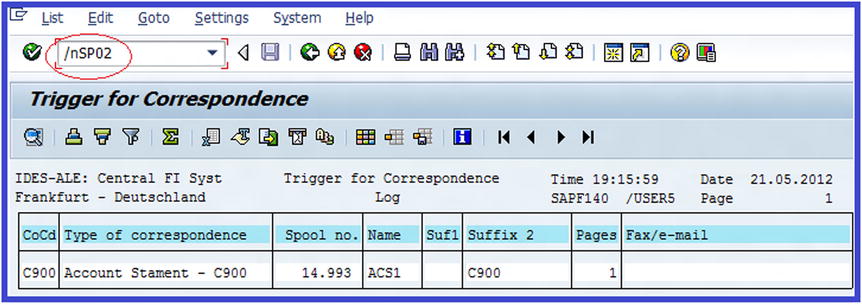
Figure 17-25. The Trigger for Correspondence screen shows the account statement for your company code
To display a list of spool requests (the documents marked for the print function but not yet output to a printer or to another output device) for the account statement you have just completed, type /nSP02 in the Command Field at the top of the screen and press Enter on your keyboard. The Output Controller: List of Spool Requests screen is displayed.
To display the printout preview, select the appropriate item from the list of spool requests by making sure that the Spool No checkbox is clicked. For this exercise, click the checkbox for spool number 14993 (the spool number we use here is for illustration only; it is not a standard spool number. Spool numbers vary depending on the current spool number used by the system). Click on the Display Contents ![]() button at the top of the screen to display the print preview for your customer account statement (Figure 17-26).
button at the top of the screen to display the print preview for your customer account statement (Figure 17-26).

Figure 17-26. Print preview of the customer’s account statement
To print the account statement, click the Back ![]() button to return to the previous screen (Figure 17-27).
button to return to the previous screen (Figure 17-27).
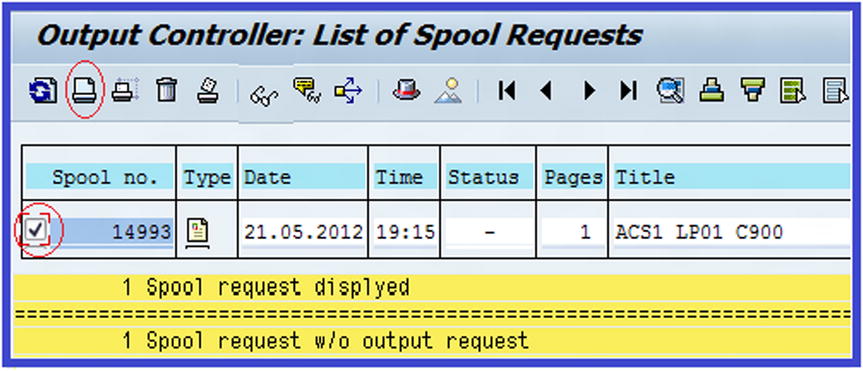
Figure 17-27. The spool requests for printing
Click the Print button ![]() at the top of the screen. The system will notify you that
at the top of the screen. The system will notify you that ![]() .
.
Execute Dunning
Dunning is the systematic process of communicating with customers to ensure adequate collection of account receivables due. The system sends reminder letters to customers about their account being due for payment. Communication through the dunning process starts with a gentle reminder and gradually escalates as an account becomes more overdue.
Problem: Your team leader sent you a memo asking that you generate dunning for customers with outstanding balances outside the agreed credit period.
To execute the dunning program, follow this menu path: Accounting ![]() Financial Accounting
Financial Accounting ![]() Account Receivable
Account Receivable ![]() Periodic Processing
Periodic Processing ![]() Dunning
Dunning ![]() Execute Dunning. Or use transaction code F150.
Execute Dunning. Or use transaction code F150.
![]() Tip Before you start with dunning, post some back-dated invoices. Use last month’s dates. This will enable you to see how dunning works in practice.
Tip Before you start with dunning, post some back-dated invoices. Use last month’s dates. This will enable you to see how dunning works in practice.
The Dunning screen is displayed. Update the fields using the data in Table 17-7.
Table 17-7. Data for the Dunning Screen
|
Field |
Value |
Description |
|---|---|---|
|
Run On |
Use today’s date (in this example, it’s 21.05.2012) |
This is the date you want to run your dunning program. We advise you to use the current date. |
|
Identification |
C900 |
This will you enable to identify your dunning notice, especially when more than one dunning run is performed on the same date. We recommend that you use any suitable identification key. The company code is ideal. |
Click the ![]() tab at the top of the screen to go to the parameter section of the Dunning Parameter screen. On this screen you will define the exact parameters for the document and the business partner you want to include in your dunning run.
tab at the top of the screen to go to the parameter section of the Dunning Parameter screen. On this screen you will define the exact parameters for the document and the business partner you want to include in your dunning run.
Update the fields using the information in Table 17-8.
Table 17-8. The Data for Dunning Parameter Specification
|
Field |
Value |
Description |
|---|---|---|
|
Dunning Date |
Today’s date |
The date you want the dunning to be performed. |
|
Document Post Up To |
Today’s date |
This field will allow you to select a range of documents up to an earlier given period. |
|
Company Code |
C900 |
Enter your company code. It is also possible to generate dunning for a range of company codes or multiple company codes by specifying the appropriate company code’s range. |
|
Customer |
152 |
Likewise, you can run dunning for a single business partner or multiple business partners. |
Click the ![]() tab at the top of the screen to return to the Status part of the screen. The system will prompt you to save your parameter. Click the
tab at the top of the screen to return to the Status part of the screen. The system will prompt you to save your parameter. Click the ![]() button on the bottom-left side of the screen to save your parameter specifications. On the Dunning screen, notice that the status of your dunning run so far will be displayed in the status section of the screen as “Parameters Were Maintained” (Figure 17-28).
button on the bottom-left side of the screen to save your parameter specifications. On the Dunning screen, notice that the status of your dunning run so far will be displayed in the status section of the screen as “Parameters Were Maintained” (Figure 17-28).
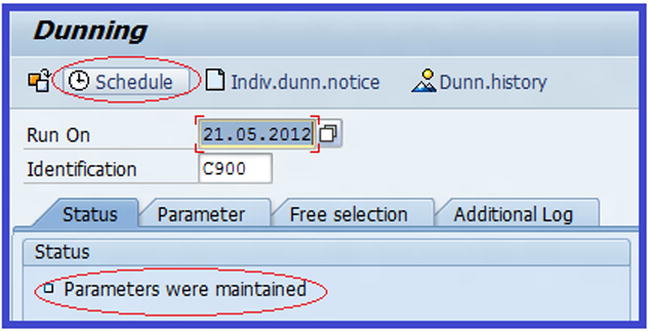
Figure 17-28. The screen where you maintain the dunning parameters
Click the ![]() button on the top-left side of the screen to schedule your dunning print program. The Output Parameter dialog box pops up. Enter your output print device (LP01) in the Output Device field and click the
button on the top-left side of the screen to schedule your dunning print program. The Output Parameter dialog box pops up. Enter your output print device (LP01) in the Output Device field and click the ![]() button on the bottom-right side of the screen. Once you click the Continue button, this will allow you specify your output device that you want to send your dunning to (in this case, to a printer). The Schedule Selection and Print screen pops up (Figure 17-29). The system automatically defaults to the start date, start time, and output device that you specified previously. Click the Start Immediately and Dunn.Print With Scheduling? checkboxes. By clicking Start Immediately, you are instructing the system to output your dunning run immediately.
button on the bottom-right side of the screen. Once you click the Continue button, this will allow you specify your output device that you want to send your dunning to (in this case, to a printer). The Schedule Selection and Print screen pops up (Figure 17-29). The system automatically defaults to the start date, start time, and output device that you specified previously. Click the Start Immediately and Dunn.Print With Scheduling? checkboxes. By clicking Start Immediately, you are instructing the system to output your dunning run immediately.
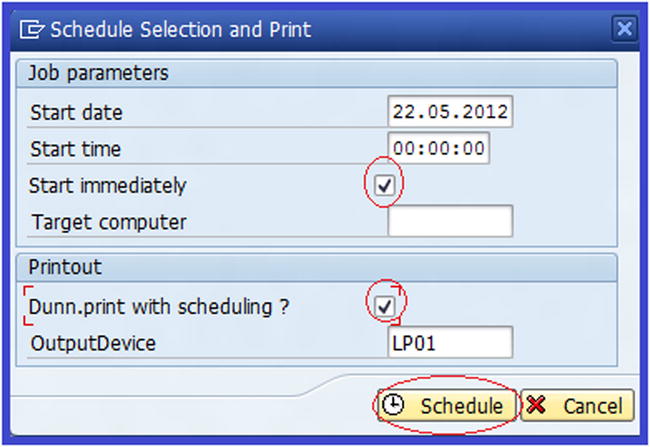
Figure 17-29. Specifying the dunning print with scheduling options
Then click the ![]() button.
button.
![]() Note It is possible to schedule the system to perform a dunning run at a later date and time.
Note It is possible to schedule the system to perform a dunning run at a later date and time.
The system gives you an update of your dunning run status. For example, “Select and Print Is Scheduled”.
Press Enter on the keyboard twice. The system will give you the current status of your dunning in the Status section of the screen, such as “Select and Print Is Complete” (Figure 17-30).

Figure 17-30. The screen where you can view the dunning run’s status
Click the ![]() button on the top-right side of the screen. The Dunning List Variant dialog box will appear and the system defaults to the print program automatically. All you need to do is click the Enter
button on the top-right side of the screen. The Dunning List Variant dialog box will appear and the system defaults to the print program automatically. All you need to do is click the Enter ![]() button. This will display the list of documents included in your dunning proposal.
button. This will display the list of documents included in your dunning proposal.
It is also possible to see details of a document on the list, which you’ll do next.
Display Dunning Details
Select the document you want to display from the displayed list in the Dunning Proposal list (Figure 17-31) and then click the Detail ![]() button at the top of the screen.
button at the top of the screen.
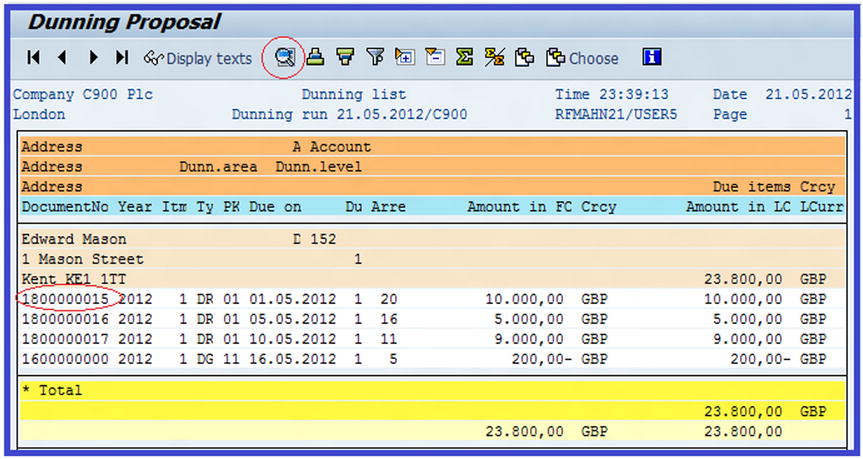
Figure 17-31. The documents included in dunning proposal
The Detail: Display screen is displayed containing the following information about the document you have selected: Account Type, Company Code, Customer, Dunning level, Doc. Company Code, Document Number, Fiscal Year, Line Item, and Reference. Click the Back ![]() button twice to return to the Dunning screen. To see a print preview before printing the dunning, click the
button twice to return to the Dunning screen. To see a print preview before printing the dunning, click the ![]() button. The Output Parameters screen pops up. Enter your output print device (LP01) in the Output Device field and click the
button. The Output Parameters screen pops up. Enter your output print device (LP01) in the Output Device field and click the ![]() button to output a sample printout. The Schedule Sample Printout dialog box appears. The system automatically defaults to the start date, start time, output device, and no.sample printout. Make sure that the Start Immediately checkbox is clicked. Click the Display
button to output a sample printout. The Schedule Sample Printout dialog box appears. The system automatically defaults to the start date, start time, output device, and no.sample printout. Make sure that the Start Immediately checkbox is clicked. Click the Display ![]() button to display a printout sample (Figure 17-32).
button to display a printout sample (Figure 17-32).
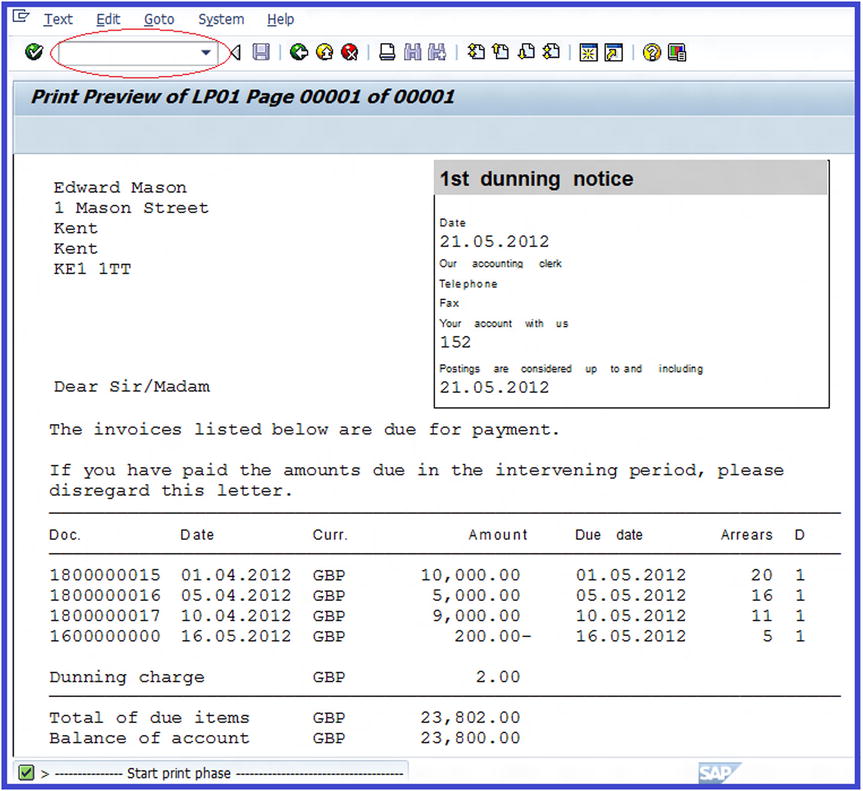
Figure 17-32. The dunning print preview for overdue items on a customer account
Print Dunning
Before printing the dunning, display the List of Spool Requests in Output Controller screen. To do this, type /nsp02 in the command field on the top-left side of the Print Preview screen and click the Enter ![]() button. Make sure the item you want to print is selected by clicking the Spool No. checkbox. Then click the Print
button. Make sure the item you want to print is selected by clicking the Spool No. checkbox. Then click the Print ![]() button. This action generates a print output request.
button. This action generates a print output request.
Accounts Payable—Document Entry
In this exercise, you will be looking at how to process vendor documents (invoices), display and post the entered document, and post credit memos to a vendor account.
Problem: The accounts payable clerks want to know how to enter and post basic invoices.
To enter and post vendor invoices, follow this menu path: Accounting ![]() Financial Accounting
Financial Accounting ![]() Accounts payable
Accounts payable ![]() Document Entry
Document Entry ![]() Invoice. Or use transaction code FB60.
Invoice. Or use transaction code FB60.
The Enter Vendor Invoice: Company Code C900 screen is displayed. Click the ![]() button at the top of the screen. The Enter Company Code dialog box pops up. Enter your company code in the Company Code field (C900) and click the Enter
button at the top of the screen. The Enter Company Code dialog box pops up. Enter your company code in the Company Code field (C900) and click the Enter ![]() button at the bottom of the screen to confirm your entry. Enter your vendor account ID in the Vendor field. You can search for your vendor’s account by using matchcode in the vendor’s field. The Account or Matchcode for the Next Line Item (n) screen pops up. To call up the customer list for a given Company Code, enter your company code in the Company Code field (C900) and click the Enter
button at the bottom of the screen to confirm your entry. Enter your vendor account ID in the Vendor field. You can search for your vendor’s account by using matchcode in the vendor’s field. The Account or Matchcode for the Next Line Item (n) screen pops up. To call up the customer list for a given Company Code, enter your company code in the Company Code field (C900) and click the Enter ![]() button at the bottom of the screen. On the Account or Matchcode for the Next Line Item 2 Entries Found screen, select the vendor you want from the displayed list of vendors and click the Enter
button at the bottom of the screen. On the Account or Matchcode for the Next Line Item 2 Entries Found screen, select the vendor you want from the displayed list of vendors and click the Enter ![]() button on the top-left side of the screen. You can also double-click on the appropriate vendor on the vendor’s list.
button on the top-left side of the screen. You can also double-click on the appropriate vendor on the vendor’s list.
![]() Note The line items on the Account or Matchcode for the Next Line Item n Entries Found screen vary according to the number of vendors you have.
Note The line items on the Account or Matchcode for the Next Line Item n Entries Found screen vary according to the number of vendors you have.
Notice that the vendor account number you selected from the vendor list is displayed in the Vendor field. Update the appropriate fields on the screen, as shown in Figure 17-33.
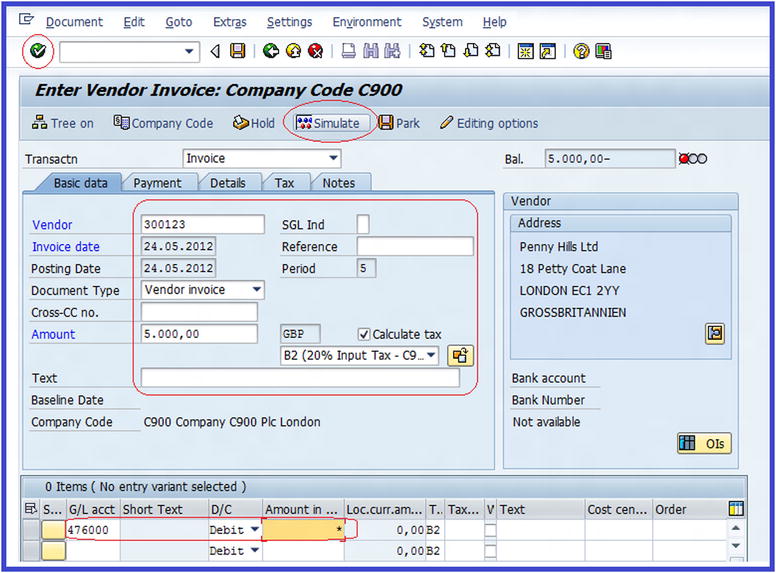
Figure 17-33. The Vendor Invoice Basic screen is where you enter vendor invoice details and the G/L account where the invoice is posted
Click the Enter ![]() button on the top-left side of the screen confirm your entries. To display your entries, click the
button on the top-left side of the screen confirm your entries. To display your entries, click the ![]() button. This Document Overview screen (Figure 17-34) shows your entries.
button. This Document Overview screen (Figure 17-34) shows your entries.
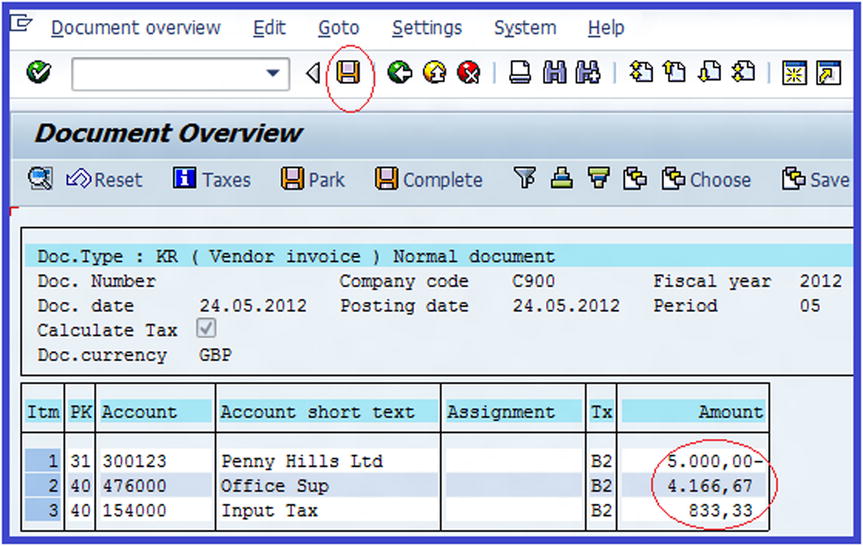
Figure 17-34. The Document Overview screen displays the document entries
Post ![]() your vendor’s invoice.
your vendor’s invoice.
As an exercise on your own, follow the steps in the account receivable in the section entitled “Customer Down Payments” and attempt the following tasks:
- Display a vendor’s account balance by following this menu path: Accounting
 Financial Accounting Accounts payable Account Display Balances. Or use transaction code FK10N.
 - Post a vendor’s down payment request by following this menu path: Accounting Financial Accounting Accounts Payable Document Entry Document Entry Request. Or use transaction code F-47.
- Post a vendor’s down payment by following this menu path: Accounting Financial Accounting Accounts Payable Document Entry Document Entry Down Payment Down Payment. Or use transaction code F-48.
- Clear a vendor’s down payment by following this menu path: Accounting Financial Accounting Accounts Payable Document Entry Document Entry Down Payment Clearing. Or using transaction code F-54.
Manual Outgoing Payment
The Manual Outgoing Payment option allows you to settle vendor invoices and clear open items manually.
Before attempting manual outgoing payment, post an invoice amount of $10,000 to your vendor’s account.
Outgoing Payment
To post an outgoing payment manually, follow this menu path: Accounting ![]() Financial Accounting
Financial Accounting ![]() Account Payable
Account Payable ![]() Document Entry
Document Entry ![]() Outgoing Payment
Outgoing Payment ![]() Post. Or use transaction code F-53.
Post. Or use transaction code F-53.
The Post Outgoing Payments: Header Data screen is displayed (Figure 17-35).
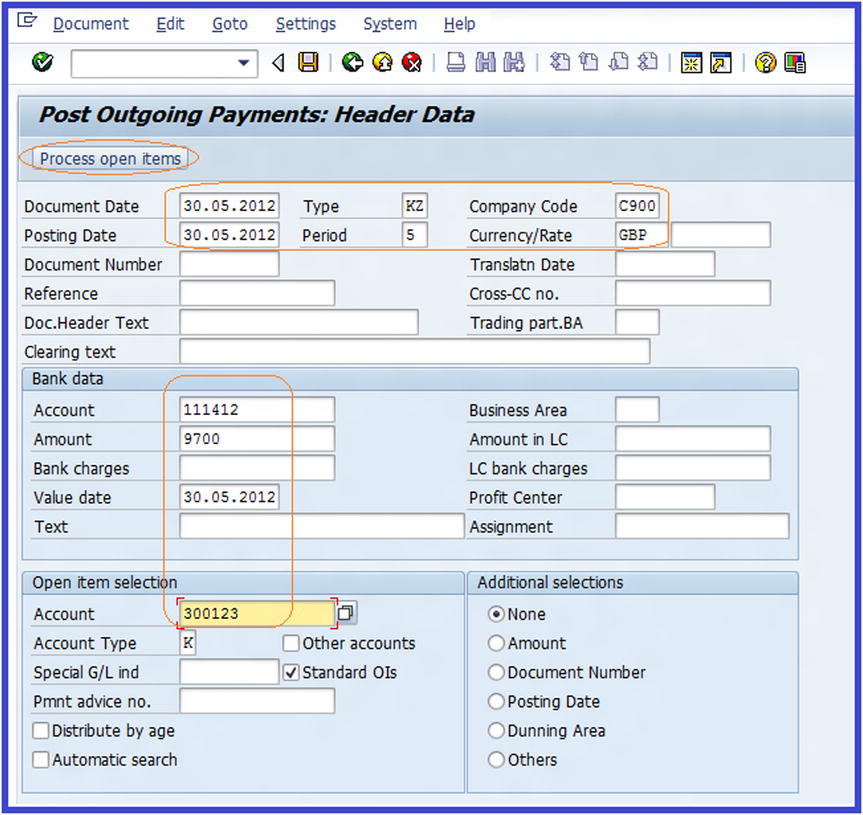
Figure 17-35. The screen where outgoing payments are posted
Update the following fields:
- Document Date: Use today’s date.
- Posting Date: Use today’s date.
- Account: Enter the G/L account for clearing outgoing payments.
- Amount: Enter $9700 (this is the invoice amount of $10,000 you posted in Manual Outgoing Payments earlier, less $300 discount received)
- Value Date: Use today’s date.
- Account (in the Open Item selection): Enter the vendor account that you’re making payment to.
To clear a payment with an open item, click the ![]() button on the top-left side of the screen. The Post Outgoing Payments Process Open Items is displayed.
button on the top-left side of the screen. The Post Outgoing Payments Process Open Items is displayed.
![]() Note Notice that the open items in the Gross Amount column are activated (displayed in blue). Also notice that Cash Discount Amount and Cash Discount Percentage are red. Since you do not want to clear all open items simultaneously, you need to deactivate all activated items and activate only the open item(s) you want to clear.
Note Notice that the open items in the Gross Amount column are activated (displayed in blue). Also notice that Cash Discount Amount and Cash Discount Percentage are red. Since you do not want to clear all open items simultaneously, you need to deactivate all activated items and activate only the open item(s) you want to clear.
Deactivate all activated open items on the screen and only activate the open item you want to process with the payment. You may want to refer back to the section “Posting Standard Incoming Payments” to review how to deactivate and activate open items.
![]() Note Notice that the Amount Entered and Assigned will be $9700 (the document amount of $10000 less $300 cash discount and the outgoing amount of $9700), bringing Not Assigned to a zero balance.
Note Notice that the Amount Entered and Assigned will be $9700 (the document amount of $10000 less $300 cash discount and the outgoing amount of $9700), bringing Not Assigned to a zero balance.
To display the posted outgoing payment overview, click the ![]() button on the menu bar at the top of the screen; a pull-down menu is displayed. Choose
button on the menu bar at the top of the screen; a pull-down menu is displayed. Choose ![]() from the drop-down menu. The Post Outgoing Payments Display Overview screen is displayed (Figure 17-36).
from the drop-down menu. The Post Outgoing Payments Display Overview screen is displayed (Figure 17-36).

Figure 17-36. The Outgoing Payments Display Overview screen.
Check your entries and then click Post ![]() if they meet your requirements.
if they meet your requirements.
Automatic Payments
The automatic payment program is an automated way to process and post huge lists of accounts payables and accounts receivables in a single payment run.
Before proceeding with an automatic payment run, you’ll learn how to create check lots. You need check lots when maintaining the variant for a payment run.
Check Lots
Checks are managed in lots (batches). SAP provides a check-management system that divides bank checks into check lots (batches) by assigning number ranges to represent batches or check lots. To define the check lots that you will use, follow this menu path: IMG: Financial Accounting ![]() Account Receivable & Account Payable
Account Receivable & Account Payable ![]() Business Transaction
Business Transaction ![]() Payments
Payments ![]() Automatic Outgoing Payments
Automatic Outgoing Payments ![]() Payment Media
Payment Media ![]() Check management
Check management ![]() Define Number Ranges for Checks. Or use transaction code FCHI. The Check Lots screen is displayed. Using the information in Table 17-9, update the appropriate fields.
Define Number Ranges for Checks. Or use transaction code FCHI. The Check Lots screen is displayed. Using the information in Table 17-9, update the appropriate fields.
Table 17-9. Updating the Check Lots Screen
|
Field |
Value |
Description |
|---|---|---|
|
Paying Company Code |
C900 |
This is the company code that is making payments. This is the case where centralized payment system is in operation. All invoices from branches are sent to the head office for payment. |
|
House Bank |
Barc1 |
Using the matchcode or the Search button to search for your house bank, enter your house bank’s ID in this field. The system uses a combination of both the house bank code and the account ID to trace check lots to the paying bank. |
|
Account ID |
Barc |
The house bank ID and account ID are used by the payment program to determine which bank to use for invoice payment. |
Click the Enter ![]() button on the top-left side of the screen. Then click the Change
button on the top-left side of the screen. Then click the Change ![]() button on the top-left side of the screen. The Maintain Check Lots screen is displayed. Click the Create
button on the top-left side of the screen. The Maintain Check Lots screen is displayed. Click the Create ![]() button on the top-left side of the screen to create your check lots. The Create Lot screen pops up (Figure 17-37). This screen allows you to specify your check lot and check numbers.
button on the top-left side of the screen to create your check lots. The Create Lot screen pops up (Figure 17-37). This screen allows you to specify your check lot and check numbers.

Figure 17-37. Specifying the check lots and check numbers
Using the data in Table 17-10, specify the lot number and check number information.
Table 17-10. Data to Update the Check Lot Screen
|
Field |
Value |
Description |
|---|---|---|
|
Lot Number |
0001 |
Enter a check lot number in this field. You can enter up to four digits in this field. This number enables you to identify this particular check, which is helpful when you have more than one check lot. |
|
Check Number |
0001 |
Checks are issued systematically in sequence. This is the start number of the check. |
|
To |
1000 |
This is the end number of the check sequence. The system will automatically issue checks for payment in this order. |
|
Additional Information |
||
|
Short info. |
Check lot |
This is a short description of the check lot. |
Click the Enter ![]() button on the bottom-right side of the Create Lot screen to confirm your specifications. The system will then create your check lot (Figure 17-38).
button on the bottom-right side of the Create Lot screen to confirm your specifications. The system will then create your check lot (Figure 17-38).
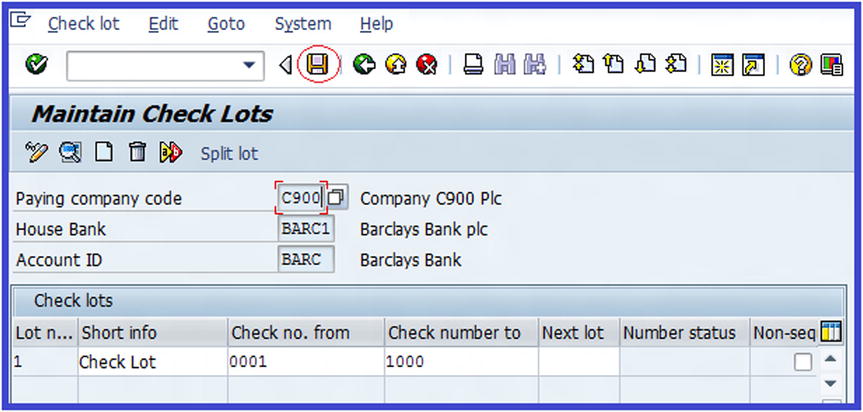
Figure 17-38. The Maintain Check Lots screen
Save ![]() your check lot.
your check lot.
Automatic Payment Program
The Automatic Outgoing Payments option is a payment management tool that allows you to pay multiple open invoices, post payment documents, and print payment media using EDI (Electronic Data Interchange) or DME (Date Medium Exchange).
Configuring the automatic outgoing settings takes four major steps:
- Maintain parameters (enter your parameters).
- Start proposal run (create and edit payment proposal).
- Start payment run.
- Schedule print.
To go to the automatic payment transaction screen, follow this menu path: Accounting ![]() Financial Accounting
Financial Accounting ![]() Banks
Banks ![]() Outgoings
Outgoings ![]() Automatic Payments
Automatic Payments ![]() Open Items (Customer and Vendor). Or use transaction code F110. The Automatic Payment Transactions: Status screen is displayed (Figure 17-39).
Open Items (Customer and Vendor). Or use transaction code F110. The Automatic Payment Transactions: Status screen is displayed (Figure 17-39).

Figure 17-39. Specifying the automatic payment transaction’s run date
Update the following fields:
- Run Date: Enter today’s date, plus 10 days. This is the date on which you want the system to run the payment program. This date can be changed depending on what you want to achieve. For example, if today’s date is May 21, 2012, your run date will be May 31, 2012.
- Identification: Enter C900 as your payment run identification in this field. You can use up to a five-digit identifier. This will enable you to identify your payment run if you have more than one payment run with the same run date.
![]() Note Notice that the system displays the status of the automatic payment as “No Parameters Entered As Yet” in the Status section of the screen in Figure 17-39.
Note Notice that the system displays the status of the automatic payment as “No Parameters Entered As Yet” in the Status section of the screen in Figure 17-39.
Click the ![]() tab at the top of the screen to go to the Automatic Payment Transactions: Parameters screen to specify the payment parameters of the automatic payment run (Figure 17-40).
tab at the top of the screen to go to the Automatic Payment Transactions: Parameters screen to specify the payment parameters of the automatic payment run (Figure 17-40).
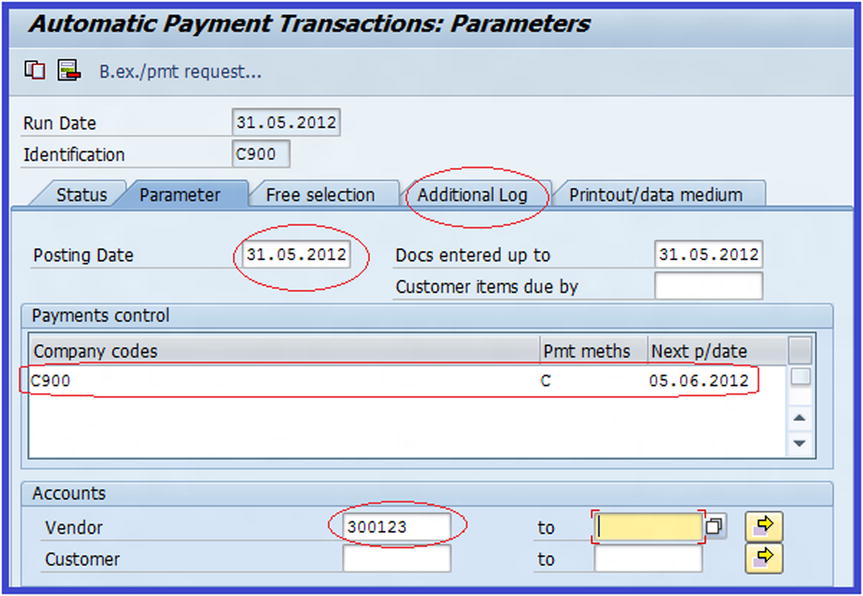
Figure 17-40. Specifying the automatic payment parameters
Update the following fields:
- Posting Date: This is set to today’s date by default. We recommend that you use today’s date.
- Docs Entered Up To: Defaults to today’s date.
- Company Codes: You determine the company code you are using for your automatic payment run. Enter your company code (C900) in this field.
- Payment Methods: Enter the payment you want to use for your payment run. For example, C- Check, T-Bank Transfer, and so on. You can access the payment methods supplied by SAP using the matchcode next to the payment methods fields. In this exercise, we making payment by check, so enter C (check) in this field for your payment method.
- Next Payment Date: Enter today’s date plus 30 days. This means the next payment run will be 30 days from today’s date. The importance of the next payment date is that it enables the system to decide whether to make payment using a cash discount or to make payment based on the net amount.
- Vendor: Enter your vendor account number (300123) in this field. You can specify the vendor’s range (from/to) for which you want to trigger the payment program.
Click the ![]() tab at the top of the screen to go to the Automatic Payment Transactions: Additional Log screen to specify the required logging type and additional account required for your payment proposal (Figure 17-41).
tab at the top of the screen to go to the Automatic Payment Transactions: Additional Log screen to specify the required logging type and additional account required for your payment proposal (Figure 17-41).
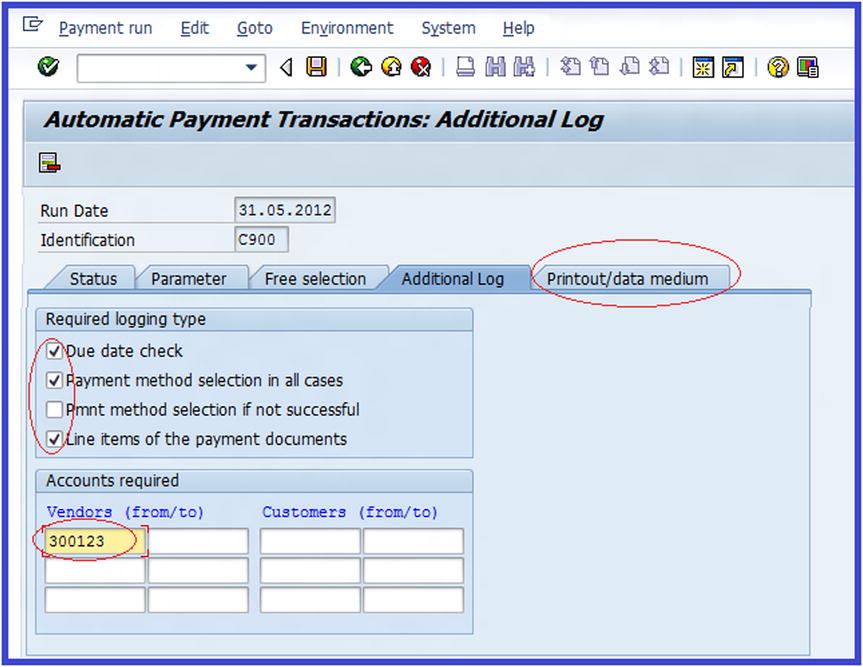
Figure 17-41. The screen for additional specifications for your payment proposal
When creating the payment proposal, select the following items in the Required Logging Type section of the screen:
- Due date check
- Payment method selection in all cases
- Line items of the payment documents
Enter the vendor’s account number(s) that you want to include in the Accounts Required section.
Click Enter ![]() and then save
and then save ![]() your payment program.
your payment program.
Next, click the ![]() tab to go to the Automatic Payment Transactions: Printout/DME screen to specify the variant for the print program. The print variant allows you to store the properties of frequently used datasets and call them up easily.
tab to go to the Automatic Payment Transactions: Printout/DME screen to specify the variant for the print program. The print variant allows you to store the properties of frequently used datasets and call them up easily.
![]() Note Once your payments have been posted, you need to print the payment media. Since different payment methods were specified in your payment program, the print program will need print variants for the payment media and a payment advice note.
Note Once your payments have been posted, you need to print the payment media. Since different payment methods were specified in your payment program, the print program will need print variants for the payment media and a payment advice note.
The Automatic Payment Transactions: Printout and DME screen is displayed. Using the data in Table 17-11, update the appropriate fields.
Table 17-11. The Data to Use to Specify the Variant for the Print Program
|
Report |
Variant |
Description |
|---|---|---|
|
RFFOAVIS |
Leave blank | |
|
RFFOEDI1 |
Leave blank | |
|
RFFOUS_C |
C900 |
Enter a variant name. You can enter up to 14 characters in this field. This does not necessarily have to be your company code. We used our company code for easy identification of our variant. |
Click the ![]() button on the top-left side of the screen. The Variants: Change Screen Assignment dialog box pops up. This is the screen where variants are maintained for the print program. You have two options to choose from:
button on the top-left side of the screen. The Variants: Change Screen Assignment dialog box pops up. This is the screen where variants are maintained for the print program. You have two options to choose from:
- For All Selection Screens
- For Indiv.Selection Screens
Click the All Selection Screens button and then click the ![]() button on the bottom-right side of the screen to confirm your selection. The Maintain Variant: Report RFFOUS_C, Variant C900 screen is displayed (Figure 17-42).
button on the bottom-right side of the screen to confirm your selection. The Maintain Variant: Report RFFOUS_C, Variant C900 screen is displayed (Figure 17-42).
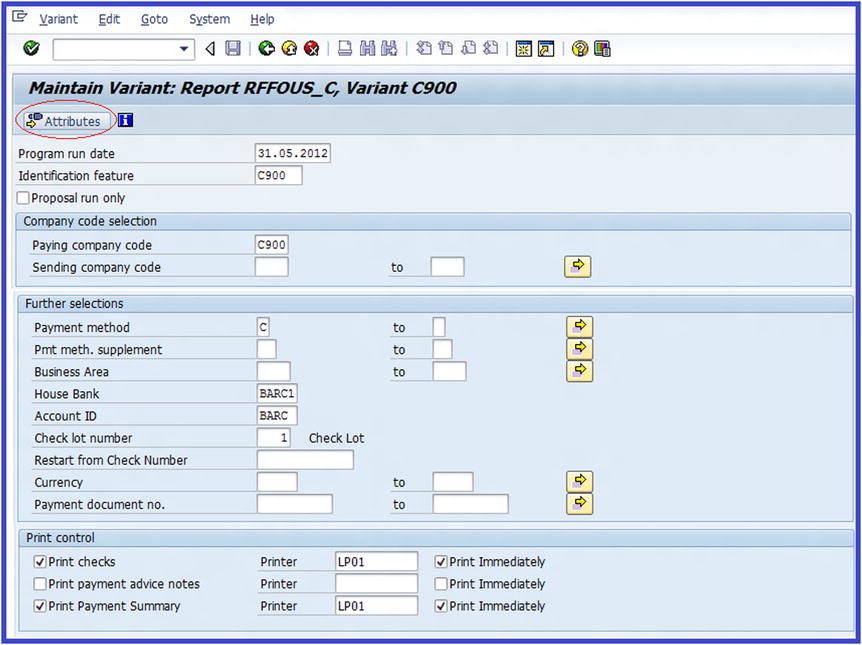
Figure 17-42. The screen where Print Variant is updated
Update the following fields:
- Program run date: Enter Today’s date plus 10 days. This defaults to today’s date.
- Identification feature: Enter a four digit (C900) code as your identification feature in this field. You can use up to a five digits of your choice. Using your company code will enable you to identify your print media variant if you have more than one variant in the system.
- Paying company code: Enter the paying company code (C900). This is the company that makes payments. You should determine the company code you want to use as a paying company code.
- Payment method: Enter the payment method you want to use for your variant. For example, C for check payments.
- House Bank: Enter up to five digits as your house bank identifier (Barc 1) in this field. This is the bank that will make the payments.
- Account ID: Enter up to five digits as your account ID (Barc). The house bank ID and account ID used by the payment program determine the banks to use during invoice payment.
- Check lot number: Enter the check lot number (1) you defined in the Check Lot section. Using the matchcode or search function, specify the check lot you want to use for the print media variant.
- Print checks: When selected, this checkbox indicator allows you to print checks in the payment program.
- Print Payment Summary: This specification allows you to print payment summaries in the payment program.
- Printer: Enter the printer you want to use for printing. For example, LP01 (local Printer 01).
- Print Immediately: This specification allows your printing job to be sent to print spooling and print when the printer is available.
Click the ![]() button on the top-left side of the screen. The Variant Attributes screen is displayed. Update the Meaning field by entering a description of your variant attribute. In this exercise, we used Payment Run C900.
button on the top-left side of the screen. The Variant Attributes screen is displayed. Update the Meaning field by entering a description of your variant attribute. In this exercise, we used Payment Run C900.
Save ![]() your variant.
your variant.
Click the Back ![]() button to return to the previous screen (the Automatic Payment Transactions: status screen).
button to return to the previous screen (the Automatic Payment Transactions: status screen).
Click the Status ![]() tab at the top of the screen to go to the Status screen. You can see the status of your payment program so far.
tab at the top of the screen to go to the Status screen. You can see the status of your payment program so far.
When you click the Status tab, the system will prompt you to save your payment proposal. Confirm the save by clicking the ![]() button. On the Automatic Payment Transactions screen, the system will notify that “Parameters have been entered”.
button. On the Automatic Payment Transactions screen, the system will notify that “Parameters have been entered”.
Payment Proposals
The Payment Proposal option allows you to execute a test run of your payment before performing an actual payment run. Because of the sensitive nature of payment program, a test run will give you the opportunity to see which items you have included in your payment proposal and which items are blocked for payment.
Using the Edit ![]() Proposal menu path on the menu bar at the top of the screen, you can carry out the following tasks:
Proposal menu path on the menu bar at the top of the screen, you can carry out the following tasks:
- Display proposals
- Edit or delete proposals
- Generate a proposal list
- Display an exceptional list
From the proposal list, you can block and unblock items planned for payment.
On the Automatic Payment Transactions: Status screen (Figure 17-43), the system status turns green and displays, “Parameters have been entered”. Click the ![]() button on the top-left side of the screen to schedule a payment proposal.
button on the top-left side of the screen to schedule a payment proposal.
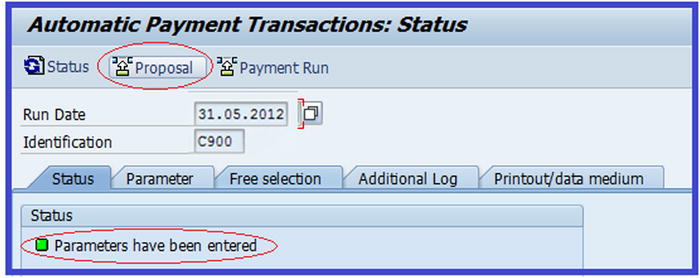
Figure 17-43. The Automatic Payment Transactions Status screen shows that the parameters have been entered
The Schedule Proposal dialog box pops up. Update the following fields:
- Start Date: Today’s date is the default. We recommend that you use today’s date to schedule a proposal for your payment run.
- Start Immediately: If you want your schedule proposal to start immediately, make sure that this checkbox is clicked. If this checkbox is not clicked, you must specify a start time in the Start Time field.
Click the Enter ![]() button on the bottom-right side of the screen. The system status displays “Proposal is ready to be started” under “Parameter have been entered”. Click the
button on the bottom-right side of the screen. The system status displays “Proposal is ready to be started” under “Parameter have been entered”. Click the ![]() button on the top-left side of the screen to see the status of your payment proposal. The system status displays “Proposal is running”. Click the
button on the top-left side of the screen to see the status of your payment proposal. The system status displays “Proposal is running”. Click the ![]() button again to create your payment proposal. The display on the status screen will turn green and state that “Payment proposal has been created”.
button again to create your payment proposal. The display on the status screen will turn green and state that “Payment proposal has been created”.
Payment Runs
When you execute a payment run, the system will read your payment and perform the following functions:
- Clear selected items for payment
- Clear open items in accounts payable
- Reduce payables against appropriate G/L accounts
- Post payments to bank sub-accounts as per transfers and checks
To execute a payment run, click the ![]() button. The Schedule Payment dialog box pops up. Update the following fields:
button. The Schedule Payment dialog box pops up. Update the following fields:
- Start Date: This defaults to today’s date.
- Start Immediately: For your schedule payment to start immediately, make sure that this checkbox is clicked. If this checkbox is blank, you must specify a start time in the Start Time field.
Click the Enter ![]() button on the bottom-right side of the screen. The system status displays “Payment Run is ready to be started”. Click the
button on the bottom-right side of the screen. The system status displays “Payment Run is ready to be started”. Click the ![]() button to run your payment. The status turns green and states that (Figure 17-44):
button to run your payment. The status turns green and states that (Figure 17-44):
- Payment run has been carried out
- Posting orders: 1 generated, 1 completed

Figure 17-44. The automatic payment transactions have been posted, generated, and completed
Display Payment Proposals
The Display Payment Proposal option allows you edit and block/unblock payment proposals. To display a payment proposal, click the ![]() button. The Display Payment Proposal: Payments screen is displayed with your payment proposal. The indicator for payments/exceptions turns green (Figure 17-45).
button. The Display Payment Proposal: Payments screen is displayed with your payment proposal. The indicator for payments/exceptions turns green (Figure 17-45).
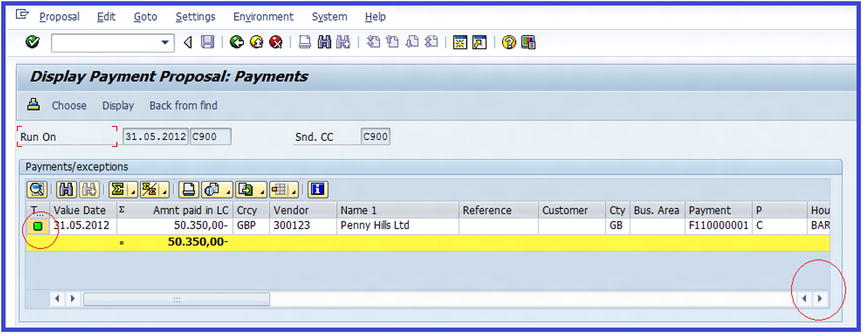
Figure 17-45. The Payment Proposal display screen
![]() Tip You can scroll to the right to see more details.
Tip You can scroll to the right to see more details.
Click the Back ![]() button to return to the previous screen (Automatic Payment Transaction: Status).
button to return to the previous screen (Automatic Payment Transaction: Status).
To display the proposal log click the ![]() button. Here the system will display any errors that occurred during your payment run.
button. Here the system will display any errors that occurred during your payment run.
Click the Back ![]() button to return to the Automatic Payment Transaction: Status screen.
button to return to the Automatic Payment Transaction: Status screen.
To display the payment list, use this menu path: Edit ![]() Payment
Payment ![]() Payment List. The List Variant dialog box pops up. The Program field’s value RFZALI20 is set by default by the system. You don’t need to do anything here. Click the Enter
Payment List. The List Variant dialog box pops up. The Program field’s value RFZALI20 is set by default by the system. You don’t need to do anything here. Click the Enter ![]() button on the bottom-right side of the screen to display the Payment List screen, which contains all payments included in your automatic payment program.
button on the bottom-right side of the screen to display the Payment List screen, which contains all payments included in your automatic payment program.
To send your payment transaction to a print spool, click the Back ![]() button to return to the Automatic Payment Transaction: Status screen. Click the
button to return to the Automatic Payment Transaction: Status screen. Click the ![]() button. The Schedule Print dialog box pops up (Figure 17-46). Make sure that the Start Immediately checkbox is clicked.
button. The Schedule Print dialog box pops up (Figure 17-46). Make sure that the Start Immediately checkbox is clicked.
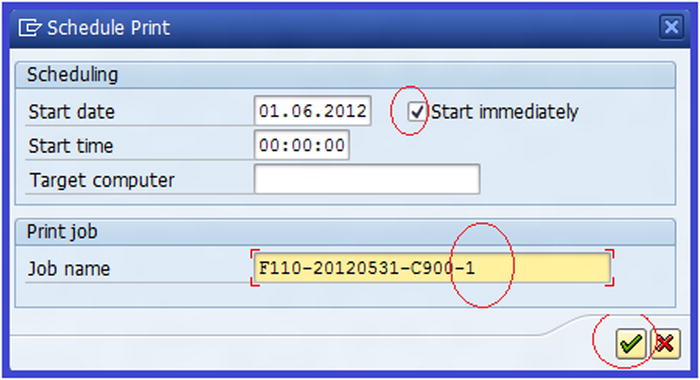
Figure 17-46. Specifying the print job to start immediately
Replace the ‘?’ in the Job Name field with a letter or number of your choice. There is no strict rule on what you can replace it with. The number 1 we use is for illustration purposes. Click the Enter button ![]() . The system will display the message
. The system will display the message ![]() on the status bar at the bottom of the screen.
on the status bar at the bottom of the screen.
Display Spool Request
To display a spool request, use this menu path: System ![]() Service
Service ![]() Output Control, found on the menu bar at the top of the screen. The Output Controller: List of Spool Requests screen is displayed (Figure 17-47).
Output Control, found on the menu bar at the top of the screen. The Output Controller: List of Spool Requests screen is displayed (Figure 17-47).

Figure 17-47. The List of Spool Requests screen
Click the Execute ![]() button. The Output Controller: List of Spool Requests screen is displayed with list of spool requests. Use date and title to identify the item you want to display from the spool list. Select the Spool No. of the item or item(s) you want to include in your print preview. Click the Display Content
button. The Output Controller: List of Spool Requests screen is displayed with list of spool requests. Use date and title to identify the item you want to display from the spool list. Select the Spool No. of the item or item(s) you want to include in your print preview. Click the Display Content ![]() button at the top of the screen. The sample of check printout will be displayed (Figure 17-48).
button at the top of the screen. The sample of check printout will be displayed (Figure 17-48).

Figure 17-48. The Check Payment Advice Note Sample Printout - Print Preview screen
To see the actual print preview, click the Next Page ![]() button on the top-right side of the screen to display the Payment Advice note. When you click the Next Page
button on the top-right side of the screen to display the Payment Advice note. When you click the Next Page ![]() button again a few times, you can see all the payment documents, including the check payment summary.
button again a few times, you can see all the payment documents, including the check payment summary.
To print, click the Back ![]() button to return to the Output Controller: List of Spool Requests screen. Click the Print
button to return to the Output Controller: List of Spool Requests screen. Click the Print ![]() button on the top-left side of the screen; the system will send your check to the printer.
button on the top-left side of the screen; the system will send your check to the printer.
The system will then notify you that ![]() .
.
Use the Cash Journal
The Cash Journal allows you to post small cash documents instead of using the normal accounts payable and receivable transaction postings. The Cash Journal allows you to post the following cash transactions:
- Cash payments (for cash purchases)
- Cash receipts (for cash sales)
- Check receipts
To post transactions in the Cash Journal, follow this menu path: Accounting ![]() Financial Accounting
Financial Accounting ![]() Banks
Banks ![]() Incomings
Incomings ![]() Cash Journal. Or use transaction code FBCJ.
Cash Journal. Or use transaction code FBCJ.
The Cash Journal 0001 Company Code C900 screen is displayed. Click the Change Cash Journal ![]() button (located somewhere in the middle of the screen) to specify the Company Code and/or the Cash Journal you want to use for your Cash Journal transaction. The Cash Journal dialog box pops up. Update the following fields:
button (located somewhere in the middle of the screen) to specify the Company Code and/or the Cash Journal you want to use for your Cash Journal transaction. The Cash Journal dialog box pops up. Update the following fields:
- Company Code: Enter your company code (C900) in this field. This is the company code that you want to use for your Cash Journal transaction.
- Cash Journal: Enter the Cash Journal number (0001) in this field. This is the Cash Journal you want to use for posting the Cash Journal transactions.
- Click the Continue
 button in the middle of the screen. The screen name will change to reflect the Cash Journal and company code you specified, such as Cash Journal 0001 Company Code C900.
Cash Receipts
Cash receipts are small cash amounts generated from miscellaneous sales, cash withdrawals, or other miscellaneous cash incomes during a fiscal year period and that are retained as petty cash to mitigate small amounts of cash purchases.
Problem: As a SAP FI consultant, you have been asked to teach the accounting clerks how to process petty cash transactions in the Cash Journal. Your task is to post a Cash Journal transaction amount of $2000.
Click the ![]() tab in the middle of the screen to go to the part of the Cash Journal screen where cash receipts transactions are posted (Figure 17-49).
tab in the middle of the screen to go to the part of the Cash Journal screen where cash receipts transactions are posted (Figure 17-49).
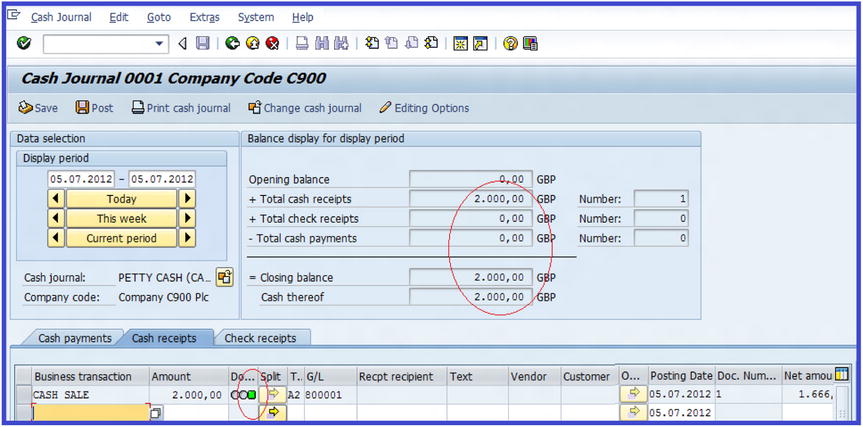
Figure 17-49. Document status in the Cash Journal
Update the following fields:
- Business Transaction: Specify CASH SALES in this field. This is the nature of the business transaction you want to conduct.
- Amount: Enter the cash document amount ($2000) in this field.
- Tax: Specify the tax code for the output sale (A2) you want to apply to your cash receipt for calculating tax amount.
The system will automatically default to the G/L account 8000001 to post cash sales, based on the specification you made when you customized the Cash Journal.
Click the Enter ![]() button on the top-left side of the screen. Notice that the Document Status option has turned red. Click the
button on the top-left side of the screen. Notice that the Document Status option has turned red. Click the ![]() button at the top of the screen to post your cash receipt transaction. After posting, the Document Status will turn green and the total cash receipts will be credited with the amount posted.
button at the top of the screen to post your cash receipt transaction. After posting, the Document Status will turn green and the total cash receipts will be credited with the amount posted.
Cash Payments
Like the cash receipts, these are small cash payments made toward miscellaneous office purchases.
Problem: A petty cash purchase of $1500 was made. You are told to make this Cash Journal posting by splitting the expenses as follows: printing paper at $1000 and pens at $500.
Click the ![]() tab in the Cash Journal 0001 Company Code C900 screen and update the following fields:
tab in the Cash Journal 0001 Company Code C900 screen and update the following fields:
- Business Transaction: Specify CASH PURCHASE in this field. This is the nature of the business transaction you want to conduct in your Cash Journal.
- Amount: Enter the document amount ($1000) that you want to process in your Cash Journal transaction.
- Text for Item: Enter a short description of your transaction. For example, printing paper.
The next step is to split the document amount. Click the Split ![]() button next to the 0.
button next to the 0.
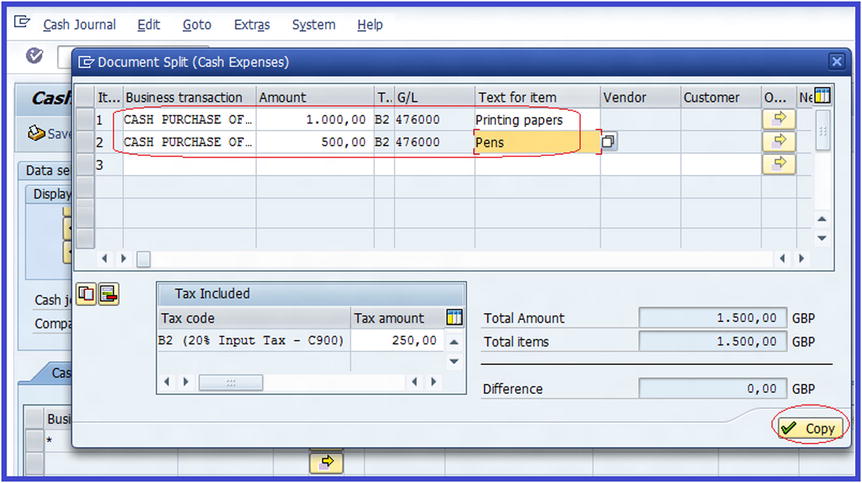
Figure 17-50. How to split a document amount in the Cash Journal
Notice that the cash amount of $1000 is copied into Row 1. Since you want to split $1500 between two Cash Journal items, update Row 2 with the following information:
- Business Transactions: Specify the Cash Journal transaction CASH PURCHASE in this field.
- Amount: Enter the amount of $500 for pens.
- Text for Item: Enter the description of the transaction item (pens).
Click the ![]() button on the bottom-right side of the screen. The Cash Document Split (Cash Expenses) screen disappears. On the Cash Journal 0001 Company Code C900 screen, notice that the Business Transaction field will have an * sign because this Cash Journal transaction has split documents. Click the Enter
button on the bottom-right side of the screen. The Cash Document Split (Cash Expenses) screen disappears. On the Cash Journal 0001 Company Code C900 screen, notice that the Business Transaction field will have an * sign because this Cash Journal transaction has split documents. Click the Enter ![]() button on the top-left side of the screen. The Document Status field will turn red because the Cash Journal document has not been posted. Click the
button on the top-left side of the screen. The Document Status field will turn red because the Cash Journal document has not been posted. Click the ![]() button to post your transaction. After posting, the Document Status field turns green and the total cash receipts are credited with the amount posted.
button to post your transaction. After posting, the Document Status field turns green and the total cash receipts are credited with the amount posted.
![]() Note The Balance Display for Display Period section displays the total receipt and cash payments balances, as well as the total Cash Journal balance.
Note The Balance Display for Display Period section displays the total receipt and cash payments balances, as well as the total Cash Journal balance.
Summary
This chapter showed you how to create customer and vendor master records and how to enter customer invoices using hypothetical scenarios. You also learned how to post credit memos in order to reduce an original invoice amount. After this, you learned what holding and parking documents do. You then learned how to post various incoming payments, including posting income payments in the standard way, posting partial payments, and posting residual items.
You also learned how to post customer down payments—this included posting down payment requests, down payments received, and clearing down payment requests with a down payment. You next looked at how to display account balances and line items. You learned how to generate and print correspondence, as well as how to execute dunning runs.
You learned how to post a vendor’s invoice and then went on to perform manual outgoing payment. Afterward, you learned how to carry out the specifications for automatic payment. You learned how to define check lots for automatic payments, set up automatic payments, start proposal runs, start payment runs, and schedule print runs. You then learned about payment proposals. Finally, you looked at the Cash Journal and learned how to post cash receipts and cash payment transactions.
In Chapter 18, you will learn how to define a controlling area, create cost elements, define cost center accounting, maintain statistical key figures, and define a profit center.