
![]()
Customizing the Controlling Module
In this chapter, you learn how to customize the Controlling module in SAP ERP and learn how to define the cost elements, cost center, and profit center.
At the end of this chapter, you will be able to:
- Explain what controlling is
- Maintain a controlling area
- Maintain version approaches/transfer prices
- Explain what cost element accounting is
- Make default settings for automatic creation of primary and secondary cost elements
- Perform cost center accounting
- Define cost centers’ standard hierarchy
- Define statistical key figures
- Configure the basic settings of a profit center
- Maintain the controlling area settings
- Create a dummy profit center
- Assign profit centers to cost centers
- Post controlling documents
- Produce a profit center: interactive reporting
- Define distribution
The Controlling Module
The Controlling module is designed to enable organizations to collate, manipulate, and coordinate huge financial data accumulated from business operations into concise and meaningful management reports. These reports provide management with timely and adequate information beyond that of basic financial reports to aid management in making vital decisions on running the organizations relating to cost and profitability.
Management needs to present and past performance, and predicts future performance. This is where SAP controlling plays an important role. It provides the platform to maintain be able to make operational and strategic decisions that will make the business profitable. In order to do this, they need a tool that measures cost and profit, measures management accounting to meet management’s reporting needs, and it facilitates management decision-making and optimization of the entire organizational process.
General Controlling
The settings carried out at the General Controlling level are fundamental, because they hold general information relevant to the entire Controlling (CO) module.
Organizational Controlling
The following controlling settings are carried out in the organizational structure:
- Maintain controlling area
- Maintain number ranges for controlling documents
- Maintain versions
Problem: As a SAP functional consultant, your task is to maintain the controlling area, define number ranges for controlling documents, and maintain the appropriate versions for the controlling area for Company C900.
Maintain Controlling Area
The controlling area is an internal system within an organization specifically used for cost accounting purposes. It is the internal structure that allows management to plan activities, carry out activities’ allocation, and monitor costs.
To maintain the controlling area, follow this menu path: IMG: Controlling ![]() General Controlling
General Controlling ![]() Organization
Organization ![]() Maintain Controlling Area. Or use transaction code OKKP.
Maintain Controlling Area. Or use transaction code OKKP.
The Choose Activity screen pops up with three options to choose from:
- Copy, delete, and check controlling area
- Maintain controlling area
- Delete controlling area
Select Maintain Controlling Area from the list of activities by clicking on it. Click the ![]() button at the top of the screen. The Change View “Basic Data”: Overview screen appears. Click the
button at the top of the screen. The Change View “Basic Data”: Overview screen appears. Click the ![]() button on the top-left side of the screen to go to the New Entries: Details of Added Entries input screen (Figure 18-1).
button on the top-left side of the screen to go to the New Entries: Details of Added Entries input screen (Figure 18-1).
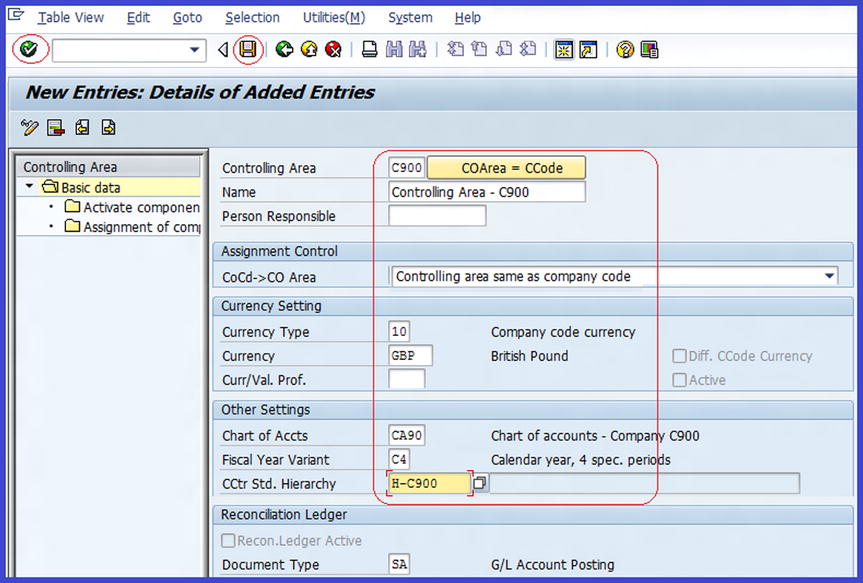
Figure 18-1. The screen where the basic settings for a controlling area are maintained
- Controlling Area: Enter controlling area C900. This can be up to four digits. We recommend that you use your company code as your controlling area. This makes it easier to remember, especially if you have more than one controlling area.
- Name: Enter a short description for your controlling area. For example, “Controlling Area C900”.
- Person Responsible: If your organization has a designated person responsible for that controlling area, enter their name. This field is optional.
- CoCd -> CO Area: Choose from two options: Controlling Area Same as Company Code (if you select this option, the company code assignment to the controlling area must be uniform with processes defined for your company code in logistics and FI) or Cross Company Code-Costing Accounting (this option allows all cost accounting to be conducted in several company codes in one controlling area). Click the drop-down arrow next to the field to display the options. For this exercise, select Controlling Area Same as Company Code.
- Currency Type: Enter the currency type that you want to use for your controlling area; we use 10 in this example. SAP comes with standard currency types (10-Company Code Currency, 20-Controlling Area Currency, 30-Group Currency, 40-Hard Currency, 50-Index-Based Currency, and 60-Global Company Currency).
- Currency: Specify the country currency key (GBP is used here) that you want to use for your controlling area.
- Chart of Accts: Enter the company code’s chart of accounts you want to use for the controlling area. CA90 is used here.
- Fiscal Year Variant: Enter the fiscal year variant (C4). This is the same fiscal year variant you used in your company code.
- CCtr Std. Hierarchy: Enter a meaningful identifier key for your cost center standard hierarchy. The cost center standard hierarchy you enter here will define the tree structure of the cost centers belonging to your controlling area. In this exercise, we used H-C900 as the cost center standard hierarchy.
- Document Type: Enter the document type (SA) for G/L account posting. This will represent the document type for your controlling area. This document type can be accessed using the matchcode next to the document type field.
![]() Note Only company codes with the same chart of account in the controlling area can use the same controlling area.
Note Only company codes with the same chart of account in the controlling area can use the same controlling area.
Click the Enter ![]() button on the top-left side of the screen to confirm your entries. The Check Standard Hierarchy dialog box comes up asking if you want the system to create a standard hierarchy for the standard hierarchy identifier key (H-C900).
button on the top-left side of the screen to confirm your entries. The Check Standard Hierarchy dialog box comes up asking if you want the system to create a standard hierarchy for the standard hierarchy identifier key (H-C900).
Click the ![]() button at the bottom of the screen to confirm that you want the system to create a standard hierarchy for your standard hierarchy key (H-C900).
button at the bottom of the screen to confirm that you want the system to create a standard hierarchy for your standard hierarchy key (H-C900).
The second step is to assign the company code(s) to the controlling area.
To create the standard hierarchy for your cost centers, double-click the ![]() folder in the Controlling area of the left pane of the New Entries screen. The Check Standard Hierarchy dialog box pops up again stating that, “Standard hierarchy does not exist, should the system create it?”. Click the
folder in the Controlling area of the left pane of the New Entries screen. The Check Standard Hierarchy dialog box pops up again stating that, “Standard hierarchy does not exist, should the system create it?”. Click the ![]() button to confirm that you want the system to create the hierarchy. The Change View “Assignment of Company Code(s)”: Overview screen appears. This screen allows you to assign your company code to the controlling area you defined earlier. Click the
button to confirm that you want the system to create the hierarchy. The Change View “Assignment of Company Code(s)”: Overview screen appears. This screen allows you to assign your company code to the controlling area you defined earlier. Click the ![]() button on the top-left side of the screen. The New Entries: Details of Added Entries screen is displayed. Enter your company code (C900) in the CoCd (Company Code) field. Click the Enter
button on the top-left side of the screen. The New Entries: Details of Added Entries screen is displayed. Enter your company code (C900) in the CoCd (Company Code) field. Click the Enter ![]() button on the top-left side of the screen and then save
button on the top-left side of the screen and then save ![]() .
.
The third and last step is to assign components and control indicators.
To assign controlling components and control indicators to your controlling area, double-click the ![]() folder in the Controlling area on the left pane of the screen. The New Entries: Details of Added Entries screen is displayed (Figure 18-2).
folder in the Controlling area on the left pane of the screen. The New Entries: Details of Added Entries screen is displayed (Figure 18-2).
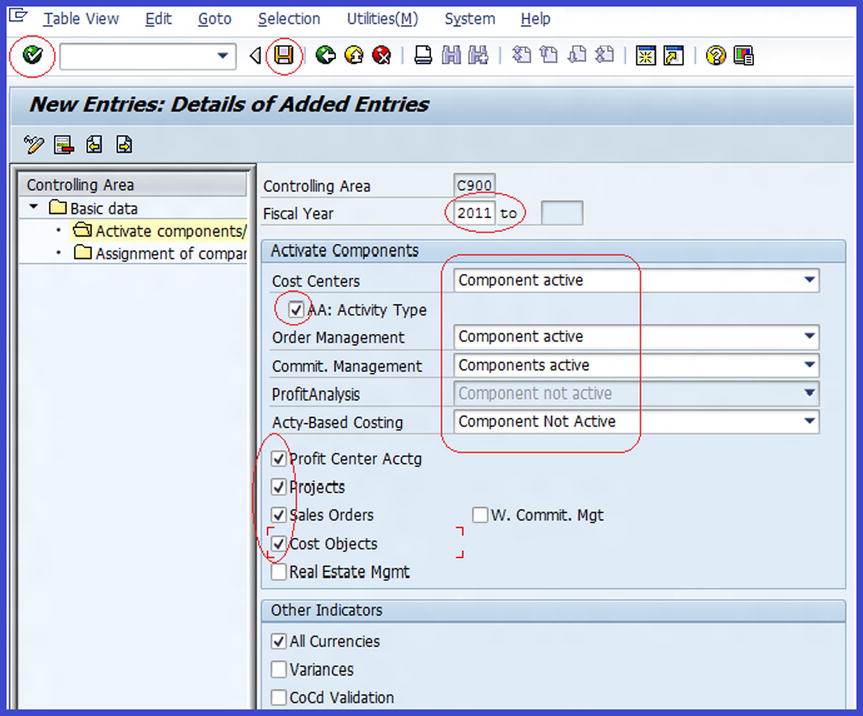
Figure 18-2. Activating components for the controlling area
Update the following fields:
- Fiscal Year: This is your company code accounting year. The fiscal year you assigned to your controlling area must have the same number of posting periods as the fiscal year in the FI (Financial Accounting) components for your company code.
![]() Tip Make sure your fiscal year range specification is earlier than the current fiscal year. For example, if your current fiscal year is 2013, use 2011 as the starting fiscal year. By default, the system uses 9999 as the ending fiscal year.
Tip Make sure your fiscal year range specification is earlier than the current fiscal year. For example, if your current fiscal year is 2013, use 2011 as the starting fiscal year. By default, the system uses 9999 as the ending fiscal year.
To include important controlling components with your controlling area, you must assign the following items:
- Cost Centers: Set this field to Component Active. The cost center will remain inactive until set to active.
- Order Management: Set this to Component Active. Order management becomes active when activated.
- Commit. Management: Set this to Component Active.
- AA. Activity Based Costing: If this indicator is set, primary costs can be assigned directly to activity type of a cost center.
- Projects: Set to indicator.
- Sales Orders: Set to indicator.
- Cost Objects: Set to indicator.
- All Currencies: Set to indicator.
Save ![]() your efforts. The Information dialog box pops up stating, “Critical transport: Control Indicator in Controlling Area. Ignore this warning. Click the Enter
your efforts. The Information dialog box pops up stating, “Critical transport: Control Indicator in Controlling Area. Ignore this warning. Click the Enter ![]() button to confirm.
button to confirm.
![]() Note The warning “Critical transport: Control indicator in Controlling Area” means that you want to transport some important controlling indicators in the controlling area, which could result in data inconsistencies in the target system for two reasons:
Note The warning “Critical transport: Control indicator in Controlling Area” means that you want to transport some important controlling indicators in the controlling area, which could result in data inconsistencies in the target system for two reasons:
If the indicator has been changed in the target system.
If you make an account assignment to cost objects in the target system.
Maintain Number Ranges for Controlling Documents
In this exercise, you will copy an existing controlling area’s number ranges and adapt them to your controlling area number ranges. The general principle is that when a document is posted in the controlling area, the system automatically generates a unique document number from the number ranges and assigns it to the document. A number range is unique to a document and cannot be reused when posting another transaction. Every document posted in a controlling area must be assigned to a number range group. For more details on document number ranges, refer back to Chapter 3 (in the section “Defining Number Ranges”).
Problem: As a functional consultant, your task is to maintain number ranges for controlling documents. Your colleagues told you that it is easier to copy an existing number range in the system rather than create your own. Your task is to copy the standard number range from company code 1000 and adjust it to meet your requirements.
To copy predefined number ranges, follow this menu path: IMG: Controlling ![]() General Controlling
General Controlling ![]() Organization
Organization ![]() Maintain Number Ranges for Controlling Documents. Or use transaction code KANK. In the CO Area field on the Number Ranges for CO Document screen, enter the controlling area code 1000 you want to copy and then click the
Maintain Number Ranges for Controlling Documents. Or use transaction code KANK. In the CO Area field on the Number Ranges for CO Document screen, enter the controlling area code 1000 you want to copy and then click the ![]() Copy button in the middle of the screen. The Copy: CO Area dialog box pops up. The system will use the controlling area 1000 that you want to copy the number ranges in the From field. Enter your controlling area (C900) in the To field. The Transport Number Range Intervals screen pops up with messages. Ignore the messages and click the Enter
Copy button in the middle of the screen. The Copy: CO Area dialog box pops up. The system will use the controlling area 1000 that you want to copy the number ranges in the From field. Enter your controlling area (C900) in the To field. The Transport Number Range Intervals screen pops up with messages. Ignore the messages and click the Enter ![]() button to confirm that the number ranges should be copied from the source to the target company.
button to confirm that the number ranges should be copied from the source to the target company.
![]() Note The system will notify you that
Note The system will notify you that ![]() on the status bar at the bottom of the screen.
on the status bar at the bottom of the screen.
Maintain Versions
Versions allow you to maintain the settings for planned and actual data for independent data groupings. In the basic version configuration, you must have one actual version for posting actual data. The planned version is optional. The planned/actual version is represented by “0”. This is an operative version that can be used in planned/actual comparison and variance analysis between planned/actual activities. Planned data is used to calculate planned prices for activity types and to determine the rates for settling activities containing actual figures.
To maintain versions, follow this menu path: IMG: Controlling ![]() General Controlling
General Controlling ![]() Organization
Organization ![]() Maintain Versions. Or use transaction code OKEQ. The General Version Definition screen is displayed (Figure 18-3).
Maintain Versions. Or use transaction code OKEQ. The General Version Definition screen is displayed (Figure 18-3).
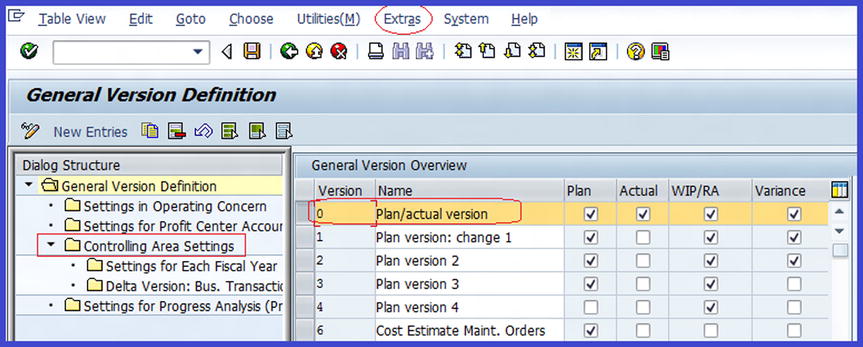
Figure 18-3. The Maintain General Version Definition screen for planned/actual version
The next step is to set the controlling area for the version. To do this, select version “0” plan/actual version from the displayed list of versions and click the ![]() button at the top of the screen. A pull-down menu is displayed. When you click
button at the top of the screen. A pull-down menu is displayed. When you click ![]() from the pull-down menu, the Determine Work Area Entry dialog box comes up. Enter your controlling area code (C900) in the Controlling Area field and click the Enter
from the pull-down menu, the Determine Work Area Entry dialog box comes up. Enter your controlling area code (C900) in the Controlling Area field and click the Enter ![]() button on the bottom-left side of the screen to confirm your settings.
button on the bottom-left side of the screen to confirm your settings.
Double-click ![]() in the left pane. Notice that only version “0” Plan/Actual Version is now displayed (Figure 18-4) and the status bar says, “One entry chosen”.
in the left pane. Notice that only version “0” Plan/Actual Version is now displayed (Figure 18-4) and the status bar says, “One entry chosen”.

Figure 18-4. Specifying the General Version Definition for plan/actual version
Make sure that Plan and Actual are checked. Using the pull-down arrow by the Valuation View field, select Legal Valuation in Valuation View. All postings are therefore done in version 0. Legal valuation will enable you to valuate business processes in accordance with your company code statutory accounting requirements.
To set the fiscal year for your version, select or highlight the ![]() version and double-click the next folder down
version and double-click the next folder down ![]() on the left pane of the screen. The Change View “Settings for Each Fiscal Year”: Overview screen is displayed. Select the current fiscal year from the list of years displayed in the Version Settings for Each Fiscal Year. Your selection will turn yellow; click the Details
on the left pane of the screen. The Change View “Settings for Each Fiscal Year”: Overview screen is displayed. Select the current fiscal year from the list of years displayed in the Version Settings for Each Fiscal Year. Your selection will turn yellow; click the Details ![]() button on the top-left side of the screen. The Change View “Settings for Each Fiscal Year”: Details screen is displayed. Most of the settings you need are set by default. Click the
button on the top-left side of the screen. The Change View “Settings for Each Fiscal Year”: Details screen is displayed. Most of the settings you need are set by default. Click the ![]() tab to display the Price Calculation screen (Figure 18-5).
tab to display the Price Calculation screen (Figure 18-5).
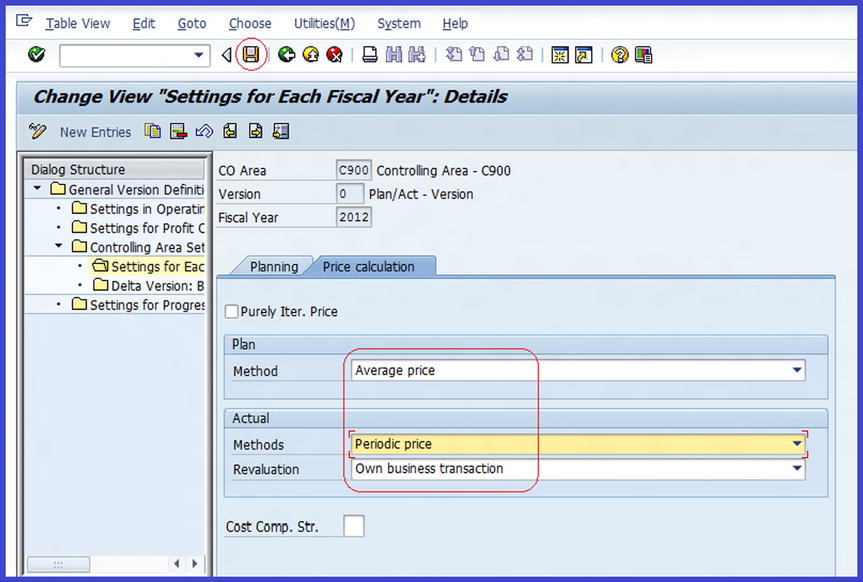
Figure 18-5. Specifying the fiscal year price calculations
- Method: The system defaults to average price. You have two price options to choose from—Average and Periodic Prices. We recommend that you stick to Average Price in the plan section.
- Methods: You have three options to choose from—Periodic Price, Average Price, and Cumulative Price. Choose the one most appropriate for you. In this exercise, we used Periodic Price.
- Revaluation: Using the pull-down arrow next to the Revaluation field, select Own Business Transaction from the list.
Save ![]() your version.
your version.
Multiple Valuation Approaches/Transfer Prices
The settings you make when customizing the Multiple Valuation Approach/Transfer Prices allow you to pass and clear deliveries of goods using multiple valuation (parallel valuation) approaches between company codes and profit centers within a corporate group. By maintaining a currency and a valuation profile, you can determine the valuation approaches to use in the accounting components, such as currencies and valuations. For example, you can determine the currency managed in legal valuation in the company code currency, the currency managed in corporate valuation in the group currency, and the currency managed in profit center valuation in company code. To maintain the currency and valuation profile, follow this menu path: IMG: Controlling ![]() General Controlling
General Controlling ![]() Multiple Valuation Approaches/Transfer Prices
Multiple Valuation Approaches/Transfer Prices ![]() Basic Settings
Basic Settings ![]() Maintain Currency and Valuation Profile.
Maintain Currency and Valuation Profile.
The Change View “Currency and Valuation Profiles”: Overview screen is displayed. Click the ![]() button at the top of the screen to go to the input screen (Figure 18-6).
button at the top of the screen to go to the input screen (Figure 18-6).

Figure 18-6. The screen where currency and valuation profiles are maintained
Update the following fields:
- C+V Profile: Enter a four-digit-character (such as C900) as the identifier key in the Currency &Valuation Profile field.
- Text: Enter a short description (such as Valuation Profile – C900) here.
Click the Enter ![]() button to confirm your entries. The system will notify you on the status bar that “One entry chosen”.
button to confirm your entries. The system will notify you on the status bar that “One entry chosen”.
The next step is to specify the currency type and the valuation view for your currency and valuation profile. To do this, make sure that your C+V profile is selected and double-click the ![]() folder. The Change View “Details”: Overview screen is displayed. Click the
folder. The Change View “Details”: Overview screen is displayed. Click the ![]() button.
button.
Update the appropriate fields using the information in Table 18-1.
Table 18-1. The Information Needed to Complete the Currency and Valuation Profiles Screen
|
No. |
Currency Type |
Valuation View |
|---|---|---|
|
20 |
30 |
Group Valuation |
|
30 |
30 |
Profit Center Valuation |
Save ![]() your currency and profile.
your currency and profile.
Create Versions for Valuation Methods
In this exercise, you can create additional versions for representing parallel valuations in the controlling component and make changes to existing ones displayed in the General Version Overview list by controlling area. If transfer pricing (the price used to valuate movement of goods between profit centers) is not used, you should automatically use version 0 in legal valuation for actual posting. On the other hand, if transfer pricing is used, you must maintain parallel actual versions for group valuation and profit center valuation. You also have to specify operational actual version 0 in your settings. This specification becomes the leading valuation in determining which planning, price calculation, planned/actual comparisons, and variance analysis are based.
To maintain currency for valuation methods, follow this menu path: IMG: Controlling![]() General Controlling Organization
General Controlling Organization ![]() Multiple Valuation Approaches/Transfer Prices
Multiple Valuation Approaches/Transfer Prices ![]() Basic Settings
Basic Settings ![]() Create Versions for Valuation Methods.
Create Versions for Valuation Methods.
The General Version Definition screen is displayed. From the General Version Overview list, select ![]() and double-click on
and double-click on ![]() in the left pane. The Determine Work Area: Entry dialog box pops up. Enter your controlling area (C900) identifier key in the Controlling Area field and click the Enter
in the left pane. The Determine Work Area: Entry dialog box pops up. Enter your controlling area (C900) identifier key in the Controlling Area field and click the Enter ![]() button to confirm. Make sure Plan and Actual are checked and that Valuation View is set to Legal Valuation. All postings are done in version 0. Save
button to confirm. Make sure Plan and Actual are checked and that Valuation View is set to Legal Valuation. All postings are done in version 0. Save ![]() and then click on the Back
and then click on the Back ![]() button to return to the previous page.
button to return to the previous page.
On the General Version Definition screen, click the ![]() button to define additional versions for your valuations. Update the screen using the information shown in Figure 18-7.
button to define additional versions for your valuations. Update the screen using the information shown in Figure 18-7.
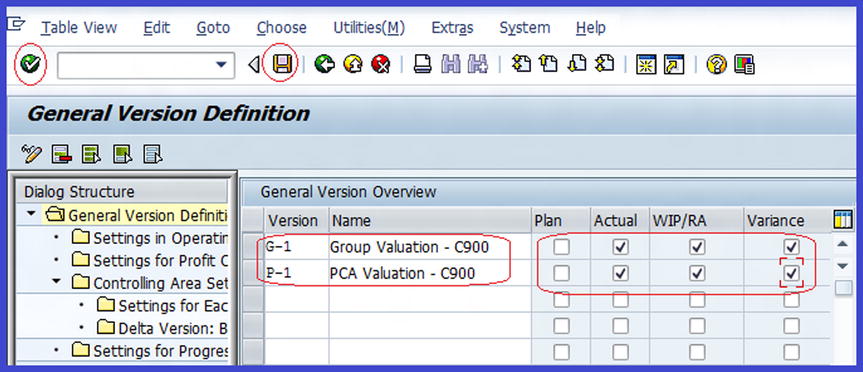
Figure 18-7. Creating versions for your valuation methods
![]() Note Version keys are freely definable. You can use any version key in this exercise. The version keys we used in the definition of our version are for illustration purposes and are not the standard. We used G-1 for group valuation and P-1 for profit center accounting.
Note Version keys are freely definable. You can use any version key in this exercise. The version keys we used in the definition of our version are for illustration purposes and are not the standard. We used G-1 for group valuation and P-1 for profit center accounting.
Click the Enter ![]() button to confirm your entries and save
button to confirm your entries and save ![]() your work. Select or highlight the versions for the valuation method you have just created (G-1 and P-1) and then double-click the
your work. Select or highlight the versions for the valuation method you have just created (G-1 and P-1) and then double-click the ![]() folder. The Confirm Transfer from Version dialog box pops up with the question, “Version G-1 does not exist in CO Area C900. Transfer version to CO Area?” Click the
folder. The Confirm Transfer from Version dialog box pops up with the question, “Version G-1 does not exist in CO Area C900. Transfer version to CO Area?” Click the ![]() button on the bottom-right side of the screen. A second Confirm Transfer from Version dialog box pops up with the question, “Version P-1 does not exist in CO Area C900. Transfer version to CO Area?” Click the
button on the bottom-right side of the screen. A second Confirm Transfer from Version dialog box pops up with the question, “Version P-1 does not exist in CO Area C900. Transfer version to CO Area?” Click the ![]() button again and then save
button again and then save ![]() your work.
your work.
Cost Element Accounting
The Cost Element function is very important and plays a significant role when reconciling costs and postings between FI and the Controlling (CO) module. Cost Element is a function in CO that reconciles costs and revenue in FI and primary costs in CO. Simply put, all cost and revenue flows via its cost element between FI and CO.
In SAP, cost element is classified into two categories:
- Primary cost element: The primary cost element allows costs and revenues to flow between FI and CO when a corresponding G/L account exists in FI. This cost element can only be created in an environment where costs/revenues exist in a G/L account in the chart of accounts in FI.
- Secondary cost element: This is the opposite of the primary cost element. Costs that arise in controlling are purely for internal cost allocations, overhead apportionments, and other internal costs.
A cost element can be created in IMG (Using Automatic Creation of Primary and Secondary Cost Elements) or in Accounting. In this exercise, you will set default settings for Automatic Creation of Primary and Secondary Cost Elements, Create Batch Input Session, and Execute Batch Input Session.
Make Default Settings for Automatic Creation of Primary and Secondary Cost Elements
In this exercise, you will use the automatic cost element’s default settings to maintain cost elements individually or as intervals with a corresponding cost element category. To set a default, follow this menu path: IMG: Controlling ![]() Cost Element Accounting
Cost Element Accounting ![]() Master Data
Master Data ![]() Cost Elements
Cost Elements ![]() Automatic Creation of Primary and Secondary Cost Elements
Automatic Creation of Primary and Secondary Cost Elements ![]() Make Default Settings. Or use transaction code OKB2. The Determine Work Area Entry dialog box pops up. Enter your chart of accounts (CA90) in the Chart of Accounts field and click the Enter
Make Default Settings. Or use transaction code OKB2. The Determine Work Area Entry dialog box pops up. Enter your chart of accounts (CA90) in the Chart of Accounts field and click the Enter ![]() button at the bottom of the screen. The Change View “Automatic Generation of Cost Elements: Default Setting screen is displayed. To set the default settings for the automatic postings, click the
button at the bottom of the screen. The Change View “Automatic Generation of Cost Elements: Default Setting screen is displayed. To set the default settings for the automatic postings, click the ![]() button at the top of the screen. The New Entries Overview of Added Entries screen is displayed (Figure 18-8).
button at the top of the screen. The New Entries Overview of Added Entries screen is displayed (Figure 18-8).
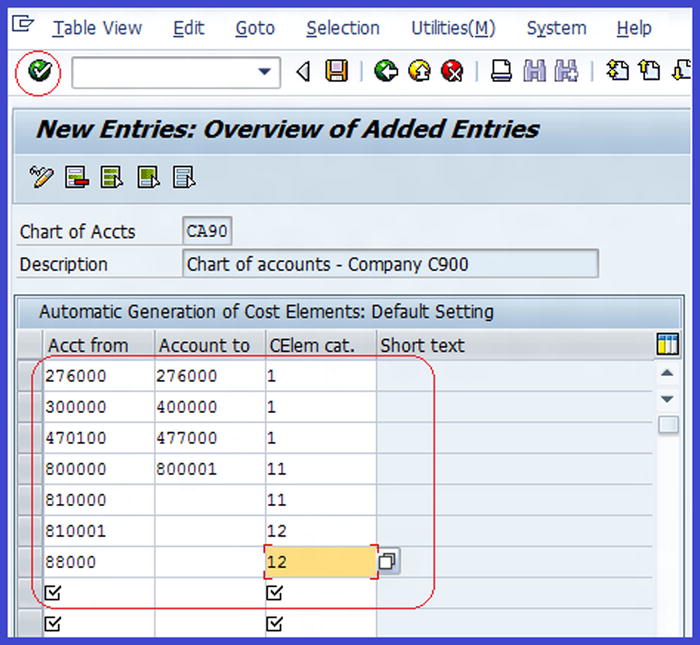
Figure 18-8. Default settings for automatically generating cost elements
Specify the account ranges you want to include in your default settings in the Account fields. Begin with the lowest number in the account number range in the Acct from and Account to fields and include all the numbers in the specified range. Also, specify the Cost Element category for your account range. For example, for accounts ranging from 3000 to 4000, the assigned cost element is 1, as these accounts are expenses (primary cost/cost-reducing revenues).
SAP comes with a predefined list of cost element categories to choose from. A list of cost elements supplied by SAP is in Table 18-2.
Table 18-2. Cost Element Categories Supplied by SAP
|
Cost Element Category |
Short Description |
|---|---|
|
1 |
Primary cost/cost –reducing revenues |
|
3 |
Accrual/deferral per surcharge |
|
4 |
Accrual/deferral per debt, actual |
|
11 |
Revenues |
|
12 |
Sales deduction |
|
21 |
Internal settlement |
|
22 |
External settlement |
|
31 |
Order/project results analysis |
|
41 |
Overhead rates |
|
42 |
Assessment |
|
43 |
Internal activity allocation |
|
90 |
Statistical cost element for balance sheet account |
|
50 |
Project-related incoming order: sales revenue |
|
51 |
Project-related incoming order: other revenues |
|
52 |
Project-related incoming order: costs |
|
61 |
Earned value |
The Cost Element category controls the nature of your posting to a cost element directly (this will allow transactions to be posted to all the accounts you specify in the primary cost elements) or indirectly (the system determines whether to post transactions internally at the time of posting).
When you click Enter ![]() to confirm your entries, the Short Texts field automatically describes the cost elements you selected. Save
to confirm your entries, the Short Texts field automatically describes the cost elements you selected. Save ![]() your specifications.
your specifications.
Since you have completed the process of customizing the default settings of cost elements, the next step is create a batch input session for the cost element defaults you have specified. This will complete the creation of your primary cost elements for your controlling area.
Create Batch Input Session
Batch input provides a way to transfer huge amounts of data into the SAP R/3 system. To create a batch input section, follow this menu path: IMG: Controlling ![]() Cost Elements Accounting
Cost Elements Accounting ![]() Master Data
Master Data ![]() Cost Elements
Cost Elements ![]() Automatic Creation of Primary and Secondary Cost Elements
Automatic Creation of Primary and Secondary Cost Elements ![]() Create Batch Input Session. Or use transaction code OKB3. The Create Batch Input Session to Create Cost Elements screen is displayed (Figure 18-9).
Create Batch Input Session. Or use transaction code OKB3. The Create Batch Input Session to Create Cost Elements screen is displayed (Figure 18-9).

Figure 18-9. Specifying the controlling area and validity date for executing a batch input session
In Figure 18-9, notice that the system has set the Valid To date as the current date by default, as well as the session name and batch input user (as user ID). Use the information in Table 18-3 to update the screen.
Table 18-3. The Data Needed to Update the Create Batch Input Session to Create Cost Elements Screen
|
Field |
Value |
Description |
|---|---|---|
|
Controlling Area |
C900 |
Enter your controlling area ID. |
|
Valid From |
01.01.2011 |
Enter an earlier date than the current fiscal year. |
|
Valid To |
31.12.9999 |
This defaults to the future year. You can override this if desired. |
|
Session Name |
USER5 |
The system defaults to your user ID. |
|
Batch input user |
USER5 |
The system defaults to your user ID. |
Click the Execute ![]() button on the top-left side of the screen; the system will execute your batch input session. The Create Batch Input Session to Create Cost Elements screen will be displayed showing a list of accounts you have created (Figure 18-10).
button on the top-left side of the screen; the system will execute your batch input session. The Create Batch Input Session to Create Cost Elements screen will be displayed showing a list of accounts you have created (Figure 18-10).
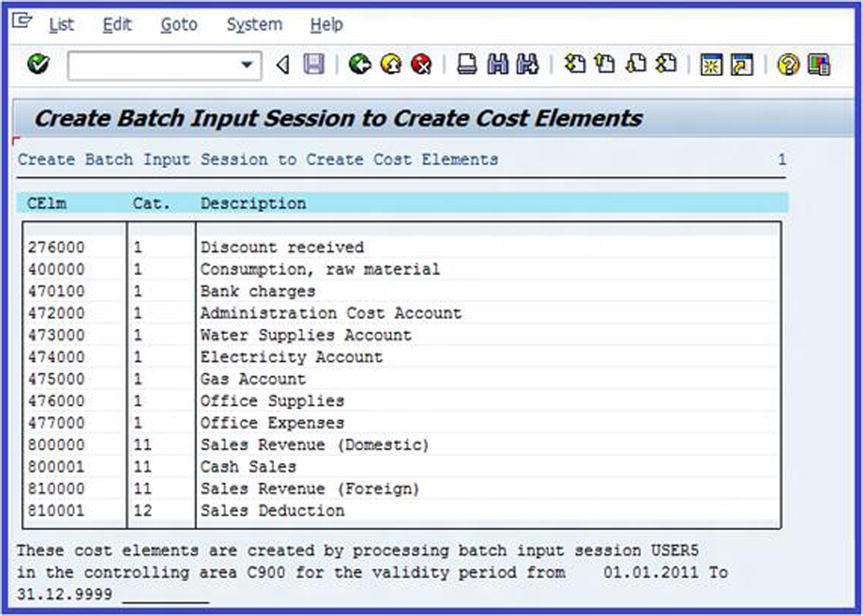
Figure 18-10. A batch input session displaying accounts created in cost elements
Execute a Batch Input Session
When a batch input session is generated, the system will automatically determine the chart of accounts to be processed and the cost elements to be created based on the company code and chart of accounts assigned to the controlling area. To generate a cost element you created, you can execute a batch input session. Follow this menu path: IMG: Controlling ![]() Cost Elements Accounting
Cost Elements Accounting ![]() Master Data
Master Data ![]() Cost Elements
Cost Elements ![]() Automatic Creation of Primary and Secondary Cost Elements
Automatic Creation of Primary and Secondary Cost Elements ![]() Execute Batch Input Session. Or use transaction code SM35. The Batch Input: Session Overview screen is displayed (Figure 18-11).
Execute Batch Input Session. Or use transaction code SM35. The Batch Input: Session Overview screen is displayed (Figure 18-11).
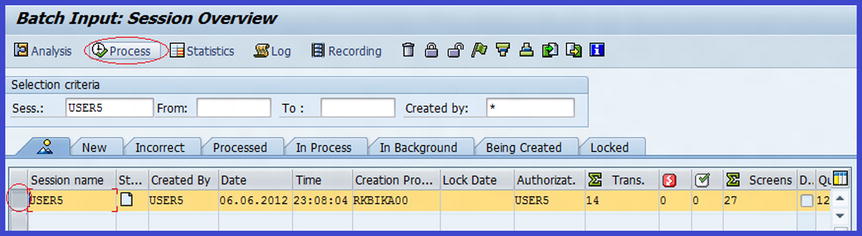
Figure 18-11. Processing a batch input session
Select or highlight your cost element from the list of the session names and then click the ![]() button on the top-left side of the screen. The Process Session screen pops up (Figure 18-12). This screen allows you to set other options for your batch input session.
button on the top-left side of the screen. The Process Session screen pops up (Figure 18-12). This screen allows you to set other options for your batch input session.
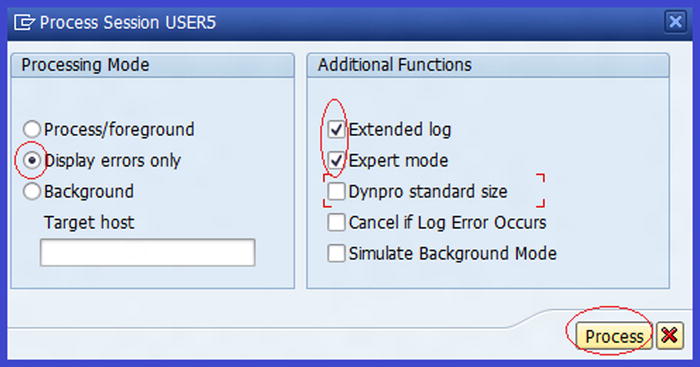
Figure 18-12. The screen where the processing mode and additional functions are specified for batch input processing
Select the following indicators:
- Display Errors Only: When this radio button is clicked, the system will allow you to check for errors resulting from faulty transactions and correct them online. It allows you to run transactions in background mode.
- Extended Log: This is an additional function in batch input processing. When you select this checkbox, all messages encountered when a transaction is run are displayed. This includes warning messages, error messages, information messages, and other messages returned by SAP.
- Expert Mode: This is an additional function. Expert mode only works in interactive batch input.
![]() Note A session that you want to process immediately is scheduled as a background process using the Background mode. It enables transactions to be processed in the background, freeing your entry screen for data input.
Note A session that you want to process immediately is scheduled as a background process using the Background mode. It enables transactions to be processed in the background, freeing your entry screen for data input.
Click the ![]() button on the bottom-right side of the screen for your batch input session to apply the set indicators. An Information dialog box appears with the message, “Processing of batch input session completed’. Confirm the message by clicking the
button on the bottom-right side of the screen for your batch input session to apply the set indicators. An Information dialog box appears with the message, “Processing of batch input session completed’. Confirm the message by clicking the ![]() button at the bottom of the screen. Notice that the Status
button at the bottom of the screen. Notice that the Status ![]() button is checked (Figure 18-13), indicating that the status of your batch input session is completed.
button is checked (Figure 18-13), indicating that the status of your batch input session is completed.
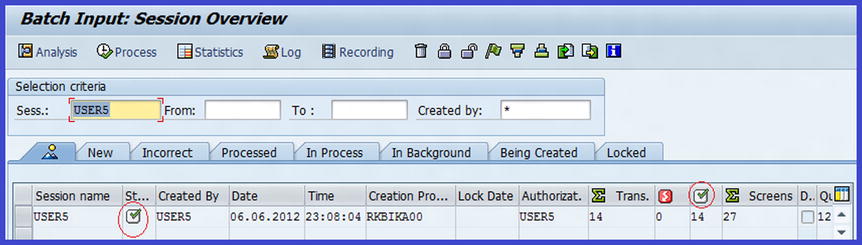
Figure 18-13. The Batch Input Session Overview screen
Primary Cost Element
The Primary Cost Element function is a cost/revenue item in the chart of accounts. Costs/revenues that form part of the cost elements must have a corresponding G/L account in FI.
Primary cost elements are relevant costs in the chart of accounts. For example:
- The cost of raw materials
- Utility costs (electricity, gas, heating, water, and so on)
![]() Note To be able to create a cost element, you must make sure that a corresponding G/L accounts exists in the chart of accounts. Otherwise, you have to create the appropriate G/L account first in the chart of accounts.
Note To be able to create a cost element, you must make sure that a corresponding G/L accounts exists in the chart of accounts. Otherwise, you have to create the appropriate G/L account first in the chart of accounts.
Problem: Now that you have set defaults for automatic creating of primary and secondary cost elements, your next task as a functional consultant is to create a primary cost element for Cash Purchase – Office Material using the G/L account 460000. Make sure that the validity date includes the current year.
To create a primary cost element, follow this menu path: IMG: Easy Access: Accounting ![]() Controlling
Controlling ![]() Cost Element Accounting
Cost Element Accounting ![]() Master Data
Master Data ![]() Cost Element
Cost Element ![]() Individual Processing
Individual Processing ![]() Create Primary. Or use transaction code KA01. The Create Cost Element: Initial Screen is displayed. Update the appropriate fields using the data in Table 18-4.
Create Primary. Or use transaction code KA01. The Create Cost Element: Initial Screen is displayed. Update the appropriate fields using the data in Table 18-4.
Table 18-4. The Initial Data Needed to Create a Primary Cost Element
|
Field |
Value |
Description |
|---|---|---|
|
Cost Element |
460000 (Cash purchase of office materials) |
Enter the G/L account for cash purchases. |
|
Valid From/To |
01.01.2011 - 31.12.9999 |
Enter a date range for your primary cost element. Make sure that the date range includes the company code’s current fiscal year. For example, if your company code fiscal year is 01.01.2012, set your valid from date to a year earlier (01.01.2011) and the end date to any date after the fiscal year (31.12.9999). |
![]() Tip When you enter a valid from date into the Valid From field and click the Enter button, the system will automatically set the Valid To date for you. Although you can modify the Valid To date, we recommend that you use the default.
Tip When you enter a valid from date into the Valid From field and click the Enter button, the system will automatically set the Valid To date for you. Although you can modify the Valid To date, we recommend that you use the default.
Click the ![]() button on the top-left side of the screen to create the cost element master record. The Create Cost Element: Basic Screen is displayed. The system will automatically set the Name and Description of the cost element in the Basic Data section of the screen (Figure 18-14).
button on the top-left side of the screen to create the cost element master record. The Create Cost Element: Basic Screen is displayed. The system will automatically set the Name and Description of the cost element in the Basic Data section of the screen (Figure 18-14).

Figure 18-14. Creating a primary cost element master record
In the Basic Data section of the screen, select 1 for the Cost Element Category (Primary Cost/Cost –Reducing Revenues) using matchcode. Click the Enter ![]() button to confirm your entries and then save
button to confirm your entries and then save ![]() your cost element master data. The system will notify you on the status bar that
your cost element master data. The system will notify you on the status bar that![]() .
.
Secondary Cost Elements
Secondary cost elements are costs that arise within the controlling module due to internal cost allocations, overhead apportionment, and other internal costs.
Problem: As a functional consultant your task is to create a secondary cost element for IT service costs (called 600000). Make sure that the valid date includes the current year.
To execute the batch input section, follow this menu path: IMG: Easy Access: Accounting ![]() Controlling
Controlling ![]() Cost Element Accounting
Cost Element Accounting ![]() Master Data
Master Data ![]() Cost Element
Cost Element ![]() Individual Processing
Individual Processing ![]() Create Secondary. Or use transaction code KA06. The Set Controlling Area dialog box pops up. Enter your controlling area (C900) in the Controlling Area field and click the Enter
Create Secondary. Or use transaction code KA06. The Set Controlling Area dialog box pops up. Enter your controlling area (C900) in the Controlling Area field and click the Enter ![]() button at the bottom of the screen. The Create Cost Element: Initial Screen is displayed. Update the following fields:
button at the bottom of the screen. The Create Cost Element: Initial Screen is displayed. Update the following fields:
- Cost Element: Enter the G/L account (600000—IT Service Cost) for your cost element.
- Valid From/To: Enter a range of valid dates that will include the company code current fiscal year 01.01.2011 to 31.12.9999.
Click the ![]() button on the top-left side of the screen.
button on the top-left side of the screen.
![]() Note Unlike when you create a primary cost element, you do not have to create a G/L account before you create a secondary cost element. This is only an internal cost in CO and does not have any implication on the FI.
Note Unlike when you create a primary cost element, you do not have to create a G/L account before you create a secondary cost element. This is only an internal cost in CO and does not have any implication on the FI.
The Create Cost Element: Basic Screen is displayed (Figure 18-15).
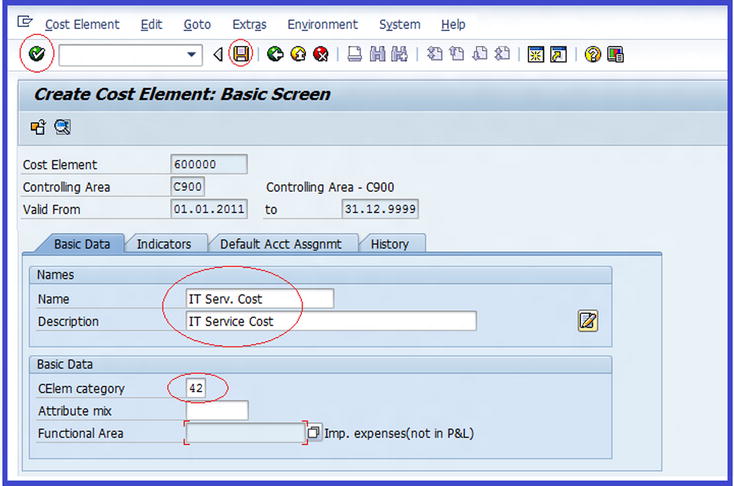
Figure 18-15. Creating a secondary cost element
Update the following fields:
- Name: Enter the IT Serv. Cost. This is a short description of your secondary cost element.
- Description: Enter the IT service cost. This is a full description of your secondary cost element.
- CElem Category: Enter 42 – Assessment as your cost element category.
After updating the screen, click the Enter ![]() button on the top-left side of the screen and save
button on the top-left side of the screen and save ![]() your work.
your work.
![]() Note You can change, display, and delete cost elements after saving and you can also display any changes you made.
Note You can change, display, and delete cost elements after saving and you can also display any changes you made.
Cost Center Accounting
A cost center, simply put, is a function in an organization that incurs its own costs, which may or may not add to its profit. Typical examples include Production, Administration, R&D, Marketing, and so on. Cost center accounting helps to monitor costs to ensure they are within budget.
In order to customize the Cost Accounting feature, you will configure the following settings:
- Define the standard hierarchy
- Create a cost center group
- Define cost elements for activity allocation
- Create activity types
- Use statistical key figures
- Change activity output/price planning
- Compare cost centers: actual/plan/variance
Define the Standard Hierarchy
A standard hierarchy is simply a tree structure that allows you to structure cost centers in a controlling area in a systematic manner.
Problem: As its functional consultant, Company C900 plc has asked you to define the standard hierarchy for their controlling area C900, which contains all their cost centers and the appropriate cost center groups using the standard hierarchy structure.
![]() Note It is possible to change an existing hierarchy supplied by SAP system or create a new one.
Note It is possible to change an existing hierarchy supplied by SAP system or create a new one.
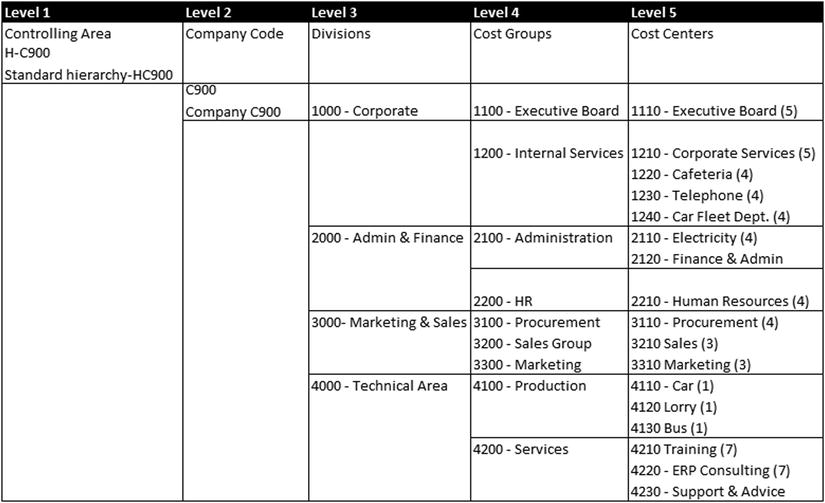
In this exercise, you will maintain the relevant standard hierarchy for your controlling area. Before you start this exercise, let’s first map out the costs hierarchy you will be using for your cost center standard hierarchy. There is no standard way of doing this. In practice, standard hierarchy can be very lengthy and cumbersome. It is important that you spend quality time mapping out your standard hierarchy before commencing your configuration. We have provided a standard hierarchy mapping in Table 18-5 to help you define the standard hierarchy for your cost centers. You can refer back to this table as you build the hierarchy levels.
Table 18-5. Mapping for Defining the Standard Hierarchy
To define the standard hierarchy, use this menu path: IMG: Controlling ![]() Cost Center Accounting
Cost Center Accounting ![]() Master Data
Master Data ![]() Cost Centers
Cost Centers ![]() Define
Define ![]() Standard Hierarchy. Or use transaction code OKEON. The Set Controlling Area dialog box pops up. Enter your controlling areas (C900) in the Controlling Area fields. Click the Enter
Standard Hierarchy. Or use transaction code OKEON. The Set Controlling Area dialog box pops up. Enter your controlling areas (C900) in the Controlling Area fields. Click the Enter ![]() button at the bottom of the screen. The Standard Hierarchy for Cost Center Change screen is displayed, where you will define the standard hierarchy for your cost centers. Follow the five steps (levels) outlined in the next sections.
button at the bottom of the screen. The Standard Hierarchy for Cost Center Change screen is displayed, where you will define the standard hierarchy for your cost centers. Follow the five steps (levels) outlined in the next sections.
Level 1: Update the Standard Hierarchy Group Name
Your standard hierarchy H-C900 created in the Maintain Controlling Area section earlier should be displayed and automatically selected by the system (the selection is yellow). Otherwise, you have to select it by clicking on it. In the Details for Cost Center Group section of the screen (Figure 18-16), update the group name by entering a descriptive name (for example, Standard Hierarchy) in the Group Name field.
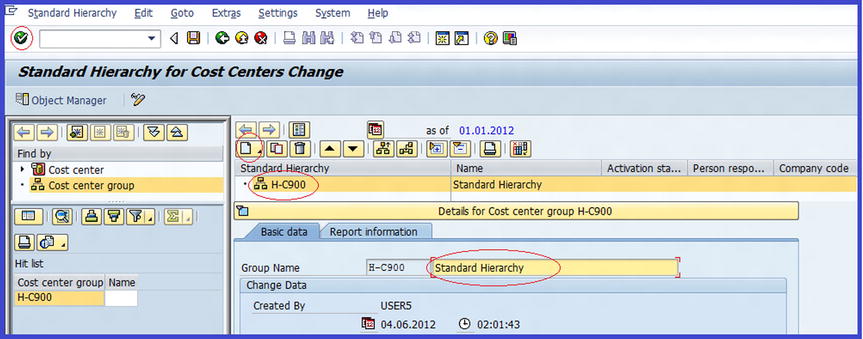
Figure 18-16. Defining a standard hierarchy for the cost centers
Click the Enter ![]() button on the top-left side of the screen.
button on the top-left side of the screen.
Level 2: Create a Cost Center Group for Your Company Code
The next step is to create a lower group level for a cost center group for your company code in the Standard Hierarchy section (Figure 18-17).

Figure 18-17. Creating a lower group level under the standard hierarchy
To create a lower group in the standard hierarchy, select the cost center group for standard hierarchy ![]() and then click the Create
and then click the Create ![]() button on the top-left side of the screen. A pull-down menu appears with a list of the following options:
button on the top-left side of the screen. A pull-down menu appears with a list of the following options:
- Lower level group
- Group at the same level
- Cost center
Since you a creating a lower cost group level in the standard hierarchy for the cost center group, select Lower Level Group from the pull-down menu. A new lower level cost center group is created under the standard hierarchy cost center group. The system will automatically highlight the new group you just created. In the Details for Cost Center Group section, enter a code (C900) for the group and overwrite the field’s content. (Change “New group” to your own group name; in this case, Company C900 Plc, as shown in Figure 18-18).
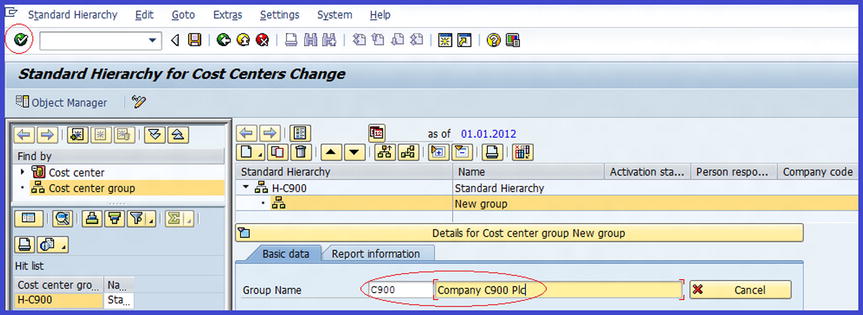
Figure 18-18. Creating a new cost center group as a lower level under the standard hierarchy cost center group
Click the Enter ![]() button on the top-left side of the screen.
button on the top-left side of the screen.
Level 3: Create Divisions
In this level you will create lower group levels under the company code for Divisions. Select Cost Center Group for the company code ![]() and click the Create
and click the Create ![]() button. From the pull-down menu, select Lower Level Group. The system will create a cost center group as a lower level under the company code cost center group. Enter code 1000 for the group and overwrite the field’s content with the group name —Corporate.
button. From the pull-down menu, select Lower Level Group. The system will create a cost center group as a lower level under the company code cost center group. Enter code 1000 for the group and overwrite the field’s content with the group name —Corporate.
Click the Enter ![]() button.
button.
For this exercise, you also need to create the following Divisions: 2000 – Admin & Finance, 3000 – Marketing & Sales, and 4000 – Technical Area. These should be at the same Cost Center Group Level as 1000 - Corporate.
Select the corporate cost center group you just created and then click the Create ![]() button. This will allow you to create a same level group for the remaining divisions. Click
button. This will allow you to create a same level group for the remaining divisions. Click ![]() on the pull-down menu. Update the group name with information for the next division—2000 – Admin & Finance—and then click the Enter
on the pull-down menu. Update the group name with information for the next division—2000 – Admin & Finance—and then click the Enter ![]() button. Repeat this step to complete the remaining cost center groups for the division using the data in Table 18-5, which you saw earlier in the section “Define the Standard Hierarchy.” Upon completion, your hierarchy will look like the one in Figure 18-19.
button. Repeat this step to complete the remaining cost center groups for the division using the data in Table 18-5, which you saw earlier in the section “Define the Standard Hierarchy.” Upon completion, your hierarchy will look like the one in Figure 18-19.

Figure 18-19. Maintaining a cost center group for divisions
Save ![]() your entries.
your entries.
Level 4: Create Cost Groups
In this level you create cost groups Table 18-5) at a lower group for the divisions you just created in level 3. First, create the cost groups for 1000 – Corporate on the standard hierarchy. To do this, select 1000 - Corporate on the standard hierarchy and click the Create ![]() button. From the pull-down menu, select Lower level group. Update the Group Name field with 1100 – Executive Board and click the Enter
button. From the pull-down menu, select Lower level group. Update the Group Name field with 1100 – Executive Board and click the Enter ![]() button. The Executive Board Cost Group will be included in the standard hierarchy under corporate as a lower level. Using Table 18-5 as a reference, create the remaining cost groups. You can display the entire standard hierarchy that you have created by clicking the
button. The Executive Board Cost Group will be included in the standard hierarchy under corporate as a lower level. Using Table 18-5 as a reference, create the remaining cost groups. You can display the entire standard hierarchy that you have created by clicking the ![]() bar. Your standard hierarchy you have created so far should look like the one in Figure 18-20.
bar. Your standard hierarchy you have created so far should look like the one in Figure 18-20.

Figure 18-20. Details for the cost center group process
Save ![]() your work.
your work.
Level 5: Create Cost Centers
At this level, you create cost centers for the cost groups that you created in level 4. To create cost centers, follow this menu path: IMG: Controlling ![]() Cost Center Accounting
Cost Center Accounting ![]() Master Data
Master Data ![]() Cost Centers
Cost Centers ![]() Create Cost Centers. Or use transaction code KS01. The Choose Activity screen pops up with two options on the screen. You can create or change a cost center. Double-click the Create Cost Center option. The Set Controlling Area screen pops up. Enter your controlling area (C900) in the Controlling Area field and click the Enter
Create Cost Centers. Or use transaction code KS01. The Choose Activity screen pops up with two options on the screen. You can create or change a cost center. Double-click the Create Cost Center option. The Set Controlling Area screen pops up. Enter your controlling area (C900) in the Controlling Area field and click the Enter ![]() button at the bottom of the screen to set the controlling area. The Create Cost Center Initial Screen is displayed. Update the following fields:
button at the bottom of the screen to set the controlling area. The Create Cost Center Initial Screen is displayed. Update the following fields:
- Cost Center: Enter a cost center identifier (1110) in the cost center field. This is the number we suggested for the executive board in Table 18-5.
- Valid From: Enter the date you want the cost center to be valid from, such as 01.01.2011 (we advise that you use a date a year earlier than your fiscal year). Make sure that the valid from date includes your company code’s current fiscal year.
- Valid To: This defaults to 31.12.9999. We recommend that you stick to this date.
Click the ![]() button on the top-left side of the screen. The Create Cost Center: Basic Screen is displayed (Figure 18-21).
button on the top-left side of the screen. The Create Cost Center: Basic Screen is displayed (Figure 18-21).
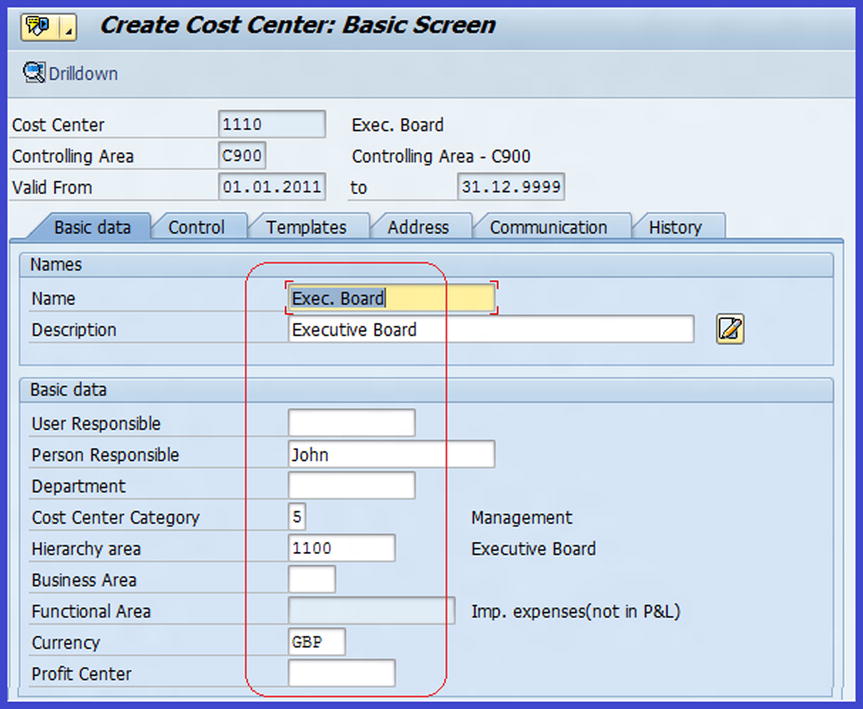
Figure 18-21. The Cost Center Basic Screen dialog box
Update the following fields:
- Name: Enter the name of your cost center, such as Exec. Board, in this field. This can be an abbreviation.
- Description: Enter your cost center description, such as Executive Board. This can be the full name of the cost center. This will allow you to easily distinguish your cost centers.
- Person Responsible: Enter the name of the staff responsible for the cost center. We used John in this field. This is optional.
- Cost Center Category: Enter the appropriate cost category. In this case, we used 5 (management). The cost center category could be, for example, Production, Sales, Administration, or Management. You can access the cost center category using the matchcode next to the cost center field.
- Hierarchy Area: Select the hierarchy area from the standard hierarchy—1100 (Executive Board)—that you created in level 4.
- Currency: Enter the currency key (GBP) that you want to apply to your cost center. This field is required.
- Profit Center: You cannot enter the profit center for your cost center at this level, because a profit center has not been created. Leave this field blank for now. It will be visited again later in Profit Center section.
Click the Enter ![]() button to confirm your entries and then click Save
button to confirm your entries and then click Save ![]() . After you save, the system will take you back to the Create Cost Center: Initial Screen.
. After you save, the system will take you back to the Create Cost Center: Initial Screen.
![]() Note The system will issue this warning:
Note The system will issue this warning: ![]() .
.
Ignore the warning and click on ![]() again. Then save
again. Then save ![]() your efforts.
your efforts.
Using the information in Table 18-5, create the remaining 16 cost centers. Once you have created all the cost centers, you can display the standard hierarchy using this menu path: IMG: Controlling ![]() Cost Center Accounting
Cost Center Accounting ![]() Master Data
Master Data ![]() Standard Hierarchy
Standard Hierarchy ![]() Display. Or use transaction code OKENN. The Standard Centers for Cost Centers Display screen appears. Click the
Display. Or use transaction code OKENN. The Standard Centers for Cost Centers Display screen appears. Click the ![]() bar to display your standard hierarchy list (Figure 18-22).
bar to display your standard hierarchy list (Figure 18-22).
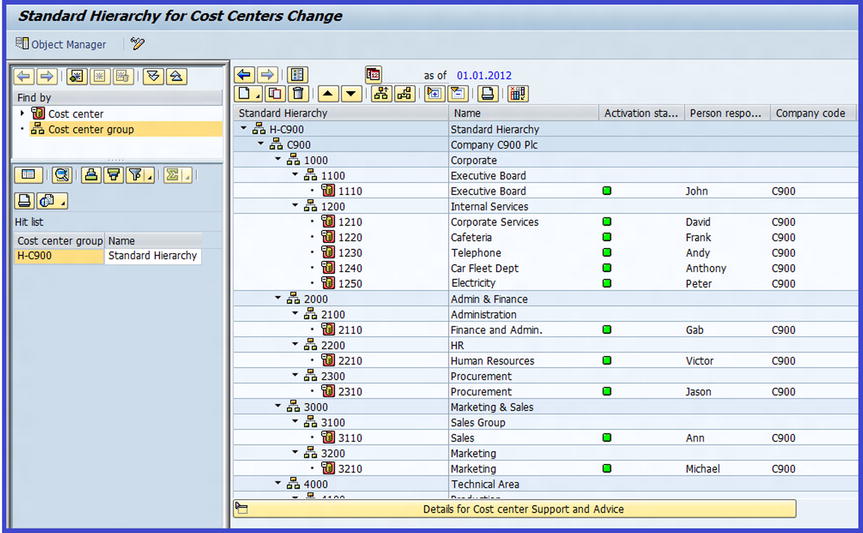
Figure 18-22. The standard hierarchy list display
Create Cost Center Group
A cost center group combines cost centers according to organizational and/or functional requirements into groups, thereby making cost center management easy. It also builds groups into cost center hierarchies, which aids reporting summaries for decision-making. After you have created the cost center hierarchy for your controlling area in the master data, when you display Create Cost Center Group: Initial Screen and click the Standard Hierarchy button, the system will automatically generate the cost center group for your standard hierarchy. There must be at least one cost center group in the standard hierarchy and you can add as many alternative or independent groups, as you require. They can be structured according to organizational or functional specific requirements.
The advantages of cost center groups include:
- For performing reporting of activities in specific cost centers in the information system. Information system enables you to generate reports delivered with the system or to create your own reports.
- Processing multiple cost centers in a single transaction, including cost center planning, distribution, and assessment (we will be looking at distribution and assessment later in this chapter).
To create a cost center group, follow this menu path: IMG: Controlling ![]() Cost Center Accounting
Cost Center Accounting ![]() Master Data
Master Data ![]() Cost Centers
Cost Centers ![]() Define Cost Centers Group. Or use transaction code KSH1. The Choose Activity screen pops up. You can create or change a cost center group. Select Create Cost Center Group from the list by double-clicking it. The Create Cost Center Group: Initial Screen is displayed (Figure 18-23). The system will automatically pick your standard hierarchy (H-C900) as the cost center group.
Define Cost Centers Group. Or use transaction code KSH1. The Choose Activity screen pops up. You can create or change a cost center group. Select Create Cost Center Group from the list by double-clicking it. The Create Cost Center Group: Initial Screen is displayed (Figure 18-23). The system will automatically pick your standard hierarchy (H-C900) as the cost center group.
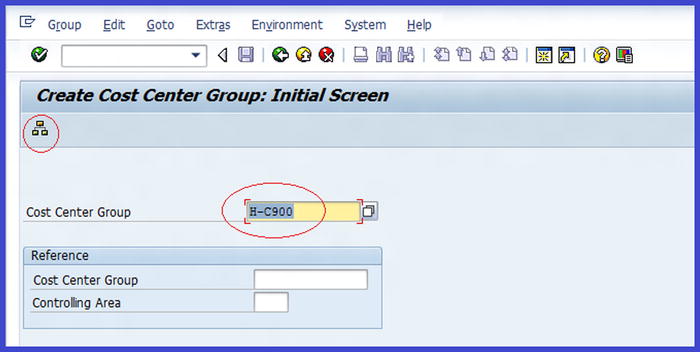
Figure 18-23. The default cost center group
Click the Standard Hierarchy ![]() button on the top-left side of the screen. The Go to Change? screen is displayed, informing you that “The object already exists…” (Figure 18-24).
button on the top-left side of the screen. The Go to Change? screen is displayed, informing you that “The object already exists…” (Figure 18-24).
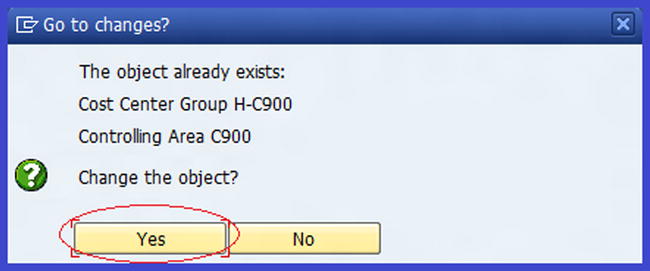
Figure 18-24. The screen where you can accept or reject existing objects for cost center group in standard hierarchy
Click the ![]() button on the bottom-left side of the screen; the Change Standard Hierarchy (Cost Center Group): Structure screen is displayed showing the defaulted cost groups (Figure 18-25). You can expand each cost to display details of cost centers by clicking
button on the bottom-left side of the screen; the Change Standard Hierarchy (Cost Center Group): Structure screen is displayed showing the defaulted cost groups (Figure 18-25). You can expand each cost to display details of cost centers by clicking ![]() .
.
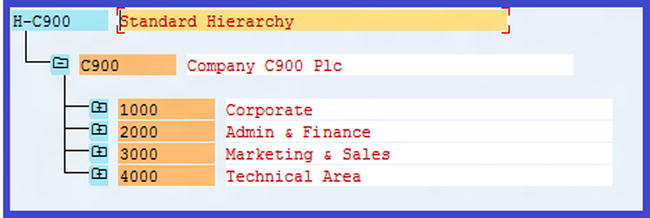
Figure 18-25. The default standard hierarchy cost center group
Activity Types
Activity types allow the system to classify similar activities performed at a cost center in a controlling area.
Valuation of activity types for each cost center and period with a given charge rate consist of both fixed and variable portions. This allows costs incurred at a cost center to be distributed adequately to products based on activities performed in relation to products.
In this exercise, you will define cost elements for activity allocation and create activity types.
Define Cost Elements for Activity Allocation
The cost element allocation serves as an activity allocation. It takes the receiver debits and treats them internally as direct or indirect allocations. To define cost elements for activity allocation, follow this menu path: IMG: Controlling ![]() Cost Center Accounting
Cost Center Accounting ![]() Master Data
Master Data ![]() Activity Types
Activity Types ![]() Define Cost Elements for Activity Allocation. The Choose Activity dialog box is displayed. You can change an existing cost element for activity allocation or create a cost element for activity allocation.
Define Cost Elements for Activity Allocation. The Choose Activity dialog box is displayed. You can change an existing cost element for activity allocation or create a cost element for activity allocation.
Click the ![]() option and then click the
option and then click the ![]() button on the bottom-right side of the screen. The Create Cost Element: Initial screen is displayed. Update the following fields:
button on the bottom-right side of the screen. The Create Cost Element: Initial screen is displayed. Update the following fields:
- Cost Element: Enter your cost element identifier. In this exercise, we used 710000 as the cost element number. The cost element used here is only for illustration. You can use the cost element identifier of choice. In practice you can obtain this number from the cost accounting team.
- Valid From: Enter a valid from date. Make sure that the valid from date includes your company code’s fiscal year.
- Valid To: The system will automatically choose a valid to date.
Click the ![]() button on the top-left side of the screen. The Create Cost Element: Basic Screen is displayed (Figure 18-26).
button on the top-left side of the screen. The Create Cost Element: Basic Screen is displayed (Figure 18-26).
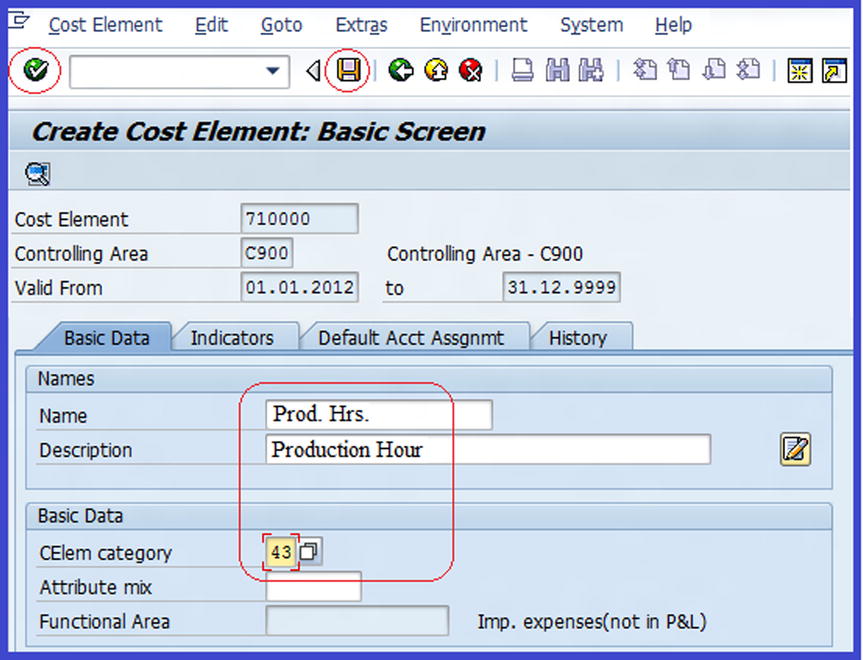
Figure 18-26. The basic screen for creating cost elements
- Name: Enter the name of your cost element—Prod.Hrs. (this can be an abbreviation).
- Description: Enter a full description of your cost element—Production Hour
- Cost Element Category: Select the appropriate cost category—43 for internal Activity Allocation. You can access this number using matchcode.
Click the Enter ![]() button on the top-left side of the screen and save
button on the top-left side of the screen and save ![]() your work.
your work.
Create Activity Types
Before creating your activity types, you must make sure that the following activities have been maintained/created:
To create an activity type for your cost center, follow this menu path: IMG: Controlling ![]() Cost Center Accounting
Cost Center Accounting ![]() Master Data
Master Data ![]() Activity Types
Activity Types ![]() Create Activity Types. Or use transaction code KL01. The Choose Activity screen pops up with the option to create or change an activity type. Select Create Activity Type and then click the
Create Activity Types. Or use transaction code KL01. The Choose Activity screen pops up with the option to create or change an activity type. Select Create Activity Type and then click the ![]() button on the bottom-right side of the screen. The Create Activity Type: Initial Screen is displayed. Update the following fields:
button on the bottom-right side of the screen. The Create Activity Type: Initial Screen is displayed. Update the following fields:
- Activity Type: Enter your Activity Type identifier. For this activity, we used PROD1 as the activity type. There is no special rule to the activity type identifier you can use. It is advisable to use as simple an activity type name as you can remember.
- Valid From: Enter the date you want your activity type to be valid from. Make sure that the date entered in this field includes the period you want your activity type to apply to.
- Valid To: The system automatically chooses this date.
Click the ![]() button on the top-left side of the screen. The Create Activity Type: Basic Screen is displayed (Figure 18-27).
button on the top-left side of the screen. The Create Activity Type: Basic Screen is displayed (Figure 18-27).

Figure 18-27. The basic screen for creating activity types
Update the following fields:
- Name: Enter the name—Assembly—for your activity type. This is can be abbreviated if desired.
![]() Note Activity types is a classification of activities produced in the cost centers within a controlling area. The name (Assembly) we used in this exercise is for illustration purposes only. In practice, you should use a name that reflects your organization’s activity types.
Note Activity types is a classification of activities produced in the cost centers within a controlling area. The name (Assembly) we used in this exercise is for illustration purposes only. In practice, you should use a name that reflects your organization’s activity types.
- Description: Enter a description—Assembly—of your activity type.
- Activity/Unit: Enter the measurement unit key—HR (Hours)—that you want to apply to your activity type. For example, Hours, Sales Percentage, and so on. The system has a list of cost center category to choose from. You can access these cost categories using matchcode.
- CCtr Categories: Enter the cost center category you want to use for your activity type. The system comes with a list of cost center categories to choose from using matchcode.
- ATyp Category: Select the appropriate activity type category—1 (manual entry, manual allocation). The system comes with four activity type categories to choose from.
- Allocation Cost Elem: Enter the cost element allocation number—7100000. This is the number you defined in the Define Cost Elements for Activity Allocation section.
- Price Indicator: Enter 1 (plan price, automatically based on activity). This specification allows you to calculate an allocation price by planned price automatically based on activity type for a cost center. You also can decide whether allocation calculation should be based on capacity or be determined manually by the user. You can access this indicator using the matchcode.
- Average Price: By setting the average price indicator, this will allow the system to determine how price of activity type or business process calculation is performed for a cost center.
- Actl Acty Type Cat: Select manual entry, manual allocation from the list of variant activity type categories for actual posting list. This is used to determine how the activity type is allocated.
- Act. Price indicator: Select actual price indicator for actual allocation price— 5 (actual price, automatically based on activity). This price indicator also determines how the activity type is calculated.
Click the Enter ![]() button to confirm your entries and save
button to confirm your entries and save ![]() your activity type.
your activity type.
Use Statistical Key Figures
Statistical key figures provide vital information relating to a business activity measured in non-monetary terms. For example, it can show number of employees, machine hours, and so on. This serves as the basis for internal allocation, which is defined either as a fixed value or as total values.
Statistical key figures can be used for the following internal allocations:
- Distribution: Method of cost allocation used to allocate FI costs (primary costs) to a cost center, which is applicable to primary cost elements.
- Assessment: This is the process of cost allocation generated internally in controlling to cost center. This method of allocation can be used for both primary and secondary costs. Costs allocated are posted to a secondary assessment cost element.
To create statistical key figures, use this menu path: IMG: Controlling ![]() Cost Center Accounting
Cost Center Accounting ![]() Master Data
Master Data ![]() Statistical Key Figures
Statistical Key Figures ![]() Create Activity Types
Create Activity Types ![]() Maintain Statistical Key Figures. Or use transaction code KK01. The Choose Activity Screen is displayed with the option to create or change the statistical key figures. Select Create Statistical Key Figures and click the
Maintain Statistical Key Figures. Or use transaction code KK01. The Choose Activity Screen is displayed with the option to create or change the statistical key figures. Select Create Statistical Key Figures and click the ![]() button on the bottom-right side of the screen. The Create Statistical Key Figure: Initial Screen is displayed. Enter an identifier for your statistical key figure in the Stat. Key Figure field (STAT01) and then click the
button on the bottom-right side of the screen. The Create Statistical Key Figure: Initial Screen is displayed. Enter an identifier for your statistical key figure in the Stat. Key Figure field (STAT01) and then click the ![]() button on the top-left side of the screen. This will allow you to enter details in the statistical key figure master data. The Create Statistical Key Figure: Master Data screen is displayed (Figure 18-28). The system will automatically set the statistical key figure and the controlling area.
button on the top-left side of the screen. This will allow you to enter details in the statistical key figure master data. The Create Statistical Key Figure: Master Data screen is displayed (Figure 18-28). The system will automatically set the statistical key figure and the controlling area.
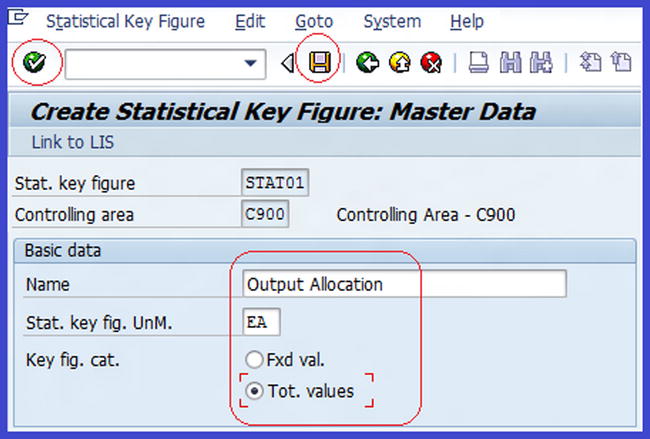
Figure 18-28. Basic screen for creating statistical key figures: master data
Update the following fields:
- Name: Enter a description—Output Allocation—for your statistical key figure.
- Stat. Key Fig. UnM.: Enter EA (Each) as the unit of measurement for your statistical figure by selecting it from the list supplied by the system using the matchcode.
- Key fig. Cat.: You are presented with two options to choose from, either as fixed values or total values, which will serve as a basis for internal allocation for your statistical key figure.
![]() Note The Fixed Val. indicator allows you to fix the value used for measurement to be carried forward to a future period. This value can be the number of employees, production hours, and so on.
Note The Fixed Val. indicator allows you to fix the value used for measurement to be carried forward to a future period. This value can be the number of employees, production hours, and so on.
The Tot. Values indicator enables you to indicate that the total values will vary from period to period. This means for each period you have to specify a new value. This would work well for machine hours, for example.
Click the Enter ![]() button to confirm your entries and save
button to confirm your entries and save ![]() your statistical key figure customizing.
your statistical key figure customizing.
Change Activity Output/Prices Planning
The Activity Output/Prices Planning option allows you to create multiple plan versions that you can use to compare different plan values or business processes. Go to the Change Activity Type/Price Planning: Initial Screen (Figure 18-29) by following this menu path: Easy Access: Accounting ![]() Controlling
Controlling ![]() Cost Enter Accounting
Cost Enter Accounting ![]() Planning
Planning ![]() Activity Output/Prices
Activity Output/Prices ![]() Change. Or use transaction code KP26.
Change. Or use transaction code KP26.

Figure 18-29. The initial screen for change activity type/price planning
Update the following fields:
- Version: Enter Plan/Actual version 0. This is a standard version supplied by SAP for this purpose.
- From/To Period: Enter the starting and ending period that you want your activity output/price to cover. This is usually 1-12-month periods.
- Fiscal Year: Enter the fiscal year you want to cover (the current fiscal year). This will usually be your company code’s fiscal year.
- Cost Center: Enter the cost center you want to take into consideration in your activity type planning.
- Activity Type: Enter the activity type you created.
Click the Enter ![]() button to confirm your entries. To display your activity type planning overview, click the Overview Screen
button to confirm your entries. To display your activity type planning overview, click the Overview Screen ![]() button on the top-left side of the screen. The Change Activity Type/Price Planning: Overview Screen is displayed (Figure 18-30).
button on the top-left side of the screen. The Change Activity Type/Price Planning: Overview Screen is displayed (Figure 18-30).
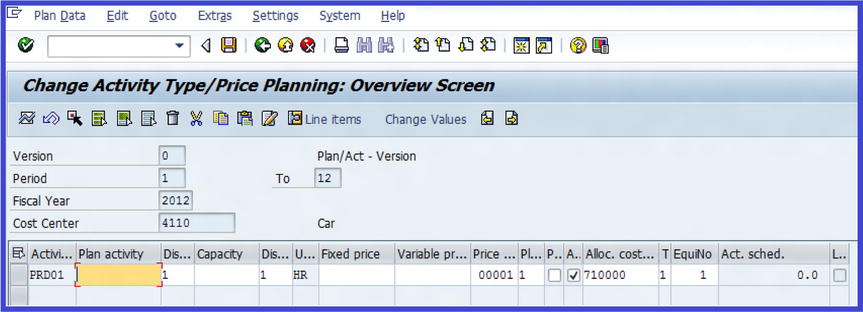
Figure 18-30. The overview screen for change activity type/price planning
When you save ![]() your work, the system will notify you in the status bar at the bottom of the screen that
your work, the system will notify you in the status bar at the bottom of the screen that ![]() .
.
Compare Cost Centers: Actual/Plan/Variance
This exercise will allow the system to compare actual costs with planned costs, generate variances between actual and planned costs, and execute a report displaying actual/planned costs and variances relating to activities in the cost center. By allowing you to generate reports that compare the actual with the planned business activities, this helps you make precise and prompt decisions and effectively plan and coordinate the business activities efficiently. Use this menu path: Easy Access: Accounting ![]() Controlling
Controlling ![]() Cost Accounting
Cost Accounting ![]() Information System
Information System ![]() Reports for Cost Accounting
Reports for Cost Accounting ![]() Plan/Actual Comparisons
Plan/Actual Comparisons ![]() Cost Center: Actual/Plan/Variance. Or use transaction code S_ALR_87013611.
Cost Center: Actual/Plan/Variance. Or use transaction code S_ALR_87013611.
The Cost Centers: Actual/Plan/Variance: Selection screen is displayed. Using the data in Table 18-6, update the fields listed.
Table 18-6. The Data Needed to Complete Cost Center: Actual/Plan/Variance Selection Screen
|
Field |
Value |
Description |
|---|---|---|
|
Controlling Area |
C900 |
Enter your controlling area. |
|
Fiscal Year |
2012 |
Enter the fiscal year you want to compare here. |
|
From Period |
1 |
This is the period you want to compare actual costs with plan costs. |
|
To Period |
12 |
The end period for actual/planned/variance. |
|
Plan Version |
0 |
This is the planned version you created in the “Maintain Plan Version” section. |
Click the Enter ![]() button to confirm your entries. To execute the actual/plan comparison, click the Execute
button to confirm your entries. To execute the actual/plan comparison, click the Execute ![]() button on the top-left side of the screen. The Cost Centers: Actual/Plan/Variance screen is displayed (Figure 18-31).
button on the top-left side of the screen. The Cost Centers: Actual/Plan/Variance screen is displayed (Figure 18-31).

Figure 18-31. The Cost Centers Actual/Plan Comparison report screen
Profit Center Accounting
A profit center is a department or unit within an organization that generates revenues. Profit centers can generate revenues and perhaps costs to arrive at a profit.
Under profit center accounting, you will configure the following settings:
- Maintain controlling area settings
- Create a dummy profit center
- Set control parameters for actual data
- Maintain plan versions
- Define a standard hierarchy for profit centers
- Define profit centers
- Define number ranges for local documents
- Assign profit centers to cost centers
Basic Settings
First, you need to define the setting for the controlling area necessary to set up profit center accounting. Secondly, you need to maintain the global settings for profit center accounting in the controlling area. To set your controlling area, follow this menu path: IMG: Controlling ![]() Profit Center Accounting
Profit Center Accounting ![]() Basic Settings
Basic Settings ![]() Set Controlling Area Settings. Or use transaction code OKKS.
Set Controlling Area Settings. Or use transaction code OKKS.
The Set Controlling Area dialog box is displayed. Enter your controlling area (C900) in the Controlling Area field and click the Enter ![]() button to confirm.
button to confirm.
Maintain Controlling Area Settings
Problem: You are tasked with maintaining the controlling area setting for your client’s company code C900. As additional information, you were told by the accounting team that the settings for the profit center currency type should be based on controlling area currency and the valuation view should be based on legal valuation.
Settings in this exercise will define the general control parameters for your current controlling area as it relates to a profit center in SAP R/3. To go to the maintain controlling area settings, follow this menu path: IMG: Controlling ![]() Profit Center Accounting
Profit Center Accounting ![]() Basic Settings
Basic Settings ![]() Controlling Area Settings
Controlling Area Settings ![]() Maintain Controlling Area Settings. Or use transaction code OKE5.
Maintain Controlling Area Settings. Or use transaction code OKE5.
The Change View “EC-PCA: Controlling Area Settings”: Overview screen is displayed (Figure 18-32). The system will use defaults based on the controlling area section of the page.
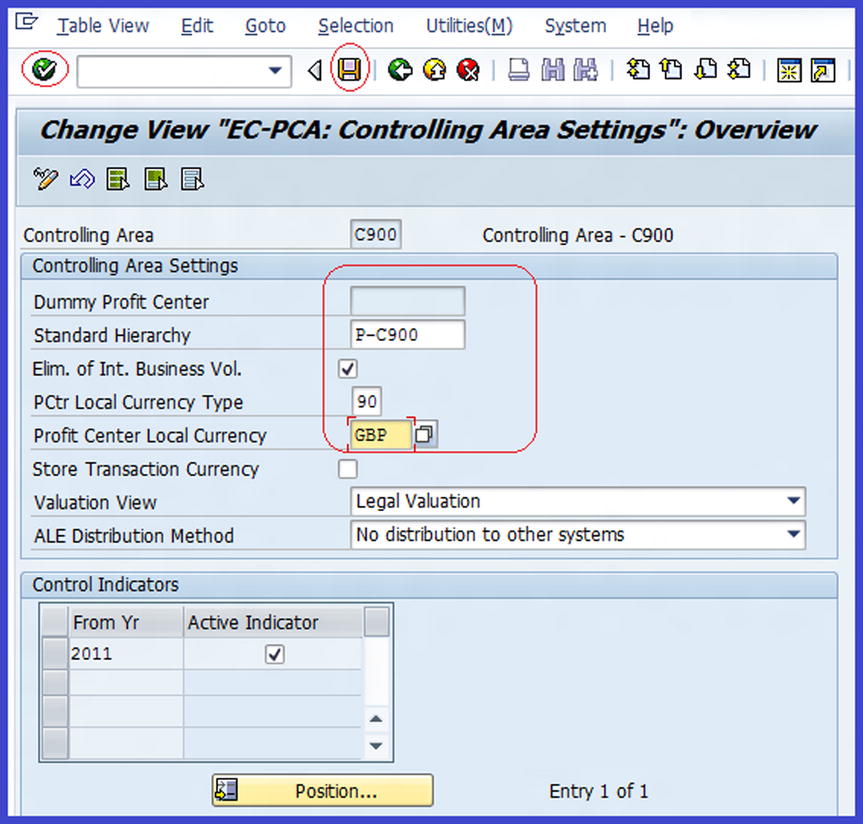
Figure 18-32. The overview screen for controlling area settings
Update the following fields:
- Standard Hierarchy: Enter a meaningful key as your profit center standard hierarchy. The profit center standard hierarchy will be used to define the tree structure of the profit center belonging to your controlling area. In this exercise we used P-C900.
- Dummy Profit Center: All postings in the system to objects that are not assigned to a profit center are received by a dummy profit center. The dummy profit center here is inactive. We will be defining dummy profit center in the next section.
- Elim. of Int, Business Vol.: Allows you to eliminate internal business volume in the controlling area. If you click this checkbox, the system will update transaction data between objects not assigned to the same profit center in the account based EC-PCA (Enterprise Controlling - Profit Center Accounting).
- PCtr Local Currency Type: This defines the currency type you want to use as the special profit center report currency. For example, GBP for British pound sterling.
- The transaction data in profit center accounting is updated in up to three currencies:
- Transaction currency
- Company code currency
- Third currency
Profit Center Local Currency: This allows you to set the currency type you want to use in your profit center. This displays values in the set currency for your standard report. You can choose from:
- 30 - Group currency
- 20 - Controlling area currency
- 90 - Profit center currency
Store Transaction Currency: When you choose Store Transaction Currency, the transaction data to profit center accounting in the transaction currency will be updated.
Valuation View: This allows you to determine whether the data is stored using transfer price from legal view, the group view, or the profit view in the controlling area.
ALE Distribution Method: This determines how data in the profit center accounting is distributed across systems using ALE (Application Link Enable).
Click the Enter ![]() button to confirm your entries and then save
button to confirm your entries and then save ![]() your controlling area settings.
your controlling area settings.
Create Dummy Profit Center
All postings in the system to objects that are not assigned to a profit center are received by a dummy profit center. This ensures that the data in the profit center accounting is complete. Data on the dummy cost center can later be sent to the other profit centers using the assessment or distribution function.
Problem: Not all cost centers are assigned to profit centers. You have been asked to create a dummy profit center that the system will automatically post all unassigned cost centers to.
To create a dummy profit center, follow this menu path: IMG: Controlling ![]() Profit Center Accounting
Profit Center Accounting ![]() Master Data
Master Data ![]() Profit Center
Profit Center ![]() Create Dummy Profit Center. Or use transaction code KE59. The Choose Activity screen pops up and you can create a dummy profit center or change a profit center. Select
Create Dummy Profit Center. Or use transaction code KE59. The Choose Activity screen pops up and you can create a dummy profit center or change a profit center. Select ![]() and click the
and click the ![]() button on the bottom-right side of the screen. The Create Dummy Profit Center: Initial Screen is displayed (Figure 18-33).
button on the bottom-right side of the screen. The Create Dummy Profit Center: Initial Screen is displayed (Figure 18-33).
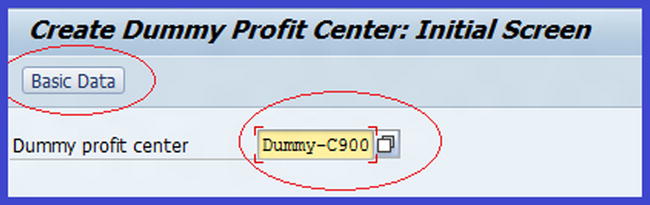
Figure 18-33. The initial screen for creating a dummny profit center
Enter an identification key for your dummy profit center in the Dummy Profit Center field (this could be numeric, alphabetic, or alphanumeric). We used Dummy-C900 in this exercise for illustration purposes. Click the ![]() button. The Create Dummy Profit Center: Basic Screen is displayed. The system will set the profit center, controlling area, and validity date by default. Update the following fields:
button. The Create Dummy Profit Center: Basic Screen is displayed. The system will set the profit center, controlling area, and validity date by default. Update the following fields:
- Name: Enter a suitable name, such as Dummy, for your dummy profit center.
- Description: Enter a description, such as Dummy – Profit Center, for your dummy profit center.
- Profit Center Group: Enter a key as an identification (P-C900) for the profit center group. This is used to group similar profit centers together, based on company specific criteria in a hierarchical structure of profit centers.
Click the Enter ![]() button to confirm your entries and save
button to confirm your entries and save ![]() .
.
Set Control Parameters for Actual Data
In this exercise, you will set all the control parameters for actual postings in profit center accounting. To set control parameters for the actual data, follow this menu path: IMG: Controlling ![]() Profit Center Accounting
Profit Center Accounting ![]() Basic Settings
Basic Settings ![]() Controlling Area Settings
Controlling Area Settings ![]() Activate Direct Postings
Activate Direct Postings ![]() Set Control Parameters for Actual Data. Or use transaction code 1KEF.
Set Control Parameters for Actual Data. Or use transaction code 1KEF.
The Change View “EC-PCA: Control Parameters for Actual Postings”: Overview screen is displayed. To be able to set the indicators for line items and for online transfer, click the ![]() button at the top of the screen. The New Entries: Overview of Added Entries screen appears. Update the appropriate fields using the information listed in Table 18-7.
button at the top of the screen. The New Entries: Overview of Added Entries screen appears. Update the appropriate fields using the information listed in Table 18-7.
Table 18-7. Data to Set Control Parameters for Actual Data
|
Field |
Value |
Description |
|---|---|---|
|
From Year |
2011 |
The year entered here must not be greater than your company’s fiscal year. |
|
Line Items |
Tick |
Determines whether actual line items are updated. |
|
Online Transfer |
Tick |
Controls how actual data is transferred to the R/3 system. |
Click the Enter ![]() button to confirm your entries and save
button to confirm your entries and save ![]() .
.
Maintain Plan Versions
The Plan Versions option allows you to maintain and manage several plans at the same time in the same profit center. You can then use more than one version simultaneously. To maintain plan versions, follow this menu path: IMG: Controlling ![]() Profit Center Accounting
Profit Center Accounting ![]() Basic Settings
Basic Settings ![]() Controlling Area Settings
Controlling Area Settings ![]() Activate Direct Postings
Activate Direct Postings ![]() Plan Versions
Plan Versions ![]() Maintain Plan Versions. Or use transaction code OKEQ. The General Version Definition screen is displayed (Figure 18-34). Select the appropriate version you want to include in your profit center. SAP comes with several plan versions.
Maintain Plan Versions. Or use transaction code OKEQ. The General Version Definition screen is displayed (Figure 18-34). Select the appropriate version you want to include in your profit center. SAP comes with several plan versions.
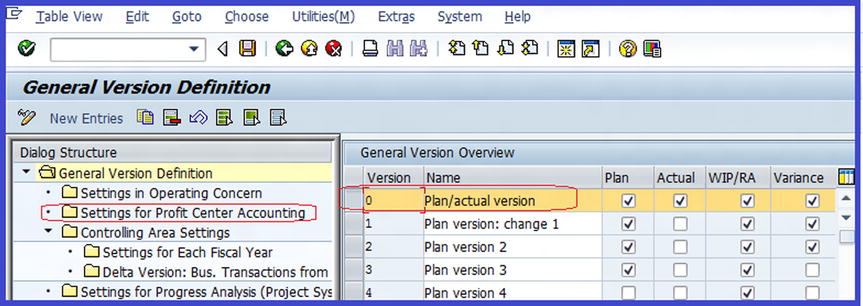
Figure 18-34. The General Version Definition screen, where you specify the version for your profit centers
For this exercise, select ![]() from the list of displayed versions. Double-click the
from the list of displayed versions. Double-click the ![]() folder on the left pane of the screen.
folder on the left pane of the screen.
The Determine Work Area: Entry dialog box pops up. Enter your controlling area code (C900) in Controlling Area field and click the Enter ![]() button on the bottom-left side of the screen. The Change View “Settings for Profit Center Accounting” Overview screen comes up. Click the
button on the bottom-left side of the screen. The Change View “Settings for Profit Center Accounting” Overview screen comes up. Click the ![]() button to bring up the New Entries screen (Figure 18-35).
button to bring up the New Entries screen (Figure 18-35).

Figure 18-35. The screen where you update the profit center accounting settings
- Years: Enter the years you want to maintain versions for in your profit center. Make sure this includes the fiscal year.
- Line Items: This option allows you to display line items in your report.
- ExRateType: The system comes with predefined exchange rates to choose from for your cost planning. Exchange rate type “M” used in this exercise is for standard transactions at average rates.
Click the Enter ![]() button to confirm your entries and save
button to confirm your entries and save ![]() .
.
Define Standard Hierarchy for Profit Centers
A standard hierarchy is simply a tree structure that allows you to structure profit centers in a controlling area; it shows the divisions responsible for generating profit in profit center accounting.
Before you define a standard hierarchy, it is important to map out the profit center’s hierarchy that you will be using as a guide. Because of the complexities involved in customizing standard hierarchies, there is no standard way of doing this. It is important that you spend time mapping out your standard hierarchy before commencing your configuration. We provide a standard hierarchy mapping in Table 18-8 as an illustration to help you define a standard hierarchy for your profit centers.
Problem: Company C900 Plc has asked you as their functional consultant to define the standard hierarchy for their profit centers in controlling area C900, using the data in Table 18-8.
Table 18-8. Mapping for Defining the Standard Hierarchy for Profit Centers
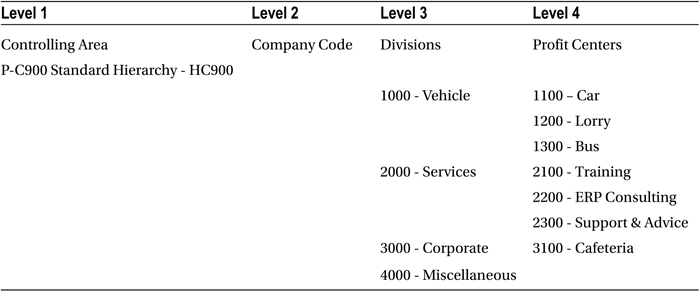
To define a standard hierarchy for your profit centers, follow this menu path: IMG: Controlling ![]() Profit Center Accounting
Profit Center Accounting ![]() Master Data
Master Data ![]() Profit Center
Profit Center ![]() Define Standard Hierarchy. Or use transaction code KCH1. The Set Controlling Area dialog box pops up. This will allow you to set the controlling area for your profit center. Enter your controlling area (C900) in the Controlling Area field and confirm your entries by clicking the Enter
Define Standard Hierarchy. Or use transaction code KCH1. The Set Controlling Area dialog box pops up. This will allow you to set the controlling area for your profit center. Enter your controlling area (C900) in the Controlling Area field and confirm your entries by clicking the Enter ![]() button at the bottom of the screen. The Change Standard Hierarchy (Profit Center Group): Structure screen is displayed (Figure 18-36), which is where you define the standard hierarchy for your profit center.
button at the bottom of the screen. The Change Standard Hierarchy (Profit Center Group): Structure screen is displayed (Figure 18-36), which is where you define the standard hierarchy for your profit center.
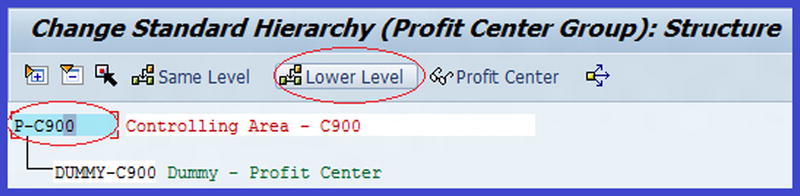
Figure 18-36. Defining a standard hierarchy for the profit center group
Since you want to create a lower level node under your standard hierarchy, select P-C900 – Controlling Area on the standard hierarchy and click the ![]() button in the middle of the screen to create a node under Dummy – Profit Center you created earlier. A node appears in the hierarchy under Dummy Profit Center. Update the node with your profit center group using the data in Table 18-8. Enter the profit center code 1000 and a description (such as Vehicles) in respective fields (Figure 18-37).
button in the middle of the screen to create a node under Dummy – Profit Center you created earlier. A node appears in the hierarchy under Dummy Profit Center. Update the node with your profit center group using the data in Table 18-8. Enter the profit center code 1000 and a description (such as Vehicles) in respective fields (Figure 18-37).
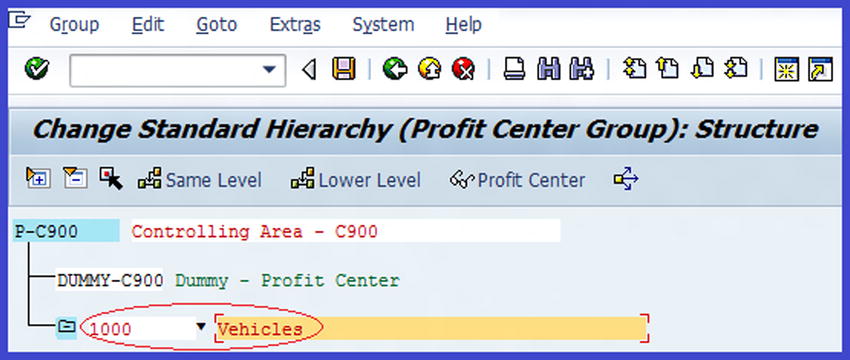
Figure 18-37. Updating a standard hierarchy for a profit center group
You need to create another node at the same level with 1000-Vehicles for 2000-Services. Select the 1000-Vehicles node from the hierarchy by clicking on it and then click the ![]() button. A blank node appears at the same level under 1000-Vehicles. Update the node by entering the code for profit center (2000) and a description of the profit center (Services).
button. A blank node appears at the same level under 1000-Vehicles. Update the node by entering the code for profit center (2000) and a description of the profit center (Services).
Repeat this process to create the followings profit center groups:
- 3000 – Corporate
- 4000 – Miscellaneous
The hierarchy structure for your profit center groups should look like the one shown in Figure 18-38.

Figure 18-38. The complete standard hierarchy for the profit center groups
Save ![]() your work.
your work.
Define Profit Center
In this exercise, you will define a profit center and change the profit center master data.
![]() Note Before creating a profit center, make sure that you have defined the standard hierarchy for your profit center in the controlling area’s basic settings.
Note Before creating a profit center, make sure that you have defined the standard hierarchy for your profit center in the controlling area’s basic settings.
To define a profit center, follow this menu path: IMG: Controlling – Profit Center Accounting – Master Data – Profit Center – Define Profit Center. Or use transaction code KE51. The Create Profit Center Choose Activity screen is displayed with the option to create or change a profit center. Select EC-PCA: Create Profit Center from the activity list by double-clicking it or selecting it and then clicking the ![]() button on the bottom-right side of the screen. An initial Create Profit Center screen comes up. Enter your profit center. It is advisable to use a numeric value. We used 1100 as our profit center. To specify details for the proft center, click the
button on the bottom-right side of the screen. An initial Create Profit Center screen comes up. Enter your profit center. It is advisable to use a numeric value. We used 1100 as our profit center. To specify details for the proft center, click the ![]() button on the top-left side of the screen. The Create Profit Center screen for further specifications is displayed (Figure 18-39). On this screen, notice the defaults used in the following fields—Controlling Area – C900, Profit Center -1100, and Analysis Period – 01.01.2012-31.12.9999. You can change the analysis period if you choose to.
button on the top-left side of the screen. The Create Profit Center screen for further specifications is displayed (Figure 18-39). On this screen, notice the defaults used in the following fields—Controlling Area – C900, Profit Center -1100, and Analysis Period – 01.01.2012-31.12.9999. You can change the analysis period if you choose to.
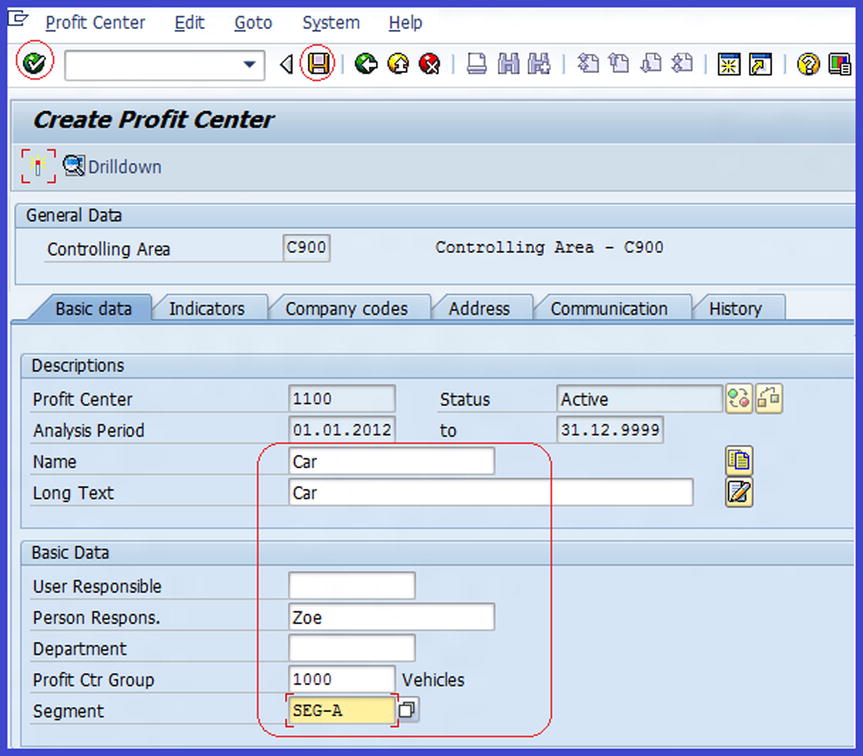
Figure 18-39. The screen where you enter details for your profit center and ensure that the profit center status is active
- Name: Enter the name of your profit center. In this exercise we used Car as our profit center name. You can use an abbreviation.
- Long Text: Enter the full name or a detailed description of your profit center, such as Car (Vehicle).
- User Responsible: This is the name of the user of the profit center. This is optional.
- Person Respons.: Enter the name of the key staff responsible for the profit center, such as Zoe.
- Department: This is the department in your organization that’s in charge of the profit center. This field is optional.
- Profit Ctr Group: Enter the profit center group 1000 (Vehicles) that your profit center relates to. The profit center group was defined in the standard hierarchy earlier (for example, Vehicles). You can access profit center group by using the matchcode.
- Segment: Enter the area or division in your company that creates its own financial statement for external reporting relating to the profit center.
At this point the profit center is inactive, as shown in the Status field. To activate the profit center, click the Activate ![]() button on the top-left side of the screen. The Status field will turn from ‘Inactive’ to ‘Active’.
button on the top-left side of the screen. The Status field will turn from ‘Inactive’ to ‘Active’.
Repeat the steps in this section to define the remaining profit centers using the information in Table 18-8.
![]() Note To view or display the profit centers you have created, return to the standard hierarchy and expand each of the profit center groups.
Note To view or display the profit centers you have created, return to the standard hierarchy and expand each of the profit center groups.
Define Number Ranges for Local Documents
The same process for maintaining number intervals for G/L documents is applicable when you’re defining number ranges for local documents. The idea here is to assign number intervals to the documents you created and the ones delivered by the system. Number assignment functions with company code and your company code fiscal year.
In this exercise, you will copy existing number ranges from company code 1000. You can refer back to the section “Define Number Ranges” in Chapter 3 to define number ranges. To define number ranges for your profit centers, follow this menu path: IMG: Controlling ![]() Profit Center Accounting
Profit Center Accounting ![]() Planning
Planning ![]() Basic Settings for Planning
Basic Settings for Planning ![]() Define Number Ranges
Define Number Ranges ![]() Define Number Ranges for Local Documents. Or use transaction code GB02.
Define Number Ranges for Local Documents. Or use transaction code GB02.
The Number Ranges for Local G/L Documents screen comes up with a list of predefined number ranges. Select the company code you want to copy number ranges from and click the Copy ![]() button left of the screen. The Copy Company Code Number Ranges screen pops up. Notice that the company code you want to copy from (Source Company code - 1000) is entered in the From field. Enter your company code (target company code is C900) in the To field and then click the Copy
button left of the screen. The Copy Company Code Number Ranges screen pops up. Notice that the company code you want to copy from (Source Company code - 1000) is entered in the From field. Enter your company code (target company code is C900) in the To field and then click the Copy ![]() button at the bottom of the screen. The Transport number range intervals screen pops up with a message. Ignore the message and click the Enter
button at the bottom of the screen. The Transport number range intervals screen pops up with a message. Ignore the message and click the Enter ![]() button at the bottom of the screen to confirm your action. The system will then notify you that
button at the bottom of the screen to confirm your action. The system will then notify you that![]() .
.
Assign Profit Centers to Cost Centers
The final stage in creating profit centers is to assign the profit centers to the cost centers you created in the “Create Cost Centers” section in the “Cost Center Accounting” section, earlier in this chapter.
![]() Note Not all cost centers generate profits. Only cost centers that generate profits are assigned to profit centers. The cost centers that are not assigned to a specific profit center will be automatically assigned to a dummy profit center.
Note Not all cost centers generate profits. Only cost centers that generate profits are assigned to profit centers. The cost centers that are not assigned to a specific profit center will be automatically assigned to a dummy profit center.
To assign profit centers to cost centers in the cost center master data, follow this menu path: IMG: Controlling ![]() Cost Center Accounting
Cost Center Accounting ![]() Master Data
Master Data ![]() Cost Centers
Cost Centers ![]() Change Cost Centers. Or use transaction code KS02.
Change Cost Centers. Or use transaction code KS02.
The Choose Activity screen is displayed with options to create or change a cost center. Select the option to ![]() master data and click the
master data and click the ![]() button on the bottom-left side of the screen. The Set Controlling Area dialog box pops up. Enter your controlling area (C900) in the Controlling Area field and click the Enter
button on the bottom-left side of the screen. The Set Controlling Area dialog box pops up. Enter your controlling area (C900) in the Controlling Area field and click the Enter ![]() button at the bottom of the screen to confirm your entries. The Change Cost Center Initial Screen is displayed.
button at the bottom of the screen to confirm your entries. The Change Cost Center Initial Screen is displayed.
![]() Note For illustration purposes, we assume that the following cost centers generate profits and costs and should therefore be assigned profit centers: Cafeteria, Car, Lorry, Bus, Training, and ERP Consulting.
Note For illustration purposes, we assume that the following cost centers generate profits and costs and should therefore be assigned profit centers: Cafeteria, Car, Lorry, Bus, Training, and ERP Consulting.
Enter the cost center 1220 (for Cafeteria) in the Cost Center field and then click the ![]() button on the top-left side of the screen to call up the Change Cost Center: Basic Screen (Figure 18-40). This is where you assign the appropriate profit center to the cost center in the cost center master data.
button on the top-left side of the screen to call up the Change Cost Center: Basic Screen (Figure 18-40). This is where you assign the appropriate profit center to the cost center in the cost center master data.
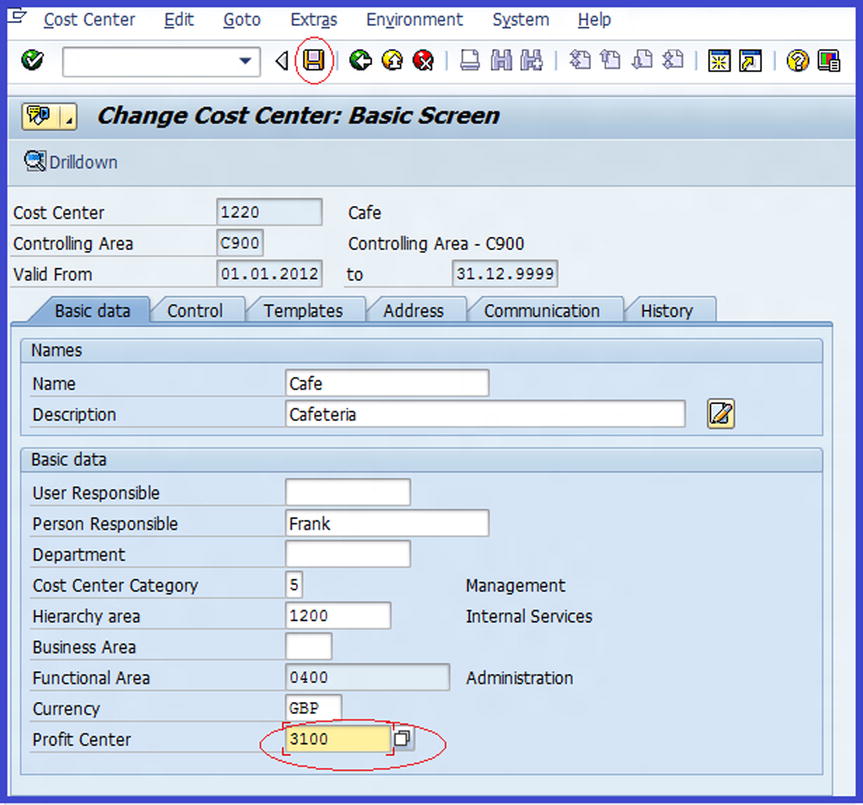
Figure 18-40. Assigning a profit center to a cost center
The settings you made in the cost center will be the defaults here. The only change you need to make in this exercise is to assign cost centers to profit centers. Using the matchcode, enter the cost center 3100 (Café) in the Profit Center field and save ![]() your changes.
your changes.
![]() Note If the valid date for your profit and cost centers are not the same, you may likely experience problems when saving your work. The system will issue an error message on the status bar stating that “Profit Center C900/ 3100 does not exist for the validity date 01.01.XX”.
Note If the valid date for your profit and cost centers are not the same, you may likely experience problems when saving your work. The system will issue an error message on the status bar stating that “Profit Center C900/ 3100 does not exist for the validity date 01.01.XX”.
To resolve this issue, go back to the profit center master data and make the validity date the same as the cost center master’s date.
The Change the field screen pops up with a message relating to the changes you have made in your cost center master data. Confirm these changes by clicking the ![]() button at the bottom of the screen.
button at the bottom of the screen.
Repeat the steps in the “Assign Profit Centers to Cost Centers” section to assign the remaining cost centers to profit centers.
Now let’s post some controlling documents in FI to test what you have done so far.
Posting Controlling Documents
It is important to note that during FI document posting, cost object’s (for example, cost center, internal order and so on) controlling documents are automatically posted in controlling. Use transaction code FB60 to go to the Enter Vendor Invoice: Company Code C900 screen. Post a document controlling document using the data in Table 18-9.
Table 18-9. The Data Needed to Post a Controlling Document in FI
|
Field |
Value |
Description |
|---|---|---|
|
Vendor |
300124 |
Using the matchcode, enter the vendor account you are posting the document to. |
|
Invoice Date |
21.06.2012 |
Use today’s date as your invoice date. |
|
Posting Date |
Today’s date |
Use today’s date as your document posting date. |
|
Amount |
1000 |
Enter the document amount. |
|
Calculate Tax |
Check |
Check to set the system to calculate tax amount for this document. |
|
Tax Code |
A2 |
Enter the tax code for input tax that the system will use when calculating the tax amount. |
|
G/L Account |
474000 |
The account the document is posted to. |
|
D/C |
Debit |
Since this transaction is an expense, the accounting treatment is a debit. The system will automatically credit the corresponding vendor’s account. |
|
Amount |
1000 |
The document amount that is posted to the expense account as a debit. |
|
Cost Center |
4110 |
The cost center that the expense is posted to. |
![]() Note The system will automatically update the Profit Center field. You can check to see if the profit center is assigned to the document entry by scrolling to the right side of the screen (Figure 18-41).
Note The system will automatically update the Profit Center field. You can check to see if the profit center is assigned to the document entry by scrolling to the right side of the screen (Figure 18-41).

Figure 18-41. The Enter Vendor Invoice: Company Code C900 screen
You will notice that profit center 1100 is assigned automatically through the cost center assignment in the Profit Center field. Once you are satisfied with your entries, click the ![]() button at the top of the screen to display your transaction entry and post
button at the top of the screen to display your transaction entry and post ![]() your invoice entries.
your invoice entries.
Now that you have posted a controlling document in FI, let’s see how this affects the controlling module.
Display Line Items
To display line items, use transaction code FBL1N. The Vendor Line Item Display screen comes up.
![]() Note For more information on line items, refer back to Chapter 17 (in the section “Display line items”) to see the note on line item display.
Note For more information on line items, refer back to Chapter 17 (in the section “Display line items”) to see the note on line item display.
Update the screen with the information shown in Table 18-10.
Table 18-10. Information to Update the Line Item Display Screen
|
Field |
Value |
Description |
|---|---|---|
|
Vendor Account |
300124 (your vendor) |
Enter the vendor account that you want to display the line item. |
|
Company code |
C900 (your company code) |
Enter your company code. |
|
Open Items |
Select |
Check this option to display all open items in the vendor account. |
For the system to execute line items, click the Execute ![]() button on the top-left side of the screen. The Vendor Line Item Display screen appears showing all the open line items for your vendor (Figure 18-42).
button on the top-left side of the screen. The Vendor Line Item Display screen appears showing all the open line items for your vendor (Figure 18-42).
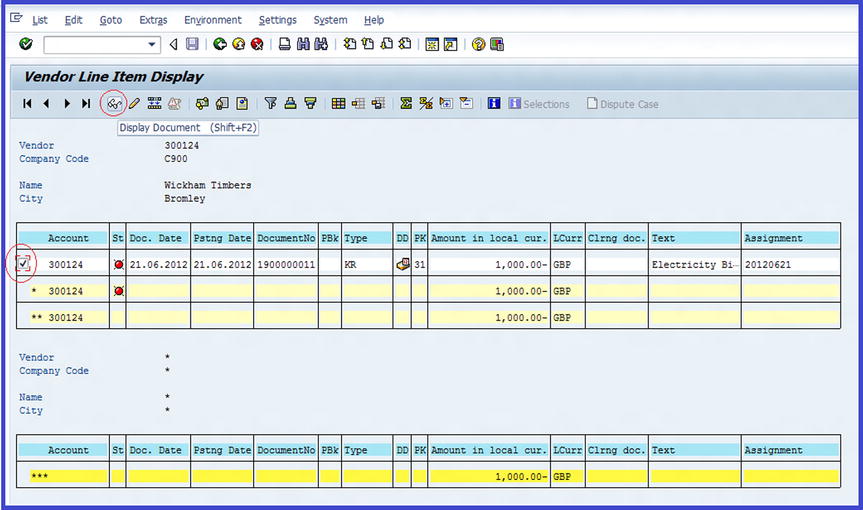
Figure 18-42. The Vendor Line Items Display screen
Check the item you want to consider in the controlling document by selecting the checkbox in the Account column. To display the item you selected, click the Display Document ![]() button on the top-left side of the screen. The Display Document: Line Item 001 screen comes up. Click the Call Up Document Overview
button on the top-left side of the screen. The Display Document: Line Item 001 screen comes up. Click the Call Up Document Overview ![]() button at the top of the screen. The Display Document: Data Entry View screen is displayed. On the menu bar at the top of the screen, click the
button at the top of the screen. The Display Document: Data Entry View screen is displayed. On the menu bar at the top of the screen, click the ![]() button; a pull-down menu is displayed. Select
button; a pull-down menu is displayed. Select ![]() from the list and then select
from the list and then select ![]() from the sub pull-down menu. The List of Documents in Accounting screen pops up.
from the sub pull-down menu. The List of Documents in Accounting screen pops up.
Select ![]() from the displayed list of items on the screen and then click the
from the displayed list of items on the screen and then click the ![]() button at the bottom of screen. The Display Actual Cost Documents screen appears displaying the cost objects posted to the system (Figure 18-43).
button at the bottom of screen. The Display Actual Cost Documents screen appears displaying the cost objects posted to the system (Figure 18-43).
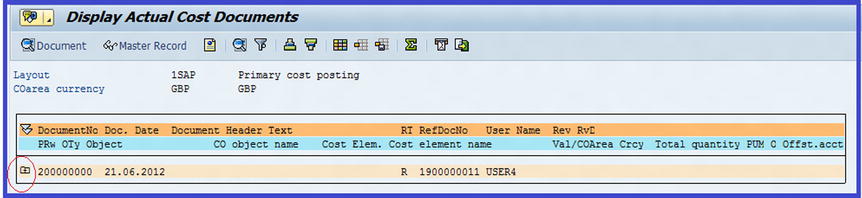
Figure 18-43. The Display Actual Cost Documents screen
To expand your document further, click the Expand ![]() button in the front of the document number to expand the actual cost. Notice that the CO object item (for example, electricity) is displayed.
button in the front of the document number to expand the actual cost. Notice that the CO object item (for example, electricity) is displayed.
Finally, let’s see how this transaction will appear in a profit center.
Click the Back ![]() button to return to previous screen. The Display Actual Cost Document screen pops up with the question, “Do you want to exit this list?” Confirm that you want to exit the list by clicking the
button to return to previous screen. The Display Actual Cost Document screen pops up with the question, “Do you want to exit this list?” Confirm that you want to exit the list by clicking the ![]() button at the bottom of the screen. The List of Documents in Accounting screen is displayed. Select
button at the bottom of the screen. The List of Documents in Accounting screen is displayed. Select ![]() from the displayed list and click the Choose
from the displayed list and click the Choose ![]() (F2) button at the bottom of the screen. The Profit Center: Actual Line Items screen is displayed showing the profit center documents in the profit center (Figure 18-44).
(F2) button at the bottom of the screen. The Profit Center: Actual Line Items screen is displayed showing the profit center documents in the profit center (Figure 18-44).
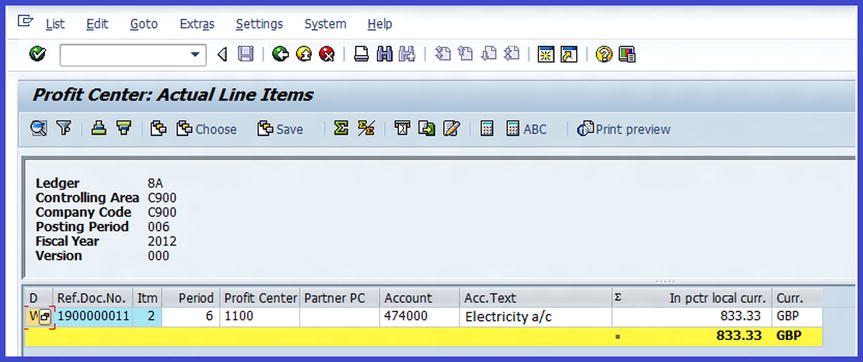
Figure 18-44. Profit center’s actual line item display
Profit Center: Interactive Reporting
Several reports can be displayed in the system. In this exercise, you will only look at the profit center group: plan/actual/variance report. To generate the profit center group planned and actual variance report, follow this menu path: Easy Access: Accounting ![]() Controlling
Controlling ![]() Profit Center
Profit Center ![]() Information System
Information System ![]() Interactive Reporting
Interactive Reporting ![]() Profit Center Group: Plan/Actual/Variance. Or use transaction code S_ALR_87013326.
Profit Center Group: Plan/Actual/Variance. Or use transaction code S_ALR_87013326.
![]() Tip The system may request a controlling area setting. If this is the case, enter your controlling area (C900) in the Set Controlling field in the controlling area screen and then confirm your entry.
Tip The system may request a controlling area setting. If this is the case, enter your controlling area (C900) in the Set Controlling field in the controlling area screen and then confirm your entry.
The Selection: Profit Center Grp: Plan/Actual/Variance screen is displayed. Using the data in Table 18-11, update the appropriate fields.
Table 18-11. The Data Needed to Specify Profit Center Interactive Reporting
|
Field |
Value |
Description |
|---|---|---|
|
From |
1 |
Enter the start period that you want to include in the report. |
|
To |
12 |
Enter the period you want the report to end. This is the accounting period that you want to include in your report. This is usually between 1 to 12 months for a given fiscal year. |
|
Fiscal Year |
2012 |
Enter the accounting year you want to include in your report. This is likely to be the current fiscal year. |
|
Plan Version |
0 |
Enter the version of your plan version. For this exercise use version 0. |
Update the fields and then click the Execute  button on the top-left side of the screen to generate the report.
![]() Tip Try other reports on your own.
Tip Try other reports on your own.
Distribution
Distribution is the method of cost allocation that you use when allocating primary costs of a cost center between the sender and the receiver. In this exercise, we will configure settings for actual distribution. We will define distribution in the form of cycles by defining rules for the settlement of primary costs for a cost center. Original costs are passed on to the receiver cost center by way of allocation.
You can access the screen to define distribution in two ways, in easy access or using IMG:
- Easy Access: Accounting
 Controlling Cost Center Accounting Period-End Closing Current Settings Define Distribution
 - IMG: Controlling Cost Center Accounting Actual Posting Period-End Closing Distribution Define Distribution
The Choose Activity screen is displayed, where you can create or change an actual distribution. Select Create Actual Distribution from the list and click the ![]() button at the bottom of the screen. The Create Actual Distribution Cycle: Initial Screen is displayed (Figure 18-45). This is where you define the cycle ID and the start date of the distribution circle.
button at the bottom of the screen. The Create Actual Distribution Cycle: Initial Screen is displayed (Figure 18-45). This is where you define the cycle ID and the start date of the distribution circle.
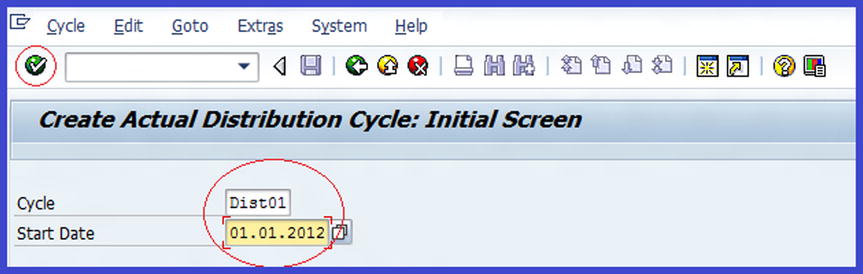
Figure 18-45. The initial screen to define the cycle ID and the start date of the distribution cycle
- Cycle: Enter an ID (DIST01) for your distribution cycle. This can be a numeric or an alphanumeric digit. Whatever you use as your identifier digit must be agreed on with the cost accounting team.
- Start Date: This is the date you want your distribution cycle to start. This can be the start date of your current fiscal year.
Click the Enter ![]() button to proceed to the Create Actual Distribution Cycle: Header Data screen. Enter a description for your distribution cycle in the Text field (Distribution Circle –C900).
button to proceed to the Create Actual Distribution Cycle: Header Data screen. Enter a description for your distribution cycle in the Text field (Distribution Circle –C900).
To attach a segment to your distribution cycle, click the ![]() button. The Create Actual Distribution Cycles: Segment screen is displayed (Figure 18-46).
button. The Create Actual Distribution Cycles: Segment screen is displayed (Figure 18-46).
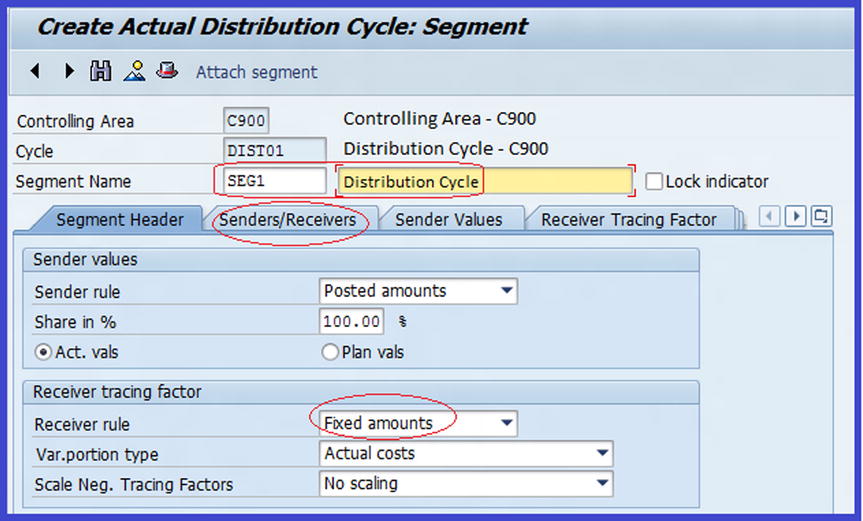
Figure 18-46. The Create Actual Distribution Cycle (Segment Header) screen
Enter a key (SEG1) and a name for your segment distribution cycle in the Segment Name field. The sender rule defaults to posted amounts, and share in % is set to 100% by default. Change the receiver rule to Fixed Amounts. A receiver rule controls how the receiver-tracing factor is determined. By specifying fixed amount as a tracing factor, a specific amount allocation is passed to receivers based on the sender rule.
The next step is to specify the cost center and cost element for the sender and receiver. Click the ![]() tab at the top of the Create Actual Distribution Cycle: Segment screen to go to sender’s section of the screen. Enter the cost center you want to include in your distribution cycle and specify the cost element range as well in the respective fields. In the Receiver section, enter the receiving cost centers (Figure 18-47).
tab at the top of the Create Actual Distribution Cycle: Segment screen to go to sender’s section of the screen. Enter the cost center you want to include in your distribution cycle and specify the cost element range as well in the respective fields. In the Receiver section, enter the receiving cost centers (Figure 18-47).
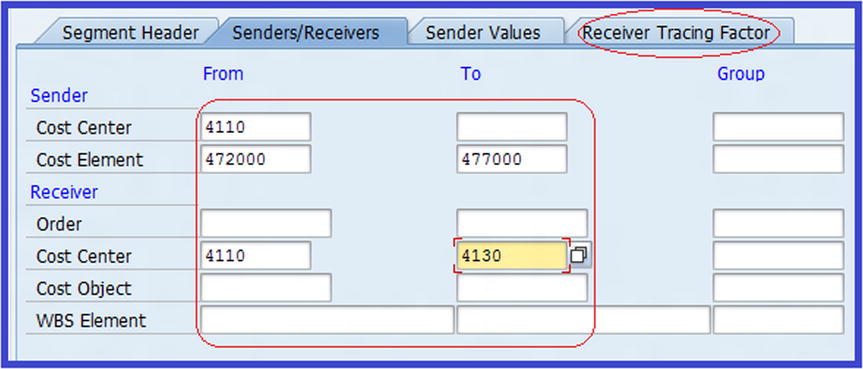
Figure 18-47. The screen to specify the accounts for sender/receiver
The final step is to specify the percentage to distribute costs to centers in the Receiver Tracing Factor section of the screen. Click the ![]() tab. The concept here is that the cost of the cost center 4110 (sender) is being passed to other cost centers (receivers). Since this cost is being passed to more than one cost center, it is important to distribute the cost to each cost center (the receivers) systematically. You can do this by using percentage rates as the basis of apportioning the cost to each receiving cost centers 4120 – 4130. The total percentages you apply to the cost centers must equal 100%. See Figure 18-48.
tab. The concept here is that the cost of the cost center 4110 (sender) is being passed to other cost centers (receivers). Since this cost is being passed to more than one cost center, it is important to distribute the cost to each cost center (the receivers) systematically. You can do this by using percentage rates as the basis of apportioning the cost to each receiving cost centers 4120 – 4130. The total percentages you apply to the cost centers must equal 100%. See Figure 18-48.
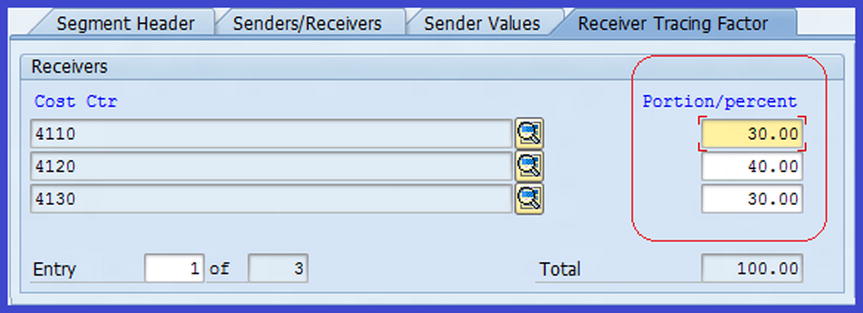
Figure 18-48. The screen where you set the mode of apportionment in percentage rate between cost centers (receivers)
Save ![]() your efforts. The system will notify you that
your efforts. The system will notify you that ![]() in the status bar at the bottom of the screen.
in the status bar at the bottom of the screen.
Let’s see how the distribution you have created works by posting some expenses in G/L accounts.
G/L Account Posting
Use transaction code FB50 to enter the G/L account documents. Using the Enter G/L Account Document: Company Code C900 screen in Figure 18-49 as a model, update your screen.
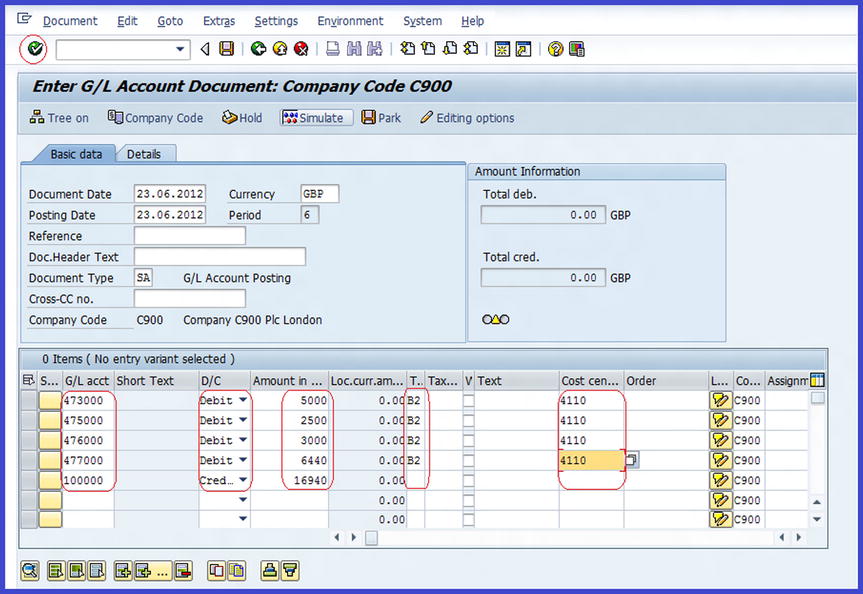
Figure 18-49. Entering G/L account documents
Click the Enter ![]() button. Notice that the status bar for each of the G/L accounts you have entered are ticked green. In order to instruct the system to calculate tax using the tax code you have entered, click the
button. Notice that the status bar for each of the G/L accounts you have entered are ticked green. In order to instruct the system to calculate tax using the tax code you have entered, click the ![]() tab at the top of the screen and make sure that the Calculate Tax checkbox is checked
tab at the top of the screen and make sure that the Calculate Tax checkbox is checked ![]() .
.
To display your entries, click the ![]() button at the top of the screen. The Document Overview screen displays all the items you entered in the G/L account. If you are satisfied with your entries, you can post
button at the top of the screen. The Document Overview screen displays all the items you entered in the G/L account. If you are satisfied with your entries, you can post ![]() them.
them.
Finally, let’s see how the cost center line items are displayed.
Display Actual Cost Line Items for Cost Centers
To display the cost line items for your cost centers, use this menu path: Easy Access: Accounting ![]() Control
Control ![]() Cost Center Accounting
Cost Center Accounting ![]() Information System
Information System ![]() Report for Cost Center Accounting
Report for Cost Center Accounting ![]() Line Items
Line Items ![]() Cost Centers: Actual Line Items. Or use transaction code KSB1.
Cost Centers: Actual Line Items. Or use transaction code KSB1.
The Display Actual Cost Line Items for Cost Centers: Initial Screen is displayed. You can enter a range of cost centers that you want to display in your line items in the Cost Center fields if you choose to display more than one cost center in your line item display. For this exercise, enter Cost Center 4110 in the Center field and click the Execute![]() button on the top-left side of the screen to generate line items report of the cost center. The Display Actual Cost Line Items for Cost Center screen comes up showing all items posted in the cost center (Figure 18-50).
button on the top-left side of the screen to generate line items report of the cost center. The Display Actual Cost Line Items for Cost Center screen comes up showing all items posted in the cost center (Figure 18-50).

Figure 18-50. The Actual Cost Line Items display of cost center 4110
It is possible to see the source document on an item in the line item display. To do this, select the item you want to view and then click the ![]() button on the top-left side of the screen. The Display Document: Data Entry View screen is displayed showing the source document for the item you chose (Figure 18-51).
button on the top-left side of the screen. The Display Document: Data Entry View screen is displayed showing the source document for the item you chose (Figure 18-51).
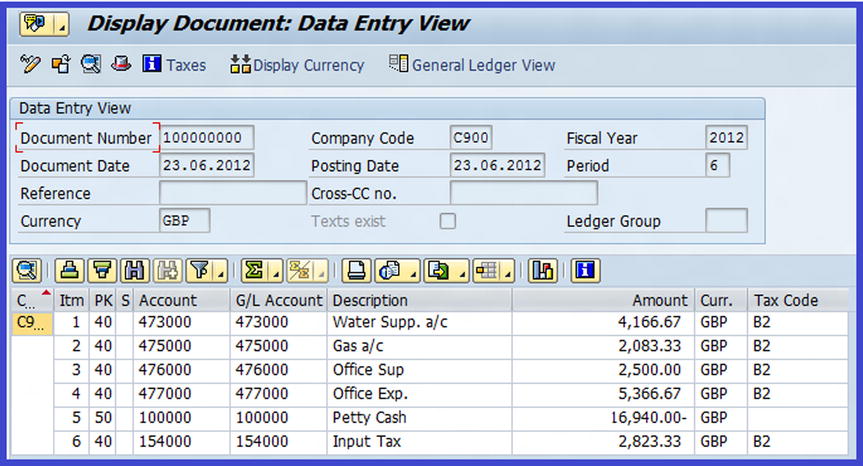
Figure 18-51. Source document display for an individual item in a cost center
Summary
This chapter explained what controlling is. You learned how to maintain a controlling area, how to set number ranges for controlling documents, and how to set version approaches/transfer pricing. You also learned what a cost element is and how to set defaults for automatic creation of primary and secondary cost elements. You learned what a cost center is and how to define standard hierarchy for cost centers, create cost center groups, and define statistical key figures. You then learned what a profit center is and went through the various steps involved in customizing a profit center. This included the basic settings involved in the profit center, including how to maintain controlling areas settings, create dummy profit centers, set the control parameters for the actual data, maintain versions for profit centers, and assign profit centers to a cost center. You also looked at how to post controlling documents and how to generate interactive reporting for a profit center.
In the next chapter, you will look at what a new G/L is, how to define ledgers for the general ledger, how to define leading and non-leading ledgers, the benefits of a new general ledger, what scenarios are, and how to carry out real-time integration of controlling with FI. You will also learn how to define documents for entry view in a ledger, what splitting a document entails, and how to define a splitting document. Finally, you will look at the steps involved in closing procedures for foreign currencies valuations, carrying forward balances, and reclassifying GR/IR clearing.