
![]()
Managing the Shopping Cart
Up until now, you have been focusing on displaying the products’ listings and their detailed information. In this chapter, you will enable the users to choose the product(s) they want to purchase and add them to the shopping cart.
As the name suggests, a shopping cart is a software module that shows the products chosen by the visitor for purchase. The items in the cart can be revised if required, i.e., after adding the products to the cart, users can remove them from the cart, add more items to the cart, and increase the quantity of the products already selected in the cart. A cart is a database table that temporarily keeps the user’s items selected for purchase.
To store and manage items in the cart, a database table called cart was created with the structure defined in Chapter 1. Here, you’ll learn to write code to save items to the cart that the visitor wants to buy.
In this chapter, you are going to learn about the following:
- Saving selections to the cart
- Maintaining the cart
- Displaying the cart count in the site header using AJAX
- Proceeding to check out
- Supplying shipping information
- Understanding different payment modes
- Making payments
Saving Selections in the Cart
Recall from Chapter 3 that the itemdetails.php script shown in Listing 3-7 displays the detailed information about the selected product and shows the following two buttons beneath the information:
- Buy Now—Adds the item to the cart and proceeds to checkout.
- Add To Cart—Adds the item to the cart and remains there, thus enabling the user to choose more products.
The Add To Cart button navigates to the cart.php script, which saves the current product’s information in the cart table. The code in the cart.php script is shown in Listing 4-1.
The program begins by starting the session. The session ID will be used to remember the items selected in the cart by the particular user. Remember that the status of the session is equal to PHP_SESSION_NONE if the session is enabled and none exists. Then, a connection to the MySQL server is established and the shopping database file is selected. The quantity of the item purchased (stored in the quantity variable) is retrieved from the $_POST array. If the user has not specified a quantity, the default is one. It also verifies that the value of the quantity entered is a non-negative number. The item code, item name, and price (stored in the icode, iname, and iprice variables) sent from the itemdetails.php script are retrieved using the $_REQUEST array and are assigned to the $itemcode, $item_name, and $price variables.
A session is generated and stored in the $sess variable. This session ID is assigned to all the products selected in the cart to identify the items selected by a particular user. The value of the action variable is retrieved and determines the kind of operation to be applied to the cart items. The value of the action variable can be add, change, or delete. When the action variable’s value is add, it means the product has to be added to the cart table. Similarly, if the action’s value is change, it means a product that is already in the cart needs to be modified, and the delete action means that the specified product has to be deleted from the cart.
When the action variable is add, it is first checked to determine whether the product is already in the cart. If the product is already in the cart, only the quantity field is modified, i.e., the quantity of the product is incremented to indicate the addition. If the product does not exist in the cart, a new row is added to the cart table.
![]() Note A session is a combination of a server-side file containing all the data you want to store about the visitor and a client-side cookie containing a reference to the server data. The file and the client-side cookie are created using the function session_start(). As you learned in Chapter 3, HTTP is a stateless protocol, which means the session ID must be continuously correlated with the user through the use of cookies, URL rewrites, or hidden fields.
Note A session is a combination of a server-side file containing all the data you want to store about the visitor and a client-side cookie containing a reference to the server data. The file and the client-side cookie are created using the function session_start(). As you learned in Chapter 3, HTTP is a stateless protocol, which means the session ID must be continuously correlated with the user through the use of cookies, URL rewrites, or hidden fields.
Upon running the script, you get the detailed information of the selected product. You’ll also see prompts to enter the quantity of that product, followed by clicking Add To Cart or Buy Now, as shown in Figure 4-1.

Figure 4-1. Adding the selected item to the cart
The cart.php script shown in Listing 4-1 is primarily focused on adding products to the cart. After adding products to the cart, you need to maintain it. That is, you need to modify the cart’s content based on the visitor’s changes. You’ll see how that is done in the next section.
After adding products to the cart, you need a script to display all the products selected in the cart and modify the cart content if required. The showcart.php script shown in Listing 4-2 does the task of displaying items selected in the cart and managing them.
The program determines whether the session ID is already set. If not, a new session is started. As you read earlier, the session ID helps to identify the products selected by the specific visitor of the site. Thereafter, a connection to the MySQL server is established and the shopping database is selected. A SQL query is executed to check if there are any products in the cart with the given session ID. If there are, that means the visitor has added one or more products to the cart already. In that case, all the items stored in the cart, along with their respective quantities, are displayed on the screen.
If no products are found in the cart table that match the given session ID, it means no products are in the cart. A message is displayed on the screen indicating that the visitor has "0 products selected in the cart".
The script enables the visitor to perform the following tasks:
- Add more products to the cart by selecting any category of item from the top menu.
- Modify the quantity of any item already in the cart.
- Delete an item from the cart or empty the cart entirely.
Upon running the script, you see the products selected in the cart, as shown in Figure 4-2. Note that only one product is selected in the cart at this point.
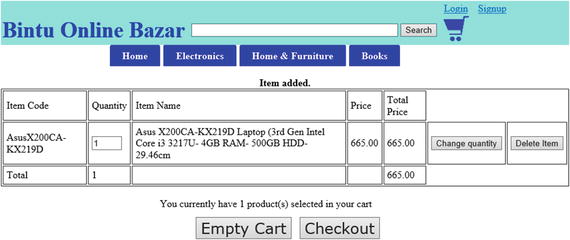
Figure 4-2. Maintaining the cart
Assuming the visitor added two iPhone smartphones to the cart, the cart’s content would now appear as shown in Figure 4-3.

Figure 4-3. Showing items selected in the cart
You can always change the quantity of any product by entering the desired quantity in the textbox, followed by clicking the Change Quantity button found in the product’s row. Upon changing the quantity of the iPhone product to 1, the cart will appear as shown in Figure 4-4.

Figure 4-4. Cart’s content after changing the quantity of any item in the cart
You can also delete any product from the cart by selecting the Delete Item button in that respective row. After deleting the Asus laptop from the cart, for example, only one item will be left in the cart, as shown in Figure 4-5.

Figure 4-5. Cart’s content after deleting an item from the cart
The Empty Cart button at the bottom will delete all the items from the cart. You will get a message confirming this action, as shown in Figure 4-6.

Figure 4-6. The mesaage you see when the cart is empty
Displaying the Cart Count in the Site Header Using AJAX
The header of the site looks great (see Figure 4-5), but something is still missing that is required in an e-commerce site. First, the count of the items in the cart, i.e., if the visitor selects a product in the cart, a numeric value 1 should appear next to the cart icon in the header to indicate that one product is in the cart. The numeric value should keep updating when the user adds more products to the cart or removes any products from the cart. The second thing that is missing in the header is the e-mail address of the signed-in user. That is, if the user is signed into the site, the Login link above the cart icon should display a welcome message, along with the visitor’s e-mail address. You’ll learn how to add these two things now.
To display the count of the items selected in the cart and the visitor information in the site header, you’ll use AJAX.
AJAX stands for Asynchronous JavaScript and XML. It is an umbrella term used for creating dynamic and highly responsive web pages. Usually, in a web application, partial updating of a web page is not possible. For example, when the user prompts for some information from the database on the server, the entire web page is refreshed to display the fetched information. That is, even if the fetched information is meant to be displayed in a small region of the web page, the entire page is reloaded. With AJAX, only the region that is supposed to display the fetched information is refreshed, which makes it highly responsive.
Secondly, with AJAX, the data is sent to and accessed from the server in the background. This makes it much faster at displaying responses.
AJAX uses the XMLHttpRequest object and JavaScript to communicate with the server and to display data on web pages, respectively.
![]() Note Web pages are typically a bit slow at displaying results desired by the users because of the round trip process. The round trip process refers to the time taken by the request from the client and the response generated by the server. The request of desired information is sent from the client to the web server. The web server, in return, accesses the required information from the database or processes it if required and sends it back to the client. The client reloads the entire web page to display the server’s response. Even if the server’s response is supposed to be displayed in a small region of the web page, the entire web page is refreshed. Whereas in AJAX, a small region of the web page can be refreshed, making it much faster at delivering results.
Note Web pages are typically a bit slow at displaying results desired by the users because of the round trip process. The round trip process refers to the time taken by the request from the client and the response generated by the server. The request of desired information is sent from the client to the web server. The web server, in return, accesses the required information from the database or processes it if required and sends it back to the client. The client reloads the entire web page to display the server’s response. Even if the server’s response is supposed to be displayed in a small region of the web page, the entire web page is refreshed. Whereas in AJAX, a small region of the web page can be refreshed, making it much faster at delivering results.
To display the count of items selected in the cart along with the visitor’s e-mail address, the existing topmenu.php script is modified to appear as shown in Listing 4-3. Note that only the code in bold is new.
Statement #1 creates an XMLHttpRequest object. The XMLHttpRequest object enables the JavaScript code to make asynchronous HTTP server requests. It is through using this object that you can make HTTP requests, receive responses, and update a region of the page completely in the background.
In order to make an HTTP request to the server using JavaScript, a class is required that was originally introduced in Internet Explorer as an ActiveX object. It’s called XMLHTTP. JavaScript has a built-in XMLHttpRequest() function that can be used for making HTTP requests in other browsers, such as Firefox, Safari, and Opera.
Statement #1 tries to create an XMLHttpRequest object using ActiveXObject("Msxml2.XMLHTTP")and assuming that the browser is IE6+. If it fails, statement #2 executes ActiveXObject("Microsoft.XMLHTTP"), assuming the browser is IE5.0. If all these fail, the built-in function XMLHttpRequest() in statement #3 is used to create an XMLHttpRequest object.
The updateCart function shown in statement #4 defines a JavaScript function that displays the count of the items in the cart. This function is called whenever the user makes changes to the cart, i.e., whenever any item is added, modified, or deleted from the cart.
For implementing AJAX, the next task after creating the XMLHttpRequest object is to send the web request to get data from the server. The request is made using the open method. Statement #5 makes a request to the server with the GET method and passes the file name, countcart.php, to be executed on the server. The countcart.php script is shown in Listing 4-4 and it simply counts the number of rows in the cart table and returns the result.
![]() Note All modern browsers—Chrome, IE7+, Firefox, Safari, and Opera—have a built-in XMLHttpRequest object.
Note All modern browsers—Chrome, IE7+, Firefox, Safari, and Opera—have a built-in XMLHttpRequest object.
When an asynchronous request is made to the server, you need to watch for the state of the request and also for the response to the request. To do this, a function called xmlhttp.onreadystatechange is used in statement #6 and it continuously checks the status of the request.
The readyState property shown in statement #7 holds the status of the server’s response. Each time the readyState changes, the onreadystatechange function will be executed. Here are the possible values for the readyState property:
- State Description
- 0 The request is not initialized
- 1 The request has been set up
- 2 The request has been sent
- 3 The request is in process
- 4 The request is complete
The status attribute in statement #7 represents the status of the HTTP request. If the status value is 500, it represents an Internal Server Error; a 400 value represents a Bad Request; 401 represents Unauthorized; 403 represents Forbidden; 404 is Not Found, and so on. The status value 200 means no error. The onreadystatechange function checks for the state of the request. If the state has the value of 4, that means that the full server response is received. If the status has a value of 200, that means the response doesn’t have an error and you can continue processing it.
Statement #8 accesses the element with the cartcountinfo ID. The cartcountinfo is the ID of the span element that is added to the header after the cart icon. It is through this element that the cart count returned by the file countcart.php will be displayed.
Statement #9 displays the welcome message along with the user’s e-mail address if the user is already signed in and the session variable exists. Also, if the user is signed in, statement #10 displays the Log Out link, which invokes the logout.phpfile when clicked.
To display the number of items in the cart, the countcart.php script, shown in Listing 4-4, accesses the items in the cart table that match the session ID of the site’s visitor and returns the count of the rows fetched.
You can see in this code that the connection to the MySQL server is established, the shopping database is active, and all the rows from the cart table that match the session ID of the visitor are accessed. The quantity of the items in the cart is added and the total of the quantity is returned as the cart count. Assuming the visitor selected two items in the cart, the cart count 2 will appear next to the cart icon in the site header, as shown in Figure 4-7.

Figure 4-7. The web site header showing the count of items selected in the cart
Upon clicking the Login link, the signin.php script is executed and it prompts the user to enter an e-mail address and password. If the user enters a valid e-mail address and password, a welcome message will be displayed in the header of the site as well as in the body of the page, as shown in Figure 4-8.

Figure 4-8. The welcome message for the signed-in user is displayed in the site header
Proceeding to Check Out
Once visitors are done adding items to the cart and want to purchase them, they can always click on the Checkout button found at the bottom of the cart (see Figure 4-7). When they click the Checkout button, the visitor’s status is checked to determine whether they are signed in or not. To keep the shipment information for a product’s delivery, the visitor needs to register with the site and must be signed in. If the visitor is not yet signed in, two links will be displayed—one that enables the user to sign in and another to create an account if the user has not yet registered. Depending on the current status of the visitors, they can either create a new account or sign in to the site.
The checklogin.php script shown in Listing 4-5 checks the login/sign in status of the visitor.
As each user has her respective products chosen in her unique session, the session_start() function is invoked before reading the session variables. After that, connection to the MySQL server is established and the shopping database is selected. The e-mail address and password in the $_SESSION array are retrieved in case they were set by any web page earlier.
The $_SESSION array elements can only be set when the user is registered and has signed into the site; otherwise, its elements are not set. If the e-mail address and password is set in the $_SESSION array, i.e., if the user is already logged in, he is provided with two options. He must provide shipping information if he’s finished shopping (see Figure 4-9) or he can continue shopping by selecting the category of items from the menu on top. But if the e-mail address and password are not set in the $_SESSION array, the user is asked to sign in or create an account.

Figure 4-9. The message displayed after checking the login status of the visitor
Assuming the user is already registered, the next task is to supply shipping information for product delivery. You’ll do that in the next section.
Supplying Shipping Information
If the user is already signed into the site, a link is shown to provide shipping information for product delivery. The shipping_info.php script shown in Listing 4-6 loads the address, state, country, and other information from the customer’s table and displays it on the screen. Visitors can choose the same address for product delivery or can change it if required.
The session is started. The connection is established with the MySQL server and the shipping database is selected. The e-mail address and password entered during the sign-in operation and stored in the $_SESSION array are retrieved and assigned to the $email_address and $password variables.
A SQL statement is executed to retrieve all the details of the visitor (including name, address, city, state, country, ZIP code, and phone number) from the customers table. This information is displayed on the screen. The shipping information is also displayed. Visitors can get the product’s delivery using the address that was already provided while creating the account or they can provide new shipping information. After supplying the shipping information, the visitor can click on the Supply Payment Information button to pay for the products.

You have now come to the stage in your web site where you want the users to pay for their items. In the next section, you’ll learn about the different payment modes.
Understanding Different Payment Modes
In e-commerce sites, payments for purchased products are processed electronically. The main electronic payment modes are:
- Credit Cards—A credit card is small plastic card issued by a bank or some provider that enables its holder to purchase goods or services on credit. The card issuer puts a credit limit and the card holder cannot spend more than that. When a card holder purchases something, the card issuer pays on behalf of the card holder. The card holder then pays the amount back to the card issuer after a specific time period.
- Debit Cards—A debit card, like a credit card, is a small plastic card that enables the card holder to pay from his bank account. The card holder first needs to put money into his bank account and then can pay for the purchased goods or services via the debit card. The major difference between debit and credit cards is that when you use a debit card, the amount is deducted from your bank account immediately. There must be sufficient funds in your bank account for the transaction to go through. Where as, in the case of credit cards, even if there is insufficient funds in the account, the transaction is completed and the bank pays on behalf of the customer.
- Smart Cards—Similar to credit and debit cards in appearance, the smart card has a small microprocessor chip embedded in it. It stores the customer’s information along with the monetary information. The monetary information is updated when the customer makes purchases.
- E-Money—In this mode of payment, the amount is transferred from one financial body to another directly, without involvement of any card company in the middle.
- Electronic Fund Transfer—This is an electronic payment method that transfers money from one bank account to another. Fund transfer can be done using ATMs (Automated Teller Machines) or using a computer. To transfer funds on a computer, the customer needs to register on the bank website. After signing in, they can make a request to transfer a certain amount to the seller’s account. The bank transfers the amount to the specified account if it is in the same bank; otherwise, the request is transferred to ACH (Automated Clearing House).
- Cash on Delivery Transactions (COD)—The payments in this mode are made directly from the customer to the seller.
- Netbanking—The customer using this method pays money to the e-commerce site from their accounts by supplying a netbanking ID and PIN. No card is required for this method of payment.
![]() Note E-commerce sites collect money from consumers through a service provider known as a payment gateway provider. A payment gateway is an e-commerce application service provider that processes credit card and other card payments. It acts as a bridge between the consumer who is making purchases and the bank that issued the credit card. Payment gateways provide a safer platform for money exchanges to take place. In cash on delivery (COD) transactions, payment gateway is not involved because the payments are made directly from the customer to the seller.
Note E-commerce sites collect money from consumers through a service provider known as a payment gateway provider. A payment gateway is an e-commerce application service provider that processes credit card and other card payments. It acts as a bridge between the consumer who is making purchases and the bank that issued the credit card. Payment gateways provide a safer platform for money exchanges to take place. In cash on delivery (COD) transactions, payment gateway is not involved because the payments are made directly from the customer to the seller.
Making Payments
After choosing products to purchase, the next step is to pay for them. The purchase.php script prompts the visitor to supply payment information.
To accept payments online through credit and debit cards, you can use several online payment processing services. I am using the 2CheckOut.com service in my purchase.php script, as shown in Listing 4-7. Visit https://www.2checkout.com/ to learn more.
JQUERY
The code shown in Listing 4-7 makes use of jQuery, so let’s take a quick look at jQuery.
jQuery is a lightweight, feature-rich JavaScript library. It makes it easier to apply JavaScript on your site. In fact, many complex tasks like traversing HTML elements, implementing animation, handling events, etc. can be easily applied to your site just by using jQuery methods. Here are a few of jQuery’s features:
- jQuery makes it quite easy to select DOM elements and manipulate them as required.
- jQuery is capable of sensing different events on HTML elements and then taking actions accordingly.
- jQuery enables you to apply AJAX to your site, thus making it highly responsive.
- jQuery includes several built-in animation effects that can be directly applied to your site.
- jQuery is supported by most major browsers, including IE 6.0+, FF 2.0+, Safari 3.0+, Chrome, and Opera 9.0+.
Upon running the script, the user is asked to provide credit/debit card information, as shown in Figure 4-11.

Figure 4-11. Entering payment information
When the user clicks the Submit button, the order will be placed and information about the purchased products will be saved in the orders and orders_details tables. The placeorder.php script shown in Listing 4-8 accepts the visitor’s order and displays the order number along with a “thanks” message.
The session is started. Connection to the MySQL server is established and the shopping database is selected. The shipping information (such as the shipping address, city, state, country, ZIP code, and payment mode entered by the user in the shipping_info.php script) is retrieved from the $_POST array. A SQL statement is executed to store that information in the orders table along with the system date, which is the date the order was placed. In the orders table a primary key field called order_no is made. It is of integer type and is set to auto_increment mode, which means its value is automatically incremented by 1 on insertion of every record. With the help of the following statement:
$orderid = mysql_insert_id();
The id of the order_no of the inserted record in the orders table is retrieved and is stored in the $orderid variable. This order number is added to each item in the orders_details table to determine all the items that have been purchased with a particular order number.
All the records in the cart table with the given session ID (of the same user) are extracted one by one and stored in the orders_details table. After that, all the items from the cart table with the given session ID are deleted. The user sees the “Order Acceptance” message and the order ID is displayed for future communication. In the end, the session is destroyed.
Summary
In this chapter, you saw how the chosen products are saved in the cart table, which keeps track of the visitor’s session ID. Also, you saw how the cart content is managed and modified as the visitor makes changes. You also saw how the site’s header displays the cart count and the visitor’s sign-in status. Finally, you learned to supply the shipping information, accept payments, and save the chosen products into the orders and orders_details tables. You learned about different types of payment modes.
The goal of the book was to learn about different PHP statements and functions and their practical implementation in making a fully featured e-commerce site. In this book, you learned how information about the customers and products can be saved into the MySQL database for future use. You now know how a drop-down menu is made and how it can be used in linking other web pages of the site.
You saw how the most crucial and important component of an e-commerce site, the shopping cart, is defined, how the items are chosen in it, and how they can be manipulated. You also learned about the different payment modes through which an e-commerce site can accept payments from its customers.
In this book, I tried to keep the code as simple as possible and each script is supported with explanations and with the output. I hope you have enjoyed reading the book and have learned the concepts deeply enough to make your own fully featured e-commerce site.