
BY ROGER CORMIER
As anybody working in the enterprise space can tell you, there’s no avoiding the cloud. Whether your organization is looking to reduce its data center footprint, simplify its operations model, or simply achieve that fabled “evergreen state,” some form of public or private cloud will be part of that future landscape. When organizations are moving services and workloads to the cloud, it is often required that these services and workloads continue to exist on-premises for a certain amount of time. One of the most significant challenges faced by many organizations is managing the experience for users during that bridge state. Managing user impact and creating a single unified and cohesive collaboration experience are considered key success factors when migrating from SharePoint on-premises to SharePoint Online (Office 365).
Getting Started
In this chapter, we will be taking an in-depth look at a key product enhancement that aims to tackle this very issue head-on: Hybrid Team Sites. Hybrid Team Sites—also referenced as hybrid sites in some documentation—is available in both SharePoint 2013 and SharePoint 2016 on-premises and is designed to work with your Office 365 Enterprise subscription. We will review how Hybrid Team Sites will change your collaboration experience and dive into what must be done for any organization to start taking advantage of the value that Hybrid Team Sites brings.
As the objective of this chapter is to truly explain how Hybrid Team Sites works in depth, we will also be taking a closer look at some of the underlying technologies that make this possible, such as Office Graph.
Exploring Office Graph
One of the key elements that makes it possible to have a cohesive SharePoint hybrid sites experience is Office Graph. The features and capabilities provided by Office Graph really serve as the fabric that unifies the SharePoint 2013/2016 on-premises and SharePoint Online experiences. Before delving into how Office Graph influences the SharePoint hybrid sites experience, it is important for us to take a closer look at Office Graph.
What’s in a Name?
The name Graph, in the context of computing, is derived from mathematical graph theory. In mathematics, a graph is effectively a representation of a collection of objects in which some pairs of objects are connected by various links. Think, for example, User A and User B are both contributing to the same document (document.docx). These two users do not know each other but may share a skip-level manager. A very simplified view of that section of the graph may look like the following (see Figure 4-1).

Figure 4-1. Abstract representation of a Graph
What About the Other Graph?
Yes, you’ve heard that right. There are, in fact, both an Office Graph and a Microsoft Graph . Although conceptually they both provide the same type of functionality—that is, to identify relationships between various types of objects/entities—they are not the same, and the terms should not be used interchangeably.
You can think of the Office Graph as being user-centric. As a user collaborates on documents and interacts with colleagues, connections are made. Leveraging machine learning algorithms, using these data points as well as knowledge of the user’s organization, Office Graph can bubble up information that is most relevant in the context of the user. Microsoft Graph expands on this by connecting the individual user-centric networks across a variety of services and is frequently described as the “one endpoint to rule them all” ( https://graph.microsoft.io/ ). In effect, the Office Graph computes insights across Office 365 and makes those insights available through Microsoft Graph.
How Can You Use Graph ?
I would like to preface this section by stating that at the time of this writing, many features of the Office Graph API were still in pre-release. As a result, some of the features described may change and/or not be available after general availability.
As of this writing, there are two types of insights that can be queried from the Office Graph: the first being TrendingAround and the second being People. TrendingAround will return items that the user has access to, and People will return people that the user interacts with.
Graph Query Language (GQL) is the primary method used to query the Office Graph via the SharePoint Online search REST API. As such, we can simply issue HTTP requests with appropriate syntax, in order to query the Office Graph.
What Syntax Do I Use?
Let’s start by looking at an example.
This URL is composed of three distinct sections.
https://spotenant.sharepoint.com/_api/search/query ?
This section of the URL represents the address of the service, and the question mark (?) indicates that there are additional query parameters.
Querytext='*'This section of the URL is a wildcard search, which effectively says “return everything.”
&Properties='GraphQuery:ACTOR(17593168896770)This section indicates that this is an Office Graph query, and it supplies a filter for the ACTOR. The ACTOR, in this case, means the user with ID 17593168896770 in SharePoint. ACTOR can be either the ID of a user, or “ME.” To obtain the ID of a specific user, we can query the SharePoint search service directly. The following example will search for a user with the login spfarm:
This example, again, is composed of three distinct sections. The first two sections are easily explained using the same logic as before. In this case, the SourceID represents the ID of the “local people results” result source.
How Do I Query for Specific Actions?
The Office Graph API describes several “Action Types,” which can be used to filter the returned results. Table 4-1 describes the available action types.
Table 4-1. Available Action Types
Action Type | Description | Visibility | ID | Weight | Timestamp |
|---|---|---|---|---|---|
PersonalFeed | The actor’s personal feed, as shown on their Home view in Delve | Private | 1021 | A sequence number | When the item was added to the feed on the Home view in Delve |
Modified | Items that the actor has modified in the last three months | Public | 1003 | The number of modifications | Last modified |
OrgColleague | Everyone who reports to the same manager as the actor | Public | 1015 | Always 1 | - |
OrgDirect | The actor’s direct reports | Public | 1014 | Always 1 | - |
OrgManager | The person to whom the actor reports | Public | 1013 | Always 1 | - |
OrgSkipLevelManager | The actor’s skip-level manager | Public | 1016 | Always 1 | - |
WorkingWith | People with whom the actor frequently communicates or works | Private | 1019 | A relevance score | - |
TrendingAround | Items popular with people with whom the actor frequently works or communicates | Public | 1020 | A relevance score | - |
Viewed | Items viewed by the actor in the last three months | Private | 1001 | The number of views | Last viewed |
WorkingWithPublic | A public version of the WorkingWith edge | Public | 1033 | A sequence number | - |
Using this table, we could execute the following request, to return all items that have been “Viewed” or “Modified” by a specific user:
https://SPOTenant.sharepoint.com/_api/search/query?Querytext='*'&Properties='GraphQuery:ACTOR(17593168896770, OR(action:1001,action:1003))'
Note that in this case, two actions are being passed. We encapsulate the OR’d conditions in parentheses. Therefore, OR(action:1001,action:1003) can actually be read literally as either action 1001 (viewed) or action 1003 (modified).”
So, What Does All of This Have to Do with SharePoint Hybrid Sites?
As I was explaining earlier in the chapter, Office Graph really is the fabric that unifies the user experience in a hybrid SharePoint configuration . Although we do configure both the on-premises farm and the SharePoint Online tenant to be aware of and trust each other, the contents of each site is distinctly in a single environment. As such, so are the interactions of a user within the context of that site.
This is where the concept of a “signal” comes into the picture. There are several types of signals to identify various types of actions, such as viewing an item, sharing an item, following an item, modifying an item, etc. A signal will include an “actor,” an “action,” and an “object.” For example, “User A” shared Document X. When we configure SharePoint hybrid sites, we are actually allowing SharePoint on-premises to send these “signals” into the Office Graph. This way, when a user encounters a feature that leverages Office Graph, the experience presented to the user will represent activities performed in the on-premises SharePoint environment and in Office 365.
In the case of hybrid sites, when you follow a site in SharePoint 2013 or 2016 on-premises, an entry will be populated in the “followed” list in both the on-premises environment but also to SharePoint Online, via the Office Graph API. Links that point to the followed sites (via the “sites” link and the Extensible App Launcher) will redirect users to the “followed” list in SharePoint Online.
It is also important to note that this functionality applies only to followed sites. Followed documents and followed people do not have this same characteristic presently. It is also important to note that any existing sites that were followed will not automatically be ported over to SharePoint Online; therefore, users will have to follow their sites again to populate their existing followed sites in the “followed” list in SharePoint Online.
Getting Back to SharePoint Hybrid Sites
Now that we have covered the basics of Office Graph, we are ready to move on to SharePoint hybrid sites. Any time an organization transitions a workload into the cloud, there is a real potential to disrupt the way people work. If there is too much disruption, adoption of the new solution could be hindered. In the case of SharePoint, or any other workload in Office 365, this could impact the productivity of the organization, and, in turn, that could impact the morale of their business users. Therefore, how change is managed and how the impact of such a change is reduced becomes a critical success factor in such a transition.
When we talk about hybrid workloads in SharePoint 2013/2016—whether it’s SharePoint hybrid sites, Hybrid OneDrive, Hybrid Search, Hybrid Taxonomy, etc.—we’re really talking about concepts that are designed to make the transition from SharePoint on-premises to SharePoint Online less disruptive. The objective of a successful SharePoint hybrid implementation is to create a seamless experience for end users, such that the location where the user collaborates is completely transparent. Configuring SharePoint hybrid sites will also configure Hybrid OneDrive redirection, hybrid user profiles, hybrid site following, and the hybrid app launcher.
Before You Get Started
This section assumes that the Office 365 tenant has already been configured to a certain standard, primarily, that the following prerequisites have been met:
All necessary domains have been registered with your tenant.
UPN suffixes have been assigned for user accounts.
User accounts have been synchronized to Azure Active Directory.
Required licenses have been assigned to users.
As of this writing, the primary method used to deploy SharePoint hybrid sites for SharePoint 2013 and SharePoint 2016 is Hybrid Picker. The Hybrid Picker tool must be run from a SharePoint server that is joined to a farm and will help to automate some of the configuration steps that are needed to connect your on-premises SharePoint farm with your SharePoint Online tenant. Hybrid Picker is accessed via the SharePoint Admin Center in Office 365 (Figure 4-2).

Figure 4-2. Hybrid Picker in Office 365
The account that you use to run Hybrid Picker will also have to meet the following requirements :
A member of the Farm Administrators group
A service application administrator (Full Control) for the User Profile Service
An Office 365 Global Administrator or a SharePoint Online Administrator
Logged into Office 365 and SharePoint Server from a server in your SharePoint Server farm
Ability to launch Hybrid Picker as a Farm Administrator with elevated permissions
Familiarizing Yourself with Hybrid Picker
Although we use Hybrid Picker to set up Hybrid OneDrive and Sites, and will focus on that application in this chapter, Hybrid Picker continues to be developed to support more hybrid scenarios. As of this writing, the following workloads are supported by Hybrid Picker:
OneDrive
OneDrive and Sites
App Launcher
Extranet Business-to-Business Sites
Auditing
Taxonomy
Installing Hybrid Picker
Hybrid Picker itself should be launched from a server that has SharePoint 2013 or SharePoint 2016 installed and is joined to a farm. The basic sequence of the steps you will take are as follows (see Figure 4-3):
Log on to a SharePoint 2013/2016 Server using an account that meets the requirements outlined in the preceding text.
Navigate to your SharePoint Admin Center (in Office 365), again using the same credentials you used to log on to the server.
Click Configure Hybrid in the left navigation.
Click Go to Hybrid Picker Download Page.
Click click here. This will launch an Application Install—Security Warning.
Click Install to proceed.

Figure 4-3. Installing Hybrid Picker application
Execution of Hybrid Picker
Immediately after installing Hybrid Picker, a wizard experience will be launched (Figure 4-4).

Figure 4-4. Hybrid wizard in Office 365
Once we click Next, we will be asked for credentials for the account that will be used for on-premises activities, as well as credentials for a global administrator account. We click Validate credentials, in order to validate that the credentials supplied meet the expected requirements (Figure 4-5).

Figure 4-5. Hybrid Configuration Wizard Credentials screen
If you happen to enter valid credentials that do not meet the requirements to complete the configuration, Hybrid Picker will provide you with a very clear message, such as the message in the following screenshot. In this example, credentials for a valid SharePoint Online Administrator that is not a global administrator were entered (Figure 4-6).
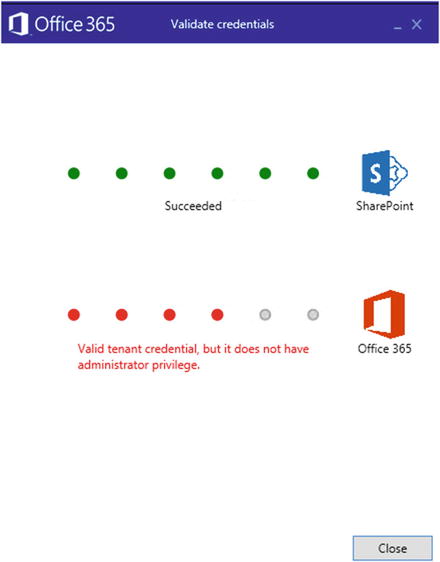
Figure 4-6. Hybrid wizard credentials validation screen with no administrator privileges
Once we have supplied credentials that meet the expected requirements, validation will return a message, as seen in the following screenshot (Figure 4-7).

Figure 4-7. Hybrid wizard credentials validation screen with valid privileges
Upon closing the validation screen, the Next button in the main window will become visible, and we can proceed. At this point, we are going to validate that the local SharePoint environment also meets the expected configuration. If you happen to fail any of the local validations, Hybrid Picker will notify you, so that you can remediate any issues that would prevent you from being successful with a hybrid configuration (Figure 4-8).

Figure 4-8. Hybrid Configuration Wizard missing prerequisites
Clicking View report will give you detailed information about why specific validation steps failed (Figure 4-9).
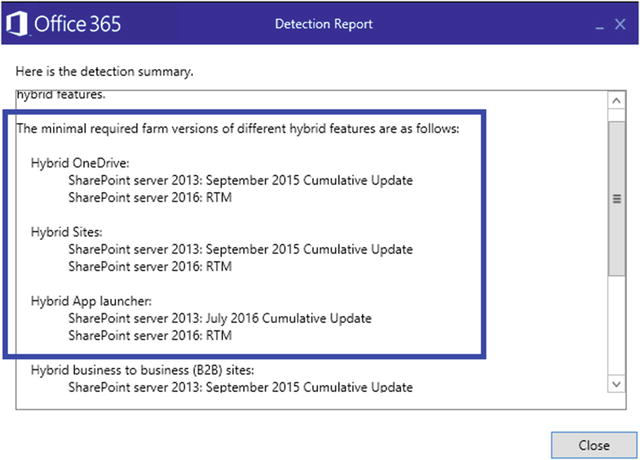
Figure 4-9. Hybrid Configuration Wizard Detection Report
Once we have performed all necessary remediation, Hybrid Picker should return a validation message that looks like the following screenshot (Figure 4-10).

Figure 4-10. Hybrid Configuration Wizard with all prerequisites
Clicking Next will move you along to the hybrid feature selection screen, from which you can choose the hybrid features you would like to configure. Selecting one feature may require additional features to be enabled, as we see in the following screenshot. As you can see, even though App Launcher and Business to Business (B2B) sites have not been selected, they will be enabled (Figure 4-11).

Figure 4-11. Features selection for Hybrid environment
As a general practice, I personally select to configure all services that will be enabled, such that my selected features match the features that will be enabled, as illustrated in Figure 4-12.

Figure 4-12. Recommended features selection for Hybrid environment
Clicking Next brings us into the configuration phase, and Hybrid Picker begins to configure the environment, based on the chosen configuration (Figure 4-13). As noted in the following screenshot, clicking Stop will prevent the configuration from continuing but will not roll back any changes that have been performed. Proceed with caution.

Figure 4-13. Hybrid configuration progress
Once this has been completed, a configuration summary page will be displayed. Assuming all remediation was performed before continuing with the configuration, the configuration will be successful, and the output will be similar to that shown in Figure 4-14.

Figure 4-14. Hybrid configuration summary screen
Clicking Next will allow you an opportunity to submit feedback regarding your experience, which will be used to improve the experience in the future (Figure 4-15).

Figure 4-15. Hybrid configuration successful completion screen
Clicking Close concludes the Hybrid Picker configuration, and you are ready to validate that your hybrid features have been successfully configured.
Validating Extensible App Launcher, SharePoint Hybrid Sites, and Hybrid OneDrive Configuration
One of the primary requirements for a working SharePoint Hybrid environment is that a trust must exist between your local farm and your SharePoint Online tenant. After having run Hybrid Picker, you should see some additional trusts present in your on-premises environment. There may be a slight difference if you are comparing a SharePoint 2013 and a SharePoint 2016 environment. In SharePoint 2013, trusts will only be registered for the ACS STS, and in SharePoint 2016, you will see both the ACS STS and the EVOSTS entries. In SharePoint 2013, the screen will look like that shown in Figure 4-16.

Figure 4-16. Trusted service consumers in SharePoint 2013
In SharePoint 2016, it will look rather like Figure 4-17.

Figure 4-17. Trusted service consumers in SharePoint 2016
You can also validate that the additional trusts have been added in PowerShell by issuing the Get-SPTrustedSecurityTokenIssuerPowerSell cmdlet. Each trust will be represented by the certificate entry and will contain information similar to that shown in Figure 4-18.

Figure 4-18. Listing trusted service consumers with PowerShell
Extensible App Launcher Validation
Once we have verified that all necessary trusts are in place, we should be able to move on to other validation steps. When it comes to validating the successful configuration of the Extensible App Launcher, the steps are slightly different, depending on the version of SharePoint you are using. In SharePoint 2013, Hybrid Picker will install the SuiteNav feature but will not activate the feature on your sites. This feature can be enabled on your sites by using the following PowerShell cmdlet:
Enable-SPFeature SuiteNav -url <SiteCollectionURL>If you prefer to activate this feature on all sites in your environment at once, you could use the following cmdlet:
Get-SPSite | %{Enable-SPFeature SuiteNav -url $_.url -ErrorAction 0}After having performed this action, you may have to wait for the application pool that hosts your SharePoint site to recycle. You could also force this action, or perform an IISReset. Each SharePoint 2013 site for which the SuiteNav feature has been activated will then include the Extensible App Launcher, as seen in Figure 4-19.

Figure 4-19. App launcher in SharePoint 2013
In SharePoint 2016, there will be no visual change, as the app launcher is already present and remains unchanged (see Figure 4-20).

Figure 4-20. App launcher in SharePoint 2016
You can then add custom tiles to your Extensible App Launcher by using the Office 365 Admin Center. Expand Settings and click Organization profile (Figure 4-21).

Figure 4-21. Office 365 admin center
In here, you will see a section to add custom tiles for your organization (Figure 4-22).

Figure 4-22. Organizational tiles screen
Click Edit and complete the requested details (Figure 4-23).

Figure 4-23. Edit tile screen
New or modified tiles may take up to a day to appear in SharePoint 2013 and SharePoint 2016 on-premises environments.
Hybrid OneDrive Validation
Validating Hybrid OneDrive configuration is relatively similar, regardless of whether you are completing these steps in SharePoint 2013 or SharePoint 2016. The first place we would look is in SharePoint Central Administration. As of this writing, in a fully patched environment, SharePoint central administration will have an “Office 365” link in the left navigation. Clicking this item will take you to a page with a link to “Configure hybrid OneDrive and Sites features.” Clicking this link should show you your OneDrive for Business Hybrid configuration options, as displayed in Figure 4-24.

Figure 4-24. Hybrid OneDrive and Sites features screen
You should note that the URL of the my-site host in your tenant has been configured. It should be formatted as https://<tenant>-my.sharepoint.com.
You will also notice some additional options, such as the ability to choose between both hybrid OneDrive and Sites, just OneDrive, or to disable this hybrid functionality. In addition, you can also choose to limit the hybrid functionality to a select audience of users or enable this functionality to everyone in your organization.
Once the configuration has been validated, we can validate the functionality. This is quite simple. All you do is access OneDrive the way you would normally access OneDrive from your on-premises environment, with a user to whom this feature has been made available.
In SharePoint 2013, it will look like what is depicted in Figure 4-25 and Figure 4-26.

Figure 4-25. OneDrive option in the SharePoint 2013 suite bar

Figure 4-26. OneDrive Option in the SharePoint 2013 app launcher
And in SharePoint 2016, it will look like what is shown in Figure 4-27.

Figure 4-27. OneDrive Option in the Sharepoint 2016 app launcher
The hyperlink itself should point to a URL such as https://<tenant>-my.sharepoint.com/_layouts/15/MySite.aspx?MySiteRedirect=AllDocuments&Source=SP2016.
Validating Hybrid Sites
The first time you try to follow a site after you have configured hybrid sites, you may be prompted with the following message, if your OneDrive hasn’t already been configured in SharePoint Online (Figure 4-28).

Figure 4-28. Hybrid sites configuration wait screen
Clicking Get Started will take you to your OneDrive for Business site in Office 365 and bring you through a quick introduction to OneDrive. Once everything has been set up, following a site will return a simple message to the user indicating that the operation completed successfully (Figure 4-29).

Figure 4-29. Document Center notification
Then, clicking on the Sites tile in the Extensible App Launcher will take you to your “followed” list in your OneDrive for Business site in SharePoint Online. Sites the user has followed in both the on-premises environment and the SharePoint Online tenant will be displayed (see Figure 4-30).

Figure 4-30. Sites you are following in SharePoint 2016
Summary
The purpose of these hybrid features is to help users have a seamless experience while their services are distributed among multiple premises, such as SharePoint on-premises and SharePoint Online. In the instance of the services discussed in this chapter, SharePoint online becomes the authoritative source, and SharePoint on-premises becomes a consumer of data stored in SharePoint Online.
Hybrid Picker is the most common method used when configuring SharePoint hybrid sites, hybrid OneDrive for Business, and the hybrid app launcher; however, you can still find many resources that illustrate that this process can also be performed via PowerShell. The main benefits of Hybrid Picker are the time savings and the accuracy of the solution. Using Hybrid Picker, SharePoint administrators can be confident that all the necessary environment and access prerequisites are met before beginning making any changes to their SharePoint environment. This helps to ensure that the environment is never left in an unknown state, which could result in a negative experience for end users.
Although not discussed in this chapter, there are other hybrid services available today in SharePoint 2013 and SharePoint 2016 that further improve the user experience across multiple premises. These hybrid services include multiple flavors of Search and Taxonomy (managed metadata).