
BY ANDREW STOBART
According to Talos, a digital threat research division of Cisco Systems, 86% of all e-mail traffic is unsolicited junk mail. This works out to approximately 400 billion spam messages being sent every day. In addition to stopping spam, we are also faced with a never-ending assault of phishing messages, messages containing malware, and messages containing URLs to malicious web sites. Attacks are more sophisticated than ever before, and technology is ever-evolving to keep ahead of the attacks.
In this chapter, we will explore the protection aspects of Exchange Online. Features will be explored, and troubleshooting tips and experiences will be shared. These will be presented as “notes from the field,” from my own knowledge and experiences that I have gained with troubleshooting this product daily.
EOP processes Billions of messages every day. ➔ Include other EOP related statistics?
Exchange Online Protection (EOP), formerly Forefront Online Protection for Exchange (FOPE), and Business Productivity Online Suite (BPOS) before that, is the protection system of Exchange Online. From a high level, this includes all aspects of the service that work to prevent spam and malicious messages from landing in users’ inboxes. Whether we are talking about spam, malware, phishing, safe or block lists, the Sender Policy Framework (SPF), Domain-based Message Authentication Reporting and Conformance (DMARC), DomainKeys Identified Mail (DKIM), or data loss prevention (DLP), these topics and many others all fall under the protection umbrella.
Header Analysis
Message headers contain a wealth of information that can be used when troubleshooting messages that pass through EOP. You just need to know where to look. The following headers are the main places to look when troubleshooting false positives and false negatives.
X-Forefront-Antispam-Report
Whether a message has been sent out of Exchange Online or received by Exchange Online, this header will be present on the message. This header is the first place to look when troubleshooting false positives and false negatives. This header will look something like the following:
X-Forefront-Antispam-Report: CIP:xx.xx.xx.xx;IPV:NLI;CTRY:;EFV:NLI;SFV:NSPM;SFS:(8156002)(2980300002);DIR:INB;SFP:;SCL:1;SRVR:DM2PR21MB0028;H:NAM01-BY2-obe.outbound.protection.outlook.com;FPR:;SPF:Pass;PTR:mail-by2nam01on0139.outbound.protection.outlook.com;MX:1;A:1;LANG:en;I have found that the following items are the most important from the preceding message.
CIP (Connecting IP Address): This is the IP that delivered the message to Exchange Online.
SFV (Spam Filter Verdict ): Most of the time, we will either see NSPM (Not Spam) or SPM (Spam) beside this property. However, this is where we will see if a trusted sender or blocked sender caused the SCL to be altered, for example, if an end user received a spam message that should have been marked as spam. If the preceding header contains SFV:SFE, this indicates that the sender is on the recipient’s trusted senders list, so spam filtering was bypassed.
SCL (Spam Confidence Level ): A -1 indicates that spam filtering was skipped. This could be because of a transport rule, a white listed IP, or the sender being in the recipient’s trusted senders list. A 1 indicates the message was scanned for spam but was deemed safe. A 5 indicates spam, and a 9 indicates high-confidence spam. Sometimes, we will see SCL:6. This is an indication that the sender was on the recipient’s blocked senders list. In this case, we should also see SVF:BLK in this header, which would verify that the sender is on the recipient’s blocked senders list.
X-Forefront-Antispam-Report-Untrusted
If the X-Forefront-Antispam-Report header exists in a message that is received by Exchange Online, the pre-existing header will be renamed “X-Forefront-Antispam-Report-Untrusted.” This prevents an attacker from adding their own X-Forefront-Antispam-Report header, in hopes that it will trick Exchange Online.
We see this behavior for all messages that pass from one Office 365 tenant to another. When the message is out one Office 365 tenant, it will be stamped with X-Forefront-Antispam-Report. When the recipient Office 365 tenant receives the message, the original header will be renamed to have “-Untrusted” at the end, and a new X-Forefront-Antispam-Report header will be stamped on the message. While most of the analysis will be looking at the X-Forefront-Antispam-Report header, it can sometimes be interesting to see how a message was stamped when it left a tenant, by looking at the header with -Untrusted on the end of it.
X-Microsoft-Antispam
This is the header in which you will find the Bulk Confidence Level, or BCL, that a message has been given. A BCL of 0 indicates the message is not bulk, whereas a 9 indicates that the message is absolutely bulk mail. When talking about spam and bulk, bulk mail can be thought of as newsletters that you may have inadvertently signed up for, and spam mail is completely unsolicited mail. The X-Microsoft-Antispam header looks as follows:
X-Microsoft-Antispam: UriScan:;BCL:0;PCL:0;RULEID:(22001)(81800161)(13002);SRVR:BL2PR03MB289;X-Original-Forefront-Antispam-Report
When a message is sent to the Quarantine, the X-Forefront-Antispam-Report header is renamed “X-Original-Forefront-Antispam-Report.” The reason for this is persistence. If the message is released from the quarantine, a new X-Forefront-Antispam-Report header will be stamped on the message with SCL:-1. The X-Original-Forefront-Antispam-Report will still be present on a message that has been released and will contain the original SCL and SFV that were stamped on the message.
If you are troubleshooting a false positive that an end user has already released, you’ll still be able to pull the original stamp, by looking at the X-Original-Forefront-Antispam-Report header.
X-Original-Microsoft-Antispam
Like the X-Original-Forefront-Antispam-Report header, the X-Microsoft-Antispam header will be renamed “X-Original-Microsoft-Antispam” when it lands in the quarantine.
Authentication-Results
The Authentication-Results header will display information about the SPF, DMARC, and DKIM checks. It will also display the From and MailFrom domains that were used. Here is an example.
Authentication-Results: spf=pass (sender IP is xx.xx.xx.xx)smtp.mailfrom=contoso.com; microsoft.com; dkim=pass (signature was verified)header.d=contoso.com;microsoft.com; dmarc=pass action=noneheader.from=contoso.com;microsoft.com; dkim=fail (body hash did not verify)header.d=contoso.com;
In the preceding example, we see SPF pass but dkim fail. DMARC, however, passes, because SPF passed and because theMailFrom domain matches the From domain. There is much more information on SPF, DMARC, and DKIM in the section “Identifying Spoofing Attacks and Technologies That Can Protect Your Domain.”
X-CustomSpam
In the Spam Filter, there is an advanced options section (see Figure 9-1).

Figure 9-1. Spam Filter advanced options
The items listed here allow you to increase the aggressiveness of the Exchange Online Protection spam engine. If one of these options is enabled and causes a message to be marked as spam, you will find the X-CustomSpam header present in the header of the message. If a message that was marked as spam does not have the X-CustomSpam header present, then one of the preceding options was not the reason the message was marked as spam.
Example: I enabled the advanced option “URL redirect to other port” (see Figure 9-2).

Figure 9-2. URL redirect to other port in advanced options
I then sent a message that contained the link http://www.contoso.com:123 in the body. This message triggered the preceding ASF in the Content Filter and caused the message to be marked as spam. Looking in the headers of this message, I see the following:
X-CustomSpam: URL redirect to other portRight away I can see exactly which item in the Advanced Options of the spam filter caused this message to be marked as spam. When educating customers on these advanced options, I often recommend the following. When configuring EOP for the first time, don’t initially enable all ASF options, as this can cause a large number of false positives. Instead, leave them off and, after evaluating mail flow, turn them on one at a time. I have found that the top-four ASF options are the most prone to causing false positives.
For organizations concerned about phishing, it is recommended that both SPF record: hard fail and Conditional Sender ID filtering: hard fail ASF options be enabled. Before enabling an ASF option, when possible, put it in Test Mode, to evaluate what impact it will have.
Tip for Obtaining Message Headers
In my line of work, I am constantly requesting message samples from customers, so that I can analyze the headers. Whether an end user has received a message that they believe should have been marked as spam, or they receive a message that was marked as spam that should not have been, step one of the troubleshooting starts with asking for the original message. Forwarding a sample message does not work, as the original headers are destroyed.
Less known by most people is that forwarding a sample as an attachment is also problematic (Figure 9-3).

Figure 9-3. Forwarding an attachment in Outlook
When this message is sent, the Outlook desktop application will convert the .msg file that is attached to an .eml file. In this process, the attached message will become smaller in size before sending. The problem with this is that headers in the original message will be stripped, and oftentimes, the EOP headers that we are looking for will be gone.
To guarantee a message is forwarded intact, it first must be saved to your desktop, compressed (I recommend adding the message to a .zip archive), and then sent as an attachment. The Outlook Desktop client will not modify a message in a zip file, and this will ensure that the complete message, with all headers intact, will arrive at the destination.
Best Practices for Configuring Protection Features
This is the meat and potatoes of Exchange Online Protection . TechNet does a wonderful job of documenting how the various features work, such as the Spam Filter, the Malware Filter, Advanced Threat Protection, etc. Instead of copying TechNet, I’m going to provide best practices from my field knowledge, as well as some advanced troubleshooting tips for when problems arise.
One benefit that EOP has over on-premises spam filters is that the EOP filters are continually updated throughout the day. Spam analysts are constantly adding rules and tweaking existing ones, based on current attacks. Our customers also submit spam samples to us (both false positives and false negatives), and these are also used to update our spam filters on a continuing basis. These actions ensure that our filters are updated quickly and efficiently. Once we are aware of an attack, we can stop it very quickly.
The same applies to the EOP anti-malware engine, of which there are three. It is guaranteed that at any time, at least two of the malware engines will scan a message. Usually, all three are engaged, but this gives us the ability to pull one out of rotation for maintenance work. The three malware engines have their definitions updated continually throughout the day.
Advanced Threat Protection
Advanced Threat Protection is a feature set that can be added to Exchange Online for an additional price. The two main features of Advanced Threat Protection are Safe Attachments and Safe Links.
Safe Attachments
With Safe Attachments, all inbound mail that contains attachments will be, as we call it, “detonated.” Attachments will be executed in a virtual environment, and we will look for malware characteristics. The idea here is that this can catch zero-day viruses that do not yet have a virus definition.
The catch to using this feature is that your mail could be delayed up to 30 minutes. As of this writing, Microsoft will soon be releasing dynamic delivery, which will allow an inbound message with an attachment to be delivered right away, but without the attachment. Once the attachment is detonated and observed with Safe Attachments, it will then be forwarded on to the recipient, as long as it doesn’t look like malware.
Safe Links
Safe Links will rewrite any URL that is found in an e-mail. We can see the rewritten link in the following example when we hover the mouse over the embedded URL (Figure 9-4).

Figure 9-4. Safe Links rewrite
When an end user clicks the link, they will be directed to Microsoft servers. If the link is good, they will be redirected to the actual web site. This redirection is seamless for the end user. If, at a later date, the link is determined to be malicious, users that click this link will instead be shown a page noting that the link is malicious and that they should not continue. As an administrator, you can choose to have the warning page contain a link to allow the user to continue to the actual web site.
With this proxying, we can track which users have clicked a link. If a malicious message has come into your organization with a phishing URL, you can run a report to find out exactly which users clicked the link, allowing you to start your remediation with those users that may actually be impacted.
Identifying Spoofing Attacks and Technologies That Can Protect Your Domain
SPF, DMARC, and DKIM are technologies that can be used to help protect your domain against spoofing. By using these technologies, a recipient can verify that a message they received from your domain really did, in fact, come from you, as opposed to coming from an attacker. Before discussing the three aforementioned technologies, I would first like to discuss header terminology that will be used in this section.
Header Terminology
The following excerpt from a message header will be used to identify the various headers that are important when dealing with a spoofing attack.
Authentication-Results: spf=none (sender IP is 167.220.24.220)smtp.mailfrom=contoso.com; microsoft.com; dkim=none (message not signed)header.d=none;microsoft.com; dmarc=none action=noneheader.from=tailspintoys.com;From: From header [email protected] ← 5322.From headerTo: Andrew Stobart [email protected]Subject: Different MailFrom and From headersReturn-Path: [email protected] ← 5321.MailFromReply-To: [email protected] ← Reply-To address
5321.MailFrom Header
The MailFrom address represents the address that was sent in the envelope of the message. The domain used in this address is what the SPF check will be done against. In an SMTP conversation, this will be specified as MailFrom. In a message header, this will be identified as the Return-Path.
5322.From
This is the “From” address that you see in your mail client (Figure 9-5).

Figure 9-5. From address in an e-mail
In the message header, this address will be the “From” header.
From: From header <[email protected]>To: Andrew Stobart <[email protected]>Subject: Different MailFrom and From headers
In most scenarios, the From and MailFrom headers will match; however, these will typically be different in messages in which spoofing is used (they also tend to be different for bulk mail). Typical spoofing attacks will only spoof the From header, because SPF will not check the domain specified in this header, therefore bypassing SPF.
Authentication-Results Header
This header will provide the results of the SPF/DKIM and DMARC checks. It also contains the following:
Smtp.mailfrom = Specifies the domain used in the 5321.MailFrom address.Header.from = Specifies the domain used in the 5322.From address.SPF = Results of the SPF check.DKIM = Results of the DKIM check.DMARC = Results of the DMARC check.
Reply-To Header
If this header is set, when a mail client replies to the message, the reply will be directed to this address, regardless of what the original From or MailFrom addresses were.
Spoofing Methods
The following are examples of the most common type of spoofing attacks.
5322.From Header Is Spoofed, but the 5321.MailFrom Is for a Domain Controlled by the Attacker
Consider the following SMTP commands for a sent message:
S: Helo woodgrovebank.comS: Mail from: [email protected] <-- 5321.MailFromS: Rcpt to: [email protected]S: dataS: To: "Andrew Stobes" <[email protected]>S: From: "Woodgrove Bank Security" [email protected] <-- 5322.From
The recipient would see the message being sent from [email protected] (Figure 9-6).

Figure 9-6. E-mail from [email protected]
The SPF check will be done against phishing.contoso.com, which will pass (or be none), because the attacker will own this domain. This is why this type of attack is so frequently used. This type of spoof can be identified when you see a Return-Path header that is different from the From header. Here’s an excerpt of the message header for the preceding message:
From: Woodgrove Bank Security <[email protected]>To: Andrew Stobart <[email protected]>Subject: Different MailFrom and From headersReturn-Path: [email protected] ← SPF only checks this domain
In these types of messages, the attacker will usually not expect the user to reply to them (as the message would go to the spoofed address, which the attacker will not control). These types of messages typically contain a URL to a phishing site that the attacker is hoping the recipient will click. SPF, combined with DMARC, would detect this type of spoof. SPF on its own would not, as SPF only checks the domain in the 5321.MailFrom address.
5322.From Header Spoofed and 5321.MailFrom = 5322.From
Like the preceding attack, but in the headers, you will see the From header and Return-Path header match. These attacks typically contain phishing links that the attacker hopes will be clicked. SPF will detect this attack; however, it is strongly recommended to implement DMARC along with SPF.
Homoglyph Attacks (Attacker Owns a Domain That Is Similar to the Customer’s)
Again, these types of attacks are similar to the preceding ones, except that the domain being spoofed is owned by the attacker and is very similar to the company that they are attacking. Consider the message shown in Figure 9-7.

Figure 9-7. E-mail message from [email protected]
In this case, the attacker hopes that when the recipient replies to the message, they will not notice that the domain they are replying to isn’t actually their own. We also see a similar type of attack used, in which the attacker spoofs the customer’s domain exactly but then sets a Reply-To header that is set to a domain that is similar to the customer’s but owned by the attacker.
Attacks That Use the Reply-To Header
When a Reply-To header is present, when a recipient replies to a message, the reply will be directed to the address specified in the Reply-To header. For example, consider the following spoofed message (Figure 9-8). Notice how even the profile picture appears.

Figure 9-8. Spoofed message with picture
Here’s what happens when I hit the Reply button (Figure 9-9).

Figure 9-9. Replying to an e-mail
Note that the reply is being sent to a domain that the attacker will own. The attacker hopes that the recipient won’t notice that the Reply-To address is different from the sending address. Here’s what the header looks like for this type of attack:
From: <name redacted>@microsoft.comTo: <name redacted>@microsoft.comReply-To: [email protected]Subject: Wire transfer requestReturn-Path: <name redacted>@microsoft.com
SPF and DMARC will detect these types of attacks. In addition, end-user education is also highly recommended.
Anti-Spoofing Technologies
You should understand the following technologies .
Sender Policy Framework (SPF)
SPF is a technology for sender authentication. SPF uses a DNS TXT record to store a list of authorized sending IP addresses for a given domain. A receiving mail server performs an SPF check by confirming that the connecting IP address is in the SPF record for the 5321.MailFrom domain. In Exchange Online, the results of the SPF check are recorded in the Authentication-Results header and the Received-SPF header.
Because SPF only checks the domain in the 5321.MailFrom address, SPF cannot detect spoofing attacks in which the 5322.From address is spoofed and the 5321.MailFrom address is set to a domain that the attack owns and, therefore, can ensure that SPF passes. This is where DMARC comes in.
Domain-Based Message Authentication, Reporting and Conformance (DMARC)
DMARC uses SPF and/or DKIM to authenticate the 5322.From address. DMARC will pass if an SPF or DKIM check passes and the domain in the 5321.MailFrom and 5322.From addresses match. This means that DMARC will always fail if the domain of the 5321.MailFrom does not match the domain of the 5322.From.
DomainKeys Identified Mail
With SPF records, you can only add up to ten DNS lookups in the record. If you have many third parties that can send on your behalf, you will quickly hit this wall. This is where DKIM comes in.
DKIM allows you to sign outbound mail with a signing certificate. The public key for the certificate is present in your Public DNS, which will allow recipients to verify that the sender is authorized.
User Education
End-user education is an extremely important part of preventing spoofing attacks. End users should be educated about the following conventions:
Hover over URLs in your e-mail client to verify that they are going to a known location.
Don’t click URLs from people you aren’t familiar with.
When replying to a message, always verify that the expected address is present on the To line.
Advanced Troubleshooting and Tips
The following section provides some advanced guidance to help troubleshoot complex issues.
Extended Message Trace
Regular message traces are sufficient for most mail flow troubleshooting, but, occasionally, we need more data, which requires obtaining an extended message trace. These traces (provided as a CSV file) contain a plethora of information. However, parsing them can be a very overwhelming experience. Next, I will share the work flow that I use when I must extract data from an extended message trace.
Obtaining an Extended Message Trace
Obtaining an extended message trace can be tricky, if you’ve never requested one before. In the Message Trace tool, set a custom date range and ensure that the starting date is at least a week in the past (this is the key to enable the extended trace). Add either a sender, recipient, or Message ID, and check the “Include routing events and routing details with report” box (Figure 9-10).

Figure 9-10. Message trace tool
These traces typically take about an hour to complete. Once completed, you can download the CSV file at the link View pending or the completed traces on the Message Trace page. After opening the CSV file in Excel, you should see something like what is shown in Figure 9-11.

Figure 9-11. Excel spreadsheet
Parsing an Extended Message Trace in Excel
Message traces do not come sorted by date and time (in fact, they aren’t sorted by anything), and so this is the first order of business. Next, highlight the first row, then click the Data tab, and then Filter (Figure 9-12).

Figure 9-12. Filter option in Excel
To make reading our headers easier, highlight the entire first row again, and then click Format, under the Home tab, and then AutoFit Column Width (Figure 9-13).

Figure 9-13. AutoFit Column Width option in Excel
Expand the date_time column (first column), so you can see the full timestamp, then click the filter drop-down for that column and select Sort A to Z (Figure 9-14).

Figure 9-14. Sort A to Z option on an Excel column
Now that we have our trace sorted chronologically, we next have to start removing messages that aren’t part of our investigation.
Only Show Rows Pertaining to a Particular Message
Typically, we only want to see details from a particular message. The easiest way to do this is to filter based on the Message ID. If you don’t have the Message ID, you can also filter based on sender, recipient, subject, etc. For this example, I’m going to filter based on Message ID.
Find the message_id column, click the filter drop-down, then uncheck Select All. Now find your Message ID in the list, check it off, then hit OK (see Figure 9-15).

Figure 9-15. Filtering entries in Excel
I am now looking at 7 rows, compared to my starting point of more than 7,000 rows! Each of the now remaining rows represent a different EOP server that this message traversed through. Some rows are more interesting than others, and, typically, the most important row is that in which the EOP header (x-forefront-antispam-report) values are stamped on the message.
Extracting the EOP (X-Forefront-Antispam-Report) Header
One of the most important items we can pull from the extended message trace is the x-forefront-antispam-report header information for a message. This is especially helpful when we do not have the original .msg file for a message we are investigating.
This data can be found in the custom_data column. Look for the cell that starts with S:AMA=, as shown in Figure 9-16.

Figure 9-16. S:AMA= entry in our Excel spreadsheet
For my workflow, I copy the contents of this cell and paste it into Notepad++, which results in the following view (Figure 9-17).

Figure 9-17. Entry viewed in Notepad++
To clean this up, I use the Replace action. Use the following options in the Replace window , then click Replace All (Figure 9-18).

Figure 9-18. Replace All in Notepad++
I can now very easily pick out the various EOP results (Figure 9-19).

Figure 9-19. EOP Results in NotePad++
Some interesting items we can quickly pull from here are as follows:
S:AMA—Anti-malware Agent: Will indicate if any viruses were detected.
S:TRA=ETR—Transport Rule Agent: ETR|ruleid=[guid] will indicates the GUID of any transport rules that triggered (Note: S:TRA=ETRI and S:TRA=ETRP do not indicate rules that have been triggered)
S:SFA—Spam Filter Agent: Will display contents from the X-Forefront-Antispam-Report header (Spam Filter Score, Spam Filter Verdict, message direction, etc.…)
Here is the S:SFA string from an extended trace with the SCL, SFV, and direction values highlighted.
S:SFA=SUM|SFV=SKN|IPV=|SRV=|SFS=|SCL=-1| SCORE=0|LIST=0|DI=|RD=|H=BLUPR06MB849.namprd06.prod.outlook.com|CIP=|SFP=0|ASF=0|HCTFP=|CTRY=|CLTCTRY=US|LANG=en|LAT=0|LAT=0|LAT=0|FPR=|DIR=INB This was an inbound message that EOP gave an SCL of -1. The Spam Filter Verdict for this message is SKN, which indicates that the safe listing was done prior to the spam filter (ex. Transport rule).
For more information on the custom_data column, see Run a Message Trace and View Results. On this page, expand information under “View message trace results for messages that are greater than 7 days old.”
EOP Outbound Connector That Was Used
For mail that is leaving your Office 365 tenant, the extended trace can tell us which EOP outbound connector was used to deliver the message. For an outbound message, look in the custom_data column for a row that begins with S:E2ELatency=. In this example, my outbound message was sent using an EOP outbound connector, called xbox.com outbound, that I created.
S:E2ELatency=32.140;S:ExternalSendLatency=3.155;'S:Microsoft.Exchange.Hygiene.TenantOutboundConnectorCustomData=Name=xbox.com outbound;ConnectorType=Partner;UseMxRecord=False';S:OutboundProxyTargetIPAddress=xx.xx.xx.xx;S:OutboundProxyTargetHostName=xx.xx.xx.xx;...I can also see that this connector is type Partner and uses a smart host for delivery, because UseMXRecord is set to false. The OutboundProxyTargetIPAddress property shows us the recipient IP. (I have obfuscated the actual IP in the preceding text).
Server SMTP Responses
Another interesting piece of data that we can pull from extended traces are the SMTP server responses. This data can be found in the recipient_status column. As an example, consider the following:
'450 4.7.0 Proxy session setup failed on Frontend with ''451 4.4.0 Primary target IP address responded with: "454 4.7.5 Certificate validation failure." Attempted failover to alternate host, but that did not succeed. Either there are no alternate hosts, or delivery failed to all alternate hosts. The last endpoint attempted was xx.xx.xx.xx:25'''Note that this data can also be seen in regular message traces.
Delivery Folder
For inbound messages destined to mailboxes hosted in Exchange Online, an extended message trace will show which folder in the recipient’s mailbox the message was delivered to. Note: This only works if the recipient mailbox is located in Exchange Online, and only for server-side mailbox rules that cause a message to be delivered to a particular folder. For example, here’s an inbox rule that I have configured on my Exchange Online mailbox (Figure 9-20).

Figure 9-20. Exchange inbox rule
When I run an extended message trace on a message that would have triggered this mailbox rule, I can see the folder where this message was delivered (Figure 9-21).
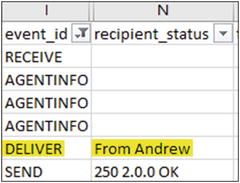
Figure 9-21. Deliver field from the message
Just look for the DELIVER event in the event_id column, and note the recipient_status column. A semicolon in the recipient_status column indicates that the message was delivered to the recipient’s inbox.
Which Transport Rule Triggered on My Message?
While a message trace can be used to determine which rule(s) triggered on a message, it is not always fast. With the following trick, you can determine which rule(s) triggered on a message, by looking only at the headers.
In all your transport rules, add the predicate “Set the message header to this value,” as shown in Figure 9-22.

Figure 9-22. Setting a value to the message header
When configuring this predicate on your transport rules, come up with a common company-wide header name (I used X-ContosoRule). Then, in each rule, append a unique string after this, to identify it.
As an example of this, I had a message that triggered two of my transport rules. Looking at the header of the message, I found the following:
X-ContosoRule-SafeDomainFound: Rule triggeredX-ContosoRule-ExecutableFound: Rule triggered
Without even running a message trace, I could see right away which rules triggered on this message.
Reporting
All the Exchange Online Protection reports can be found under the main Office 365 page, under Reports, and then Security & compliance (Figure 9-23).
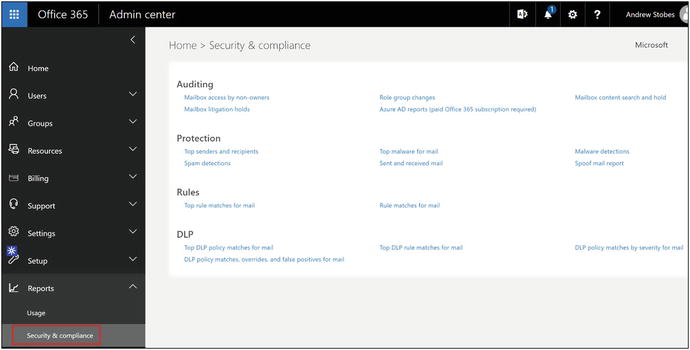
Figure 9-23. Security & compliance portal in Office 365
While the reports are available on demand, it can very beneficial to schedule these reports to be delivered to your inbox on a set schedule. In addition to the ease of getting information, it will also allow trending, as data is only kept for so long in Exchange Online.
Not all reports can be scheduled, but for the ones that can, you will see something similar to what is shown in Figure 9-24.

Figure 9-24. Schedule this report link
Reports can be scheduled to be sent on a weekly or monthly basis.
Additional Resources
The following links are additional resources that can help you troubleshoot common issues:
EOP Field Notes Blog: https://blogs.technet.microsoft.com/eopfieldnotes/
250 Hello Blog: https://blogs.technet.microsoft.com/rmilne/
Remote Connectivity Analyzer: https://testconnectivity.microsoft.com/
Summary
This chapter covered protection features in Exchange Online. With knowledge of network captures, message tracing, and what various EOP headers mean, you can easily determine why a message was marked the way it was and then troubleshoot mail-flow problems. With implementation of SPF, DMARC, and DKIM, you can protect your domains against spoofing. Knowing what tools exist, and how to use them, can significantly cut down on remediation work, following a spam or phishing attack.