
Chapter 2. Building a Basic Static Site
For our first static site, we’ll start with something incredibly simple. For some, brochure-ware is a derogatory term for a website that looks like it was copied directly from a marketing brochure. While some sites certainly are simple copies of marketing material, that doesn’t mean there’s anything particularly wrong with them.
There are times when a website will be nothing more than one or two pages of content. For example, maybe you’re launching the Next Big Thing™ as part of your plan to become a dot-com millionaire. While your product is in development, you may simply need a single-page “Coming Soon” site.
Other examples of simple sites include the following:
- A restaurant site providing hours, address, and a menu
- A landing page for your mobile app that provides links to the various app stores
- A portfolio page that functions as a resume for someone looking for a job
In all of these examples, the entire site might consist of nothing more than one or two unique pages. A static site generator might be overkill for such a thing, but in my experience, small projects have a way of growing—not the other way around. The benefits that static site generators provide will become more useful over time as the site (possibly) grows with new content.
For our first example site, we’re going to create an online presence for a coffee shop called Camden Grounds. While not a terribly imaginative name, you’ve probably come across simple coffee-shop/restaurant sites before, so you have a basic idea of how they work. For Camden Grounds, the site will consist of:
- A home page which is mostly pretty images.
- A menu showing a list of various coffees, teas, cookies, and more.
- A list of locations because—wouldn’t you know it—Camden Grounds is actually a chain.
- An “About Us” page talking about the history of the company. No one is ever going to read this, but it’s pretty standard for such sites.
That’s a grand total of four pages and, as I said previously, a static site generator may be a bit much for this, but the good news is that we will be “future-proofed” when we expand the site in the future. For this site, we’ll look at our first static site generator in the book, Harp.
Welcome to Harp
Harp (harpjs.com, Figure 2-1) is a lightweight static site generator. It is rather simple and, at times, limited but can be easy to pick up for people new to static sites.

Figure 2-1. The Harp website
Harp requires minimal setup and focuses more on convention than configuration. That’s a fancy way of saying that as long as you follow a few simple rules in terms of organization, Harp will “just work.” Let’s start with installing Harp.
Before you begin, you’ll need to ensure that npm is installed on your system. npm stands for Node Package Manager and is commonly used to handle installation for programs. Imagine, for example, that a program requires some other program. Now imagine that program requires something else. The cool thing about npm is that a program developer can define what’s required for it to run and the package manager handles the rest.Because of how helpful this is, a great number of utilities use npm. You even already have it installed. The quickest way to find out is to simply go to the terminal if you’re using a Mac or the command prompt in Windows and type npm (Figure 2-2).

Figure 2-2. Checking for npm
If this command fails to work, or if you know for sure you don’t have npm installed, the easiest way to get it is to install Node.js. Don’t worry—you don’t have to actually know how to use Node, nor will you ever need to learn it (although Node.js is pretty darn cool and recommended anyway). Head over to nodejs.org and download the installer for your operating system.
Assuming you’ve got Node installed and npm is working fine, you can install Harp like so:
npm install -g harp
To confirm Harp installed correctly, simply run harp in your terminal. You should see a nice usage summary, as shown in Figure 2-3.

Figure 2-3. Checking that Harp is installed
Harp has a few different features, but its simplest use is to enable a web server in a directory of files. Instead of just serving up files as they are, Harp supports different preprocessors that enable you to build dynamic resources.
- To write HTML:
You can use Markdown, Jade, or Embedded JavaScript (EJS). By simply using the proper extension (
.md,.jade, or.ejs), Harp will automatically convert the syntax for each particular preprocessor into HTML. Of course, if you prefer, you can use regular HTML files instead.- To write CSS:
You can use Less (
.less), Sass (.scss), or Stylus (.styl). Regular CSS files work just fine, too.- To write JavaScript:
The only option you have is CoffeeScript. Any file with a
.coffeeextension will be converted from CoffeeScript into JavaScript.
You can mix and match any of these preprocessors in any way you see fit. If you don’t really care about CSS preprocessing and like JavaScript, then skip those preprocessors and just decide on which HTML preprocessor you want to use. Harp doesn’t care.
Your First Harp Project
The Harp CLI supports creating an initial “seed” application, but it may be easier to start more simply. Create an empty folder—it doesn’t matter what it’s called—and add a file called index.md. For our first test, we’ll use Markdown, and again, this is completely arbitrary. Example 2-1 shows the contents of the file. You can find this in the GitHub repo (https://github.com/cfjedimaster/Static-Sites-Book) of code samples for this book in code/harp/demo1/index.md.
Example 2-1. Contents of index.md file
Hello World
===

This is a page. Woot.
At the command line, ensure that you’re in the directory that contains the file, and run harp server. You should see Harp start up and describe where it is running, as shown in Figure 2-4.

Figure 2-4. Starting the Harp server
If you open your web browser to the address and port shown in your command prompt, you’ll see the web page rendered via Harp (Figure 2-5).

Figure 2-5. Harp rendering the Markdown page
Notice how the Markdown was automatically converted into HTML. If you view source or open your browser developer tools, you can see this for yourself (Figure 2-6):

Figure 2-6. The Markdown code has been converted into HTML
Along with converting the Markdown code into HTML, Harp actually makes your file available as an HTML file in the URL as well. If you actually try to access index.html, Harp will recognize that index.md represents this URL and will serve that file up. This is an important thing to remember. No matter what preprocessor you use, when you actually link to pages, or resources, you’ll always use the “proper” type for what that preprocessor supports. For example, if you want to add a CSS file and you’re using Less, you don’t link to styles.less, but rather styles.css instead.
Learning More About Markdown
If you want to learn more about Markdown, check out its reference guide here: http://daringfireball.net/projects/markdown/.
Now let’s make another file. test.jade will use the Jade template syntax. Here are the contents:
h1 This is Jade

a(href="index.html") Go Home
In this example, we’ve used Jade to create a header and a link back to the home page. Notice that we’re linking to index.html. Again, you do not want to link to index.md because the final site, when static, will not include those extensions. Figure 2-7 shows the result along with the rendered HTML in Chrome’s Dev Tools.

Figure 2-7. Jade code converted into HTML
Learning More About Jade
You can learn more about Jade at its home page: http://jade-lang.com.
Finally, let’s make another file to demonstrate EJS support. EJS is an older templating language and resembles PHP or Classic ASP in some ways. Unlike Jake and Markdown, which work from almost an abstraction layer over HTML, EJS requires you to write your HTML in—well—TML. You only use EJS’s template language when outputting something dynamic. Here’s an example of that in action:
<h1>This is EJS</h1>The time is:<%= new Date() %>
In this example, the dynamic aspect begins with <%= and ends with >. The inner portion is pure JavaScript and will be executed when the template is rendered. You can find this file in the book repo as anothertest.ejs. As before, you can open this in your browser by going to anothertest.html, as shown in Figure 2-8. In Figure 2-8, you can see the HTML rendered as is, but notice how the JavaScript was executed.

Figure 2-8. EJS code converted into HTML
Learning More About EJS
You can learn more about EJS at its home page: http://www.embeddedjs.com/.
As you can see, there are many different ways to write your HTML. We didn’t even touch on the CSS preprocessors. So which do you choose? My suggestion is to play with both and get a feel for which works best for you. The rest of the examples in this chapter will use Jade for consistency’s sake.
Working with Layouts and Partials
Now that you’ve seen how Harp preprocesses templates for you, it’s time to kick it up a notch. One of the benefits that a CMS typically provides is the idea of a site-wide layout. For example, you may have a design theme for your site that sets a header, footer, basic colors, etc. The CMS then applies that layout to your content. Moving to static doesn’t mean giving up that feature. Harp provides support for layouts by looking for a file named _layout.ext, where ext represents whatever preprocesser you want to use. That means a request for foo.ejs will look for _layout.ejs or _layout.jade. Yes, you can mix up your layout preprocessor and regular content preprocessor, but that’s probably not a good idea.
Harp passes a variable called yield to the layout file that includes the contents of the file requested. Let’s see this in action. If you are working with the code from the book repository, you can find the next example in the demo2 folder. We’ve copied the files from demo1 but also added a new file, _layout.jade:
html
	head
		title Harp Site
	body
		!= yield
		hr
		p Copyright #{new Date().getFullYear()}
This layout isn’t terribly exciting, but notice in the middle where we’ve included the yield variable. This “sucks in” the page that was actually requested and puts it in the layout file. Beneath that, an hr element is used along with a bit of code to include the current year in a copyright notice.
Now when you request one of the previous files, you’ll see it wrapped in the layout, as you can see in Figure 2-9.

Figure 2-9. Layout applied to pages
By default, Harp will look in the current folder before it looks in folders higher in the project directory. This means you can create a customized layout for a subdirectory. Later on when we look at how to work with data, you’ll see another way to modify layout as well.
Partials are simply a way for one template to include another. Imagine you have a bit of boilerplate legal text, such as the typical license agreement text that no one actually reads. If you need that text in a few different pages, Harp provides a simple way to include that text in your templates. Let’s look at an example.
h1 This is Jade

!= partial("_legal")

a(href="index.html") Go Home
In the Jade template above, the partial function is passed _legal as an argument. This tells Harp to look for a file named _legal.ext where the extension can be .jade, .ejs, .md. The extension is not included in the call.
Here’s a version in EJS:
<h1>This is EJS</h1><%- partial("_legal") %> The time is:<%= new Date() %>
Same basic concept as the Jade version—you tell Harp the name of the file minus the extension. Unfortunately, you can’t use the partial function within a Markdown file. You can include a Markdown file, but a Markdown file itself can’t include items. As for what you put in the included file, it can be whatever you want.
Here is a Jade template that simply outputs a tiny bit of legalese:
pre This is some boring legal text.
In Figure 2-10, you can see both the Jade and EJS templates with the same file.

Figure 2-10. Examples of the partial function in Jade and EJS
Partials can be made even more powerful by passing variables to them. This covers the use case where you want to include common code in templates but slightly tweak them every now and then. To pass a variable to an include loaded via partial, you simply include a second argument in your call.
Here is an example:
h1 Testing Variables

!= partial("_greeting", {name:"Raymond"})
In this Jade example (and of course you can do this in EJS as well), the second argument is a plain JavaScript object of name/value pairs. In this case, we have one value for name. You can have as many name/value pairs as you would like. On the partial side, you display the variable as you see fit. Here’s _greeting.jade:
h3 Hello #{name}
Obviously, this will display “Hello Raymond”, and if you change the variable, then the output will change as well.
All of the previous demos for the partial function may be found in the demo3 folder. As a final note, you may wonder why the partials we used were named with an underscore in front. That is not a requirement. However, Harp has a feature where any filename beginning with an underscore will not be converted to a static file. For partials, it makes sense that we don’t need them generated as is, so using an underscore in front of the name ensures we won’t end up with stray static files we don’t need.
Working with Data
So far, we’ve seen how Harp can convert multiple types of templates into simple HTML pages (and don’t forget that Harp also supports this for CSS and JavaScript) as well as how to use layouts and partials. Now let’s kick it up a notch and talk about how you can add data to a project to use within templates. Generally, data in Harp comes in two forms: global data and metadata. Global data is useful for things that apply to the site as a whole. For example, you may want to store a contact email address in data so you can easily change it one place. Conversely, metadata is more useful for describing specific parts of your site. For example, given that you have a blog, you can use metadata to describe your blog entries (e.g., their titles and publication dates). Let’s start with global data.
In your Harp project, you can add a file named _harp.json. The contents should be valid JSON and contain a top-level “key” called globals. Inside of this should be a set of name/value pairs for whatever data you want to use in your site.
Here is an example:
{"globals":{"title":"My Site!","owner":"Raymond Camden"}}
In this example, we have two values—one for title and one for owner. To be clear, this is completely arbitrary. You can use whatever makes sense for you here. Your values also need not be simple strings. As long as it is valid JSON, you can use whatever you want, including arrays.
{"globals":{"title":"My Site!","owner":"Raymond Camden","subjects":["Math","Science","Beer"]}}
Once defined, you can use these variables in any of your templates, whether it be a regular template, layout file, or partial. How you use it depends on the language. For Jade, it would look like this:
p #{ owner }
In EJS, it would look like so:
<p><%= owner %></p>
Let’s look at an example of this in action. In the demo4 folder, you’ll find a complete example that includes a home page, a layout, and a _harp.json file. The contents of the globals match the previous code example so we won’t share it again. Here’s the home page.
h1 This is my site.

p Welcome to my site. Sorry this isn't more exciting.

p This site was made by #{owner}.
The owner value from _harp.json is used within a simple paragraph tag. Now let’s look at the layout.
html
	head
		title #{title}
	body
		!= yield
		hr
		p Copyright #{new Date().getFullYear()}
In this version, the layout is now dynamic based on the global variable. Note that we still have a dynamic copyright as well. You can mix and match global variables with things defined locally on the template. We could replace that code with a global variable, but then we’d have to edit the year every New Year’s Eve and no one wants to do that.
View it in your browser to see it in action (Figure 2-11). Simply change the values, reload the page, and you can see your change reflected immediately.

Figure 2-11. Examples of global variables
Now let’s consider metadata. This can be a slightly confusing topic so let’s start off with an example. Imagine you’re building a simple store. Your website will consist of a home page and a product page for each of your products. The folder, demo5, will be the basis for this site. Figure 2-12 shows that it has a home page, a layout, and a folder of products.

Figure 2-12. Version one of the product site
If you run this with harp server, you can request the home page and then each individual product page. If you wanted to link to the products from the home page, how would you do it?
Since you only have three products, you could just hard code a simple list. That certainly works, but isn’t really scalable. What if you had a hundred products? What if you wanted your home page to only list the most recently released products and keep a complete list of products on some other page? This is where metadata comes into play.
To begin, create a new file in your products folder called _data.json. As with the globals file, it must be a valid JSON file. In this file, describe your data. Let’s consider the following example.
{"nuke":{"title":"A Nuke","price":9.99},"cookie":{"title":"Cookies","price":2.99},"beer":{"title":"Beer","price":8.99}}
In this JSON file, we have three main parts—one for each product. The names—nuke, cookie, and beer—match the filenames from the demo. This will become important in a moment. Inside each block of data are two variables—title and price. As before, this is arbitrary. But here’s where things get interesting.
The first change is that Harp will now recognize this data and make it available to your templates. Any template can access this data via a new variable, public.products._data. The public variable is always available in Harp projects. The products key comes from the fact that we have a folder called products. Finally, _data maps to the _data.json file itself. What this means then is that we can create a dynamic list of products. Here’s an updated home page that now creates a list of links.
h1 Welcome to our store

ul
  for product, link in public.products._data
    li
      a(href='/products/#{link}.html') #{product.title} ($#{product.price})

p This site was made by #{owner}.
Let’s break this down. The for loop iterates over the data, grabbing two values. product represents the individual product. Notice how we include the title and price. The link variable is the top-level key in the JSON file, namely “nuke”, “cookie”, and “beer”. Remember how we said we made it match the filenames? That then lets us create links to the product files. Because we have access to the raw data, we could even do something complex, such as re-sorting the values by price or title. Figure 2-13 shows a screenshot of the home page now including the links.

Figure 2-13. Product links
Now you can click on the links and go directly to each product page. But here’s where things get even more interesting. Consider the beer page shown in Figure 2-14.

Figure 2-14. The beer page
Notice anything in particular? See how the title changed? What happened there? When Harp works with variables, it does something special with metadata. Harp recognized that beer.md was being loaded, and that “beer” matched the value in _data.json. Because of this match, when Harp checks variables, it will look in _data.json before it checks globals defined in _harp.json. This allows you to dynamically update values on a page-by-page basis. It’s perfect for cases where you may want a default, global title for a site but have specific titles for each product.
Generating a Site
Now that you’ve seen the basics of how to use Harp and work with dynamic templates, how do you actually create static output? The basic command with the CLI is: harp compile pathToCode pathToOutput. A full example could look like this: harp compile ./ ../output. This tells Harp to compile the current directory and output the result in a folder above the current path named output. Given the input from the last demo (demo6), the output looks like Figure 2-15:

Figure 2-15. Compiled output
Notice how the .jade and .md files are now all regular HTML files. Also, all the “special” files (layout- and data-related) are gone.
Building Camden Grounds
We began this chapter by explaining what we would build as an example of a fairly simple site—a coffee shop named Camden Grounds. We described this as a site with four pages—a home page, menu, list of locations, and a simple “About Us” that frankly no one will ever read. (But don’t tell the client that!)
To create this site, we first need a design. If you’re like me (with little to no design skill), you’ll probably want to either hire a designer or find a website template that you can use. Luckily, the website freewebsitetemplates.com actually has one called “Coffee Shop Web Template” that is both perfect and free.
As a word of caution, before deciding to use any template, it is a good idea to take a look at the source code behind it. It could be an incredibly good-looking web page with an absolutely horrible mess of code behind it. In this case, the shop template was fairly simple and easy to work with. Figure 2-16 shows the template in its original form:

Figure 2-16. Original coffee shop web template
It matches perfectly with our requirements except for the Blog item. Luckily, we can just remove it. You can find the complete source code for this demo in the ch2/camdengrounds folder, but let’s go over the files one by one so you can see how it is put together.
First, let’s look at the template. This was created by looking at a few of the files from the template and determining which content remained the same. As you can imagine, this is the header and footer. Since a majority of the template is regular HTML, Example 2-2 focuses on the dynamic, more interesting aspects of the template. See the original file (_layout.ejs) for the complete listing.
Example 2-2. Dynamic aspects of the coffee shop web template
<divid="header"><ahref="/index.html"><imgsrc="/images/logo.png"alt="Image"></a><ul><li<%if(current.source =='index'){%>class="current"<% } %> ><ahref="/index.html">Home</a></li><li<%if(current.source =='menu'){%>class="current"<% } %> ><ahref="/menu.html">Menu</a></li><li<%if(current.source =='locations'){%>class="current"<% } %> ><ahref="/locations.html">Locations</a></li><li<%if(current.source =='about'){%>class="current"<% } %> ><ahref="/about.html">About Us</a></li></ul></div><divid="body"><%- yield %></div>
The first thing to make note of is in the header menu; note the use of a variable called current:
<li<%if(current.source =='index'){%>class="current"<% } %> ><ahref="/index.html">Home</a></li>
The current object is a helper value that Harp provides to each template. It has two values: source and path. The path value represents the current “directory hierarchy” of the request. So given a request like raymondcamden.com/products/weapons/foo.html, the path value would be an array consisting of: products, weapons, foo. The source value is just the very end of the hierarchy, so given the same URL, you would get a value of foo. As you can imagine, this is a useful way of saying, “I’m on page so and so, do so and so.” The code snippet above basically handles adding a CSS class to each menu item when the user is on a particular page. Similar code is used in the bottom menu. Finally, don’t forget that your layout file has to include the yield variable to display the contents of the template.
Let’s now look at the pages. It will be easier to start with the simplest page, about.html, as it is just simple text. Remember that we don’t have to include the layout. Example 2-3 shows about.ejs with some of the boilerplate text removed to save space:
Example 2-3. Simple text of the about.html page
<divid="figure"><imgsrc="images/headline-about.jpg"alt="Image"><span>Lorem ipsum dolor sit amet.</span></div><div><ahref="about.html"class="about">About</a><div><h3>We Have Coffee for Everyone</h3><p>Mauris sed libero ac neque lobortis aliquam. Vivamus vitae ultricies.</p><h3>We Even Have Tea!</h3><p>Sed a pretium risus, ut volutpat nunc. Donec blandit orci id sollicitn.</p><h3>We Don't Have Beer</h3><p>Proin dapibus, orci vitae bibendum laoreet, libero velit condimentum</p></div></div>
There’s nothing dynamic here, so the only real content is the text describing the company. Figure 2-17 shows it as run under Harp—notice how the menu recognizes what page is being displayed.

Figure 2-17. About Us page
Now let’s move to the Locations page. This one will be a bit tricky. Though there aren’t many locations now, Camden Grounds hopes to grow into a mega-coffee-serving chain to rival that of a certain company out of Seattle. The locations page therefore should be dynamic to make it easy to add locations later on. Let’s first look at a screenshot (shown in Figure 2-18), and then we’ll explain how it was built.

Figure 2-18. Locations page
Each location is rendered as a name, an address, phone numbers, hours of operation, and a little map. How is this done? First, we added location data to the _harp.json file as a global. Example 2-4 shows that file, with a few locations removed for brevity.
Example 2-4. _harp.json file of the locations page
{"globals":{"locations":[{"name":"Main Street Camden Grounds","address":"200 Kaliste Saloom, Lafayette, LA","hours":"Mon-Sat 6AM to 10PM","phone":"555-555-5001"},{"name":"Northside Camden Grounds","address":"3009 College Drive, Baton Rouge, LA","hours":"Mon-Sat 6AM to 10PM","phone":"555-555-5107"}]}}
Now let’s look at the template code, shown here in Example 2-5.
Example 2-5. Template code for locations page
<divid="figure"><imgsrc="images/headline-locations.jpg"alt="Image"></div><div><ahref="locations.html"class="locations">Locations</a><div><% for(idx in locations) { %><dl><dt><%- locations[idx].name %></dt><dd><%- locations[idx].address %></dd><dd><%- locations[idx].phone %></dd><dd><%- locations[idx].hours %></dd><dd><imgsrc="https://maps.googleapis.com/maps/api/staticmap?center=<%- locations[idx].address %>&size=250x250&zoom=15&markers=color:red%7Clabel:S%7C<%- locations[idx].address %>&key=AIzaSyB3eiEtldYqoxbVyN5wq_-PqvV7xrDuUQA"></dd></dl><% } %></div></div>
The list of locations is iterated as a JavaScript array. Each item is output per the original template design but with some modifications to fit our data. Finally, the Google Static Maps API (a very handy Google service that doesn’t get a lot of attention) is used to display a small map of the location. Note that Google requires you to get a key to use this service. There is a free tier that is more than appropriate for simple static sites.
Fairly simple—but the big win here is that when Camden Grounds expands, all you need to do is edit the pure data to have the site updated. (And, of course, generate the static version and deploy it.)
Now it’s time to kick it up a notch. Handling the menu for Camden Grounds will be a two-step process. First, we will make a unique page for each menu item. We’ll store that under a coffees directory. Each page will include text about the product, but for now we’ve kept it down to just one simple sentence. As before, let’s look at a menu page and then we’ll cover how it was built. Here is coffee1.ejs:
<%- partial("_coffee_header") %><p>This is coffee 1.</p><%- partial("_coffee_footer") %>
Obviously, this would be a bit longer for a real product, but you can see in Example 2-6 where we’re using partials to include header and footer layout for the item. (As an aside, you can do nested layouts in Harp, but it is somewhat complex.) The footer is just a few closing div tags, but the header is a bit dynamic:
Example 2-6. Partials to include headers and footers
<divid="figure"><imgsrc="/images/headline-menu.jpg"alt="Image"><span><%- name %></span></div><div><ahref="/menu.html"class="whatshot">What's Hot</a><div><imgsrc="/images/<%- image %>"alt="<%- name %>"style="float:right">
What’s going on here? We’re outputting a name and image, but where does this come from? Well, remember that we can supply metadata for our content. Let’s now take a look at that in Example 2-7. (As with other code listings, we’ve trimmed it a bit.)
Example 2-7. Supplying metadata for our content
{"coffee1":{"name":"Coffee One","price":2.99,"image":"coffee1.jpg","short":"Creamy"},"coffee2":{"name":"Coffee Two","price":9.99,"image":"coffee2.jpg","short":"Rich"},"coffee6":{"name":"Coffee Six","price":4.99,"image":"coffee6.jpg","short":"Weird"}}
Each menu item has a key that matches with its filename, and then some basic information about the menu item. Notice that we aren’t using all of that data. You’ll see where we actually do in a moment. Figure 2-19 is the page for the first coffee.

Figure 2-19. Menu item page
So what about the menu itself? Since we’ve created a few products and have metadata defined in _data.json, we can make use of it to render a dynamic menu. Example 2-8 shows how we do that.
Example 2-8. Rendering a dynamic menu
<ul><% for(idx in public.coffees._data) { %><li><ahref="/coffees/<%- idx %>.html"><imgsrc="images/<%- public.coffees._data[idx].image %>"alt="<%- public.coffees._data[idx].name %>"></a><div><ahref="/coffees/<%- idx %>.html"><%- public.coffees._data[idx].name %></a><p><%- public.coffees._data[idx].short %>$<%- public.coffees._data[idx].price %></p></div></li><% } %></ul>
Remember that Harp places metadata in a public.X object where X represents the folder containing the data file. This lets us loop over each menu item and list out the name, short description, price, and image. Figure 2-20 shows the menu.
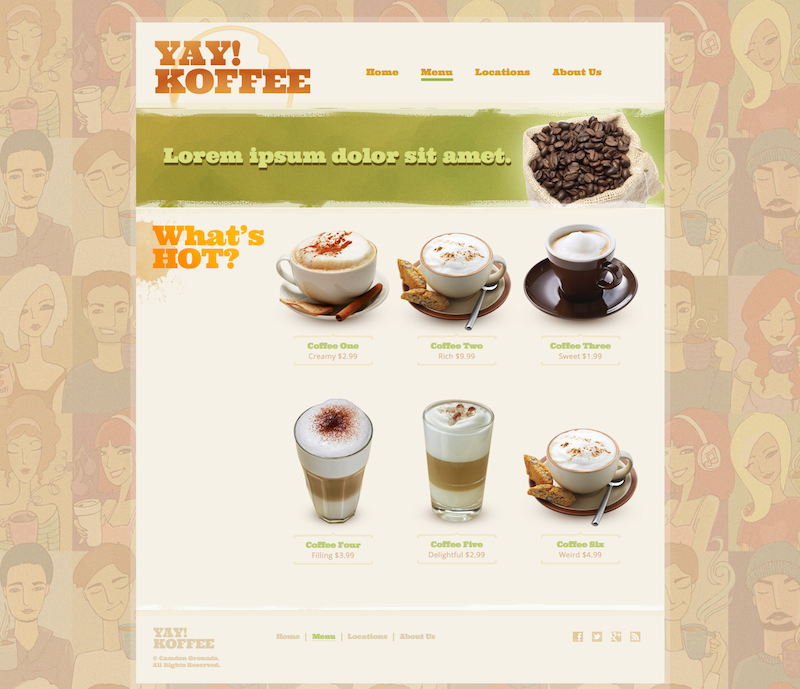
Figure 2-20. Menu page
We’re almost done. The final page is the home page. This is somewhat modified from the original template as we don’t have a blog anymore. Instead, we’re going to display three products. In theory, we could sort these by the most expensive or best selling, but for now we’ll just grab the first three. Example 2-9 shows the code.
Example 2-9. Home page code displaying products
<divid="figure"><imgsrc="images/headline-home.jpg"alt="Image"><spanid="home">Camden Grounds is the best darn coffee in the world!<ahref="about.html">Find out why.</a></span></div><divid="featured"><spanclass="whatshot"><ahref="menu.html">Find out more</a></span><div><% coffeeKeys = Object.keys(public.coffees._data); for(var x = 0; x<Math.min(coffeeKeys.length,3);x++){coffee =public.coffees._data[coffeeKeys[x]];%><ahref="/coffees/<%- coffeeKeys[x] %>.html"><imgsrc="images/<%- coffee.image %>"alt="<%- coffee.name %>"></a><% } %></div></div>
In general, this isn’t too different from the menu page, but instead we grab the keys from the data and loop until we hit either the total number of items or 3. The result is pretty much as you expect and is shown in Figure 2-21.

Figure 2-21. Home Page
Obviously, there’s more that could be done, but we hope you can see how Harp really makes it easy to manage this simple little website.
Going Further with Harp
As we said in the beginning, we were only going to scratch the surface of the Harp static site generator. Here is a quick look at some of the features we did not cover in this chapter:
- While we documented it, we didn’t show any CSS or JavaScript preprocessing. Don’t forget that Harp allows for this as well.
- Harp provides access to a
_contentsvariable that represents each folder in the project. This could be useful for generating a dynamic list of images for an art gallery. - Harp sets an
environmentvariable that represents development versus production. This lets you toggle certain things based on where your code is running. - Harp provides basic 404 and client-side routing support.
- Harp can be used inside another Node.js application.
For more information, see the Harp documentation.