ANIMATION WITH FLASH AND AFTER EFFECTS
DAVE E. PHILLIPS
Have you seen what the kids are watching these days? Look familiar? It should because there’s a good chance the software used is the same application that created the e-card you sent your mum on her birthday: Macromedia Flash. Flash has made the opportunity of producing quality animation accessible to almost anyone. To take animation to the next level, however, you’ll need a tool designed to add visual splendor and make it ready for broadcast. Enter Adobe After Effects.
In this chapter you’ll learn how to combine the best qualities of both applications to get your animation ready for broadcast. I’ll assume that you’ve had previous experience in 2D animation and that you have an intermediate understanding of Flash. So, without further delay, get your Wacom warmed up.
WHAT’S ON THE DVD
Included on the DVD are all the source files for the project and a completed rendered sequence. With the supplied resources, you can begin this tutorial at any point simply by using the assets provided.
INTRODUCTION
Parameters
:: THE CHASE
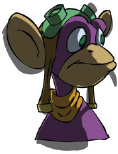
In this chapter you’ll be creating a six-shot sequence in which a small purple monkey, Lucid, is being pursued by a giant crablike monster named Creaton. You’ll use Flash to pre-visualize, animate, ink, and color the frame-by-frame animated elements. Then, in Adobe After Effects, you’ll pull it together with backgrounds, camera moves, and special effects. Additionally, you’ll learn unique techniques such as how to create a “2½D” looping background cycle and how to make “Walt quality” shadows.
:: TOOLS NEEDED:
• Macromedia Flash MX 2004 or later.
• An image-editing application such as Adobe Photoshop
• Either a digital tablet or a scanner (for importing hand-drawn artwork)
• An inhuman amount of patience
:: ESTIMATED HOURS
(However the finished Flash files are provided if you want to skip forward several steps)
• Storyboards and animatic: 5 hours
• Rough animation, ink and paint: 40-60 hours
• Digitally painted backgrounds: 12-15 hours
• Special effects and editing: 8 hours
• Musical score: 15 hours
:: THE PLAN
Now that you know the premise, here’s the shot list:
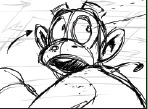
Shot 1a: Lucid, our primate protagonist, dashes into a clearing in a surreal jungle. (SEE FIGURE 01.)
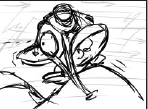
Shot 1b: Just as Lucid breathes a sigh of relief, Creaton explodes into the scene and the chase begins. (SEE FIGURE 02.)
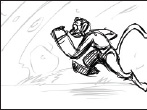
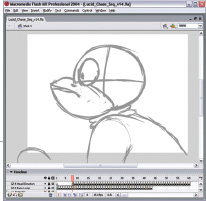
Shot 2: Lucid runs though the jungle. (SEE FIGURE 03.)
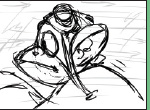
Shot 3: Creaton gallops close behind. (SEE FIGURE 04.)
Shot 4a: Lucid running. (SEE FIGURE 05.)
Shot 4b: Lucid looks behind at Creaton. (SEE FIGURE 06.)
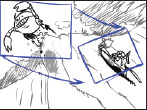
Shot 4c: A shocked Lucid turns to see the approaching cliff. (SEE FIGURE 07.)
Shot 5: The approaching precipice! (SEE FIGURE 08.)
Shot 6: Lucid skids to the edge of the cliff and narrowly keeps from going over. He looks back at Creaton, then turns back and leaps over the left edge. Creaton charges forward, skids over the edge, clings to the cliff for a moment then falls to his doom. The camera booms and tracks to the side of the cliff, where Lucid is safely hanging on a convenient branch. (SEE FIGURE 09.)


TIP // GONE ON EXPORT :: Like something for reference but don’t want it in the final movie? Turn the layer into a Guide layer. Guide layers appear like normal layers in Flash but aren’t exported in the final movie. Use them for elements such as rough animation, title-safe and action-safe guides or even production notes.
TIP // MORE ROOM, PLEASE :: Excess panels in your way? Press F4 to hide all panels except for the Timeline.
Tutorial
:: GETTING STARTED IN FLASH
In order to have an animation that can go to video, you’ll need to properly set it up in Flash. Head to the Document Properties dialogue (Modify>Document). Since Flash doesn’t support non-square pixels, set the Dimensions to 720X534 for final output to NTSC DV (or 720X540 for output to NTSC D1). Then set the Frame Rate to 15 or 30fps. The important thing is that you use a frame rate that After Effects can smoothly translate for video. Most animation for television shoots in twos or more, so every drawing is shown on screen for at least two frames. Choose 15fps and you deal with half the frames in Flash (and half the mess). After Effects then merely needs to double it to output for video. (SEE FIGURE 10.)
:: STORYBOARD AND ANIMATICS IN FLASH
Flash’s unique toolset makes it an ideal choice for creating pre-visualization. By creating your storyboards in Flash, you can proceed to the animatic without wasting time scanning and breaking up elements. Here are a few tips on the process:
Use a separate scene for each shot.
Create background and characters on separate layers.
Do only enough detail to communicate the shot effectively.
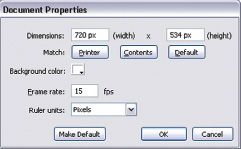
10 » THE DOCUMENT SETTING FOR DV
 ACTION-SAFE AND TITLE-SAFE GUIDES IN FLASH
Creating these guides will keep you aware of what your audience will be seeing on their television sets.
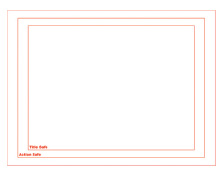
1. On a new layer, create a box the size of your document and delete the fill.
2. Change the stroke color to red.
3. Make two duplicates. Scale the first to 90% of your document and the second to 80%.
4. Select all the boxes and convert it to a symbol and turn the layer into a guide layer.
TIP // PRINTING THE STORYBOARDS :: To print your boards, select File>Export>Export Movie. Then in the “Save as type” drop-down menu select JPEG Sequence. Then import each file into your favorite graphic application to lay them out to print.
TIP // TIMING IS EVERYTHING :: In animation, timing is key. In order to get it right, refine your animatic as much as possible before moving on to rough animation. Remember, it’s much easier to re-tween a symbol, than it is to redraw animation.
Create symbols of your characters and Motion Tween them for the animatic.
Keeping elements on separate layers in Flash makes animatics a breeze. (SEE FIGURE 11.)
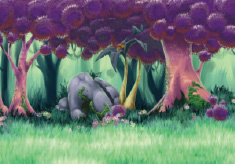
:: BACKGROUNDS
Backgrounds are a huge factor in making your animation look professional. Traditionally, backgrounds are richly painted. I created these backgrounds in Corel Painter. This method looks great but adds three to five hours per background. So consider your budget when deciding how to render your backgrounds. You may find that Flash works best for your look and budget. Whatever you decide, keep a few things in mind:
Detail of the scenery for Shot 2 (SEE FIGURE 12.)
Keep your sketches clean and light, and use them to animate over.
Add a 100-pixel border to your images so you can reframe the shot slightly if needed later. For shots with a stationary camera, such as Shot 1, this means your image size will be 920X734 square pixels.
Pay attention to the title-safe and action-safe areas. An example of a good background. (SEE FIGURE 13.)
11 »
12 »

13 »
TIP // THE PENNY DROPPED :: Don’t know a key from an extreme? Check out The Animator’s Survival Kit by Richard Williams. I consider this modestly priced book more valuable than the education I’ll be paying off until I die. It’s a sacred text that no animator should be without.

14 »
Paint what the camera sees. Plan your camera moves ahead of time and save yourself from hours of painting areas the audience will never see. (SEE FIGURE 14.)
Look at all that used space! Why paint it?
When in doubt, go larger. You don’t want to spend time creating backgrounds, only to find out in After Effects that you underestimated.
:: PLANNING MULTI-PLANE EFFECTS
This process involves breaking up the elements of your background into multiple layers or planes for the foreground, middle ground, and background. It’s the digital child of the multi-plane camera developed by Disney in the golden age of 2D. When deciding whether to implement this technique, ask these questions:
Will the camera move in the shot?
Do I have scenery in the immediate foreground?
Do the characters move behind parts of the scenery?
Am I using a rack focus effect?
If you answered yes to any of these, then you’ll need to set up your scenery accordingly. Group your scenery in layers such as foreground, middle ground and background.
Splitting this scenery along red line will make compositing them with animation headache-free. (SEE FIGURE 15.)
:: ANIMATING WITH EASE
15 »
Although I won’t be teaching you how to animate frame by frame in this chapter, I have compiled some tips designed to help you focus on your animating and streamline the process.
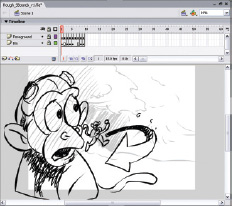
:: ROUGH ANIMATION
First open your animatic FLA file and save it as a new file. Turn your animatic layers into Guide layers and toggle the visibility to reference them while animating. Place your refined background sketch on a layer below and lock it. Use a medium gray for drawing your rough animation so you can see your lines clearly later when you ink it.
Gray lines work best for rough animation. (SEE FIGURE 16.)
:: DIGITAL INK AND PAINT
Once you’ve completed the rough animation and you’re happy with it, it’s time to ink it. Ink and color your animation on a separate layer above your rough animation. Create a separate layer for each element. In the case of Shot 1, create a separate layer for Lucid, Creaton, and Creaton’s dust cloud. This separation is vital for implementing effects such as shadows, dust, and rack focus.

:: PAINTING
I find I do more work filling areas that the Close Gaps misses due to the gap threshold than it saves me by closing my gaps. So for coloring, alternate between the Bucket Fill tool (K) set to Don’t Close Gaps and the Brush tool (B) set to Paint Behind mode. Choose a color and fill the appropriate areas in the frame. When you run across a shape with a gap that prevents you from filling it, switch to the Brush and dab the gap to close it off. Then go back to the Bucket to fill it. Got tiny areas that are difficult to click to fill? Dab it with the Brush tool. (SEE FIGURE 17.)
A completed frame. (SEE FIGURE 18.)
:: SHADOWS AND HIGHLIGHTS DONE RIGHT
Animators love shortcuts. Who doesn’t? In my opinion, however, you should never cut corners on shadows. Using simple techniques, I’ll show you how to create beautiful shadows and highlights. Open Shot 1 in Flash; I’ll be using it as the example.
:: SHADE OUTSIDE THE LINES
When creating the shadows in Flash, create a separate layer for each character shadow and one for cast shadows. Use the Brush tool with a black fill and the alpha at 60% and draw the shadows for each frame. Later you’ll blur them, so shade beyond the lines of the drawings so there won’t be a faded edge after applying blur. For Creaton’s highlight, on a separate layer add small white dots in the eyes where the light source directly hits. When you finish the highlights in After Effects, they’ll be amplified with a glow, so keep their size to a minimum. (SEE FIGURE 20.)
16 »

17 » INKING THE ANIMATION.
18 »

BRUSH SIZE
This is the biggest “gotcha” for the Brush tool. The brush size in Flash is relative to the screen, not the stage. This means that if you draw a stroke zoomed at 100% and then again at 25%, the stroke you drew at 25% will be thicker than the stroke drawn at 100%. This can be a huge hassle for animators, especially when working with multiple animators. So what’s the solution? Agree on zoom levels ahead of time. Pick a zoom level for main lines and another for detail lines and then stick with it.

19 » ALL THESE STROKES WHERE CREATED USING THE SAME BRUSH SIZE AT VARYING ZOOM LEVELS..
20 » IT’S BEST TO COLOR OUTSIDE THE LINES.
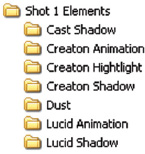
21 » SAMPLE DIRECTORY STRUCTURE.
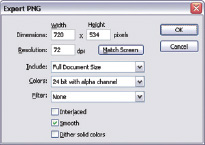
22 » THE PROPER EXPORT SETTINGS.
:: LAYER EXODUS I
Flash doesn’t make it simple to export elements. Use the following approach to export shots 1-5, and later you’ll learn how to export the oversized animation in Shot 6. (SEE FIGURE 21.)
Create a folder on your hard drive for each layer to be exported. Then create a new Flash document with the same settings and create a new layer.
Switch back to the original file and select all the frames for the first layer to be exported. Copy the frames by pressing Cmd+Option+C (Ctrl+Alt+C).
Paste the frames in the top layer by pressing Cmd+Option+V (Ctrl+Alt+V).
1. Export a PNG image sequence by pressing Cmd+Option+S (Ctrl+Alt+S). Choose PNG Sequence. In the export PNG dialogue select Full Document Size and “24-bit with alpha channel.”
Delete this newest layer and repeat the process until all the layers with animated elements are exported. (SEE FIGURE 22.)
:: GOODBYE, FLASH
It’s time to make these shadows magic, so open After Effects and import the PNGs as sequences. Import the background PSD as a composition so that the layers come in separately. Delete the resulting composition. Create a new composition named Shot 1 using the NTSC DV 720X480 preset.
:: ADJUSTING THE FRAME RATE
After Effects has no way to decipher the proper frame rate of an image sequence and uses 30fps by default.
1. To fix this, select the first image sequence listed in the Project window and press Cmd+F (Ctrl+F) to bring up the Interpret Footage dialog.
2. Change the frame rate to 15fps.
3. To copy this setting and apply it to the other footage, with the sequences selected, press Cmd+Option+C (Ctrl+Alt+C).
4. Select the other image sequences and press Cmd+Option+V (Ctrl+Alt+V).
:: SET UP
Let’s get our shot built.
1. Drag all the PNG sequences and background assets into Shot 1 and open the composition.
2. Press Cmd+K (Ctrl+K) to open the Composition Settings dialogue and adjust the Duration to match the length of your PNG sequences.
TIP // FLAG IT! :: To label a frame, select it and open the Properties palette by pressing Cmd+F3 (Ctrl+F3). Enter the desired label in the text field “Frame.” Use frame labels for marking the ends of animation cycles and production notes.
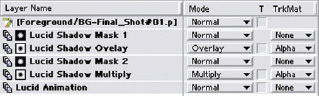
23 » THE DUAL LAYER APPROACH JUST BEFORE PRE-COMPOSITING.
3. In your Timeline, move the sequences between the background and foreground layers of your scenery. Place Lucid’s layers above Creaton’s and each shadow layer above its counterpart.
4. Lastly, place the drop shadow below the other sequences and lock the background and foreground scenery layers.
:: DOUBLE UP
It’s time to double-up some of our layers to achieve proper shading.
1. Select Lucid’s shadow layer, rename it Lucid Shadow Multiply, and set the blending mode to Multiply.
2. Add the Tint effect (Effect>Image Control>Tint) and press F3 to open the Effects Controls. Select a dark purple for both “Map Black to” and “Map White to” and enter 100 for “Amount to Tint.” This will create more appealing shadows.
3. Add a Gaussian Blur (Effect>Blur &Sharpen>Gaussian Blur) and in the Effect Controls, set the Blurriness to 5.
4. Next duplicate Lucid’s layer (not his shadow) and name the duplicate Lucid Shadow Mask 1.
5. Place it above Lucid’s shadow layer.
6. Set the Lucid Shadow Multiply layer’s Track Matte to Alpha Matte.
7. Select both the shadow layer and the mask layer and duplicate them by pressing Cmd+D (Ctrl+D).
8. Rename the new shadow layer Lucid Shadow Overlay, switch its blending mode to Overlay, and increase the blur to 15. Lower the Lucid Shadow Multiply layer’s opacity to 50. (SEE FIGURE 23.)
9. The idea is to use the multiplied shadow as the main shading and the overlay shadow to add depth and richness.
10. Finally, select all the layers related to Lucid and precompose them by pressing Cmd+Shift+C (Ctrl+Shift+C).
11. Repeat the process with Creaton and then the cast shadows. Choose a darker version of the predominant color of the element in the Tint effect. For Creaton it’s dark brown and for the cast shadow it’s dark green. (SEE FIGURE 24.)
12. Finish Creaton’s eye highlights by adding a Gaussian Blur with the Blurriness set to 1.
13. Then add two separate Glow effects with parameters in (SEE FIGURE 25.).
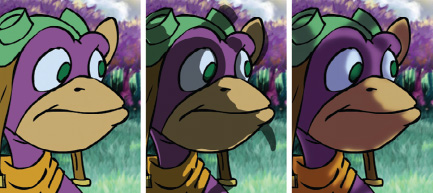
24 » FLAT, SHADED, THEN GORGEOUS!
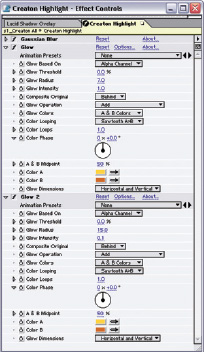
25 » THE DOUBLE GLOW EFFECT FOR HIGHLIGHTS.
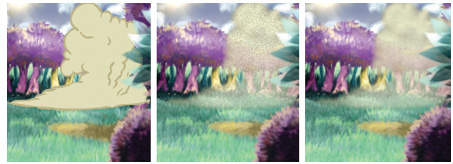
26 » ORIGINAL, WITH NOISE, AND BLUR.
:: KICKING UP DUST
With a few simple adjustments, you can take the cartoonish, flat dust you animated and give it added vitality while complimenting the scenery.
1. First hide the character layers.
2. Select the Rectangular Mask Tool (Q) and click and drag a mask that starts at the bottom-left corner of the dust to twice its height above on the right side.
3. Then in the Mask properties (M), uncheck the lock aspect ratio on Mask Feather and set the vertical value to around 500, giving the dust a gradual fade.
4. Next add a Gaussian Blur with Blurriness set to 12.
5. Add the Noise effect at 25% and uncheck the Use Color Noise option. This will break up the flat areas of color.
6. Finally, an additional Gaussian Blur set to 5 is needed to soften the noise. (SEE FIGURE 26 & 27.)
:: RACK FOCUS
To achieve a simple switch in focus, we’ll create a rack focus effect.
1. Create a new Adjustment Layer and place it below Lucid’s layer. Name it Rack Focus BG.
2. Now add the Gaussian Blur effect to the new Adjustment Layer and Lucid’s layer.
3. Set a key for the Blurriness just beyond one second into the shot, when Lucid nears the foreground.
4. Then at two seconds in, when Lucid pops up for his close-up, set another key and change the value to 15.
5. Set a keyframe for the Rack Focus BG layer’s Blurriness and leave the value at 0.

27 » DRAG A RECTANGULAR MASK WITH PLENTY OF HEADROOM.
6. Scrub forward in the Timeline about one second, just as Lucid settles from his pop. Set a key for both layers. For Lucid, change the value to 0, and for the Rack Focus BG layer set it at 3.
7. Now move forward to the point where Creaton charges into the clearing and switch the focus to the background using the same technique. (SEE FIGURE 28.)
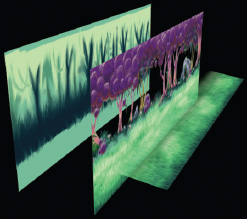
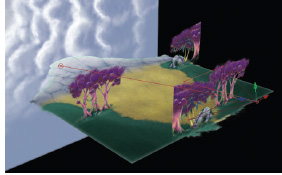
:: 2 1/2 D LOOPING BACKGROUND
Remember watching “The Flintstones” as a kid and wondering why the exact same lamp kept flying by in the background? This will be similar, but not corny. For Shot 2, I’m going to show you how to take your layered seamless background and create depth by setting them in After Effect’s 3D space.
:: PREPARING THE BACKGROUND
If you’d like to skip this step, locate the layered background files on the DVD accompanying this book and proceed to the next section. If not, you’ll need to break up or organize your background into three layers using Photoshop:
Background: A completely opaque layer with low-detail trees and grass
Foreground: A layer of sporadic trees and grass
Ground: A layer of grass from a birds-eye view (SEE FIGURE 29.)
1. Run the Offset filter (Filter>Other>Offset) on each layer to center the seam.
2. Use the Clone tool or Healing Brush tool to blend away the seam on each layer.
3. On the Ground layer use a layer mask and the Gradient tool to fade the layer at the top so that it blends with the Foreground layer. Save your work and head to After Effects.
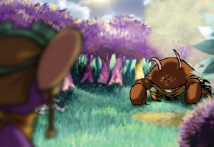
28 » THE RACK FOCUS EFFECT IN USE.

29 » THE THREE LAYERS OF THE CYCLE.

:: SETTING THE STAGE
1. Create a new composition named Shot 2.
2. Import your PNG sequences and the background layers.
3. Change the PNG sequences’ frame rate to 15fps.
4. Drag the elements into the Shot 2. Adjust the duration of the composition.
5. Finish off Lucid’s shadows as previously described, precompose his layers and move the resulting layer to the top.
6. Turn on Motion Blur and 3D Layer for each background layer.
7. Hide Lucid’s layer and switch the composition view from Active Camera to Custom View 3.
8. Then move the Background layer further back in on the Z-axis, just enough to achieve a little parallax.
9. Rotate the Ground layer –80 on the X-axis and adjust its position on the Z-axis so that it sits in front of the Foreground layer. Adjust its Y position so that the Ground ends just below the tree roots. Your result should look like FIGURE 31.
10. Select all three layers and precompose them.
11. Toggle on Collapse Transformations and 3D Layer for your new composition.
12. Switch the view back to Active Camera and unhide Lucid.
13. Next adjust the Y and Z position so that Lucid is placed in the proper position and scaled to the scenery.
30 » THE SCENERY IN 3D SPACE.
:: MOVE IT
It’s now time to put things into motion.
1. Duplicate the scenery layer and parent it to the original, linking the movement.
2. Now move the parent layer to the right until the edge of the layer is near the center of the composition.
3. Move the child layer left until its right edge is flush with the parent layer’s left edge and thus seamless.
4. Now set the parent layer’s X position at 0 and set a keyframe for position at frame 1. (SEE FIGURE 31.)
A few more nudges to the right, and seam will be hidden.
5. Move forward 10 or so frames and move the parent right until the child is framed as the parent is in frame 1.
6. Press J and K to toggle between the two keyframes to see the difference. Adjust the parent until the two key frames are identical.

:: TIME IT
Press 0 on the numeric keypad to see a RAM Preview. Chances are that the ground and Lucid aren’t synced and Lucid appears to slide rather than run. Pick a visual landmark such as a tree in the background. Then adjust the second keyframe on the parent.
Find a spot where Lucid and your landmark are adjacent. Move ahead one or two frames, when Lucid’s grounded foot has moved back. Is the spatial relationship the same with the foot and the landmark? If not, fine-tune the key frame until the relationship is consistent. Render another RAM Preview with Motion Blur enabled and watch closely. (SEE FIGURE 32.)
Did you catch it? The Motion Blur creates a seam where the two backgrounds connect. To correct this, move to a point in the cycle where the seam is centered in frame. Then nudge the child with right arrow key until it’s once again seamless. Finally, adjust the second position key frame on the parent so that once again it is identical to frame 1.

31 » A FEW MORE NUDGES TO THE RIGHT, AND SEAM WILL BE HIDDEN.

32 » YIKES! THE MOTION BLUR EXPOSED THE SEAM.
33 » IN THIS SHOT, THE STAR IS THE SCENERY.
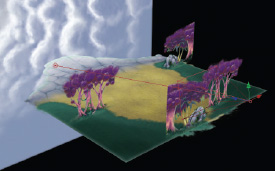
34 » THE ELEMENTS LAID OUT IN 3D SPACE.
:: LOOP IT
Let’s save some time by looping our animation.
1. To make a seamless loop, select both scenery layers, precompose them and open the resulting comp.
2. In the Composition Settings adjust the duration of the comp so that it ends one frame earlier than the last-position keyframe on the parent layer.
3. Return to Shot 2 and click RAM Preview.
There’s one last issue. Lucid’s PNG sequence is running at 15fps, but the cycle is running at 29.97fps. Notice that every other frame, the ground slips past Lucid. In other words, the background is too smooth. To fix this simply add the Posterize Time effect to the cycle layer and enter 15 for the Frame Rate. Finally, duplicate the cycle in the Timeline to run the length of the shot.
:: HAND-HELD CAMERA
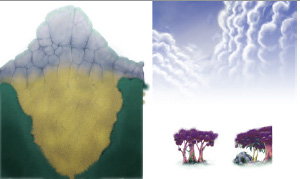
Shot 5 is Lucid’s point of view approaching the precipice. Here you’ll employ a simple hand-held camera effect. It consists of setting up scenery image planes in 3D space, flying a camera through the scene and then giving it some wiggle.
:: THE CAST
This shot has two stars: the ground and the sky. The ground should be drawn like FIGURE 33. I’ve created mine at 2460X3170 pixels. This will provide plenty of resolution for when a portion of the plane is close to the camera. On the layer below the ground create a cloudy blue sky.
The supporting cast of the shot is the trees, rocks, and shrubs. Simply nab two samples of trees from the Foreground layer of Shot 2. In Photoshop, use the Eraser tool to quickly blend out the bottom grass edges and the Clone tool to finish off the top tree leaves that were cut off. (SEE FIGURE 33.)
:: THE SET
It’s time to finish off this set for our next shot.
1. In After Effects, create a new composition named Shot 5.
2. Change the duration to four seconds.
3. Import the background PSD using the Composition Cropped Layers option.
4. Delete the resulting comp and drag the scene elements into Shot5.
5. Toggle on Motion Blur and 3D Layer options for all layers then hide the tree layers.
6. Create a new camera with the 35mm preset named Main Camera.
7. Next rotate the Ground layer –90 on the X-axis.
8. Move the sky layer back on the Z-axis until it completely clears the cliff, then scale it up to approximately two times the size of the frame.
9. Switch the composition view to Custom View 3 and turn back on the tree layers.
10. Duplicate and position your trees so that they then resemble those in FIGURE 34.
:: KEY THE CAMERA
1. Position the camera at the front edge of the Ground layer and the camera’s Point of Interest at the opposite end of the layer but just below it.
2. Keyframe both attributes and then move to the end of the Timeline.
3. Position the camera near the cliff edge, lower it on the Y-axis, and adjust your Point of Interest to better frame the shot. Then tweak the camera’s path handles to form a nice arc to the descent. (SEE FIGURE 35.)
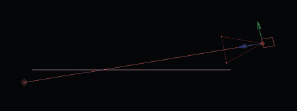
35 » THE POSITION OF THE CAMERA, VIEWED FROM THE LEFT.
36 » THE WIGGLER PANEL.
:: JUST WIGGLE IT
1. Select both keyframes for the camera position and launch The Wiggler panel (Window The Wiggler).
2. Select Spatial Path and the Smooth noise type. Click the All Dimensions Independently radio button and enter 10 for the Frequency and 40 for the Magnitude.
3. Click Apply.
4. Now select both key frames for the camera’s Point of Interest.
5. In The Wiggler panel choose One Dimension and select Y from the drop-down menu.
6. Enter 5 for the Frequency and 15 for the Magnitude and click Apply.
7. Lastly, open the Composition Settings and click the Advanced tab. Enter 400 for the Shutter Angle and click OK.
8. RAM Preview to test the results. (SEE FIGURE 36.)
Traditional Camera Moves
:: LAYER EXODUS II
In Shot 6 you’ll learn how to quickly create a traditional boom, track, and dolly using After Effect’s 3D space. First in Flash, you’ll need to export your oversized animation for this shot. The major steps you’ll need to complete are:
1. Open the FLA in file and resave it with a new name.
2. Strip the file of all scenes except for the one containing Shot 6.
3. Delete unanimated layers.
4. Increase the document size to the size of your artwork (2400X2000).
5. Then turn on the Edit Multiple Frames option and under Modify Onion Markers select Onion All.
6. Select everything and move it to the center of the stage. Turn off Edit Multiple Frames.
7. Change every layer except the top layer into a Guide Layer.
8. Export an appropriately named PNG sequence as before.
9. Change the recently exported layer into a Guide Layer and switch the layer below back to a normal layer.
10. Export and repeat.
:: SETUP
1. In After Effects, create a new composition named Shot 6.
2. Import your PNG sequences and import your background Photoshop file as composition.
3. Change the PNG sequences’ frame rate to 15fps.
4. Delete the resulting composition and drag all the elements into Shot 6.
5. Change the duration of the composition to that of the PNG sequences and order the layers appropriately.
6. Next create a new Null Object (Layer>New>Null Object) named All Assets.
7. Parent all the other layers to this null object.
8. Move All Assets so that the cliff edge is viewable and go forward in the Timeline to when Lucid is crouched down at the edge with his fingers overlapping the rock face. Select all the animated layers and position them so that Lucid is properly registered with the cliff face.
9. Scale All Assets down so that you can see most of the scene. Finish the shadows and dust using the techniques learned earlier.
10. Use a duplicate of the cliff layer as a track matte for the cast shadows.
Before implementing the camera move, you need to address one issue. Lucid and Creaton pass from one side of the cliff to the other. So for both characters, you’ll need to split the layer at the transition (Cmd+D for Mac, Ctrl+D for PC) and sandwich the foremost cliff layer between the two.
Select all the PNG layers and the foremost cliff layer and precompose them. Within the new composition, increase the size in the Composition Settings until all artwork fits comfortably in the frame. Return to Shot 6. (SEE FIGURE 37.)

» HERE’S CHRIS IN HIS STUDIO CREATING THE SCORE.
Christopher S. Murphy of www.farawaynearby.com is the genius behind the musicial score for this sequence. If you haven’t already, pop in the DVD and listen to it. What is especially impressive is that the rich sound of a full orchestra was created in his small studio with a MIDI keyboard! Christopher used Steinberg’s Cubase SX to record, sequence and produce the score. In addition, he used an orchestral plug-in to drive the VST instruments in the score. So before you reach for that bargain-rack royalty-free music CD, consider finding a talented guy like Chris to tailor a score to your piece. It’s an added line in the budget, but catapults the feel of your piece from good to glorious.
:: MAKE YOUR (CAMERA) MOVE
Toggle on 3D Layer and Motion Blur for all the layers in Shot 6. Stagger the layers along the Z-axis starting from front to back. Give just enough space to give a noticeable parallax while moving. You can test it by grabbing the All Assets layer and moving it around.
1. Reposition All Assets so that the cliff edge is framed for the first part of the shot.
2. Scrub through the track up to Creaton’s fall to make sure all action stays in frame. Then around eight seconds, after Creaton has fallen out of frame, set a keyframe for both position and rotation.
3. Go forward two seconds. Frame the shot on Lucid hanging from the branch by repositioning All Assets and rotating it clockwise.
4. Dolly in by moving All Assets towards the camera on the Z-axis.
5. Select all key frames and press F9 to apply Easy Ease.
6. Finally, move to the end of the composition and move All Assets the tiniest bit closer to camera.
7. Click RAM Preview, and you should see the camera boom down, track right, and dolly in followed by a subtle dolly in.

:: FILL THE GAPS
Now it’s time to use what you’ve learned to finish Shots 3 and 4. In Shot 3, all the elements are animated frame by frame. All you’ll need to do is set them up in Flash, export them and finish the shadows in After Effects.
Shot 4 is simply a close-up of Lucid running. Recycle the looping background you created earlier by scaling it up and adding a generous Gaussian Blur.
:: RENDER AND EDIT
Once you’ve completed all the shots, I recommend rendering them individually before you edit them together in After Effects. Render using a lossless codec (such as Animation) so that you maintain the quality in the edit. Then you can sequence the shots in a new composition. Add an opacity fade-out at the end of Shot 6.
:: AUDIO
Audio will make or break your animation. Many great tools exist including Sony Vegas for the PC platform and Soundtrack Pro for the Mac platform. Both offer the ability to score to picture and add sound effects.
However most great animators are not also composers. I had the good fortune to know an amazing musician who created a custom score to the animation. So simply import the music from the accompanying DVD and place it in the Timeline to see and hear what a difference music makes.
:: HIDING THE EVIDENCE
You’ve completed the sequence but it still looks like Flash! To keep you from being accused of putting web toons on television, I’ve gathered a few tips to hide your animation’s origin and make it broadcast safe.
:: WORKING DIRTY
The dead giveaway that this sequence is Flash-based is ultra-clean artwork. So make it dirty.
Create a new Adjustment Layer named Soft Focus and add a 15-pixel Gaussian Blur. Lower the layer opacity to 30%.
Create another Adjustment Layer named Video Blur, add a 1-pixel Gaussian Blur but only vertically. This will reduce flickering on video from thin line weights.
Now add a new Solid Layer filled with 50% gray and name it Noise. Apply the Add Noise effect with the default settings and reduce the layer opacity to 50%. This effect will break up the telltale flat color and bring it closer to the look of film.
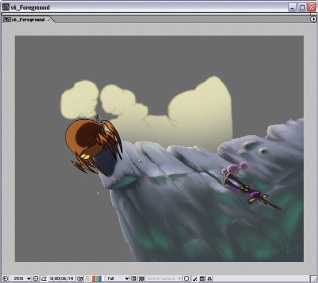
37 » RESIZE THE FOREGROUND COMPOSITION TO THE SIZE OF THE ARTWORK.
Add yet another Solid Layer named Film Edge and choose black as the fill color. Double-click the Elliptical Mask tool to create an elliptical mask the exact size of the layer. Then in the Mask settings, invert the mask, increase the feathering to 200 and the expansion to 100. This effect mimics the way old films darken around the edges.
Add one more Adjustment Layer named Video Levels and add the Levels effect. Set the Output Black to 16 and the Output White to 235. This will bring your animation into the video-safe range. If you have extremely vivid colors, you may consider adding a Hue/Saturation effect and lowering the saturation.
Finally select all these effect layers and precompose them, making sure to turn on Collapse Transformations afterwards.
Now you have a portable effect that you can add to any other scene in an animation or duplicate and make variations. One possibility is a web variation. Just duplicate the composition and delete the two video-safe layers. (SEE FIGURE 38

38 » FROM BEGINNING TO END. A LITTLE AFTER EFFECTS GOES A LONG WAY.
Conclusion
Well, you did it. You produced a whopping 45 seconds of broadcast-quality animation! I hope I’ve shown you at least a few new tricks and that you can produce beautiful broadcast-quality animation on a budget. Good luck, and may your audience love your ones, accept your twos and forgive your threes.
ABOUT THE AUTHOR
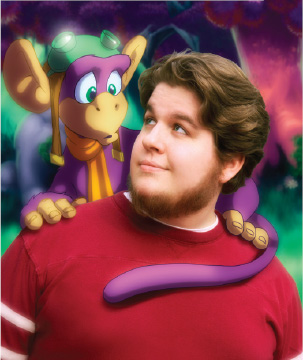
Dave E. Phillips is best known for saturating the web with his subversively humorous animated Flash shorts. He began his career in fine art but soon felt the pull of animation. Since completing a degree in 2D and 3D animation, Dave has assisted in the creation of animation and motion graphics pieces for clients such as the American Diabetes Association and America Online. Dave currently resides in the Albany, NY area with his wife, Amy.
ABOUT THE PROJECT
This animated sequence was fully animated and produced by Dave E. Phillips. It was created as an accompaniment to a production bible for “Lucid the Dreamer.” In order to attract network attention, Dave wanted to create a compelling and visually stunning sequence that would immediately immerse viewers in Lucid’s dream world. He has met that goal by combining the best aspects of Flash and After Effects.
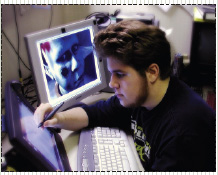
Photo by Amy Phillips