
The Right Stuff
You want to know the first secret to drawing? Find the best tools available! You have to have the right toys. Having the proper pencils, paper, erasers and other tools can make a big difference in your art. I'll show you what I prefer, but I fully expect you to develop an addiction to trying out new drawing supplies on your own. Think of it as the chocolate in your art life.
In addition to the right supplies, you need something to draw from. Whether it's a photograph, still life setup, live model or a trip to the great outdoor for some plein air sketching (and maybe a little bug-slapping), the inspiration for your artwork can come in many different forms.
Something to Draw With
Finding the right pencils to use for your drawings is the first step toward developing your artistic identity. The pencil is, after all, the primary tool of our trade. We can’t work without it!
Though the selection of pencils available in most art stores may overwhelm you at first, you’ll get the hang of it in no time. Each pencil is clearly marked and labeled according to the brand and type of graphite, making your shopping adventure that much easier. You’ll soon enjoy seeking out the perfect drawing implement. Look at it this way: The art store is like a candy shop without the guilt or the calories, and you can have as many pencils as you want!
As with all tools, it’s important to experiment with a wide variety to find those pencils that best suit your individual tastes. Here are some of your options.
No. 2 Pencil
This is the standard yellow pencil you always forgot to bring to class when you were a kid. The grade of lead, actually graphite, is called “HB.” Don’t ask me why—maybe those were the initials of the inventor’s mom. It’s a nice, middle-ofthe-road pencil to draw with.
Hard (“H”) Pencils
Pencils labeled “H” have hard graphite. (You could say the “H” stands for “hard.”) A hard lead doesn’t like to draw. The harder the lead, the lighter the line. The higher the number preceding the “H,” the harder the graphite. A 2H pencil is harder than an HB (our old yellow buddy), but not as hard as a 4H. By the time you reach 6H, you have a very vengeful pencil indeed—it can actually indent the paper if you push too hard. Despite your best efforts to erase, its marks will remain scored on your paper.
You might consider avoiding these harder pencils altogether, but they can be useful when working with certain types of paper. For instance, harder leads take well to Clearprint or other drafting papers. You might use 2H pencils to do some of the lightest shading on your drawing before moving on to an HB and the darker leads. They can be used for any subject but require a very gentle hand.
Soft (“B”) Pencils
“B” pencils contain softer graphite that results in a darker line. (“B” could stand for “bold.”) The higher the number, the darker the line. A 2B pencil is darker than an HB, but not as dark as a 6B. Soft pencils are nicer to your paper, but they, too, have a nasty side: They don’t want to leave. If you dive into a major 6B scribble and then decide to erase it, there will always be a faint reminder of your original scribble on your drawing.

Standard Yellow No. 2
The same pencil that was perfect for filling in all those circles on multiple-choice exams you took in school is fine for drawing.

What the Letters and Numbers Mean
Hard pencils are labeled “H” and result in a lighter line. Soft pencils are labeled “B” and create a darker line. The higher the number, the lighter (for “H”) or darker (for “B”) the line. An HB pencil (like the yellow no. 2) falls in the middle.
 Psssssst!
For the illustrations in this book, we will use regular standard leads ranging from a 2H to 6B. No matter the pencil, it is crucial to keep it sharp. A pencil’s sharpness is directly related to the success of your drawing. Just remember a dull point equals a dull drawing.
Lead Holders
There are a variety of substitutes for the wooden drawing pencil that you can try, including one of my favorites, the lead holder. Rick and I prefer to use lead holders because they sharpen better than regular drawing pencils and can hold various leads. They do, however, require a special sharpener, which in turn requires a bit of practice.
Mechanical Pencils
Mechanical pencils are often mistaken for lead holders. Both implements hold lead in a metal casing that can be reloaded when empty. The difference is in the size of the lead. The lead holder uses 2mm leads; the mechanical pencil holds .3mm to .9mm leads. The latter translates to itty-bitty leads, which break easily and can’t be sharpened well. Stick to the lead holder.
Other Possibilities
I have also tried Ebony pencils, which are very dark. Many artists love them, and certainly they’re fun to experiment with. I also bought a box of woodless pencils—pure graphite bound in lacquer. They work fine but waste a lot of graphite when they need to be sharpened.
Pencil Sharpeners
You can keep your pencils sharp by using standard sharpeners or special sharpeners that accommodate certain types of pencils (as is the case with lead holders). Some artists use razor blades or other sharp instruments to whittle the wood back off the lead point, and then sharpen the exposed graphite with a sanding block. I personally avoid sharp objects, as I tend to get hurt, but if you’re proficient with such tools, whittle away!

Soft Leads
These are all “B” pencils with soft lead (actually graphite), but their marks vary quite a bit depending on the number.

Lead Holders Lead holders have
Lead holders have the advantage of being able to hold various leads. They also sharpen better than regular pencils but require a special sharpener that takes a bit of practice to use correctly.
 Psssssst!
An important point about pencils, if you’ll pardon my pun, is to avoid dropping them. If you drop a pencil on a hard floor, the lead inside can break. When this happens, the pencil point will keep breaking off as you try to sharpen the pencil.
Something to Erase With (or, Your New Best Friends)
Diamonds may be a girl’s best friend and a dog may be man’s, but an eraser will be yours. Not only can it eliminate your mistakes, but it also comes in handy for executing shading techniques and creating amazing textures. (You’ll learn how to do this a little later.)
Unlike pencils, erasers are not lined up and cunningly labeled for the shopper’s convenience, so you’ll need to investigate your options before making a purchase. There is a wide selection of erasers available, each varying in hardness (or firmness) and messiness (how much eraser residue is left behind). The upside, though, is that with so many options you’re guaranteed to find an eraser that suits your needs.
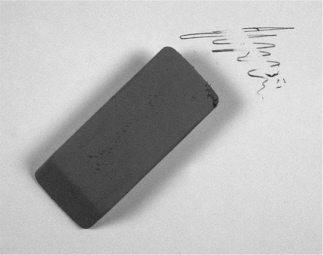
Pink Rubber Eraser
If you’re looking for something that really gets the lead out, it’s hard to beat the classic pink rubber eraser. Its firmness makes it an industrial-strength option, able to remove all traces of graphite. Think of it as the eraser wearing black leather and riding a Harley—it’s one tough eraser! Be warned, though: pink erasers are rather abrasive and can roughen up the surface of your paper, so exercise caution when using on delicate surfaces.
Kneaded Rubber Eraser
This eraser is a must for every artist. It starts out as a neat little square and soon resembles something you might have to scrape off your shoe. This eraser is best at removing a layer of graphite (as opposed to erasing down to the white paper) and gently cleaning up certain areas of your drawing. You can mold or knead the eraser as needed to reach tight spots without disturbing other nearby areas. You can clean the accumulated graphite off the eraser by folding it back on itself.
For years, the kneaded eraser only came in standard gray, but now colors are available. Faber-Castell offers a superior kneaded eraser in red, blue or yellow that is softer and more pliable than the traditional gray erasers. Check around and you may find other similar options.
Pink Rubber Eraser

Kneaded Rubber Eraser
White Plastic Eraser
I love the white plastic eraser. It can remove pencil marks cleanly and completely. Better still, it leaves behind no residue, and its nonabrasive quality makes it safe for all surface types. It’s also quite easy to cut if need be. If the edges of the eraser have worn dull, you can use a knife to make a fresh, sharp edge that’s perfect for erasing thin lines.
Portable Electric Eraser
Nothing, I mean nothing, is more fun, more useful or more cool than a portable electric eraser. This battery-powered mechanism has a white plastic eraser tip and works fantastically for erasing in tight spaces or correcting small details. The only setback: It sounds like a dentist’s drill!
Gummed Eraser
Probably the messiest of all erasers, the gummed eraser is gentle enough to remove unwanted smudges or marks without damaging your paper, but it leaves behind a dandruff-like residue in the process. Even the cleanest gummed eraser will still make a small mess, so find a brush for whisking your paper clean.

White Plastic Eraser
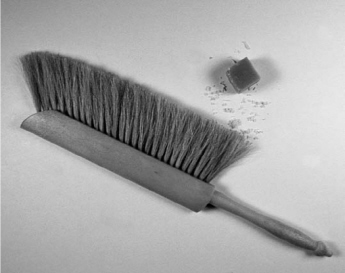
Gummed Eraser With an Artist’s Horsehair Dusting Brush

Portable Electric Eraser
 Psssssst!
Some artists “fix” the graphite on their finished drawings with spray fixative. Personally, I don’t usually use such a product because, well, I’ll come right out and say it: It stinks. Even if you spray outside, the smell lingers on the paper and will subsequently stink up the house. There are some “odor-free” spray fixatives that smell less awful. Some artists use hairspray, although I’m not sure how safe it is for your art over time. You could simply handle your artwork with care, store it between tissue paper and frame it behind glass at your earliest convenience.
A Few Additional Fun (and Very Useful) Tools
There are several other items you’ll want to purchase for your budding art career. I find the following tools to be indispensable when drawing, and I know you will, too!
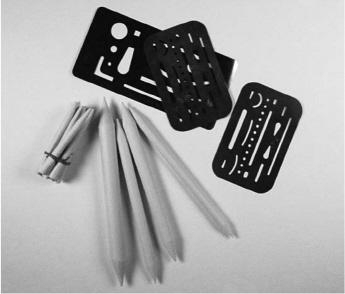
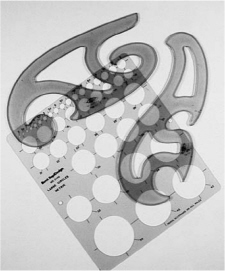
A Ruler, Circle Templates and French Curves
If you choose to draw anything architectural or mechanical, such as a building or a B-52 bomber, you can either opt to keep it sketchy or aim for a truly realistic look. For the latter, you will need a few special tools: rulers, French curves and circle templates.
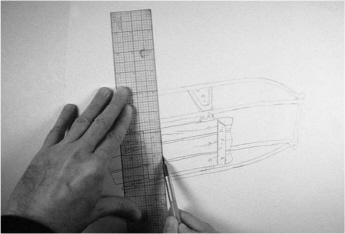
None of us can draw a perfectly straight line, so a ruler is a must. Even if you’re not drawing a complex subject, you’ll want a ruler for such tasks as checking proportions and angles. I prefer a plastic C-Thru ruler, as it has a very useful grid on it and a centering row of numbers. You can find a similar ruler at the fabric store.
Circle templates and French curves are useful for the more uniform parts of the drawings you might do. They are usually made of plastic. Circle templates contain multiple circles of varying sizes, and they are useful for drawing precise circles or arcs. French curves are templates that help you draw other complex curves and shapes. Both of these tools will be discussed at length later in the book.
Erasing Shields and Blending Tools
Made of thin metal, erasing shields have openings of various shapes that allow you to carefully erase lines, highlights or other details without disturbing nearby areas. They are usually available in the drafting section of office supply stores.
Paper stumps and tortillions are used to smoothly blend pencil strokes. A paper stump is a compressed wad of paper, pointed on both ends, that can be used on its side or tip to smooth and shade pencil marks. The tortillion is rolled paper with one pointed tip for use in tiny areas that need smudging.

Ruler
Erasing Shields, Stumps and Tortillions
Circle Templates and French Curves
Psssssst!
If you don’t have a fancy art box, a fishing tackle box is perfect for toting around your newly acquired drawing supplies. It has plenty of compartments for storing your goodies.
Getting It Straight
There’s no law in art that says a manmade object with straight edges has to look mechanically drawn. Freehand lines are very nice, charming in fact, and can look realistic. If you desire to have the object look even more realistic, though, then you should use some type of straightedge such as a ruler.
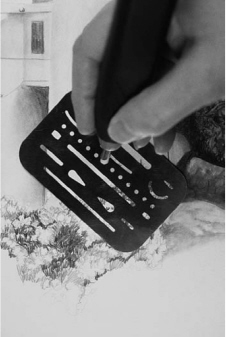
Intricate Erasing
An erasing shield is a handy little device that is quite inexpensive, yet priceless. You can use it to erase various shapes, clean up edges and make even the slightest adjustments.

Navigating Curves
Av ariety of French curves can be of great help when drawing mechanical or uniform curving shapes such as those found on musical instruments, cars, jars with curved sides and arches on doorways.
Smooth Blending and Shading
The paper stump (shown here) may be used on its tip or side, unlike the tortillion which is designed to be used on its tip only. If you have a large area to blend, use the stump; save the tortillion for smaller areas. These tools can do more than just blend previously pencilled marks; they can pick up and retain graphite to be used for making their own marks.
A Surface to Draw On
You can draw on almost any surface. Certainly, there isn’t a right or wrong paper, only a preference for a certain look or feel for your drawing.
One of the first things to consider when choosing paper is thickness. I like to do my finished drawings on bristol board. It’s very heavy and forgiving, allowing me to correct many mistakes without jeopardizing the surface. Thinner surfaces like newsprint are more sensitive to erasers and harder to blend on; they just don’t work that well. The only real benefit in buying thinner paper is that it saves you some cash.
Another consideration is surface texture. The texture, or tooth, of your drawing paper is determined by touch and makes quite a difference in the final appearance of your work of art. The paper designated as smooth or plate finish allows for a finished drawing with lots of detail. The individual pencil strokes tend to blend together well because the graphite will fill in evenly on the paper surface. The bristol board I use has a smooth finish.
Papers labeled medium, regular or rough have more texture, causing the surface to grab the graphite in an uneven manner. The rougher paper holds more graphite, allowing for deeper shadows and more contrast, but results in a grainier drawing.
In addition to buying paper for your finished drawings, you’ll also want to stock up on tracing paper. Tracing paper is useful for a number of tasks, such as keeping your drawing paper clean and spotting (and correcting) errors in your drawing. Later we will cover the use of tracing paper in more detail.
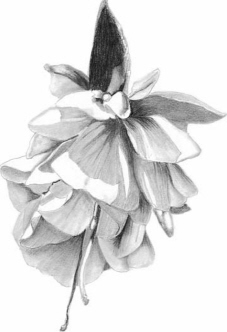
Smooth Sailing
This fuchsia was drawn on smooth bristol board. Smooth paper gives your drawing a softer, less sketchy look. It works well for smooth skin tones, glass and other slick surfaces. Of course, you could intentionally use rougher paper for smooth subjects to create interest.
EVELYN’S FUCHSIA
Graphite on bristol board
10" x 8" (25cm x 20cm)
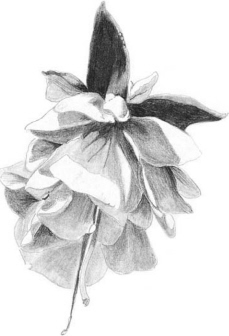
In the Rough
This one was drawn on regular drawing paper, which has more tooth. Rougher paper adds texture to your drawing, which makes it a good choice for highly textured subjects like landscapes, animals, stone and so on. Between these two drawings, I liked the smoother surface better, as the drawing looks more delicate.
EVELYN’S FUCHSIA II
Graphite on regular drawing paper
10" x 8" (25cm x 20cm)
 Psssssst!
If you buy paper in a spiral-bound pad, place a piece of cardboard underneath the page you’re working on so you don’t score the page underneath. After you finish the drawing, put tracing paper over it to protect from unwanted smudging.
And while we’re on the topic of pads: Either buy sealed ones, or if none are sealed, take from the bottom or back of the stack. Pads that are unsealed or in the front may have been fondled by other shoppers, and the oils from their fingers ruin the paper.
A Place to Work
Now you need a place to lay your supplies and go about the business of drawing. A full-size drawing table provides a firm, steady surface and enough room to rest your arm as you draw. The table angles so that your drawing paper is parallel to your eyes, which minimizes the chance for visual distortion as you work.
Your pencils, erasers, sharpeners and other tools should be arranged in an uncluttered fashion and made easily accessible for drawing. It helps put you quickly in the mood to draw if you can leave your art materials set up in a designated area. I have a studio where I keep my table, along with a taboret (or art-supply caddy), pencil tray and a light. Rick, of course, has two drawing tables, and they’re bigger than mine. It’s one of those things I have learned to live with.
If you have limited space or want to carry your studio with you, consider a portable drawing table. I have a dandy one that has a handle for easy transport and whose angle is somewhat adjustable (though not as much as a larger drawing table). Homemade drawing surfaces work just as well, as long as they are firm and steady. Use a clipboard or a piece of smooth material such as Masonite or plywood with the addition of bulldog clips or drafting tape to hold your work in place.
Back to the Drawing Board
This portable model can make any place your art studio.
 Psssssst!
To protect your art supplies from damage or loss, put them away after each use. Otherwise, husbands, wives or kids may grab your favorite 2B pencil the next time they take a phone message and promptly lose it. Or worse, your cat or dog might find your kneaded eraser an interesting toy or munchie, ruining the eraser and possibly getting a tummy ache. Be kind to your supplies, and to your pets!
Drawing From Photographs
Once you’ve rounded up all the essential supplies, where do you find inspiration for your drawing? Chances are that long before you picked up your pencil, you knew what you wanted to draw. Maybe you wanted to draw the adorable action of one of your kids or grandkids, the way the sunlight lit up a particular rose in your garden or the swans you saw on the lake during your last vacation. The desire to capture something meaningful and personal to you for all time in a unique expression is the motivation that drives most artists.
You’ll make your life a lot easier and your drawings a lot better if you start with a good photograph. For one, photos freeze an exact moment in time, alleviating the pressure to memorize a scene or face. Add to this the fact that you don’t have to deal with squirming subjects or changing lighting conditions, and the argument for using reference photos is pretty solid.
Not just any photo will work, though. Here are a few important considerations for shooting and choosing good photos.
Size Matters
As obvious as it sounds, you need to be able to see the information in a photo in order to draw it. Use a photocopier or scanner to enlarge smaller images so the details are able to be seen. And when you do enlarge the photo, make sure the details are still clear enough to draw from. The more you enlarge a photo, the grainier the quality will become.
Stay Focused
Only work with photos that are in focus. The reasons behind avoiding blurry photos are pretty obvious. You can’t see the details, so you might have to make them up. All in all, a bad idea.
Candid Camera
Most of us have quite a few shots of our vacations, family gatherings and favorite critters. You have a new assignment: shooting photos with future drawings in mind. Don’t just take a photo of Aunt Millie in front of a waterfall. Photograph the waterfall itself, the rocks around it, the moss on the surrounding trees, the butterfly that landed on a nearby wildflower … you get the drift. Become a shutterbug if you’re not one already. Get close to something, really close, then step back and try shooting from another angle.
Pay attention to the effects of light on your subject. Don’t just take a picture of your friend—have her put on a nifty hat that filters light in an interesting pattern. Set a basket of vegetables you gathered from your garden near a window that receives early-morning sun. Then try setting it in a different window during the late afternoon to see how the light falls differently on the veggies.
Shoot at least half a roll of film on any given subject, and several rolls when it’s a particularly exciting subject. Go to places that lend themselves to getting great shots, such as a zoo or national park. And by all means, ask others for assistance. We have asked bird breeders to bring their feathered friends over for photo shoots. (The drawing came from such an experience.)

Think Big
Don’t expect to turn out a good drawing of your subject if your reference is too small to gauge details. Trying to do a facial portrait from a photo in which the face is a dot is self-defeating. Rick is so far away in this picture that there’s no way I could accurately draw his face!
Psssssst!
It may be tempting to use a photo from a book or magazine, but these pictures are copyrighted. So are studio portraits taken by other photographers. Bottom line: If you don’t own it, you shouldn’t draw from it. I know you’re saying, “But I just draw for myself. What does it matter?” However, because it’s a good, clear photo, you’ll inevitably turn out a nice drawing, and you’ll want to show someone. They’ll say, “Hey, that’s great! You should put that drawing in a show!” And before you know it, you’ll get a call from so-and-so’s lawyer that you have infringed on someone’s copyright. Don’t take that first fateful step down the path to ruin!
Editing What You See
A photo captures what’s there, but artists aren’t limited to the photo. Just because a tree is in a certain spot in your picture doesn’t mean you need to draw it that way—or even draw it at all. Although we emphasize the use of photos, you’re not a human copier machine. You can simplify, rearrange, include, exclude, change and exaggerate the various elements of your reference photos to make the drawing you want. You want your drawing to do more than merely record, as a camera does. You want it to tell a story, to reflect your view of the subject—and ultimately, to captivate the viewer.

Reference Photo
A few years ago I took a trip to Scotland, where I photographed this statue on the William Wallace monument in Stirling.
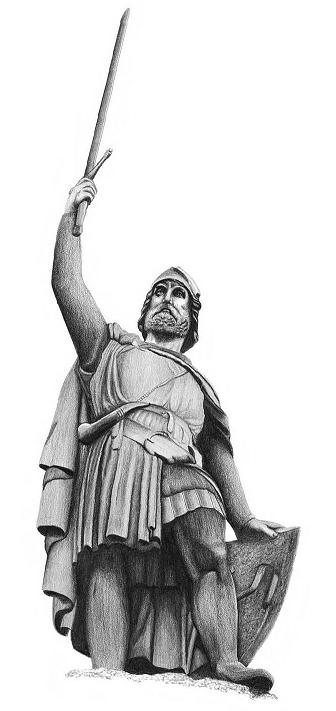
Finished Drawing
Rick simplified the legs, removed the stonework surrounding the figure and darkened the shadows, allowing for more drama.
Combining Photo References
Not only do you have the ability to change what you find in a single photograph, you can combine several photos for a single drawing. After all, trying to photograph a litter of puppies, four little children, or both sets of in-laws who live two thousand miles apart is waaaay too much work. You can also create a composite drawing of family members who have passed away, every dog you’ve ever owned, or other things that could never be grouped together for a photo. Composite drawings can enhance reality or make the impossible possible.
Let’s look at how the drawing on the opposite page was created using a number of different photos.
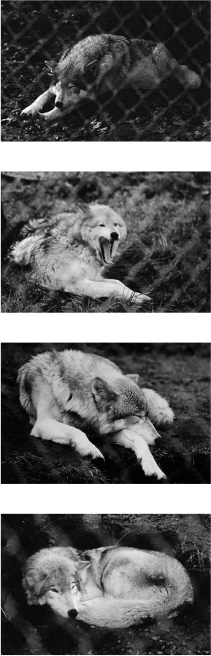

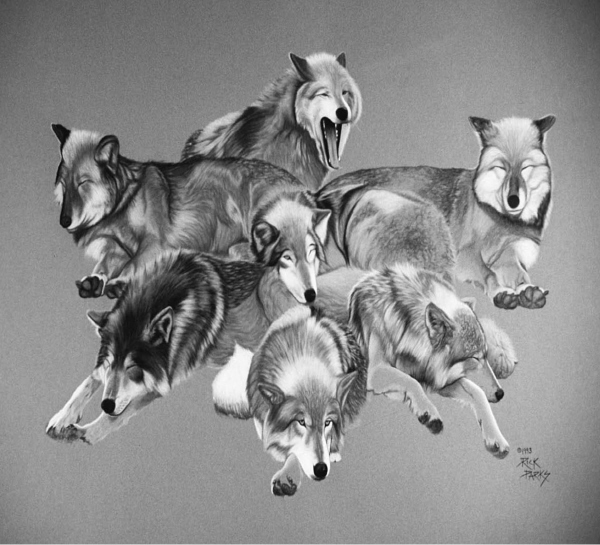
Finished Composite
This composite drawing was derived from seven photos taken at Wolf Haven in Tenino, Washington. The wolves were arranged in an interesting pattern, and the ground was implied, not drawn. Rick named it Monday Morning because he thought the body language of these wolves resembled the appearance of his fellow workers around the watercooler after too short of a weekend.
MONDAY MORNING
Pastel pencil on toned paper
24" x 36" (61cm x 91cm)
Collection of Frank and Barbara Peretti
 Psssssst!
There are two tricks to making good composite drawings. The first is getting the proportions of the combined elements correct so that everything looks like it naturally goes together. The second is a consistent light source, especially when the lighting is different in every photo. You may need to do a bit of research or ask questions when combining images.
Drawing From Life
I used to do most of my drawing from life—rendering the subjects in front of me rather than working from a photo. I wasn’t attempting to be artsy, I just didn’t own a good camera. One way to draw from life is to draw on location, which the French refer to as plein air drawing. The idea is to hike somewhere with your drawing equipment, sit on the wet ground, swat at bugs, unwittingly find poison ivy, get sunburned and draw a so-so sketch which gets soaked in a sudden monsoon on the way back to your car. Sounds fun, huh?
Why Bother?
You might think I’m not too fond of plein air sketching. That’s not entirely true; drawing on location does have its benefits, and I’ve been known to take advantage of them occasionally. Plein air sketching, along with general drawing from life (which doesn’t necessarily have to occur outdoors), allows you to register the mood of a location and the immediacy of the scene. However, it also forces you to deal with unwanted movement and ever-changing lighting conditions. For these reasons, it can be a lot harder than drawing from a photo.

Hold Still!
Rick and I have a herd of turkeys that has taken a shine to our land, so naturally we photograph, sketch and paint them. Turkeys, being, well, turkeys, do not hold still. This is one of the many challenges of drawing from life.
One time I sketched a black Labrador retriever for a lady. He was a very nice dog, holding still for long periods of time and moving only very slowly. Unfortunately, because he moved so slowly, I didn’t catch the fact that his head was slightly turned to the left when I started drawing the top of his head, facing me straight on when I drew his eyes, and slightly turned to the right by the time I finished his nose. Not my best work, believe me!
The best of both worlds is to tote your camera, sketchbook and notebook on location when you draw. Photograph the scene or subject from several angles, then sketch and make notes about your feelings, the colors (if you plan on eventually turning this into a painting) and your ideas for incorporating what you see into a finished work. Think of the possibilities! You can take that great old photo of Grandpa McCandless and place him in front of the antique car on display at a car show. Keep a collection of your sketches, photos and notes, which will come in especially handy on those rainy days when you’d rather make a drawing than watch another rerun on television.

A Plein Air Sketch
Rick couldn’t capture all the feathers or the shading, but he did try to get the feeling of movement and the roundness of the turkey.
Drawing on location can be both exciting and beneficial to the artist, but it’s not as easy as working from photo references. It’s more challenging because the wind tosses the leaves, critters wander off and people don’t hold still. Drawing from photos in the comfort of your studio or workspace means you can take your time, a luxury you usually don’t have when you draw from life. Give drawing from life a try, but don’t beat yourself up if you find it to be difficult.
Taking It All In
It can be exhilarating to take in a scene firsthand, as it provides you with an opportunity to use all of your senses. Choose a comfortable spot with a good view. And be sure to check the weather forecast before heading out!
 Psssssst!
Always carry a camera with you when heading outside to draw. That way if the experience is not all it’s cracked up to be, you can at least get some good reference photos out of it.
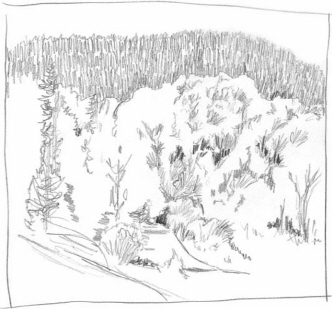
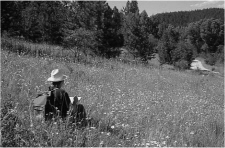
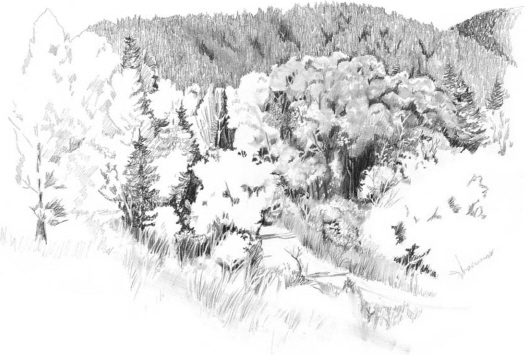
A Plein Air Sketch
This is a sketch of our upper field and the dirt road that leads to our house. The hillside was covered in flowers, which in turn were covered with bees. Rick quickly sketched the scene, seeking the various shapes, shades and textures of the vegetation on a summer day.
Cheat Sheet
When first starting to draw, you will need:
• an HB graphite pencil (a yellow No. 2 will do)
• a pencil sharpener
• a white plastic eraser
• makeshift blending tools—facial tissue, a makeup sponge, etc.
• a ruler or other straightedge
• drawing paper or a sketchpad
• a steady, firm drawing surface
• a place to store your supplies
• photo references or live inspiration
It would be nice to have:
• a variety of pencils ranging from 2H (hard) to 6B (soft), or the same size leads with a lead holder (plus the special sharpener it requires)
• additional erasers—kneaded, portable electric
• paper stumps and tortillions for blending (plus
sandpaper for cleaning the stumps)
• bristol board
• French curves and circle templates
• erasing shields
Finished Drawing
Plein air drawings capture a freshness, spontaneity, action and movement that is unique to the art. This finished drawing was created mostly from the rough sketch with a few more details added from a photo taken the same day. It is deliberately loose in execution.

Drawing Is Seeing
Learning to draw involves learning to see. To draw this buffalo, Ken worked from reference photos taken in his native state of Wyoming. Although he already had a keen eye for drawing animals, Ken attended our course on composites to hone his face-drawing skills.
WYOMING PRIDE
Ken MacMillan
Graphite on bristol board
9" x 12" (23cm x 30cm)