
Chapter 5
File Identification and Profiling
Initial Analysis of a Suspect File on a Windows System
Solutions in this chapter:
• Overview of the File Profiling Process
• File Signature Identification and Classification
• Embedded Artifact Extraction
• Symbolic and Debug Information
• File Obfuscation: Packing and Encryption Identification
• Embedded Artifact Extraction Revisited
• Profiling Suspect Document Files
• Profiling Suspect Portable Document Format (PDF) Files
Introduction
This chapter addresses the methodology, techniques, and tools for conducting an initial analysis of a suspect file. Some of the techniques covered in this and other chapters may constitute “reverse engineering” and thus fall within the proscriptions of certain international, federal, state, or local laws. Similarly, some of the referenced tools are considered “hacking tools” in some jurisdictions, and are subject to similar legal regulation or use restriction. Some of these legal limitations are set forth in Chapter 4. In addition to careful review of these considerations, consultation with appropriate legal counsel prior to implementing any of the techniques and tools discussed in these and subsequent chapters is strongly advised and encouraged.
![]() Analysis Tip
Analysis Tip
Safety First
Forensic analysis of a potentially dangerous file specimen requires a safe and secure lab environment. After extracting a suspicious file from a system, place the file on an isolated or “sandboxed” system or network to ensure that the code is contained and unable to connect to, or otherwise affect, any production system. Even though only a cursory static analysis of the code is contemplated at this point of the investigation, executable files nonetheless can be accidentally executed fairly easily, potentially resulting in the contamination of, or damage to, production systems.
Overview of the File Profiling Process
![]() File profiling is essentially malware analysis reconnaissance, an effort necessary to gain enough information about the file specimen to render an informed and intelligent decision about what the file is, how it should be categorized or analyzed, and, in turn, how to proceed with the larger investigation. Take detailed notes during the process, not only about the suspicious file but also about each investigative step taken.
File profiling is essentially malware analysis reconnaissance, an effort necessary to gain enough information about the file specimen to render an informed and intelligent decision about what the file is, how it should be categorized or analyzed, and, in turn, how to proceed with the larger investigation. Take detailed notes during the process, not only about the suspicious file but also about each investigative step taken.
![]() A suspicious file may be fairly characterized as:
A suspicious file may be fairly characterized as:
• Seemingly familiar, but located in an unusual place on the system
• Unusually named and located in an unusual folder on the system (e.g., C:Documents and Settings[USER]TEMPaxx.exe)
• Similarly named to a known or familiar file, but misspelled or otherwise slightly varied (a technique known as file camouflaging)
• File contents are hidden by obfuscation code
• Determined during the course of a system investigation to conduct network connectivity or an other anomalous activity
![]() After extracting the suspicious file from the system, determining its purpose and functionality is often a good starting place. This process, called file profiling, should answer the following questions:
After extracting the suspicious file from the system, determining its purpose and functionality is often a good starting place. This process, called file profiling, should answer the following questions:
• What is the intended purpose of the file?
• What is the functionality and capability of the file?
• What does the file suggest about the sophistication level of the attacker?
• What is the target of the file—is it customized to the victim system/network or a general attack?
• What affect does this file have on the system?
• What is the extent of the infection or compromise on the system or network?
• What remediation steps are necessary because the file exists on the system?
![]() The file profiling process entails an initial or cursory static analysis of the suspect code (Figure 5.1). Static analysis is the process of analyzing executable binary code without actually executing the file. A general approach to file profiling involves the following steps:
The file profiling process entails an initial or cursory static analysis of the suspect code (Figure 5.1). Static analysis is the process of analyzing executable binary code without actually executing the file. A general approach to file profiling involves the following steps:
• Detail: Identify and document system details pertaining to the system from which the suspect file was obtained.
• Hash: Obtain a cryptographic hash value or “digital fingerprint” of the suspect file.
• Compare: Conduct file similarity indexing of the file against known samples.
• Classify: Identify and classify the type of file (including the file format and the target architecture/platform), the high-level language used to author the code, and the compiler used to compile it.
• Visualize: Examine and compare suspect files in graphical representation, revealing visual distribution of the file contents.
• Scan: Scan the suspect file with anti-virus and anti-spyware software to determine if the file has a known malicious code signature.
• Examine: Examine the file with executable file analysis tools to ascertain whether the file has malware properties.
• Extract and Analyze: Conduct entity extraction and analysis on the suspect file by reviewing any embedded American Standard Code for Information Interchange (ASCII) or Unicode strings contained within the file, and by identifying and reviewing any file metadata and symbolic information.
• Reveal: Identify any code obfuscation or armoring techniques protecting the file from examination, including packers, wrappers, or encryption.
• Correlate: Determine whether the file is dynamically or statically linked, and identify whether the file has dependencies.
• Research: Conduct online research relating to the information you gathered from the suspect file and determine whether the file has already been identified and analyzed by security consultants, or conversely, whether the file information is referenced on hacker or other nefarious Web sites, forums, or blogs.

Figure 5.1 The file profiling process
![]() Although all of these steps are valuable ways to learn more about the suspect file, they may be executed in varying order or in modified form, depending upon the preexisting information or circumstances surrounding the code.
Although all of these steps are valuable ways to learn more about the suspect file, they may be executed in varying order or in modified form, depending upon the preexisting information or circumstances surrounding the code.
• Familiarity with a wide variety of both command-line interface (CLI) and Graphical User Interface (GUI) tools will further broaden the scope of investigative options.
• Familiarity and comfort with a particular tool, or the extent to which the reliability or efficacy of a tool is perceived as superior, often dictate whether the tool is incorporated into any given investigative arsenal.
• Further tool discussion and comparison can be found in the Tool Box section at the end of this chapter. ![]()
Profiling a Suspicious File
![]() This section presumes a basic understanding of how Windows Portable Executable (PE) files are compiled. A detailed discussion of this process can be found in the Introductory Chapter.
This section presumes a basic understanding of how Windows Portable Executable (PE) files are compiled. A detailed discussion of this process can be found in the Introductory Chapter.
System Details
![]() If the suspicious file was extracted or copied from a victim system, be certain to document the details obtained through the live response techniques mentioned in Chapter 1, including information about:
If the suspicious file was extracted or copied from a victim system, be certain to document the details obtained through the live response techniques mentioned in Chapter 1, including information about:
• The system’s operating system, version, service pack, and patch level
• The full system path where the file resided prior to discovery
• Associated file system metadata, such as created, modified, and accessed dates/times
• Details pertaining to any security software, including personal firewall, anti-virus, or anti-spyware programs
![]() Collectively, this information provides necessary file context, as malware often manifests differently depending on the permutations of the operating system and patch and software installation.
Collectively, this information provides necessary file context, as malware often manifests differently depending on the permutations of the operating system and patch and software installation.
File Name
![]() Acquire and document the full file name
Acquire and document the full file name
![]() Identifying and documenting the suspicious file name is a foundational step in file profiling. The file name, along with the respective file hash value, will be the main identifier for the file specimen.
Identifying and documenting the suspicious file name is a foundational step in file profiling. The file name, along with the respective file hash value, will be the main identifier for the file specimen.
• Be mindful to disable the Windows Folder View Option “Hide extensions for known file types” on your analysis system so that the file extension associated with the file is visible and can be documented.
• Attackers often try to conceal their malicious programs by using pseudo file extensions in an effort to trick victims into executing the malicious program.
• Miss Identify (missidentify.exe)1 is a utility for finding Win32 executable programs, regardless of file extension, allowing the digital investigator to detect misnamed executable files or hidden extensions.
• In Figure 5.2, Miss Identify is used to reveal two executable files that appear to be image files as a result of hidden file extensions and icons embedded into the PE Resources (discussed later in this chapter and in Chapter 6).
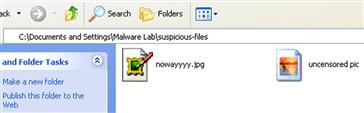
Figure 5.2 Using Miss Identify to uncover misnamed executable files
Investigative Considerations
• Although the full file path in which a suspect file was discovered on the victim system is not a part of the file name per se, it is a valuable detail that can provide further depth and context to a file profile. The full file path should be noted during live response and post-mortem forensic analysis, as discussed in Chapters 1 and 3, respectively.
File Size
![]() Acquire and document the specimen’s file size
Acquire and document the specimen’s file size
![]() File size is a unique file variable that should be identified and noted for each suspect file.
File size is a unique file variable that should be identified and noted for each suspect file.
• Although file size in no way can predict the contents or functionality of a file specimen, it can be used as a gauge as to determine payload. For instance, a malware specimen that contains its own SMTP engine or server function will likely be larger than other specimens that are modular and will likely connect to a remote server to download additional files.
File Appearance
![]() Note or screenshot a suspect file’s appearance as an identifier for your report and catalog it for reference with other samples.
Note or screenshot a suspect file’s appearance as an identifier for your report and catalog it for reference with other samples.
![]() Attackers often manipulate the icon associated with a file to give a malicious file a harmless and recognizable appearance, tricking users into executing the file.
Attackers often manipulate the icon associated with a file to give a malicious file a harmless and recognizable appearance, tricking users into executing the file.
• Documenting the file appearance is useful for reports and for comparison and correlation with other malware samples.
• An intuitive and flexible tool to assist in obtaining screen captures of files is MWSnap (Figure 5.3).2
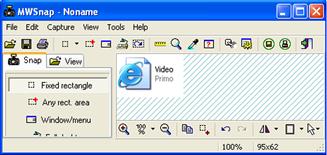
Figure 5.3 MWSnap capturing the appearance of a suspicious file
Hash Values
![]() Generate a cryptographic hash value for the suspect file to both serve as a unique identifier or digital “fingerprint” for the file throughout the course of analysis, and to share with other digital investigators who already may have encountered and analyzed the same specimen.
Generate a cryptographic hash value for the suspect file to both serve as a unique identifier or digital “fingerprint” for the file throughout the course of analysis, and to share with other digital investigators who already may have encountered and analyzed the same specimen.
![]() The Message-Digest 5 (MD5)3 algorithm generates a 128-bit hash value based upon the file contents and typically is expressed in 32 hexadecimal characters.
The Message-Digest 5 (MD5)3 algorithm generates a 128-bit hash value based upon the file contents and typically is expressed in 32 hexadecimal characters.
• MD5 is widely considered the de facto standard for generating hash values for malicious executable identification.
• Other algorithms, such as Secure Hash Algorithm Version 1.0 (SHA1)4 can be used for the same purpose.
Investigative Considerations
• Generating an MD5 hash of the malware specimen is particularly helpful for subsequent dynamic analysis of the code. Whether the file copies itself to a new location, extracts files from the original file, updates itself from a remote Web site, or simply camouflages itself through renaming, comparison of MD5 values for each sample will enable determination of whether the samples are the same or new specimens that require independent analysis.
Command-Line Interface MD5 Tools
![]() CLI hashing tools provide a simple and effective way to collect hash values from suspicious files, the results of which can be saved to a log file for later analysis.
CLI hashing tools provide a simple and effective way to collect hash values from suspicious files, the results of which can be saved to a log file for later analysis.
• md5deep is a powerful MD5 hashing and analysis tool suite written by Jesse Kornblum that gives the user granular control over the hashing options, including piecewise and recursive modes (Figure 5.4).5
• In addition to the MD5 algorithm, the md5deep suite provides for alter-native algorithms by providing additional utilities such as sha1deep, tigerdeep, sha256deep, and whirlpooldeep, all of which come included in the md5deep suite download. ![]()

Figure 5.4 Hashing a suspicious file with md5deep
GUI MD5 Tools
![]() Despite the power and flexibility offered by these CLI MD5 tools, many digital investigators prefer to use GUI-based tools during analysis, because they provide drag-and-drop functionality and easy-to-read output. Similarly, tools that enable a Windows Explorer shell extension, or “right-click” hashing, provide a simple and efficient way to generate hash values during analysis. A useful utility that offers a variety of scanning options to acquire both MD5 and SHA1 hash values for suspect files is Nirsoft’s HashMyFiles,6 depicted in Figure 5.5.
Despite the power and flexibility offered by these CLI MD5 tools, many digital investigators prefer to use GUI-based tools during analysis, because they provide drag-and-drop functionality and easy-to-read output. Similarly, tools that enable a Windows Explorer shell extension, or “right-click” hashing, provide a simple and efficient way to generate hash values during analysis. A useful utility that offers a variety of scanning options to acquire both MD5 and SHA1 hash values for suspect files is Nirsoft’s HashMyFiles,6 depicted in Figure 5.5. ![]()

Figure 5.5 Using HashMyFiles to recursively scan a directory for hash values
![]() Other Tools to Consider
Other Tools to Consider
CLI Hashing Tools
Microsoft File Checksum Integrity Verifier (FCIV)—http://www.microsoft.com/downloads/en/details.aspx?FamilyID=B3C93558-31B7-47E2-A663-7365C1686C08&displaylang=en
GNU Core Utilities—http://gnuwin32.sourceforge.net/packages/coreutils.htm
GUI Hashing Tools
Hash Quick—http://www.lindseysystems.com/contact.php
WinMD5—http://www.blisstonia.com/software/WinMD5/
MD5Summer—http://www.md5summer.org/
HashonClick—http://www.2brightsparks.com/onclick/hoc.html
Graphical MD5sum—http://www.toast442.org/md5/
Malcode Analyst Pack—http://labs.idefense.com/software/malcode.php#more_malcode+analysis+pack
Visual MD5—http://www.tucows.com/preview/505450 (previously available from http://www.protect-folder.com/)
SSDeepFE—http://sourceforge.net/project/showfiles.php?group_id=215906&package_id=267714
Further tool discussion and comparison can be found in the Tool Box section at the end of this chapter and on the companion Web site, http://www.malwarefieldguide.com/Chapter5.html.
File Similarity Indexing
![]() Comparing the suspect file to other malware specimens collected or maintained in a private or public repository is an important part of the file identification process.
Comparing the suspect file to other malware specimens collected or maintained in a private or public repository is an important part of the file identification process.
![]() An effective way to compare files for similarity is through a process known as fuzzy hashing or Context Triggered Piecewise Hashing (CTPH), which computes a series of randomly sized checksums for a file, allowing file association between files that are similar in file content but not identical.
An effective way to compare files for similarity is through a process known as fuzzy hashing or Context Triggered Piecewise Hashing (CTPH), which computes a series of randomly sized checksums for a file, allowing file association between files that are similar in file content but not identical.
• Use ssdeep,7 a file hashing tool that utilizes CTPH to identify homologous files, to query suspicious file specimens. ![]()
• Ssdeep can be used to generate a unique hash value for a file, or compare an unknown file against a known file or list of file hashes.
• In the vast arsenal of ssdeep’s file comparison modes exists a “pretty matching mode,” wherein a file is compared against another file and scored based upon similarity (a score of 100 constituting an identical match).
• In Figure 5.6, a file that has been changed by one byte and saved to a new file is scanned in conjunction with the original file with ssdeep in “pretty matching mode.” Although the one byte modification changes the MD5 hash values of the respective files, ssdeep detects the files as nearly identical.
• Through these and other similar tools employing the CTPH functionality, valuable information about a suspect file may be gathered during the file identification process to associate the suspect file with a particular specimen of malware, a “family” of code, or a particular attack or set of attacks. Further discussion regarding malware “families,” or phylogeny, can be found in Chapter 6.

Figure 5.6 ssdeep “pretty matching mode”
![]() Online Resources
Online Resources
Hash Repositories
Online hash repositories serve as a valuable resource for querying hash values of suspect files. The hash values and associated files maintained by the operators of these resources are acquired through a variety of sources and methods, including online file submission portals. Keep in mind that by submitting a file or a search term to a third-party Web site, you are no longer in control of that file or the data associated with that file.
Team Cymru Malware Hash Registry—http://www.team-cymru.org/Services/MHR/
Zeus Tracker—https://zeustracker.abuse.ch/monitor.php
viCheck.ca Malware Hash Query—https://www.vicheck.ca/md5query.php
VirusTotal Hash Search—http://www.virustotal.com/search.html
File Visualization
![]() Visualize file data in an effort to identify potential anomalies and to quickly correlate like files.
Visualize file data in an effort to identify potential anomalies and to quickly correlate like files.
![]() Visualizing file data, particularly through byte-usage-histograms, provides the digital investigator with a quick reference about the data distribution in a file.
Visualizing file data, particularly through byte-usage-histograms, provides the digital investigator with a quick reference about the data distribution in a file.
• Inspect suspect files with bytehist, a GUI-based tool for generating byte-usage-histograms.8
• Bytehist makes histograms for all file types, but is geared toward PE files, in that it makes separate sub-histograms for each section of the executable file.
• Histogram visualization of executables can assist in identifying file obfuscation techniques such as packers and cryptors (discussed in the “File Obfuscation: Packing and Encryption Identification” section later in this chapter).
• Byte distribution in files concealed with additional obfuscation code or with encrypted content will typically manifest visually distinguishable from unobfuscated versions of the same file, as shown in Figure 5.7, below, which displays histogram visualization of the same file in both a packed and unpacked condition with bytehist.
• Comparing histogram patterns of multiple suspect files can also be used as a quick triage method to identify potential like files based upon visualization of data distribution.
• To further examine a suspicious binary file through multiple visualization schemes, probe the file with BinVis, a framework for visualizing binary file structures.9 BinVis is discussed in greater detail in Chapter 6. ![]()

Figure 5.7 Visualizing files with bytehist
File Signature Identification and Classification
![]() After gathering system details, acquiring a digital fingerprint, and conducting a file index similarity inquiry, additional profiling to identify and classify the suspect file will prove an important part of any preliminary static analysis.
After gathering system details, acquiring a digital fingerprint, and conducting a file index similarity inquiry, additional profiling to identify and classify the suspect file will prove an important part of any preliminary static analysis.
![]() This step in the file identification process often produces a clearer idea about the nature and purpose of the malware, and in turn, the type of damage the attack was intended to cause the victim system.
This step in the file identification process often produces a clearer idea about the nature and purpose of the malware, and in turn, the type of damage the attack was intended to cause the victim system.
• Identifying the file type is determining the nature of the file from its file format or signature based upon available data contained within the file.
• File type analysis, coupled with file classification, or a determination of the native operating system and the architecture for which the code was intended, are fundamental aspects of malware analysis that often dictate how and the direction in which your analytical and investigative methodology will unfold.
File Types
![]() The suspect file’s extension cannot serve as the sole indicator of its contents; instead examination of the file’s signature is paramount.
The suspect file’s extension cannot serve as the sole indicator of its contents; instead examination of the file’s signature is paramount.
• A file signature is a unique sequence of identifying bytes written to a file’s header. On a Windows system, a file signature is normally contained within the first 20 bytes of the file.
• Different file types have different file signatures; for example, a Windows Bitmap image file (.bmp extension) begins with the hexadecimal characters 42 4D in the first two bytes of the file, characters that translate to the letters “BM.”
• Most Windows-based malware specimens are executable files, often ending in the extensions .exe, .dll, .com, .pif, .drv, .qtx, .qts, .ocx, or .sys. The file signature for these files is “MZ” or the hexadecimal characters 4D 5A, found in the first two bytes of the file.
• Generally, there are two ways to identify a file’s signature.
![]() First, query the file with a file identification tool.
First, query the file with a file identification tool.
![]() Second, open and inspect the file in a hexadecimal viewer or editor. Hexidecimal (or hex, as it is commonly referred) is a numeral system with a base of 16, written with the letters A–F and numbers 0–9 to represent the decimal values 0–15. In computing, hexadecimal is used to represent a byte as 2 hexadecimal characters (one character for each 4-bit nibble), translating binary code into a more human-readable format.
Second, open and inspect the file in a hexadecimal viewer or editor. Hexidecimal (or hex, as it is commonly referred) is a numeral system with a base of 16, written with the letters A–F and numbers 0–9 to represent the decimal values 0–15. In computing, hexadecimal is used to represent a byte as 2 hexadecimal characters (one character for each 4-bit nibble), translating binary code into a more human-readable format.
• By viewing a file in a hex editor, every byte of the file is visible, assuming its contents are not obfuscated by packing, encryption, or compression.
• MiniDumper by Marco Pontello10 is a convenient tool for examining a file in hexadecimal format, as it displays a dump of the file header only, as illustrated in Figure 5.8.
• Other hexadecimal viewers for Windows provide additional functionality to achieve a more granular analysis of a file, including strings identification, hash value computation, multiple file comparison, and templates for parsing the structures of specific file types. ![]()

Figure 5.8 Examining a file header in MiniDumper
![]() Other Tools to Consider
Other Tools to Consider
Hex Editors
RevEnge—http://www.sandersonforensics.com/content.asp?page=325
010 Editor—http://www.sweetscape.com/010editor/
McAffee FileInsight—http://www.mcafee.com/us/downloads/free-tools/fileinsight.aspx
Hex Workshop Hex Editor—http://www.hexworkshop.com/
FlexHex—http://www.flexhex.com/
WinHex—http://www.x-ways.net/winhex/index-m.html
HHD Hex Editor Neo—http://www.hhdsoftware.com/free-hex-editor
Further discussion and comparison of hex editors can be found in the Tool Box section at the end of this chapter, and on the companion Web site, http://www.malwarefieldguide.com/Chapter5.html.
File Signature Identification and Classification Tools
![]() Unlike distributions of the Linux operating system that come with the utility file preinstalled (which classifies a queried file specimen based on the data contained in the file as compared against a comprehensive list—or, magic file of known file headers), Microsoft Windows operating systems have no inherent equivalent command. Despite this apparent void in this genre of analytical tools, there are a number of CLI and GUI tools that have been developed to address file identification and analysis for Windows systems.
Unlike distributions of the Linux operating system that come with the utility file preinstalled (which classifies a queried file specimen based on the data contained in the file as compared against a comprehensive list—or, magic file of known file headers), Microsoft Windows operating systems have no inherent equivalent command. Despite this apparent void in this genre of analytical tools, there are a number of CLI and GUI tools that have been developed to address file identification and analysis for Windows systems.
CLI File Identification Tools
• Perhaps the closest tool to the Linux version of file is File Identifier (version 0.6.1), developed by Optima SC.11 Similar to file, File Identifier compares a queried file against a magic-like database file.12
![]()
• In addition to conducting file identification through signature matching, File Identifier also extracts file metadata, as illustrated in Figure 5.9.
• In addition to providing a variety of different file scanning modes, including a recursive mode for applying the tool against directories and subdirectories of files, File Identifier also offers Hypertext Markup Language (HTML) and CVS report generation.
• As an alternative, TrID, a CLI file identifier written by Marco Pontello,13 does not limit the classification of an unknown file to one possible file type based on the file’s signature, unlike other tools. Rather, it compares the unknown file against a file signature database and provides a series of possible results, ranked by order or probability, as depicted in the analysis of the suspect file in Figure 5.10.
• The TrID file database consists of approximately 4,000 different file signatures,14 and is constantly expanding, due in part to Pontello’s distribution of TrIDScan, a TrID counterpart tool that offers the ability to easily create new file signatures that can be incorporated into the TrID file signature database.15

Figure 5.9 Scanning a suspect file with File Identifier

Figure 5.10 Scanning a suspect file with TrID
GUI File Identification Tools
• There are a number of GUI-based file identification and classification programs for use in the Windows environment; many are intuitive to use and convenient for an initial static analysis of any suspect file. ![]()
• TrIDNet,16 a GUI version of TrID, provides for quick and convenient drag-and-drop functionality and an intuitive interface, as shown in Figure 5.11.
• Like the CLI version, TrIDNet compares the suspect file against a file database of nearly 4,000 file signatures, scores the queried file based upon its characteristics, and reveals a probability-based identification of the file.
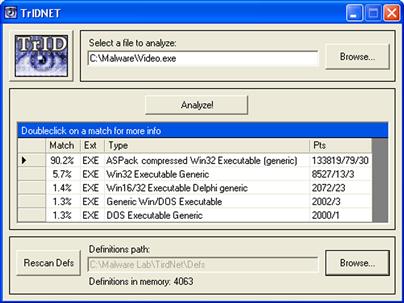
Figure 5.11 A suspect file classified with TrIDNet
![]() Other Tools to Consider
Other Tools to Consider
CLI File Identification Tools
Exetype—http://www.microsoft.com/resources/documentation/windowsnt/4/server/reskit/en-us/reskt4u4/rku4list.mspx?mfr=true
FileType—http://gnuwin32.sourceforge.net/packages/filetype.htm
Infoexe v. 1.32—http://www.exetools.com/file-analyzers.htm
Peace v. 1.00—http://www.exetools.com/file-analyzers.htm
Fileinfo v. 2.43—http://www.exetools.com/file-analyzers.htm
GUI File Identification Tools
Digital Record Object Identifier (DROID)—http://droid.sourceforge.net/
FileAlyzer—http://www.safer-networking.org/en/filealyzer/index.html
WhatFile—http://www.sinnercomputing.com/dl.php?prog=WhatFile
Further tool discussion and comparison can be found in the Tool Box section at the end of this chapter and on the companion Web site, http://www.malwarefieldguide.com/Chapter5.html.
Anti-virus Signatures
![]() After identifying and classifying a suspect file, the next step in the file profiling process is to query the file against anti-virus engines to see if it is detected as malicious code.
After identifying and classifying a suspect file, the next step in the file profiling process is to query the file against anti-virus engines to see if it is detected as malicious code.
• Approach this phase of the analysis in two separate steps:
![]() First, manually scan the file with a number of anti-virus programs locally installed on the malware analysis test system to determine whether any alerts are generated for the file. This manual step affords control over the configuration of each program, ensures that the signature database is up to date, and allows access to the additional features of locally installed anti-virus tools (like links to the vendor Web site), which may provide more complete technical details about a detected specimen.
First, manually scan the file with a number of anti-virus programs locally installed on the malware analysis test system to determine whether any alerts are generated for the file. This manual step affords control over the configuration of each program, ensures that the signature database is up to date, and allows access to the additional features of locally installed anti-virus tools (like links to the vendor Web site), which may provide more complete technical details about a detected specimen.
![]() Second, submit the specimen to a number of free online malware scanning services for a more comprehensive view of any signatures associated with the file.
Second, submit the specimen to a number of free online malware scanning services for a more comprehensive view of any signatures associated with the file.
Local Malware Scanning
![]() To scan malware locally, implement anti-virus software that can be configured to scan on demand, as opposed to every time a file is placed on the test system.
To scan malware locally, implement anti-virus software that can be configured to scan on demand, as opposed to every time a file is placed on the test system.
• Make sure that the AV program affords choice in resolving malicious code detected by the anti-virus program; many automatically delete, “repair,” or quarantine the malware upon detection.
• Some examples of freeware anti-virus software for installation on your local examiner system include:
Investigative Considerations
• The fact that installed anti-virus software does not identify the suspect file as malicious code is not dispositive. Rather, it may mean simply that a signature for the suspect file has not been generated by the vendor of the anti-virus product, or that the attacker is “armoring” or otherwise implanting a file protecting mechanism to thwart detection.
• Although an anti-virus signature does not necessarily dictate the nature and capability of identified malicious code, it does shed potential insight into the purpose of the program.
• Given that when a malicious code specimen is obtained and when a signature is developed for it may vary between anti-virus companies, scanning a suspect file with multiple anti-virus engines is recommended. Implementing this redundant approach helps ensure that a malware specimen is identified by an existing virus signature and provides a broader, more thorough inspection of the file.
Web-based Malware Scanning Services
![]() After running a suspect file through local anti-virus program engines, consider submitting the malware specimen to an online malware scanning service.
After running a suspect file through local anti-virus program engines, consider submitting the malware specimen to an online malware scanning service.
• Unlike vendor-specific malware specimen submission Web sites, online malware scanning services will scan submitted specimens against numerous anti-virus engines to identify whether the submitted specimen is detected as hostile code.
| Web Service | Features |
| VirusTotal: http://www.virustotal.com | • Scans submitted file against 43 different anti-virus engines • “First seen” and “last seen” submission dates provided for each specimen • File size, MD5, SHA1, SHA256, and ssdeep values generated for each submitted file • File type identified with file and TrID • PE file structure parsed • Relevant Prevx, ThreatExpert, and Symantec reports cross-referenced and hyperlinked. • URL link scanning • Robust search function, allowing the digital investigator to search the VirusTotal (VT) database • VT Community discussion function • Python submission scripts available for batch submission: http://jon.oberheide.org/blog/2008/11/20/virustotal-python-submission-script/ http://www.bryceboe.com/2010/09/01/submitting-binaries-to-virustotal/ |
| VirScan: http://virscan.org/ | • Scans submitted file against 36 different anti-virus engines • File size, MD5, and SHA1 values generated for each submitted file |
| Jotti Online Malware Scanner: http://virusscan.jotti.org/en | • Scans submitted file against 19 different anti-virus engines • File size, MD5, and SHA1 values generated for each submitted file • File type identified with file magic file • Packing identification |
| Metascan Online www.metascan-online.com | • Scans submitted file with 19 different anti-virus engines • File size, MD5, and SHA1 values generated for each submitted file • File type identification • Packing identification • “Last scanned” dates |
• During the course of inspecting the file, the scan results for the respective anti-virus engines are presented in real time on the Web page.
• These Web sites are distinct from online malware analysis sandboxes that execute and process the malware in an emulated Internet, or “sandboxed,” network. The use of online malware analysis sandboxes will be discussed in Chapter 6.
• Remember that submission of any specimen containing personal, sensitive, proprietary, or otherwise confidential information may violate the victim company’s corporate policies or otherwise offend the ownership, privacy, or other corporate or individual rights associated with that information. Be careful to seek the appropriate legal guidance in this regard, before releasing any such specimen for third-party examination.
• Do not submit a suspicious file that is the crux of a sensitive investigation (i.e., circumstances in which disclosure of an investigation could cause irreparable harm to a case) to online analysis resources, such as anti-virus scanning services, in an effort not to alert the attacker. The results relating to a submitted file to an online malware analysis service are publicly available and easily discoverable—many portals even have a search function. Thus, as a result of submitting a suspect file, the attacker may discover that his malware and nefarious actions have been discovered, resulting in the destruction of evidence, and potentially damaging your investigation.
• Assuming you have determined it is appropriate to do so, submit the suspect file by uploading the file through the Web site submission portal.
• Upon submission, the anti-virus engines will run against the suspect file. As each engine passes over the submitted specimen, the file may be identified, as manifested by a signature identification alert similar to that depicted in Figure 5.12.
• If the file is not identified by any anti-virus engine, the field next to the respective anti-virus software company will either remain blank (in the case of VirusTotal and VirScan), or state that no malicious code was detected (in the case of Jotti Online Malware Scanner and Metascan Online).
• The signature names attributed to the file provide an excellent way to gain additional information about what the file is and what it is capable of. By visiting the respective anti-virus vendor Web sites and searching for the signature or the offending file name, more often than not a technical summary of the malware specimen can be located.
• Alternatively, through search engine queries of the anti-virus signature, hash value, or file name, information security-related Web site descriptions or blogs describing a researcher’s analysis of the hostile program also may be encountered. Such information may contribute to the discovery of additional investigative leads and potentially reduce time spent analyzing the specimen.
• Conversely, there is no better way to get a sense of your malicious code specimen than thoroughly analyzing it yourself; relying entirely on third-party analysis to resolve a malicious code incident often has practical and real-world limitations.
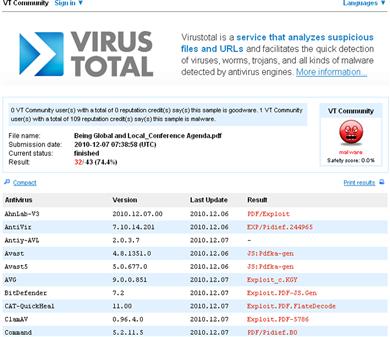
Figure 5.12 A suspect file submitted and scanned on VirusTotal
Embedded Artifact Extraction: Strings, Symbolic Information, and File Metadata
![]() In addition to identifying the file type and scanning the file with anti-virus scanners to ascertain known hostile code signatures, many other potentially important facts can be gathered from the file itself.
In addition to identifying the file type and scanning the file with anti-virus scanners to ascertain known hostile code signatures, many other potentially important facts can be gathered from the file itself.
![]() Information about the expected behavior and function of the file can be gleaned from entities within the file, like strings, symbolic information, and file metadata.
Information about the expected behavior and function of the file can be gleaned from entities within the file, like strings, symbolic information, and file metadata.
• Although symbolic references and metadata may be identified while parsing the strings of a file, these items are treated separately and distinctly from one another during the examination of a suspect file.
• Embedded artifacts—evidence contained within the code or data of the suspect program—are best inspected separately to promote organization and clearer file context. Each inspection may shape or otherwise frame the future course of investigation.
Strings
![]() Some of the most valuable clues about the identifiers, functionality, and commands associated with a suspect file can be found within the embedded strings of the file. Strings are plain-text ACSII and Unicode (contiguous) characters embedded within a file. Although strings do not typically provide a complete picture of the purpose and capability of a file, they can help identify program functionality, file names, nicknames, Uniform Resource Locators (URLs), e-mail addresses, and error messages, among other things. Sifting through embedded strings may yield the following information:
Some of the most valuable clues about the identifiers, functionality, and commands associated with a suspect file can be found within the embedded strings of the file. Strings are plain-text ACSII and Unicode (contiguous) characters embedded within a file. Although strings do not typically provide a complete picture of the purpose and capability of a file, they can help identify program functionality, file names, nicknames, Uniform Resource Locators (URLs), e-mail addresses, and error messages, among other things. Sifting through embedded strings may yield the following information:
• Program Functionality: Often, the strings in a program will reveal calls made by the program to a particular .dll or function call. To help evaluate the significance of such strings, the Windows API Reference Web site24 and the Microsoft Advanced Search engine25 are solid references.
• File Names: The strings in a malicious executable often reference the file name the malicious file will manifest as on a victim system, or perhaps more interestingly, the name the hacker bestowed on the malware. Further, many malicious executables will reference or make calls for additional files that are pulled down through a network connection to a remote server.
• Moniker Identification (“greetz” and “shoutz”): Although not as prevalent recently, some malicious programs actually contain the attacker’s moniker hard-coded within it. Similarly, attackers occasionally reference, or give credit to, another hacker or hacking crew in this way—references known as “greetz” or “shoutz.” Like self-recognition references inside code, however, greetz and shoutz are less frequent.26
• URL and Domain Name References: A malicious program may require or call on additional files to update. Alternatively, the program may use remote servers as drop sites for tools or stolen victim data. As a result, the malware may contain strings referencing the URLs or domain names utilized by the code.
• Registry Information: Some malware specimens reference registry keys or values that will be added or modified upon installation. Often, as discussed in other chapters, hostile programs create a persistence mechanism through a registry autorun subkey, causing the program to start up each time the system is rebooted.
• IP Addresses: Similar to URLs and domain names, Internet Protocol (IP) addresses often are hard-coded into malicious programs and serve as “phone home” instructions, or in other instances, the direction of the attack.
• E-mail Addresses: Some specimens of malicious code e-mail the attacker information extracted from the victim machine. For example, many of the Trojan horse variants install a keylogger on the victim computers to collect usernames and passwords and other sensitive information, then transmit the information to a drop-site e-mail address that serves as a central receptacle for the stolen data. An attacker’s e-mail address is obviously a significant evidentiary clue that can develop further investigative leads.
• IRC Channels: Often the channel server and name of the Internet Relay Chat (IRC) command and control server used to herd armies of compromised computers or botnets are hard-coded into the malware that infects the zombie machines. Indeed, suspect files may even reference multiple IRC channels for redundancy purposes should one channel be lost or closed and another channel comes online.
• Program Commands or Options: More often than not, an attacker needs to interact with the malware he or she is spreading, usually to promote the efficacy of the spreading method. Some older bot variants use instant messenger (IM) programs as an attack vector, and as such, the command to invoke IM spreading can be located within the program’s strings. Similarly, command-line options and/or embedded help/usage menu information can potentially reveal capabilities of a target specimen.
• Error and Confirmation Messages: Confirmation and error messages found in malware specimens (such as “Exploit FTPD is running on port: %i, at thread number: %i, total sends: %i”) often become significant investigative leads and provide good insight into the malware specimen’s capabilities.
![]() Analysis Tip
Analysis Tip
False Leads: “Planted” Strings
Despite the potential value embedded strings may have in the analysis of a suspect program, be aware that hackers and malware authors often “plant” strings in their code to throw digital investigators off track. Instances of false nicknames, e-mail addresses, and domain names are fairly common. When examining any given malware specimen and evaluating the meaningfulness of its embedded strings, remember to consider the entire context of the file and the digital crime scene.
Tools for Analyzing Embedded Strings
![]() Unlike Linux and UNIX distributions, which typically come preloaded with the strings utility, Windows operating systems do not have a native tool to analyze strings. Thankfully, there are a number of strings extracting utilities, both CLI and GUI, available for use on Windows systems.
Unlike Linux and UNIX distributions, which typically come preloaded with the strings utility, Windows operating systems do not have a native tool to analyze strings. Thankfully, there are a number of strings extracting utilities, both CLI and GUI, available for use on Windows systems.
• A version of strings, named “strings.exe” has been ported to Windows by Mark Russinovich of Microsoft (formerly of Sysinternals).27
• Like the UNIX/Linux version of strings, Russinovich’s ported version can query for both ASCII and Unicode strings and by default searches for three or more printable characters. Strings.exe can also recursively scan subdirectories.
• BinText28 is an intuitive and powerful GUI-based strings extraction program that displays ASCII, Unicode, and resource strings, each identified by a distinct letter and color on the left-hand side of the GUI (ASCII strings are identified by a green “A,” Unicode Strings by a Red “U,” and resource strings by a blue “R”), as displayed in Figure 5.13. ![]()
• BinText identifies the file offset and memory address of the discoverable strings in unique fields in the GUI. Further, the tool provides drag-and-drop functionality and a useful search feature, allowing the digital investigator to query for particular strings within the output.
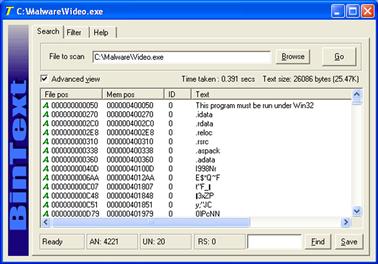
Figure 5.13 Examining a suspect file in BinText
![]() Other Tools to Consider
Other Tools to Consider
GUI Strings Analysis Tools
AnalogX TextScan—http://www.analogx.com/contents/download/Programming/textscan/Freeware.htm
TextExtract—previously hosted on http://www.ultima-thule.co.uk/downloads/textextract.zip
String Extractor (Strex)—http://www.zexersoft.com/products.html
iDefense Malcode Analyst Pack (MAP) Strings Shell Extension—http://labs.idefense.com/software/malcode.php#more_malcode+analysis+pack
Further tool discussion and comparison can be found in the Tool Box section at the end of this chapter, and on the companion Web site, http://www.malwarefieldguide.com/Chapter5.html.
Inspecting File Dependencies: Dynamic or Static Linking
![]() During initial analysis of a suspect program, simply identifying whether the file is a static or dynamically linked executable will provide early guidance about the program’s functionality and what to anticipate during later dynamic analysis of library and system calls made during its execution.
During initial analysis of a suspect program, simply identifying whether the file is a static or dynamically linked executable will provide early guidance about the program’s functionality and what to anticipate during later dynamic analysis of library and system calls made during its execution.
• A number of tools can help quickly assess whether a suspect binary is statically or dynamically linked. ![]()
• DUMPBIN,29 a command-line utility provided with Microsoft Visual C++ in Microsoft Visual Studio,30 combines the functionality of the Microsoft development tools LINK, LIB, and EXEHDR. Thus, DUMPBIN can parse a suspect binary to provide valuable information about the file format and structure, embedded symbolic information, as well as the library files required by the program.
• To identify an unknown binary file’s dependencies, query the target file with DUMPBIN, using the /DEPENDENTS argument, as shown in Figure 5.14.
• To obtain a better picture of the suspect file’s capabilities based upon the dependencies it requires, research each dependency separately, eliminating those that appear benign or commonplace, and focus more on those that seem more anomalous. Some of the better Web sites on which to perform such research are listed in the textbox Online Resources: Reference Pages.
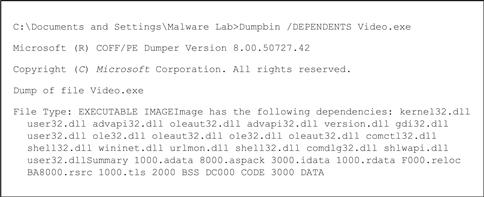
Figure 5.14 DUMPBIN query of a suspect file
![]() Online Resources
Online Resources
Reference Pages
It is handy during the inspection of embedded entities like strings, dependencies, and API function call references to have reference Web sites available for quick perusal. Consider adding these Web sites to your browser toolbar for quick and easy reference.
Windows API Reference—http://msdn.microsoft.com/en-us/library/aa383749%28v=vs.85%29.aspx
Process and Thread Functions Reference—http://msdn.microsoft.com/en-us/library/ms684847.aspx
Microsoft DLL Help Database—Retired by Microsoft in February 2010, but archived on http://web.archive.org/web/20090615190853/http://support.microsoft.com/dllhelp/
Microsoft Advanced Search Engine—http://search.microsoft.com/advancedsearch.aspx?mkt=en-US&setlang=en-US
Microsoft TechNet—http://technet.microsoft.com/en-us/
Microsoft Standard .Exe Files and Associated .DLLs—http://technet.microsoft.com/en-us/library/cc768380.aspx
• If the feel of a GUI tool to inspect file dependencies is preferred, Tim Zabor has developed dumpbinGUI,31 a sleek front-end for DUMPBIN, which includes dumpbinCHM, a shell context menu that allows for a right-click on the target file and a selection of the DUMPBIN argument to be applied against a target file. ![]()
• To gain a more granular perspective of a target file’s dependencies, a useful command-line and GUI utility is Dependency Walker,32 which builds a hierarchical tree diagram of all dependent modules in the binary executable—allowing drill-down identification of the files that the dependencies require and invoke, as shown in Figure 5.15.

Figure 5.15 Examining a suspect file with Dependency Walker
Symbolic and Debug Information
![]() The way in which an executable file is compiled and linked by an attacker often leaves significant clues about the nature and capabilities of a suspect program.
The way in which an executable file is compiled and linked by an attacker often leaves significant clues about the nature and capabilities of a suspect program.
![]() If an attacker does not strip an executable file of program variable and function names known as symbols, which reside in a structure within Windows executable files called the symbol table, the program’s capabilities may be readily detected.
If an attacker does not strip an executable file of program variable and function names known as symbols, which reside in a structure within Windows executable files called the symbol table, the program’s capabilities may be readily detected.
• To check for symbols in a binary, turn to the utility nm, which is preinstalled in most distributions of the Linux operating system. The nm command identifies symbolic and debug information embedded in executable/object files specimen.
• Although Windows systems do not have an inherent equivalent of this utility, there are several other tools that nicely extract the same symbol information.
• As with file dependencies, DUMPBIN can be used with the /SYMBOLS argument to display the symbols present in a Windows executable file’s symbol table.
• As previously discussed, there is a GUI alternative to the DUMPBIN console program called dumpbinGUI, which also can be used to query target files for symbolic information. DumpbinGUI is particularly helpful in that it offers a shell context menu, allowing for a file to be right-clicked and run through the program.
Embedded File Metadata
![]() In addition to embedded strings and symbolic information, an executable file may contain valuable clues within its file metadata.
In addition to embedded strings and symbolic information, an executable file may contain valuable clues within its file metadata.
![]() The term metadata refers to information about data. In a forensic context, discussions pertaining to metadata typically center on information that can be extracted from document files, like those created with Microsoft Office applications. Metadata may reveal the author of a document, the number of revisions, and other private information about a file that normally would not be displayed.
The term metadata refers to information about data. In a forensic context, discussions pertaining to metadata typically center on information that can be extracted from document files, like those created with Microsoft Office applications. Metadata may reveal the author of a document, the number of revisions, and other private information about a file that normally would not be displayed.
• Metadata also resides in executable files, and often these data can provide valuable insight as to the compilation date/time, origin, purpose, or functionality of the file.
• Metadata in the context of an executable file does not reveal technical information related to file content, but rather contains information about the origin, ownership, and history of the file. In executable files, metadata can be identified in a number of ways.
![]() To create a binary executable file, a high-level programming language must be compiled into an object file, and in turn, be linked with any required libraries and additional object code.
To create a binary executable file, a high-level programming language must be compiled into an object file, and in turn, be linked with any required libraries and additional object code.
![]() From this process alone, numerous potential metadata footprints are left in the binary, including the high-level language in which the program was written, the type and version of the compiler and linker used to compile the code, and the date and time of compilation.
From this process alone, numerous potential metadata footprints are left in the binary, including the high-level language in which the program was written, the type and version of the compiler and linker used to compile the code, and the date and time of compilation.
• In addition to these pieces of information, other file metadata may be present in a suspect program, including information relating to the following:
| Metadata Artifacts | ||
| Program author | Publisher | Warnings |
| Program version | Author/Creator | Location |
| Operating system or platform in which the executable was compiled | Created by software | Format |
| Intended operating system and processor of the program | Modified by software | Resource Identifier |
| Console or GUI program | Contributor information | Character Set |
| Company or organization | Copyright information | Spoken or Written Language |
| Disclaimers | License | Subject |
| Comments | Previous File Name | Hash Values |
| Creation Date | Modified Date | Access Date |
• These metadata artifacts are references from various parts of the executable file structure. The goal of the metadata harvesting process is to extract historical and identifying clues before examining the actual executable file structure.
• Later in this chapter (in the “Windows Portable Executable Format” section), as well as in Chapter 6, we will be taking a detailed look at the format and structure of the PE file, and specifically where metadata artifacts reside within it.
• Most of the metadata artifacts listed in the previous table manifest in the strings embedded in the program; thus, the strings parsing tools discussed earlier in this chapter certainly can be used to discover them. However, for a more methodical and concise exploration of an unknown, suspect program, the tasks of examining the strings of the file and harvesting file metadata are better separated.
• To gather an overview of file metadata as a contextual baseline, scan a suspect file with exiftool.33 A number of GUI front-ends have been developed for exiftool that provide for drag-and-drop functionality and recursive scanning. ![]()
• Exiftool will provide the digital investigator with temporal context, operating system, and target environment identifiers, along with other helpful clues such as linker version, as displayed in Figure 5.16. However, further probing is often required to gather additional metadata artifacts of value from a suspect executable file.
• After gaining an overview of the file metadata, review or “peel” the file for specific metadata artifacts in chronological order of the compilation process—from high-level source code to compiled executable. Initial clues to look for include:
![]() Identify the high-level language used to create the suspect program
Identify the high-level language used to create the suspect program
![]() Determine the compiler (and linker version) used to create the program
Determine the compiler (and linker version) used to create the program
![]() Ascertain the file compilation time and date
Ascertain the file compilation time and date
![]() Identify the Regional Settings (Language Code and Character Set) embedded within the binary during the time of compilation
Identify the Regional Settings (Language Code and Character Set) embedded within the binary during the time of compilation
• Often, metadata items of interest are obfuscated by the attacker through packing or encrypting the file (discussed in the “File Obfuscation: Packing and Encryption Identification” section, later in this chapter). If the file is not obfuscated, the high-level programming language can be quickly identified by GT2, a file format detection utility with a shell context menu that allows for a right-click on the target file.34
![]()
• Although GT2 can identify and parse many file formats, it is particularly geared toward extracting data from PE files. Figure 5.17 displays the output of GT2 extracting file version information and identifying the high-level programming language of a target file (Visual C++ 6.0).
• There are a number of other utilities that may be useful for identifying the compiler used to create a binary executable. Among them is PEid,35 a power utility for examining PE files, including compiler and packing identification. Another is Babak Farrokhi’s Language 2000 tool,36 an older compiler detection utility, which identifies the compiler used to create a program and extracts the program version information embedded in the file. ![]()
• PE file metadata can also provide temporal context surrounding an incident and contribute toward building an investigative time line in conjunction with live response and post-mortem forensic artifacts acquired from a victim system.
• In particular, the date and time stamp when the executable was compiled can be extracted from the IMAGE_FILE_HEADER structure of a PE file. A detailed discussion of the IMAGE_FILE_HEADER and other PE file structures can be found in the section “Windows Portable Executable File Format,” later in this chapter.
![]() The compilation date and time can be quickly extracted using Nick Harbour’s pestat command line utility.37
The compilation date and time can be quickly extracted using Nick Harbour’s pestat command line utility.37
![]() For digital investigators who prefer a graphical utility, as depicted in Figure 5.18, MiTeC’s EXE Explorer38 intuitively extracts and displays the time stamp data (in GMT).
For digital investigators who prefer a graphical utility, as depicted in Figure 5.18, MiTeC’s EXE Explorer38 intuitively extracts and displays the time stamp data (in GMT).
• Looking back at the output in Figure 5.17, extensive file version information was extracted, most likely obtained from the executables Resource section (a topic covered in depth in Chapter 6). Although this information is not dispositive, these are substantial leads that can be further pursued through online research.
• To gain further insight about the attacker, examine the Language Code and Character Set identifiers embedded within the IMAGE_RESOURCE_DIRECTORY structure of the binary during the time of compilation. These settings provide information about the native attacker system environment or settings selected by the attacker during compilation.
![]() For example, looking at the data extracted in Figures 5.16 and 5.17, we learn that the regional settings in the suspect executable include a Language Identifier Code 041904E3 (Russian)39 and a Character Set (Cyrillic).40
For example, looking at the data extracted in Figures 5.16 and 5.17, we learn that the regional settings in the suspect executable include a Language Identifier Code 041904E3 (Russian)39 and a Character Set (Cyrillic).40
![]() A granular examination of the Language and Character codes can be conducted by parsing the Resource section of a target file with a PE Analysis tool such as HeavenTools’ PE Explorer,41 as depicted below in Figure 5.19.
A granular examination of the Language and Character codes can be conducted by parsing the Resource section of a target file with a PE Analysis tool such as HeavenTools’ PE Explorer,41 as depicted below in Figure 5.19.
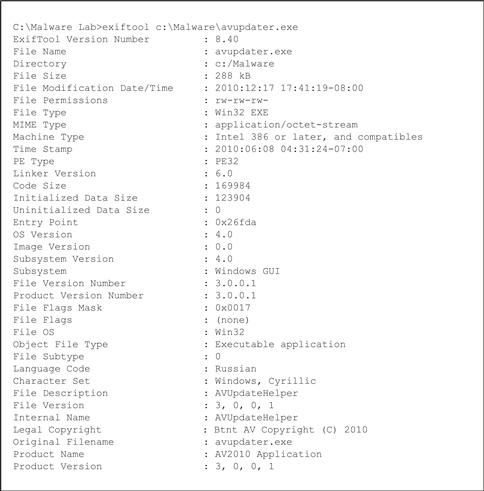
Figure 5.16 Gathering metadata from a PE file with exiftool
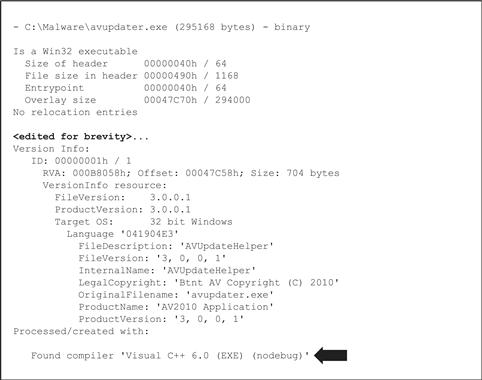
Figure 5.17 PE metadata extracted with GT2

Figure 5.18 PE compilation date and time extracted with EXE Explorer

Figure 5.19 Examining language and character codes with PE Explorer
![]() Online Resources
Online Resources
Locale Identifiers
Consider adding these Web sites to your browser toolbar for quick and easy reference of Locale Identifiers.
Locale IDs Assigned by Microsoft—http://msdn.microsoft.com/en-us/goglobal/bb964664
Locale IDs, Inout Locales, and Language Collections for Windows XP and Windows Server 2003—http://msdn.microsoft.com/en-us/goglobal/bb895996
Investigative Consideration:
• A word of caution: As with embedded strings, file metadata can be modified by an attacker. Time and date stamps, file version information, and other seemingly helpful metadata are often the target of alteration by attackers who are looking to thwart the efforts of researchers and investigators from tracking their attack. File metadata must be reviewed and considered in context with all of the digital and network-based evidence collected from the incident scene.
File Obfuscation: Packing and Encryption Identification
![]() Thus far this chapter has focused on methods of reviewing and analyzing data in and about a suspect file. All too often, malware “in the wild” presents itself as armored or obfuscated, primarily to circumvent network security protection mechanisms like anti-virus software and intrusion detection systems.
Thus far this chapter has focused on methods of reviewing and analyzing data in and about a suspect file. All too often, malware “in the wild” presents itself as armored or obfuscated, primarily to circumvent network security protection mechanisms like anti-virus software and intrusion detection systems.
![]() Obfuscation is also used to protect the executable’s innards from the prying eyes of virus researchers, malware analysts, and other information security professionals interested in reverse-engineering and studying the code.
Obfuscation is also used to protect the executable’s innards from the prying eyes of virus researchers, malware analysts, and other information security professionals interested in reverse-engineering and studying the code.
• Moreover, in today’s underground hacker economy, file obfuscation is no longer used to just block the “good guys,” but also to prevent other attackers from examining the code. Savvy and opportunistic cyber criminals can analyze the code, determine where the attacker is controlling his infected computers or storing valuable harvested information (like keylogger contents or credit card information), and then “hijack” those resources away to build their own botnet armies or enhance their own illicit profits from phishing, spamming, click fraud, or other forms of fraudulent online conduct.
• Given these “pitfalls,” attackers use a variety of utilities to obscure and protect their file contents; it is not uncommon to see more than one layer, or a combination, of file obfuscation applied to hostile code to ensure it remains undetectable.
• Some of the more predominant file obfuscation mechanisms used by attackers to disguise their malware include packers, encryption programs (known in hacker circles as cryptors), and binders, joiners, and wrappers, as graphically portrayed in Figure 5.20. Let’s take a look at how these utilities work and how to spot them.

Figure 5.20 Obfuscating code
Packers
![]() The terms packer, compressor, and packing are used in the information security and hacker communities alike to refer generally to file obfuscation programs.
The terms packer, compressor, and packing are used in the information security and hacker communities alike to refer generally to file obfuscation programs.
• Packers are programs that allow the user to compress, and in some instances encrypt, the contents of an executable file.
• Packing programs work by compressing an original executable binary, and in turn, obfuscating its contents within the structure of a “new” executable file. The packing program writes a decompression algorithm stub, often at the end of the file, and modifies the executable file’s entry point to the location of the stub.42
• As illustrated in Figure 5.21, upon execution of the packed program, the decompression routine extracts the original binary executable into memory during runtime and then triggers its execution.
• In addition to unpacking programs that were created to foil specific packers, there are numerous generic unpackers and file dumping utilities that can be implemented during runtime analysis of a packed executable malware specimen. These tools will be discussed in greater detail in Chapter 6.

Figure 5.21 Execution of a packed malware specimen
Cryptors
![]() Executable file encryption programs or encryptors, better known by their colloquial “underground” names cryptors (or crypters) or protectors, serve the same purpose for attackers as packing programs. They are designed to conceal the contents of the executable program, render it undetectable by anti-virus and IDS, and resist any reverse engineering or hijacking efforts.
Executable file encryption programs or encryptors, better known by their colloquial “underground” names cryptors (or crypters) or protectors, serve the same purpose for attackers as packing programs. They are designed to conceal the contents of the executable program, render it undetectable by anti-virus and IDS, and resist any reverse engineering or hijacking efforts.
• Unlike packing programs, cryptors accomplish this goal by applying an encryption algorithm upon an executable file, causing the target file’s contents to be scrambled and undecipherable.
• Like file packers, cryptors write a stub containing a decryption routine to the encrypted target executable, thus causing the entry point in the original binary to be altered. Upon execution, the cryptor program runs the decryption routine and extracts the original executable dynamically at runtime, as shown in Figure 5.22.
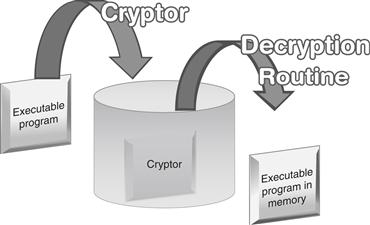
Figure 5.22 Execution of a cryptor protected executable file
Packer and Cryptor Detection Tools
![]() PEiD43 is the packer and cryptor freeware detection tool most predominantly used by digital investigators, both because of its high detection rates (more than 600 different signatures) and its easy-to-use GUI interface that allows multiple file and directory scanning with heuristic scanning options.
PEiD43 is the packer and cryptor freeware detection tool most predominantly used by digital investigators, both because of its high detection rates (more than 600 different signatures) and its easy-to-use GUI interface that allows multiple file and directory scanning with heuristic scanning options.
• PEiD allows drag-and-drop functionality to quickly identify obfuscation signatures, as demonstrated in Figure 5.23.
• PEiD contains a plug-in interface44 and a myriad of plug-ins that afford additional detection functionality. Plug-ins are listed and described in the Tool Box section at the end of this chapter. ![]()
• Entropy calculation—or the measurement of disorder in a block of data45—and PE Entry Point (EP) anomaly detection in a suspect file can be calculated with PEiD using the “Extra Information” feature invoked by clicking the double append button located at the bottom right corner of the PEiD GUI. High entropy levels are typically indicia that an obfuscation scheme has been applied to a suspect file.
• In addition to PEiD, there are a number of other GUI-based obfuscation detection tools that offer slightly different features and plug-ins, including Mandiant’s Red Curtain,46 NTCore’s PE Detective,47 and RDG.48 Refer to the Tool Box section at the end of this chapter and on the companion Web site, http://www.malwarefieldguide.com/Chapter5.html, for additional tool options. ![]()

Figure 5.23 Analyzing a suspect file with PEiD
CLI Packing and Cryptor Detection Tools
• In addition to these GUI-based tools, there are a few handy python-based tools, making them extensible and command-line operated.
• Pefile,49 developed by Ero Carrera, is a robust PE file parsing utility as well as a packing identification tool. In particular, some of its functionality includes the ability to inspect the PE header and sections, obtain warnings for suspicious and malformed values in the PE image, detect file obfuscation with PEiD’s signatures, and generate new PEiD signatures.
• Jim Clausing, a SANS Internet Storm Center Incident Handler, wrote a similar python script for PE packer identification based upon pefile, called packerid.py.50 Like pefile, packerid.py is extensible and can be run in both the Windows and Linux environments, convenient for many Linux purists who prefer to conduct malware analysis in a Linux environment. Further, like pefile, packerid.py can be configured to compare queried files against various PE obfuscation signature databases, including those used by PEiD51 and others created by Panda Security.52 The output of packerid.py as applied against a suspect binary can be seen in Figure 5.24.
• Another very helpful CLI-based packer detection utility is SigBuster, written by Toni Koivunen of teamfurry.com. SigBuster has a myriad of different scan options and capabilities, and is written in Java, making it useful on Linux and UNIX systems (Figure 5.25). Currently, SigBuster is not publicly available, but is available to anti-virus researchers and law enforcement. However, SigBuster is implemented in the Anubis online malware analysis sandbox where the public can submit specimens for analysis.53
![]()
Figure 5.24 Inspecting a suspect file with packer.py on a Linux system

Figure 5.25 Inspecting a suspect file with SigBuster on a Linux system
Binders, Joiners, and Wrappers
![]() Binders (also known as joiners or wrappers) in the Windows environment simply take Windows PE files and roll them into a single executable.
Binders (also known as joiners or wrappers) in the Windows environment simply take Windows PE files and roll them into a single executable.
• The binder author can determine which file will execute and whether the state will be normal or hidden. The copy location of the file can be specified in the Windows, system, or temp directories, and the action can be specified to either open/execute or copy only.
• From the underground perspective, binders allow attackers to combine their malicious code executable together with a benign one, with the latter serving as an effective delivery vehicle for the malicious code’s distribution.
• There are many different binders available on the Internet; a simple and most fully featured one is known as YAB or “Yet Another Binder.”54
Embedded Artifact Extraction Revisited
![]() After de-obfuscating a target specimen, conduct a file profile of the unobscured file.
After de-obfuscating a target specimen, conduct a file profile of the unobscured file.
![]() After successfully pulling malicious code from its armor through the static and behavioral analysis techniques discussed in Chapter 6, re-examine the unobscured program for strings, symbolic information, file metadata, and PE structural details. In this way, a comparison of the “before” and “after” file will reveal more clearly the most important thing about the structure, contents, and capabilities of the program.
After successfully pulling malicious code from its armor through the static and behavioral analysis techniques discussed in Chapter 6, re-examine the unobscured program for strings, symbolic information, file metadata, and PE structural details. In this way, a comparison of the “before” and “after” file will reveal more clearly the most important thing about the structure, contents, and capabilities of the program.
Windows Portable Executable File Format
![]() A robust understanding of the file format of a suspect executable program that has targeted a Windows system will best facilitate effective evaluation of the nature and purpose of the file.
A robust understanding of the file format of a suspect executable program that has targeted a Windows system will best facilitate effective evaluation of the nature and purpose of the file.
![]() This section will cover the basic structure and contents of the Windows PE file format. In Chapter 6 deeper analysis of PE files will be conducted.
This section will cover the basic structure and contents of the Windows PE file format. In Chapter 6 deeper analysis of PE files will be conducted.
• The PE file format is derivative of the older Common Object File Format (COFF) and shares with it some structural commonalities.
• The PE file format not only applies to executable image files, but also to DLLs and kernel-mode drivers. Microsoft dubbed the newer executable format “Portable Executable” with aspirations of making it universal for all Windows platforms, an endeavor that has proven successful.
• The PE file format is defined in the winnt.h header file in the Microsoft Platform Software Development Kit (SDK). Microsoft has documented the PE file specification,55 and researchers have written whitepapers focusing on its intricacies.56
• Despite these resources, PE file analysis is often tricky and cumbersome.57 The difficultly lies in the fact that a PE file is not a single, large continuous structure, but rather a series of different structures and sub-components that describe, point to, and contain data or code, as illustrated graphically in Figure 5.26.
• To gain a clear and intuitive perspective of the entire PE file format, run the suspect binary through a CLI tool, like Matt Pietrek’s pedump utility,58 or pefile.py, so that each structure and sub-component can be studied and analyzed in a comprehensive view. Alternatively, for a general graphical overview of the PE structure, load the suspect file into a GUI-based PE analysis tool, such as PEView,59 AnyWherePEViewer,60 and CFF Explorer61 (see Figure 5.27), among others. ![]()
• After reviewing the entirety of the PE file output, which can often be rather extensive, consider “peeling” the data slowly by reviewing each structure and sub-component individually; that is, begin your analysis at the start of the PE module and work your way through all of the structures and sections, taking careful note of the data that are present, and perhaps just as important, the data that are not.

Figure 5.26 The Portable Executable (PE) file format
Figure 5.27 Parsing a suspect PE file with CFF Explorer
MS-DOS Header
![]() The IMAGE_DOS_HEADER structure, or MS-DOS header, is the file structure that every PE file begins with. For investigative purposes, the MS-DOS header contains two important pieces of information.
The IMAGE_DOS_HEADER structure, or MS-DOS header, is the file structure that every PE file begins with. For investigative purposes, the MS-DOS header contains two important pieces of information.
• First, the e_magic field contains the DOS executable file signature, previously identified as “MZ” or the hexadecimal characters 4D 5A, found in the first two bytes of the file. Similarly, Borland Delphi executables have a “P” in the file signature, following the MZ.
• Second, as shown in Figure 5.28, the e_lfanew field points to the offset in the file where the PE header begins, known as the IMAGE_NT_HEADERS structure.

Figure 5.28 The e_magic and e_lfanew fields in IMAGE_DOS_HEADER
MS-DOS Stub
![]() The IMAGE_DOS_HEADER is followed by the MS-DOS stub program, which serves primarily as a compatibility notification method.
The IMAGE_DOS_HEADER is followed by the MS-DOS stub program, which serves primarily as a compatibility notification method.
• In particular, when the PE file format was first introduced, many users operated in DOS and not within the Windows GUI environment. If a PE file is mistakenly executed in DOS, the MS-DOS stub prints out the message “This program cannot be run in DOS mode.”
• The stub program is not essential for the successful execution of a PE file, and many times attackers will modify, delete, or otherwise obfuscate it (see Figure 5.29).

Figure 5.29 The MS-DOS Stub Program
PE Header
![]() Below the MS-DOS stub, at the offset address designated by the e_lfanew field, resides the IMAGE_NT_HEADERS structure, also known simply as the PE Header.62
Below the MS-DOS stub, at the offset address designated by the e_lfanew field, resides the IMAGE_NT_HEADERS structure, also known simply as the PE Header.62
• As depicted in Figure 5.30, the PE Header is actually comprised of the PE signature and two other data structures: the IMAGE_FILE _HEADER structure and the IMAGE_OPTIONAL_HEADER structure, which contains its own substructure, the Data Directory.

Figure 5.30 The PE Header and its contents
• A PE file is identified by the 4-byte (or DWORD) signature “PE” followed by two null values (ASCII characters “PE” with the hexadecimal translation of 50 45 00 00). The signature appears in the file after the MS-DOS stub, but need not be located at a particular offset.
• The first sub-structure in the IMAGE_NT_HEADERS structure is the IMAGE_FILE_HEADER, also known as the COFF File header.63
• From an investigative perspective, this structure is potentially comprised of informative data about the target file, including, among other things (Figure 5.31)64:
![]() Time and date the file was compiled/created
Time and date the file was compiled/created
![]() Number of sections in the Section Table
Number of sections in the Section Table
![]() File characteristics, such as whether the file is executable
File characteristics, such as whether the file is executable
![]() Whether symbols have been stripped from the file
Whether symbols have been stripped from the file
![]() Whether debugging information has been stripped from the file
Whether debugging information has been stripped from the file
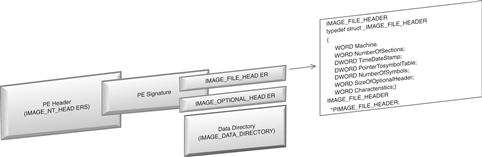
Figure 5.31 The IMAGE_FILE_HEADER structure
• To parse the IMAGE_FILE_HEADER for these details, query the suspect file in PEView, a GUI-based tool that provides an intuitive interface for navigating headers, descriptors, and values for each field in the PE structure, as shown in Figure 5.32.

Figure 5.32 Examining the Image_File_Header with PEView
• Following the IMAGE_FILE_HEADER structure is the IMAGE_OPTIONAL_HEADER, better known simply as the Optional Header, which is ironically not optional as the executable will fail to load without it.65 (See Figure 5.33.)

Figure 5.33 The IMAGE-OPTIONAL_HEADER structure
• The Optional Header is dense with a number of fields containing items of interest to digital investigators that can be extracted from this structure, including66:
Data Directory
![]() In addition, the Optional Header also contains the IMAGE_DATA_DIRECTORY structures, commonly referred to as Data Directories. The IMAGE_DATA_DIRECTORY, shown in Figure 5.34, contains 16 directories that identify values and map the locations of other structures and sections within the PE file.
In addition, the Optional Header also contains the IMAGE_DATA_DIRECTORY structures, commonly referred to as Data Directories. The IMAGE_DATA_DIRECTORY, shown in Figure 5.34, contains 16 directories that identify values and map the locations of other structures and sections within the PE file.

Figure 5.34 The IMAGE_DATA_DIRECTORY structure
Section Table
![]() The last structure in the PE file is the IMAGE_SECTION_HEADER, or Section Table, which follows immediately after the IMAGE_DATA_DIRECTORY.
The last structure in the PE file is the IMAGE_SECTION_HEADER, or Section Table, which follows immediately after the IMAGE_DATA_DIRECTORY.
• The Section Table consists of individual entries, or section headers, each 40 bytes in size and containing the name, size, and description of the respective section.
• The IMAGE_FILE_HEADER (COFF header) structure contains a “NumberOfSections” field, which identifies the number of entries in the Section Table. The Section Table entries are arranged in ascending order, starting from the number one (see Figure 5.35).

Figure 5.35 Section Table
![]() Online Resources
Online Resources
Exe Dump Utility
To get a feel for how pefile works, submit an executable file to the Exe Dump Utility portal at http://utilitymill.com/utility/Exe_Dump_Utility and receive a text or HTML report containing the results of the file being processed through pefile.
Profiling Suspect Document Files
During the course of profiling a suspect file, the digital investigator may determine that a file specimen is not an executable file, but rather a document file, requiring distinct examination tools and techniques.
![]() Malicious document files have become a burgeoning threat and increasingly popular vector of attack by malicious code adversaries.
Malicious document files have become a burgeoning threat and increasingly popular vector of attack by malicious code adversaries.
![]() Malicious documents crafted by attackers to exploit vulnerabilities in document processing and rendering software such as Adobe (Reader/Acrobat) and Microsoft Office (Word, PowerPoint, Excel) are becoming increasingly more common.
Malicious documents crafted by attackers to exploit vulnerabilities in document processing and rendering software such as Adobe (Reader/Acrobat) and Microsoft Office (Word, PowerPoint, Excel) are becoming increasingly more common.
• As document files are commonly exchanged in both business and personal contexts, attackers frequently use social engineering techniques to infect victims through this vector—such as attaching a malicious document to an e-mail seemingly sent from a recognizable or trusted party.
• Typically, malicious documents contain a malicious scripting “trigger mechanism” that exploits an application vulnerability and invokes embedded shellcode; in some instances, an embedded executable file is invoked or a network request is made to a remote resource for additional malicious files.
• Malicious document analysis proposes the additional challenges of navigating and understanding numerous file formats and structures, as well as obfuscation techniques to stymie the digital investigator’s efforts.
![]() In this section we will examine the overall methodology for examining malicious documents. As the facts and context of each malicious code incident dictates the manner and means in which the digital investigator will proceed with his investigation, the techniques outlined in this section are not intended to be comprehensive or exhaustive, but rather to provide a solid foundation relating to malicious document analysis.
In this section we will examine the overall methodology for examining malicious documents. As the facts and context of each malicious code incident dictates the manner and means in which the digital investigator will proceed with his investigation, the techniques outlined in this section are not intended to be comprehensive or exhaustive, but rather to provide a solid foundation relating to malicious document analysis.
• Malicious Document Analysis Methodology
![]() Identify the suspicious file as a document file through file identification tools
Identify the suspicious file as a document file through file identification tools
![]() Scan the file to identify indicators of malice
Scan the file to identify indicators of malice
![]() Examine the file to discover relevant metadata
Examine the file to discover relevant metadata
![]() Examine the file structure to locate suspect embedded artifacts, such as scripts, shellcode, or executable files
Examine the file structure to locate suspect embedded artifacts, such as scripts, shellcode, or executable files
![]() Extract suspect scripts/code/files
Extract suspect scripts/code/files
![]() If required, decompress or de-obfuscate the suspect scripts/code/files
If required, decompress or de-obfuscate the suspect scripts/code/files
![]() Examine the suspect scripts/code/files
Examine the suspect scripts/code/files
![]() Identify correlative malicious code, file system, or network artifacts previously discovered during live response and post-mortem forensics
Identify correlative malicious code, file system, or network artifacts previously discovered during live response and post-mortem forensics
![]() Determine relational context within the totality of the infection process
Determine relational context within the totality of the infection process
Profiling Adobe Portable Document Format (PDF) Files
![]() A solid understanding of the PDF file structure is helpful to effectively analyze a malicious PDF file.
A solid understanding of the PDF file structure is helpful to effectively analyze a malicious PDF file.
PDF File Format
![]() A PDF document is a data structure comprised of a series of elements Figure 5.37)67:
A PDF document is a data structure comprised of a series of elements Figure 5.37)67:
• File Header: The first line of a PDF file contains a header, which contains 5 characters; the first three characters are always “PDF,” and the remaining two characters define the version number, for example, “%PDF-1.6” (PDF versions range from 1.0 to 1.7).
• Body: The PDF file body contains a series of objects that represent the contents of the document.
• Objects: The objects in the PDF file body represent contents such as fonts, text, pages, and images.
![]() Objects may reference other objects. These indirect objects are labeled with two unique identifiers collectively known as the object identifier: (1) an object number and (2) a generation number.
Objects may reference other objects. These indirect objects are labeled with two unique identifiers collectively known as the object identifier: (1) an object number and (2) a generation number.
![]() After the object identifier is the definition (Figure 5.36) of the indirect object, which is contained in between the keywords “obj” and “endobj.” For example:
After the object identifier is the definition (Figure 5.36) of the indirect object, which is contained in between the keywords “obj” and “endobj.” For example:
![]() Indirect objects may be referred to from other locations in the file by an indirect reference, or “references,” which contains the object identifier and the keyword “R,” for example: 11 0 R.
Indirect objects may be referred to from other locations in the file by an indirect reference, or “references,” which contains the object identifier and the keyword “R,” for example: 11 0 R.
![]() Objects that contain a large amount of data (such as images, audio, fonts, movies, page descriptions, and JavaScript) are represented as stream objects or “streams.”68 Streams are identified by the keywords stream and endstream, with any data contained in between the words manifesting as the stream. Although a stream may be of unlimited length, streams are typically compressed to save space, making analysis challenging. Careful attention should be paid to streams during analysis, as attackers frequently take advantage of their large data capacity and embed malicious scripting within a stream inside of an object.
Objects that contain a large amount of data (such as images, audio, fonts, movies, page descriptions, and JavaScript) are represented as stream objects or “streams.”68 Streams are identified by the keywords stream and endstream, with any data contained in between the words manifesting as the stream. Although a stream may be of unlimited length, streams are typically compressed to save space, making analysis challenging. Careful attention should be paid to streams during analysis, as attackers frequently take advantage of their large data capacity and embed malicious scripting within a stream inside of an object.
• Cross Reference (XREF) Table: The XREF table serves as a file index and contains an entry for each object. The entry contains the byte offset of the respective object within the body of the file. The XREF Table is the only element within a PDF file with a fixed format, enabling entries within the table to be accessed randomly.69
• Trailer: The end of a PDF file contains a trailer, which identifies the offset location of the XREF table and certain special objects within the file body.70
Figure 5.36 Object definition
Figure 5.37 The Portable Document File format
![]() In addition to the structural elements of a PDF, there are embedded entities for investigative consideration, such as dictionaries, action type keywords, and identifiable compression schemes as described in the next chart.71
In addition to the structural elements of a PDF, there are embedded entities for investigative consideration, such as dictionaries, action type keywords, and identifiable compression schemes as described in the next chart.71
| Keyword | Relevance |
| /AA | Indicia of an additional-actions dictionary that defined actions that will occur in response to various trigger events affecting the document as a whole. |
| /Acroform | Interactive form dictionary; indicia that an automated action will occur upon the opening of the document. |
| /OpenAction | A value specifying a destination that will be displayed, or an action that will occur when the document is opened. |
| /URI | Indicia that a URI (uniform resource identifier) will be resolved, such as a remote resource containing additional malicious files. |
| /Encrypt | Indicia that encryption has been applied to the contents of strings and streams in the document to protect its contents. |
| /Named | Indicia that a predefined action will be executed. |
| /JavaScript | Indicia that the PDF contains JavaScript. |
| FlateDecode | Indicia of a compression scheme encoded with the zlib/deflate compression method. |
| /JBIG2Decode | Indicia of a compression scheme encoded with the JBIG2 compression method. |
| /JS | Indicia that the PDF contains JavaScript. |
| /EmbeddedFiles | Indicia of embedded file streams. |
| /Launch | Indicia that an application will be launched or a file will be opened. |
| /Objstm | Indicia of an object stream inside the body of the PDF document. |
| /Pages | An indicator that interactive forms will be invoked. |
| /RichMedia | Indicia that the PDF contains JavaScript. |
Pdf Profiling Process: CLI Tools
![]() The following steps can be taken to examine a suspect PDF document:
The following steps can be taken to examine a suspect PDF document:
Triage: Scan for Indicators of Malice
• Inspect the suspect file for indicators of malice—clues within the file that suggest the file has nefarious functionality—using Didier Stevens’ python utility, pdfid.py.
• Pdfid.py scans the document for keywords and provides the digital investigator with a tally of identified keywords that are potentially indicative of a threat, such as those previously described (Figure 5.38).

Figure 5.38 Scanning a suspect PDF file with pdfid.py
• An alternative to pdfid.py for triaging a suspect PDF is the pdfscan.rb script in Origami, a Ruby framework for parsing and analyzing PDF documents.72
• Further, the python utility pdf-parser.py (discussed in greater detail later), when used with the --stats switch, can be used to collect statistics about the objects present in a target PDF file specimen. ![]()
• Meaningful metadata can provide temporal context, authorship, and original document creation details about a suspect file.
• Temporal metadata from the suspect file can be gathered with pdfid.py using the --extra switch (Figure 5.39).

Figure 5.39 Metadata gathered from a suspect PDF with the pdfid.py --extra command switch (left) and the Origami framework printmetadata.rb script (right).
• Deeper metadata extraction, such as author, original document name, and original document creation application, among other details, can be acquired by querying the suspect file with the Origami framework printmetadata.rb script. ![]()
Examine the file structure and contents
• After conducting an initial assessment of the file, use Didier Stevens’ pdf-parser.py tool to examine the specimen’s file structure and contents to locate suspect embedded artifacts, such as anomalous objects and streams, as well as hostile scripting or shellcode. The following commands are useful in probing the PDF file specimen:
| Command Switch | Purpose |
| --stats | Displays statistics for the target PDF file |
| --search | String to search in indirect objects (except streams) |
| --filter | Pass stream object through filters (FlateDecode ASCIIHexDecode and ASCII85Decode only) |
| --object=<object> | ID of indirect object to select (version independent) |
| --reference=<reference> | ID of indirect object being referenced (version independent) |
| --elements=<elements> | Type of elements to select (cxtsi) |
| --raw | Raw output for data and filters |
| --type=<type> | Type of indirect object to select |
| --verbose | Displays malformed PDF elements |
| --extract=<file to extract> | Filename to extract to |
| --hash | Displays hash of objects |
| --dump | Dump unfiltered content of a stream |
| --disarm | Disarms the target PDF file |
• An alternative to pdf-parser.py is the pdfscan.rb script from the Origami framework. ![]()
• Use the information collected with pdfid.py as a guide for examining the suspect file with pdf-parser.py. For instance, the pdfid.py results in Figure 5.38 revealed the presence of JavaScript in the suspect file. Pdf-parser.py can be used to dig deeper into the specimen, such as locating and extracting this script.
Locating suspect scripts and shellcode
• To locate instances of JavaScript keywords in the suspect file, use the --search switch and the string javascript, as shown in Figure 5.40. The results of the query will identify the relevant objects and references in the file.

Figure 5.40 Searching the suspect file for embedded JavaScript with pdf-parser.py
• The relevant object can be further examined using the --object= <object number> switch. In this instance, the output reveals that the object contains a stream that is compressed (Figure 5.41).
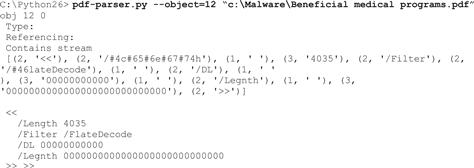
Figure 5.41 Parsing a specific object with pdf-parser.py
Decompress suspect stream objects and reveal scripts
• Use the --filter and --raw switches to decompress the contents of the stream object and reveal the scripting as shown in Figure 5.42.
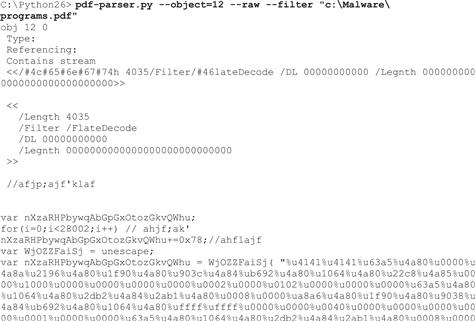
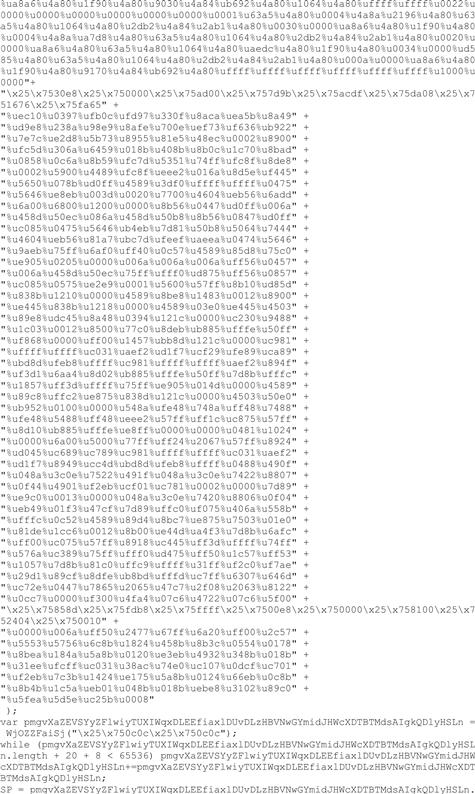

Figure 5.42 Decompressing the suspect stream object with pdf-parser.py (Cont’d)
Extract suspect JavaScript for further analysis
• The suspicious JavaScript can be extracted by redirecting the output in Figure 5.42 to a new file, such as output.js, as shown in Figure 5.43.
![]()
Figure 5.43 Extracting suspicious JavaScript using pdf-parser.py
• Other methods that can be used to extract the JavaScript include:
• JavaScript extracted from a suspect PDF specimen can be examined through a JavaScript engine such as Mozilla Foundation’s SpiderMonkey.75
• A modified version of SpiderMonkey geared toward malware analysis has been adapted by Didier Stevens.76
![]()
Extract shellcode from JavaScript
• Attackers commonly exploit application vulnerabilities in Adobe Reader and Acrobat with malicious PDF files containing JavaScript embedded with shellcode (typically obfuscated in an unescape() function), as shown in Figure 5.42.77
• Often, the shellcode payload is injected into memory through performing a heap spray,78 and in turn, invoking the execution of a PE file embedded (and frequently encrypted) in the suspect PDF file.79
• The shellcode can be extracted from the JavaScript for further analysis.
![]() After copying the shellcode out of JavaScript, compile it into a binary file for deeper analysis, such as examination of strings, disassembling, or debugging. Prior to compilation, be certain that the target shellcode has been “unescaped”—or deciphered from the unescape encoding—and placed into binary format.
After copying the shellcode out of JavaScript, compile it into a binary file for deeper analysis, such as examination of strings, disassembling, or debugging. Prior to compilation, be certain that the target shellcode has been “unescaped”—or deciphered from the unescape encoding—and placed into binary format.
![]() Shellcode can be compiled into a Windows executable file with the python script shellcode2exe.py,80 the convertshellcode.exe utility,81 and MalHostSetup (included with OfficeMalScanner; discussed later in this chapter in the “MS Office Dcoument Profiling Process” section). Similarly, a shellcode2exe Web portal exists for online conversion.82
Shellcode can be compiled into a Windows executable file with the python script shellcode2exe.py,80 the convertshellcode.exe utility,81 and MalHostSetup (included with OfficeMalScanner; discussed later in this chapter in the “MS Office Dcoument Profiling Process” section). Similarly, a shellcode2exe Web portal exists for online conversion.82
![]() Other Tools to Consider
Other Tools to Consider
CLI-based PDF Analysis Tools
PDF Scanner—http://blogs.paretologic.com/malwarediaries/index.php/pdf-scanner/
Origami—http://code.google.com/p/origami-framework/; http://esec-lab.sogeti.com/dotclear/index.php?pages/Origami
Open PDF Analysis Framework (OPAF)—http://opaf.googlecode.com; http://feliam.wordpress.com/2010/08/23/opaf/
PDF Miner—http://www.unixuser.org/~euske/python/pdfminer/index.html
PDF Tool Kit—http://www.pdflabs.com/tools/pdftk-the-pdf-toolkit/
Malpdfobj—http://blog.9bplus.com/releasing-the-malpdfobj-tool-beta
PDF Profiling Process: GUI Tools
![]() GUI-based tools can be used to parse and analyze suspect PDF files to gather additional data and context.
GUI-based tools can be used to parse and analyze suspect PDF files to gather additional data and context.
• Zynamics’ PDF Dissector83 provides an intuitive and feature-rich environment allowing the digital investigator to quickly identify elements in the PDF and navigate the file structure.
• Anomalous strings can be queried through the tool’s text search function, and suspect objects and streams can be identified through a multifaceted viewing pane, as shown in Figure 5.44, below.

Figure 5.44 Navigating the structure of a suspect PDF file with PDF Dissector (Figure 5.45)

Figure 5.45 Executing JavaScript with the PDF Dissector JavaScript interpreter
• The contents of a suspicious object can be further examined by using the content tree feature of PDF Dissector.
![]() Once a target object or stream is selected, the contents are displayed in a separate viewing pane.
Once a target object or stream is selected, the contents are displayed in a separate viewing pane.
![]() Compressed streams are automatically filtered through FlateDecode and decoded—the contents of which can be examined in the tool’s built-in text or hexadecimal viewers.
Compressed streams are automatically filtered through FlateDecode and decoded—the contents of which can be examined in the tool’s built-in text or hexadecimal viewers.
![]() The contents of a suspicious stream object (raw or decoded) can be saved to a new file for further analysis.
The contents of a suspicious stream object (raw or decoded) can be saved to a new file for further analysis.
• PDF Dissector offers a variety of tools to decode, execute, and analyze JavaScript, as well as extract embedded shellcode.
• Identified JavaScript can be executed within the tool’s built-in JavaScript interpreter.
• Embedded shellcode that is invoked by the JavaScript can be identified in the Variables panel. Right-clicking on the suspect shellcode allows the digital investigator to copy the shellcode to the clipboard, inspect it within a hexadecimal viewer, or save it to a file for further analysis, as depicted in Figure 5.46.

Figure 5.46 Inspecting and saving shellcode extracted from a suspect file
• Extracted shellcode can be examined in other GUI-based PDF analysis tools, such as PDF Stream Dumper,84 PDFubar,85 and Malzilla,86 which are described in further detail in the Tool Box section at the end of this chapter. ![]()
• The Adobe Reader Emulator feature in PDF Dissector allows the digital investigator to examine the suspect file within the context of a document rendered by Adobe Reader, which may use certain API functions not available in a JavaScript interpreter.
• Adobe Reader Emulator also parses the rendered structure and reports known exploits in a PDF file specimen by Common Vulnerabilities and Exposures (CVE) number and description, as shown in Figure 5.47.

Figure 5.47 Examining a suspect PDF file through the Adobe Reader Emulator
![]() Online Resources
Online Resources
A number of online resources exist to scan suspicious PDF and MS Office document files, scan URLs hosting PDF files, or run suspicious document files in a sandboxed environment. Many of these Web portals also serve as great research aids, providing database search features to mine the results of previous submissions.
JSunpack—a JavaScript unpacker and analysis portal, http://jsunpack.jeek.org/dec/go.
ViCheck.ca—Malicious code analysis portal; numerous tools and searchable database, https://www.vicheck.ca/.
MalOffice—Malicious document analysis system, http://mwanalysis.org/?site=7&page=home.
WePawet—A service for detecting and analyzing Web-based malware (Flash, JavaScript, and PDF files), http://wepawet.iseclab.org/.
Shellcode2exe—Web portal that converts shellcode to a Portable Executable file, http://sandsprite.com/shellcode_2_exe.php.
Profiling Microsoft (MS) Office Files
![]() Malicious MS Office documents are an increasingly popular vector of attack against individuals and organizations due to the commonality and prevalence of Microsoft Office software and MS Office documents.
Malicious MS Office documents are an increasingly popular vector of attack against individuals and organizations due to the commonality and prevalence of Microsoft Office software and MS Office documents.
Microsoft Office Documents: Word, PowerPoint, Excel
![]() MS Office documents such as Word documents, PowerPoint presentations, and Excel spreadsheets are commonly exchanged in both business and personal contexts. Although security protocols, e-mail attachment filters, and other security practices typically address executable file threats, MS Office files are often regarded as innocuous and are trustingly opened by recipients. Attackers frequently use social engineering techniques to infect victims through this vector, such as tricking a user to open an MS Office document attached to an e-mail seemingly sent from a recognizable or trusted party.
MS Office documents such as Word documents, PowerPoint presentations, and Excel spreadsheets are commonly exchanged in both business and personal contexts. Although security protocols, e-mail attachment filters, and other security practices typically address executable file threats, MS Office files are often regarded as innocuous and are trustingly opened by recipients. Attackers frequently use social engineering techniques to infect victims through this vector, such as tricking a user to open an MS Office document attached to an e-mail seemingly sent from a recognizable or trusted party.
MS Office Documents: File Format
![]() There are two distinct MS Office document file formats87:
There are two distinct MS Office document file formats87:
• Binary File Format: Legacy versions of MS Office (1997–2003) documents are binary format (.doc, .ppt, .xls).88 These compound binary files are also referred to as Object Linking and Embedding (OLE) compound files or OLE Structured Storage files.89 They are a hierarchical collection of structures known as storages (analogous to a directory) and streams (analogous to files within a directory). Further, each application within the MS Office suite has application-specific file format nuances, as described in further detail next. Malicious MS Office documents used by attackers are typically binary format, likely due to the continued prevalence of these files and the complexity in navigating the file structures.
![]() Microsoft Word90
(.doc)—Binary Word documents consist of:
Microsoft Word90
(.doc)—Binary Word documents consist of:
![]() WordDocument Stream/Main Stream—This stream contains the bulk of a Word document’s binary data. Although this stream has no predefined structure, it must contain a Word file header, known as the File Information Block (FIB), located at offset 0.91 The FIB contains information about the document and specifies the file pointers to various elements that comprise the document and information about the length of the file.92
WordDocument Stream/Main Stream—This stream contains the bulk of a Word document’s binary data. Although this stream has no predefined structure, it must contain a Word file header, known as the File Information Block (FIB), located at offset 0.91 The FIB contains information about the document and specifies the file pointers to various elements that comprise the document and information about the length of the file.92
![]() Summary Information Streams—The summary information for a binary Word document is stored in two storage streams: Summary Information and DocumentSummaryInformation.93
Summary Information Streams—The summary information for a binary Word document is stored in two storage streams: Summary Information and DocumentSummaryInformation.93
![]() Table Stream (0Table or 1Table)—The Table Stream contains data that is referenced from the FIB and other parts of the file and stores various plex of character positions (PLCs) and tables that describe a document’s structure. Unless the file is encrypted, this stream has no predefined structure.
Table Stream (0Table or 1Table)—The Table Stream contains data that is referenced from the FIB and other parts of the file and stores various plex of character positions (PLCs) and tables that describe a document’s structure. Unless the file is encrypted, this stream has no predefined structure.
![]() Data Stream—An optional stream with no predefined structure, this contains data referenced from the FIB in the main stream or other parts of the file.
Data Stream—An optional stream with no predefined structure, this contains data referenced from the FIB in the main stream or other parts of the file.
![]() Object Streams—These contain binary data for OLE 2.0 objects embedded within the .doc file.
Object Streams—These contain binary data for OLE 2.0 objects embedded within the .doc file.
![]() Microsoft PowerPoint94
(.ppt)—Binary PowerPoint presentation files consist of:
Microsoft PowerPoint94
(.ppt)—Binary PowerPoint presentation files consist of:
![]() Current User Stream—This maintains the CurrentUserAtom record, which identifies the name of the last user to open/modify a target presentation and where the most recent user edit is located.
Current User Stream—This maintains the CurrentUserAtom record, which identifies the name of the last user to open/modify a target presentation and where the most recent user edit is located.
![]() PowerPoint Document Stream—This maintains information about the layout and contents of the presentation.
PowerPoint Document Stream—This maintains information about the layout and contents of the presentation.
![]() Pictures Stream—(Optional) This contains information about image files (JPG, PNG, etc.) embedded within the presentation.
Pictures Stream—(Optional) This contains information about image files (JPG, PNG, etc.) embedded within the presentation.
![]() Summary Information Streams—(Optional) The summary information for a binary PowerPoint presentation is stored in two storage streams: Summary Information and DocumentSummaryInformation.
Summary Information Streams—(Optional) The summary information for a binary PowerPoint presentation is stored in two storage streams: Summary Information and DocumentSummaryInformation.
![]() Microsoft Excel95
(.xls)—Microsoft Office Excel workbooks are compound files saved in Binary Interchange File Format (BIFF) which contain storages, numerous streams (including the main workbook stream), and substreams. Further, Excel workbook data consists of records, a foundational data structure used to store information about features in each workbook. Records are comprised of three components: (1) a record type, (2) a record size, and (3) record data.
Microsoft Excel95
(.xls)—Microsoft Office Excel workbooks are compound files saved in Binary Interchange File Format (BIFF) which contain storages, numerous streams (including the main workbook stream), and substreams. Further, Excel workbook data consists of records, a foundational data structure used to store information about features in each workbook. Records are comprised of three components: (1) a record type, (2) a record size, and (3) record data.
• Office Open XML format: MS Office 2007 (and newer versions of MS Office) use the Office Open XML file format (.docx, .pptx, and .xlsx), which provides an extended XML vocabulary for word processing, presentation, and workbook files.96
![]() Unlike the binary file format, which requires particularized tools to parse the file structure and contents, due to their container structure, XML-based Office documents can be dissected using archive management programs such as WinRar,97 Unzip,98 or 7-Zip,99 by simply renaming the target file specimen with an archive file extension (.zip, .rar, or .7z), for example, specimen.docx to specimen.rar.
Unlike the binary file format, which requires particularized tools to parse the file structure and contents, due to their container structure, XML-based Office documents can be dissected using archive management programs such as WinRar,97 Unzip,98 or 7-Zip,99 by simply renaming the target file specimen with an archive file extension (.zip, .rar, or .7z), for example, specimen.docx to specimen.rar.
![]() XML-based Office documents are less vulnerable than their binary predecessors, and as a result, attackers have not significantly leveraged Office Open XML format files as a vector of attack. Accordingly, this section will focus on examining binary format Office documents.
XML-based Office documents are less vulnerable than their binary predecessors, and as a result, attackers have not significantly leveraged Office Open XML format files as a vector of attack. Accordingly, this section will focus on examining binary format Office documents.
MS Office Documents: Vulnerabilities and Exploits
![]() Attackers typically leverage MS Office documents as a vector of attack by crafting documents that exploit a vulnerability in an MS Office suite application.
Attackers typically leverage MS Office documents as a vector of attack by crafting documents that exploit a vulnerability in an MS Office suite application.
• These attacks generally rely upon a social engineering triggering event—such as a spear phishing e-mail—which causes the victim recipient to open the document, executing the malicious code.
• Conversely, in lieu of targeting a particular application vulnerability, an attacker can manipulate an MS Office file to include a malicious Visual Basic for Applications (VBA, or often simply referred to as VB) macro, the execution of which can cause infection.
• By profiling a suspicious MS Office file, further insight as to the nature and purpose of the file can be obtained; if the file is determined to be malicious, clues regarding the infection mechanism can be extracted for further investigation.
MS Office Document Profiling Process
![]() The following steps can be taken to examine a suspect MS Office document:
The following steps can be taken to examine a suspect MS Office document:
Triage: Scan for Indicators of Malice
• As shown in Figure 5.48, query the suspect file with Sourcefire’s officecat, a utility that processes Microsoft Office files for the presence of exploit conditions.100

Figure 5.48 Scanning a suspect Word document file with officecat
• Officecat scans the suspect file and compares it against a predefined set of signatures and reports whether the suspect file is vulnerable. A list of the vulnerabilities checked by officecat can be obtained by using the –list switch.
• In addition, officecat output:
• You can further examine the suspect file for indicators of malice with the Microsoft Office Visualization Tool (OffVis).101
• OffVis is a GUI-based tool that parses binary formatted MS Office files, allowing the digital investigator to traverse the structure and contents of a target file through a triple-paned graphical viewer, which displays:
![]() A view of the raw file contents in a hexadecimal format
A view of the raw file contents in a hexadecimal format
![]() A hierarchical content tree view of the parsing results
A hierarchical content tree view of the parsing results
![]() A Parsing Notes section, which identifies anomalies in the file
A Parsing Notes section, which identifies anomalies in the file
• When loading a target file into OffVis, select the corresponding application-specific parser from the parser drop-down menu, as shown in Figure 5.49. OffVis uses unique binary format detection logic in each application-specific parser to identify 16 different CVE enumerated vulnerabilities; if a vulnerability is discovered in the target file, the Parsing Notes identify the file as Definitely Malicious, as shown in Figure 5.49, below.

Figure 5.49 Selecting a parser and examining a suspect MS PowerPoint document with OffVis
• By double-clicking on the Definitely Malicious Parsing Note, the raw content of the target file containing the vulnerability is populated in the hexadecimal viewing pane.
• Meaningful metadata can provide temporal context, authorship, and original document creation details about a suspect file. Insight into this information may provide clues as to the origin and purpose of the attack.
• To extract metadata details from the file specimen, query the file with exiftool,102 as shown in Figure 5.50. Examining the metadata contents, a number of valuable contextual details are quickly elucidated, such as the Windows code page language (Windows Simplified Chinese), the purported company name in which the license of Word was registered to that it generated the document (VRHEIKER), as well as the file creation, access, and modification dates.

Figure 5.50 Querying a suspect MS Word file with exiftool (Cont’d)
• There are a number of others tools that can effectively probe an MS Office document for metadata. However, be mindful that some of these tools cause the target file to open during the course of being processed, potentially executing embedded malicious code. Be certain to understand how your metadata extraction tool works prior to implementing it during an examination.
Deeper Profiling with OfficeMalScanner
![]() OfficeMalScanner is a malicious document forensic analysis suite developed by Frank Boldewin that allows the digital investigator to probe the structures and contents of a binary format MS Office file for malicious artifacts—allowing for a more complete profile of a suspect file.103
OfficeMalScanner is a malicious document forensic analysis suite developed by Frank Boldewin that allows the digital investigator to probe the structures and contents of a binary format MS Office file for malicious artifacts—allowing for a more complete profile of a suspect file.103
Each tool will be examined in greater detail in this section.
• OfficeMalScanner has five different scanning options that can be used to extract specific data from a suspect file104:
| Scanning Option | Purpose | |
| Info | Parses and displays the OLE structures in the file and saves located VB macrocode to disk. | |
| Scan | Scans the a target file for generic shellcode patterns using the following methods: | |
| GetEIP | (Four methods) Scans for instances of instructions to locate the EIP (instruction pointer register, or program counter), indicating the presence of embedded shellcode. | |
| Find Kernel32 base | (Three methods) Scans for the presence of instructions to identify the base address of where the kernel32.dll image is located in memory, a technique used by shellcode to resolve addresses of dependencies. | |
| API Hashing | Scans for the presence of instructions to locate hash values of API function names in memory, indicative of executable code. | |
| Indirect Function calls | Searches for instructions that generate calls to functions that are defined in other files. | |
| Suspicious Strings | Scans for Windows function name strings that are commonly found in malware. | |
| Decryption sequences | Scan searches for indicia of decryption routines. | |
| Embedded OLE Data | Scans for unencrypted OLE compound file signature. Identified OLE data is dumped to disk (OfficeMalScanner directory). | |
| Function prolog | Searches for code instructions relating to the beginning of a function. | |
| PE-File Signature | Scans for unencrypted PE file signature. Identified PE files are dumped to disk (OfficeMalScanner directory). | |
| brute | Scans for files encrypted with XOR and ADD with one-byte key values of 0x00 through 0xFF. Each time a buffer is decrypted, the scanner tries to identify PE files or OLE data; if identified it is dumped to disk (OfficeMalScanner directory). | |
| debug | Scan in which located shellcode is disassembled and displayed in textual disassembly view; located embedded strings, OLE data and PE files are displayed in a textual hexadecimal viewer. | |
| inflate | Decompresses and extracts the contents of Office Open XML formatted MS Office files (Office 2007–Present) and places them into the examination system’s /Temp directory. | |
• In addition to the information collected with the scanning options, OfficeMalScanner rates scanned files on a malicious index, scoring files based on four variables and associated weighted values; the higher the malware index score, the greater the number of malicious attributes discovered in the file. As a result, the index rating can be used as a triage mechanism for identifying files with certain threshold values.105
| Index | Scoring |
| Executables | 20 |
| Code | 10 |
| Strings | 2 |
| OLE | 1 |
• The structure of the suspect file can be quickly parsed with OfficeMalScanner using the info switch (Figure 5.51). In addition to displaying the storages and streams, the info switch will extract any VB macro code discovered in the file.

Figure 5.51 Parsing the structure of a suspect Word document file with OfficeMalScanner
Locating and Extracting Embedded Executables
• After gaining an understanding of the suspect file’s structure, examine the suspect file specimen for indicia of shellcode and/or embedded executable files using the scan command.
• If unencrypted shellcode, OLE or embedded executable artifacts are discovered in the file, the contents are automatically extracted and saved to disk. In the example shown in Figure 5.52, an embedded OLE artifact is discovered, extracted, and saved to disk.

Figure 5.52 Using the OfficeMalScanner scan command
• Scan the newly extracted file with the scan and info commands in an effort to gather any further information about the file.
• Many times, shellcode, OLE data, and PE files embedded in malicious MS Office files are encrypted. In an effort to locate these artifacts and defeat this technique, use the OfficeMalScanner scan brute command to scan the suspect file specimen with common decryption algorithms. If files are detected with this method, they are automatically extracted and saved to disk, as shown in Figure 5.53.
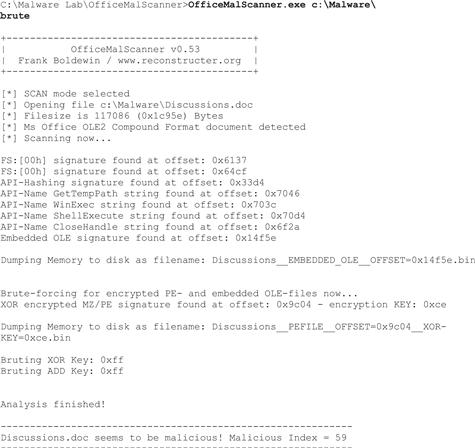
Figure 5.53 OfficeMalScanner scan brute mode detecting and extracting a PE embedded file
• Examine the extracted executable files through the file profiling process and additional malware forensic techniques discussed in Chapter 6 to gain further insight about the nature, purpose, and functionality of the program.
• To confirm your findings use the scan brute debug command combination to display a textual hexadecimal view output of the discovered and decrypted portable executable file, as shown in Figure 5.54, below.
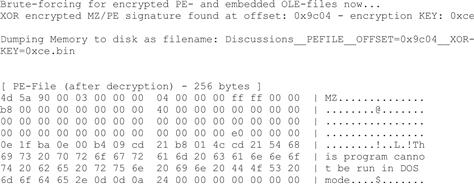
Figure 5.54 Examining an embedded PE file using OfficeMalScanner
• The scan debug command can be used to examine discovered (unencrypted) shellcode, PE, and OLE files in greater detail.
![]() Identified shellcode artifacts can be cursorily disassembled and displayed in a textual disassembly view.
Identified shellcode artifacts can be cursorily disassembled and displayed in a textual disassembly view.
![]() Identified PE and OLE file artifacts are displayed in a textual hexadecimal view.
Identified PE and OLE file artifacts are displayed in a textual hexadecimal view.
• Debug mode is helpful for identifying the offset of embedded shellcode in a suspect MS Office file and gaining further insight into the functionality of the code, as depicted in Figure 5.55.
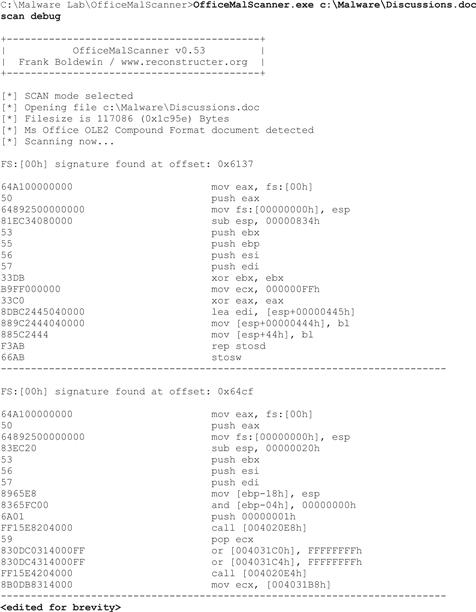
Figure 5.55 Examining a malicious Word document file using OfficeMalScanner in debug mode (Cont’d)
Locating and Extracting Shellcode with DisView and MalHost-Setup
• If deeper probing of the shellcode is necessary, the DisView (DisView.exe) utility—a lightweight disassembler included with the OfficeMalScanner suite—can further disassemble the target code.
• To use DisView, invoke the command against the target file name and relevant memory offset. In Figure 5.56, the offset 0x64cf was selected as it was previously identified by the scan debug command as an offset with a shellcode pattern (“Find kernel32 base” pattern). Identifying the correct memory offset may require some exploratory probing of different offsets.
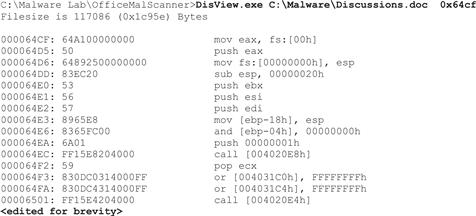
Figure 5.56 Examining a suspect file with DisView
• Once the relevant offset is located, the shellcode can be extracted and embedded into a host executable file generated by MalHost-Setup (MalHost-Setup.exe).
• To use MalHost-Setup, invoke the command against the target file, provide the name of the newly generated executable file, and identify the relevant memory offset as shown in Figure 5.57.

Figure 5.57 MalHost-Setup
• After the executable has been generated, it can be further examined with using static and dynamic analysis tools and techniques.
Profiling Microsoft Compiled HTML Help Files (CHM)
![]() Although not as prevalent as PDF or Microsoft Office document malware, Microsoft Compiled HTML Help Files (CHM) can be used as a vector of attack, particularly as a vehicle for Trojan Horse malware.
Although not as prevalent as PDF or Microsoft Office document malware, Microsoft Compiled HTML Help Files (CHM) can be used as a vector of attack, particularly as a vehicle for Trojan Horse malware.
![]() CHM files have a proprietary Microsoft file format. The files typically consist of a series of HTML pages and associated hyperlinks, compressed with LZX file compression.
CHM files have a proprietary Microsoft file format. The files typically consist of a series of HTML pages and associated hyperlinks, compressed with LZX file compression.
• Attackers use malicious scripting to automatically invoke a malicious file upon rendering of the help file contents.
• The malicious scripting often invokes a malicious binary, such as a Windows executable or ActiveX control file, that is surreptitiously embedded into the CHM file by the attacker.
• In many instances the malicious scripting will be hexadecimal encoded cipher text, adding an additional layer of analysis.
• In addition to invoking a locally embedded binary, scripting can also query an encoded URL to retrieve additional malicious files.
CHM Profiling Process
![]() The following steps can be taken to examine a suspect CHM document:
The following steps can be taken to examine a suspect CHM document:
Triage: Identify Indicators of Malice.
• Query the suspect CHM file for anomalous strings, such as references to Windows Portable Executable files, ActiveX control files, or other executable file types. Often, these embedded artifacts are discoverable in plaintext strings.
• Unlike other document types, the CHM file structure does not store a vast amount of metadata. However, meaningful metadata providing temporal and situational context about the suspect CHM file can be acquired.
• Metadata can be extracted with exiftool,106 NLNZ Metadata Extractor,107 and other utilities (Figure 5.58).

Figure 5.58 Querying a suspicious CHM file with exiftool
Examine the File Structure and Contents
• Decompile a suspect CHM file to look deeper into its file structure and contents.
• CHM Decoder,108 a GUI-based utility, can be used to decompile a suspect file—resulting in the extraction and separation of file elements into individual files for closer examination. ![]()
• To use CHM Decoder, select a target file, identify the location where the output should be saved, and process the file, as shown in Figure 5.59.

Figure 5.59 Decompiling a suspicious CHM file with CHM Decoder
• Closer inspection of the extracted file content reveals a suspicious executable file, “winhelp.exe,” which was embedded within the CHM file specimen. File identification and profiling can be conducted on this executable file to gain further insight into its nature and purpose. Further, if the file is indeed malicious, deeper dynamic and static analysis should be conducted to determine the scope of its functionality.
• Malicious executables concealed inside of CHM files are typically triggered as a linked or an embedded resource through HTML scripting. Be sure to examine HTML files extracted as a result of decompiling a CHM file.
• In examining the extracted file, AOC2007.html, depicted in Figure 5.60, the triggering mechanism of the winhelp.exe file is discovered:
![]()
Figure 5.60 Executable file triggering mechanism within HTML
Identifying and Decoding Obfuscated Scripts
• It is not uncommon for attackers to conceal the triggering method by obfuscating the HTML scripting responsible for invoking the embedded executable file. Often, in malicious CHM files, the obfuscation method is hexadecimal cipher text encoded in JavaScript unescape or escape functions.
• This obfuscation method is also used to conceal malicious VBScript embedded within HTML, which invokes requests for malicious files hosted on remote URLs.
• In Figure 5.61, the contents of a decompiled suspect CHM file reveal a suspicious ActiveX control file, “xpreload.ocx,” and the triggering mechanism (in clear text) within the page.html file. The decrypted hexadecimal cipher text reveals a call for the download of additional malware from a remote URL.

Figure 5.61 Obfuscated scripting within HTML
Conclusion
• Preliminary static analysis in a Windows environment of a suspect file can yield a wealth of valuable information that will shape the direction of future dynamic and more complete static analysis of the file.
• Through a logical, step-by-step file identification and profiling process, and using a variety of different tools and approaches, a meaningful file profile can be ascertained. There are a wide variety of tools for conducting a file profile, many of which were demonstrated in this chapter.
• Independent of the tools used and the specific suspect file examined, there is a need for a file profiling methodology to ensure that data are acquired in as consistent and repeatable a manner as possible. For forensic purposes, it is also necessary to maintain detailed documentation of the steps taken on a suspect file. Refer to the Field Notes at the end of this chapter for documentation guidance.
• The methodology in this chapter provides a robust foundation for the forensic identification and profiling of a target file. This methodology is not intended as a checklist and may need to be altered for certain situations, but it does increase the chances that much of the relevant data will be obtained to build a file profile. Furthermore, this methodology and the supporting documentation will strengthen malware forensics as a source of evidence, enabling an objective observer to evaluate the reliability and accuracy of the file profiling process and acquired data.
 Pitfalls to Avoid
Submitting sensitive files to online anti-virus scanning services or analysis sandboxes
![]() Do not submit a suspicious file that is the crux of a sensitive investigation (i.e., circumstances in which disclosure of an investigation could cause irreparable harm to a case) to online analysis resources such as anti-virus scanning services or sandboxes in an effort not to alert the attacker.
Do not submit a suspicious file that is the crux of a sensitive investigation (i.e., circumstances in which disclosure of an investigation could cause irreparable harm to a case) to online analysis resources such as anti-virus scanning services or sandboxes in an effort not to alert the attacker.
![]() By submitting a file to a third-party Web site, you are no longer in control of that file or the data associated with that file. Savvy attackers often conduct extensive open source research and search engine queries to determine if their malware has been detected.
By submitting a file to a third-party Web site, you are no longer in control of that file or the data associated with that file. Savvy attackers often conduct extensive open source research and search engine queries to determine if their malware has been detected.
![]() The results relating to a submitted file to an online malware analysis service are publicly available and easily discoverable—many portals even have a search function. Thus, as a result of submitting a suspect file, the attacker may discover that his malware and nefarious actions have been discovered, resulting in the destruction of evidence and potentially damaging your investigation.
The results relating to a submitted file to an online malware analysis service are publicly available and easily discoverable—many portals even have a search function. Thus, as a result of submitting a suspect file, the attacker may discover that his malware and nefarious actions have been discovered, resulting in the destruction of evidence and potentially damaging your investigation.
Conducting an incomplete file profile
![]() An investigative course of action should not be based upon an incomplete file profile.
An investigative course of action should not be based upon an incomplete file profile.
![]() Fully examine a suspect file in an effort to render an informed and intelligent decision about what the file is, how it should be categorized or analyzed, and in turn, how to proceed with the larger investigation.
Fully examine a suspect file in an effort to render an informed and intelligent decision about what the file is, how it should be categorized or analyzed, and in turn, how to proceed with the larger investigation.
![]() Take detailed notes during the process, not only about the suspicious file but also about each investigative step taken. Consult the Field Notes located in the Appendices in this chapter for additional guidance and a structured note taking format.
Take detailed notes during the process, not only about the suspicious file but also about each investigative step taken. Consult the Field Notes located in the Appendices in this chapter for additional guidance and a structured note taking format.
Relying upon file icons and extensions without further context or deeper examination
![]() Neither the file icon nor file extension associated with a suspect file should be presumed to be accurate.
Neither the file icon nor file extension associated with a suspect file should be presumed to be accurate.
![]() In conducting digital investigations, never presume that a file extension is an accurate representation. File camouflaging, or a technique that obfuscates the true nature of a file by changing and hiding file extensions in locations with similar real file types, is a trick commonly used by hackers and bot herders to avoid detection of malicious code distribution.
In conducting digital investigations, never presume that a file extension is an accurate representation. File camouflaging, or a technique that obfuscates the true nature of a file by changing and hiding file extensions in locations with similar real file types, is a trick commonly used by hackers and bot herders to avoid detection of malicious code distribution.
![]() Similarly, the file icon associated with a file can easily be modified by an attacker to appear like a contextually appropriate or innocuous file. The file icon associated with a Windows Portable Executable file can be inserted or modified in the file Resources section.
Similarly, the file icon associated with a file can easily be modified by an attacker to appear like a contextually appropriate or innocuous file. The file icon associated with a Windows Portable Executable file can be inserted or modified in the file Resources section.
Solely relying upon anti-virus signatures or third-party analysis of a “similar” file specimen
![]() Although anti-virus signatures can provide insight into the nature of identified malicious code, they should not be solely relied upon to reveal the purpose and functionality of a suspect program. Conversely, the fact that a suspect file is not identified by anti-virus programs does not mean that it is innocuous.
Although anti-virus signatures can provide insight into the nature of identified malicious code, they should not be solely relied upon to reveal the purpose and functionality of a suspect program. Conversely, the fact that a suspect file is not identified by anti-virus programs does not mean that it is innocuous.
![]() Third-party analysis of a “similar” file specimen can be helpful guidance; it should not be considered dispositive in all circumstances.
Third-party analysis of a “similar” file specimen can be helpful guidance; it should not be considered dispositive in all circumstances.
![]() Anti-virus signatures are typically generated based upon specific data contents or patterns identified in malicious code. Signatures differ from heuristics—identifiable malicious behavior or attributes that are non-specific to a particular specimen (commonly used to detect zero-day threats that have yet to be formally identified with a signature).
Anti-virus signatures are typically generated based upon specific data contents or patterns identified in malicious code. Signatures differ from heuristics—identifiable malicious behavior or attributes that are non-specific to a particular specimen (commonly used to detect zero-day threats that have yet to be formally identified with a signature).
![]() Anti-virus signatures for a particular identified threat vary between anti-virus vendors,109 but many times, certain nomenclature, such as a malware classification descriptor, is common across the signatures (e.g., the words “Trojan,” “Dropper,” and “Backdoor” may be used in many of the vendor signatures). These classification descriptors may be a good starting point or corroborate your findings, but should not be considered dispositive; rather, they should be taken into consideration toward the totality of the file profile.
Anti-virus signatures for a particular identified threat vary between anti-virus vendors,109 but many times, certain nomenclature, such as a malware classification descriptor, is common across the signatures (e.g., the words “Trojan,” “Dropper,” and “Backdoor” may be used in many of the vendor signatures). These classification descriptors may be a good starting point or corroborate your findings, but should not be considered dispositive; rather, they should be taken into consideration toward the totality of the file profile.
![]() Conversely, if there are no anti-virus signatures associated with a suspect file, it may mean simply that a signature for the file has not been generated by the vendor of the anti-virus product, or that the attacker has successfully (albeit likely temporarily) obfuscated the malware to thwart detection.
Conversely, if there are no anti-virus signatures associated with a suspect file, it may mean simply that a signature for the file has not been generated by the vendor of the anti-virus product, or that the attacker has successfully (albeit likely temporarily) obfuscated the malware to thwart detection.
![]() Third-party analysis of a similar malware specimen by a reliable source can be an incredibly valuable resource, and may even provide predictors of what will be discovered in your particular specimen. Although this correlative information should be considered in the totality of your investigation, it should not replace thorough independent analysis.
Third-party analysis of a similar malware specimen by a reliable source can be an incredibly valuable resource, and may even provide predictors of what will be discovered in your particular specimen. Although this correlative information should be considered in the totality of your investigation, it should not replace thorough independent analysis.
Examining a suspect file in a forensically unsound laboratory environment
![]() Suspect files should never be examined in a production environment or on a system that has not been forensically baselined to ensure that it is free of misleading artifacts.
Suspect files should never be examined in a production environment or on a system that has not been forensically baselined to ensure that it is free of misleading artifacts.
![]() Forensic analysis of potentially damaging code requires a safe and secure lab environment. After extracting a suspicious file from a victim system, place the file on an isolated or “sandboxed” system or network, to ensure that the code is contained and unable to connect to or otherwise affect any production system.
Forensic analysis of potentially damaging code requires a safe and secure lab environment. After extracting a suspicious file from a victim system, place the file on an isolated or “sandboxed” system or network, to ensure that the code is contained and unable to connect to or otherwise affect any production system.
![]() Even though only a cursory static analysis of the code is contemplated at this point of the investigation, executable files nonetheless can be accidentally executed fairly easily, potentially resulting in the contamination of or damage to production systems.
Even though only a cursory static analysis of the code is contemplated at this point of the investigation, executable files nonetheless can be accidentally executed fairly easily, potentially resulting in the contamination of or damage to production systems.
![]() It is strongly encouraged to examine malicious code specimens in a predesigned and designated malicious code laboratory, which can even be a field deployable laptop computer. The lab system should be revertible, that is, using a virtualization or host-based software solution that allows the digital investigator to restore the state of the system to a designated baseline configuration.
It is strongly encouraged to examine malicious code specimens in a predesigned and designated malicious code laboratory, which can even be a field deployable laptop computer. The lab system should be revertible, that is, using a virtualization or host-based software solution that allows the digital investigator to restore the state of the system to a designated baseline configuration.
![]() The baseline configuration in which specimens are examined should be thoroughly documented and free from artifacts associated with other specimens, resulting in forensic unsoundness, false positives, and mistaken analytical conclusions.
The baseline configuration in which specimens are examined should be thoroughly documented and free from artifacts associated with other specimens, resulting in forensic unsoundness, false positives, and mistaken analytical conclusions.
Basing conclusions upon a file profile without additional context or correlation
![]() Do not make investigative conclusions without considering the totality of the evidence.
Do not make investigative conclusions without considering the totality of the evidence.
Navigating to malicious URLS and IP addresses
![]() Exercise caution and discretion in visiting URLs and IP addresses embedded in, or associated with, a target malware specimen.
Exercise caution and discretion in visiting URLs and IP addresses embedded in, or associated with, a target malware specimen.
![]() These resources might be an early warning and indicator capability employed by the attacker to notify him/her that the malware is being examined.
These resources might be an early warning and indicator capability employed by the attacker to notify him/her that the malware is being examined.
![]() Logs from the servers hosting these resources are of great investigative value (i.e., other compromised sites, visits from the attacker[s], etc.) to law enforcement, Computer Emergency Response Teams (CERTs), and other professionals seeking to remediate the malicious activity and identify the attacker(s). Visits by those independently researching the malware will leave network impression evidence in the logs.
Logs from the servers hosting these resources are of great investigative value (i.e., other compromised sites, visits from the attacker[s], etc.) to law enforcement, Computer Emergency Response Teams (CERTs), and other professionals seeking to remediate the malicious activity and identify the attacker(s). Visits by those independently researching the malware will leave network impression evidence in the logs.
Selected Readings
Papers
1. Blonce A, Filiol E. Portable Document File (PDF) Security Analysis and Malware Threats 2008;In: http://www.blackhat.com/presentations/bh-europe-08/Filiol/Presentation/bh-eu-08-filiol.pdf ; 2008.
2. Boldewin F. Analyzing MS Office Malware with OfficeMalScanner 2009;In: http://www.reconstructer.org/papers/Analyzing%20MSOffice%20malware%20with%20OfficeMalScanner.zip ; 2009.
3. Boldewin F. New Advances in MS Office Malware Analysis 2008;In: http://www.reconstructer.org/papers/New%20advances%20in%20Ms%20Office%20malware%20analysis.pdf ; 2008.
4. Dan B. Methods for Understanding and Analyzing Targeted Attacks with Office Documents 2008;In: http://www.blackhat.com/presentations/bh-jp-08/bh-jp-08-Dang/BlackHat-Japan-08-Dang-Office-Attacks.pdf ; 2008.
5. Raynal F, Delugré G, Aumaitre D. Malicious PDF Origamis Strike Back 2010;In: www.security-labs.org/fred/docs/hack.lu09-origamis-strike-back.pdf ; 2010.
6. Raynal F, Delugré G. Malicious Origami in PDF 00E9;, 2008;In: www.security-labs.org/fred/docs/pacsec08/pacsec08-fr-gd-full.pdf ; 00E9;, 2008.
7. Stevens D. Malicious PDF Documents Explained. IEEE Security & Privacy Magazine. 2011;Vol. 9.
8. Stevens, D. (2010). Malicious PDF Analysis E-book. In the Proceedings of BruCON, 2010, http://didierstevens.com/files/data/malicious-pdf-analysis-ebook.zip.
9. Stevens D. Malicious PDF Documents. ISSA Journal 2010;In: https://www.issa.org/Library/Journals/2010/July/Stevens-Malicious%20PDF%20Documents.pdf ; 2010.
10. Stevens D. Stepping Through a Malicious PDF Document. HITB Magazine 2010;In: http://magazine.hitb.org/issues/HITB-Ezine-Issue-004.pdf ; 2010.
11. Stevens D. Anatomy of Malicious PDF Documents. HAKIN9 IT Security Magazine 2009.
12. Tzermias Z, et al. Combining Static and Dynamic Analysis for the Detection of Malicious Documents 2011.
Online Resources
1. Holz T. Analyzing Malicious PDF Files 2009;In: http://honeyblog.org/archives/12-Analyzing-Malicious-PDF-Files.html ; 2009.
2. Selvaraj K, Gutierres NF. The Rise of PDF Malware 2010;In: http://www.symantec.com/connect/blogs/rise-pdf-malware ; 2010;In: http://www.symantec.com/content/en/us/enterprise/media/security_response/whitepapers/the_rise_of_pdf_malware.pdf ; 2010.
3. Zdrnja B. Sophisticated, Targeted Malicious PDF Documents Exploiting CVE-2009-4324 2010;In: http://isc.sans.edu/diary.html?storyid=7867 ; 2010.
4. Zeltser L. Analyzing Malicious Documents Cheat Sheet 2010;In: http://zeltser.com/reverse-malware/analyzing-malicious-documents.html ; 2010;In: http://zeltser.com/reverse-malware/analyzing-malicious-document-files.pdf ; 2010.
Technical Specifications
Microsoft Office File Formats:
http://msdn.microsoft.com/en-us/library/cc313118.aspx
Microsoft Office File Format Documents:
http://msdn.microsoft.com/en-us/library/cc313105.aspx
Microsoft Office Binary (doc, xls, ppt) File Formats:
http://www.microsoft.com/interop/docs/officebinaryformats.mspx
Microsoft Compound Binary File Format:
http://msdn.microsoft.com/en-us/library/dd942138%28PROT.13%29.aspx
http://download.microsoft.com/download/a/e/6/ae6e4142-aa58-45c6-8dcf-a657e5900cd3/%5BMS-CFB%5D.pdf
Microsoft Word (.doc) Binary File Format:
http://msdn.microsoft.com/en-us/library/cc313153.aspx
http://download.microsoft.com/download/2/4/8/24862317-78F0-4C4B-B355-C7B2C1D997DB/%5BMS-DOC%5D.pdf
http://download.microsoft.com/download/5/0/1/501ED102-E53F-4CE0-AA6B-B0F93629DDC6/Word97-2007BinaryFileFormat(doc)Specification.pdf
Microsoft PowerPoint (.ppt) Binary File Format:
http://msdn.microsoft.com/en-us/library/cc313106.aspx
http://download.microsoft.com/download/2/4/8/24862317-78F0-4C4B-B355-C7B2C1D997DB/%5BMS-PPT%5D.pdf
http://download.microsoft.com/download/5/0/1/501ED102-E53F-4CE0-AA6B-B0F93629DDC6/PowerPoint97-2007BinaryFileFormat(ppt)Specification.pdf
Microsoft Excel (.xls) Binary File Format:
http://msdn.microsoft.com/en-us/library/cc313154.aspx
http://download.microsoft.com/download/2/4/8/24862317-78F0-4C4B-B355-C7B2C1D997DB/%5BMS-XLS%5D.pdf
http://download.microsoft.com/download/5/0/1/501ED102-E53F-4CE0-AA6B-B0F93629DDC6/Excel97-2007BinaryFileFormat(xls)Specification.pdf
Portable Document Format (PDF):
http://wwwimages.adobe.com/www.adobe.com/content/dam/Adobe/en/devnet/pdf/pdfs/PDF32000_2008.pdf

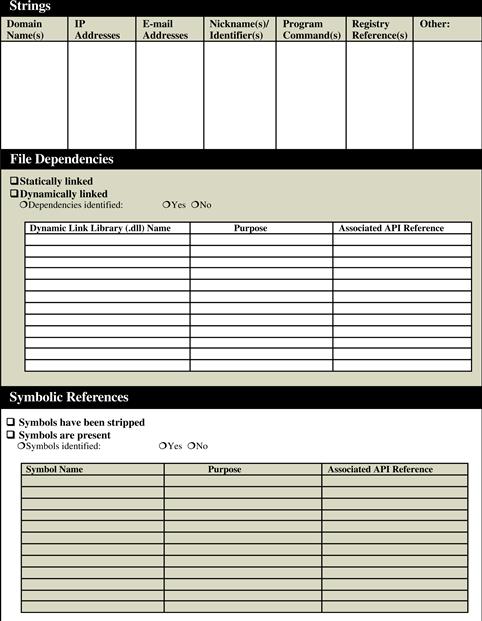


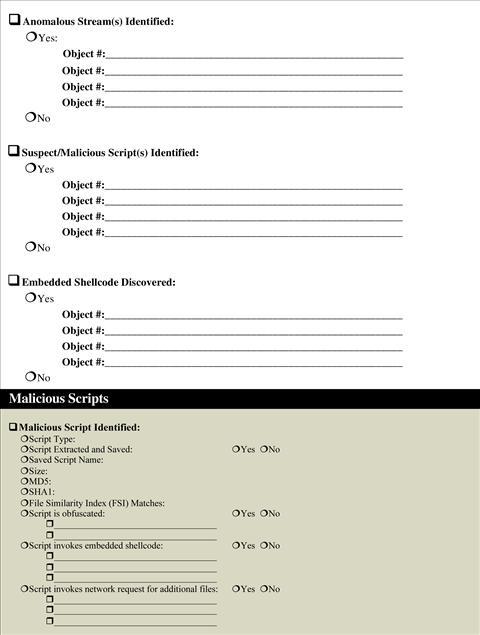


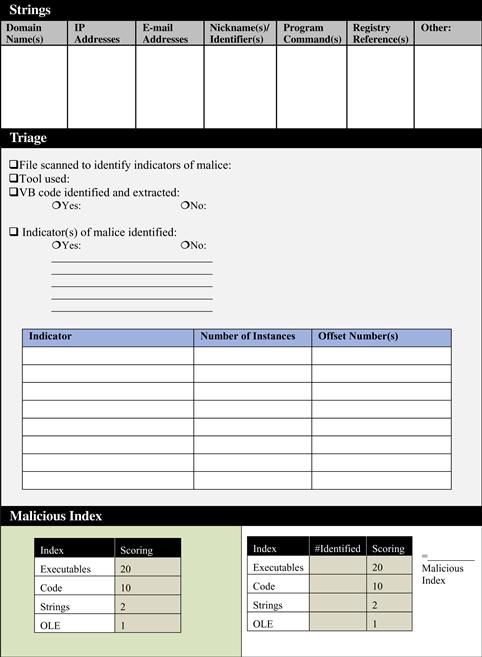


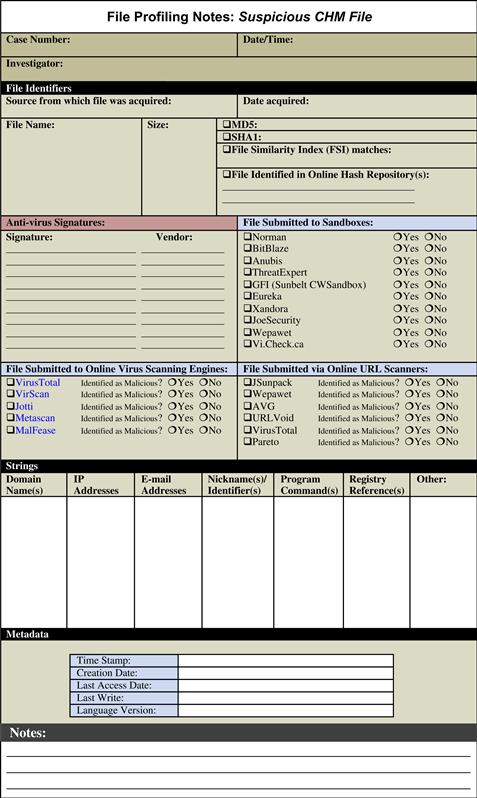


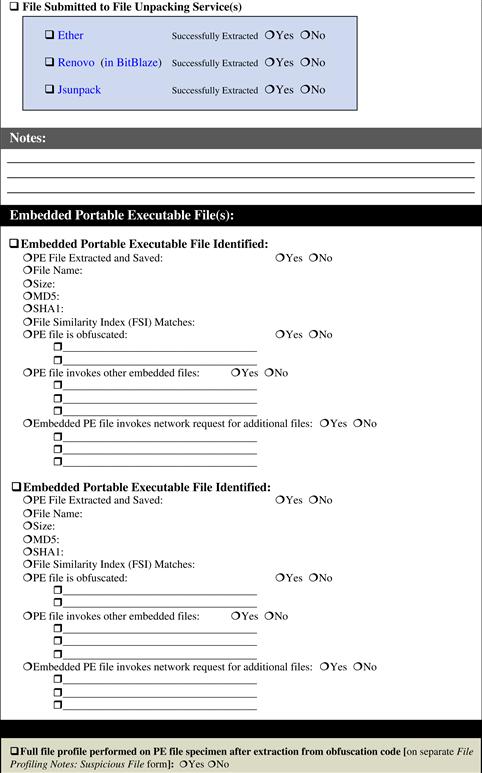


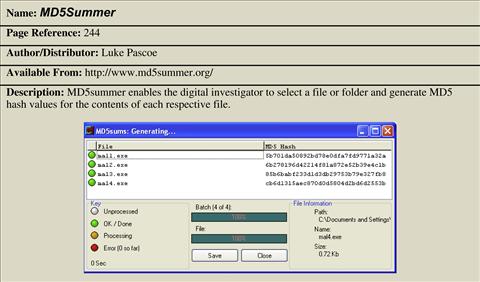


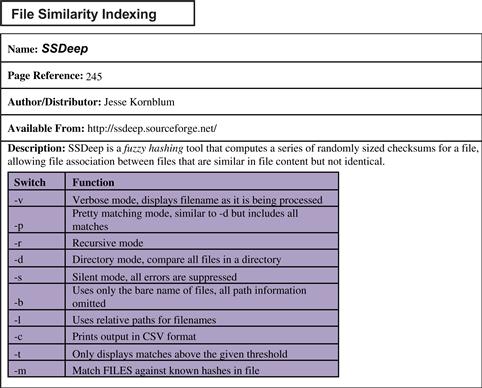


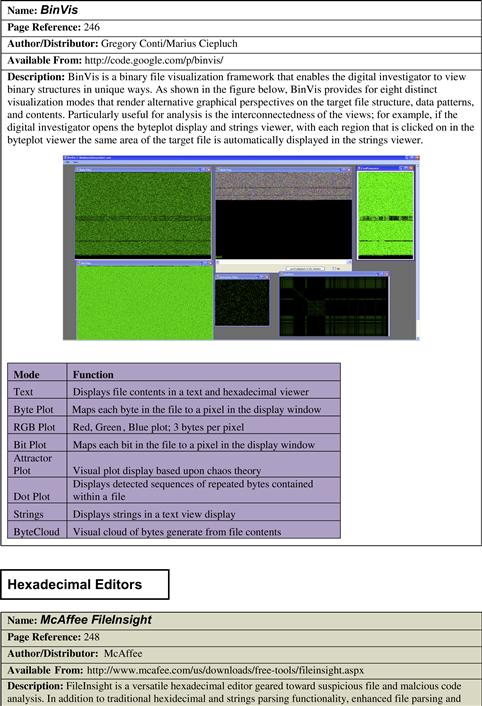
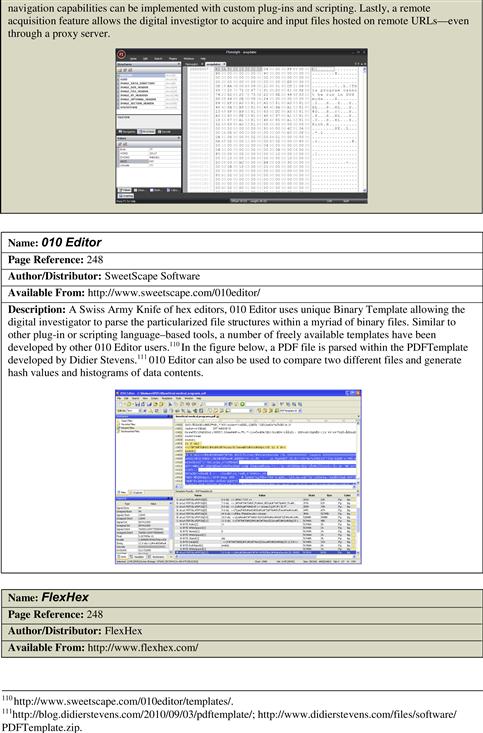
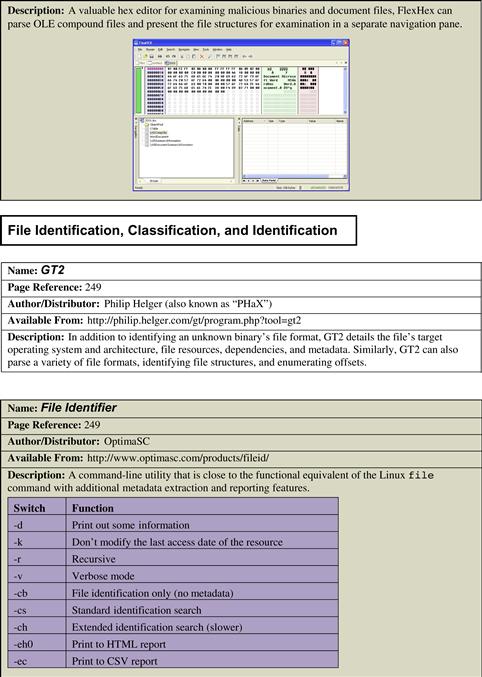


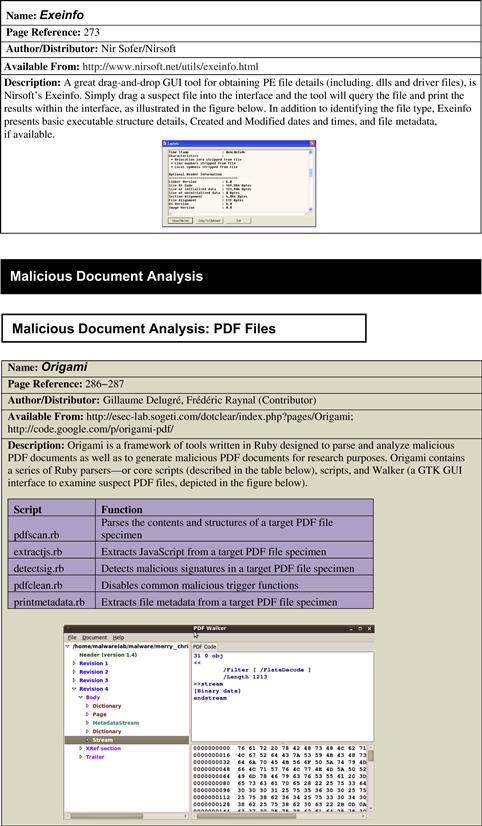


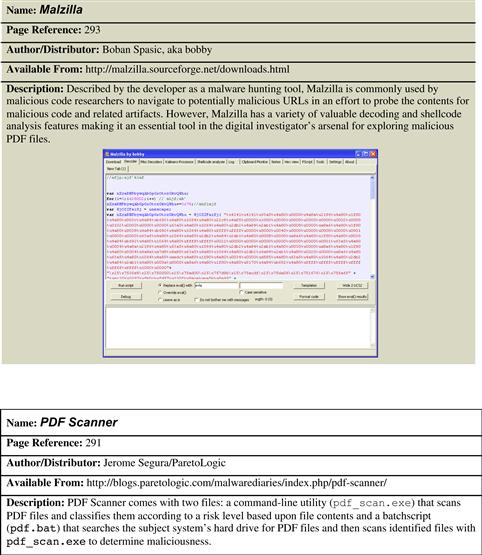

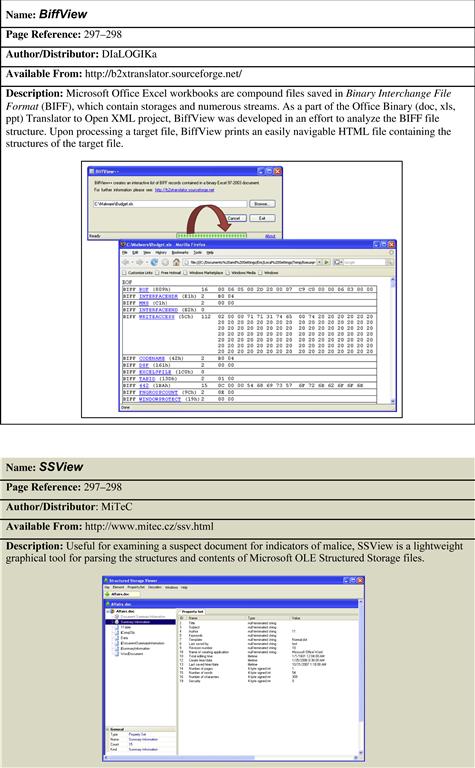

1 For more information about Miss Identify, go to http://missidentify.sourceforge.net/.
2 For more information about MWSnap, go to http://www.mirekw.com/winfreeware/mwsnap.html.
3 For more information on the MD5 algorithm, go to http://www.faqs.org/rfcs/rfc1321.html.
4 For more information on the SHA1 algorithm, go to http://www.faqs.org/rfcs/rfc3174.html.
5 For more information about md5deep, go to http://md5deep.sourceforge.net.
6 For more information about HashMyFiles, go to http://www.nirsoft.net/utils/hash_my_files.html.
7 For more information about ssdeep, go to http://ssdeep.sourceforge.net.
8 For more information about bytehist, go to http://www.cert.at/downloads/software/bytehist_en.html.
9 For more information about BinVis, go to http://code.google.com/p/binvis/.
10 For more information about MiniDumper, go to http://mark0.net/soft-minidumper-e.html.
11 For more information about the File Identifier tool, go to http://www.optimasc.com/products/fileid/index.html.
12 For more information about the Optima SC magic file, go to http://www.optimasc.com/products/fileid/magic-format.pdf and www.magicdb.org.
13 For more information about TrID, go to http://mark0.net/soft-trid-e.html.
14 For a list of the file signatures and definitions, go to http://mark0.net/soft-trid-deflist.html.
15 For more information about TrIdScan, go to http://mark0.net/soft-tridscan-e.html.
16 For more information about TrIDNet, go to http://mark0.net/soft-tridnet-e.html.
17 For more information about Avast, go to http://www.avast.com/free-antivirus-download.
18 For more information about AGV, go to http://free.avg.com/us-en/company-profile.
19 For more information Avira AntiVir Personal, go to http://www.free-av.com/.
20 For more information about ClamWin, go to http://www.clamwin.com.
21 For more information about F-Prot, go to http://www.f-prot.com/products/home_use/linux/.
22 For more information about BitDefender, go to http://www.bitdefender.com/PRODUCT-14-en--BitDefender-Free-Edition.html.
23 For more information about Panda, go to http://research.pandasecurity.com/free-commandline-scanner/.
24 http://msdn.microsoft.com/microsoft.com/en-us/library/aa383749.aspx.
25 http://search.microsoft.com/AdvancedSearch.aspx?mkt=en-US&qsc0=0&FORM=BAFF.
26 One example of a greetz can be found inside the Zotob worm code, in the phrase “Greetz to good friend Coder” (http://www.f-secure.com/weblog/archives/archive-082005.html).
27 For more information about strings.exe, go to http://technet.microsoft.com/en-us/sysinternals/bb897439.
28 For more information about BinText, go to http://www.mcafee.com/us/downloads/free-tools/bintext.aspx.
29 For more information about DUMPBIN, go to http://support.microsoft.com/kb/177429.
30 For more information about Visual Studio, go to http://www.microsoft.com/express/Downloads/#http://www.microsoft.com/express/Downloads/# (Visual Studio Express version) and http://www.microsoft.com/visualstudio/en-us/products/2010-editions/professional/overview (Visual Studio Professional).
31 For more information about dumpbinGUI, go to http://www.cheztabor.com/dumpbinGUI/index.htm.
32 For more information about Dependency Walker, go to http://www.dependencywalker.com/.
33 For more information about exiftool, go to http://www.sno.phy.queensu.ca/~phil/exiftool/.
34 For more information about GT2, go to http://philip.helger.com/gt/index.php.
35 For more information about PEiD, go to http://www.peid.info.
36 For more information about Language 2000, go to http://farrokhi.net/language/language.zip.
37 For more information about pestat, go to http://www.rnicrosoft.net/.
38 For more information about EXE Explorer, go to http://www.mitec.cz/exe.html.
39 For a list of Language Identifier Codes, go to http://msdn.microsoft.com/en-us/library/aa912040.aspx.
40 For a list of Character Codes, go to http://msdn.microsoft.com/en-us/library/cc195051.aspx.
41 For more information about PE Explorer, go to http://www.heaventools.com/overview.htm.
42 For a good discussion on file packing programs and obfuscation code analysis, see Lenny Zeltser’s SANS Forensics 610, Reverse-Engineering Malware: Malware Analysis Tools and Techniques, 2010.
43 For more information about PEiD, go to http://peid.info/.
44 For more information on PEiD plug-ins, go to http://www.peid.info/plugins/.
45 Lyda, R., and Hamrock, J. (2007). Using entropy analysis to find encrypted and packed malware, IEEE Security and Privacy (S&P).
46 For more information about Mandiant Red Curtain, go to http://www.mandiant.com/products/free_software/red_curtain/.
47 For more information about PE Detective, go to http://www.ntcore.com/pedetective.php.
48 For more information about RDG, go to http://www.rdgsoft.8k.com/.
49 For more information about pefile, go to http://code.google.com/p/pefile/.
50 To obtain a copy of packerid.py, go to http://handlers.dshield.org/jclausing/packerid.py.
51 http://www.peid.info/BobSoft/Downloads.html.
52 http://research.pandasecurity.com/blogs/images/userdb.txt.
53 For more information about Anubis, go to http://anubis.iseclab.org/.
54 For more information about Yet Another Binder, go to http://gsa.ca.com/pest/pest.aspx?ID=453073945.
55 http://msdn.microsoft.com/en-us/windows/hardware/gg463119.aspx.
56 Some of the foundational whitepapers on the subject are authored by Matt Pietrek, including: Peering Inside the PE: A Tour of the Win32 Portable Executable File Format (http://msdn.microsoft.com/en-us/library/ms809762.aspx) and An In-Depth Look into the Win32 Portable Executable File Format (http://technet.microsoft.com/en-us/library/bb985992.aspx).
57 http://www.openrce.org/reference_library/files/reference/PE%20Format.pdf.
58 http://www.wheaty.net/pedump.zip.
59 For more information about PEView, go to http://www.magma.ca/~wjr/.
60 For more information about Anywhere PE Viewer, go to http://www.ucware.com/apev/index.htm.
61 For more information about CFF Explorer, go to http://www.ntcore.com/exsuite.php.
62 For more information about the IMAGE_NT_HEADERS structure, go to http://msdn.microsoft.com/en-us/library/ms680336%28v=vs.85%29.aspx.
63 For more information about the IMAGE_FILE_HEADER structure, go http://msdn.microsoft.com/en-us/library/ms680313%28v=vs.85%29.aspx.
64 Microsoft Portable Executable and Common Object File Format Specification, Section 2.3, Revision 8.2—September 21, 2010.
65 For more information about the IMAGE_OPTIONAL_HEADER structure, go to http://msdn.microsoft.com/en-us/library/ms680339%28v=vs.85%29.aspx.
66 Microsoft Portable Executable and Common Object File Format Specification, Section 2.4, Revision 8.2—September 21, 2010.
67 For detailed information about the Portable Document Format, see the Adobe Portable Document File Specification (International Standard ISO 32000-1:2008), http://www.adobe.com/devnet/pdf/pdf_reference.html.
68 Portable Document Format Specification (International Standard ISO 32000-1:2008), Section 7.3.8.1.
69 Portable Document Format Specification (International Standard ISO 32000-1:2008), Section 7.5.4, Note 1.
70 Portable Document Format Specification (International Standard ISO 32000-1:2008), Section 7.5.5.
71 Further detail can be found in the PDF specification documentation: Portable Document Format Specification (International Standard ISO 32000-1:2008); International Organization for Standardization (ISO) 2008; Adobe Extensions to ISO 32000-1:2008, Level 5; Adobe Supplement to the ISO 32000-1:2008, Exension Level 3.
72 For more information about Origami, go to http://code.google.com/p/origami-pdf/.
73 For more information about jsunpack-n, go to https://code.google.com/p/jsunpack-n/.
74 For more information about Origami, go to https://code.google.com/p/origami-pdf/.
75 For more information about SpiderMonkey, go to http://www.mozilla.org/js/spidermonkey/.
76 For more information about Didier Stevens’ version of SpiderMonkey, go to http://blog.didierstevens.com/programs/spidermonkey/.
77 For an example of this paradigm, see “PDF file loader to extract and analyze shellcode,” http://www.hexblog.com/?p=110.
78 Heap spraying works by allocating multiple objects containing the attacker’s exploit code in the program’s heap—or the area of memory dynamically allocated for the program during runtime. Ratanaworabhan, P., Livshits, B., and Zorn, B. (2008), NOZZLE: A Defense Against Heap-spraying Code Injection Attacks, SSYM’09 Proceedings of the 18th conference on USENIX security symposium.
79 For an example of this infection paradigm, see “Explore the CVE-2010-3654 matryoshka,” http://www.computersecurityarticles.info/antivirus/explore-the-cve-2010-3654-matryoshka/.
80 For more information about shellcode2exe, including its implementation in other tools, see http://winappdbg.sourceforge.net/blog/shellcode2exe.py; http://breakingcode.wordpress.com/2010/01/18/quickpost-converting-shellcode-to-executable-files-using-inlineegg/; (as implemented in PDF Stream Dumper, http://sandsprite.com/blogs/index.php?uid=7&pid=57); and (as implemented in the Malcode Analysts Pack, http://labs.idefense.com/software/malcode.php#more_malcode+analysis+pack).
81 http://zeltser.com/reverse-malware/ConvertShellcode.zip.
82 http://sandsprite.com/shellcode_2_exe.php.
83 For more information about PDF Dissector, go to http://www.zynamics.com/dissector.html.
84 For more information about PDF Stream Dumper, go to http://sandsprite.com/blogs/index.php?uid=7&pid=57.
85 For more information about PDFubar, go to http://code.google.com/p/pdfubar/.
86 For more information about Malzilla, go to http://malzilla.sourceforge.net/.
87 http://msdn.microsoft.com/en-us/library/cc313105%28v=office.12%29.aspx.
88 http://www.microsoft.com/interop/docs/officebinaryformats.mspx; http://download.microsoft.com/download/2/4/8/24862317-78F0-4C4B-B355-C7B2C1D997DB/OfficeFileFormatsProtocols.zip.
89 http://download.microsoft.com/download/0/B/E/0BE8BDD7-E5E8-422A-ABFD-4342ED7AD886/WindowsCompoundBinaryFileFormatSpecification.pdf.
90 The Microsoft Word Binary File Format specifications can be found at http://download.microsoft.com/download/2/4/8/24862317-78F0-4C4B-B355-C7B2C1D997DB/%5BMS-DOC%5D.pdf and at http://download.microsoft.com/download/5/0/1/501ED102-E53F-4CE0-AA6B-B0F93629DDC6/Word97-2007BinaryFileFormat(doc)Specification.pdf.
91 http://msdn.microsoft.com/en-us/library/dd926131%28office.12%29.aspx.
92 http://msdn.microsoft.com/en-us/library/dd949344%28v=office.12%29.aspx.
93 http://download.microsoft.com/download/2/4/8/24862317-78F0-4C4B-B355-C7B2C1D997DB/%5BMS-OSHARED%5D.pdf.
94 The Microsoft PowerPoint Binary File Format specifications can be found at http://msdn.microsoft.com/en-us/library/cc313106%28v=office.12%29.aspx; http://download.microsoft.com/download/2/4/8/24862317-78F0-4C4B-B355-C7B2C1D997DB/%5BMS-PPT%5D.pdf; and http://download.microsoft.com/download/5/0/1/501ED102-E53F-4CE0-AA6B-B0F93629DDC6/PowerPoint97-2007BinaryFileFormat(ppt)Specification.pdf.
95 The Microsoft Excel Binary File Format specification can be found at http://msdn.microsoft.com/en-us/library/cc313133%28v=office.12%29.aspx; http://download.microsoft.com/download/2/4/8/24862317-78F0-4C4B-B355-C7B2C1D997DB/%5BMS-XLSB%5D.pdf.
96 The Office Open XML file format specification documents can be found at http://msdn.microsoft.com/en-us/library/aa338205%28office.12%29.aspx.
97 For more information about WinRaR, go to http://www.rarlab.com/.
98 For more information about Unzip, go to http://www.info-zip.org/.
99 For more information about 7-Zip, go to http://www.7-zip.org/.
100 For more information about officecat, go to http://www.snort.org/vrt/vrt-resources/officecat.
101 For more information about OffVis, go to http://blogs.technet.com/b/srd/archive/2009/09/14/offvis-updated-office-file-format-training-video-created.aspx; http://go.microsoft.com/fwlink/?LinkId=158791.
102 For more information about exiftool, go to http://www.sno.phy.queensu.ca/~phil/exiftool/.
103 For more information about OfficeMalScanner, go to http://www.reconstructer.org/code.html.
104 Boldewin, F. (2009). Analyzing MS Office Malware with OfficeMalScanner, http://www.reconstructer.org/papers/Analyzing%20MSOffice%20malware%20with%20OfficeMalScanner.zip and Boldewin, F. (2009). New Advances in MS Office Malware Analysis, http://www.reconstructer.org/papers/New%20advances%20in%20Ms%20Office%20malware%20analysis.pdf.
105 Boldewin, F., 2009, Analyzing MS Office Malware with OfficeMalScanner, p. 8.
106 For more information about exiftool, go to http://www.sno.phy.queensu.ca/~phil/exiftool/.
107 For more information about the National Library of New Zealand (NLNZ) Metadata Extractor, go to http://meta-extractor.sourceforge.net/.
108 For more information about CHM Decoder, go to http://www.gridinsoft.com/chm.php.
109 The wide variety of anti-virus signature names for certain threats caused the Mitre Corporation to create the Common Malware Enumeration project “[t]o provide single, common identifiers to new virus threats and to the most prevalent virus threats in the wild to reduce public confusion during malware incidents.” See http://cme.mitre.org/index.html.