
Chapter 6. Securing data
This chapter is recommended for
| Business analysts | |
| Data architects | |
| Enterprise architects | |
| Application developers |
A key consideration in any organization is limiting access to sensitive data, and Adventure Works is no exception. They want to be able to restrict sensitive sales information to only the sales managers who need it. They also want to make sure that only HR has access to human resource information about employees.
There are a number of ways to limit data access, such as by user ID, roles, or a user’s attributes. Mondrian uses an approach called role-based access control (RBAC). In an RBAC data approach, users are assigned roles, and data is restricted by the role assigned to the user. Using RBAC means you don’t need to manage permissions for each individual user.
This chapter will show you how to restrict access to specific data items, dimensions, and even the entire schema.
6.1. Use of roles
The first things to understand are what a role is and how it can be used by Mondrian to restrict access to data. After reading this section, you’ll understand what roles are, how they’re generally applied to restrict data, and how they’re provided via external settings. You’ll also see how to set the default role in the schema. Finally, we’ll touch on the concept of joint roles, which let you combine multiple roles together to create entirely new roles.
6.1.1. What’s a role?
A role can be thought of as a collection of the rights and responsibilities of a person. For example, one role might be that of sales manager. This person would be interested in the sales of the people under him or her, the level of sales for particular products or services, and who the top customers are. To perform this role, the sales manager would need access to information about products, sales, customers, and so on.
A separate role might be that of inventory manager. This person would be more interested in the sale of items by time period, popular items by region, and similar inventory-related items. The inventory manager doesn’t need to know profit margins, top customers, or top salespeople.
By assigning individuals to roles, it’s possible to then restrict access to data. Table 6.1 shows a simplified view of which roles should have access to which data. In this case, the fact table contains sales data, and there are four general roles that have access to different parts of the cube.
- The product manager role is given access to the numbers of items being sold, including the locations and dates of the sales. The product manager can use this information to determine popular products and make decisions about what new products to sell or products to discontinue. The product manager isn’t given details of the sales, such as customer information and salesperson information.
- The inventory manager cares about the movement of inventory in order to anticipate stock levels in the various warehouses. The inventory manager doesn’t require sales details.
- The US sales manager will see almost all information about sales but doesn’t know the details of specific item sales. This manager is interested in how sales are going, who the big customers are, and who the top salespeople are.
- State sales manager is a variation of the US sales manager. Adventure Works restricts sales information for state sales managers so they can only see the data from their state.
Table 6.1. Data access by role
|
Product manager |
Inventory manager |
US sales manager |
State sales manager (individual state data only) |
|
|---|---|---|---|---|
| Warehouse | ||||
| Customer | ||||
| State | ||||
| Item | ||||
| Sale price | ||||
| Qty purchased | ||||
| Sales person |
Too many roles?
In the preceding example, you’ll notice that Adventure Works had to create 50 different roles for the various state managers. In a global company, there might be thousands if various regions are described. Even more challenging is if each store has a manager who needs their own data restrictions. In chapter 8, we’ll show you how to use information from the user session to restrict data access, eliminating the need for so many roles.
You also need to understand the concept of a joint role. A joint role is the union of two or more roles into a single role. A user with this role will have rights to see anything that any of the combined roles can see. For example, if the product manager and sales manager are combined, someone with the product and sales manager role would see both inventory and sales information. This can be useful for managers who oversee multiple departments and need access to all data without having to create a completely new role. Note that this means that if something is restricted in one role but allowed in the other, the person with the joint role can see that data.
There are two ways to combine roles. The first is by explicitly declaring a joint role with the Union element, as shown in section 6.1.2. The Union element lists the names of the previously defined roles and then assigns the combined role security into a single role with a new name. This role has the combined privileges of all of the combined roles.
The second way of combining roles is to define them implicitly at connection time by having the user be in two or more existing roles. Because a joint role can see data from both roles, it’s important when designing and assigning roles to make sure users in multiple roles will only see the data that they really should. If you’re using a lot of roles and complex filters, this can get confusing and hard to manage. In this case, it might be better to create explicit combined roles and have each user assigned to the joint roles.
6.1.2. Declaring roles in the Mondrian schema
Roles must be defined in the Mondrian schema to which they’ll be applied. Listing 6.1 shows the high-level role declarations. The basic declaration of a role is simple; just use the Role element and assign a value to the name attribute. Later sections will describe the various security grants that can be given. The last role declaration combines the product and sales manager role using the Union element.
Listing 6.1. Declaring roles

6.1.3. Enforcement of roles
Mondrian allows you to define role-based restrictions for security. For example, if a user is assigned to the role of sales manager, that person can only see data that a sales manager is allowed to see. If sales managers aren’t allowed to see information about customers, anyone assigned to this role couldn’t see customer information unless they’re assigned to a second role that gives access to customer information.
Mondrian schemas define roles, and Mondrian enforces roles, but it’s up to the container to provide the role of the user when performing queries. The container does this when it makes a connection to Mondrian. It’s important to remember that Mondrian doesn’t perform any authentication for incoming requests. Mondrian assumes that the security is handled by the container and that the roles provided are correct. This makes sense, because it means Mondrian can be used in a wide variety of containers and security scenarios without change. But it also means that if the container doesn’t properly apply security restrictions, Mondrian will return data that you might want restricted.
How roles are set depends on the container. If you’re writing your own application, setting roles must be part of the code. If you’re using the Saiku server, you can set the user roles in the users.properties file. Finally, if you’re using Mondrian with Pentaho, you have to tell Pentaho to send role information to Mondrian via XML configuration. Because Pentaho is the most common container for Mondrian, we’ll explore how to configure security for Pentaho.
Pentaho security is configured by specifying a role mapper, which will then map from Pentaho user roles to Mondrian roles. The configuration is done in the Pentaho Objects.spring.xml file located in the pentaho-solutions/system directory. In chapter 8, you’ll see how to programmatically assign custom roles, but for now we’ll use the standard role mappings provided.
No Role Mapper Means no Security
A common mistake with new users to Mondrian security is to forget to assign the role mapper. The default, if no roles are set, is to have no security applied. That means that all users will see all data in the schema.
Keep in mind that we’re talking about two different roles. The first is the role as understood by the container. Sometimes these are called groups, but Pentaho uses the term role. The second is the role as defined in the Mondrian schema. Our goal is to map between the Pentaho role and the Mondrian role.
There are three predefined role mappers in Pentaho, and each takes a slightly different approach. By default, no role mappers are defined, which means that Mondrian will not be told to restrict by role, and all users will have access to everything. The bean ID in the configuration file is called Mondrian-UserRoleMapper. The following sections describe each of the role mappers, along with their configurations.
One-to-one role mapper
The one-to-one role mapper is the simplest of the role mappers. It passes the Pentaho roles of the user to Mondrian, so if a user has a role of “Sales Manager” in Pentaho, then that’s passed to Mondrian without changes. Because many companies develop Mondrian schemas for existing users and roles, this is a very common role mapper.
This mapper has an optional parameter called failOnEmptyRoleList that will throw an exception if no role matches from user to role are found. This is the default behavior for the mapper, and it’s safe. You can, however, set this value to true, in which case a user with no role mapping will have all permissions, as if no role mapper was specified. To configure this role mapper, simply uncomment or add the bean declaration shown in listing 6.2
Listing 6.2. One-to-one role mapper configuration
<bean id="Mondrian-UserRoleMapper"
      name="Mondrian-One-To-One-UserRoleMapper"
      class="org.pentaho.platform.plugin.action.
             mondrian.mapper.MondrianOneToOneUserRoleListMapper"
      scope="singleton" />
Long Java class names
The class for the role mappers is spread over two lines in the text due to formatting limitations. When you’re configuring Mondrian, the entire class name will be on one line inside the quotes.
Lookup-map role mapper
The lookup-map role mapper maps Pentaho roles to Mondrian roles. This might be useful when you’re using the same schema for different customers or departments that have different names for the same roles.
The configuration for this mapper is shown in listing 6.3. To add a role mapping, simply enter a key value that represents the role in Pentaho. Then enter a value that the Pentaho role will be mapped to in Mondrian. When Pentaho makes calls to Mondrian, it will look at the user’s roles and pass the mapped roles instead.
Listing 6.3. Lookup-map role mapper configuration
<bean id="Mondrian-UserRoleMapper"
      name="Mondrian-SampleLookupMap-UserRoleMapper"
      class="org.pentaho.platform.plugin.action.
             mondrian.mapper.MondrianLookupMapUserRoleListMapper"
      scope="singleton">
  <property name="lookupMap">
    <map>
      <entry key="sales_manager" value="Sales Manager" />
      <entry key="product_manager" value="Product Manager" />
      <entry key="inventory_manager" value="Inventory Manager" />
    </map>
  </property>
</bean>
User-session role mapper
The user-session role mapper maps from a session attribute of the user to one or more Mondrian roles. When Pentaho makes a connection to Mondrian, it will look at the user session and find the session attribute. The values in this session attribute will then be passed to Mondrian.
The only configuration item you need to provide is the name of the session attribute to use for the roles. In the following listing, the session attribute name is MondrianUserRoles.
Listing 6.4. User-session role mapper configuration

There are a number of ways that the session can be populated, and section 8.1 will explain how to populate session variables when a user session starts. The user-session role mapper will then extract the value from the session and convert it to Mondrian roles.
The conversion that takes place depends on the type of value in the session attribute. Table 6.2 shows the conversion for each recognized type. The conversions are chosen in the order listed.
Table 6.2. Session attribute to role list conversion process
|
Attribute type |
Conversion approach |
|---|---|
| String [] | Each array entry is used as a Mondrian role. |
| java.util.Collection | Each entry in the collection is converted to a string using Object.toString(). |
| Object [] | Each object in the array is converted to a string using Object.toString(). |
| Anything else | The object is converted to a string using Object.toString(). |
Your very own role mapper
If none of the provided role mappers meets your needs, you can also create your own. The simplest approach is to extend the abstract class org.pentaho.platform.plugin.action.mondrian.mapper.MondrianAbstractPlatformUserRoleMapper. This class does most of the heavy lifting and only requires you to implement a single method:
   protected abstract String[] mapRoles(String[] mondrianRoles, String[]
platformRoles) throws PentahoAccessControlException;
Viewing the Pentaho mappers
You can also look at the Pentaho mappers to see how they work. The source code is in a public Subversion repository that anyone can access online. The root for the Mondrian platform extensions is http://source.pentaho.org/viewvc/svnroot/pentaho-platform/trunk/extensions/src/.
The method receives an array of Mondrian roles from the schema and a set of platform roles from Pentaho. It’s up to the role mapper to map between the two and return an array of roles for the user to pass to Mondrian. The method is also expected to throw a PentahoAccessControlException if the user shouldn’t have access to Mondrian for some reason.
To make the concept a bit more concrete, listing 6.5 shows an example of a role mapper. The management of Adventure Works has decided to restrict roles based on state. Rather than create a unique role for each user, however, they’ll simply append the two-letter acronym for the state to each role except Authenticated and Admin. This is done by looking up the state for the user and then adding it to the end of each role. The code for getting the state isn’t included here. Note that a production version might also check to see if the new role exists in the Mondrian schema, but it’s not required.
Listing 6.5. User-state role mapper

The last step to get this to work is to configure the Pentaho Objects.xml file to use the new class as the role mapper. The following listing shows what this looks like. This declaration can be put in the same area as the commented-out role mappers.
Listing 6.6. User-state role mapper configuration
<bean id="Mondrian-UserRoleMapper"
      name="Mondrian-One-To-One-UserRoleMapper"
      class="org.pentaho.mondrian.mapper.UserStateRoleMapper"
      scope="singleton" />
So far we’ve explored the concept of roles for restricting data. We’ve talked about what roles are and how they’re mapped. But we still haven’t restricted access to any data. The next section will show you how to apply a wide variety of controls to the data based on the roles you’ve defined.
6.2. Security grants
Now that you have a few roles, it’s time to restrict data, but how do you specify the data to be restricted? Suppose you only want the product manager to see the state, item, and quantity purchased. Next, you want the state sales manager to see all of the same data as the US sales manager, but only for the one state. This section shows how to apply such restrictions.
Mondrian security grants can be thought of as a set of filters on the data, and the role can only see what their filters let through. At each level in the schema, the user can have data explicitly blocked or shown. The nesting of the security grants matches the general nesting of the schema design, as shown in figure 6.1.
Figure 6.1. Security grants within security grants

The SchemaGrant applies to the entire schema. Nested inside of that, the CubeGrant controls access to individual cubes. Each cube can have further restrictions through DimensionGrant and HierarchyGrant. Finally, access controls can be applied to individual members via MemberGrant. We’ll discuss each of these types of grants in detail in the remainder of this section.
6.2.1. Schema grants
The first security grant is the SchemaGrant, and it has one attribute, access. There are three options available for SchemaGrant access: all, none, and all_dimensions. The all and none access grants are the most common. The access type of all_dimensions is rarely used; it gives the same results as none and is likely to be removed in the future, so we won’t cover it further here. The next few sections explain the use of each of the schema grant types.
Schema grant all
Listing 6.7 shows the use of the all option. It gives the role access to all of the cubes and dimensions in the schema, but you can later limit access to all or parts of the data using finer detailed grants. Other grants are nested within the schema grant.
Listing 6.7. Granting access to the entire schema

Schema grant none
Listing 6.8 shows the use of the none option. This option is used when you want to restrict a user from seeing the schema completely. For example, maybe you have a schema completely dedicated to Human Resources and want to limit it from everyone except HR. You can create a role that all users get except HR, and then restrict the schema from this role with a few lines of XML.
Listing 6.8. Granting access to none of the schema

The more common use of setting access to none is to then grant access back to users. When a role has no access to the schema, they won’t be able to see any of the dimensions or cubes in the schema. If your schema has a lot of different cubes, this is an easy way to initially restrict access to all of the cubes. Then, when specific cubes are to be used by certain roles, you can simply add the cubes back. This also has the advantage that if new cubes are added to the schema, the old roles won’t be able to see the new cubes unless permission is explicitly granted, which means you don’t need to remember to restrict access to the new cubes.
Note that when a role is granted access to something, it’s implicitly given access to the parent. This means that if you use an access type of none for a schema and then grant access to a cube, the role now has access to the schema as well. In this case, an access type of none is a shortcut to taking away access from all other cubes except the one(s) specified.
Pentaho’s authenticated role
When using the default configuration in Pentaho, all logged-in users will have the Authenticated role. This is a convenient role for limiting or granting access to all users of the system. For example, if you create an Authenticated role and use a schema grant access="none", the default behavior is to have no access to the schema unless it’s explicitly granted. In cases where data is sensitive and new roles may be created by others, this can be a good security precaution.
6.2.2. Cube grants
The next level of detail in security grants below the schema is the CubeGrant. The CubeGrant takes two attributes: the name of the cube that the grant applies to and the access control for the grant. There are only two options for cube grant access: all or none. Both work similarly to the schema grant, but at the cube level.
Cube grant all
The all option gives the role access to the cube. If a user has no access to the schema, this gives access to the particular cube but no others. As with the previous schema options, you can restrict access to parts of the cube after granting access. A common approach is to restrict access to a role that every user will have, such as Authenticated, and then specifically grant access to the cubes the user should be able to see.
The following listing shows the use of the all option at the cube level. In this case, the product manager didn’t have access to the schema but is given access to the Product Sales cube.
Listing 6.9. Granting access to the entire cube

Cube grant none
A cube grant of none means that a user who is in the given role is not given access to the cube. Unlike with the schema grant, once access to the cube has been taken away, the user can’t see any of the cube data. A cube grant with no access would be used when most users of the system can see many of the things in the schema, but you want to restrict certain cubes for certain roles. Note that unless the restricted cube is for a role that all users are guaranteed to have, there’s a higher risk of unintentionally giving access to the cube.
Listing 6.10 shows the use of the none option. In this case, the product manager has access to the entire schema but doesn’t need access to the Human Resources cube that likely contains sensitive information about employees.
Listing 6.10. Granting access to none of the cube

Cube grants are often all that you need for many cubes. If roles that are allowed to see the cube can see everything in the cube, and those that aren’t don’t know about the cube, this is enough. But you’ll often want to control access to parts of the cube. That’s where hierarchy grants are used.
6.2.3. Dimension and hierarchy grants
If you recall from chapter 4, hierarchies make up the structure of dimensions. Each dimension must have at least one hierarchy and one or more levels. Similarly, within a cube grant you can have dimension and hierarchy grants, and these are both at the same level. The dimension grant restricts access to an entire dimension and all of its hierarchies, whereas a hierarchy grant specifies access to just a single hierarchy within the dimension.
The DimensionGrant has two required attributes: dimension, the name of the dimension, and access, which can be either all or none. An access of all doesn’t usually add a lot of value, because it’s the default, so you’ll typically only use none. Dimension grants also can’t have any children. If you want finer-grained control over the contents of a dimension, you’ll need to use a hierarchy grant.
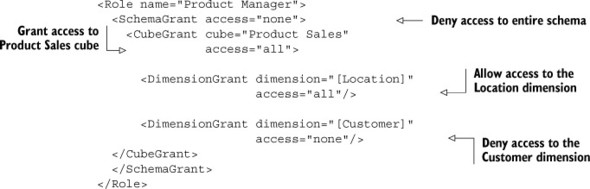
The following listing shows an example of a dimension grant that gives access to the Location dimension and restricts access to the Customer dimension.
Listing 6.11. Granting access to dimensions
The HierarchyGrant has two required attributes: hierarchy, the name of the hierarchy, and access. The values for each of these attributes are described in the following sections. There are also several optional attributes that we’ll discuss in a bit. As you’ll also see, there are some special rules for the HierarchyGrant if you want to include other grants.
The name of the hierarchy can be either the full name of the hierarchy or, if the hierarchy name follows the conventions of Mondrian and there is only one, just the dimension name. For example, if the dimension is named [Product] and the hierarchy is named [Products], it is enough to set the hierarchy name to [Product]. But if you have multiple hierarchies, such as [Org Structure.Financial] and [Org Structure.Reporting], you’d need to specify the full name for the hierarchy you want to use.
Hierarchy grant access
The hierarchy grant has three types of access: all, none, and custom.
All is used when you want to grant access to the entire hierarchy and all its members. All is the default for hierarchies, so it’s rarely explicitly set. The following listing shows how you would explicitly grant an access type of all to the hierarchy.
Listing 6.12. Granting access to all of the hierarchy

The hierarchy access of none restricts a user from seeing a hierarchy, including any of the levels or members in the hierarchy. The none option, shown in the following listing, is useful when you want to allow a role to see all parts of a cube except certain ones.
Listing 6.13. Granting access to none of the hierarchy

The custom access role is only used, and must be used, when you want to specify access to particular members in a level or if you want to specify a top or bottom level. Suppose you want to restrict sales managers at the state level to only see the members in their state. An example of the custom access with a MemberGrant is shown in the next section. Note that if you use an access type of custom and then don’t specify any other settings, it behaves like an access type of all.
Top and bottom levels
In addition to the hierarchy grant’s required attributes of name and access, there are two optional attributes, topLevel and bottomLevel. These attributes allow you to grant access to a range of levels within the hierarchy, and they’re only used with an access of custom.
The topLevel attribute specifies the highest level in the hierarchy a user is allowed to view data at. For example, you may want to specify that managers can only see up to the business unit level and not the entire organization.
The bottomLevel attribute does the exact opposite; it restricts access to details of data below a certain level. This is useful when you want to provide access to the higher-level data but not the details. For example, perhaps you want to let salespeople see how sales in general are doing, but not how individual salespersons have done.
Listing 6.14 shows an example of using the topLevel and bottomLevel attributes. In this example, you’re restricting the product manager to only be able to see sales information up to the country level and down to the city level. The product manager won’t be able to see at the territory level above the country, nor will they see details about specific stores.
Listing 6.14. Limiting access to certain levels of the hierarchy
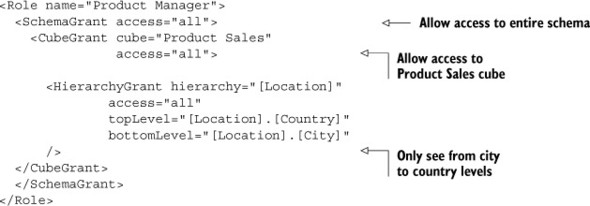
Figure 6.2 shows how the topLevel and bottomLevel attributes restrict access to parts of the hierarchy. In this case, topLevel hides the territory level, and bottomLevel hides the city level. The user would only have access to the lighter shaded data.
Figure 6.2. Topand bottom-level restrictions

6.2.4. Member grants
Member grants provide finer-grained control to dimensions than hierarchy grants. The role has access to the dimension but can only see the specific members that it is given access to. For example, the location hierarchy has a state level that includes as members all of the individual states. Suppose you want to restrict a state sales manager to see only the values associated with their state. To do so, you’ll want to use a member grant.
Custom hierarchy grant
As mentioned previously, to use member grants, the hierarchy grant for the hierarchy must have an access type of custom.
Member grants have two access levels: all and none. How these are interpreted can be fairly complex, so it’s good to understand what’s going on. If you have a member grant, no matter what the access, access to all other members is taken away. For example, if you have access of type none on [Location].[Country].[USA], that’s equivalent to a hierarchy access of type none. The difference is that instead of the hierarchy being hidden from the user, the report will simply generate no data.
On the other hand, if you grant access of all to a member, you’ll see that member, its parents, and all its children. In the case of [Location].[Country].[USA] that means you’d see [North America], [USA], [CA], [WA], and so on. Understanding how each of these works allows you to combine them in a variety of ways.
Listing 6.15 shows an example of limiting access to only the state of Washington. The member grant that denies access to USA limits access to USA and all of its children. This means the user can’t see USA, CA, OR, WA, and so on. It also means the user can’t see Europe or Asia. The next line adds back access to WA. The result is that the user can see USA and WA, but none of the other states or their children.
Listing 6.15. Limiting access to specific members of the hierarchy

Table 6.3 shows how the grants work together. To understand how the restrictions work, assume that you have multiple countries, including [USA] and all of its states. In the table, we only show [CA], [ID], [OR], and [WA]. Note that we’re using the {} characters to indicate an MDX set.
Table 6.3. Comparing member grant combinations
|
[WA] access |
State members available |
|
|---|---|---|
| none | Not specified | {} |
| all | Not specified | { [CA], [ID], [OR], [WA] } |
| none | all | { [WA] } |
| none | none | {} |
| all | none | {} |
| all | all | { [WA] } |
Member grant rules
A key concept of member grants is that they are order-dependent, and this can cause confusion when you first start working with them. But if you keep the following in mind when creating member grants, you should be OK.
- Grants are order-dependent. If you grant access to a child and then deny access to a parent, then the role can’t see the child. For example, if you create a member access that can see [USA].[CA] and then deny access to [USA], the role will no longer be able to see [USA].[CA].
- Grants inherit from other grants. For example, if you deny access to [USA], all of the child members are also denied access because access to the children requires access to the parent. But access to children can be granted later. This allows you to block access to a set of members and then only give access back to a limited few.
- Parents are implicitly granted access if a child is. This goes with the previous rule about inheritance. In order to reach [USA].[WA], for example, you need to first access [USA].
- Member grants don’t override topLevel and bottomLevel attributes at the hierarchy grant level. This means that even if you grant access to an individual store in a state, but you set a bottom level of the city that the store is in, you’ll still only see down to the city level.
Rollup policies
When access is restricted to only certain members, it can cause aggregate values to look incorrect. For example, you may have a list of sales by state for certain states, but the total shown is larger. This is because the aggregate is applied for the given level. To help in managing what users see at the higher aggregation levels, Mondrian provides a concept of rollup policies. Rollup policies tell Mondrian what to return for higher levels of aggregation.
Rollup policies are specified using the rollupPolicy attribute, and there are three possible values: full, partial, and hidden.
A full rollup policy lets the user see the aggregate value for all children, including those that they couldn’t normally see. This is the default policy used by Mondrian if no rollup policy is specified. Seeing all of the data can be confusing, however, because some higher-level reports show all of the data and others show only the data the user should see.
A partial rollup policy means the user will only see the aggregates for the members the user can see. If a user is restricted to the state of Washington, then an aggregate for the US will only reflect values in Washington, not the entire United States. This is usually the policy that makes the most sense to users.
A hidden rollup policy will hide all data at the higher levels. This means that aggregates above the restricted level are completely hidden. Note that different UIs reflect hidden in different ways. JPivot, for example, will completely hide the aggregate, whereas Analyzer will show no data for the query.
Aggregate versus total
You may have noticed that we’re using the term aggregate instead of total when describing rollup policies. We use this term because the aggregate is not always the total. In Mondrian, you can specify the aggregate to be other values, such as the count or maximum value. The roll-up policy will be applied correctly for any of the aggregate types.
An example should make this concept clear. Table 6.4 shows some representative data from a cube: we have four different states with sales for each. Now assume there’s a member grant restriction to only see WA. Table 6.5 shows the aggregate (the sum in this case) value for each policy.
Table 6.4. Sales data by state
|
State |
Sales |
|---|---|
| CA | 15,000 |
| ID | 3,000 |
| OR | 8,000 |
| WA | 11,000 |
| USA total | 37,000 |
Table 6.5. Results of rollup policies with member restricted to WA
|
Rollup policy |
USA aggregate sales |
|---|---|
| full | 37,000 |
| partial | 11,000 |
| hidden |
6.2.5. Measure grants
Measure grants are a special case of member grants. Measures are simply another dimension of the cube; the existing grants can be used to restrict access to measures. There’s no way to explicitly specify a measure grant.
You can use DimensionGrant, HierarchyGrant, and MemberGrant to restrict access as you can with any other dimension, but if you completely restrict a role from seeing any measures, Mondrian will throw an exception when you attempt to use the cube. This means that the only way to truly restrict access to measures is to use a combination of MemberGrant that allows access to at least one measure.
Listing 6.16 shows a partial listing limiting access to measures. In this case the inventory manager is able to see the quantity of items ordered but not the sale price. As described previously, this restricts the inventory manager to only seeing the quantity of items ordered unless other members have access granted.
Listing 6.16. Example of restricting access to measures

6.3. Summary
This chapter showed you how roles and security grants can be used to restrict access to data. Roles can be assigned to users, and then those roles are assigned grants. Grants can be any of the following:
- SchemaGrants that can limit access to entire schemas
- CubeGrants that can limit access to specific cubes
- DimensionGrants that can limit access to entire dimensions
- HierarchyGrants that can limit access to dimensional hierarchies
- MemberGrants that can limit access to specific members within a hierarchy level
- Measure grants, a special case of the MemberGrant that limits access to measures
Now that you know how to define schemas and measures and restrict access to the data, it’s time to take a look at performance. The next chapter will show you how to make data access faster. This isn’t a major problem for smaller datasets, but when data warehouses run into the millions of records, performance becomes a concern.