
Now that we know what types of branches are there and what their purposes are, let's examine how branches are used. Note that different situations call for different use of branches. For example, smaller projects are better suited for simpler branching workflows, while larger projects might need more advanced ones.
We will now describe here how to use different standard workflows. Each workflow is distinguished by the various types of branches it uses (the types described earlier in this chapter). In addition to getting to know how the ongoing development looks like for a given workflow, we would also see what to do at the time of the new release (major and minor, where relevant). Among others, we will find out what happens then to branches used in the chosen workflow.
One of the simplest workflows is to use just a single integration branch. Such branches are sometimes called the
trunk; in Git, it would usually be the master branch (it is the default branch when creating a repository). In a pure version of this workflow, one would commit everything on the said branch, at least, during the normal development stage. This way of working comes from the times of centralized version control, when branching and especially merging was more expensive and people avoided branch-heavy workflows.
In this workflow, we create the new release branch out of trunk when deciding to cut the new major release. This is done to avoid the interference between stabilizing for release and ongoing development work. The rule is that all the stabilization work goes on the release branch, while all the ongoing development goes to the trunk. Release candidates are cut (tagged) from the release branch, as is the final version of a release.
The release branch for a given version can be later used to gather bug fixes, and to cut minor releases from it.
The disadvantage of such simple workflow is that during development, we often get in an unstable state. In this case, it could be hard to come up with a good starting point, stable enough to start working on creating a new release. An alternative solution is to create revert commits on the release branch, undoing the work that is not ready. But it can be a lot of work and it would make the history of a project hard to follow.
Another difficulty with this workflow is that the feature that looks good at the first glance might show problems later in use. This is something this workflow has trouble dealing with. If it turns out during development that some feature created in multiple commits feature is not a good idea, reverting it can be difficult. This is true especially if its commits are spread across the timeline (across the history).
Moreover, the trunk and release branch workflow does not provide any inherent mechanism for finding bad interactions between different features, that is, for the integration testing.
In spite of these problems, this simple workflow can be a good fit for a small team.
To be able to provide the stable line of the product and to be able to test it in practice as a kind of floating beta version, one needs to separate work that is stable from the work that is ongoing and might destabilize code. That's what graduation branches are for: to integrate revisions with different degrees of maturation and stability (this type of long-running branches is also called integration branches or progressive-stability branches). See Fig 1 of the Integration, or graduation, or progressive-stability branches section in this chapter, which shows a graph view and a silo view of a simple case with progressive-stability branches and linear history. Let's call the technique that utilizes mainly (or only) this type of branches the graduation branches workflow.
Besides keeping stable and unstable development separate sometimes, there is also a need for an ongoing maintenance. If there is only one version of the product to support, and the process of creating a new release is simple enough, one can also use the graduation-type branch for this.
In such situation, one would have at least three integration branches. There would be one branch for the ongoing maintenance work (containing only bug fixes to the last version), to create minor releases. One branch for stable work to create major releases; this branch can also be used for nightly stable builds. And last, one branch for ongoing development, possibly unstable.
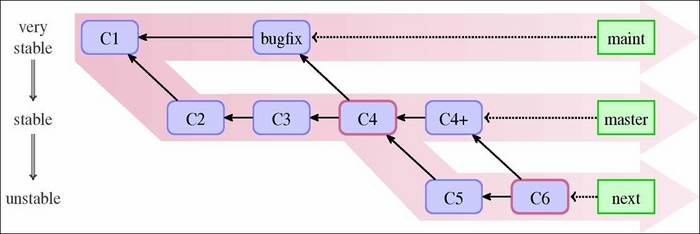
Fig 2. The graduation or progressive-stability branches workflow. You should never merge a less stable branch into more stable one, as merging would bring all the unstable history.
You can use this workflow as it is, with only graduation branches, and no other types of branches. You commit bug fixes on the maintenance branch and merge it into the stable branch and development branch, if necessary. You create revisions with the well-tested work on the stable branch, merging it into the development branch when needed (for example, if the new work depends on them). You put the work in progress, possibly unstable, on the development branch. During normal development, you never merge less stable into more stable branches, otherwise you would decrease their stability. It is always more stable into less stable, as represented in Fig 2.
This, of course, requires that you know upfront whether the feature that you are working on should be considered stable or unstable. There is also an underlying assumption that different features work well together from the start. One would expect in practice, however, that each piece of the development matures from the proof of concept, through being a work in progress during possibly several iterations, before it stabilizes. This problem can be solved with the workflow involving use of topic branches, which will be described next.
In the pure graduation branches workflow, one would create minor releases (with bug fixes) out of the maintenance branch. Major releases (with new features) are created out of the stable-work branch. After a major release, the stable-work branch is merged into the maintenance branch to begin supporting the new release that was just created. At this point also, an unstable (development) branch can be merged into a stable one. This is the only time when merging upstream, which means merging less stable branches into more stable branches, should be done.
The idea behind the topic branches workflow is to create a separate short-lived branch for each topic, so that all the commits belonging to a given topic (all the steps in its development) are kept together. The purpose of each topic branch is a development of the new feature, or a creation of a bug fix.

Fig 3. The topic branches workflow with one integration branch (master) and three topic or feature branches. Among the topic branches, there is one (namely, newidea) already merged in the integration branch and one (iss-95-2) dependent on the feature developed in the other feature branch (iss-95 here).
In the topic branches workflow (also called the feature branches workflow), you have are at least two different types of branches. First, there needs to be at least one permanent (or just long-lived) integration branch. This type of branches is used purely for merging. Integration branches are public.
Second, there are separate short-lived temporary feature branches, each intended for the development of a topic or the creation of a bug fix. They are used to carry all the steps, and only the steps required in the development of a feature or a fix; a unit of work for a developer. These branches can be deleted after the feature or the bug fix is merged. Topic branches are usually private and are often not present in public repositories.
When a feature is ready for review, its topic branch is often rebased to make integration easier, and optionally to make history more clear. It is then sent for review as a whole. The topic branch can be used in a pull request, or can be sent as a series of patches (for example, using git format-patch and git send-email). It is often saved as a separate topic branch in a maintainer's working repository (for example, git am --3way if it was sent as patches) to help in examining and managing it.
Then, the integration manager (the maintainer in the blessed repository workflow, or simply another developer in the central repository workflow) reviews each topic branch and decides whether it is ready for inclusion in selected integration branch. If it is, then it will get merged in (perhaps, with the --no-ff option).
The simplest variant of the topic branches workflow uses only one integration branch. Usually, however, one would combine the graduation branches workflow with topic branches.

Fig 4. The topic branches workflow with two graduation branches. Among topic branches, there is one (iss92) that is considered stable enough to be merged into both the next (unstable) and master (stable) graduation branches. One (idea) that got merged into next for testing and one (feat) just created from master.
In this often used variant, the feature branch is started from the tip of a given stable branch (usually) or from the last major release, unless the branch requires some other feature. In the last case, the branch needs to be forked from (created from) the topic branch it depends on, such as the feat branch in Fig 4. Bugfix topic branches are created on top of the maintenance branch.
When the topic is considered done, it is first merged into the development-work integration branch (for example, next) to be tested. For example, in Fig 4, topic branches idea and iss92 are both merged into next, while feat is not considered ready yet. Adventurous users can use builds from given unstable branch to exercise the feature, though they better take into the account the possibility of crashes and data loss.
After this examination, when the feature is considered to be ready to be included in the next release, it is merged into the stable-work integration branch (for example, master). Fig 4 includes one such branch: iss92. At this point, after merging it into the stable integration branch, the topic branch can be deleted.
Using a feature branch allows topical revision to be kept together and not mixed with other commits. The topic branch workflow allows for the easy undoing of topic as a whole, and for removing of all bad commits together (removing a series of commits as a whole unit), instead of using a series of reverts.
If the feature turns out to be not ready, it is simply not merged into the stable branch, and it remains present only in the development-work branch. If we, however, realize too late that it was not ready, after the topic was merged into the stable branch, we would need to revert the merge. This is a slightly more advanced operation than reverting a single commit, but it is less troublesome than reverting commits one, by one while ensuring that all the commits get correctly reverted. Problems with reverting merges will be covered in Chapter 8, Keeping History Clean.
The workflow for topic branches containing bugfixes is similar. The only difference is that one needs to consider into which of integration branches the bugfix branch is to be merged into. This, of course, depends on the situation. Perhaps the bugfix applies only to the maintenance branch, because it was accidentally fixed by a new feature in the stable-work and development-work branches; then, it is merged only to this branch. Perhaps, the bug applies only to the stable-work and development-work branches, because it is about the feature that was not present in the previous version, thus the maintenance branch is excluded from being merged into.
Using a separate topic branch for bug fixing, instead of committing bugfix directly, has an additional advantage. It allows us to easily correct the misstep, if it turns out after the fact that the fix applies to more branches than we thought.
For example, if it turns out that the fix needs to be applied also to the maintained version and not only to the current work, with the topic branch you can simply merge the fix into additional branches. This is not the case if we were to commit the fix directly on the stable branch. In the latter situation, you cannot use merging, as it would destabilize the maintenance branch. You would need to copy the revision with the fix, by cherry-picking it from the branch it was committed on into the maintenance branch (see Chapter 7, Merging Changes Together for detailed description of this operation). But it means that duplicated commits; additionally cherry-picked commits can sometimes interact wrongly with the act of merging.
The topic branches workflow also allows us to check whether the features conflict with each other, and then fix them as necessary. You can simply create a throw-away integration branch and merge into it topic branches containing these features, to test the interaction between them. You can even publish such branches meant for integration testing (named proposed-updates or just pu for example) to allow for other developers to examine the works in progress. You should however state explicitly in the developer documentation that said branch should not be used as a basis to work on, as it is recreated each time from scratch.
Let's assume that we are using three graduation (integration) branches: maint for maintenance work on the last release, master for stable work, next for development.
The first thing that the maintainer (the release manager) needs to do before creating a new release is to verify that master is a superset of maint, that is, all the bugs are fixed also in the version considered for the next release. You can do this by checking whether the following command gives an empty output (see Chapter 2, Exploring Project History):
$ git log master..maint
If the preceding command show some unmerged commits, the maintainer needs to decide what to do with them. If these bug fixes don't break anything, he/she can simply merge maint into master (as it is merging the more stable branch into the less stable one).
Now that the maintainer knows that master is a superset of maint, he/she can create the new release from remote master by tagging it, and then pushing just created tag to the distribution point (to the public repository), for example with the following:
$ git tag -s -m "Foo version 1.4" v1.4 master
$ git push origin v1.4 master
The preceding command assumed that the public repository of the Foo project is the one described by the origin, and that we use the double-digit version for major releases (following the semantic versioning specification: http://semver.org/).
Then, the maintainer updates maint to the new release, advancing the branch (note that step one ensured that maint was a subset of master):
$ git checkout maint
$ git merge --ff-only master
If the second command fails, it means that there are some commits on the branch maint that are not present in master, or to be more exact that master is not a strict descendant of maint.
Because we usually consider features for inclusion in master one by one, there might be some topic branches that are merged into next, but they were abandoned before they were merged into master (or they are not merged because they were not ready.) This means that though the next branch contains a superset of topic branches that compose the master branch, master is not necessarily the ancestor of next.
That's why advancing the next branch after a release can be more complicated than advancing the maint branch. One solution is to rewind and rebuild the next branch:
$ git checkout next
$ git reset --hard master
$ git merge ai/topic_in_next_only_1...
You can find unmerged topics to be merged to rebuild next with:
$ git branch --no-merged next
After creating the release following rebuilding of next, other developers would have to force fetch the next branch (see the next section), as it would not fast-forward if it is not already configured to force fetch:
$ git pull
From git://git.example.com/pub/scm/project
   62b553c..c2e8e4b  maint      -> origin/maint
   a9583af..c5b9256  master     -> origin/master
 + 990ffec...cc831f2 next       -> origin/next  (forced update)
Notice the forced update for the next branch here.
One can see that the more advanced version of the topic branching workflow builds on top of the graduation branch's one. In some cases, even more involved branching model might be necessary, utilizing more types of branches: graduation branches, release branches, hotfix branches, and topic branches. Such model is sometimes called gitflow or git-flow.
This development model uses two main long-running graduation branches to separate the production-ready stable state from the work involved with integration of the latest delivered ongoing development. Let's call these branches for example master (stable work) and develop (gathers changes for the next release). The latter can be used for nightly builds. These two integration branches have an infinite lifetime.
These branches are accompanied in this workflow by supporting branches, namely, feature branches, release branches, and hotfix branches.
Each new feature is developed on a topic branch (such branches are sometimes called feature branch), named after a feature. Such branches are forked off the tip of either the devel or master branch, depending on the details of the workflow and the requirements of the feature in question. When work on a feature is finished, its topic branch is merged, with the --no-ff option (so that there is always a merge commit where a feature can be described), into devel for integration testing. When they are ready for the next release, they are merged into the master branch. A topic branch exists only as long as a feature is in development, and are deleted when merged (or when abandoned).
The purpose of a release branch is twofold. When created, the goal is to prepare a new production release. This means doing last minute clean-up, applying minor bug fixes, and preparing metadata for a release (for example, version numbers, release names, and so on). All but the last should be done using topic branches; preparing metadata can be done directly on the release branch. This use of the release branch allows us to separate the quality assurance for the upcoming release from the work developing features for the next big release.
Such release branches are forked off when the stable state reflects, or is close to, the desired state planned for the new release. Each such branch is named after a release, usually something such as release-1.4 or release-v1.4.x. One would usually create a few release candidates from this branch (tagging them v1.4-rc1 and so on) before tagging the final state of the new release (for example, v1.4).
The release branch might exist only until the time the project release it was created for is rolled out, or it might be left to gather maintenance work: bug fixes for the given release (though, usually, maintenance is done only for a few latest versions or the most popular versions). In the latter situation, it replaces the maint branch of other workflows.
Hotfix branches are like release branches, but for an unplanned release usually connected with fixing serious security bugs. They are usually named hotfix-1.4.1 or something similar. A hotfix branch is created out of an old release tag if the respective release (maintenance) branch does not exist. The purpose of this type of branches is to resolve critical bugs found in a production version. After putting a fix on such branches, the minor release is cut (for each such branch).
Let's examine another situation now. How can we use branches to manage fixing a bug, for example, a security issue. This requires a slightly different technique than an ordinary development.
As explained in Topic branches workflow, while it is possible to create a bugfix commit directly on the most stable of the integration branches that is affected by the bug, it is usually better to create a separate topic branch for the bugfix in question.
You start by creating a bugfix branch forking from the oldest (most stable) integration branch the fix needs to be applied to, perhaps even at the branching point of all the branches it would apply to. You put the fix (perhaps, consisting of multiple commits) on the branch that you have just created. After testing it, you simply merge the bugfix branch into the integration branches that need the fix.
This model can be also used to resolve conflicts (dependencies) between branches at an early stage. Let's assume that you are working on some new feature (on a topic branch), which is not ready yet. While writing it, you have noticed some bugs in the development version and you know how to fix them. You want to work on top of the fixed state, but you realize that other developers would also want the bugfix. Committing the fix on top of the feature branch takes the bugfix hostage. Fixing the bug directly on an integration branch has a risk of forgetting to merge the bugfix into the feature in progress.
The solution is to create a fix on a separate topic branch and to merge it into both the topic branch for the feature being developed, and into the test integration branch (and possibly the graduation branches).
The matter complicates a bit if there is security involved. In the case of a severe security bug, you would want to fix it not only in the current version, but also in all the widely used versions.
To do this, you need to create a hotfix branch for various maintenance tracks (forking it from the specified version):
$ git checkout -b hotfix-1.9.x v1.9.4
Then, you need to merge the topic branch with the fix in question into the just created hotfix branch, to finally create the bugfix release:
$ git merge CVE-2014-1234
$ git tag -s -m "Project 1.9.5" v1.9.5