
Many times, while working on a project, you may want to revise your commit history. One reason for this could be to make it easier to review before submitting changes upstream. Another reason would be to take reviewer comments into account in the next improved version of changes. Or perhaps you'd like to have a clear history while finding regressions using bisection, as described in Chapter 2, Exploring Project History.
One of the great things about Git is that it makes revising and rewriting history possible, while providing a wide set of tools to revise history and make it clean.
Note
There are two conflicting views among users of the version control system: one states that history is sacred and you should better show the true history of the development, warts and all, and another that states that you should clean up the new history for better readability before publishing it.
An important issue to note is that, even though we talk about rewriting history, objects in Git (including commits) are immutable. This means that rewriting is really creating a modified copy of commits, a new path in the DAG of revisions. Then appropriate branch reference is switched to point to the just created new path. The original, pre-rewrite commits are there in the repository, referenced and available from the reflog (and also, ORIG_HEAD). Well, at least, until they get pruned (that is, deleted) as unreferenced and unreachable objects during garbage-collecting. Though, this happens only after the reflog expires.
The simplest case of history rewriting is correcting the latest commit on a branch (the current commit).
Sometimes, you notice a typo (an error) in a commit message, or that you have committed incomplete change in the last revision. If you have not pushed (published) your changes, you can amend the last commit. This is done with the --amend option to git commit.
The result of amending a commit is shown in Fig 6 in Chapter 3, Developing with Git. Note that there is no functional difference between amending the last commit and changing the commits deeper in history. In both the cases you are creating a new commit, leaving the old version referenced by the reflog.
Here, the index (that is, the explicit staging area for commits) shows its usefulness again. For example, if you want to simply fix only the commit message, and you do not want to make any changes, you can use git commit --amend (note the lack of -a / --all option). This works even if you started work on a new commit; at least, assuming that you didn't add any changes to the index. If you did, you can put them away temporarily with git stash, fix the commit message of the last commit, and then pop stashed changes and restore the index with git stash pop --index.
If, on the other hand, you realize that you have forgotten some changes, you can just edit the files and use git commit --amend --all. And if the changes are interleaved, you can use git add, or its interactive version (utilizing knowledge from Chapter 5, Managing Your Worktree), to create the contents you want to have, finalizing it with git commit --amend.
Sometimes, you might want to edit commit deeper in history, or reorganize commits into a logical sequence of steps. One of the built-in tools that you can use in Git for this purpose is git rebase --interactive.
Here, we will assume that you are working on a feature using a separate topic branch and a topic branch workflow described and recommended in Chapter 6, Advanced Branching Techniques. We will also assume that you are doing the work in the series of logical steps, rather than in one large commit.
While implementing a new feature, you usually don't do it perfectly from the very beginning. You would want to introduce it in a series of self-contained small steps (see Chapter 12, Git Best Practices) to make code review (or code audit) and bisection (finding the cause of regressions) easier. Often only after finishing work you see how to split it better. It is also unreasonable to expect that you would not make mistakes while implementing a new feature.
Before submitting the changes (either pushing to a central repository, pushing to your own public repository and sending pull requests, or using some other workflows described in Chapter 5, Collaborative Development with Git), you would often want to update your branch to the current up-to-date state of a project . By rebasing your changes on top of current state, and having them up to date, you would make it easier for the maintainer (the integration manager) to ultimately merge your changes in, when they are accepted for the inclusion in the mainline. Interactive rebase allows you to clean up history, as described earlier, while doing it.
Besides tidying up before publishing changes, there is also additional use for tools such as an interactive rebase. While working on a more involved feature, the very first submission is not always accepted into an upstream and added to the project. Often, patch review finds problem with the code or with the explanation of the changes. Perhaps, something is missing (for example, the feature lacks documentations or tests), some commit needs to be fixed, or the submitted series of patches (or a branch submitted in a pull request) should be split into smaller commits for easy review. In this case, you would also use an interactive rebase (or an equivalent tool) to prepare a new version to submit, taking into account the results of code inspection.
Rebase, as described in Chapter 7, Merging Changes Together, consists of taking a series of changes of the commits being rebased and reapplying them on top of a new base (a new commit). In other words, rebase moves changesets, not snapshots. Git starts the interactive rebase by opening the instructions sheet corresponding to those series operations of reapplying changes in an editor.
Like in the case of the template for editing commits, the instruction sheet is accompanied by the comments explaining what you can do with it (note that if you use older Git version, some interactive rebase commands might be missing):
pick 89579c9 first commit in a branch
pick d996b71 second commit in a branch
pick 6c89dee third commit in a branch

# Rebase 89579c9..6c89dee onto b8fffe1
#
# Commands:
#  p, pick = use commit
#  r, reword = use commit, but edit the commit message
#  e, edit = use commit, but stop for amending
#  s, squash = use commit, but meld into previous commit
#  f, fixup = like "squash", but discard this commit's log message
#  x, exec = run command (the rest of the line) using shell
#  d, drop = remove commit
#
# These lines can be re-ordered; they are executed from top to bottom.
#
# If you remove a line here THAT COMMIT WILL BE LOST.
#
# However, if you remove everything, the rebase will be aborted.
#
# Note that empty commits are commented out
As explained in the comments, the instructions are in the order of execution, starting from the instruction on the top to create the first commit with the new base as its parent, and ending with the instruction copying commit at the tip of the branch being rebased at the bottom. This means that revisions are listed in an increasing chronological order, older commits first. This is the reverse order as compared to the git log output with the most recent commit first (unless using git log --reverse). This is quite understandable; the rebase reapplies changesets in the order they were added to the branch, while the log operation shows commits in the order of reachability from the tips.
Each line of the instruction sheet consists of three elements separated by spaces. First, there is a one-word command; by default, the interactive rebase starts with pick. Each command has a one-letter shortcut that you can use instead of the long form, as shown in the comments (for example you can use "`p`" in place of "`pick`").
Next, there is a uniquely shortened SHA-1 identifier of a commit to be used with the command. Strictly speaking, it is the identifier of a commit being rebased, which it had before the rebase started. This shortened SHA-1 identifier is used to pick the appropriate commit (for example while reordering lines, which means reordering commits).
Last, there is the description (the subject) of a commit. It is taken from the first line of the commit message (specifically, it is the first paragraph of the commit message with the line breaks removed, where a paragraph is defined as the set of subsequent lines of text separated from other paragraphs by at least one empty line—that is, two or more end-of-line characters). This is one of the reasons why the first line of the commit message should be a short description of changes (see Chapter 12, Git Best Practices). This description is for you to help decide what to do with the commit; Git uses its SHA-1 identifier and ignores the rest of the line.
Reordering commits with the interactive rebase is as simple as reordering lines in the instruction sheet. Note, however, that if the changes were not independent, you might need to resolve conflicts, even if they would be no merge conflicts without doing reordering. In such cases, as instructed by Git, you would need to fix conflicts, mark conflicts as resolved, (for example, with git add), and then run git rebase --continue. Git will remember that you are in the middle of an interactive rebase, so you don't need to repeat the --interactive option.
The other possibility of dealing with a conflict, namely, skipping a commit, rather than resolving a conflict, by running git rebase --skip, is here as well. By default, rebase removes changes that are already present in upstream; you might want to use this command in case the rebase doesn't detect correctly that the commit in question is already there in the branch we are transplanting revisions onto. In other words, do skip a commit if you know that the correct resolution of a conflict is an empty changeset.
To remove
changes, you simply need to remove the relevant line from the instruction sheet, or to comment it out, or -- with the newest Git -- use the drop command. You can use it to drop failed experiments, or to make it easier on the rebase by deleting changesets that you know are already present in the rebase onto the upstream, though perhaps in a different form. Note, though, that removing the instruction sheet altogether aborts the rebase.
To fix a commit, change the pick command preceding the relevant commit in the instruction sheet to edit (or just e). This would make rebase stop at this commit, that is, at the step of reapplying changes, similar to the case with a conflict. To be precise, the interactive rebase applies the commit in question, so it is the HEAD commit and stops the process giving control to the user. You can then fix this commit, as if it were a current one with git commit --amend, as described in Amending the last commit. After changing it to your liking, run git rebase --continue, as explained in the instruction that Git prints.
Note
A proper git-aware command-line prompt, such as the one from the Git contrib command, would tell you if you are in the middle of the rebase (see Chapter 10, Customizing and Extending Git). If you are not using such a prompt, you can always check what's happening with git status:
$ git status
rebase in progress; onto b3cebef
You are currently rebasing branch 'subsys' on 'b3cebef'.
  (fix conflicts and then run "git rebase --continue")
  (use "git rebase --skip" to skip this patch)
  (use "git rebase --abort" to check out the original branch)
As you can see, you can always go to the state before starting the rebase with git rebase --abort.
If you only want to change the commit message (for example, to fix spellings or include additional information), you can skip the need to run git commit --amend and then git rebase --continue by using reword (or r) instead of edit. Git would then automatically open the editor with the commit message. Saving changes and exiting the editor will commit the changes, amend the commit, and continue the rebase.
Sometimes, you might need to make one commit out of two or more, squashing them together. Maybe, you decided that it didn't make sense to split the changes and they are better together.
With the interactive rebase, you can reorder these commits, as needed, so they are next to each other. Then, leave the pick command for the first of the commits to be concatenated together (or change it to edit). For the rest of the commits, use the squash or fixup command. Git will then accumulate the changes and create the commit with all of them together. The suggested commit message for the folded commit is the commit message of the first commit with the messages of the commits with the squash command appended; commit messages with the fixup command are omitted. This means that the squash command is useful while squashing changes, while fixup is useful for adding fixes. If the commits had different authors, the folded commit will be attributed to the author of the first commit. The committer will be you, the person performing the rebase.
Let's assume that you noticed that you forgot to add some part of the changes to the commit. Perhaps, it is missing tests (or just negative tests) or the documentation. The commit is in the past, so you cannot just add to it by amending. You could use an interactive rebase or the patch management interface to fix it, but often it is more effective to create the commit with forgotten changes and squash it later.
Similarly, when you notice that the commit you created a while ago has a bug, instead of trying to edit it immediately, you can create a fixup commit with a bugfix to be squashed later.
If you are using this technique, some time might pass between noticing the need to append new changes or fix a bug and creating an appropriate commit, and the time taken to rebase. How to mark the said commit to squash or fixup? If you use the commit message beginning with the magic string squash! ... or fixup! ..., respectively, preceding the description (the first line of the commit message that is sometimes called subject) of a commit to be squashed into, you can ask Git to autosquash them, thus automatically modifying the to-do list of rebase -i. You can request this on an individual basis with the --autosquash option or you can enable this behavior by default with the rebase.autoSquash configuration variable. To create the appropriate magic commit message, you can use git commit --squash/--fixup. (with commit to be squashed into / commit to be fixes as a parameter to this option)
Sometimes, you might want to make two commits or more out of one commit, splitting it in two or more parts. You may have noticed that the commit is too large, perhaps it tries to do too much, and should be split in two. Or perhaps, you have decided that some part of a changeset should be moved from one commit to another, and extracting it into a separate commit is a first step towards that.
Git does not provide a one-step built-in command for this operation. Nevertheless, splitting commits is possible with the clever use of the interactive rebase.
To split a given commit, first mark it with the edit action. As described earlier, Git will stop at the specified commit and give the control back to the user. In the case of splitting a commit, when you return the control to Git with git rebase --continue, you would want to have two commits in place of one.
The problem of splitting a commit is comparable to the problem of having different changes tangled together from Chapter 3, Developing with Git (the section about interactive commit). The difference is that the commit is already created and copied from the branch being rebased. It is simple to fix it with git reset HEAD^; as described in Chapter 4, Managing Your Worktree, this command will keep the working area at the (entangled) state of the commit to be split while moving the HEAD pointer and the staging area for the commit to the state before this revision. Then you can interactively add to the index the changes that you want to have in the first commit, composing the intermediate step in the staging area. Next, check whether you have what you want in the index, then create a commit from it using git commit without the -a / --all option. Repeat these last two steps as often as necessary.
Alternatively, instead of adding changes interactively, you can interactively remove changes to create the intermediate state for split commit. This can be done with interactive reset, mentioned in Chapter 4, Managing Your Worktree.
For the last commit in the series (the second one if you are splitting the commit in two), you can either add everything to the index making a working copy clean and create a commit from the index, or you can create a commit from the state of the working area (git commit --all). If you want to keep, or start from, the commit message of the original commit to be split, you can provide it with the --reuse-message=<commit> or --reedit-message=<commit> option while creating a commit. I think, the simplest way of naming a commit that was split (or that is being split) is to use reflog—it will be the HEAD@{n} entry just before reset: moving to HEAD^ in the git reflog output.
Instead of crafting the commit in the staging area (in the index) starting from the parent of the commit to be split, and adding changes, perhaps interactively, you could start from the final state (that is, the commit to be split) and remove the changes that are to be in second step, for example, with git reset --patch HEAD^ (interactive removal). Frankly, you can use any combination of techniques from Chapter 4, Managing Your Worktree. I find, for example, graphical commit tools such as git gui quite useful (you can find what are the graphical commit tools, and their examples in Chapter 11, Customizing and Extending Git).
If you are not absolutely sure that the intermediate revisions you are creating in the index are consistent (they compile, pass the test suite, and so on), you should use git stash save --keep-index to stash away the not-yet-committed changes, bringing the working area to the state composed in the index. You can the test the changes (for example by using the testsuite), and if fixes are necessary amend the staging area. Alternatively, you can create the commit from the index and use plain git stash to save the state of the working area after each commit. You can then test and amend the created intermediate commit if the fixes are necessary. In both the cases, you need to restore changes with git stash pop before you work on a new commit in the split.
A good software development practice is to test each change before committing it. But it does not always happen. Let's assume that you forgot to test some commits or skipped it because the change seemed trivial and you were pressed for time. The interactive rebase allows you to execute tests (to be precise, any command) during the rebase process by adding the exec (x) action with an appropriate command after the commit you want to test.
The exec command launches the command (the rest of the line) in a shell: the one specified in SHELL environment variable, or the default shell if SHELL is not set. This means that you can use shell features (for POSIX shell, it would be using cd to change directories, ">" to command output redirection, and ";" and "&&" to sequence multiple commands, and so on). It's important to remember that the command to be executed is run from the root of the working tree, not from the current directory (the subdirectory you were in while starting the interactive rebase).
If you are strict about not publishing untested changes, you might have worried about the fact that rewritten commits, rebased on the top of the new changes, might not pass the tests, even if the originals have. You can, however, make the interactive rebase test each commit with the --exec option, for example:
$ git rebase --interactive --exec "make test"
This would modify the staring instruction sheet, inserting exec make test after each entry:
pick 89579c9 first commit in a branch
exec make test
pick d996b71 second commit in a branch
exec make test
pick 6c89dee third commit in a branch
exec make test
You might prefer fixing the old commit immediately at the time you have noticed the bug, and not postponing it till the branch is rebased. The latter is usually done just before the branch is sent for review (to publish it). This might be quite some time after realizing the need to edit the past commit.
Git itself doesn't make it easy to fix the found bug straight away, not with built-in tools. You can, however, find third-party external tools that implement the patch management interface on the top of Git. Examples of such tools include Stacked Git (StGit) and Git Quilt (Guilt).
These tools provide similar functionality to Quilt (that is, pushing/popping patches to/from a stack). With them, you have a set of work-in-progress floating patches in the Quilt-like stack. You have also accepted changes in the form of proper Git commits. You can convert between patch and commit and vice versa, move and edit patches around, move and edit commits (that is done by turning the commit and its children into patches and back again), squash patches, and so on.
This is, however, an additional tool to install, additional set of operations to learn (even if they make your work easier), and additional set of complications coming from the boundary between the Git and the tool in question. An interactive rebase is powerful enough nowadays and, with autosquash, the need for another layer on top of Git is lessened.
In some cases, you might need to use more powerful tools than the interactive rebase to rewrite and clean up the history. You might want something that would rewrite the full history, and would do the rewrite noninteractively, given some specified algorithm to do the rewrite. Such situations are the task for git filter-branch.
The calling convention of this command is rather different than for the interactive rebase. First, you need to give it a branch or a set of branches to rewrite, for example, --all to rewrite all the branches. Strictly speaking, you give it the rev-list options as arguments, that is, a series of positive and negative references (see Chapter 2, Exploring Project History for definition). The command will only rewrite the positive refs mentioned in the command line. This means that positive references, which are the upper limits of revision ranges, need to be able to be rewritten—to be branch names. Negative revisions are used to limit what is ran through the rewriting process; you can, of course, also specify a pathspec on a command line to limit the changes.
This command rewrites the Git revision history by applying custom filters (scripts) on each revision to be rewritten. That's another difference: rebase works by reapplying changesets, while filter-branch works with snapshots. One of the consequences of this is that, for the filter-branch, a merge is just a kind of a commit object, while the rebase skips merges, unless you use the --preserve-merges option that does not work well combined with the interactive mode.
And, of course, with the filter-branch, you use scripts for rewrite (that are called filters), instead of rewriting interactively: editing instruction sheets and running commands by hand to edit, reword, squash, split, or test commits during the rebase process. This means that the speed of the filter-branch operation is not limited by the speed of the user interaction, but by I/O. It is recommended to use an off-disk temporary directory for rewriting (if the filter requires it) with the -d <directory> option.
Note
Because git filter-branch is usually used for massive rewrites, it saves the original refs, pointing to the pre-rewritten history in the refs/original/ namespace (you can override it with the --original <namespace> option).
The command would also refuse to start, unless forced, if there are already existing refs starting with refs/original/, or if there is anything in a temporary directory.
If you specify no filters, the commits will be recommitted without any changes. Such usage would normally have no effect, but it is permitted to allow in the future to compensate for (to fix) some Git bugs.
It is important to note that this command respects both grafts (it honors .git/info/grafts file) and replacements (refs in the refs/replace/ namespace), thought you can ask Git with a command line option to not follow the latter. Grafts and replacements are techniques to affect the history (or a rather a view of it) without rewriting any revisions. Both will be explained later in the Replacements mechanism section.
This means that running git filter-branch without any filter can be used to make permanent the effects of grafts or replacements by rewriting the selected commits. This way, you can use the following technique: use git replace on the specified commits to alter the view of a history, ensure that it looks correct (like you wanted it to look like), and then make the modification permanent with a filter-branch.
Additionally, while rewriting commits, git filter-branch respects the current value of a few relevant configuration variables. The values of those variables might have changed since the original creation of the commits being rewritten. This feature might be used, for example, to fix history if you have used nonstandard encoding for the commit messages (not UTF-8), but forgot to set i18n.commitEncoding. Rewriting history with no filters, with 'i18n.commitEncoding' set correctly at that tome, will nevertheless add the encoding header to the commit objects.
There is a large set of different types of possible filters to specify how to rewrite history. You can specify more than one type of filter; they are applied in the listed order. Note that different filters have different performance considerations.
The command argument is always evaluated in the shell context and is called once per commit undergoing the rewrite. Information about a pre-rewrite SHA-1 identifier of a current commit (that is, the commit being rewritten) is passed to the filter using the GIT_COMMIT environment variable. In addition, there is a map shell function available that takes the original SHA-1 of a commit as an argument, and outputs either the rewritten or original SHA-1 depending on whether the commit was rewritten or not at the time this shell function was invoked.
Also, GIT_AUTHOR_NAME, GIT_AUTHOR_EMAIL, GIT_AUTHOR_DATE, GIT_COMMITTER_NAME, GIT_COMMITTER_EMAIL, and GIT_COMMITTER_DATE are taken from the current commit and exported to the environment to make it easier to write the contents of the filter, and to affect the author and committer identities of the replacement commit. The filter-branch command uses git commit-tree to create a replacement commit if the filter function succeeds; if the command returns a nonzero exit status, then the whole rewrite will get aborted.
When writing filter scripts, just like for normal scripts, it is usually better to use low-level plumbing commands, rather than high-level porcelain commands designed for interactive use. In particular, the filter-branch command uses plumbing itself... without all the do what I mean (DWIM) niceties(like following gitignore files). If you prefer, though, you can use programs for filters, instead of shell scripts.
The git filter-branch command supports the following types of filters:
--env-filter: This may be used to modify environments in which a commit is performed. You might use it to change author or committer information, namely their name, e-mail, or time of operation. Note that variables need to be re-exported.--tree-filter: This may be used to rewrite the contents of the commit, that is, the tree object the commit refers to. The command is evaluated in the shell, with the working directory set to the root of the project and current commit checked out. After the command finishes, the contents of the working area are used as-is, new files are auto-added, and disappeared files are auto-removed without considering any ignore rules (for example, from.gitignore).--index-filter: This may be used to rewrite the index and the staging area from which the rewritten commit will be created. It is similar to the tree filter, but is much faster, because it doesn't need to check out files into the working area (into the filesystem).--parent-filter: This may be used to rewrite the commit's parent list. It receives a parent string in the form of the parent's command-line parameters to thegit commit-treecommand (-p <parent full SHA-1>) on a standard input, and shall output a new parent string on a standard output.--msg-filter: This may be used to rewrite the commit messages. It receives the original commit message on a standard input, and shall output a new commit message on a standard output.--commit-filter: This may be used to specify the command to be called instead ofgit commit-tree. This means getting<tree> [(-p <parent>)...]as arguments to the filter command, and getting the log message on the standard input.You can use in this filter a few convenience functions:
skip_commit "$@"to leave out the current commit (but not its changes!), andgit_commit_non_empty_tree "$@"to automatically skip no-change commits.--tag-name-filter: This may be used to rewrite tag names. The original tag name is passed on a standard input, and the command shall write a new name to a standard output. The original tags are not deleted, but can be overwritten; use--tag-name-filter catto simply update tags (stripping signatures).Note that the signature gets stripped, because by definition, it is impossible to preserve them. Tags with rewritten names are properly rewritten to point to the changed object. Currently, there is no support to change the tagger, timestamp, tag message, or re-signing tags.
--subdirectory-filter <directory>: This may be used to leave only the history of the given directory, and make this directory a project root. Can be used to change a subdirectory of a project into a subproject; see also Chapter 9: Managing Subprojects - Building a Living Framework.
Note that if you use the git log / git rev-list options to limit the set of revisions to rewrite (for example, --all to rewrite all the branches), you must separate them with "--" from the specification of filters and other git filter-branch options.
Let's assume that you committed a wrong file to a repository by mistake and you want to remove the file from the history. Perhaps this was a site-specific configuration file with passwords or their equivalent. Perchance, during "git add .", you have included a generated file that was not properly ignored (maybe it was a large binary file). Or mayhap, it turned out that you don't have the distribution rights to a file and you need to have it removed to avoid copyright violation.
Now you need to remove it from the project. Using git rm --cached would remove it only from future commits. You can also quite easily remove the file from the latest version by amending the commit (as described earlier in this chapter).
To excise the file from the entire history, (let's assume it is called passwords.txt), you can use git filter-branch with the --tree-filter option:
$ git filter-branch --tree-filter 'rm -f passwords.txt' HEAD
Rewrite fdfb73095fc0d594ff8d7f507f5fc3ab36859e3d (32/32)
Ref 'refs/heads/master' was rewritten
There is, however, a faster alternative—instead of using a tree filter, which involves writing out files, you can use delete files from the index using git rm --cached with the index filter. You need to ensure that the filter runs successfully and does not exit even if there are no files to delete; there is also no need for output:
$ git filter-branch --index-filter
     'git rm -f --cached -q --ignore-unmatch passwords.txt' HEAD
Or, you can use the BFG Repo-Cleaner third-party tool described in a later section.
You can use a filter branch to remove all the specific types of commits from the history, for example, commits by a specific author (one that, for example, didn't fulfill the copyright obligations, such as the contributor agreement). Note, however, that there is a very important difference between removing commits with filter-branch and removing them using a interactive rebase. A filter-branch removes nodes in the DAG of revisions, but does not remove the changes—there is simply no longer an intermediate step between two snapshots, and changes move to the child commit. On the other hand, an interactive rebase removes both commit and changes. This means that all the child commits are modified so that their snapshot does not include removed changes.
To remove a commit, you can use the skip_commit shell function in a commit filter:
$ git filter-branch --commit-filter '
if [ "$GIT_AUTHOR_NAME" = "Bad Contributor" ];
then
  skip_commit "$@"
else
  git commit-tree "$@"
fi' HEAD
You can use a filter-branch to permanently join two repositories, connect histories, and split the history in two. You can do this directly with a parent filter. For example to join repositories, making the commit <root-id> from the history of one of repositories being joined have <graft-id> commit (from the other repository) as a parent, you can use:
$ git filter-branch --parent-filter
'test "$GIT_COMMIT" = <root-id> && echo "-p <graft-id>" || cat' HEAD
You can split history at a given commit in two in a similar way, by setting parents to an empty set with echo "".
If you know that you have only one root commit (only one commit with no parents), you can simplify the method to join the history to the following command:
$ git filter-branch --parent-filter 'sed "s/^$/-p <graft id>/"' HEAD
In my opinion, however, it is simpler to use grafts or replacements, check whether the joined/split history renders correctly, and then make replacements permanent by running filter-branch without filters with the revision range starting, at least, from the rewritten joint/root commit. Still, the --parent-filter approach has an advantage if you can tell programmatically which revision or revisions to split (or join); a simple version of this technique is presented in the single-root join as shown in the preceding example.
Another common case is to fix erroneous names or e-mail addresses in commits. Perhaps, you forgot to run git config to set your name and e-mail address before you started working and Git guessed it incorrectly (if it couldn't guess it, it would ask for it before allowing the commit), and .mailmap is not enough. Maybe, you want to open the sources of the formerly proprietary closed-source program and need to change the internal corporate e-mail to a personal address.
In any case, you can change the e-mail addresses in the whole history with a filter-branch. You need to ensure that you are changing your commits. You can use --env-filter for this (though --commit-filter would work too, with just git commit-tree "$@" and no export lines):
$ git filter-branch --env-filter '
if test "$GIT_AUTHOR_EMAIL" = "joe@localhost"; then
  GIT_AUTHOR_NAME="Joe Hacker"
  [email protected]
  export GIT_AUTHOR_NAME GIT_AUTHOR_EMAIL
fi' HEAD
This example presents a simplified solution, you would want to change the committer data too, and the code is nearly identical.
If you are open-sourcing a project, you could also want to add the Signed-off-by: lines for the Digital Certificate of Origin (see Chapter 12, Git Best Practices):
$ git filter-branch --msg-filter
'cat && echo && echo "Signed-off-by: Joe Hacker <[email protected]>"'
HEAD
Suppose that you have noticed a typo in the name of a subdirectory, for example, inlude/ instead of include/. If there is no problem rewriting it, you could fix it by using --tree-filter with mv -f inlude include; but with some ingenuity, we can use --index-filter faster:
$ git filter-branch --index-filter '
  git ls-files --stage |
  sed -e "s!(	"*)inlude/!1include/!" |
  GIT_INDEX_FILE=$GIT_INDEX_FILE.new
    git update-index --index-info &&
  mv "$GIT_INDEX_FILE.new" "$GIT_INDEX_FILE"
' HEAD
The explanation is as follows: we use the fact that the output of git ls-files --stage matches the format of input for git update-index --index-info (the latter command is a plumbing command underlying the git add porcelain). To replace text and fix a typo in a path name, the sed (streaming editor) utility is used. Here, we needed to write the regular expression to take care that some file names may require quoting. A temporary index file is used to make an atomic operation.
Often, some part of a larger project takes life on its own and it begins to make sense to use it separate from the project it started in. We would want to extract the history of this part to make its subdirectory the new root. To rewrite history in this way and discard all the other history, you can run:
$ git filter-branch --subdirectory-filter lib/foo -- --all
Though, perhaps, a better solution would be to use a specialized third-party tool, namely, git subtree. This tool (and its alternatives) will be discussed in Chapter 9, Managing Subprojects – Building a Living Framework.
The git filter-branch command is not the only solution for the large-scale rewriting of the project's history. There are other tools that might be easier to use, either because they include lots of predefined clean-up operations, or because they provide some level of interactivity with the ability for scripted rewrite (with read-evaluate-print loop (REPL), similar to interactive shells in some interpreted programming languages).
The BFG Repo Cleaner is a simpler, faster, and specialized alternative to using the git filter-branch command for cleansing bad data out of your Git repository history: removing files and directories and replacing text in files (for example, passwords with placeholders). It is faster than filter-branch for its area of application, because it can assume that we don't care where in the directory hierarchy the bad file is, only that we want it to be gone. Also, it can use multiple cores with parallel processing, and it doesn't need to fork and the exec shell to run filter script for each commit—BFG is written in Scala and uses JGit as a Git implementation.
BFG is simpler to use in typical use cases, because it provides a set of command-line parameters specialized for removing files and fixing them, such as --delete-files or --replace-text, a query language of sorts It lacks the flexibility (often unnecessary one) of filter-branch, though.
One issue you need to remember is that BFG assumes that you have fixed the contents of your current commit.
The reposurgeon was originally created to help clean up artefacts created by the repository conversion (migrating from one version control system to another). It relies on being able to parse, modify, and emit the command stream in the git fast-import format, which is nowadays a common export and import format among source control systems thanks to it being version control agnostic.
It can be used for history rewriting, including editing past commits and metadata, excising commits, squashing (coalescing) and splitting commits, removing files and directories from history, and splitting and joining history.
The major advantage reposurgeon has over using git filter-branch is that it can be run in two modes: either as an interactive interpreter, a kind of debugger/editor for history with command history and tab completion, and a batch mode to execute commands given as arguments. This allows to interactively inspect history and test changes, and then batch run them for all the revisions.
The disadvantage is having to install and then learn to use a separate tool.
There is, however, a very important principle. Namely, that you should never (or, at least, not without a very, very good reason) rewrite published history, especially when it comes to commits that got pushed to the public repository, or were otherwise made public. What you can do is to change those parts of the graph of the revisions that are private.
The reason behind this rule is that rewriting published history could cause trouble for downstream developers, if they based their changes on revisions that got rewritten.
This means that it is safe to rewrite and rebuild those public branches that are explicitly stated and documented to be in flux, for example, as a way of showing work in progress (such as pu: proposed updates type of branch). Another possibility for the safe rewriting of a public branch is to do it at specific stages of the project's life, namely, after creating a new release; again, this needs to be documented.
Now, you will see on a simple example the perils of rewriting published history (for example, rebasing) and how it causes trouble. Let's assume that there are two public branches that are of interest: master and subsys. The latter branch is based on (forked from) the former. Let's also assume that a downstream developer (who might be you) created a new topic branch based on subsys for his/her own work, but did not published it yet; it is present only in his/her local repository. This situation is shown in Fig 1 (the darker blue color denotes the revisions present only in the local repository of the downstream developer):

Fig 1: The state of the local repository of a downstream developer before the rewrite of the published history with the new local work that was put on a topic branch
Then, upstream rewrites the subsys branch to start from the current (topmost) revision in the master branch. This operation is called rebase, and was described in the previous chapter, Chapter 7, Merging Changes Together. During rewrite, one of the commits was dropped; perhaps the same change was already present in master and was skipped, or perhaps it was dropped for some reason or squashed into the previous commit with an interactive rebase (this operation will be described later in the Interactive rebase section). The public repository now looks as follows:

Fig 2: The state of a public upstream repository after rewrite. You can see the emphasized old base of the rebased branch, new base, and rewritten commits (after rebase)
Note that, in the default configuration, Git would refuse to push rewritten history (would deny a nonfast-forward push). You would need to force the push.
The problem is with merging changes based on the pre-rewrite versions of the revisions, such as the topic branch in this example:
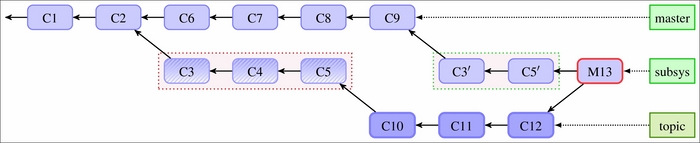
Fig 3: The situation after merging the changes that were based on pre-rewrite revisions into post-rewrite branches. Notice that the merge brings the pre-rewrite version of the revisions, including the commits dropped during rebase
If neither the downstream developer, nor the upstream one, notices that the published history has been rewritten, and merges the changes from the topic branch into, for example, the subsys branch it was based on, the merge would bring duplicated commits. As we can see in the example in Fig 3, after such a merge (denoted by M13 here), we have both the C3, C4, and C5 pre-rewrite commits brought by the topic branch, and the C3' and C5' post-rewrite commits. Note that the commit C4 that was removed in the rewrite is back; it might have been a security bug!
But what can we do if the upstream has rewritten the published history (for example, rebased it)? Can we avoid bringing the abandoned commits back, and merging a duplicate or near-duplicate of the rewritten revisions? After all, if the rewrite is published, changing it would be yet another rewrite.
The solution is to rebase your work to fit with the new version from the upstream, moving it from the pre-rewrite upstream revisions to the post-rewrite ones.

Fig 4: After a downstream rebase of a topic branch, done to recover from upstream rewrite
In the case of our example, it would mean rebasing the topic branch onto a new (post-rewrite) version of subsys, as shown in Fig 4.
Depending on whether the topic branch is public or not, it might mean that now you are breaking the promise of unaltered public history for your downstream. Recovering from an upstream rewrite might then result in a ripple of rebases following the rewrite down the river of downstreams (of dependent repositories).
An easy case is when subsys is simply rebased, and the changes remain the same (which means that C4 vanished because one of C6-C9 included it). Then, you can simply rebase topic on top of its upstream, that is, subsys, with:
$ git rebase subsys topic
The topic part is not necessary if you are currently on it (if topic is the current branch). This rebases everything: the old version of subsys and your commits in topic. This solution, however, relies on the fact that git rebase would skip repeated commits (removing C3, C4, and C5, and leaving only C10' and C12'). It might be better and less error-prone to assume the more difficult case.
The hard case is when rewriting subsys involved some changes and was not only a pure rebase, or when an interactive rebase was used. In this case, it is better to explicitly move just your changes, namely subsys@{1}..topic (assuming that the subsys@{1} entry in subsys reflog is before rewrite), stating that they are moved on top of new subsys. This can be done with the --onto option:
$ git rebase --onto subsys subsys@{1} topicYou can make Git use reflog to find a better common ancestor with the --fork-point option to Git rebase, for example:
$ git rebase --fork-point subsys topic
The rebase would then move the changes to topic, starting with the result of the git merge-base --fork-point subsys topic command; though if the reflog of the subsys branch does not contain necessary information, Git would fall back to upstream; here subsys.