
In this chapter, we will finally start to work in a distributed manner, using remote servers as a contact point for different developers. As we said earlier, Git is a distributed version-control system. This chapter is for the distributed part.
You know that Git is a tool for versioning files. However, it has been built with collaboration in mind. In 2005, Linus Torvalds had the need for a light and efficient tool to handle tons of patches proposed to the Linux kernel from a multitude of contributors. He wanted a tool that would allow him and hundreds of other people to work on it without going crazy. The pragmatism that guided its development gave us a very robust layer to share data among computers, without the need of a central server.
A Git remote is another computer that has the same repository you have on your computer. Every computer that hosts the same repository on a shared network can be the remote of other computers:

So, a remote Git repository is nothing other than a remote copy of the same Git repository we created locally. If you have access to that host via common protocols such as SSH, HTTPS or the custom git:// protocol, you can keep your modification with it in sync.
The great difference between Git and other distributed version control systems (DVCS) to classical centralized versioning systems (VCS) such as Subversion is that there's no central server where you can give custody of your repository. However, you can have many remote servers. This allows you to be fault tolerant and have multiple working copies where you can get or pull modifications, giving you incredible flexibility.
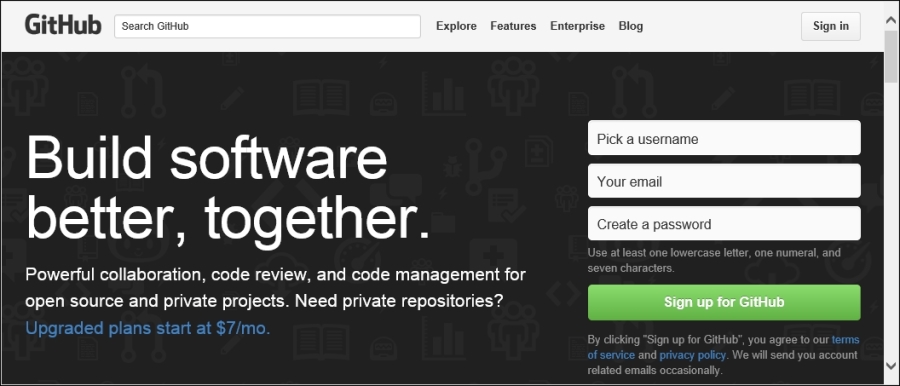
To start working with a remote, we have to get one. Today, it is not difficult to get a remote. The world has plenty of free online services that offer room for Git repositories. One of the most commonly used repository is GitHub. Before starting, note that GitHub offers free space for open source repositories, so everyone in the world can access their code. Be careful, and don't store sensitive information such as passwords and so on in your repository; they will be publicly visible.
GitHub offers unlimited free public repositories, so we can make use of them without investing a penny. In GitHub, you have to pay only if you need private repositories, for example, to store the closed source code on which you base your business.
Creating a new account is simple. Just perform the following steps:
- Go to https://github.com.
- Sign up using your e-mail.
When done, we are ready to create a brand new repository where we can push our work:

Go to the Repositories tab, click on the green New button, and choose a name for your repository:

For the purpose of learning, I will create a simple repository for my personal recipes. These recipes are written using the Markdown markup language (http://daringfireball.net/projects/markdown/).

Then, you can write a description for your repository. This is useful to allow people who come to visit your profile to better understand what your project is intended for. We create our repository as public because private repositories have a cost, as we said earlier. Then, we initialize it with a README file. Choosing this GitHub makes a first commit for us, initializing the repository that is now ready to use.
Now, we have a remote repository, so it's time to learn how to hook it locally. For this, Git provides the git clone command.
Using this command is quite simple. All we need to know is the URL of the repository to clone. The URL is provided by GitHub in the bottom-right corner of the repository home page, as shown in the following screenshot:

To copy the URL, you can simply click on the clipboard button on the right-hand side of the textbox.
So, let's try to follow these steps together:
- Go to the local root folder,
C:Repos, for the repositories. - Open a Bash shell within it.
- Type
git clone https://github.com/fsantacroce/Cookbook.git.
Obviously, the URL of your repository will be different. As you can see in this screenshot, GitHub URLs are composed by https://github.com/<Username>/<RepositoryName>.git:

At this point, Git created a new Cookbook folder that contains the downloaded copy of our repository. Inside, we will find a README.md file, a classical one for a GitHub repository. In this file, you can describe your repository using the common Markdown markup language to users who will chance upon it.
So, let's try to edit the README.md file and upload modifications to GitHub:
- Edit the
README.mdfile using your preferred editor. You can add, for example, a new sentence. - Add it to the index and then commit.
- Put your commit on the remote repository using the
git pushcommand.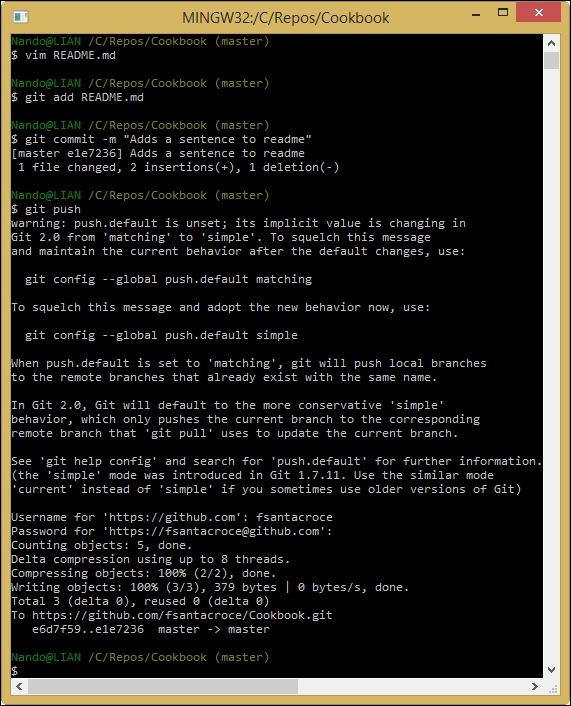
The git push command allows you to upload local work to a configured remote location, in this case, a remote GitHub repository. There are a few things we have to know about pushing. We can begin to understand the message Git gave us just after we run the git push command.
When you give the git push command without specifying anything else, Git sends to the remote all the new commits you did locally in your actual branch. For new commits, we will send only the local commits that have not been uploaded yet.
The messages that appeared earlier tell us that something is about to change in the default behavior of the git push command. Before the incoming Git 2.0 release, when you fire the push command without specifying anything else, the default behavior is to push all the new commits in all the corresponding local-remote branches.
In this brand new Cookbook repository, we only have the master branch. However, next, you will learn how to deal with the remote having many branches.
Obviously, we can create and push a new branch to the remote to make our work public and visible to other collaborators. For instance, I will create a new branch for my first recipe; then, I will push this branch to the remote GitHub server. Follow these simple steps:
- Create a new branch, for instance,
Pasta:git checkout –b Pasta. - Add to it a new file, for example,
Spaghetti-Carbonara.md, and commit it. - Push the branch to the remote using
git push -u origin Pasta.
Before continuing, we have to examine in depth some things that happened after we used the git push command.
With the git push –u origin Pasta command, we told Git to upload our Pasta branch (and the commits within it) to the origin. The origin is the default remote name of a repository, like master is the default branch name. When you clone a repository from a remote, that remote becomes your origin alias. When you tell Git to push or pull something, you often have to tell it about the remote you want to use. Using the origin alias, you tell Git that you want to use your default remote.
If you want to see remotes actually configured in your repository, you could type a simple git remote command, followed by -v (--verbose) to get some more details:

In the details, you will see the full URL of the remote.
You can add, update, and delete remotes using the git remote command. We will make use of it when we need to. For now, just remember that there is a command for that.
Using the -u option, we told Git to track the remote branch. Tracking a remote branch is the way to tie your local branch with the remote one. Note that this behavior is not automatic; you have to set it if you want it (Git does nothing until you ask for it!). When a local branch tracks a remote branch, you actually have a local and remote branch that can be kept easily in sync. This is very useful when you have to collaborate with some remote coworkers at the same branch, allowing all of them to keep their work in sync with other people's changes.
Furthermore, consider that when you use the git fetch command, you will get changes from all tracked branches. While you use the git push command, the default behavior is to push to the corresponding remote branch only.
To better understand the way our repository is now configured, try to type git remote show origin:

As you can see, both the Pasta and master branches are tracked.
You can also see that your local branches are configured to push and pull to remote branches with the same name. However, remember that it is not mandatory to have local and remote branches with the same name. The local branch foo can track the remote branch bar and vice versa; there are no restrictions.
The first thing you have to learn when working with remote branches is to check whether there are modifications to retrieve.
The git fetch command is very helpful. To see it at work, create a new file directly on GitHub using the following steps so that we can work with it:

Now, we can make use of git fetch:

The git fetch command downloads differences from the remote, but does not apply them. With the help of git status, we will see more details:

As you can see, Git tells us there is one downloaded commit we have to apply to keep our branch in sync with the remote counterpart.
If push is the verb used to define the upload part of the work, pull is the verb used to describe the action of downloading and applying remote changes. When you pull something from a remote, Git will retrieve all the remote commits made after your last pull from the branch you specify and merge them. Of course, the local destination branch is the branch you are in now (if you don't explicitly specify another one). So, finally, the pull command is the git fetch command plus the git merge command (in the future, you can skip git fetch and use only git pull to merge remote commits).
Now, use the git pull command to merge the brand new Bucatini-Amatriciana.md file committed directly from GitHub:

Well done! Now, our Pasta branch is in sync with the remote one. We have the Bucatini-Amatriciana.md file in our local branch, ready to be filled.
Just to end this simple example, make some modifications to the new downloaded file and push the commit to GitHub:

This time we have specified the branch where we want to push changes, so Git avoids reminding us the default git push behavior is going to change in the next release.
Often, you will find yourself needing to put your local repository in a shared place where someone else can look at your work. In this section, we will learn how to achieve this.
Create a new local repository to publish by following these simple steps:
- Go to our
C:Reposfolder. - Create a new
HelloWorldfolder. - Init a new repository, as we did in Chapter 1, Getting Started with Git.
- Add a new
README.mdfile and commit it.
Now, create the GitHub repository as we did previously. This time, leave it empty. Don't initialize it with a README.md file; we already have one in our local repository:

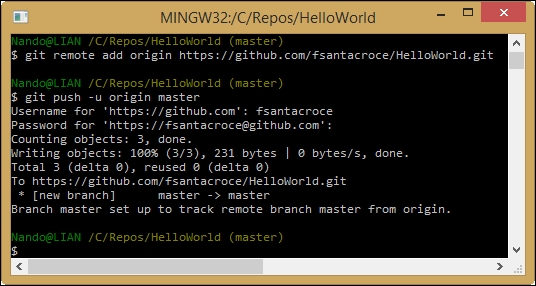
At this point, we are ready to publish our local repository on GitHub or, more specifically, add a remote to it.
To publish our HelloWorld repository, we simply have to add its first remote. Adding a remote is quite simple: Use the command git remote add origin <remote-repository-url>.
So, type git remote add origin https://github.com/fsantacroce/HelloWorld.git in the Bash shell.
Adding a remote, like adding or modifying other configuration parameters, simply consists of editing some text files in the .git folder. In the next chapter, we will take a look at some of these files.
GitHub's trademark is the so-called social coding. Right from the beginning, GitHub made it easy to share code, track other people's work, and collaborate using two basic concepts: forks and pull requests. In this section, I will illustrate these concepts in brief.
Forking is a common concept for a developer. If you have already used a GNU-Linux-based distribution, you would know that there are some forefathers, such as Debian, and some derived distro, such as Ubuntu. They are commonly called the forks of the original distribution.
In GitHub, things are similar. At some point, you will find an interesting open-source project that you want to modify slightly to perfectly fit your needs. At the same time, you want to benefit from bug fixes and new features from the original project, all the time keeping in touch with your work. The right thing to do in this situation is to fork the project.
However, first, remember that fork is not a Git feature, but a GitHub invention. When you fork on GitHub, you get a server-side clone of the repository on your GitHub account. If you clone your forked repository locally in the remote list, you would find the origin alias that points to your account repository. The original repository will generally assume the upstream alias (but this is not automatic, you have to add it manually):
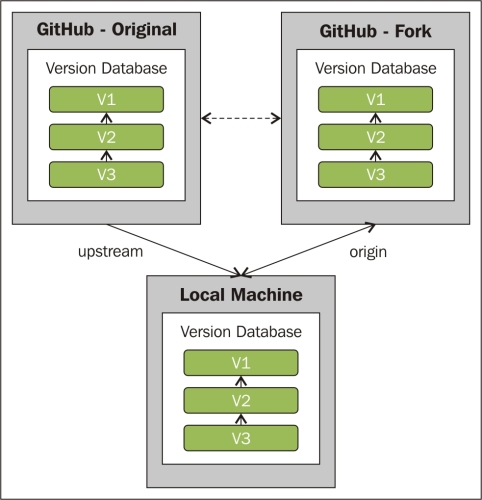
For your convenience, the right command to add the upstream remote is $ git remote add upstream https://github.com/<original-owner>/<original-repository>.git.
Now, to better understand this feature, go to your GitHub account and try to fork a common GitHub repository called Spoon-Knife, made by the octocat GitHub mascot user. Perform the following steps:
- Log in to your GitHub account.
- Look for
spoon-knifeusing the search textbox located in the top-left corner of the page:
- Click on the first result,
octocat/Spoon-Kniferepository. - Fork the repository using the Fork button at the right of the page:

- After a funny photocopy animation, you will get a brand new
Spoon-Kniferepository on your GitHub account:
Now, you can clone this repository locally, as we did earlier:

As you can see, the upstream remote is not present. This is a convention, not a thing that belongs to Git itself. To add this remote, type:
git remote add upstream https://github.com/octocat/Spoon-Knife.git

Now, you can keep your local repository in sync with the changes in your remote and the origin alias. You can also get changes ones coming from the upstream remote, the original repository you forked. At this point, you are probably wondering how to deal with two different remotes. Well, it is easy. Simply pull from upstream and merge those modifications in your local repository. Then, push them in your origin remote in addition to your changes. If someone else clones your repository, they would receive your work merged with the work done by someone else on the original repository.
If you created a fork of a repository, this is because you are not a direct contributor of the original project or simply because you don't want to make a mess in other people's work before you are familiar with the code.
However, at a certain point, you realize that your work can be useful even for the original project. You realize that you can implement a previous piece of code in a better way, you can add a missing feature, and so on.
So, you find yourself needing to allow the original author to know you did something interesting, to ask them if they want to take a look and, maybe, integrate your work. This is the moment when pull requests come in handy.
A pull request is a way to tell the original author, "Hey! I did something interesting using your original code. Do you want to take a look and integrate my work, if you find it good enough?" This is not only a technical way to achieve the purpose of integrating work, but it is even a powerful practice to promote code reviews (and then the so-called social coding) as recommended by the eXtreme Programming fellows (http://en.wikipedia.org/wiki/Extreme_programming).
One other reason to use a pull request is because you cannot push directly to the upstream remote if you are not a contributor of the original project. Pull requests are the only way. In small scenarios (such as a team of two or three developers that works in the same room), probably, the fork and pull model represents an overhead. So, it is more common to directly share the original repository with all the contributors, skipping the fork and pull ceremony.
To create a pull request, you have to go to your GitHub account and make it directly from your forked account. However, first, you have to know that pull requests can be made only from separated branches. At this point of the book, you are probably used to creating a new branch for a new feature or refactor purpose. So, this is nothing new.
To try, let's create a local TeaSpoon branch in our repository, commit a new file, and push it to our GitHub account:

If you take a look at your account, you will find a surprise: in your Spoon-Knife repository, there is now a new green button made on purpose to start a pull request:

Clicking on this button makes GitHub open a new page where we can adorn our pull request to better support our work. We can let the original author know why we think our work can be useful even in the original project.
However, let me analyze this new page in brief.
In the top-left corner, you will find what branches GitHub is about to compare for you:

This means that you are about to compare your local TeaSpoon branch with the original master branch of the octocat user. At the bottom of the page, you can see all the different details (files added, removed, changed, and so on):

In the central part of the page, you can describe the work you did in your branch. After that, you have to click on the green Create pull request button to send your request to the original author, allowing him to access your work and analyze it. A green Able to merge sticker on the right-hand side informs you that these two branches can be automatically merged (there are no unresolved conflicts, which is always good to see, considering your work):

Now, the last step: click on the Create pull request button and cross your fingers.

At this point a new conversation begins. You and the project collaborators can start to discuss your work. During this period, you and other collaborators can change the code to better fit common needs, until an original repository collaborator decides to accept your request or discard it, thus closing the pull request.