
2
Setup and Project Structure Overview
In the previous chapter, we looked at all the challenges when building a React application and some great solutions that can help us handle them. We also planned out how our application should work and what tools we should use.
In this chapter, we will look at the project structure and the setup tools that make a good baseline for our project.
We will cover the following topics:
- Next.js application overview
- TypeScript setup overview and usage
- ESLint setup overview
- Prettier setup overview
- Pre-committing checks setup overview
- Project structure overview
By the end of this chapter, we will have a good understanding of the tools we will be using for the project setup and the feature-based project structure to make organizing our code more manageable.
Technical requirements
Before we get started, we need to set up our project. To be able to develop our project, we will need the following things installed on our computer:
- Node.js version 16 or above and npm version 8 or above.
There are multiple ways to install Node.js and npm. Here is a great article that goes into more detail: https://www.nodejsdesignpatterns.com/blog/5-ways-to-install-node-js.
- VSCode (optional) is currently the most popular editor/IDE for JavaScript/TypeScript, so we will be using it. It is open source, has great integration with TypeScript, and we can extend its features via extensions. It can be downloaded from https://code.visualstudio.com/.
The code files for this chapter can be found here: https://github.com/PacktPublishing/React-Application-Architecture-for-Production.
The repository can be cloned locally with the following command:
git clone https://github.com/PacktPublishing/React-Application-Architecture-for-Production.git
Once the repository has been cloned, we need to install the application’s dependencies:
npm install
We also need to provide the environment variables:
cp .env.example .env
Once the dependencies have been installed, we need to select the right stage of the code base that matches this chapter. We can do that by executing the following command:
npm run stage:switch
This command will prompt us with a list of stages for each chapter:
? What stage do you want to switch to? (Use arrow
 keys)
❯ chapter-02
  chapter-03
  chapter-03-start
  chapter-04
  chapter-04-start
  chapter-05
  chapter-05-start
(Move up and down to reveal more choices)
This is the second chapter so we can select the chapter-02 option.
Once the chapter has been selected, all files required to follow along with the chapter will appear. To follow along with this chapter, we don’t need to make any changes to the code. We can just use it as a reference to help get a better overview of the code base.
For more information about the setup details, check out the README.md file.
Next.js application overview
Next.js is a web framework built on top of React and Node.js, allowing us to build web applications. Because it can run on the server, it can be used as a full-stack framework.
Why Next.js?
Using Next.js has multiple benefits. We want to use it because of several reasons:
- Very easy to get started with: In the early days of React, it was very challenging to start a project. To get a simple page on the screen, we had to deal with many tools such as Webpack, Babel, and others. We still use those tools today, but fortunately, most tooling configuration is hidden from us with an interface to extend the configuration if required.
Besides the challenges of setting up the project, it is very challenging to maintain all those dependencies over time. Next.js hides all those complexities away from developers and allows them to get started quickly with a new project.
- Allows multiple rendering strategies: Being able to use multiple rendering strategies is probably the main reason why we want to use Next.js, although it comes with other great benefits. First, it allows us to define the behavior of page rendering at the page level, meaning we can define how we want to render each page individually. It also supports multiple rendering strategies, such as the following:
- Client-side rendering
- Server-side rendering
- Static site generation
- Incremental static regeneration
We will be using different strategies based on the application’s needs.
- Performance optimizations: Next.js is built with web performance in mind. It implements performance optimization techniques such as the following:
- Code splitting
- Lazy loading
- Prefetching
- Image optimization
That sums up why we want to use Next.js for our application. Now, let’s see what the Next.js application structure looks like.
Next.js application structure
The easiest way to get started with Next.js is to use the create-next-app CLI to generate a new application.
Since we have already generated the application as part of the code samples, we do not need to use the CLI, but if we were generating the application from scratch, we would execute the following command:
npx create-next-app@latest jobs-app --typescript
By executing this command, we would generate a new Next.js application with TypeScript configured out of the box.
There are a couple of things that are specific to Next.js. Let’s look at the following file and folder structure of a simple Next.js application:
- .next
- public
- src
  - pages
    - _app.tsx
    - index.tsx
- next.config.js
- package.json
Let’s analyze each file and folder one by one:
- .next: Contains production-ready files generated by running the build command of Next.js.
- public: Contains all static assets of the application.
- src/pages: This is a special folder in Next.js where all pages defined here become available at corresponding routes. This is possible thanks to the filesystem-based routing system. The pages folder can also live in the root of the project, but it is nice to keep everything in the src folder.
- src/pages/_app.tsx: The _app.tsx file is a special file that exports a React component that wraps every page when rendered. By wrapping pages with this special component, we can add custom behavior for our application, such as adding any global configurations, providers, styles, layouts, and more to all the pages.
- src/pages/index.tsx: This is how we declare pages of the application. This shows how the root page is defined. We will dive into Next.js-specific routing in the upcoming chapters.
- next.config.js: This is where we can extend the default functionalities such as Webpack configuration and other things in a simple way.
- package.json: Every Next.js application includes the following npm scripts:
- dev: Starts a development server on localhost:3000
- build: Builds the application for production
- start: Starts the production build on localhost:3000
We will cover more on these topics in the following chapters, but for now, this should give us enough information to get started with Next.js.
TypeScript setup overview and usage
JavaScript is a dynamically typed programming language, meaning it doesn’t catch any type errors during build time. That’s where TypeScript comes into play.
TypeScript is a programming language that acts as a superset of JavaScript, which allows us to write JavaScript with some behaviors of a statically typed language. This comes in handy as we can catch many potential bugs before they get into production.
Why TypeScript?
TypeScript is especially useful for large applications built by large teams. Code written in TypeScript is much better documented than code written in vanilla JavaScript. By looking at the type definitions, we can figure out how a piece of code is supposed to work.
Another reason is that TypeScript makes refactoring much easier because most of the issues can be caught before running the application.
TypeScript also helps us utilize our editor’s IntelliSense, which shows us intelligent code completion, hover information, and signature information, which speeds up our productivity.
TypeScript setup
Our project already has TypeScript configured. The TypeScript configuration is defined in the tsconfig.json file at the root of the project. It allows us to configure how strict we want it to be based on our needs:
{
  "compilerOptions": {
    "target": "es5",
    "lib": ["dom", "dom.iterable", "esnext"],
    "allowJs": true,
    "skipLibCheck": true,
    "strict": true,
    "forceConsistentCasingInFileNames": true,
    "noEmit": true,
    "esModuleInterop": true,
    "module": "esnext",
    "moduleResolution": "Node",
    "resolveJsonModule": true,
    "isolatedModules": true,
    "jsx": "preserve",
    "incremental": true,
    "baseUrl": ".",
    "paths": {
      "@/*": ["./src/*"]
    }
  },
  "include": ["next-env.d.ts", "src"],
  "exclude": ["node_modules"]
}
We will not dive too deeply into every configuration property since most of the properties have been auto-generated. However, there is one thing that was also provided:
   "baseUrl": ".",
    "paths": {
      "@/*": ["./src/*"]
    }
This will tell the TypeScript compiler that anything imported via @/* will refer to the src folder.
Previously, we had to perform messy imports, like so:
import { Component } from '../../../components/component'Now, we can import components like so:
import { Component } from '@/components/component'No matter how many nested levels we have, we can always import with absolute paths, and we will not be required to change our import statement should we decide to move the consumer file somewhere else.
Basic TypeScript usage
Let’s cover some TypeScript basics so that we are comfortable using it throughout this book.
Primitive types
let numberVar: number;
numberVar = 1 // OK
numberVar = "1" // Error
let stringVar: string;
stringVar = "Hi"; // OK
stringVar = false; // Error
let stringVar: string;
stringVar = "Hi"; // OK
stringVar = false; // Error
As we can see, we are only allowed to assign values with the corresponding type. Assigning to any other type except the any type, which we will cover in a moment, will cause a TypeScript error.
Any
The any type is the loosest type in TypeScript and using it will disable any type checking. We can use it when we want to bypass errors that would usually occur. However, we should only use it as a last resort and try to use other types first:
let anyVar: any;
anyVar = 1; // OK
anyVar = "Hello" // OK
anyVar = true; // OK
numberVar = anyVar; // OK
As we can see, variables with the any type can accept and be assigned to a value of any other type, which makes it very flexible.
Unknown
Sometimes, we can’t know upfront which types we will have. This might happen with some dynamic data where we don’t know its type yet. Here, we can use the unknown type:
let unknownVar: unknown;
unknownVar = 1; // OK
unknownVar = "123" // OK
let unknownVar2: unknown;
unknownVar = unknownVar2; // OK
anyVar = unknownVar2; // OK
numberVar = unknownVar2; // Error
stringVar = unknownVar2; // Error
booleanVar = unknownVar2; // Error
As we can see, we can assign values of any type to the variable with unknown type. However, we can only assign values with type unknown to the variables with any and unknown types.
Arrays
There are two ways to define array types with TypeScript:
type numbers = number[]
type strings = Array<string>
Objects
Object shapes can be defined in two ways:
type Person = {
  name: string;
  age: number;
}
interface Person {
  name: string;
  age: number;
}
The first one is called type alias, while the second is called interface.
There are a few differences between type aliases and interfaces, but we won't get into them right now. For any object shape type we define, we can use type aliases.
Unions
The basic types we just mentioned are great, but sometimes, we want to allow a variable to be one of many types. Let’s look at the following example:
type Content = string | number;
let content: Content;
content = 1 // OK
content = "Hi"; // OK
content = false // Error
As we can see, the content variable can now be either string or number.
We can also add literal types in the union, as shown in the following example:
type Color = "red" | "green" | "blue";
let color: Color;
color = "red" // OK
color = "yellow" // Error
Here, we are defining colors as strings, but we want to add more constraints so that we can only take one of those three colors. If we try to add anything else, TypeScript will warn us with an error.
Intersections
Intersection types allow us to combine the properties of two different objects into a single type. Consider this example:
type Foo = {
  x: string;
  y: number;
}
type Bar = {
  z: boolean;
}
type FooBar = Foo & Bar;
The FooBar type will now contain the x, y, and z properties.
Generics
Generics is a mechanism of creating reusable types by parameterizing them. They can help us reduce code repetition. Consider the following type:
type Foo = {
  x: number;
}
Let’s see what happens if we need the same structure but with x as a string:
type Foo = {
  x: string;
}
Here, we can see that there is some code duplication going on. We can simplify this by making it generic so that it accepts the type as T. This would be assigned as the type of the x property:
type Foo<T> = {
  x: T;
}
let x: Foo<number>;
let y: Foo<string>;
Now, we have a nice way to reuse the structure by passing different types to the generic.
We can also use generics with functions:
function logger<T>(value: T) {
  console.log(value)
}
logger<number>(1) // OK
logger<string>(1); // Error
To try out these snippets and see how different types behave, go to https://www.typescriptlang.org/play, copy the snippets, and play around with the types to see how they work.
TypeScript and React
Every TypeScript file that uses JSX must have the .tsx extension.
Typing React components is very straightforward:
type InfoProps = {
  name: string;
  age: number
};
const Info = (props: InfoProps) => {
  return <div>{props.name}-{props.age}</div>;
};
These examples are pretty trivial. We will see more practical examples in the upcoming chapters when we start building the application. To learn more about TypeScript, it is recommended to check the TypeScript handbook at https://www.typescriptlang.org/docs, which covers all these topics in much more detail.
ESLint setup overview
Linting is a process where linters analyze source code and detect any potential issues in the code base.
We will be using ESLint, which is the most popular linting tool for JavaScript. It can be configured with different plugins and rules to adapt the linter to our application’s needs.
The ESLint configuration is defined in the .eslintrc.js file at the root of the project. We can add different rules, extend them with different plugins, and override which files to apply the rules to so that they suit our application’s needs.
Sometimes, we don’t want to lint every folder and file, so we can tell ESLint to ignore folders and files by defining them in the .eslintignore file.
ESLint has great integration with editors and IDEs so that we can see any potential issues in the file while we are coding.
To run our linter, we have defined the linting script in package.json:
"lint": "eslint --ext .ts,.tsx ./src",
By running npm run lint, we will lint every .ts and .tsx file in the src directory, and the linter will notify us about any potential issues.
Prettier setup overview
Prettier is a great tool for formatting code. It enforces a consistent coding style across the entire code base. By utilizing the “format on save” feature in our IDE, we can automatically format the code based on the configuration provided in the .prettierrc file. It will also give us good feedback when something is wrong with the code. If it doesn’t auto-format, something is wrong with the code and it needs to be fixed.
Prettier comes with a default configuration out of the box. We can override this by creating the .prettierrc file and modifying the configuration.
Just as with ESLint, sometimes, there are files we do not want to auto-format. We can tell Prettier to ignore files and folders by adding them to the .prettierignore file.
To run Prettier, we have defined a couple of scripts in package.json:
"prettier": "prettier "**/*.+(json|ts|tsx)"",
"format:check": "npm run prettier -- --check",
"format:fix": "npm run prettier -- --write",
As we can see, we can run npm run format:check to just check the formatting without trying to fix it. If we want to fix it, then we can run npm run format:fix, which will modify the files that need to be fixed.
Pre-committing checks setup overview
Having static code analysis tools such as TypeScript, ESLint, and Prettier is great; we have configured them and can run individual scripts whenever we make some changes to ensure everything is in the best order.
However, there are some drawbacks. Developers can forget to run all checks before committing to the repo, which can still bring problematic and inconsistent code to production.
Fortunately, there is a solution that can fix this problem: whenever we try to commit to the repository, we want to run all checks in an automated way.
This is the flow we want to have:
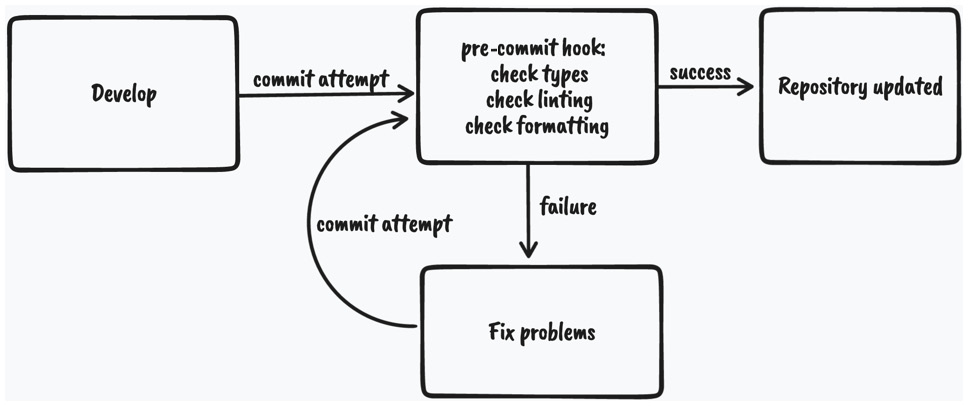
Figure 2.1 – Pre-commit code checking diagram
As we can see, whenever we attempt to commit to the repository, the git pre-commit hook will run and execute the scripts that will do the checking. If all the checks pass, the changes will be committed to the repository; otherwise, we will have to fix the issues and try again.
To enable this flow, we will use husky and lint-staged:
- husky is a tool that allows us to run git hooks. We want to run the pre-commit hook to run the checks before committing our changes.
- lint-staged is a tool that allows us to run those checks only on files that are in the staging area of Git. This improves the speed of code checking since doing that on the entire code base might be too slow.
We already have these tools installed and configured, but if we didn’t, they could be installed using the following command:
npm install –-save-dev husky lint-staged
Then, we would need to enable Git hooks:
npx husky install
Then, we would need to create the pre-commit hook:
npx husky add .husky/pre-commit "npx lint-staged"
The Husky pre-commit hook will run lint-staged. Then, we would need to define what commands lint-staged should run inside the lint-staged.config.js file:
module.exports = {
  '*.{ts,tsx}': [
    'npm run lint',
    "bash -c 'npm run types:check'",
    'npm run format:check',
  ],
};
If we try to commit code that contains any violations, it will fail and stop us from committing the changes.
Now that we covered most of our setup, let’s look at the structure of our project.
Project structure overview
As we already mentioned, React is very flexible when it comes to project structure.
Some of the benefits of having a good project structure are as follows:
- Separation of concerns
- Easier refactors
- Better reasoning about the code base
- Easier for larger teams to work on the code base simultaneously
Let’s see what the feature-based project structure looks like.
Note
We will focus on the src folder only since, from now on, most of the code base lives there.
Here is the structure of our src folder:
- components // (1)
- config // (2)
- features // (3)
- layouts // (4)
- lib // (5)
- pages // (6)
- providers // (7)
- stores // (8)
- testing // (9)
- types // (10)
- utils // (11)
Let’s analyze each of the folders, one by one:
- components: Contains all shared components that are used across the entire application.
- config: Contains the application configuration files.
- features: Contains all the feature-based modules. We will analyze this one in more detail in the following section.
- layouts: Contains different layouts for the pages.
- lib: Contains configurations for different libraries that are used in our application.
- pages: Contains the pages of our application. This is where Next.js will look for pages in the filesystem-based routing.
- providers: Contains all application providers. For example, if our application uses many different providers for styling, state, and so on, we can combine them here and export a single application provider with which we can wrap our _app.tsx to make all the providers available on all the pages.
- stores: Contains all global state stores that are used in the application.
- testing: Contains test-related mocks, helpers, utilities, and configurations.
- types: Contains base TypeScript type definitions that are used across the application.
- utils: Contains all shared utility functions.
There is nothing wrong with grouping files in folders based on their types. However, once the application starts to grow, it becomes more difficult to reason about and maintain the code base because there are too many files of a single type.
Features
To scale the application in the easiest and most maintainable way, we want to keep most of the application code inside the features folder, which should contain different feature-based things. Every feature folder should contain domain-specific code for a given feature. This will allow us to keep functionalities scoped to a feature and not mix its declarations with the shared things. This is much easier to maintain than a flat folder structure with many files.
Let’s look at one of our feature folders, which has the following structure:
- api // (1)
- components // (2)
- types // (3)
- index.ts // (4)
- api: Contains the API request declarations and API hooks related to a specific feature. This makes our API layer and the UI layer separate and reusable.
- components: Contains all components that are scoped to a specific feature.
- types: This contains the TypeScript type definitions for a specific feature.
- index.ts: This is the entry point of every feature. It behaves as the public API of the feature, and it should only export things that should be public for other parts of the application.
Note
A feature might have other folders, such as hooks, utils, and others, depending on the needs of the feature. The only required file is the index.ts file, which acts as the public API of a feature.
Let’s try to visualize the project structure with the following diagram:
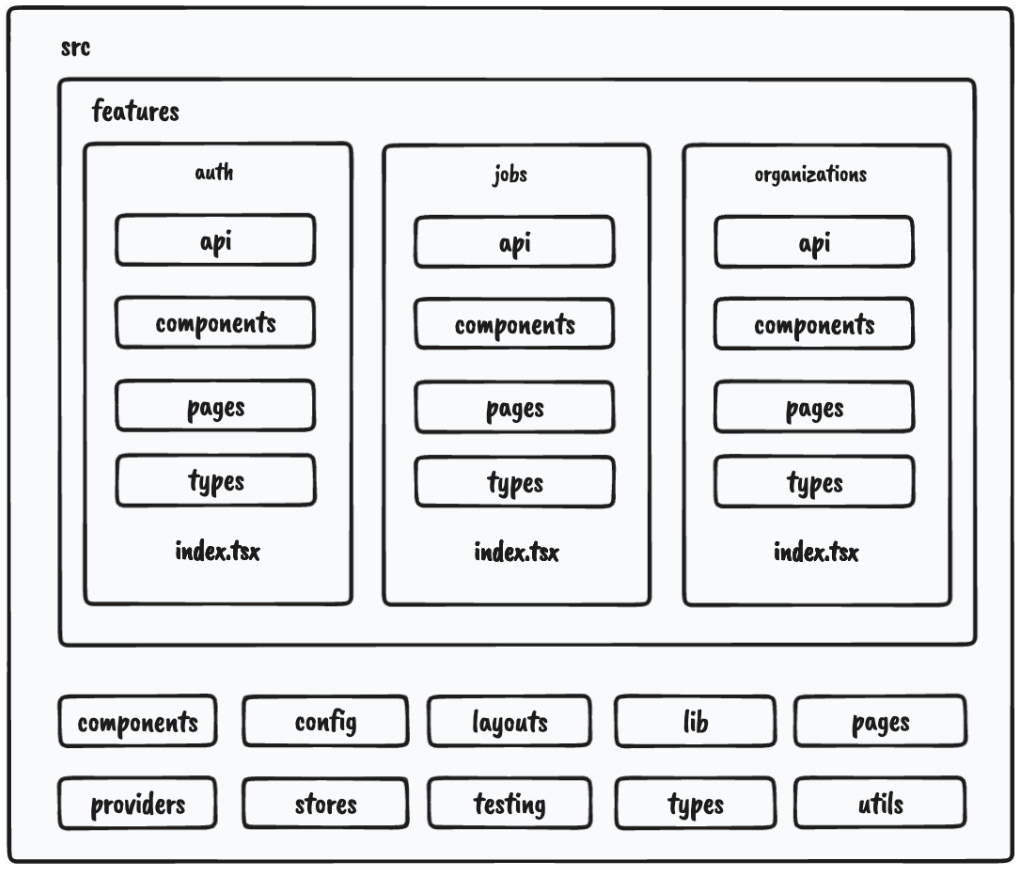
Figure 2.2 – Project structure
As we can see, most of our application code will live within features.
One more thing we can configure is enforcing developers to import features code via the index.ts file, like so:
import {JobsList} from '@/features/jobs'We shouldn’t do this:
import {JobsList} from '@/features/jobs/components/jobs-
  list'
This will give us a better picture of which dependency is used where and where it comes from. Also, if the feature gets refactored, it doesn’t have to impact any external parts of the application where that component is used.
We can constrain our code by having the following ESLint rule in the .eslintrc.js file:
rules: {
    'no-restricted-imports': [
      'error',
      {
        patterns: ['@/features/*/*'],
      },
    ],
    'import/no-cycle': 'error',
      … rest of the eslint rules
}
The no-restricted-imports rule will add constraints to imports from other features by erroring if any violations in the preceding pattern are detected.
Things from a feature can only be consumed if they’re exported from the index.ts file of that feature. This will force us to explicitly make something in a feature publicly available.
If we decide to use features this way, we should also include the import/no-cycle rule to prevent cyclic dependencies where Feature A imports things from Feature B and vice versa. If this happens, that means something with the application design is wrong and it needs to be restructured.
In this section, we learned what our application structure will look like. Then, we focused on splitting the application by feature, which will allow our code base to scale well if we decide to add more features.
Summary
In this chapter, we learned the basics of our Next.js application setup, which has been configured to work with TypeScript. Then, we learned about absolute imports, which will make it easier to move files around. We also overviewed ESLint and Prettier and made them static code analysis tools so that they can run checks before committing the changes to our repository by using lint-staged and Husky.
Finally, we learned what our project structure will look like. We learned that the best way is to group code by features. We also defined an ESLint rule to enforce importing code from a feature in a specific way and prevent cyclic dependencies to make the code base clean and easy to reason about.
In the next chapter, we will create the shared components that will act as the baseline for our application’s user interface.