
10
Going Beyond
Our application is finally in production. It might be getting some users as we speak. However, as with every piece of software, our application may never be fully completed. There is always room for improvement, and since the application we built is just an MVP, there are a lot of potential improvements worth mentioning.
In this chapter, we will be covering some of the most important improvements from both feature and technical perspectives. These topics might give us some ideas on extending and improving the existing application.
In this chapter, we will be covering the following topics:
- Feature improvements
- Technical improvements
- Appendix
By the end of this chapter, we will have covered some features we can add to the existing application to make it more complete. We will also mention some topics that were not covered in this book but are worth exploring on your own.
Feature improvements
Since our application is at the MVP stage at the moment, there are many potential improvements from the user’s perspective that would make the application more usable.
Jobs feature improvements
The jobs feature is the most important feature of this app. There are several improvements we can implement to make the application better:
- Updating jobs
- Adding jobs in a draft state
- Deleting jobs
- Adding/updating jobs information with markdown/the WYSIWYG editor
Updating jobs
Right now, our application only supports job creation. What happens when we want to change some information about the given job posting? It would be great if we could edit job data after it’s been created.
Here is how we can do that:
- Create the update endpoint handler at PATCH /jobs/:jobId, which will update the data in the database
- Create the update job page at /dashboard/jobs/:jobId/update, which is where the update form should be
- Create the update form with all the fields that we want to be able to update for a job
- Upon successful submission, we should invalidate the job query so that its data gets refetched
Adding jobs in a draft state
Currently, when we create a job for our organization, it will become immediately available to the public. However, it would be great if we could extend its functionality so that we can choose when we want to publish job postings to the public.
This can be done by doing the following:
- Extending the job model with the status property.
- Setting the status value to draft or published.
- When submitting the job creation form, the newly created job will initially have a status of draft.
- Then, we could update the status of the job via the update form, where we send the desired status as a value. Another way we could do this would be to expose a separate endpoint that would only update the status of the job.
Deleting jobs
Most of the time, job positions get closed. In that case, no one wants a job posting that is no longer relevant, so it might be a good idea to allow organization admins to delete jobs they don’t find relevant anymore.
This can be done in two ways:
- Having a Delete endpoint that will handle deleting the job from the database. Clicking on a button would send the request and, on a successful request, redirect the user to the jobs list.
- Extending the status property, which could now have an additional archived or deleted value. This method is called soft delete because we are not deleting the entry from the database, but from the application’s perspective, it looks as if it was deleted. Archiving job postings might be useful for tracking different stats from previous hires.
Adding/updating jobs information with markdown/the WYSIWYG editor
Currently, the job information is filled with a textarea input field, which is convenient for plain text values. However, the admin’s ability to add as much information as possible is limited to text only.
It would be great if we could allow admins to add things, such as different headers, lists, links, and so on, to the job information so that the job posting provides as much information as possible.
The solution would be to replace the textarea input field with a rich text editor, which would allow us to add more than just text. Just make sure that you sanitize the inputs before submitting them to keep the application as safe as possible.
Organization improvements
Currently, there is no way for the organization admin to update the organization’s information. The organization should be able to change any of the information at any time.
To make this possible, we can do the following:
- Create the endpoint for updating the organization at PATCH /organizations/:organizationId
- Create a page at /dashboard/organization/update where we can have the update form
Adding job applications
One more thing we can improve is the ability to add job applications.
Currently, there is no mechanism to apply to jobs directly in the application. When the user clicks the Apply button, the email client is opened with the correctly set subject. Then, the user would send an email to the organization’s email address, and that would be the entire flow.
To take it to the next level, we can create another entity called Application that will be submitted when the user applies for a job. This approach will allow admins to track job applications for their organizations.
Let’s rethink what the data model of the application will look like with this new feature:
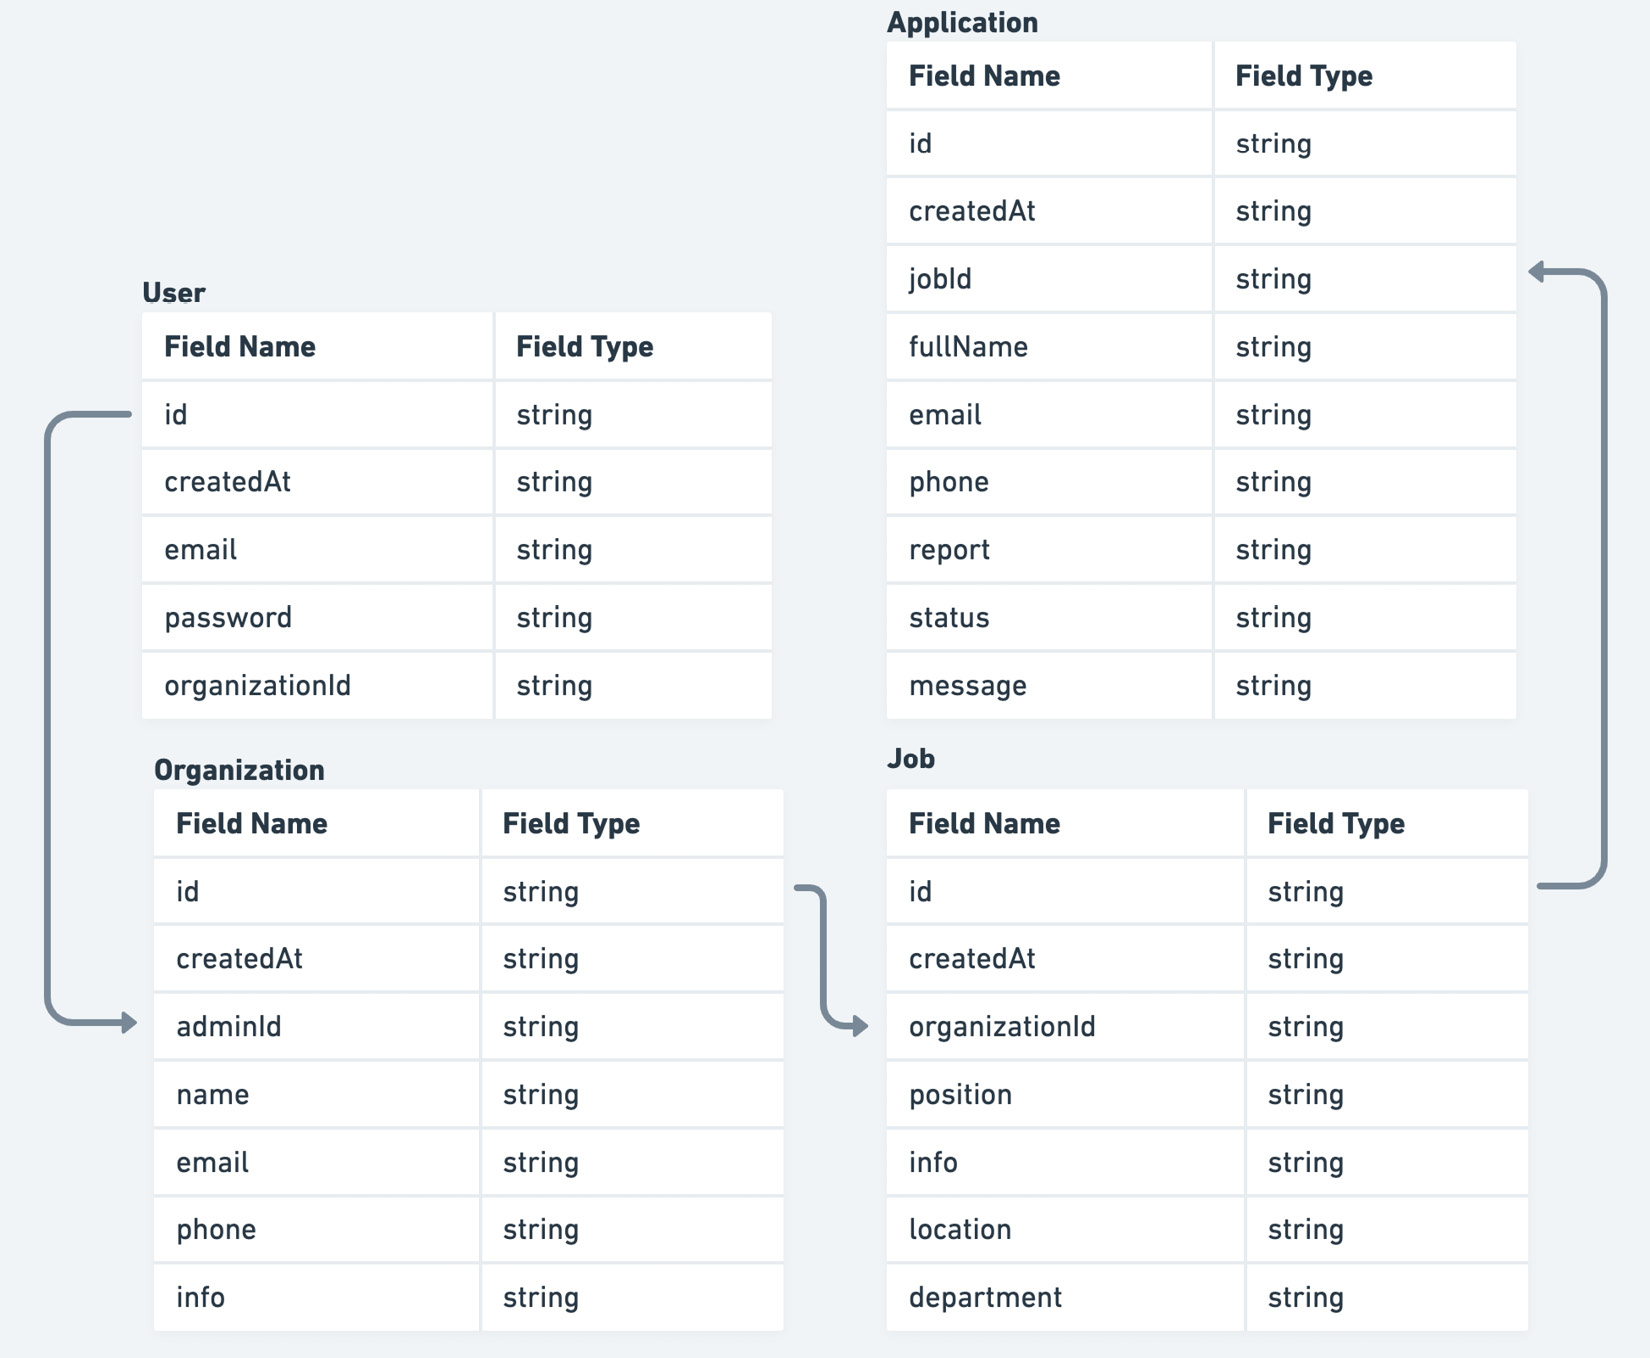
Figure 10.1 – Applications in the data model
As we can see, an application should contain some basic information about the candidate, a message, a report from the interviewer, and so on.
Once the data model has been updated, we can build the applications feature, which will handle all things related. This would include things such as the following:
- Endpoints for creating and browsing applications.
- Pages on the dashboard where the admins can browse through all the applications. They can be defined at /dashboard/applications and /dashboard/applications/:applicationId for the listing and details pages, respectively.
Filtering and paginating lists of data
Displaying lists of data in tables is fine, but what happens when the number of entries starts to grow significantly? It is not very optimal to load all the entries in one go because not all entries might be needed in the first place.
To optimize data lists, we can add support for filtering and paginating data. This will help users narrow down the search results to what they need. Both filtering and paginating should happen on the server.
Tracking current filter and pagination values should be handled by URL parameters. This will make it easy for the application to deep link the search results for any further usage.
Adding user registration
This one is pretty straightforward. Until now, we have relied on test data, which had one test user that we used to sign in to the dashboard. However, there is no way to register new users. If we want to make this application usable by more than one organization, we should add this functionality. This can be implemented by doing the following:
- Creating the registration endpoint at POST /auth/register, which would take the required data from a form and create a user and its corresponding organization in the database
- Create the registration page at /auth/register, where there is the registration form which, when submitted, calls the registration endpoint
Technical improvements
Our application is in good shape, but several things should be kept in mind in case the application starts growing. Let’s take a look.
Server-side rendering and caching
There are several improvements we can make to further optimize how the public pages are rendered on the server.
Currently, we are rendering the pages on each request, which is good if the data changes frequently; otherwise, it might increase the loading time and server costs because rendering on the server is a compute-intensive operation.
Fortunately, Next.js supports another rendering strategy called Incremental Static Regeneration.
It works as follows:
- User1 requests a page.
- The server returns the cached version of the page and returns it.
- During that request, Next.js is triggered to regenerate the same page with the latest data.
- User2 requests a page.
- The server returns the new version of the page.
If we take our public job details page as an example, it will work as follows.
First, we would need to use getStaticPaths to generate all the paths for all the jobs:
export const getStaticPaths = async () => {
  const jobs = await getJobs();
  const paths = jobs.map((job) => ({
     params: { jobId: job.id }
  }));
  return { paths, fallback: true };
}
This will generate a list of paths for all the jobs that exist in the database. The key thing here is the fallback property, which will make Next.js not return the 404 page but try to generate a new one.
We must also replace getServerSideProps with getStaticProps, which would look something like this:
export const getStaticProps = async ({
  params,
}: GetStaticPropsContext) => {
  const jobId = params?.jobId as string;
  const job = await getJob({ jobId });
  return {
    props: {
      job
    },
    revalidate: 60,
  };
};
Notice how we can add the revalidate property to the return value. This will force the page to revalidate after 60 seconds.
Since jobs and organizations’ data don’t change very frequently, this rendering strategy sounds more optimal in the long run, especially once the number of requests starts to grow.
It makes for a good compromise between the performance and freshness of the data.
React Query hydration for SSR
Currently, we are using React Query for handling data fetching on the client, but data fetching on the server is being handled without it. We are just fetching the data and passing and rendering it on the page. This is fine if we don’t have many levels of components, but there is a better way to do this.
React Query supports two ways of fetching data on the server and passing it to the client:
- Fetching the data on the server and then passing it as initialData to the query
- Prefetching on the server, dehydrating the cache, and rehydrating it on the client
The first option is good for smaller apps where there is not a very large hierarchy between the component, so there is no need to pass the server data down multiple levels to the desired query.
The second option might take more initial setup, but in the end, it makes the code base much simpler.
In the pages/_app.tsx file, we should wrap anything that is inside QueryClientProvider with Hydrate, as follows:
import { Hydrate, QueryClient, QueryClientProvider }
  from '@tanstack/react-query'
export const App = ({ Component, pageProps }) => {
  const [queryClient] = React.useState(() => new
    QueryClient())
  return (
    <QueryClientProvider client={queryClient}>
      <Hydrate state={pageProps.dehydratedState}>
        <Component {...pageProps} />
      </Hydrate>
    </QueryClientProvider>
  )
}
This will prepare the application to process any dehydrated state. But how do we provide a dehydrated state to the page?
On a specific page, we can modify getStaticProps or getServerSideProps as follows:
export const getServerSideProps = async () => {
     const queryClient = new QueryClient()
  await queryClient.prefetchQuery(['jobs'], getJobs)
  return {
    props: {
      dehydratedState: dehydrate(queryClient),
    },
  }
}
Then, we can consume the jobs as we would if we were fetching them on the client:
const JobsPage = () => {
     const jobs = useJobs();
     // ...
}
This will make it much easier to handle all the server states with React Query.
Using query key factories
Having many queries all over the app might get pretty difficult to manage once the number of queries starts to grow. It is hard to track all the variations of the queries and where they are being used. Preventing duplicate query keys might be one of the problems as well.
That’s why we should think about using query key factories instead of just deliberately adding the query keys all over the place.
We can define all potential keys in src/lib/react-query.ts:
First, we can define a simplified version of the factory:
const getQueryKeys = (baseKey: string) => {
  return {
    all: [baseKey],
    many: (params: Record<string, unknown>) => [baseKey,
      params],
    one: (id: string) => [baseKey, id],
  };
};
Then, we can create the keys for the queries:
export const queryKeys = {
  auth: {
    authUser: ['auth-user'],
  },
  jobs: getQueryKeys('jobs'),
  organizations: {
    one: getQueryKeys('organizations').one,
  },
};
As you can see, not all the features have the same key structure, but we can combine different factories to create what we need.
Then, if we wanted to use a key in a query, we could do so as follows:
const useJobs = () => {
     const { data, isLoading } = useQuery({
    queryKey: queryKeys.jobs.many(params),
    queryFn: () => getJobs({ params }),
    enabled: !!params.organizationId,
    initialData: [],
  });
  //...
}
What is good with this approach is that we have a centralized overview of all the keys, which reduces the possibility of making mistakes by mistyping a key or something similar.
This was an example of a simplified query key factory. If you need a more robust solution, there is a great library for this that can be found at https://www.npmjs.com/package/@lukemorales/query-key-factory.
Code scaffolding
When looking at our application, we might notice that there is some level of boilerplate. Creating components, for example, requires a folder that looks like this:
- my-component
     - index.ts
     - my-component.tsx
We must remember to re-export the component from index.ts to make it available.
The same thing can be said for API requests. We need to create the request function and then the hook that consumes it. These things can be automated with tools that can help us generate these kinds of files easier via their CLI.
Having some scaffolding tools such as Plop.js and Hygen.io also brings better consistency to the code base.
Validating form inputs and API responses with Zod
Let’s talk briefly about validation. With validation, we want to make sure the data is in the expected form. For our application, we can validate form inputs and API responses.
For validation, we can use Zod, which is a great validation library that is TypeScript-first. This means that we can define a schema out of which we can infer types we can use.
Form input validation
The react-hooks-form library comes with great support for Zod, which we could utilize for this. Taking the current login form, we could modify it so that it looks like this:
import { z } from 'zod';
import { yupResolver } from '@hookform/resolvers/yup';
const schema = z.object({
  email: z.string().min(1, 'Required'),
  password: z.string().min(1, 'Required'),
});
const LoginForm  = () => {
     const { register, handleSubmit } = useForm({
          resolver: yupResolver(schema);
     })
     // ...
     return (
          <Stack
      as="form"
      onSubmit={handleSubmit(onSubmit)}
      spacing="5"
      w="full"
    >
      <InputField
        label="Email"
        type="email"
        {...register('email')}
        error={formState.errors['email']}
      />
      <InputField
        label="Password"
        type="password"
        {...register('password')}
        error={formState.errors['password']}
      />
      <Button
        isLoading={login.isLoading}
        isDisabled={login.isLoading}
        type="submit"
      >
        Log in
      </Button>
    </Stack>
     )
}
Here, we are creating an object schema and providing that to useForm with the help of yupResolver.
This will make sure the form will never be submitted unless all the fields have valid values.
API requests validation
We do have TypeScript types in place, but they don’t protect us from runtime errors. That’s why we should consider validating API responses in some cases. Let’s take a look at the following example:
import { z } from 'zod';
const JobSchema = z.object({
     position: z.string(),
     info: z.string(),
     location: z.string()
});
Since Zod is a TypeScript-first library, we can use it to infer the types of the given object’s shape:
type Job = z.infer<typeof JobSchema>
This might help with reducing duplicate type definitions. Finally, we can validate our requests, as follows:
const getJob = async () => {
     const jobResponse = await apiClient.get('/jobs/123');
     const job = JobSchema.parse(jobResponse);
     return job;
}
If any of the job properties do not match the schema, Zod will throw a runtime error, which we can then handle properly.
Next.js 13
Next.js 13 is around the corner! It was released recently with some big changes, including the following:
- A new routing system with the app folder
- Server components
- A new data fetching approach
It’s worth noting that it is backward compatible with older versions, so it allows incremental upgrades. It might take some time for everything to get polished out, but it is worth keeping an eye on it and upgrading to the new approach at some point.
Appendix
There are a couple of topics that are not directly related to the application we built, but they are worth mentioning.
GraphQL
Having a GraphQL API is a very common thing nowadays, especially in a microservices architecture. We worked with a REST API in our application, but how would we structure our API layer if it were a GraphQL API?
Well, the implementation would be very similar. We could choose to use a different library, such as Apollo, but we will stick with React Query.
Look at the following request:
import { request, gql } from "graphql-request";
import { useQuery } from '@tanstack/react-query';
const jobsQuery = gql`
     query {
          jobs {
               data {
                    position
                    department
                    location
               }
          }
     }
`;
const getJobs = () => {
     return request('/api/graphql', jobsQuery);
};
const useJobs = () => {
     const { data, isLoading } = useQuery({
          queryKey: ['jobs'],
          queryFn: getJobs
     })
     // ...
};
As you can see, first, we are defining the GraphQL query, which we then use to define the request function. Finally, we use the request function to create the useJobs hook.
Monorepos
A monorepo is a Git repository that contains more than one project with a clearly defined relationship between those projects. This means that a good monorepo setup should provide the following features:
- Easy code sharing between projects
- Project constraints and visibility
- Computation caching
- Clear boundaries of the projects
It is worth exploring monorepos because they are being used in some of the largest software projects and make such large projects easier to manage.
Some of the most popular monorepo tools are as follows:
- Lerna
- Nx
- Turborepo
- Yarn workspaces
Micro frontend architecture
Micro frontend architecture is a very interesting concept. It means that we can build and deploy components of the application as separate applications, and they would look and feel as if they were part of the same application.
Some of the benefits of using this kind of architecture are as follows:
- Useful when working on a platform that has many different teams.
- Does not constrain the apps to a specific technology. Each micro frontend application can have a different stack, and they would work together really well.
However, there are also some drawbacks:
- Building micro frontend architectures with different technologies, even though it’s possible, should be discouraged. It is best to choose one framework and create standards for how the applications are built.
- Micro frontend architecture requires much more complex tooling, which for most of the use cases might not be worth it.
A couple of tools to explore are as follows:
- Module Federation
- Single SPA
Summary
In this chapter, we went through the rest of the topics that are worth exploring after finishing this book. Things such as feature improvements and technical improvements can take your application to the next level. Hopefully, you can take what you have learned here and apply it to a similar real-world scenario.