
If the content is the "heart" of a good CMS, then the Administrator Control Panel is surely the "brain". It's the piece that lets all the other pieces do their jobs. Maintaining users, adjusting permissions, approving Articles, and viewing site settings and stats are all key aspects of the Control Panel. These are the pieces we will set up in this chapter, along with giving you a basis to extend these for your own site.
This chapter will cover the following:
Creating the basic site settings table
Creating the BLL and DAL classes
User account management
Article administration
Basic site reporting
Search Engine Optimization
Most CMS sites have a number of settings that you can configure from within the Control Panel. These are typically the Site Name (as it appears on the header), the Site Image (again from the header), and the Footer text. In addition to these three, you will often also see settings to maintain the Theme, as well as a section for "additional header information", which you can use for any extra scripts you want to place in each page and also for things such as analytics scripts. For these items, we will need a way to maintain them and store these settings. Just as with our site content, we have a number of options for storing them, but for our CMS, we'll stick with using the database that we've already created. You should already be familiar with creating a new database table, so I won't go into great detail here. However, for our purpose, you will want to create the table, calling it SiteSettings, with the following columns/data types defined:
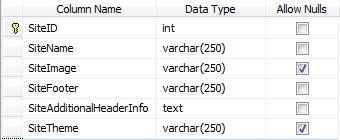
We now have the table created, but we need to go ahead and pre-load this table so that it's easier for us to work with later. For this you will do just like you did earlier in the book when you pre-loaded the Articles, by running the following simple Insert script:
Insert Into SiteSettings
(SiteID,SiteName,SiteImage,SiteFooter,SiteAdditionalHeaderInfo,SiteTheme)
values
(1,'SimpleCMS',Null,'Website design Copyright 2009 by SimpleCMS','',Null)
Now that we have the new table and sample data created, we need a way to read and write the data to it. We've already created a number of DAL datasets, but for our usage here, we'll explore another way of doing the DAL, as a class, so that you can see another option available to you. Right-click on the DAL folder in your Solutions Explorer and choose Add New Item. From the options given, choose Class and give it a name of SiteSettingsDAL.vb. This will generate a new class that should look like this:
Imports Microsoft.VisualBasic
Public Class SiteSettingsDAL
End Class
While this class will eventually work very similar to the datasets you created earlier, we would expect it to carry out only a couple of basic functions—reading and updating. So, for these two functions, let's go ahead and create them. The first is the ReadSiteSettings() function, which will look similar to the following:
Public Shared Function ReadSiteSettings() As Data.DataSet
Dim conn As New Data.SqlClient.SqlConnection( _
ConfigurationManager.ConnectionStrings( _
"SimpleCMSConnectionString").ConnectionString)
Dim cmd As New Data.SqlClient.SqlCommand("Select * from SiteSettings", conn)
Dim da As New Data.SqlClient.SqlDataAdapter(cmd)
Dim ds As New Data.DataSet()
da.Fill(ds)
Return ds
End Function
The other function we need is the SetSiteSettings() which, as the name implies, is our way of updating these settings for our system. That new function will look similar to this:
Public Shared Function SetSiteSettings( _
ByVal SiteName As String, _
ByVal SiteImage As String, _
ByVal SiteFooter As String, _
ByVal SiteAdditionalHeaderInfo As String, _
ByVal SiteTheme As String) As Boolean
Dim conn As New Data.SqlClient.SqlConnection( _
ConfigurationManager.ConnectionStrings( _
"SimpleCMSConnectionString").ConnectionString)
conn.Open()
Dim cmd As New Data.SqlClient.SqlCommand( _
"Update SiteSettings set " & _
"SiteName = @SiteName, " & _
"SiteImage = @SiteImage, " & _
"SiteFooter = @SiteFooter, " & _
"SiteAdditionalHeaderInfo = @SiteAdditionalHeaderInfo, "
& _
"SiteTheme = @SiteTheme " & _
"Where SiteID = 1 " _
, conn)
cmd.Parameters.Add("@SiteName", Data.SqlDbType.VarChar).Value = SiteName
If SiteImage = Nothing Then
cmd.Parameters.Add("@SiteImage", Data.SqlDbType.VarChar).Value = DBNull.Value
Else
cmd.Parameters.Add("@SiteImage", Data.SqlDbType.VarChar).Value = SiteImage
End If
cmd.Parameters.Add("@SiteFooter", Data.SqlDbType.VarChar).Value = SiteFooter
cmd.Parameters.Add("@SiteAdditionalHeaderInfo", _
Data.SqlDbType.Text).Value = SiteAdditionalHeaderInfo
If SiteImage Is Nothing OrElse SiteImage.Length <= 0 Then
cmd.Parameters.Add("@SiteTheme", Data.SqlDbType.VarChar).Value = DBNull.Value
Else
cmd.Parameters.Add("@SiteTheme", Data.SqlDbType.VarChar).Value = SiteTheme
End If
Return cmd.ExecuteNonQuery() = 1
End Function
End Class
While this function may look a bit complicated, it really isn't. The basic premise of it is to simply take the incoming information—the site settings—and put them into an SQL statement for updating the database. We've added some additional pieces such as the parameters, for a couple of purposes. Firstly, they are there to protect you and prevent what's called an SQL injection, which you can find easily with a search from your favorite search engine. The second is to show you how you can easily take the code and elaborate on it, making it more robust, more secure, and more stable.
The next step in our process is to create a BLL class for us to access within our site when we want to actually do the work. Right-click on your BLL folder and select the Add New Item option, choosing the Class object and giving it the name SiteSettingsBLL. It should look similar to this:
Imports Microsoft.VisualBasic
Public Class SiteSettingsBLL
End Class
Just like with the DAL class we just created, we will need to create our read and write functions. Now, we could just create these functions to call directly into the DAL and pass the returning dataset back, but we will take a more object-oriented approach. First, we will need to create our SiteSettings object. Within the same SiteSettingsBLL.vb file, we will add the following code, but we will place it AFTER the closing "End Class" part of the existing code.
Public Class SiteSettings
Private _SiteName As String
Private _SiteImage As String
Private _SiteFooter As String
Private _SiteAdditionalHeaderInfo As String
Private _SiteTheme As String
Public Property SiteName() As String
Get
Return _SiteName
End Get
Set(ByVal value As String)
_SiteName = value
End Set
End Property
Public Property SiteImage() As String
Get
Return _SiteImage
End Get
Set(ByVal value As String)
_SiteImage = value
End Set
End Property
Public Property SiteFooter() As String
Get
Return _SiteFooter
End Get
Set(ByVal value As String)
_SiteFooter = value
End Set
End Property
Public Property SiteAdditionalHeaderInfo() As String
Get
Return _SiteAdditionalHeaderInfo
End Get
Set(ByVal value As String)
_SiteAdditionalHeaderInfo = value
End Set
End Property
Public Property SiteTheme() As String
Get
Return _SiteTheme
End Get
Set(ByVal value As String)
_SiteTheme = value
End Set
End Property
End Class
This defines our SiteSettings object that we will use whenever we want to pass our settings around. Now that we have this object, we can look at the SiteSettingsBLL class we have. We already know we will need two functions—one for reading and the other for writing the settings. The function to read the settings will look similar to this:
Public Shared Function ReadSiteSettings() As SiteSettings
Dim _SiteSettings As New SiteSettings
Dim _dr As Data.DataRow = _
SiteSettingsDAL.ReadSiteSettings.Tables(0).Rows(0)
_SiteSettings.SiteAdditionalHeaderInfo = _
_dr("SiteAdditionalHeaderInfo")
_SiteSettings.SiteFooter = _dr("SiteFooter")
If _dr("SiteImage") Is DBNull.Value Then
_SiteSettings.SiteImage = "~/Images/SimpleCMSLogo.jpg"
Else
_SiteSettings.SiteImage = _dr("SiteImage")
End If
_SiteSettings.SiteName = _dr("SiteName")
If _dr("SiteTheme") Is DBNull.Value Then
_SiteSettings.SiteTheme = "SimpleCMSTheme"
Else
_SiteSettings.SiteTheme = _dr("SiteTheme")
End If
Return _SiteSettings
End Function
Note that we added some additional checks in place. Our settings allow us to have no image, as well as no theme selected, for which we use some predefined default values. The other function we need to create is the SetSiteSettings() function. For this the code would look similar to this:
Public Shared Function SetSiteSettings( _
ByVal _SiteSettings As SiteSettings) As Boolean
Return SiteSettingsDAL.SetSiteSettings( _
_SiteSettings.SiteName, _
_SiteSettings.SiteImage, _
_SiteSettings.SiteFooter, _
_SiteSettings.SiteAdditionalHeaderInfo, _
_SiteSettings.SiteTheme)
End Function
It's basically a reverse of the ReadSiteSettings() method—taking the SiteSettings object and breaking it apart to call the DAL class.
Now that we have our BLL, our DAL, and our database all set up, what do we do with this all? First off we need to consume the data. You will see that nearly all of these pieces we defined are part of our Master Page. Let's open up our SimpleCMS.master and look at the HTML in it. At the top of it we have:
<img src="Images/SimpleCMSLogo.jpg" />
Let's change this so that it's no longer a simple HTML image tag, but instead is an ASP.NET Image control. That will look like this:
<asp:Image ID="imgSiteImage" runat="server" />
While we're at it, let's go ahead and replace the hard-coded footer text so that it's using an ASP.NET Label control, like this:
<asp:Label ID="lblSiteFooter" runat="server" />
We also need to add a new control near the existing head ContentPlaceHolder. That will look like this:
<asp:ContentPlaceHolder id="head" runat="server">
</asp:ContentPlaceHolder>
<asp:Label ID="lblAdditionalInfo" runat="server" />
Now we need to open the Code view of the page. Look at the Page_Load() method and let's add the following code to it:
If Not IsPostBack() Then
Dim _SiteSettings As New SiteSettings
_SiteSettings = SiteSettingsBLL.ReadSiteSettings
Page.Title = _SiteSettings.SiteName
imgSiteImage.ImageUrl = _SiteSettings.SiteImage
lblSiteFooter.Text = _SiteSettings.SiteFooter
lblAdditionalInfo.Text = _
_SiteSettings.SiteAdditionalHeaderInfo
End If
We've now made our SimpleCMS pull in our SiteSettings and use them for its page. In addition, we've set up our site so that we can change the Theme, which we built earlier in the application. To make the site use these new settings, we need to add the following to the code for each of our pages:
Protected Sub Page_PreInit(ByVal sender As Object, _
ByVal e As System.EventArgs) Handles Me.PreInit
Page.Theme = SiteSettingsBLL.ReadSiteSettings.SiteTheme
End Sub
Okay, we have now set our site to use all these great new settings we've established, but we still have no way to alter the values of these settings, short of directly modifying them in our database. We have the SetSiteSettings() method created but we need a way of filling this. This comes back to the Administrator Control Panel, which is nothing more than a special page within our site. Go ahead and add a new page to your site, calling it ControlPanel.aspx, but make sure that you do not select a Master Page to use. You should have a standard ASP.NET Web Form. The first thing we need to do is to make sure that we limit the access to this new page to only those people we've set in the Administrator role. To do this, we will create the Page_Load() event and add the following code:
Protected Sub Page_Load(ByVal sender As Object, _
ByVal e As System.EventArgs) Handles Me.Load
If Not Page.User.Identity.IsAuthenticated Then
Response.Redirect("Login.aspx")
Else
If Not Page.User.IsInRole("Administrator") Then
Response.Redirect("Default.aspx")
End If
End If
End Sub
We'll also need to add some input controls on the page to allow us to input our settings. We will need one for each of the SiteSettings we want to maintain. The HTML for the page will look similar to this:
<table>
<tr><th>Site Settings</th></tr>
<tr>
<td>
<table>
<tr>
<td valign="top">Name:</td>
<td>
<asp:TextBox ID="txtSiteName" runat="server" />
</td>
</tr>
<tr>
<td valign="top">Image:</td>
<td>
<asp:TextBox ID="txtSiteImage" runat="server" />
</td>
</tr>
<tr>
<td valign="top">Theme:</td>
Administrator Control PanelAdministrator Control Panelnew page, adding<td>
<asp:TextBox ID="txtSiteTheme" runat="server" />
</td>
</tr>
<tr>
<td valign="top">Footer:</td>
<td>
<asp:TextBox ID="txtSiteFooter"
TextMode="MultiLine" runat="server" />
</td>
</tr>
<tr>
<td valign="top">Add'l Header Info:</td>
<td>
<asp:TextBox ID="txtAdditionalInfo"
TextMode="MultiLine" runat="server" />
</td>
</tr>
<tr>
<td colspan="2">
<asp:Button ID="btnSave" runat="server"
Text="Save" />
</td>
</tr>
</table>
</td>
</tr>
</table>
Now that we have the inputs defined, we need to actually do something with them. For this you will want to open up the Code view of the page and add an event for the btnSave.Click(). That should look like this:
Protected Sub btnSave_Click(ByVal sender As Object, _
ByVal e As System.EventArgs) Handles btnSave.Click
End Sub
Within this new event that we've created, we need to read in the values. You will need to add the following code to your event:
Protected Sub btnSave_Click(ByVal sender As Object, _
ByVal e As System.EventArgs) Handles btnSave.Click
Dim _siteSettings As New SiteSettings
_siteSettings.SiteName = txtSiteName.Text
_siteSettings.SiteImage = txtSiteImage.Text
_siteSettings.SiteTheme = txtSiteTheme.Text
_siteSettings.SiteFooter = txtSiteFooter.Text
_siteSettings.SiteAdditionalHeaderInfo = _
txtAdditionalInfo.Text
If SiteSettingsBLL.SetSiteSettings(_siteSettings) = _
True Then
' All Saved OK.
Else
' There was an error saving.
End If
End Sub
The page would now accept your inputs and save them to the database, but we really don't want to have to re-enter all the values each time. So, let's add the following code to the Page_Load() event so that the existing values are put into the controls to get us started:
If Not IsPostBack Then
Dim _siteSettings As New SiteSettings
_siteSettings = SiteSettingsBLL.ReadSiteSettings
txtSiteName.Text = _siteSettings.SiteName
txtSiteImage.Text = _siteSettings.SiteImage
txtSiteTheme.Text = _siteSettings.SiteTheme
txtSiteFooter.Text = _siteSettings.SiteFooter
txtAdditionalInfo.Text = _
_siteSettings.SiteAdditionalHeaderInfo
End If
You should now be able to alter these settings at will. You do need to keep in mind a couple of items though, and these are areas that you may wish to extend in your site. The first is that the image you type in must exist in the path you gave it. This means that you need to get it uploaded to your site. You could use the techniques you learned in the earlier chapters on uploading images and apply them here. Another thing to remember is that the Theme you type in must exist within the App_Themes folder. You need to have a fully developed theme in place. There are additional code samples on the Internet that show how to read the contents of a folder. With this you could easily iterate through the App_Themes folder to get a list of Themes in your site, and then display this list in a DropDownList control, instead of using the TextBox control, to display the Theme list in the control panel.
While we have already created a method for users to come to the site and sign up, there are still a few functions that an Administrator may want to accomplish—being able to disable users, approve users, and to set user groups/roles, just to name a few. To be able to do these, we will need to be able to list out the users, view the details on each user and, when necessary, be able to modify them. ASP.NET has a number of functions built in for us to make these things easier, so we'll take what they've done for us and build on top of it.
The first thing we'll need to do is adjust the Control Panel page to include a place for us to list out the users in the system. For our site, we'll keep it simple, as a series of hyperlinks in a Repeater. However, for your usage, you may want to look at other ways of presenting the list. Back to our site though, go ahead and add the following HTML to your Control Panel page, just before the closing </table> tag.
<tr style="background-color:Silver;">
<th>User Administration:</th>
</tr>
<tr>
<td>
<asp:Repeater ID="rptrUsers" runat="server">
<HeaderTemplate>
<table cellpadding="4"><tr>
</HeaderTemplate>
<ItemTemplate>
<td>
<asp:HyperLink ID="hyUserName" runat="server" />
</td>
<asp:Label ID="lblNewLine" runat="server" />
</ItemTemplate>
<FooterTemplate>
</tr></table>
</FooterTemplate>
</asp:Repeater>
</td>
</tr>
Now that we have a place to display the user list, we need to go into the Code view for the page and actually retrieve the list. Open the ControlPanel.aspx.vb and add the following two lines, right after the code we use to fill the SiteSettings in the Page_Load():
rptrUsers.DataSource = Membership.GetAllUsers()
rptrUsers.DataBind()
We've now retrieved the list of users and bound it to our repeater, but we haven't told the repeater what to do with this list yet. For this we will need to add the following code to the ControlPanel.aspx.vb file.
Protected Sub rptrUsers_ItemDataBound(
ByVal sender As Object, _
ByVal e As System.Web.UI.WebControls.RepeaterItemEventArgs) _
Handles rptrUsers.ItemDataBound
If e.Item.ItemType = ListItemType.Item _
OrElse e.Item.ItemType = ListItemType.AlternatingItem Then
Dim _item As MembershipUser = _
CType(e.Item.DataItem, MembershipUser)
Dim hyUserName As HyperLink = _
CType(e.Item.FindControl("hyUserName"), HyperLink)
hyUserName.Text = _item.UserName
hyUserName.NavigateUrl = _
"Profile.aspx?user=" & _item.UserName
If (e.Item.ItemIndex + 1) Mod 3 = 0 Then
Dim lblNewLine As Label = _
CType(e.Item.FindControl("lblNewLine"), Label)
lblNewLine.Text = "</tr><tr>"
End If
End If
End Sub
The code above will take each user from the list that ASP.NET has generated for us, and display their username as a hyperlink. It will also, thanks to a little fancy math, add a </tr><tr> after every third item in the list so that you get a nice, well-formed grid. You may have also realized that the hyperlinks point to a page called Profile.aspx, which doesn't yet exist. This will be our next step in the process. Go ahead and add a new Web Form to the site, calling it Profile.aspx and using the SimpleCMS.master as its Master Page. We'll want to add some controls to the page to allow us to display the details of the user we've selected. Therefore, add the following HTML and WebControls to the page, and within the ContentPlaceHolder1, your code should look similar to this:
<table>
<tr style="background-color:Silver;">
<th colspan="2">User Profile:</th>
</tr>
<tr>
<th align="right">Name:</th>
<td><asp:Label ID="lblName" runat="server" /></td>
</tr>
<tr>
<th align="right">LastLoginDate:</th>
<td>
<asp:Label ID="lblLastLoginDate" runat="server" />
</td>
</tr>
<tr>
<th align="right">IsApproved:</th>
<td>
<asp:CheckBox ID="chkIsApproved" runat="server" />
</td>
</tr>
<tr>
<th align="right">Email:</th>
<td><asp:Label ID="lblEmail" runat="server" /></td>
</tr>
<tr>
<th align="right">CreationDate:</th>
<td><asp:Label ID="lblCreationDate" runat="server" /></td>
</tr>
<tr>
<th align="right" valign="top">Roles:</th>
<td>
<asp:CheckBoxList ID="chkRoles" runat="server" />
</td>
</tr>
<tr>
<td colspan="2" align="right">
<asp:Button ID="btnSave" runat="server" Text="Save" />
</td>
</tr>
</table>
What we have is really not much more than a series of labels used to display the details for the user, but if you look close, there is also a Checkbox and a CheckboxList. The first is used to indicate if the user is "Approved" or not. This is how you can enable/disable users within your site. Also, the CheckboxList, as you'll see shortly, will contain a list of all the roles we've established within our site. And with a couple of lines of code, it will show you what roles the user is assuming. Again these Checkboxes will allow us to change the roles that a user is set up in.
Now that we've added the HTML and WebControls to the page, we need to go into the code file, Profile.aspx.vb, for the page. The first thing we need to do is add a Page_Load() event and put the following code into it:
Protected Sub Page_Load(ByVal sender As Object, _
ByVal e As System.EventArgs) Handles Me.Load
If Not Request.QueryString("user") Is Nothing Then
If Not IsPostBack Then
Dim _user As MembershipUser = _
Membership.GetUser(Request.QueryString("user"))
lblName.Text = _user.UserName
lblLastLoginDate.Text = _user.LastLoginDate
chkIsApproved.Checked = _user.IsApproved
lblEmail.Text = _user.Email
lblCreationDate.Text = _
_user.CreationDate.ToShortDateString()
chkRoles.DataSource = Roles.GetAllRoles
chkRoles.DataBind()
For Each chk As ListItem In chkRoles.Items
If Roles.IsUserInRole(_user.UserName, chk.Value) Then
chk.Selected = True
Else
chk.Selected = False
End If
Next
If Page.User.IsInRole("Administrator") Then
chkRoles.Enabled = True
chkIsApproved.Enabled = True
btnSave.Visible = True
Else
chkRoles.Enabled = False
chkIsApproved.Enabled = False
btnSave.Visible = False
End If
End If
End If
End Sub
This code will do a number of things. The first thing it does is check that a username was passed through the QueryString() to the page. The next thing it does is fill in all the details for the user into the WebControls we added to our page. You will see that it also calls another built-in property in ASP.NET to get a list of all the roles in our site. We take that list and bind it to the CheckboxList we added. Then we iterate through this list of Checkboxes and check if the user is in that role. If this is the case, we make sure that the Checkbox is selected. The last piece of this code is for us to check the user who is viewing the data and, if he/she is an Administrator, to enable the Checkbox, CheckboxList, and Button. If the user isn't an Administrator, we disable/hide these items.
Our next step is to put the code in place so that when an Administrator comes in and changes a user's IsApproved status or their roles, we can save the changes. For this we added a Button to our page, with the ID of btnSave. Add the following code to your page:
Protected Sub btnSave_Click(ByVal sender As Object, _
ByVal e As System.EventArgs) Handles btnSave.Click
Dim _user As MembershipUser = _
Membership.GetUser(Request.QueryString("user"))
_user.IsApproved = chkIsApproved.Checked
Membership.UpdateUser(_user)
For Each chk As ListItem In chkRoles.Items
If chk.Selected Then
If Not Roles.IsUserInRole(_user.UserName, chk.Value) Then
Roles.AddUserToRole(_user.UserName, chk.Value)
End If
Else
If Roles.IsUserInRole(_user.UserName, chk.Value) Then
Roles.RemoveUserFromRole(_user.UserName, chk.Value)
End If
End If
Next
End Sub
That's user Administrator in its simplest form. You will probably want to extend the functionality to fit your needs, but this should be sufficient to get you started. You'll find that if you start to look through all the properties of the Membership, MembershipUser, and Roles functionality, there is a lot you can do, all pre-built for you by Microsoft to make your work easier. Look into the Profiles system within the ASP.NET framework, and with this, you could add additional pieces of information beyond the standard membership items. You could add pieces such as First/Last Name, Address, Phone, and even look at things such as User Avatars. These are all pieces that can give your site additional flare and make it feel more comfortable to your users, thereby ensuring their return visits, which is often the goal of a web site.
The last bit of User/Role Administrator I want to touch on in this section is the ability to add new roles to the system, without having to go through the ASP.NET Site Configuration tools you used before. While we don't have any functionality in place to use any new roles, you may find that your site will. For this purpose, let's go back to the ControlPanel.aspx page in its HTML view and add the following right before the </table> tag:
<tr style="background-color:Silver;">
<th>Role Administration:</th>
</tr>
<tr>
<td>
<asp:TextBox ID="txtNewRole" runat="server" />
<asp:Button id="btnSaveRole" runat="server" Text="Add" />
<br />
<asp:Label ID="lblRoles" runat="server"></asp:Label>
</td>
</tr>
This is a simple piece, so we don't need to create an all new page for it. We'll just tuck it into our existing Control Panel. It's a simple TextBox for us to enter the name of a new role we want to create, a Button for us to call the system and tell it about the new role, and a Label that we'll use to show all of the roles we currently have in the system. First, let's populate the Label with the existing roles we've defined. In our Page_Load(), right before the first line of code that says If Not IsPostback(), we need to add the following:
lblRoles.Text = "<ul>"
For Each _role As String In Roles.GetAllRoles
lblRoles.Text += "<li>" & _role & "</li>"
Next
lblRoles.Text += "</ul>"
This will take our Label and fill it with all the roles as mentioned with a nice bullet list, using the <ul> and <li> tags. Now, we'll need to open the ControlPanel.aspx.vb file and add the following event to it:
Protected Sub btnSaveRole_Click( _
ByVal sender As Object, _
ByVal e As System.EventArgs) Handles btnSaveRole.Click
If txtNewRole.Text.Trim.Length > 0 Then
If Not Roles.RoleExists(txtNewRole.Text) Then
Roles.CreateRole(txtNewRole.Text)
End If
End If
End Sub
This piece of code will first check to see that they entered a new role's name, then if that role already exists, and lastly it will call the system and tell it to save this new Role. We now have a fully functional user and role administration system in place, and even an added benefit of the Profile page. The Profile can really make your users feel like they are part of the site, but more important is that these Profiles, when associated in roles, are the key to the functionality of the site. With proper assignments into roles and the implementation of the way to check the current user's assignment, you can enable and disable portions of the site. This can be exceptionally handy as your site grows, and you may need to allow responsibility to others to help with the maintenance. By granting special permissions through roles, you could split apart these maintenance features. Perhaps you want one group to be able to upload documents, another to upload images, and perhaps you would like two more groups to be approvers of these content sections. This is all easily done by using the pieces covered here.
Earlier in the book, we gave you the ability to create new Articles for the site. As part of the Articles, we set up the ability to allow them to be approved, through the use of the Published property. Now we need to give certain users the ability to go in and approve these Articles. As we've worked with UserControls for much of the Articles section of this book, we'll continue with that idea here. Let's go ahead and add a new UserControl to the Controls folder, calling it ApproveArticles.ascx. Now we need to add some HTML and WebControls to the new UserControl we created so that we can display the data. Add the following to the HTML of the ApproveArticles.ascx:
<asp:GridView Id="grdUnapprovedArticles"
runat="server" DataKeyNames="ArticleID"
AutoGenerateColumns="false">
<Columns>
<asp:BoundField DataField="ArticleTitle"
HeaderText="Title" />
<asp:BoundField DataField="ArticleSummary"
HeaderText="Summary" HtmlEncode="false" />
<asp:ButtonField ButtonType="Button"
Text="Delete" CommandName="Delete" />
<asp:ButtonField ButtonType="Button"
Text="Approve" CommandName="Approve" />
</Columns>
</asp:GridView>
Now that we have the HTML and WebControl using the ASP.NET GridView, let's go the the ApproveArticles.aspx.vb code view and add the following so that you can see how this will work:
Protected Sub Page_Load(ByVal sender As Object, _
ByVal e As System.EventArgs) Handles Me.Load
Dim _ArticlesBLL As New ArticlesBLL()
grdUnapprovedArticles.DataSource = _
_ArticlesBLL.GetAllUnpublishedArticles
grdUnapprovedArticles.DataBind()
End Sub
In this code, we call out to the ArticlesBLL. However, the function we called, GetAllUnpublishedArticles(), doesn't exist yet. This is what we'll need to do now, but we need to start down at the DAL, in the ArticlesDataSet. Open the ArticlesDataSet and let's add a new query to the ArticlesTableAdapter. We'll use the SELECT statement option and then SELECT
which returns rows. For the SQL statement that's generated, you will want to alter it so that it looks like this:
SELECT ArticleID, ArticleTitle, ArticleBody, ArticleSummary, ArticleCreatedBy, ArticleCreatedDate, ArticlePublished, ArticleExpirationDate
FROM Articles where ArticlePublished = 0
What this will do is limit the results to only those Articles from the database that have a 0 (or False) for the ArticlePublished value. We still need to give names to the new methods we created. For this we'll use FillAllUnpublishedArticles and GetAllUnpublishedArticles. Now, let's got to our ArticlesBLL and add the following function to the existing code:
' Get All Unpublished Articles Function
<System.ComponentModel.DataObjectMethodAttribute( _
System.ComponentModel.DataObjectMethodType.Select, True)> _
Public Function GetAllUnpublishedArticles() As _ ArticlesDataSet.ArticlesDataTable
Return Adapter.GetAllUnpublishedArticles()
End Function
With this we should now have a UserControl that will display all of the unpublished Articles in the system. While this control will now display our unpublished Articles, we don't have a way to interact with them yet. We'll need to add a couple of events to the code for this—one for deleting the articles and the other for approving them. For the delete operation, we can use the following piece of code:
Protected Sub grdUnapprovedArticles_RowDeleting( _
ByVal sender As Object, ByVal e As _
System.Web.UI.WebControls.GridViewDeleteEventArgs) _
Handles grdUnapprovedArticles.RowDeleting
Dim _id As Integer = _
CInt(grdUnapprovedArticles.DataKeys(e.RowIndex).Value)
Dim _ArticlesBLL As New ArticlesBLL()
_ArticlesBLL.DeleteArticle(_id)
grdUnapprovedArticles.DataSource = _
_ArticlesBLL.GetAllUnpublishedArticles
grdUnapprovedArticles.DataBind()
End Sub
And for our approve operation, we can use the following code snippet:
Protected Sub grdUnapprovedArticles_RowCommand( _
ByVal sender As Object, ByVal e As _
System.Web.UI.WebControls.GridViewCommandEventArgs) _
Handles grdUnapprovedArticles.RowCommand
If e.CommandName = "Approve" Then
Dim _id As Integer = _
CInt(grdUnapprovedArticles.DataKeys( _
e.CommandArgument).Value)
Dim _ArticlesBLL As New ArticlesBLL()
Dim _article As ArticlesDataSet.ArticlesRow = _
_ArticlesBLL.GetDataByArticleID(_id).Rows(0)
_article.ArticlePublished = 1
_ArticlesBLL.UpdateArticle( _
_article.ArticleID, _
_article.ArticleTitle, _
_article.ArticleBody, _
_article.ArticleSummary, _
_article.ArticleCreatedBy, _
_article.ArticleCreatedDate, _
_article.ArticlePublished, _
_article.ArticleExpirationDate)
grdUnapprovedArticles.DataSource = _
_ArticlesBLL.GetAllUnpublishedArticles
grdUnapprovedArticles.DataBind()
End If
End Sub
Now that the control is fully functional, we need to add it to our ControlPanel.aspx. Open up your page, and at the top of the page, below the <@...> directive, add the following:
<%@ Register src="Controls/ApproveArticles.ascx" tagname="ApproveArticles" tagprefix="uc1" %>
Then, down at the bottom of the page, right before the </table> tag, add the following:
<tr style="background-color:Silver;">
<th>Unpublished Articles</th>
</tr>
<tr>
<td>
<uc1:ApproveArticles ID="ApproveArticles1" runat="server" />
</td>
</tr>
We now have a fully functional Articles system, complete with adding, approving, and even deleting operations. While this code is fairly simplistic, it's all designed around the idea that you can take this and expand upon it, customizing it for your needs and experiences. There are any number of ways that all of these same pieces could be accomplished. We've shown you only a few different options. Find the one (or ones) that works for you and extend it to cover the other pieces. By taking the code and experimenting, you will find that your knowledge and understanding of how these pieces work will be greatly increased, and soon you should find yourself tweaking things you never would have imagined at the beginning.
While we have tried to cover many different options while presenting you with the samples for the Articles module, there are sure to be many others out there, but we hope the principles you've learned here will aid you in understanding them, and perhaps give you the advantages to take these different methods and methodologies, and incorporate them into your own code, both easily and effectively.
Reporting for a web site can be as simple as you would like, or as complex as building the Empire State Building, and the ways to go about it are about as varied as anything out there. For the sake of time, and to keep you from being buried, we'll stick to a fairly simple approach, but we'll also touch upon some other suggestions and ideas.
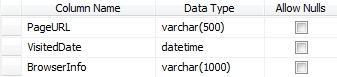
To start off, we need to decide what exactly it is that we want to report on. A few simple, key items should be enough to get you started. In our site, let's track the page that's visited, when it's visited, and some basic browser information from the user. For this we will need to store this data someplace and our database is perfect. Let's create ourselves a new table, calling it SiteStats, with the following setup:
Like most of the pieces we've done to this point, we will need to create both a DAL and BLL for handling our data. As we're taking a very simplistic approach to our reporting, we'll go with a small, object-based system like we did for the SiteSettings. Go ahead and create a new class in your DAL folder, calling it SiteStatsDAL.vb. We'll need a method to add a new row to our table and a way to read the results. For the Add method, let's create a new function called AddStat(). We'll want it to look like this:
Public Shared Function AddStat( _
ByVal PageURL As String, _
ByVal VisitedDate As DateTime, _
ByVal BrowserInfo As String) As Boolean
Dim conn As New Data.SqlClient.SqlConnection( _
ConfigurationManager.ConnectionStrings( _
"SimpleCMSConnectionString").ConnectionString)
conn.Open()
Dim cmd As New Data.SqlClient.SqlCommand( _
"Insert Into SiteStats " & _
"(PageURL,VisitedDate,BrowserInfo) " & _
"values " & _
"(@PageURL,@VisitedDate,@BrowserInfo) " _
, conn)
cmd.Parameters.Add("@PageURL", _
Data.SqlDbType.VarChar).Value = PageURL
cmd.Parameters.Add("@VisitedDate", _
Data.SqlDbType.DateTime).Value = VisitedDate
cmd.Parameters.Add("@BrowserInfo", _
Data.SqlDbType.VarChar).Value = BrowserInfo
Return cmd.ExecuteNonQuery() = 1
End Function
The other method we need is the Get method. Let's go ahead and create a new function, calling it GetStats(), with code that looks like this:
Public Shared Function GetStats() As Data.DataSet
Dim conn As New Data.SqlClient.SqlConnection( _
ConfigurationManager.ConnectionStrings( _
"SimpleCMSConnectionString").ConnectionString)
Dim cmd As New Data.SqlClient.SqlCommand( _
"Select * from SiteStats", conn)
Dim da As New Data.SqlClient.SqlDataAdapter(cmd)
Dim ds As New Data.DataSet()
da.Fill(ds)
Return ds
End Function
You may want to add other methods, getting only recent records or records for specific dates or pages, but we'll leave that for you to decide. We now need to create our BLL class and our object. In your BLL folder, add a new class, calling it SiteStatsBLL.vb. First, we'll need to create a new class in the file for the object. Place the following code right after the "End Class" in your file:
Public Class SiteStat
Private _PageURL As String
Private _VisitedDate As DateTime
Private _BrowserInfo As String
Public Property PageURL() As String
Get
Return _PageURL
End Get
Set(ByVal value As String)
_PageURL = value
End Set
End Property
Public Property VisitedDate() As DateTime
Get
Return _VisitedDate
End Get
Set(ByVal value As DateTime)
_VisitedDate = value
End Set
End Property
Public Property BrowserInfo() As String
Get
Return _BrowserInfo
End Get
Set(ByVal value As String)
_BrowserInfo = value
End Set
End Property
End Class
Now, within the SiteStatsBLL class, we will need two methods just like we did for the DAL—an Add and a Get method. For the Add method, we'll use a function called AddStat(), with the following code:
Public Shared Function AddStat( _
ByVal PageURL As String, _
ByVal VisitedDate As DateTime, _
ByVal BrowserInfo As String) As Boolean
Return SiteStatsDAL.AddStat( _
PageURL, _
VisitedDate, _
BrowserInfo)
End Function
And for the Get method, we'll call the function GetStats(), and use the following:
Public Shared Function GetStats() As _
Generic.List(Of SiteStat)
Dim _return As New Generic.List(Of SiteStat)
Dim _ds As Data.DataSet = SiteStatsDAL.GetStats
For Each _dr As Data.DataRow In _ds.Tables(0).Rows
Dim _siteStat As New SiteStat
_siteStat.BrowserInfo = _dr("BrowserInfo")
_siteStat.PageURL = _dr("PageURL")
_siteStat.VisitedDate = CDate(_dr("VisitedDate"))
_return.Add(_siteStat)
Next
Return _return
End Function
Now that we've got all our classes and methods created, we need to actually put some code into our site to save the information. In the Code view of each page, we should already have a Page_Load() event. Paste the following into this event as the first line:
SiteStatsBLL.AddStat(Page.Request.Url.PathAndQuery, _
Now, Page.Request.UserAgent)
We are now logging every page hit in the site to our database. All we are missing now is a way to view the logs. While we could simply stick a small viewer into our Control Panel page, it's really something that is independent of this. For our use, let's simply create a new page for our site, calling it StatReport.aspx and use the SimpleCMS.master for our Master Page. Let's go ahead and add a GridView control, and use an ObjectDataSource to bind it. Our resulting HTML should look like this:
<asp:GridView ID="grdStatDetails" runat="server" AllowPaging="True" AutoGenerateColumns="False" DataSourceID="ObjectDataSource1">
<Columns>
<asp:BoundField DataField="PageURL" HeaderText="PageURL"
SortExpression="PageURL" />
<asp:BoundField DataField="VisitedDate"
HeaderText="VisitedDate"
SortExpression="VisitedDate" />
<asp:BoundField DataField="BrowserInfo"
HeaderText="BrowserInfo"
SortExpression="BrowserInfo" />
</Columns>
</asp:GridView>
<asp:ObjectDataSource ID="ObjectDataSource1"
runat="server" SelectMethod="GetStats"
TypeName="SiteStatsBLL">
</asp:ObjectDataSource>
Go ahead and browse around the site a little, and then go to our new StatReport.aspx page (did you add it to your menu). You should get results similar to this:
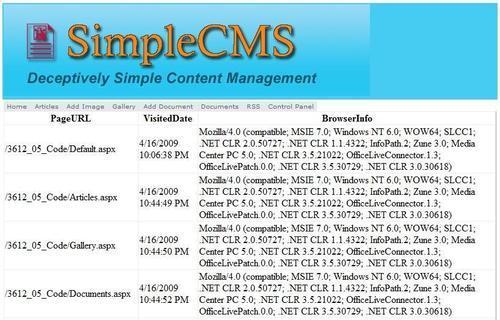
There you have it, Site Reporting, albeit in its simplest form, for you to use.
As you may have noticed that the tracking we are showing you here is quite limited while completely functional. You will want to take this and extend it long before you ever put your site up. While most functions of a site can be added as you go along, there is a distinct flaw in that ideology when it comes to reporting. There is no way to go back and get additional data after the visit. By that I mean if you start to track another piece of data one day, let's say Default Language settings on the browser, you won't have any of this data from before the time you started to track it.
The key to reporting is data, and lots of it, all the time. The more you gather, the more you can know, as well as the better you can adjust your site to fit your users' needs. Take the time at the beginning of your site design to make sure you have covered all the things you will want to track. Get these pieces implemented early on, preferably before you even launch your site. I've found that it's better to gather more information than you may think you'll ever need, simply because you never know what you may want tomorrow.
A few pieces that I highly recommend you investigate adding from the start may be view-counts on the individual module content pieces you've built. Wouldn't it be nice to know how many times a particular Article has been viewed? Perhaps adding a counter to the documents and image pieces to track how many times they've been retrieved? These are pieces that, as mentioned, you can't go back and fill in later, so it's key to add these now. Perhaps you want to log all the errors that may have happened with your site and display these in a report. All of these pieces work under the same principle as the reporting section you've just written. You could look at using the same table in your database or even look at adding others—the choices are all up to you. This is why it's difficult for anyone else to tell you what you need to do here, but hopefully we've shown you enough to let you take the pieces and arrange them into something larger that will serve you well.
The last thing I want to briefly cover when it comes to the area of site stats and reporting is that there are a great number of third-party tools for this. There are some such as Awstats and web trends that sit on your server and intercept all the calls to your site and generate some beautiful reports. There are also things such as Google Analytics, which would plug right in to the Additional Header Information piece in our SiteSettings, which gives you some other wonderful tracking systems.
With these third-party applications, it takes all the work off you for maintenance, and since these applications are constantly being updated to include new browsers and anything else that might change, you can eliminate the need for any extra work on yourself. These tools are extremely well tested and will come with all the features you could think of. I highly recommend looking into these other types of reporting tools—maybe not as full replacements, but perhaps as additional sources. Let these other tools gather things such as browser versions, languages, and even what page they visited. However, continue to use your own tools to track specific pieces such as the view-counts, and you will find that you will get a much more robust view of the usage of your site.
While the idea of Search Engine Optimization (SEO) isn't really a function of the Administration of the site, it is another one of those key pieces that happen "under the covers" of a site. With that in mind, I thought it would be a good time to bring it up so that you can implement it when you are working on your site. Many developers will fail to take advantage of the little pieces that you can add, or simply do "right", to make their site better when it comes to SEO. If your site isn't going to be exposed on the Internet, being used on an internal network/intranet, perhaps you can skip over this, but otherwise I think it pays to take just a few moments to talk about it.
I'd probably start by saying that there is some much more detailed work available on the topic, and that you should spend some time researching it to learn more. Sites such as Google will provide you page after page all devoted to this topic, and sites such as Wikipedia.org are constantly being updated to give you the most up-to-date information available. Beyond that I'll give you the quick rundown. SEO is, simply put, making your site easier for the search engines to classify, categorize, parse, and generally "learn" about. Sites with poorly implemented SEO techniques will find themselves almost unreachable when someone opens their favorite search engine. This would mean less visitors, and less visitors means less usage. If people can't find, or find out about your site, then they can't come to it and read all the information you've made available to them.
While I'm not going to cover all the details of SEO, I will try to cover a few of the big hitters and help you start off on the right track.
Create a unique title for your page:
Every page in your site will have the ability to have its own unique title (the
<title>tag that's part of the header and/or page declaration). By giving each of your page its own title, the search engines will know that these pages are different, and therefore will be classified/tracked independently. This gives a much more detailed breakdown of your site for the searching users. This title is also one of the key fields that the search engines base their results on, typically the first priority key. Be detailed in your page title, but make sure it's to the point.Add a <meta> description tag:
Within the
<head>tag of your pages, in addition to the<title>tag, you can also add what's referred to as a<meta>tag. This is a piece of additional information that really doesn't show to the site user, but is crucial for many search engines. A sample of the<meta>tag may look something like this:<head> <title>...</title> <meta name="description" content="Simple CMS" /> </head>
In this sample, the
<meta>tag is for the description of the site. This is what many search engines will use when parsing the contents of your page. A gooddescriptiontag, when it's filled with detailed, useful information, will be all that your user needs to know they've found what they need when searching. In our sample, I usedSimple CMSas the content of the description, but this would actually be a bad example. You will want to build your content section so that it's as detailed as possible.
Now there are a number of other pieces you could dig into for proper SEO, but if you take on these first two properly, you may find that you've already covered most of the basics. The other items I just want to mention to look into would be proper URL paths and the use of a SiteMap. These are additional pieces that many search engines will crawl through when evaluating your site.
In this chapter, we covered a number of items quite quickly, and by now you should be getting more familiar with the tools and the methodology of the site, but just because we covered them quickly does not mean they are not important items. The Administrator Control Panel is really an intricate part of your site. It allows you, as an Administrator, to control a number of aspects of your site and gives you the ability to customize nearly all of it. Take what you've learned here and expand it, and I think you will find that there is a wonderful opportunity for you to create a site that is truly unique, but at the same time one that can be based on some shared principles of reusability. A simple control panel adjustment here and there, and you've suddenly got an entirely new site, all without a single line of code or even a deployment of your site. We hope that you can take these pieces and grow them into something larger.