The general steps involved in loading an embedded model are as follows:
- Import the necessary classes.
- Create a class that extends the
Away3DTemplateclass from Chapter 1, Building Your First Away3D Application. - Embed the model file and the texture file.
- Create a constructor that calls the
Away3DTemplateconstructor. - Override the
initScene()function.- Create a material from the embedded texture resource
- Use the
parse()function from the respective model loading class to create anObject3D,MeshorObjectConatiner3Dobject - Assign the material to the loaded 3D object
- Add the 3D object to the scene
- Play the desired animation for those models that support animations
The general steps to load an external model file are similar:
- Import the necessary classes.
- Create a class that extends the
Away3DTemplateclass from Chapter 1, Building Your First Away3D Application. - Create a constructor that calls the
Away3DTemplateconstructor. - Override the
initScene()function. - Assign a function to respond to the
Loader3DEvent.LOAD_SUCCESSevent- Manually apply a material if needed
- Play the desired animation for those models that support animations
The Collada DAE, Quake 2 MD2, and ActionScript AS model formats are unique in that they can be used to load animated 3D objects. But there are a number of subtle differences between the classes used to load and animate each of these formats, especially with the option of embedding the resources or loading them from external files.
MD2 is the model format used by Quake 2. These models are ideal for use with Away3D because they have a low polygon count and support animations. Let's create an application called MD2EmbeddedDemo that demonstrates how a MD2 file can be embedded and loaded.
package
{
The parsed 3D object will be returned to us as a Mesh.
import away3d.core.base.Mesh;
We will use the static functions provided by the Cast class to cast objects between types.
import away3d.core.utils.Cast;
The class that will load the MD2 files is called Md2.
import away3d.loaders.Md2;
We will apply a BitmapMaterial to the 3D object. Chapter 5, Materials, covers the BitmapMaterial class in more detail.
import away3d.materials.BitmapMaterial;
The AnimationData class contains the functions we will use to animate the 3D object once it is loaded.
import away3d.loaders.data.AnimationData;
MD2 models can be embedded, but because the ActionScript compiler has no understanding of the MD2 format, they need to be embedded as a raw data file (that is, with a MIME type of application/octet-stream).
  [Embed(source="ogre.md2", mimeType="application/octet-stream")]
  protected var MD2Model:Class;
By default, the textures for MD2 models are in the PCX format, which is not supported by Away3D. Here we have converted the original PCX image file to a JPG image, which is then embedded. We don't need to specify a MIME type, because the ActionScript compiler understands the format of a JPG image.
  [Embed(source="ogre.jpg")]
  protected var MD2Material:Class;
The Mesh representing the 3D object is referenced by md2Mesh property.
protected var md2Mesh:Mesh;
The constructor calls the base Away3DTemplate class constructor, which will initialize the Away3D engine.
  public function MD2EmbeddedDemo()
  {
    super();
  }
The initScene() function is overridden to load the MD2 file and to add the resulting 3D object to the scene.
  protected override function initScene():void
  {
    super.initScene();
First, we create a new BitmapMaterial object from the embedded image file.
    var modelMaterial:BitmapMaterial =
      new BitmapMaterial(Cast.bitmap(MD2Material));
The parse() function from the Md2 class is used to load an embedded MD2 file, which is converted to a ByteArray using the bytearray() function from the Cast class. The parse() function will return a Mesh object, which is then assigned to the md2Mesh property.
    md2Mesh = Md2.parse(Cast.bytearray(MD2Model),
      {
We specify the init object parameters necessary to scale, position, and rotate the 3D object within the scene so it will be displayed nicely on the screen. You can learn more about transforming 3D objects like this in Chapter 3, Moving Objects.
        scale: 0.01,
        z: 100,
        rotationY: -90
      }
    );
The material is then assigned to the 3D object via the material property.
md2Mesh.material = modelMaterial;
The 3D object is added to the scene to make it visible.
scene.addChild(md2Mesh);
Most MD2 models define a number of animations like stand, run, attack, and jump. These animation names correspond to the actions of the characters in the game Quake 2. While these animation names are common, they are not guaranteed to be included in an MD2 model file. Before we play the desired animation, we first check to see if it is included in the loaded 3D object.
    var animationData:AnimationData =
      md2Mesh.animationLibrary.getAnimation("stand");
If the animationData variable is not null then the loaded 3D object includes the desired animation.
if (animationData != null)
The animation can then be played by calling the play() function.
        animationData.animator.play();
  }
The process for loading an external MD2 file is much the same as loading an embedded one. Let's create a call called MD2ExternalDemo to load and display an external MD2 file and see how it differs from the MD2EmbeddedDemo above.
package
{
  import away3d.core.base.Mesh;
We need to register a function to be called when the 3D object is loaded, so we can play the initial animation. This function will take a Loader3DEvent object as a parameter.
import away3d.events.Loader3DEvent;
Instead of returning a Mesh, the Md2 class will instead return a Loader3D object, which is used as a placeholder while the 3D object is loaded.
  import away3d.loaders.Loader3D;
  import away3d.loaders.Md2;
  import away3d.loaders.data.AnimationData;
The BitmapFileMaterial class gives us a convenient way to load an external image file and apply it as a material. Chapter 5, Materials, covers the BitmapFileMaterial class in more detail.
  import away3d.materials.BitmapFileMaterial;

  public class MD2ExternalDemo extends Away3DTemplate
  {
    protected var mesh:Mesh;

    public function MD2ExternalDemo()
    {
      super();
    }

    protected override function initScene():void
    {
      super.initScene();
When loading an external file, we call the load() function from the Md2 class. The first parameter is the URL of the MD2 file.
Due to a bug in the Loader3D loadTextures() function, the URL supplied to the load() function requires a slash, even if the file to be loaded is in the same folder as the SWF file.
The load() function will return a Loader3D object. This Loader3D object is a placeholder, to be displayed while the 3D object is loaded.
      var placeHolder:Loader3D = Md2.load("./ogre.md2",
        {
          scale: 0.01,
          z: 100,
          rotationY: -90
        }
      );
When the Loader3D.LOAD_SUCCESS event is dispatched, the 3D object has been loaded and parsed, and is ready to be used. We will want to set the initial animation at this point, so we register the onLoadSuccess() function to be called when the event is triggered.
      placeHolder.addEventListener(
        Loader3DEvent.LOAD_SUCCESS,
        onLoadSuccess);
The placeholder Loader3D object is added to the scene. When the 3D object is loaded, it will be added to the scene and the placeholder 3D object (which is a Cube primitive) will be removed.
      scene.addChild(placeHolder);
    }

    protected function onLoadSuccess(event:Loader3DEvent):void
    {
In the onLoadSuccess() function, we get a reference to the loaded 3D object.
mesh = event.loader.handle as Mesh;
The Md2 class does have the ability to create its own material from the texture information in the MD2 file. Since Flash has no support for the PCX format, which is the default format used by MD2 models, it will attempt to load a JPG image with the same name as the PCX file referenced in the MD2 file. The new extension can be changed from the default of JPG to another image format supported by Flash like PNG or GIF by specifying the pcxConvert init object parameter that is supplied to the Md2 load() function.
However, quite often the texture file referenced by the MD2 file is incorrect, or includes a long path like quake2/baseq2/players/modelname/texture.pcx. This unpredictability in texture filenames is best avoided by creating a new BitmapFileMaterial instance, passing the URL of the texture file to its constructor, and specifying it at the material to be used by the loaded 3D object via the material property.
mesh.material = new BitmapFileMaterial("ogre.jpg");We then play the animation called stand.
      var animationData:AnimationData =
        mesh.animationLibrary.getAnimation("stand");
      if (animationData != null)
        animationData.animator.play();
    }

  }
}Loading an embedded Collada model file is quite similar to the process of loading an embedded MD2 file: the model file and the textures are embedded, and a 3D object is created using the parse() function from the model loading class (named Collada in this case).
package
{
  import away3d.containers.ObjectContainer3D;
  import away3d.core.utils.Cast;
The Collada class will be used to parse the embedded Collada DAE file.
  import away3d.loaders.Collada;
  import away3d.loaders.data.AnimationData;
  import away3d.materials.BitmapMaterial;
  import flash.events.Event;

  public class ColladaEmbeddedDemo extends Away3DTemplate
  {
The Collada DAE file is embedded as a raw data file. We could also have specified the MIME type to be "text/xml", since a Collada file is actually an XML file.
    [Embed(source="beast.dae", mimeType="application/octet-stream")] protected var ColladaModel:Class;
    [Embed(source="beast.jpg")] protected var ColladaMaterial:Class;

    public function ColladaEmbeddedDemo()
    {
      super();
    }

    protected override function initScene():void
    {
      super.initScene();
      var modelMaterial:BitmapMaterial = new
        BitmapMaterial(Cast.bitmap(ColladaMaterial));
Here we use the static parse() function from the Collada class to create an ObjectContainer3D object containing the meshes and animations contained in the model file.
      var colladaContainer:ObjectContainer3D =
        Collada.parse(Cast.bytearray(ColladaModel),
The models in a Collada file can use a number of separate materials to achieve their final appearance. The Collada file used in this example only references one material, but the logic is still the same. We define an init object parameter called materials, and to that we assign another init object that maps Away3D materials to the material names defined in the Collada file. In this example, the single material defined in the Collada file is called monster.
        {
          materials:
            {
              monster: modelMaterial
            },
The 3D object is then rotated, so it will be displayed nicely on the screen.
          rotationY: 90
        }
      );
The scale of the 3D object is increased to make it easier to see on the screen.
      colladaContainer.scaleX =
        colladaContainer.scaleY =
        colladaContainer.scaleZ = 20;
      scene.addChild(colladaContainer);
Here we get a reference to the AnimationData object that holds the animation called default.
      var animationData:AnimationData =
      colladaContainer.animationLibrary.getAnimation("default");
If the animation exists, we then play it.
      if (animationData != null)
        animationData.animator.play();
    }

  }
}Loading an external Collada file is much the same as loading an embedded file. The big differences are that we don't need to manually assign any materials, and the animations are played once an event has been dispatched indicating that the model has been loaded.
package
{
Loading external files is an asynchronous process, and the Loader3DEvent class is used by the function registered to the Loader3DEvent.LOAD_SUCCESS event that lets us know that the file has been loaded successfully.
  import away3d.events.Loader3DEvent;
  import away3d.loaders.Collada;
The Loader3D class is used as a placeholder while the Collada file is being loaded.
  import away3d.loaders.Loader3D;
  import away3d.loaders.data.AnimationData;

  import flash.events.Event;

  public class ColladaExternalDemo extends Away3DTemplate
  {

    public function ColladaExternalDemo()
    {
      super();
    }

    protected override function initScene():void
    {
      super.initScene();
Here we use the static load() function from the Collada class. This function takes the URL of the Collada file to be loaded (remember to add a slash to the URL, even for files in the same folder as the SWF file), and returns a Loader3D object. We don't need to worry about supplying any information about the materials to be used, as the Collada class will create the materials for us by loading the image files referenced in the DAE file.
    var placeHolder:Loader3D = Collada.load("./beast.dae",
      {
          rotationY: 90
      }
    );
The addOnSuccess() function from the Loader3D class provides a short-hand way to register a function to be called when the Loader3DEvent.LOAD_SUCCESS event is dispatched.
placeHolder.addOnSuccess(onLoadSuccess);
The Loader3D object is added to the scene, and will display a Cube primitive while the Collada file is being loaded.
      scene.addChild(placeHolder);
    }
When the onLoadSuccess() function is called, we can scale the 3D object, get access to the default animation data, and then play it if it exists.
    protected function onLoadSuccess(event:Loader3DEvent):void
    {
      event.loader.handle.scaleX =
        event.loader.handle.scaleY =
        event.loader.handle.scaleZ = 20;
      var animationData:AnimationData =
        event.loader.handle.animationLibrary.getAnimation(
          "default");
      if (animationData != null)
        animationData.animator.play();
    }
}Models can also be defined in an ActionScript class. You may recall the Sea Turtle "primitive" from Chapter 2, Creating and Displaying Primitives, which was an example of a complex model that could be created by instantiating the SeaTurtle class.
The Collada DAE and Quake 2 MD2 formats were both demonstrated being loaded from external files and from an embedded resource. Because of the nature of an ActionScript class, loading it from an external file does not make sense, which is why there is only one application shown here demonstrating the use of models stored in an AS file.
For this application, we will use a class called Ogre, which has been converted from the MD2 model used in the MD2ExternalDemo and MD2EmbeddedDemo classes above. The process of creating a class like Ogre is explained in the following section Converting a loaded model to an ActionScript class.
package
{
  import away3d.core.base.Mesh;
  import away3d.core.utils.Cast;
  import away3d.materials.BitmapMaterial;

  public class AS3ModelDemo extends Away3DTemplate
  {
    [Embed(source="ogre.jpg")]
    protected var AS3Material:Class;
    protected var model:Mesh;

    public function AS3ModelDemo()
    {
      super();
    }

    protected override function initScene():void
    {
      super.initScene();
      var modelMaterial:BitmapMaterial =
        new BitmapMaterial(Cast.bitmap(AS3Material));
Just like a primitive 3D object, the Ogre model is created by instantiating a standard ActionScript class. There is no need to use an intermediary class like Collada or Md2 to load or parse a file.
You will note that we have passed in the scaling init object parameter, and then set the material and position directly via the properties exposed by the Mesh class. This is because the tool that was used to create this particular AS3 class only reads the scaling init object parameter, and does not pass the init object down to the underlying Mesh class constructor. This behavior is dependent on the particular way that a modeling application exports an AS3 Away3D model class, so this is not a universal rule.
      model = new Ogre(
        {
          scaling: 0.01
        }
      );
      model.material = modelMaterial;
      model.z = 100;
      scene.addChild(model);
    }
  }
}The 3DS, AWD, KMZ, ASE, or OBJ model formats can all be used to load and display static 3D objects. The following samples presented show you how to load embedded and external files from all of these formats.
The 3DS model format has been around for over a decade, and is widely supported by 3D authoring applications and 3D engines alike. While many formats claim to offer a "universal" standard, the 3DS format can almost be thought of as a de-facto standard, thanks to its popularity.
package
{
  import away3d.containers.ObjectContainer3D;
  import away3d.core.base.Mesh;
  import away3d.core.utils.Cast;
  import away3d.loaders.Max3DS;
  import away3d.materials.BitmapMaterial;

  public class Max3DSEmbeddedDemo extends Away3DTemplate
  {
    [Embed(source="monster.3ds", mimeType="application/octet-stream")]
    protected var MonsterModel:Class;
    [Embed(source="monster.jpg")]
    protected var MonsterTexture:Class;

    public function Max3DSEmbeddedDemo()
    {
      super();
    }

    protected override function initScene():void
    {
      super.initScene();
      var modelMaterial:BitmapMaterial =
        new BitmapMaterial(Cast.bitmap(MonsterTexture));
      var monsterMesh:ObjectContainer3D =
        Max3DS.parse(Cast.bytearray(MonsterModel),
        {
When embedding a 3D model file it does not make sense for the Max3DS class to try and load the materials from external image files. Indeed, if the Max3DS class does try to load materials from external images that don't exist an error will be displayed in place of the 3D object that you are trying to load. You can see an example of this error in the image below.
To prevent the Max3DS class from trying to load external image files we set the autoLoadTextures init object parameter to false.
          autoLoadTextures: false,
          z: 200
        }
      );
The parse() function will return a ObjectContainer3D object. The children held by this ObjectContainer3D object represent the 3D objects we have loaded from the 3DS file. We loop through each child, applying the material we created from the embedded texture.
      for each (var child:Mesh in monsterMesh.children)
        child.material = modelMaterial;
      scene.addChild(monsterMesh);
    }
  }
}
If the autoLoadTextures parameter is not set to false, you may see an error as in the following screenshot:

Loading a model from an external 3DS file is very easy. We simply supply the location of the 3DS file to the Max3DS load() function, and it will load the model and any materials referenced by the 3DS file.
package
{
  import away3d.core.utils.Cast;
  import away3d.loaders.Loader3D;
  import away3d.loaders.Max3DS;

  public class Max3DSExternalDemo extends Away3DTemplate
  {
    public function Max3DSExternalDemo()
    {
      super();
    }

    protected override function initScene():void
    {
      super.initScene();
Again, remember to add the slash to the URL.
      var monsterMesh:Loader3D = Max3DS.load("./monster.3ds",
        {
          z: 200
        }
      );
      scene.addChild(monsterMesh);
    }
  }
}The AWD format has been designed specifically for use with Away3D. It is an ASCII-based format, which means it can be viewed in a regular text editor.
package
{
  import away3d.core.base.Object3D;
  import away3d.core.utils.Cast;
  import away3d.loaders.AWData;
  import away3d.materials.BitmapMaterial;
  import away3d.core.base.Mesh;
  import away3d.containers.ObjectContainer3D;

  public class AWDEmbeddedDemo extends Away3DTemplate
  {
    [Embed(source="monster.awd", mimeType="application/octet-stream")]
    protected var MonsterModel:Class;
    [Embed(source="monster.jpg")]
    protected var MonsterTexture:Class;

    public function AWDEmbeddedDemo()
    {
      super();
    }

    protected override function initScene():void
    {
      super.initScene();
      var modelMaterial:BitmapMaterial =
        new BitmapMaterial(Cast.bitmap(MonsterTexture));
The parse() function will return an Object3D object. In this case, this object is actually an instance of the ObjectContainer3D class. So we use the as statement to cast the returned Object3D object to an ObjectContainer3D object.
      var monsterMesh:ObjectContainer3D =
        AWData.parse(Cast.bytearray(MonsterModel),
        {
          z: 200
        }
      ) as ObjectContainer3D;
We use a for loop to inspect each of the children of the ObjectContainer3D object.
      for each (var object:Object3D in monsterMesh.children)
      {
Again we use the as statement, but this time we are casting the children of the ObjectContainer3D object to a Mesh object.
var mesh:Mesh = object as Mesh;
If the cast was successful (that is, the mesh variable is not null) then we assign the material created using the embedded resources to the mesh.
if (mesh != null)
mesh.material = modelMaterial;
}
scene.addChild(monsterMesh);
}
}
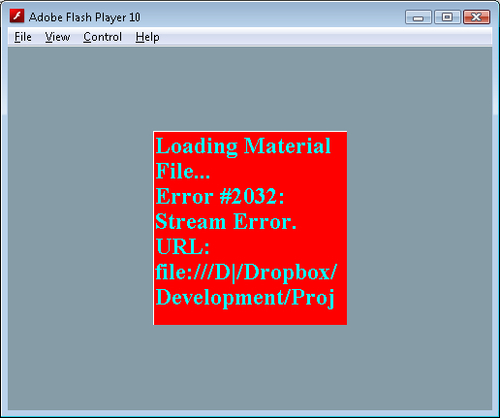
}The AWData class will attempt to load the materials referenced in the AWD file from external images using the BitmapFileMaterial class. There is no option that can be set to stop this behavior, which means that you may see an exception thrown if the SWF does not have the correct permissions to access the file. However this is not a big problem, as only the debug versions of the Adobe Player will display these exceptions, so the vast majority of end users will not see the warning.
The exception you may see will read something like:
SecurityError: Error #2148: SWF file file:///D|/Temporary%20Files/AWDEmbeddedDemo.swf cannot access local resource file:///D|/Temporary%20Files/monster.jpg. Only local-with-filesystem and trusted local SWF files may access local resources.
at flash.display::Loader/get content()
at away3d.materials::BitmapFileMaterial/onComplete()[C:Away3Daway3dmaterialsBitmapFileMaterial.as:62]
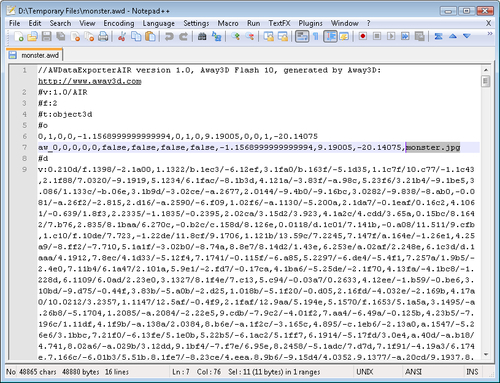
You can work around this by removing any reference to external image files from the AWD file. Since the AWD format is ASCII-based format, you can open it in a regular text editor.
The following image is of the original AWD file. The text monster.jpg has been highlighted on line 7.
In this next image the text monster.jpg has been removed.
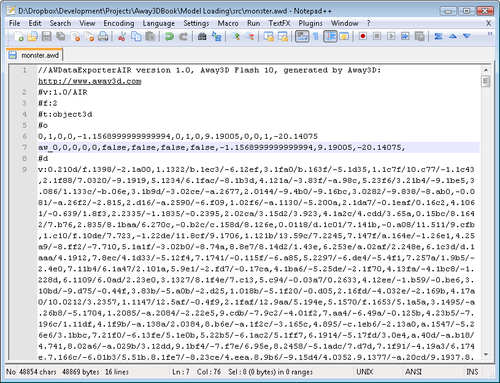
If this new AWD file, with the reference to the JPG file removed, is embedded and loaded, the AWData class will not try to load any external image files. This in turn stops an exception from being thrown.
When loading an external AWD file, we don't have to worry about the materials like we did with the embedded AWD file. We simply use the AWData class to load and apply any textures that are referenced within the AWD file.
package
{
  import away3d.loaders.AWData;
  import away3d.loaders.Loader3D;

  public class AWDExternalDemo extends Away3DTemplate
  {
    public function AWDExternalDemo()
    {
      super();
    }

    protected override function initScene():void
    {
      super.initScene();
Make sure you add the slash to the URL.
      var monsterMesh:Loader3D = AWData.load("./monster.awd",
        {
          z: 200
        }
      );
      scene.addChild(monsterMesh);
    }
  }
}The KMZ format is used by Google Sketch-Up. The Kmz class from the away3d.loaders package should load KMZ files, but due to a bug in Away3D version 3.6 this class cannot be used. Referencing the Kmz class in any way will lead to the following error:
VerifyError: Error #1053: Illegal override of Kmz in away3d.loaders.Kmz.
More information on this bug can be found at http://code.google.com/p/away3d/issues/detail?id=60&can=1&q=kmz.
The ASE file format is used by 3ds Max. It uses ASCII characters (unlike the binary 3DS format), meaning it is readable if opened using a regular text editor.
Working with an embedded ASE file is quite straightforward. In fact, when loading embedded model files in the other 3D model formats we need to be aware of how textures that are referenced in the file are loaded from external files by default. But with the Ase class, there are no workarounds or special init object parameters to deal with when loading an embedded model file.
package
{
  import away3d.core.base.Mesh;
  import away3d.core.utils.Cast;
  import away3d.loaders.Ase;
  import away3d.materials.BitmapMaterial;

  public class ASEEmbeddedDemo extends Away3DTemplate
  {
    [Embed(source="monster.ase", mimeType="application/octet-stream")]
    protected var MonsterModel:Class;
    [Embed(source="monster.jpg")]
    protected var MonsterTexture:Class;

    public function ASEEmbeddedDemo()
    {
      super();
    }

    protected override function initScene():void
    {
      super.initScene();
      var modelMaterial:BitmapMaterial =
        new BitmapMaterial(Cast.bitmap(MonsterTexture));
      var monsterMesh:Mesh =
        Ase.parse(Cast.bytearray(MonsterModel),
        {
          z: 50
        }
      );
      monsterMesh.material = modelMaterial;
      scene.addChild(monsterMesh);
    }
  }
}Loading an external ASE file is done in two steps. The first is to load the file in the usual way using the Ase load() function.
package
{
  import away3d.core.base.Mesh;
  import away3d.events.Loader3DEvent;
  import away3d.loaders.Ase;
  import away3d.loaders.Loader3D;
  import away3d.materials.BitmapFileMaterial;

  public class ASEExternalDemo extends Away3DTemplate
  {
    public function ASEExternalDemo()
    {
      super();
    }

    protected override function initScene():void
    {
      super.initScene();
Make sure you add the slash to the URL.
      var monsterMesh:Loader3D = Ase.load("./monster.ase",
        {
          z: 200
        }
      );
The second step is to manually load the materials. The Ase class does not parse any material information from the ASE file format. To accommodate this, the onLoadSuccess() function has been registered through the Loader3D addOnSuccess() function to be called when the Loader3DEvent.LOAD_SUCCESS event is dispatched.
      monsterMesh.addOnSuccess(onLoadSuccess);
      scene.addChild(monsterMesh);
    }
In the onLoadSuccess() function, we use the BitmapFileMaterial to load an external texture and apply it to the 3D object.
    protected function onLoadSuccess(event:Loader3DEvent):void
    {
      (event.loader.handle as Mesh).material =
        new BitmapFileMaterial("monster.jpg");
    }
  }
}The OBJ file format was first developed by Wavefront Technologies for its Advanced Visualizer animation package, which has since been incorporated into the Maya 3D modeling application. It is an ASCII-based format, meaning it can be read with a regular text editor. OBJ files are usually partnered with a second MTL file that defines the materials.
package
{
  import away3d.core.base.Face;
  import away3d.core.base.Mesh;
  import away3d.core.utils.Cast;
  import away3d.loaders.Obj;
  import away3d.materials.BitmapMaterial;

  public class OBJEmbeddedDemo extends Away3DTemplate
  {
    [Embed(source="monster.obj", mimeType="application/octet-stream")]
    protected var MonsterModel:Class;
    [Embed(source="monster.jpg")]
    protected var MonsterTexture:Class;

    public function OBJEmbeddedDemo()
    {
      super();
    }

    protected override function initScene():void
    {
      super.initScene();
      var modelMaterial:BitmapMaterial =
        new BitmapMaterial(Cast.bitmap(MonsterTexture));
      var monsterMesh:Mesh =
        Obj.parse(Cast.bytearray(MonsterModel),
        {
z: 200,Setting the useMtl init object parameter to false is important when using an embedded OBJ model file. If useMtl is set to true, which it is by default, an attempt will be made to load the MTL file that usually accompanies an OBJ model file. Attempting to load a nonexistent MTL file may result in an error being displayed within the scene (like in the following screenshot), or an exception may be thrown.
          useMtl: false
        }
      ) as Mesh;
Due to the way the Obj class constructs the 3D object from the embedded OBJ file, we need to set the material that is applied to each Face in the 3D object rather than assigning a material to the Mesh material property.
      for each (var face:Face in monsterMesh.faces)
        face.material = modelMaterial;
      scene.addChild(monsterMesh);
    }
  }
}
The following image shows an example of the error you may see if the useMtl init object parameter is not set to false.
When loading an external OBJ file, the Obj class will attempt to load the materials defined in the MTL class with the same name as the OBJ class. Otherwise, loading an external OBJ file is quite straightforward.
package
{
  import away3d.loaders.Loader3D;
  import away3d.loaders.Obj;

  public class OBJExternalDemo extends Away3DTemplate
  {
    public function OBJExternalDemo()
    {
      super();
    }

    protected override function initScene():void
    {
      super.initScene();
Make sure you add the slash to the URL.
    var monsterMesh:Loader3D = Obj.load("./monster.obj",
        {
          z: 200
        }
      );
      scene.addChild(monsterMesh);
    }
  }
}We have used the term "init object" quite a bit throughout the book. These init objects are usually created using object literal notation. While they are related to the Init class, they are not the same thing.
Instances of the Init class maintain a reference to an init object, and provide a number of functions that can be used to easily read the properties of the init object. So, an init object (notice the lower case "i") contains a number of properties that define the initial values or settings to be applied to an object. An Init object (with the uppercase "I") is an instance of the Init class that provides a convenient way to read the properties of an init object.
So far we have not had to use the Init class directly, but understanding how it works allows us to understand some of the differences between how materials are applied to 3D objects loaded from embedded files and how they were applied to the primitive 3D objects created in Chapter 2, Creating and Displaying Primitives. You may have noticed that when using model loading classes (like the Md2 class) we have applied the material directly via the Mesh material property, whereas in Chapter 2, Creating and Displaying Primitives, we applied materials of the primitive 3D objects using the material init object parameter.
To explain this difference, we first need to know how the Init class works. Let's take a look at the getMaterial() function provided by the Init class.
public function getMaterial(name:String):Material
{
    if (init == null)
        return null;

    if (!init.hasOwnProperty(name))
        return null;

    var result:Material = Cast.material(init[name]);

    delete init[name];

    return result;
}
The logic used by the getMaterial() function is similar to the other "get" functions provided by the Init class. It will first check for the existence of the requested property in the init object, referenced by the init property. If it does not exist, null is returned. If it does exist, the property is cast to a Material. Before the material is returned, the init object property that was just accessed is deleted.
Because the init object property is deleted once it is read, calls to the Init class "get" functions in effect consume the requested property. This means if two objects share the same init object, the first one to read a specific init object property (via an Init object) is the only one to get the value assigned to that property. This consumption of init object properties is important when you see how many classes an init object will pass through. The following list shows a selection of the classes and functions the init object supplied to the Md2 parse() function will pass through:
As you can see, the init object you supply to the Md2 parse() function changes hands quite a bit, and each time it does there is a chance that a property of that init object will be consumed. This is exactly what happens to the material init object property. It is consumed in step 6, where it is used to define the material that will be applied to the Cube primitive that is used as a place holder while the MD2 file is downloaded and parsed. The material property is then requested a second time in step 9, where it is used to define the material that is applied to the loaded 3D object. Of course, by this time the material property has been consumed and is no longer available.
The problem here is that a number of Away3D classes request the same property from an init object, and the order in which they consume these properties is not immediately obvious. In the case of the Md2 class, the material init object property is consumed by the Mesh constructor to be applied to the place holder Cube primitive, and not the AbstractParser constructor, which would apply the material to the loaded 3D object (which is the effect that you may expect when providing the material init object parameter).
The workaround to this issue is to simply assign the value to the specified property directly. This is why we have assigned the required material to the Mesh material property directly in a number of the examples presented in this chapter.
The Mesh object has a function called asAS3Class(), which can be used to dump a 3D object to an ActionScript class.
The following initScene() function could be used in the MD2EmbeddedDemo from the MD2—Embedded File example. It creates a new Mesh object from a MD2 file, and then uses the trace function to output the string returned by the asAS3Class() function.
protected override function initScene():void
{
  super.initScene();
  md2Mesh = Md2.parse(Cast.bytearray(MD2Model));
  trace(md2Mesh.asAS3Class("Ogre", "", true, true));
}
Tip
The asAS3Class() function can output many megabytes of data for complex models. You may find a tool like Vizzy Flash Tracer (http://code.google.com/p/flash-tracer/) easier to use than your authoring tool when dealing with such large trace dumps.
Converting 3D models into an ActionScript class offers some degree of copy protection by making it harder for your models to be extracted and used by a third party. And because the resulting ActionScript class only includes the data required by Away3D, it can result in smaller model files by stripping some of the extraneous data present in some 3D file formats (although this is not always the case—see Chapter 13, Performance Tips, for a more detailed look at the benefits of saving 3D objects as ActionScript classes).
Alternatively, you can use a tool like Prefab to import a 3D model file and then export an AS class. Prefab is a free tool that runs on the Adobe AIR platform, and can be downloaded from http://www.closier.nl/prefab/.
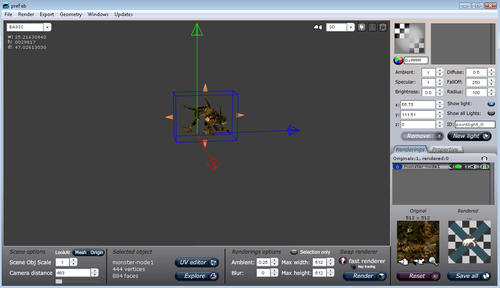
The following instructions show you how to convert a 3D model file into an ActionScript class using Prefab:
- Click File | Import 3D model.
- Select the 3D model file you wish to import and click on the OK button.
- At this point, you will see a Geometry integrity report window. Click on the Close button to return to the main window.
- Select the imported model by clicking on it. When selected, the model should be surrounded by a blue box.
- Click Export | Export to Away3D AS3 class.
- Select the Selected Object and Only Geometry options.
- Type in a name for the class in the ClassName textbox.
- You can leave the Package textbox empty, or you can optionally specify the package that the class should reside in.
- Click on the Save File button.
- Select a location to save the file (you will most likely want to save it in the same location as other source code files) and click on the Save button.
While it is possible to create simple 3D objects manually or through the primitive 3D objects supplied with Away3D, it is very common to display 3D models created and exported from 3D authoring applications. We have seen how these 3D models can be exported from a number of 3D modeling applications, such as 3ds Max, Blender, Milkshape, and Sketch-Up.
We have covered the differences in embedding the 3D model files directly into the final SWF file and loading them as external files. Sample applications were presented that demonstrate how the different formats supported by Away3D, which include 3DS, AWD, MD2, Collada, OBJ, ASE, and ActionScript, can be loaded, parsed, and displayed.
Finally, we saw how we can use the functionality in the Mesh class to convert a loaded 3D object into an ActionScript class, which provides a degree of copy protection and optimization.
In the next chapter, we will take a look at the various types of cameras and lenses available in Away3D.