As we have seen, there are many ways to create a 3D object in Away3D. Chapter 2, Creating and Displaying Primitives, covered the creation of a 3D object from its base components. That same chapter also covered a number of primitive 3D objects available in the away3d.primitives package. Then in Chapter 6, Models and Animations, we looked at how 3D objects are created by loading external model files. Finally, in Chapter 10, Creating 3D Text, we saw how text 3D objects can be created.
In addition to these methods, Away3D also has the ability to create and manipulate 3D objects programmatically using classes from the away3d.extrusions and away3d.modifiers packages. In fact, we have already seen one of these classes, TextExtrusion, at work in Chapter 10, Creating 3D Text, where it was used to give depth to a flat text 3D object.
Although creating objects in this manner is not as flexible as creating them in a 3D modeling application, it is possible to create a wide variety of 3D shapes using just a few lines of code.
This chapter will cover the following topics:
- Creating a flag with the
PathExtrusionclass - Creating walls with the
LinearExtrusionclass - Creating a vase with the
LatheExtrusionclass - Creating terrain with the
SkinExtrusionorElevationandHeightMapModifierclasses - Skimming the surface of a terrain 3D object with the
ElevationReaderclass
The PathExtrusion class, from the away3d.extrusions package, can be used to extend a cross section along a path. This cross section is known as a profile, and is defined as an array of Vector3D objects. In practice, it works much the same way as the TextExtrusion class that was introduced in Chapter 10, Creating 3D Text, by adding depth to an initial flat surface. But whereas the TextExtrusion class will extend a flat text 3D object perpendicular to the surface of the text, the PathExtrusion class can extend a surface along the length of a Path object, which can be a series of straight lines or a Bezier curve. This makes the PathExtrusion class ideal for creating 3D objects like ribbons and flags.
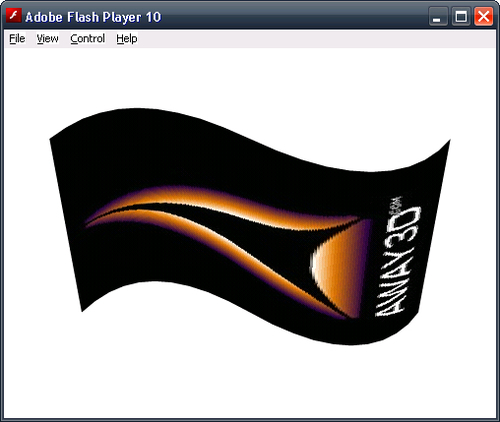
To demonstrate the PathExtrusion class, we will create an application called PathExtrusionDemo, which will create a simple flag 3D object.
package
{
  import away3d.core.geom.Path;
  import away3d.core.utils.Cast;
  import away3d.extrusions.PathExtrusion;
  import away3d.materials.BitmapMaterial;
  import flash.geom.Vector3D;

  public class PathExtrusionDemo extends Away3DTemplate
  {
    [Embed(source="away3dlogo.jpg")]
    protected var Away3DLogo:Class;

    public function PathExtrusionDemo()
    {
      super();
    }

    protected override function initScene():void
    {
      super.initScene();
To get a good view of the flag 3D object we will be creating, the camera is positioned along the Y and Z axes, and then we use the lookAt() function to orient the camera so that it is looking back at the scene's origin.
      camera.position = new Vector3D(0, 500, 500);
      camera.lookAt(new Vector3D(0, 0, 0));
Here we create a new Path object. If you recall from Chapter 10, Creating 3D Text, a path contains a number of PathSegment objects, which in turn are defined by three positions in space: the beginning, a control point, and the end. In this example, we are creating a Path object that will contain two PathSegment objects. The first PathSegment object is defined by the first three Vector3D objects in the array supplied to the Path constructor, and the second PathSegment object is defined by the last three Vector3D objects in the array. The resulting Path object looks like the following image:
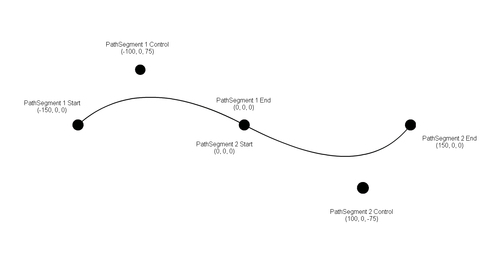
      var path:Path = new Path(
        [
          new Vector3D(-150, 0, 0),
          new Vector3D(-100, 0, 75),
          new Vector3D(0, 0, 0),
          new Vector3D(0, 0, 0),
          new Vector3D(100, 0, -75),
          new Vector3D(150, 0, 0)
        ]
      );
The cross section, or profile, is defined as an array of Vector3D objects. In this case, the profile is simply a vertical line 200 units in height.
      var profile : Array =
        [
          new Vector3D(0, -100, 0),
          new Vector3D(0, 100, 0)
];We then use the Path object and profile to create a new PathExtrusion object. The subdivision init object parameter is used to define the detail of the resulting 3D object, with higher values resulting in the final 3D object being constructed using more triangle faces, which produces a smoother appearance.
      var extrusion:PathExtrusion = new PathExtrusion(
        path,
        profile,
        null,
        null,
        {
          material: new BitmapMaterial(Cast.bitmap(Away3DLogo)),
          bothsides: true,
          subdivision: 10
        }
      );
The resulting PathExtrusion object is then added to the scene.
      scene.addChild(extrusion);
    }

  }
}
The following screenshot shows the output of this application: