
Chapter 16. Data: actions, preferences, files, SQLite, and addresses
|
This chapter covers |
|
|
In part 3 of this book, we offered a tutorial on the most important features of the SDK: we outlined Objective-C and the iPhone OS; we explored the two main tools, Xcode and Interface Builder; we examined view controllers of all types; and we looked at the standard event and action models for the iPhone. In the process, we tried to provide the strong foundation that you need to do any type of iPhone programming. Armed with that knowledge, and with the extensive documentation available online (or as part of Xcode), you should be able to start programming right away.
But we also want to offer you some additional information on many of the SDK’s best features—that’s the purpose of the fourth and final part of this book. In these five chapters, we’re going to touch upon five major categories of SDK tools and show you how to use them.
In the process, we’re going to go over some ground covered by Apple in its own documentation for each of these tools. As usual, we’re going to add value by approaching things in a tutorial manner and by offering specific examples of how each of the tools can be used in a real program.
We’ll also be expanding on our sample programs a bit. Having completed the introduction to SDK, we can take advantage of your knowledge of Objective-C to incorporate at least one in-depth example in each chapter; our intent is to show how different objects can work together to create a more complex Objective-C project. We can’t give you full iPhone App Store programs, because of the breadth of what we’re covering here, but expect to see some code examples that are more than a page long, and which typically include some off-topic elements.
This chapter will kick off our look at the SDK toolkit with a discussion of data, which will describe many of the ways you can deal with information generally (and text-specifically). We’ve broken this into a few broad categories. First, we’ll look at the ways users can input data into your program, focusing on actions and preferences. Second, we’ll examine ways that you can store and retrieve internal data, including using files and the built-in SQL database. In our long example for this chapter, you’ll build table views from SQLite data. Third, we’ll discuss the Address Book—a comprehensive iPhone system that allows for the simple input and retrieval of contact information that can be shared among multiple programs.
16.1. Accepting user actions
The simplest way to accept new data from a user is through UIControls, a topic that we covered in some depth in the latter half of chapter 14 and that we’re looking at again here for completeness’ sake. Table 16.1 includes some notes on the controls that you can use to accept user data.
Table 16.1. Various controls allow you to accept user input, most using simple interfaces.
|
Control |
Summary |
|---|---|
|
UIButton |
Offers simple functionality when the user clicks a button. See section 14.5 for an example. |
|
UIPageControl |
A pure navigation object that allows users to move between multiple pages using a trio of dots. |
|
UIPickerView |
Not a UIControl object, but allows the user to select from a number of items in a “slot machine” selection. It includes the subclass UIDatePicker. |
|
Not a UIControl object, but offers similar functionality to a UITextField. It provides an interface that includes a single-line text input, a search button, a cancel button, and a bookmark button. It could theoretically be used in any program where a user would want to save search results, though it’s obviously specialized for a web browser. See section 16.5.3 for an example. |
|
|
UISegmentedControl |
A horizontal bar containing several buttons. See section 17.4.2 for an example. |
|
UISlider |
A slider that allows users to input from a range of approximate values. See section 14.6.2 for an example. |
|
UISwitch |
An on-off button of the sort used in preferences. See section 16.2.1 for an example. |
|
UITextField |
A single-line text input, and probably the most common control for true user input. It requires some work to make the keyboard relinquish control. See section 14.6.1 for complete discussion and an example. |
|
UITextView |
Not a UIControl object, but does allow the user to enter longer bits of text. As with a text field, you must have it resignFirstResponder status to return control to the program when the user is done typing. As shown in the iPhone Notes utility, this is typically done with a separate Done button at the top of the interface, because the Return key is used to input returns. See section 16.3.4 for an example. |
|
UIToolBar |
Not a UIControl object. Instead, it’s a bar meant to hold a collection of UIBarButtonItems, each of which can be clicked to initiate an action. The bar is easy to configure and change. See section 18.4 for an example. |
Clearly, these controls serve a variety of purposes. Many exist for pure user-interface purposes, which we covered pretty extensively in chapter 14. What’s of more interest to us here are the text input controls (UISearchBar, UITextField, and UITextView) that you’re likely to use in conjunction with files and databases. We’ll look particularly at UISearchBar and UITextView, the two text inputs that we hadn’t previously given much attention to, over the course of this chapter.
Not included in this table are the integrated controller pickers that allow users to input data and make choices using complex prebuilt systems. These include the Address Book UI Picker (which is discussed in section 16.5.4) and the image picker (which is discussed in section 18.3).
Controls will be central to any real-life program, so you’ll see them throughout the upcoming chapters. Because we’ll be seeing lots of examples of their use, we can now move on to the next method of user data input: preferences.
16.2. Maintaining user preferences
Preferences are the way that an iPhone program maintains user choices, particularly from one session to another. They’re a way to not only accept user input, but also to save it. You can use your own programmatic interface to maintain these preferences, or you can use the Settings interface provided in the iPhone SDK.
If your program includes preferences that might change frequently, or if it would be disruptive for a user to leave your program to set a preference, you can create a preferences page within your program. This type of program-centric preference page is seen in the Stocks and Maps programs, each of which has settings that can be changed on the backside of the main utility.
Alternatively, if your program has preferences that don’t change that much, particularly if the defaults are usually OK, you should instead set them using the system’s settings. This type of iPhone-centric setting can be seen in the iPod, Mail, Phone, Photos, and Safari applications, all of which have their settings available under the Settings icon on the iPhone screen.
Of the two, the latter is the Apple-preferred way of doing things, but we’ll touch upon both, starting with creating your own preferences page. You should feel free to use either method, based upon the needs of your program, but you should most definitely not mix the two styles of preferences, because that’s likely to be quite confusing for your users.
16.2.1. Creating your own preferences
Whenever you’re writing iPhone programs, you should always do your best to match the look, feel, and methodology of Apple’s existing iPhone programs. Looking through built-in iPhone programs can offer lessons about when and how to use personal preferences on your own. Here’s what the personal preferences of those built-in programs can tell us:
- They’re used infrequently.
- When they do appear, they are used in conjunction with a program that has only a single page of content (like Stocks) or one that has multiple identical pages of content (like Weather).
- They appear on backside of a flipside controller.
- The preferences appear in a special list view that includes cells inside cartouches.
You can easily accommodate these standards when building your own programs. We’re going to do so over the next few examples, with the goal being to create the simple preferences table shown in figure 16.1.
Figure 16.1. This preferences page was built from scratch on the back of a flipside controller.

Drawing the Preferences Page
If you’re going to create a program that has built-in preferences, you should create it using the Utility Application template. As we’ve previously seen, this will give you access to a flipside controller, which will allow you to create your preferences on the backside of your application.
To create the special cartouched list used by preferences, you must create a table view controller with the special UITableViewGrouped style. This can be done by choosing the Grouped style for your table view in Interface Builder, or by using the initWithStyle: method in Xcode. Listing 16.1 shows the latter method by creating the UITableViewController subclass (which we’ve called a PreferencesController) inside the flipside controller’s viewDidLoad method.
Listing 16.1. Creating a grouped table in a flipside controller
- (void)viewDidLoad {

   PreferencesController *myTableView = [[PreferencesController alloc]
       initWithStyle:UITableViewStyleGrouped];
   [self.view addSubview:myTableView.view];

}
Once you’ve done this, you can then fill in your PreferencesController’s table view using the methods we described in chapter 13. You’ll probably make use of the cells’ accessoryView property, because you’ll want to add switches and other objects to the preference listing. Listing 16.2 shows the most important methods required to create a simple preferences page with two switches.
Listing 16.2. Follow the table view methods to fill out your preferences table
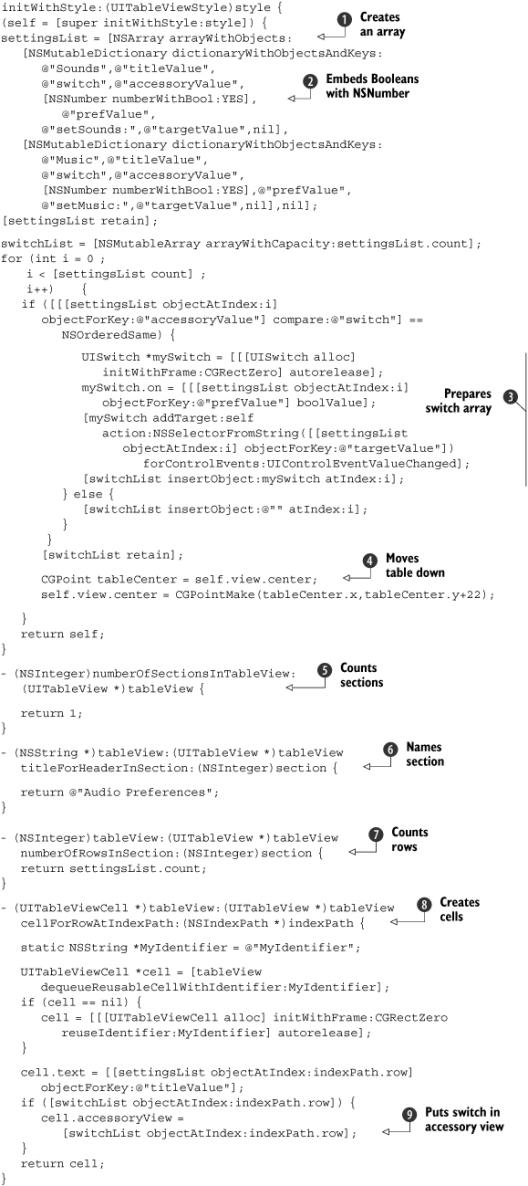
This example generally follows the table view methodology that you learned in chapter 13. You use an array to set up your table view ![]() . Besides a title, these (mutable) dictionaries also include additional info on the switch that goes into the table view,
including what it should be set to and what action it should call. This example shows one nuance we mentioned before: only
NSObjects can be placed in an NSDictionary, so you have to encode a Boolean value in order to use it
. Besides a title, these (mutable) dictionaries also include additional info on the switch that goes into the table view,
including what it should be set to and what action it should call. This example shows one nuance we mentioned before: only
NSObjects can be placed in an NSDictionary, so you have to encode a Boolean value in order to use it ![]() .
.
Your initWithStyle: method must do two other things. First, it must create a mutable array to hold all your switches for later access. You do
all of the creation here ![]() , based upon settingsList (or on whatever other means you might have used to pull in preferences data), because if you wait until you get to the table
view methods, you can’t guarantee the order in which they’ll be created. If you didn’t fill the switch list here, you could
get an out-of-bounds error, if, for example, the switch in row 1 was created before the switch in row 0. Note also that these
switches are created with no particular location on the screen, because we’ll be placing them later.
, based upon settingsList (or on whatever other means you might have used to pull in preferences data), because if you wait until you get to the table
view methods, you can’t guarantee the order in which they’ll be created. If you didn’t fill the switch list here, you could
get an out-of-bounds error, if, for example, the switch in row 1 was created before the switch in row 0. Note also that these
switches are created with no particular location on the screen, because we’ll be placing them later.
Second, it must move your table down a little bit to account for the navigation bar at the top of the flipside page ![]() .
.
The methods that define the section count ![]() , the section head
, the section head ![]() , and the row count
, and the row count ![]() are all pretty standard. It’s the method that defines the contents of the rows
are all pretty standard. It’s the method that defines the contents of the rows ![]() that’s of interest, primarily because it contains code that takes advantage of the accessoryView property that we touched upon in chapter 13. In this method you read back the appropriate switch from your array and input it
that’s of interest, primarily because it contains code that takes advantage of the accessoryView property that we touched upon in chapter 13. In this method you read back the appropriate switch from your array and input it ![]() .
.
There’s no real functionality in this preferences page—that will ultimately be dependent upon the needs of your own program. But this skeleton should give you everything you need to get started. Afterward, you’ll need to build your methods (here, setMusic: and setSounds:) which should access the switchList array, and then do the appropriate thing for your program when the switches are toggled.
Switches are the most common element of a preferences page. The other common feature that you should consider programming is the select list. That’s usually done by creating a subpage with a table view all its own. It should be set in UITableView-Grouped style, like this table was. You’ll probably allow users to checkmark one or more elements in the list.
Saving User Preferences
We’re leaving one element out of this discussion: what to do with your users’ preferences after they’ve set them. It’s possible that you’ll only want to save user preferences for the length of a single session, but it’s our experience that that can often be confusing and even annoying to users. More commonly, you should save preferences from one session to another. We offer three different ways to do so:
- Save the preferences in a file— Section 16.3 talks about file access. You can either save the preferences in plain text, or else use a more regulated format like XML, which is covered in chapter 20.
- Save the preferences in a database— Section 16.4 covers this.
- Save the preferences using NSUserDefaults—This option is discussed next.
As noted, we’re going to cover the more general methods later in this chapter. NSUserDefaults is a storage mechanism that’s specific to user preferences, though, so we’re going to cover it here.
Generally, NSUserDefaults is a persistent shared object that can be used to remember a user’s preferences from one session to another. It’s sort of like a preferences associative array. There are four major methods, listed in table 16.2.
Table 16.2. Notable methods for NSUserDefaults
|
Method |
Summary |
|---|---|
|
standardUserDefaults |
Class method that creates a shared defaults object. |
|
objectForKey: |
Instance method that returns an object for the key; there are numerous variants that return specific types of objects such as strings, Booleans, etc. |
|
setObjectForKey: |
Instance method that sets a key to the object; there are numerous variants that set specific types of objects such as strings, Booleans, etc. |
|
resetStandardUserDefaults |
Class method that saves any changes made to the shared object. |
It would be simple enough to modify the previous preferences example to use NSUserDefaults. First, you’d change the init method to create a shared defaults object, then read from it when creating the settingListing array, as shown in listing 16.3.
Listing 16.3. Preferences setup with NSUserDefaults
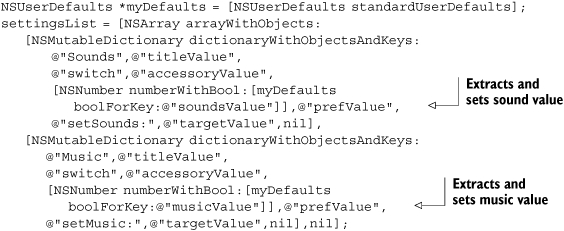
The lines in which the prefValues are set are the new material here. The information is extracted from the NSUSerDefaults first.
The methods called when each of these switches are moved can set and save changes to the default values. You’ll want to do other things here too, but the abbreviated form of these methods is shown in listing 16.4.
Listing 16.4. Setting and saving NSUserDefaults
-(void)setMusic:(id)sender {

    NSUserDefaults *myDefaults = [NSUserDefaults standardUserDefaults];

    UISwitch *musicSwitch = [switchList objectAtIndex:1];

    [myDefaults setBool:musicSwitch.on forKey:@"musicValue"];
    [NSUserDefaults resetStandardUserDefaults];
}

-(void)setSounds:(id)sender {

    NSUserDefaults *myDefaults = [NSUserDefaults standardUserDefaults];
    UISwitch *soundsSwitch = [switchList objectAtIndex:0];

    [myDefaults setBool:soundsSwitch.on forKey:@"soundsValue"];
    [NSUserDefaults resetStandardUserDefaults];
}
This functionality is simple. You call up the NSUserDefaults, set any values you want to change, and then save them. If you call up your program again, you’ll find that the two switches remain in the position that you set them last time you ran the program.
Once you decide how to save your personal preferences, you’ll have a skeleton for creating your own preferences page, and if that’s appropriate for your program, you’re done. But that’s just one of two ways to let users add preference data to your program. More commonly, you’ll be exporting your settings to the main Settings program. So, how do you do that?
16.2.2. Using the system settings
When you created a personal preferences page in the last section, you used all the SDK programming skills that you’ve been learning to date, creating objects and manipulating them. Conversely, using the system settings is much easier: it just requires creating some files.
About bundles
Xcode allows you to tie multiple files together into a coherent whole called a bundle. In practice, a bundle is just a directory. Often a bundle is made opaque, so that users can’t casually see its contents; in this case, it’s called a package.
The main advantage of a bundle is that it can invisibly store multiple variants of a file, using the right one when the circumstances are appropriate. For example, an application bundle could include executable files for different chip architectures or in different formats.
When working with Xcode, you’re likely to encounter three different types of bundles: framework bundles, application bundles, and settings bundles. All frameworks appear packaged as framework bundles, though that’s largely invisible to you. An application bundle is what’s created when you compile a program to run on your iPhone; we’ll talk about how to access individual files in a bundle in the next section, when we talk about files generally. Finally, the settings bundle contains a variety of information about system settings, a topic that we’ll be addressing now.
More information on how to access bundles can be found in the NSBundle and CFBundle classes.
To begin using the System Settings, you must create a settings bundle. This is done in Xcode through the File > New File option. To date, we’ve only created new files using the Cocoa Touch Classes option (starting in section 11.3). Now you should instead choose Settings in the sidebar, which will give you the option to create just one sort of settings file: Settings Bundle. When you do this, Settings.bundle will be added to your current project.
This bundle will, by default, contain two files: Root.plist and Root.strings. Root.strings contains localized content, which means words in the language of your choice. (Localization is a topic that we’ve generally omitted in this book.) Root.plist is what defines your program’s system settings.
Editing Existing Settings
Root.plist is an XML file, but as usual you can view it in Xcode, where it’ll appear as a list of keys and values. You’ll first want to change the Title to your project’s name. All of the rest of your settings appear under the PreferenceSpecifiers category, as shown in figure 16.2.
Figure 16.2. This look at system settings reveals some of Root.plist’s PreferenceSpecifiers.
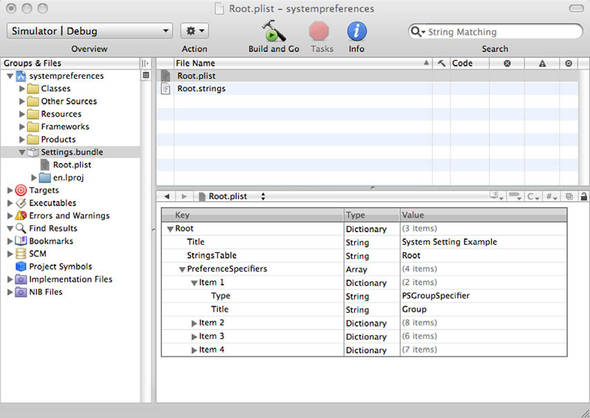
There are seven types of data that you can enter into the Settings plist file, each of which will create a specific tool on the Settings page. Of these, four appear by default in the plist file at the time of this writing, and are thus the easiest to modify. All seven options are all shown in table 16.3.
Table 16.3. Different preference types let you create different tools on the Settings page.
|
Summary |
Default |
|
|---|---|---|
|
PSChildPaneSpecifier |
Points to a subpage of preferences |
|
|
PSGroupSpecifier |
Contains a group header for the current table section |
|
|
PSMultiValueSpecifier |
Points to a subpage containing a select list |
|
|
PSSliderSpecifier |
A UISlider |
|
|
PSTextFieldSpecifier |
A UITextField |
|
|
PSTitleValueSpecifier |
Shows the current, unchangeable value of the preference |
|
|
PSToggleSwitchSpecifier |
A UISwitch |
|
The plist editor is simple to use and will allow you to easily do the vast majority of work required to create the settings for your program. You can cut and paste the existing four preferences (noted by checkmarks in table 16.3) to reorder them or create new instances of the four existing preference types. Then you fill in their data to create preferences that look exactly like you want.
For any setting, the Type string always describes which sort of preference you’re setting. Other settings define what you can change. For example, to change the text that appears in a PSGroupSpecifier, you adjust the Title string inside the PSGroupSpecifier dictionary. Changing the PSSliderSpecifier, PSTextFieldSpecifier, and PSToggleSwitchSpecifier are equally easy. The only thing to note on those is the Key string, which sets the name of the preference’s variable. You’ll need that name when you want to look it up from inside your program (a topic we’ll return to).
Creating New Settings
The remaining three preferences are a bit harder to implement because you don’t have a preexisting template for them sitting in the default Root.plist file. But all you have to do is create a dictionary that has all the right values.
When you click individual rows in the plist editor, you’ll see some iconic options to help in creating new preferences. At any time, you can create new PreferenceSpecifiers (which is to say, new preferences) by clicking the plus (+) symbol to the right of the current row. You can likewise add to dictionaries or arrays by opening them up, then clicking the indented row symbol to the right of the current row.
A PSTitleValueSpecifier is an unchangeable preference. It shows the preference name and a word on the Settings page. Its dictionary includes a Type (string) of PSTitleValueSpecifier, a Title (string) that defines the name of the preference, a Key (string) that defines the variable name, and a DefaultValue (string).
A PSMultiValueSpecifier is a select list that appears on a subpage. Its dictionary contains a Type (string) of PSMultiValueSpecifier, a Title (string), a Key (string), a DefaultValue (string), a Titles (array) that contains a number of String items, and a matched Values (array) that contains Number items.
Figure 16.3 shows what these two items look like, laid out in Xcode.
Figure 16.3. This display shows how PSTitleValueSpecifier and a PSMultiValueSpecifier look in Xcode.

The last sort of setting, PSChildPaneSpecifier does something totally different: it lets you create additional pages of preferences.
Creating Hierarchical Settings
If necessary, you can have multiple pages of settings. To create a subpage, use the PS ChildPaneSpecifier type. It should contain a Type (string) of PSChildPaneSpecifier, a Title (string), and a File (string) that contains the new plist file without extension.
Once you’ve done this, you need to create your new plist file. There is currently no “Add plist” option, so we suggest copying your existing Root.plist file, renaming it, and going from there.
We’ve put together an example of all seven preference types in figure 16.4. It shows the types of preference files that you can create using Apple’s built-in functionality.
Figure 16.4. In order, a Group, a TextField, another Group, a Switch, a TitleValue, a MultiValue, a ChildPane, a third Group, and a Slider.

Now you know everything that’s required to give your users a long list of preferences that they can set. But how do you use them from within Xcode?
Accessing Settings
Settings end up encoded as variables. As you saw when looking through the plist editor, each individual preference is an NSString, NSArray, NSNumber, or Boolean. These variables can be accessed using the shared NSUserDefaults object. We already discussed this class in the last section; it so happens that Apple’s settings bundle uses it, as we suggested you might. The functionality remains the same. You can create it as follows:
[NSUserDefaults standardUserDefaults];
Once you’ve done that, you can use NSUserDefaults’ objectForKey: methods, like arrayForKey:, integerForKey:, and stringForKey:, as appropriate to access the information from the settings. For example, the following code applies a string from the settings to a label:
myLabel.text = [[NSUserDefaults standardUserDefaults]
   stringForKey:@"name_preference"];
Similarly, you can save new settings if you want by using the various setObjectForKey: methods—although we don’t think this is a particularly good idea if users are otherwise modifying these values in Settings.
There is one considerable gotcha that you must watch for: if your user has not yet accessed the settings for your program, then all settings without default values will have a value of nil. This means that you’ll either need to create your preferences by hand or build defaults into your program, as appropriate.
Most of the time, you’ll only need to retrieve the setting values, as described here, but if more is required, you should look at the class reference for NSUserDefaults.
That concludes our look at the two ways to create preferences for your programs, and also at how users can input data into your program; but user input represents just one part of the data puzzle. Certainly, a lot of important data will come from users, but data can also come from various files and databases built into your program or into the iPhone itself. Retrieving data from those sources is the topic of the latter half of this chapter.
16.3. Opening files
When we talked about bundles earlier in this chapter, we took our first look at how the iPhone arranges its internal information for programs. That arrangement becomes vitally important when trying to access files that you added to a project.
Fortunately, you can look at how your program’s files are arranged when you’re testing applications on the iPhone Simulator. Each time you run a program, the program will be compiled to a directory under ~/Library/Application Support/iPhone Simulator/User/Applications. The specific directory will have a hexadecimal name, but you can search a bit to find the right one. Figure 16.5 shows an example of the directory for the sample program that we used to set up our system preferences example (though the subdirectories will be the same for any basic program).
Figure 16.5. Compiled programs contain several directories full of files.

As shown, there are four directories of files for this one simple program. The majority of the content appears in the application bundle, which in this example is called systempreferences.app. There you’ll find everything that you added to your project, including text files, pictures, and databases. The other three directories that you can use are Documents, Library, and tmp.
These are all intended to be used for files that are created or modified when the program is run. Documents should contain user-created information (including new or modified text files, pictures, and databases), Library should contain more programmatic items (like preferences), and tmp should contain temporary information. Each of these directories starts out empty, other than the fact that the Library maintains a local copy of your system settings. We’ll talk about how and why you’d fill them momentarily.
16.3.1. Accessing your bundle
In previous chapters, we’ve shown how easy it is to add files to your project. You drag the file into Xcode, and everything is correctly set up so that the file will become part of your program when it compiles. As we now know, that means the file is copied into your application bundle.
For many bundled files, you don’t have to worry about anything beyond that. For example, when you worked with picture files, you entered the name of the file in Interface Builder, and the SDK automatically found it for you. But if you want to access a file that doesn’t have this built-in link, you’ll need to do a little bit more work.
Whenever you’re working with the file system on the iPhone, access will be abstracted through objects. You’ll send messages that tell the SDK what area of the file system you’re looking for, and the SDK will then give you precise directory paths. The benefit of this abstraction is that Apple can reorganize the file system in future releases, and your program won’t be affected at all.
The first files you’ll want to access will probably be in your bundle: files that you included when you compiled your program. Accessing a bundle file is usually a two-step process, as shown in this database example (which we’ll return to in the next section):
NSString *paths = [ [NSBundle mainBundle] resourcePath];
NSString *bundlePath = [paths stringByAppendingPathComponent:dbFile];
In this example, mainBundle returns the directory path that corresponds to your application’s bundle, and resourcePath expands that to be the directory path for the resources of your program (including, in this case, a database, but this could also be anything else you added to your program). Finally, you use stringByAppendingPathComponent: to add your specific file to the path. This NSString method makes sure that a path is constructed using slashes (/) as needed.
The result is a complete path that can be handed to other objects as needed. We’ll see how that works with a database in the next section. You could likewise use it for UImage’s imageWithContentsOfFile: method or NSFileHandle’s fileHandleForReadingAtPath method. We’ll return to the latter shortly.
But there’s one fundamental problem with accessing files inside the application bundle: you can’t modify them. Apple generally suggests that you should treat the application bundle as read-only, and there’s a real penalty if you don’t: your program will stop working because it won’t checksum correctly. This means that the application bundle is great for files that don’t change, but if you want to modify something (or create something new), you need to use the other directories we mentioned, starting with the Documents folder.
16.3.2. Accessing other directories
When working with directories other than the bundle, you have to think about two things: how to access those files and how to move files among multiple directories.
Retrieving a File
Once a file is sitting in your Documents directory, you can retrieve it much like you retrieved files from the bundle directory:
NSArray *paths = NSSearchPathForDirectoriesInDomains(NSDocumentDirectory,
   NSUserDomainMask, YES);
NSString *documentsDirectory = [paths objectAtIndex:0];
NSString *docPath = [documentsDirectory
   stringByAppendingPathComponent:dbFile];
The magic here occurs in the NSSearchPathForDirectoriesInDomains function. The first argument is usually NSDocumentDirectory or NSLibraryDirectory, depending on which directory you want to get to. The other two arguments should always be the same for the iPhone. The result will be an array of strings, with each containing a path. The first path in the NSArray will usually be the right one, as shown here. You can then use the stringByAppendingPathComponent: method, like before, to build the complete path for your file. Voila! You’ve now used some slightly different methods to access a file in your Documents directory rather than the bundle directory.
Copying a File
There’s been a slight disconnect in our discussion of files and directories to date. When you compile your project, all of your files will be placed into your application bundle. But if you ever want to edit a file, it must be placed in a different directory, such as Documents. So how do you get a file from one place to the other? You use the NSFileManager:
NSFileManager *fileManager = [NSFileManager defaultManager];
success = [fileManager copyItemAtPath:bundlePath toPath:docPath
   error:&error];
The file manager is a class that allows you to easily manipulate files by creating them, moving them, deleting them, and otherwise modifying them. As is the case with many classes we’ve seen, you initialize it by accessing a shared object. You can do lots of things with the file manager, including copying (as we’ve done here) and checking for a file’s existence (which we’ll demonstrate shortly). You should look at the NSFile-Manager class reference for complete information.
As we’ll see, the NSFileManager is one of numerous classes that you can use to work with files.
16.3.3. Manipulating files
It’s possible that once you’ve built your file path, you’ll be ready to immediately read the file’s contents, using something like the UIImage methods (which we’ll touch upon in chapter 19) or the functions related to SQLite (which we’ll cover later in this chapter). But it’s also possible that you’ll want to manipulate the raw files, reading and parsing them in your code, as soon as you’ve created a file path. There are numerous ways to do this, as shown in table 16.4.
Table 16.4. A couple of ways to manipulate files using the SDK
|
Class |
Method |
Summary |
|---|---|---|
|
NSHandle |
fileHandleForReadingAtPath: fileHandleForWritingAtPath: fileHandleForUpdatingAtPath: |
Allows you to open a file |
|
NSHandle |
readsDataofLength: |
Returns an NSData containing the specified number of bytes from the file |
|
NSHandle |
readsDataToEndOfFile |
Returns an NSData with the rest of the file’s content |
|
NSHandle |
closeFile |
Closes an NSHandle |
|
NSFileManager |
contentsAtPath: |
Returns an NSData with the complete file’s contents |
|
NSData |
initWithContentsOfFile: |
Creates an NSData with the complete file’s contents |
|
NSData |
writeToFile:atomically: |
Writes the NSData to a file |
|
NSString |
stringWithContentsOfFile:encoding:error: |
Returns an NSString with the complete file’s contents |
|
initWithData:encoding: |
Returns an NSString with the NSData’s contents |
|
|
NSString |
writeToFile:atomically:encoding:error: |
Writes the NSString to a file |
As table 16.4 shows, you can access files in a huge variety of ways once you’ve created a file path. If you’re a C programmer, opening a file handle, reading from that file handle, and finally closing that file handle is apt to be the most familiar approach. Or, you could use a shortcut and go straight to the NSFileManager and have it do the whole process. Even quicker is using methods from NSData or NSString to directly create an object of the appropriate type.
Any of these simpler methods is going to cost you the ability to step through a file byte by byte, which may be a limitation or a benefit, depending on your program. But with the simpler methods, you just need a single line of code:
NSString *myContents = [NSString stringWithContentsOfFile:myFile
    encoding:NSASCIIStringEncoding error:&error];
Table 16.4 also lists a few ways to write back to files, including simple ways to dump an NSData object or an NSString object to a file. There are also other ways. When you decide which set of methods you’re most comfortable using, you should consult the appropriate class reference for additional details.
File content
In this section—and in our next example—we’re largely assuming that files contain plain, unstructured text. But this doesn’t have to be the case. XML is a great way to store local data in a more structured format. Chapter 20 covers how to read XML and includes an example of reading local XML data.
When you’re working with files, you’re likely to be doing one of two things. Either you have files that contain large blobs of user information or you have files that contain short snippets of data that you’ve saved for your program. To demonstrate how to use a few of the file objects and methods, we’re going to tackle the first problem by building a simple notepad prototype.
16.3.4. Filesaver: a UITextView example
This program will allow you to maintain a text view full of information from one session to another. It’s relatively basic, but you can imagine how you could expand it to mimic the iPhone’s notepad program, with its multiple notes, toolbars, navigator, and image background.
Listing 16.5 shows this simple filesaver example. The objects, as usual, were created in Interface Builder: a UIToolBar (with associated UIBarButtonItem) and a UITextView.
Listing 16.5. A prototype notepad program that maintains a text field as a file
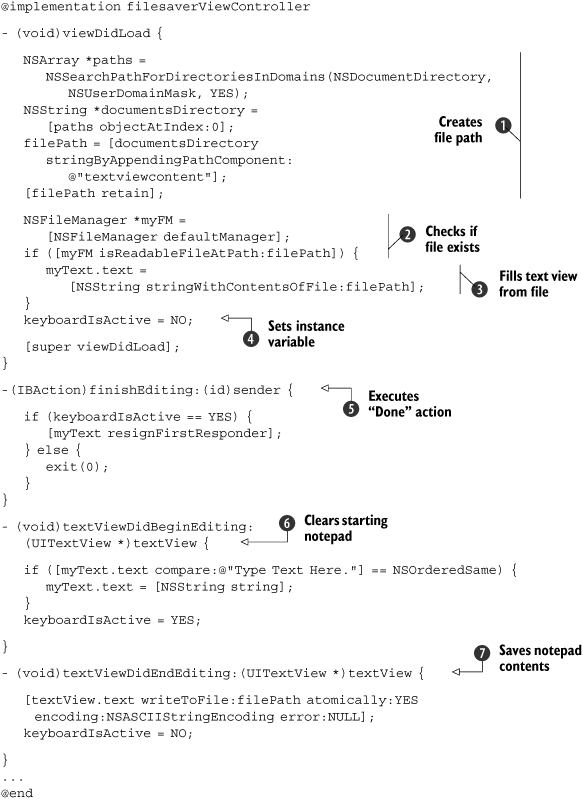
This program shows how easy it is to access files. The hardest part is determining the path for the file, but that involves
using the path creation methods we looked at a few sections back. When you’ve got your path, you save it as a variable so
that you won’t have to recreate the path later ![]() . Next, you use NSFileManager to determine whether a file exists
. Next, you use NSFileManager to determine whether a file exists ![]() . If it does, you can immediately fill your UITextField with its content
. If it does, you can immediately fill your UITextField with its content ![]() . Finally, you set a keyboardIsActive variable
. Finally, you set a keyboardIsActive variable ![]() , which you’ll update throughout the program.
, which you’ll update throughout the program.
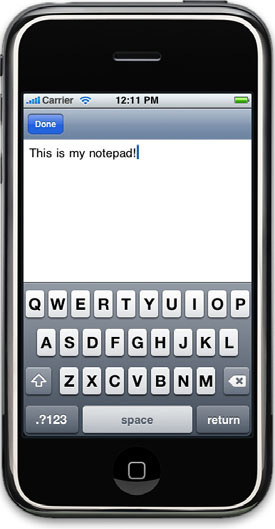
As we’ve previously noted, the objects that pull up keyboards are a bit tricky, because you have to explicitly get rid of the keyboard when editing is done. For UITextFields you could turn the Return key into a Done key to dismiss the keyboard, but for a UITextView you usually want your user to be able to enter returns, so you must typically create a bar at the top of the page with a Done button. Figure 16.6 shows this layout of items.
Figure 16.6. A keyboard fills the screen of the Filesaver.
When the Done button is clicked, your finishEditing: method ![]() is called, which resigns the first responder, making the keyboard disappear (unless you’re not editing, in which case it
closes the program).
is called, which resigns the first responder, making the keyboard disappear (unless you’re not editing, in which case it
closes the program).
The last two methods are defined in the UITextFieldDelegate protocol. Whenever editing begins on the text field ![]() , your program checks to see if the starting text is still there, and if so clears it. Whenever editing ends on the text field
, your program checks to see if the starting text is still there, and if so clears it. Whenever editing ends on the text field
![]() , the content is saved to your file. Finally, the keyboardIsActive variable is toggled, to control what the Done button does in each state.
, the content is saved to your file. Finally, the keyboardIsActive variable is toggled, to control what the Done button does in each state.
As you saw in table 16.4, there are numerous other ways to read files and save them. The methods in listing 16.5 are simple, but they allow you to make good use of your notepad’s file.
Files are OK to use for saving one-off data, but if you’re storing a lot of really large data, we suggest using a database when it’s available. And on the iPhone, a database is always available.
16.4. Using SQLite
The SDK’s built-in database is SQLite, a public domain software package. You can find more information on it at http://www.sqlite.org, including documentation that’s considerably more extensive than what we could include here. You need to know the SQL language to use SQLite, and we won’t cover SQL syntax here at all. In addition, you must be familiar with the SQLite API. We’ll show how to use it for some basic tasks here, but there’s a much more extensive reference online.
SQLite has what we find to be two major limitations. First, there’s no simple way to create your database. We think that there should be an integrated interface in Xcode, and we hope that there is sometime soon. Instead, you must create the database by hand for now. Second, there’s no object-oriented interface to SQLite. Instead, you’ll be using an API that falls back on C code, which we find less elegant and harder to use than the typical Objective-C class.
Given these limitations, we still think that using an SQL database is a better option than files for most situations, and we highly suggest that you learn enough about SQL to use it comfortably.
16.4.1. Setting up an SQLite database
Prior to using SQLite in your program, you must set up a database that contains all of your tables and the initial data that you want. We’ll look at the general steps first, and then set up a database that can be used to drive a navigation menu.
Creating an Sqlite Database
Creating an SQLite database typically is done from the command line, although it can also be done entirely programmatically. Programmatic creation of the database will not be covered here, but you can find documentation on the SQLite site for doing that. The steps for creating it from the command line are listed in table 16.5.
Table 16.5. Creating an SQLite database from the command line
|
Step |
Description |
|---|---|
|
1. Prepare your table. |
Figure out the design of each table in your database. Create a file for the initial data of each table (if any) that has data cells separated with pipes (|) and data rows separated with returns. |
|
2. Create your database. |
Start SQLite with this command: sqlite3 filename Use a CREATE TABLE command to create each table. |
|
3. Enter your initial info. |
Use this command to fill each table: .import table filename Quit SQLite. |
|
4. Add your database to the Xcode. |
Inside Xcode, use the Add > Existing Files menu option to add your database to your project. |
To show how all this works, we’re going to put together a data file for a database-driven navigation controller. When we talked about tables in chapters 13 and 15, we created them from arrays and dictionaries. This is a fine technique when you’re creating small, stable hierarchies, but what if you want to build something larger or something that can be modified by the user? In those cases, a database is a great backend for a navigation menu.
Designing a Navigation Menu
To support a database-driven menu, we’ve designed a simple database schema. Each row in the navigation hierarchy will be represented by one row in a database. Each of those rows will have five elements:
- catid—provides a unique (and arbitrary) ID for an individual row in the menu
- parentid—indicates what row in the database acts as the hierarchical parent of the current row, or lists 0 if it’s a top-level row that would appear on the first page of the menu
- title—contains the printed text that will appear in the menu
- entrytype—specifies whether the row is a category (which opens up a submenu) or a result (which performs some action)
- ordering—lists the order in which the rows should appear on an individual page of the menu
Here’s an example of what a data file might look like, with the five elements shown in the preceding order:
> cat nav.data
1|0|First|category|1
2|0|Third|category|3
3|0|Second|category|2
4|2|Submenu|category|1
5|0|Action #1|result|4
6|1|Action #1B|result|1
And here’s how you’d create a table for that data and import it:
> sqlite3 nav.db
SQLite version 3.4.0
Enter ".help" for instructions
sqlite> CREATE TABLE menu (catid int(5),parentid int(5),title
  varchar(32),entrytype varchar(12), ordering int(5));
sqlite> .import nav.data menu
Afterward, you can add your now-complete database to Xcode using the normal procedures, a step that’s not shown here. Once you’ve linked in your database the first time, you can go back and make changes to it, and the new version will always be used when you recompile your project.
You’ve now got a ready-to-run database, but you’ll still need to prepare your Xcode to use SQLite. We’ll look at that next.
16.4.2. Accessing SQLite
You’ll have to link in some additional resources to use SQLite, as is typical for any major new functionality.
First, you need to add the framework, which you’ll find under /usr/lib/ libsqlite3.0.dylib, rather than in the standard Framework directory. Second, you must add the include file, which is sqlite3.h.
You’ve now got a database that’s ready to use, and you’ve included the functionality that you need to use it. The next step is to access SQLite’s functions.
16.4.3. Accessing your SQLite database
SQLite includes approximately 100 functions, about 20 object types, and a huge list of constants. We’re going to cover the basics that you’ll need to access the database you’ve created. Table 16.6 shows the most critical API commands. They generally revolve around two important concepts: the database handle (which is returned by sqlite3_open and is used by everything else) and the prepared statement (which is returned by sqlite3_prepare and which is used to run queries).
Table 16.6. The most important SQLite API commands
|
Function |
Arguments |
Summary |
|---|---|---|
|
sqlite3_open |
filename, address of database |
Opens a database |
|
sqlite3_prepare |
database, SQL as UTF-8, max length to read, address of statement, address of unread results |
Turns an SQL statement in UTF-8 format into a pointer to a prepared statement, which can be handed to other functions |
|
sqlite3_step |
prepared statement |
Processes a row of results from a prepared statement, or else returns an error |
|
sqlite3_column_int |
prepared statement, column # |
Returns an int from the active row; there are also several other simple functions that similarly return a specific column from the active row |
|
sqlite3_column_string |
prepared statement, column # |
Returns a char *, which is to say a string, from the active row; there are also several other simple functions that similarly return a specific column from the active row |
|
sqlite3_finalize |
prepared statement |
Deletes a prepared statement |
|
sqlite3_close |
database |
Closes a database |
These functions, in order, show the usual life cycle of an SQLite database:
- Open the database.
- Prepare statements, one at a time.
- Step through a statement, reading columns.
- Finalize the statement.
- Close the database.
SQLite does include two convenience functions, sqlite3_exec() and sqlite3_get_table(), which simplify these steps; but the functions are built using the core functionality above, so that’s what we’ve decided to highlight.
16.4.4. Building a navigation menu from a database
Now that you have a basic understanding of the SQLite functions, you can put together a prototype of a database-driven menu navigation system. What we’ll do here is by no means complete, but it’ll give you a great basis to build on. This example will also be one of the most complex in the book. It includes multiple classes of new objects designed to work either apart (in different programs) or together.
In this section we’ll be covering the SKDatabase class (which abstracts database connections), the SKMenu class (which abstracts navigator menu creation), and the Data-baseViewController (which transforms a typical table view controller into a database-driven class). In the end, we’ll hook everything together with the app delegate.
The Database Class
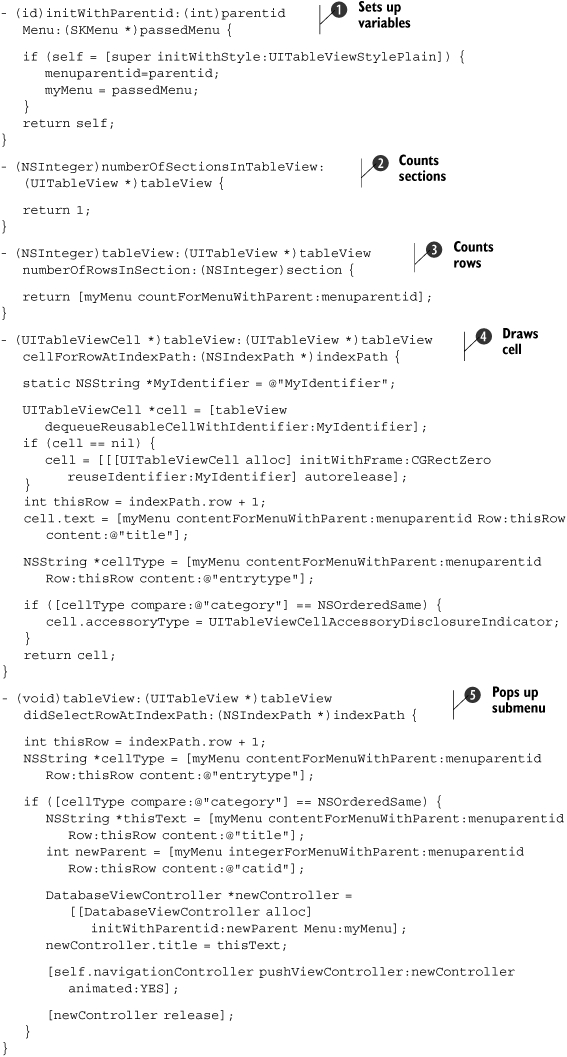
Because there aren’t any preexisting object-oriented classes for the SQLite database functions, any program using a database should start off creating its own. Listing 16.6 contains the start of such a class, creating methods for the parts of the API that you’ll need to create the database view controller.
Listing 16.6. SKDatabase, a new SQLite3 database class

The header file ![]() , not shown, includes one variable declaration for dbh, the database handle. That’s the one variable you want to always have available to your class, because it gives access to
the database. Now you’re ready to start work on the source code file.
, not shown, includes one variable declaration for dbh, the database handle. That’s the one variable you want to always have available to your class, because it gives access to
the database. Now you’re ready to start work on the source code file.
The initWithFile: method ![]() uses some of the file commands that you learned in the previous section to find the database file, which is in the main bundle
(but remember, you’ll want to copy this to the Documents directory if you make changes to your database). It then opens the
file using sqlite3_open, the first of several SQLite3 API commands. Note that the NSString for the path has to be converted with the UTF8String method. This must be done throughout the class, because the SQLite API does not use the Objective-C classes you’re familiar
with.
uses some of the file commands that you learned in the previous section to find the database file, which is in the main bundle
(but remember, you’ll want to copy this to the Documents directory if you make changes to your database). It then opens the
file using sqlite3_open, the first of several SQLite3 API commands. Note that the NSString for the path has to be converted with the UTF8String method. This must be done throughout the class, because the SQLite API does not use the Objective-C classes you’re familiar
with.
The next few methods are pretty simple. close signals the end of the database life cycle ![]() , dbh is a getter for the class’s one variable
, dbh is a getter for the class’s one variable ![]() , and prepare turns an SQL statement into a prepared statement
, and prepare turns an SQL statement into a prepared statement ![]() .
.
The lookupSingularSQL: method is where things get interesting, because it shows off the life cycle of a complete SQL function call ![]() . Note that this function allows only a simple SQL call that returns one column from one row of information. That’s all you
need for the database view controller, but you’ll doubtless need more complexity for a larger application.
. Note that this function allows only a simple SQL call that returns one column from one row of information. That’s all you
need for the database view controller, but you’ll doubtless need more complexity for a larger application.
The function starts off by turning the SQL statement into a prepared statement ![]() . Then it steps to the first row
. Then it steps to the first row ![]() . Depending on the type of lookup, it either fetches a string
. Depending on the type of lookup, it either fetches a string ![]() or an int
or an int ![]() ). Finally, it cleans up the statement with a finalize
). Finally, it cleans up the statement with a finalize ![]() .
.
In a more complex class, you’d doubtless want to write methods that execute SQL calls without any returns, that return multiple columns from a row, and that return multiple rows, but we’re going to leave that for now (because we don’t need any of those features for this example), and move on to the menu class. The SQLite API has more information on these features if you need them.
The Menu Class
The next class, SKMenu, acts as an intermediary. At the front end, it accepts requests for information about the menu that will fill the table view. On the back end, it turns those requests into SQL queries. It’s been designed in this way to create an opaque interface: a programmer will never have to know that a database is being used, simply that the SKMenu class returns results for a table view.
The simple code of SKMenu is shown in listing 16.7. It mainly illustrates how to use the SKDatabase class in listing 16.6.
Listing 16.7. SKMenu, an interface to the SKDatabase class

Again, we haven’t shown the include file ![]() , but it includes one variable, myDB, which is a reference to the database object linked to the menu. The initWithFile: method
, but it includes one variable, myDB, which is a reference to the database object linked to the menu. The initWithFile: method ![]() initializes myDB by creating the database object.
initializes myDB by creating the database object.
The countForMenuWithParent: method is the first one to use the database ![]() . It gets a sum of how many menu items there are at a particular level of the menu hierarchy. contentForMenuWithParent:
. It gets a sum of how many menu items there are at a particular level of the menu hierarchy. contentForMenuWithParent: ![]() and integerForMenuWithParent:
and integerForMenuWithParent: ![]() are two other lookup functions. The first looks up database entries that will return strings, and the second looks up database
entries that will return ints. This is required because, as you’ll recall, SQLite has different database lookup functions
for each of the variable types.
are two other lookup functions. The first looks up database entries that will return strings, and the second looks up database
entries that will return ints. This is required because, as you’ll recall, SQLite has different database lookup functions
for each of the variable types.
Finally, the dealloc method cleans up the database ![]() , first closing it and then releasing the object. It’s always important in Objective-C to keep track of which objects are
responsible for which objects. Here, the menu is responsible for the database, so it does the cleanup.
, first closing it and then releasing the object. It’s always important in Objective-C to keep track of which objects are
responsible for which objects. Here, the menu is responsible for the database, so it does the cleanup.
The Database View Controller
Now that you’ve got some menu methods that allow a program to figure out the contents of a hierarchy of menus, you can put together your table view controller, which will read that information and fill table views on the fly. Listing 16.8 shows how the menu functions are used.
Listing 16.8. DatabaseViewController, a database-driven table view controller
To properly understand how the database view controller works, you should remind yourself of the menu format that we introduced a few pages ago. Remember that each row of the menu has an individual ID (the catid), and a parentid that indicates what lies above it in the menu hierarchy. There’s also a title, which lists what the menu row will say, a category, which indicates whether it leads to a new menu or is an end result, and an ordering variable. You’ll use all that information in putting together your table view.
The database view controller will be called multiple times by your project, once per menu or submenu. Each time, the initWithParentid:Menu: method identifies what level of the hierarchy to draw from the menu that’s enclosed ![]() . For example, if the parentid is 0, the top-level menu is drawn; if the parentid is 2, the menu that lies under entry (catid) 2 is drawn. The sole purpose of the init is to save that information.
. For example, if the parentid is 0, the top-level menu is drawn; if the parentid is 2, the menu that lies under entry (catid) 2 is drawn. The sole purpose of the init is to save that information.
You then have to fill in the standard table view controller methods. The count of sections is always 1 ![]() . The number of rows is calculated from the database, using the SKMenu’s countForMenuWithParent: method
. The number of rows is calculated from the database, using the SKMenu’s countForMenuWithParent: method ![]() .
.
tableView:cellForRowAtIndexPath: is the first somewhat complex method ![]() . After the standard setup of the cell, the method looks up the title to be placed in the menu row. It then determines whether
the menu row is a category or not; this affects whether the chevron accessory is placed.
. After the standard setup of the cell, the method looks up the title to be placed in the menu row. It then determines whether
the menu row is a category or not; this affects whether the chevron accessory is placed.
Finally, tableView:didSelectRowAtIndexPath: does the fancy work ![]() . If the cell isn’t a category, it doesn’t do anything. (You will probably change this when creating another program, because you may want results to result in some action; this could be a great place to introduce a new protocol to respond when a result row is selected.)
. If the cell isn’t a category, it doesn’t do anything. (You will probably change this when creating another program, because you may want results to result in some action; this could be a great place to introduce a new protocol to respond when a result row is selected.)
If the cell is a category, magic happens. The database view controller creates a new database view controller, on the fly, using the same old menu, but the current catid becomes the new parentid, which means the new view controller will contain all of the rows that lie under the current row on the hierarchy. The new database view controller is then placed on the navigator controller’s stack, using the navigation methods you learned in chapter 15.
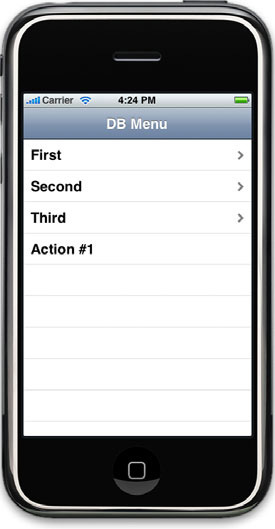
Figure 16.7 shows how all this fits together, using the database that you created at the beginning of this section.
Figure 16.7. This menu was created directly from a database.
There’s just one thing missing from this example—the app delegate.
The App Delegate
The app delegate needs to create the navigator, initialize the menu object, build the first level of the menu hierarchy, and clean things up afterward. Listing 16.9 shows the couple of steps required to do this.
Listing 16.9. The app delegate that glues together these classes
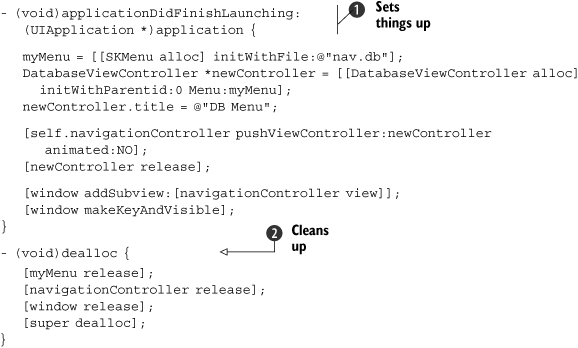
The applicationDidFinishLaunching: method sets things up ![]() . After initializing the menu, it creates the first database view controller, and pushes it onto the navigation stack. The
dealloc method later closes everything out
. After initializing the menu, it creates the first database view controller, and pushes it onto the navigation stack. The
dealloc method later closes everything out ![]() . Note that it releases the menu object, which in turn will close the database and release that, ending the menu’s life cycle.
. Note that it releases the menu object, which in turn will close the database and release that, ending the menu’s life cycle.
Not shown here is the Interface Builder file, which includes one object, a navigation controller. Its standard view controller should be deleted, because you’ll be replacing it here.
Though it’s relatively basic, you now have a hierarchical menu of tables built entirely from a database.
16.4.5. Expanding this example
This example not only showed how to use databases in a real application, but also how to put together a more complex project. Nonetheless, if you wanted to make regular use of the database and menu classes, you’d probably want to expand it more. We’ve already noted that SKDatabase could use more functionality, and that the database view controller will need to do something for the result pages that it arrives on.
Because this is all database driven, you can also hand off considerable power to the users. It would be easy to expand this example so that users could create their own rows in menus and reorder the existing ones.
With SQLite now covered to the depth we can give it, we’re going to move on to the last major method of data retrieval, one of equal complexity: the Address Book.
16.5. Accessing the Address Book
Like SQLite, the Address Book is too complex to wholly document within the constraints of this chapter. It’s made up of two different frameworks—the Address Book framework and the Address Book UI framework—and together they contain over a dozen references. Fortunately, Apple offers an extensive tutorial on the Address Book: “Address Book Programming Guide for iPhone OS.”
In this section, we’ll try to provide a basic reference that will supplement Apple’s own tutorial, but we suggest you read their guide for more extensive information.
16.5.1. An overview of the frameworks
As noted, there are two frameworks for the Address Book. The Address Book framework contains what you’d expect: information on the data types that make up the Address Book and how to access them. The Address Book UI framework contains a bunch of handy interfaces that allow you to hand off the selection and editing of Address Book entries to modal view controllers that Apple has already written.
In order to use this functionality, you must include one or both frameworks, plus the appropriate include files: AddressBook/AddressBook.h and AddressBookUI/ AddressBookUI.h.
Table 16.7 lists many of the most important classes in the frameworks.
Table 16.7. The Address Book classes
|
Class |
Framework |
Summary |
|---|---|---|
|
ABAddressBook |
Address Book |
Interface for accessing and changing the Address Book; may not be required if you use the Address Book UI framework |
|
ABNewPersonViewController |
Address Book UI |
Interface for entering new record manually |
|
ABPeoplePickerNavigationController |
Address Book UI |
Interface for selecting users and properties |
|
ABPersonViewController |
Address Book UI |
Interface for displaying and editing records |
|
ABUnknownPersonViewController |
Address Book UI |
Interface for displaying “fake” contact and possibly adding it to Address Book |
|
ABGroup |
Address Book |
Opaque type giving access to the records of groups |
|
ABPerson |
Address Book |
Opaque type giving access to the records of individual people |
|
ABRecord |
Address Book |
Record providing information on a person or group |
|
ABMultiValue |
Address Book |
Type containing multiple values, each with its own label; its precise use is defined in ABPerson, where it’s applied to addresses, dates, phone numbers, instant messages, URLs, and related names |
|
ABMutableMultiValue |
Address Book |
An ABMultiValue whose values can be modified |
Each of these classes contains numerous functions that can be used to build Address Book projects. We’ll talk about a few important functions and point you to the class references for the rest.
16.5.2. Accessing Address Book properties
As we’ll see shortly, the Address Book and Address Book UI frameworks ultimately provide different ways of accessing the iPhone’s Contacts data information: you might be working with the Address Book programmatically, or a user might be making selections through fancy UIs. Ways to select individual contacts might vary, but once a contact has been selected, you’ll generally use the same getter and setter functions to work with that record. These important functions are listed in table 16.8.
Table 16.8. Property setters and getters are among the most important functions in the Address Book.
|
Function |
Arguments |
Summary |
|---|---|---|
|
ABRecordCopyValue |
ABRecordRef, property |
Looks up a specific property from a specific record |
|
ABRecordSetValue |
ABRecordRef, property, value, |
Sets a property to a value in a record |
|
ABMultiValueGetCount |
ABMultiValue |
Returns the size of a multi-value (which can contain one or more copies of a record, such as multiple phone numbers) |
|
ABMultiValueCopyLabelAtIndex |
ABMultiValueRef, index |
Looks up the label of an entry in a multivalue |
|
ABMultiValueCopyValueAtIndex |
ABMultiValueRef, index |
Looks up the content of an entry in a multivalue |
|
ABCreateMutableCopy |
ABMultiValueRef |
Creates a copy of a multivalue |
|
ABMultiValueReplaceLabelAtIndex |
ABMutableMultiValueRef, label, index |
Replaces a label at an index in a multivalue |
|
ABMultiValueReplaceValueAtIndex |
ABMutableMultiValueRef, value, index |
Replaces a label at an index in a multivalue |
Generally, when you’re using the getter functions for contacts in the Address Book, you’ll follow this procedure:
- Select one or more contacts through either the Address Book or the Address Book UI framework.
- To look at an individual property, like a name or phone numbers, use ABRecordCopyValue:
- – If it’s a single value property, you’ll immediately be able to work with it as a string or some other class.
- – If it’s a multivalue property, you’ll need to use the ABMultiValue functions to access individual elements of the multivalue.
We included the setter methods in table 16.8 to keep the methods all in one place, but you’ll usually only be using the setters if you’re working with the Address Book framework, not the Address Book UI framework. Here’s how they work:
- Make changes to individual properties or to multivalues (using the mutable multivalue).
- Use ABRecordSetValue to save the value to your local copy of the Address Book.
- Use ABAddressBookSave to save your local changes to the real Address Book database.
We won’t be covering the setter side of things (which you can find out about in the “Address Book Programming Guide for iPhone OS”), but we’re going to use many of the getter functions in the next section.
16.5.3. Querying the Address Book
Our first exploration of the Address Book will use the plain Address Book framework to access the Address Book and look up many of the values. This is shown in listing 16.10. It centers on a simple application with two objects built in Interface Builder: a UISearchBar and a UITextView (with an IBOutlet called myText).
We haven’t used search bars before, but they’re a simple way to enter search text. You set the search bar’s delegate, and then respond to appropriate messages. In this case, our program responds to the searchBarSearchButtonClicked: delegate method, and then looks up the information that was entered.
Listing 16.10. An example of looking up information in the Address Book

You start out by running ABAddressBookCreate, which makes a local copy of the Address Book ![]() . You’ll need to do this whenever you’re working manually with the Address Book. After that, you make use of a few general
Address Book functions that let you do things like count your number of contacts and groups
. You’ll need to do this whenever you’re working manually with the Address Book. After that, you make use of a few general
Address Book functions that let you do things like count your number of contacts and groups ![]() . But it’s the search function that’s most important
. But it’s the search function that’s most important ![]() . This is one of two ways that you might extract contacts from the Address Book by hand, the other being ABAddressBookCopyArrayOfAllPeople. Note the typing of searchBar.text as CFStringRef. This is a Core Foundation class equivalent to NSString *; there’s more information on the details of Core Foundation in the “Using Core Foundation” sidebar.
. This is one of two ways that you might extract contacts from the Address Book by hand, the other being ABAddressBookCopyArrayOfAllPeople. Note the typing of searchBar.text as CFStringRef. This is a Core Foundation class equivalent to NSString *; there’s more information on the details of Core Foundation in the “Using Core Foundation” sidebar.
The preceding steps are the major ones that differentiate working with the Address Book manually from working with it through a UI. With the Address Book framework, your program does the selection of contact records; with the UI framework, the user would do it through a graphical interface. Beyond that, things work similarly via either methodology.
Once you’ve got a list of contacts, you need to extract individuals from the array ![]() . There are numerous functions that can then be used to look at their properties. ABRecordCopyCompositeName gives you a full name already put together
. There are numerous functions that can then be used to look at their properties. ABRecordCopyCompositeName gives you a full name already put together ![]() , and ABRecordCopyValue lets you pick out other properties
, and ABRecordCopyValue lets you pick out other properties ![]() . The list of properties and returned values is in the ABPerson reference.
. The list of properties and returned values is in the ABPerson reference.
Multivalues are only a little more difficult to use than simple properties. You use ABRecordCopyValue as usual ![]() , but then you have to work through the entire multi-value, which is effectively an associative array. The easiest thing to
do is extract all the individual labels and values
, but then you have to work through the entire multi-value, which is effectively an associative array. The easiest thing to
do is extract all the individual labels and values ![]() . This program displays the slightly awkward label names (for your reference), but you probably wouldn’t usually want to show
off words like $!<Mobile>!$, and it’s easy enough to strip them out.
. This program displays the slightly awkward label names (for your reference), but you probably wouldn’t usually want to show
off words like $!<Mobile>!$, and it’s easy enough to strip them out.
The program ends by cleaning up some of the Core Foundation objects, using the standard Core Foundation memory management
functions ![]() . When you run it, this program displays some of the data from names that you search for, as shown in figure 16.8.
. When you run it, this program displays some of the data from names that you search for, as shown in figure 16.8.
Figure 16.8. The Address Book framework gives you low-level access to contact information.

There’s lots more that can be done with the Address Book, but this should outline the basics of how to access its several classes.
16.5.4. Using the Address Book UI
There are definitely times when you’ll want to work with the low-level Address Book functions that we’ve seen so far. But you also don’t want to reinvent the wheel. If you need to let a user select, edit, or insert a new contact, there’s no need to program any of the UI. Instead, you can use the Address Book UI framework, which has all of that functionality preprogrammed.
The Address Book UI framework contains only the four classes that we summarized in table 16.7: ABPeoplePickerNavigationController, ABNewPersonView-Controller, ABPersonViewController, and ABUnknownPersonViewController. Each of these UI objects is—as the names suggest—a view controller. To be precise, they’re highly specialized modal controllers that each assist you in a single Address Book–related task. Each controller also has a delegate protocol, which is how you link to a class that’s already pretty fully realized. We’re going to touch upon each of these classes, but we’re only going to give a lot of attention to the people-picker (ABPeople-PickerNavigationController).
The People-Picker View Controller
To demonstrate the people-picker, we’re going to put together a quick utility with substantially identical functionality to the previous Address Book example. But rather than searching for multiple users using the Address Book framework, the user will instead select a specific user using the Address Book UI framework.
This program is built with a couple of Interface Builder–created objects. A UIToolBar with a single button allows the user to activate the program via the select-Contact: method, and text will once more be displayed in a non-editable UITextView called myText. The program is shown in listing 16.11.
Listing 16.11. People-picker: a simple, graphical way to select contacts

In order to instantiate a modal view controller, you follow three simple steps that are executed when the user clicks on the
appropriate button in the toolbar. You create the controller ![]() , set its delegate
, set its delegate ![]() , and use UIViewController’s presentModalViewController: animated: method to place it at the top of your user’s screen
, and use UIViewController’s presentModalViewController: animated: method to place it at the top of your user’s screen ![]() . You then don’t have to worry about how the modal view controller looks or works; you just have to respond to the messages
listed in the protocol reference.
. You then don’t have to worry about how the modal view controller looks or works; you just have to respond to the messages
listed in the protocol reference.
The fully featured interface that’s available to you as soon as you pop up the controller is shown in figure 16.9.
Figure 16.9. A people-picker view controller

You’ll do most of the work in the peoplePickerNavigationController:shouldContinueAfterSelect ingPerson: method ![]() . This is called whenever a user selects an individual contact. Note that you can use a property of the peoplePicker variable to access the Address Book itself
. This is called whenever a user selects an individual contact. Note that you can use a property of the peoplePicker variable to access the Address Book itself ![]() , which allows you to use many of the ABAddressBook functions without needing to create the Address Book manually. Beyond that, the people-picker sends you an ABRecordRef for the contact that the user selected; from there, you work with it exactly like you worked with the ABRecordRefs that you looked up in listing 16.10.
, which allows you to use many of the ABAddressBook functions without needing to create the Address Book manually. Beyond that, the people-picker sends you an ABRecordRef for the contact that the user selected; from there, you work with it exactly like you worked with the ABRecordRefs that you looked up in listing 16.10.
In this example, users can only select individual contacts, so when the method is done, you dismiss the modal view controller
![]() , and then return NO
, and then return NO ![]() , which tells the people-picker that you don’t want to take the standard action for selecting the contact (which would be
to call up a subpage with all of that contact’s properties).
, which tells the people-picker that you don’t want to take the standard action for selecting the contact (which would be
to call up a subpage with all of that contact’s properties).
If you’d wanted to let a user select a specific property from within a contact, you’d fill in the peoplePickerNavigationController:shouldContinueAfterSelectingPerson:property:identifier: method ![]() .
.
The third method defined by the ABPeoplePickerNavigationController protocol is peoplePickerNavigationControllerDidCancel: ![]() , which here causes the program to (again) dismiss the people-picker.
, which here causes the program to (again) dismiss the people-picker.
You can do a little more with the people-picker. As we already noted, you could have opted to let a user select an individual property by returning YES for the first should-Continue method, and then filling in the second one. You could also choose the individual properties that display on a contact page. Information on these possibilities is available in the ABPeoplePickerNavigationController and ABPeoplePickerNavigationController-Delegate class references.
Using Core Foundation
The Address Book framework is the first framework you’ve worked with that requires you to use Core Foundation, a non-Cocoa library. This means you’ll have to program slightly differently, as we promised would be the case back in chapter 10. The biggest differences are how variables and memory allocation work.
Core Foundation variables use different classes, such as CFStringRef replacing NS-String *. Remember that the Core Foundation variable types usually have equivalents in Cocoa that you can freely switch between by casting, as is done in listing 16.10 when moving between the Address Book records and the UITextView text. When you’re using the Core Foundation variables natively, you’ll have to use Core Foundation functions, such as CFArrayCount, to deal with them.
You’ll also have to deal with memory management a little differently. Core Foundation memory management uses the same general approach as Cocoa Touch. There’s a reference count for each object that is increased when it’s created or retained and decreased when it’s released. You just have to remember slightly different rules for when you have a reference. If you create an object with a function using the word(s) create or copy, you own a reference to it and must CFRelease it. If you create an object in another way, you do not have a reference, and you must CFRetain the object if you want to keep it around. Some classes of objects may have their own release and retain functions. The “Memory Management Programming Guide for Core Foundation” tutorial at developer.apple.com has more information.
Core Foundation will show up again in chapter 18, where it controls some audio services, and in chapter 19, where it’s used for the Quartz 2D graphics package.
There are three other view controllers that you can use to allow users to interact with the Address Book.
The Other View Controllers
The other three view controllers work much like ABPeoplePickerNavigation-Controller, with one notable difference: they must each be built on top of a navigation controller. Technically, they’re probably not modal view controllers, because they go inside a navigation controller, but you can treat the navigation controller as a modal view controller once everything is loaded up, as you’ll see in our example.
The ABNewPersonViewController allows a user to enter a new contact. You can prefill some of the info by recording it in an ABRecordRef and setting the displayed-Person property, but this is purely optional (and probably won’t usually be done). Once you’ve created the controller, you’ll need to respond to a method that tells you when the user has entered a new contact. You don’t have to do anything with it except dismiss the modal controller, because the controller automatically saves the new contact to the Address Book. You can see what info the user entered, though, and do something with it if you want. Listing 16.12 shows how to deploy a new-person view on top of a navigation controller, and how to respond to its single method.
Listing 16.12. Functionality required to call up a new-person view controller
-(IBAction)newContact:(id)sender {

   ABNewPersonViewController *myAdder =
       [[ABNewPersonViewController alloc] init];
   myAdder.newPersonViewDelegate = self;

   UINavigationController *myNav = [[UINavigationController alloc]
       initWithRootViewController:myAdder];
   [self presentModalViewController:myNav animated:YES];

   [myAdder release];
   [myNav release];
}

- (void)newPersonViewController:
   (ABNewPersonViewController *)newPersonViewController
    didCompleteWithNewPerson:(ABRecordRef)person {

    [self dismissModalViewControllerAnimated:YES];
}
The other two view controllers work the same way, except for the specifics about what methods each protocol defines.
The ABPersonViewController displays the information for a specific user. You’ll need to set the displayedPerson property to an ABRecordRef before you call it up. This ABRecordRef might have been retrieved from the Address Book search functions or from the people-picker, using the functions we’ve already discussed. The person view controller can optionally be editable. There’s one method listed in the protocol, which activates when an individual property is selected.
Finally, the ABUnknownPersonViewController allows you to display the ABRecordRef defined by displayedPerson as if it were a real contact. Optionally, the user can create that information as a new contact, add it to an existing contact, or take property-based actions, like calling a number or showing a URL. It’s a great way to give users the option to add contact info for your software company to their Address Book.
You should now understand the basics of how to use the Address Book in your own programs.
16.6. Summary
In this chapter, we covered a variety of ways that you can import primarily text-based data into your iPhone program.
User action is one of the most important methods, and one well covered by previous sections. Besides the UITextFields, UITextViews, and UISearchBars, there are any number of non-textual interface options.
Preferences mark the other major way that users can influence your program. You can either program them manually or use the System Setting bundle.
Ultimately, user input is going to be somewhat limited because of the slow typing speed of the iPhone. If you’re dealing with piles of text, you more frequently want to pull that data from an existing resource on the iPhone.
Files are the traditional way to do it. We’ll return to files as we deal with photos and sounds in the future. Databases are frequently an easier way to access data, particularly if the data is well organized. Finally, the Address Book gives you a way to share contact information among many different applications, and it even includes its own data entry routines.
There’s only one data-input method that we’ve largely ignored: the internet. We consider that so important for the iPhone that we’ll cover it in its own chapter at the end of the book.
The data-input and retrieval methods discussed in this chapter will form a foundation for much of the other work you do with the iPhone, because ultimately everything’s data. You’ll need to retrieve data when you work with images and sounds. Similarly, you may want to save data from your accelerometer, Core Location, or when you’ve created a graphic. Keep what you’ve learned here in your back pocket as you move on to the rest of the iPhone toolbox.
We’re now ready to move on to what we expect are two of the most anticipated topics in this book: how to work with the iPhone’s accelerometers and its GPS to determine locations.