
Chapter 4. Advanced WebKit and textual web apps
|
This chapter covers |
|
|
In the previous chapter we covered the fundamentals of redeveloping an existing web page for use on iPhones. In the process you learned about important concepts like the viewport, and we discussed a lot of what works—and what doesn’t—on Apple’s unique mobile platform. We expect, though, that most of you aren’t just interested in touching up existing web pages but instead are looking to create totally new programs. Further, after considering the advantages and disadvantages of both web and native development, you’ve decided that writing a new program using a web language is the best way to go. We’re now ready to enter the world of web apps, a topic that will consume the rest of part 2 of this book.
We’ve identified three ways to create web apps for the iPhone. Each will take advantage of all your existing web knowledge, but each will also connect you with a specific library or Apple browser add-on that will allow you to unlock additional functionality on the iPhone platform.
First, you might choose to build a textual web app, which is an application that is largely built on the fundamentals of HTML itself. You’ll be able to supplement it with the advanced features of Apple’s WebKit. We’ll be discussing this programming method in this chapter.
Second, you might choose to build an iPhone-UI web app, which is an application with a user interface that looks like iPhone’s native apps. That will be the topic of chapter 5, where we’ll also cover iUI, a programming library meant to make this task easier.
Third, you might choose to build a graphical web app, which is an application that pushes the boundaries of web graphics. That will be the topic of chapter 6, where our discussion will center on Canvas, a graphical add-on introduced by Apple several years ago that is now widely available.
Let’s get started with the first of those topics: textual web apps and the advanced functionality of Apple’s WebKit. In this chapter we’ll explore a wide variety of WebKit options, starting with simple HTML and CSS, and then build on that with advanced functionality such as transformations and databases. We’ll conclude with some code that’s iPhone only.
4.1. Introducing the WebKit
We touched on the WebKit in the previous chapter when we talked about the iPhone’s viewport command. As we noted there, the WebKit is a browser engine that underlies several existing browsers. It was originally derived from the Linux browser Konquerer, and is now in wider use on Unix-derived systems.
WebKit compatibility note
Although we’re highlighting the WebKit for the advanced functionality it offers to the Apple iPhone, you can make greater use of the features in this chapter that are not iPhone specific. This includes new tags, various sorts of animation, and the client-side database. Most notably, these features should work on Apple’s desktop Safari, the brand-new Google Android and Google Chrome platforms, and GNOME’s Epiphany browser. Many of these features will become more accessible when they’re accepted into new HTML and CSS standards.
It’s Apple who has brought the WebKit to the greatest prominence to date, and thus it should be no surprise that it’s Apple who is pushing hardest on new features for the WebKit. It’s those new features that should excite you as iPhone developers, because they represent totally new functionality that you can use on the iPhone and that isn’t yet available on Internet Explorer or Firefox. You’ll innately be making your web apps incompatible with those browsers if you start depending heavily on WebKit tricks, but we figure that’s the point: using all the tricks you can to produce the best possible web apps for use largely or exclusively by the iPhone.
As you’ll recall from chapter 3, there’s some information on the WebKit at Apple’s Web Apps site. As of this writing, it’s pretty rudimentary, but we suspect it’ll improve with time. Even now it has somewhat greater breadth than this chapter, covering some special functions that we don’t get to here.
We’ll offer the warning that all of this functionality is very new. Since some of the functions are being offered for future HTML and CSS standards, they could change entirely. Even now they’re not entirely consistent. Over the course of writing this chapter we discovered one minor function (a transitioning rotation) that worked on Safari but not mobile Safari and a whole category of functionality (explicit animation) that worked on mobile Safari, but nowhere else. We expect that by the time this book is published, behavior will be more consistent across versions of Safari, but our prime goal has been to document how things will work on the iPhone.
4.1.1. New HTML elements
The WebKit introduces several new HTML elements. We’ve listed the ones most likely to be useful for iPhone design in table 4.1.
Table 4.1. WebKit HTML elements give some new basic features for your iPhone web design.
|
Tag |
Summary |
|---|---|
|
<canvas> |
WebKit/JavaScript drawing object; discussed in chapter 6 |
|
<marquee>content</marquee> |
Sets content (which could be text or other object) as a horizontally scrolling marquee |
|
<meta name="viewport"> |
Metatag for the iPhone; discussed in chapter 3 |
There are also some variants of <pre> and some alternate ways to do embeds and layers, most of which are being deprecated in HTML 4.01.
4.1.2. New CSS elements
The bulk of the WebKit’s new functionality comes from its large set of extensions to the CSS standards. These include the full set of transforms, transitions, and animations that we cover separately later in this chapter, as well as some simpler CSS elements that are summarized in table 4.2.
Table 4.2. This partial list shows the numerous simple new CSS elements that can be incorporated into your iPhone designs.
|
HTML element |
CSS properties |
Summary |
|---|---|---|
|
Background |
-webkit-background-size |
Controls the size of the background image. |
|
Box |
-webkit-border-radius |
Sets the rounded corner radiuses of the box, in length units, either one corner at a time or all using one property. |
|
Box |
-webkit-border-image |
Allows you to set an image as a box border using a somewhat complex syntax, which is explained in Apple’s reference pages. |
|
-webkit-box-shadow |
Sets a drop shadow for a box by designating a horizontal offset, a vertical offset, a blur radius, and a color. |
|
|
Link |
-webkit-tap-highlight-color |
Overrides the standard highlight when a user taps on a link on an iPhone. |
|
Link |
-webkit-touch-callout |
Disables the touch-and-hold info box if set to none. |
|
Marquee |
-webkit-marquee-direction |
Controls the direction of the marquee, which can go forward, left, right, up, reverse, or several other directions. |
|
Marquee |
-webkit-marquee-increment |
Controls the distance the marquee moves, in length units. |
|
Marquee |
-webkit-marquee-repetition |
Limits the number of marquee repetitions. |
|
Marquee |
-webkit-marquee-speed |
Sets marquee speed to fast, normal, or slow. |
|
Text |
-webkit-text-fill-color |
Together allows you to differentiate between the interior and exterior of text by setting colors for each and by defining the stroke width using a length unit. |
|
Text |
-webkit-text-size-adjust |
Adds a percentage to increase size of text on the iPhone. |
Table 4.2 is not a complete listing, nor does it give you all the details you need to use the properties. There are not only other CSS properties, but also new CSS constants that can be applied to existing properties. Our main purpose is to show you the cooler elements that are available among the WebKit’s basic CSS elements, and to encourage you to find out more information at Apple’s WebApps reference site.
Figure 4.1 shows how some of the new WebKit CSS properties could be applied to a simple <div> to create an attractive box that features rounded corners and a three-dimensional back shadow.
Figure 4.1. New WebKit properties on the iPhone make your pages more attractive.
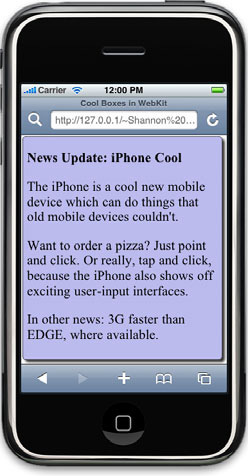
The <div> is simply defined with a new class name, as is typical for CSS:
<div class="roundedbox">
The definition of the roundedbox class then includes several standard CSS properties (to set the background-color and so forth), plus the new border-radius and box-shadow properties, which appear for the first time in Apple’s WebKit.
The code to create the roundedbox class is shown in listing 4.1.
Listing 4.1. Using the new CSS web properties to create an attractive box
.roundedbox {
    background-color: #bbbbee;
    border: 1px solid #000;
    padding: 10px;
    -webkit-border-radius: 8px;
    -webkit-box-shadow: 6px 6px 5px #333333;
}
All of the other new CSS properties could be used in a similar way.
The iPhone-Specific Properties
Before we finish our discussion of the simpler WebKit CSS properties, we’d like to point out the ones specifically intended for the iPhone. –webkit-tap-highlight-color and –webkit-touch-callout each give you some control over how links work on the iPhone. It’s the last iPhone-specific property, –webkit-text-size-adjust, that is of particular note, because it allows you to increase point size by a percentage only on the iPhone.
In chapter 3, we talked a bit about adjusting font sizes through multiple CSS files. However, if that’s all you need to do differently between iPhones and desktop browsers, you can do it with a single line in your CSS file:
body {
    -webkit-text-size-adjust: 120%;
}
Having now explored the mass of simple additions that the WebKit offers to iPhone developers, we’re ready to dive more wholeheartedly into the big stuff, starting with a variety of advanced CSS methods that you can use to manipulate and animate the content of your web page.
4.2. CSS transforms, transitions, and animations
One of the most innovative elements of the WebKit is its ability to manipulate existing HTML objects in various ways, allowing you to accomplish some fancy-looking work entirely in CSS. You have three options: transformation (or static changes), transitions (or implicit animations), and animations (or explicit animations).
4.2.1. The transform function
Transforms allow you to apply various geometric functions to objects in a web page when they’re created. There’s no animation here (yet), but you have considerable control over exactly what your HTML objects look like.
Each transform is applied using a –webkit-transform CSS property:
-webkit-transform: rotate(30deg);
Several transforms are available, as shown in table 4.3.
Table 4.3. The WebKit transforms apply to output elements in a variety of ways.
|
Argument |
Summary |
|
|---|---|---|
|
scale |
Number |
Resizes the object |
|
scaleX |
||
|
scaleY |
||
|
rotate |
CSS angle |
Rotates the object |
|
translate |
Length (or percentage) in X direction, |
Moves the object |
|
translateX |
Length (or percentage) in Y direction |
|
|
translateY |
||
|
skew |
CSS angle |
Skews the object |
|
skewX |
||
|
skewY |
The properties in table 4.3 are applied to boxes within CSS. Much like relative positioning, they don’t affect layout, so you have to be careful with them.
The following definition could be added to our roundedbox class from listing 4.1, turning it into a wackybox class:
-webkit-transform: rotate(30deg) translate(5%,5%);
The result is that your news article appears at an angle, moved somewhat off the screen. Figure 4.2 shows this change, which you can compare to the nontransformed news article that appears a few pages back as figure 4.1. This particular transform isn’t that useful if you want people to read it, but it could be a nice background for a news site or something similar. There are many other things that you can do with transforms, such as setting up banners, printing text at a variety of sizes, and making similar changes on static web pages. Some will be gimmicks, but others can have functional benefits.
Figure 4.2. Our roundedbox transformed into a wackybox, which is rotated 30 degrees and translated 5 percent along each of the X and Y axes.

Before we leave transforms behind, we’ll note that they support one other property, –webkit-transform-origin, which can be used to move the origin for scales and skews away from the center of the object.
Although you can do quite a bit with transforms all on their own, their real power appears when you start working with the implicit animation of transitions, which are the next WebKit function that we’re going to talk about.
4.2.2. The transition function
A transition is also called an “implicit animation” because it supports animated frames, but you, as a web designer, don’t have to worry about how the animation occurs. All you do is define the endpoints.
To define a transition, you place the new –webkit-transition properties in the CSS element that marks the end of your animation. You can define what properties to transition (possibly including all of them), how long the transition should last, and how the transition should work. Then, when the block of text changes to the end-point class, a smooth and animated transition will occur. Table 4.4 lists the various transition properties.
Table 4.4. Transitions let you animate changes of CSS properties.
|
Property |
Values |
Summary |
|---|---|---|
|
-webkit-transition-property |
Various properties, including all |
Defines the property to animate |
|
-webkit-transition-duration |
Time value, such as 1s |
Specifies how long the animation takes |
|
-webkit-transition-timing-function |
ease, linear, ease-in, ease-out, ease-in-out, or cubic-bezier (user-defined) |
Defines the curve for how the animation occurs; ease was auto in previous versions of the iPhone OS |
|
-webkit-transition-delay |
Time value, such as 1s |
Specifies how long to wait to start transition |
Unfortunately, not all CSS properties can be transitioned. Apple states that “any CSS property which accepts values that are numbers, lengths, percentages or colors can be animated.” This isn’t entirely true, because some percentage-based elements such as font-size don’t yet work. If you want to know whether a CSS property can be transitioned, you can find a list on the Apple website. And there’s no harm if you list something that doesn’t transition in a property; it just does an abrupt change instead.
You can reduce a transition command to a single line of code using the –webkit-transition shorthand property:
-webkit-transition: property duration timing-function delay
Separate additional transitions after the first with commas.
Traditional websites are already making good use of transitions to highlight page elements when a hover occurs. However, hovers aren’t possible on the iPhone, so it’s more likely that you’ll be making transitions based on a click. Listing 4.2 shows a simple transition of a box to color in the text and background (making it more visible) when you click it.
Listing 4.2. Using transitions to animate changes between styles
div {
   -webkit-transition: all 2s;
}
.clearbox {
   background-color: #bbbbbb;
   opacity: .5;
// Other properties make our box beautiful
}

.visiblebox {
   background-color: #bbbbee;
   opacity: 1;
// Other properties make our box beautiful
}
Once you’ve defined these styles, you just need to add an onclick event handler that shifts from one style to the other:
<div class="clearbox" onclick="this.className='visiblebox'">
This simple transition could easily be built into a more sophisticated interface where a user could make individual elements of your page more or less visible by clicking on those individual elements (or alternatively through some pagewide control panel).
Seeing this simple example highlights why transitions are called implicit animation. You don’t have to do a thing other than define your endpoint styles and say what you want to animate between them. In this example, your pages enjoy a nice animation from gray to cyan, with increasing opacity, thanks just to your defining two styles (and a transition for all <div> s).
However, transitioning between normal styles is just the tip of the iceberg. The coolest thing about transitions is that they can be used with that other new WebKit feature we just discussed: transforms.
Transitioning Transforms
By putting together transforms and transitions, you can create actual graphical animations of scales, rotates, skews, and translations. In other words, you can make boxes revolve, move, and otherwise change, showing off sophisticated graphical animations, with nothing but CSS definitions (and perhaps a bit of JavaScript to change the styles).
Listing 4.3 shows how to put a transition and a transform together to create an animated thumbnail program.
Listing 4.3. Scaling a picture to create thumbnails

For the example in listing 4.3, your transforms are enacted in JavaScript. Therefore, your CSS file only needs to do two things. First, you set up all <div> s so that they’ll transition ![]() , and second, you set the initial scale of your images to be .2
, and second, you set the initial scale of your images to be .2 ![]() , which means that your images will be read in at full size but then displayed in a much smaller form.
, which means that your images will be read in at full size but then displayed in a much smaller form.
Your <div> is then set up to use the imagebox class and call the animatePic function when clicked ![]() . animatePic does all the magic
. animatePic does all the magic ![]() . Every other click, it either scales up and rotates
. Every other click, it either scales up and rotates ![]() or scales back down
or scales back down ![]() , using the webkitTransform property. The rotate animation is just a graphical flourish to make the animation look more attractive. Figure 4.3 shows this simple transition.
, using the webkitTransform property. The rotate animation is just a graphical flourish to make the animation look more attractive. Figure 4.3 shows this simple transition.
Figure 4.3. A thumbnail (left) is animated by a tap (middle), turning it into a full-page picture (right).
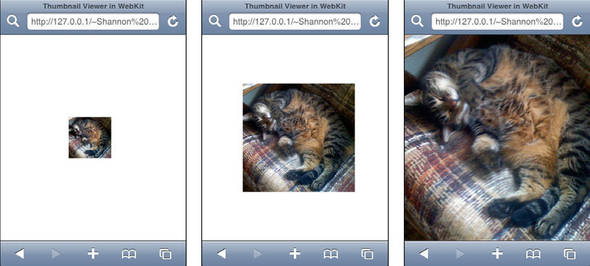
We’ll also offer a brief aside on that rotate: for the moment the rotate animation works on Safari, but not on mobile Safari, which is why you don’t see the thumbnail twisting in figure 4.3. As we’ve already explained, we expect the platforms will eventually sync, perhaps by the time this book sees print, but we offer this as a further caveat. In any case, what’s the end result of our work? As long as you’re on a setup where you don’t mind loading larger pictures, you can thumbnail easily. More importantly, you can see how easy it is to use attractive implicit animations to scale thumbnails on your iPhone by combining the transition and transform properties.
4.2.3. The animation function
Transitions support fully featured animations, within the constraints of the CSS properties and the transform abilities. So, how can the WebKit’s “explicit” animation improve on that? The answer is by giving you better control over how the animation works.
Listing 4.4 shows an example of animation in use.
Listing 4.4. Using animation keyframes

To create an animation, you must define a style ![]() that includes a set of –webkit-animation properties. The three critical ones are –webkit-animation-name
that includes a set of –webkit-animation properties. The three critical ones are –webkit-animation-name ![]() , which is the name for the animation; -webkit-animation-duration
, which is the name for the animation; -webkit-animation-duration ![]() , which is the length of the animation, and –webkit-animation-iteration-count
, which is the length of the animation, and –webkit-animation-iteration-count ![]() , which is the number of times to repeat the animation.
, which is the number of times to repeat the animation.
The animation itself is defined by a @-webkit-keyframes entry ![]() , where the name matches the name you already set. You can define as many frames as you want, setting whatever CSS properties
you desire in each frame. Then when the animation occurs, the WebKit will automatically transition among all the individual
points. Unlike transitions, an animation will return to its start point when it’s done, possibly iterating.
, where the name matches the name you already set. You can define as many frames as you want, setting whatever CSS properties
you desire in each frame. Then when the animation occurs, the WebKit will automatically transition among all the individual
points. Unlike transitions, an animation will return to its start point when it’s done, possibly iterating.
To apply an animation, you just set a box to use the class. If you do this in your regular HTML code, the animation will begin the instant your web page loads. Alternatively, you can change a class name to the animated class when a button click or some other event occurs. For example, if a button in your application requires a doubleclick, you could start the button shivering when it’s clicked the first time to encourage a second click.
Our simple example here just takes a box and shoves it down toward the bottom of the screen, making it disappear as it goes. You could use similar functionality to delete items from a page as a user interacts with it.
The transformations, transitions, and animations are all impressive when put into use. However, there’s one more WebKit function that’s broadly available on WebKit browsers that we think is even more impressive—and more likely to be useful in your own web apps: the client-side database.
4.3. The WebKit database
WebKit includes a client-side database built on SQLite. This means that you can save much larger amounts on information on your client’s machine—which could be an iPhone—than was possible using traditional cookies. This is all done through a set of new JavaScript routines.
4.3.1. Loading a database
A table is loaded into your JavaScript through the openDatabase command:
var mydb = openDatabase(databaseName,version,displayName,maxSize);
databaseName and displayName are both arbitrary names that you’ll select for an individual database. version should currently be set to 1.0, and maxSize is a maximum size for your database in bytes (such as 65536). Here’s a typical command for opening a database:
var mydb = openDatabase(prefData,'1.0','Preference Data',65536);
If a database doesn’t exist, the open command will automatically create it. However, this command won’t actually create tables in the database, which you must do by hand.
4.3.2. Running a transaction
Activity is run through the database as transactions, which are atomic query units that succeed or fail as a unit. Each transaction may contain one or more queries. A complete transaction looks like this:
  db.transaction(
     function (transaction) {
        transaction.executeSql(SQL,[array of ?s],
           dataHandler*,errorHandler*);
           // addition transactions
        },transactionError*,transactionSuccess*
  );
The actual query is done in SQL. You can find good information at www.sqlite.org on the SQL syntax currently supported. Use this site as a reference if you’re unfamiliar with the language.
Each of the four handler arguments, marked with an *, is optional, meaning that the simplest call to a transaction just sends the SQL and any arguments. The first two handlers are for individual queries, and the last two handlers are for the transaction as a whole. They each refer to a different function that accepts one or more arguments, as shown in table 4.5.
Table 4.5. Error and data handlers tell you what SQLite is doing.
|
Function |
Arguments |
Notes |
|---|---|---|
|
dataHandler |
transaction, results |
Parses results of successful query |
|
errorHandler |
transaction, error |
Shows query errors |
|
transactionError |
error |
Runs if anything in transaction failed |
|
transactionSuccess |
N/A |
Runs if everything in transaction succeeded |
results and error are both fully featured JavaScript objects that give you access to a number of properties and let you know how your SQL query affected your database. The most important ones are listed in table 4.6.
Table 4.6. error and results give you access to SQL responses.
|
Property |
Summary |
|---|---|
|
error.code |
Error code |
|
error.message |
Error text |
|
results.rows.length |
Number of rows of responses |
|
results.rows.item(i)['name'] |
Result from column 'name' of row i of your response |
|
results.rowsAffected |
Number of rows affected by an UPDATE or DELETE |
|
results.insertId |
ID of last INSERT operation |
The underlying functionality of the JavaScript database is quite simple—presuming you already know SQL. Thus the question becomes: how can you use it?
4.3.3. A sample database
A client-side database will have any number of advantages, all of which you can make use of on the iPhone. However, there’s one iPhone-specific trick you should consider: iPhones uniquely might be connected to either a fast network (wireless) or a slow network (EDGE or 3G). So why not give your users the ability to offload their networked data to a local database to improve access time when they’re on the road? Listing 4.5 shows a somewhat simplified example that does just that.
Listing 4.5. A database that saves online data to a local resource

This process generally follows the examples we’ve already given. You start off by opening your database ![]() and creating your table if it doesn’t already exist
and creating your table if it doesn’t already exist ![]() . Note that you link to your first two query handlers here. Your default error handler
. Note that you link to your first two query handlers here. Your default error handler ![]() , which you use throughout this program, just reports your error, while your default data handler
, which you use throughout this program, just reports your error, while your default data handler ![]() doesn’t do anything because most of your queries won’t return any results.
doesn’t do anything because most of your queries won’t return any results.
We opted not to use the bigger picture transaction handlers at all. Your individual project should determine whether or not you need them.
Your updateBooks function ![]() will change the most at your individual site, since this is where you need to read the data from your server-side database
and dump it into a client-side database. This function just shows an example of placing one item in the database, using question
marks to highlight how the transaction’s array argument works. You’ll doubtless have some type of for loop in a real program to iteratively map your data into the client-side database.
will change the most at your individual site, since this is where you need to read the data from your server-side database
and dump it into a client-side database. This function just shows an example of placing one item in the database, using question
marks to highlight how the transaction’s array argument works. You’ll doubtless have some type of for loop in a real program to iteratively map your data into the client-side database.
When you update the books, you also list them ![]() , which ultimately updates the data on your web page. This is the only SQL transaction that uses a real data handler, a requirement
since it returns results.
, which ultimately updates the data on your web page. This is the only SQL transaction that uses a real data handler, a requirement
since it returns results.
Your bookDataHandler ![]() shows how easy this is to code. You just iterate through all the rows you get back
shows how easy this is to code. You just iterate through all the rows you get back ![]() , each time creating a variable that makes it easier to access the individual items
, each time creating a variable that makes it easier to access the individual items ![]() , then using that variable to write a line of HTML code.
, then using that variable to write a line of HTML code.
The results show up in the body of your program ![]() , which includes both the button that gets things started
, which includes both the button that gets things started ![]() and the <div> where your new data is placed
and the <div> where your new data is placed ![]() .
.
The results are shown in figure 4.4, which as you can see make good use of some of the WebKit CSS elements that we highlighted earlier, showing off the great functionality that the WebKit provides you with.
Figure 4.4. Data retrieved from a database can then be displayed.

The JavaScript database is the last WebKit element that you can make use of on the iPhone, but it can also be used more broadly. The last couple of items that we’ll discuss are instead iPhone specific.
4.4. Adjusting the chrome
In the previous chapter we showed you some simple methods for dealing with the iPhone chrome. We explained how to scroll the URL bar and noted that the status bar and the bottom bar could not be changed. Using the WebKit, you have slightly more control over things, provided that your user is using iPhone OS 2.1 or higher. All you need to do is enter a new metatag on your web app’s home page:
<meta name="apple-mobile-web-app-capable" content="yes" />
This code doesn’t change the web app when it’s run through the browser. It’s only when a user chooses to save your app to his or her iPhone home page and then calls it back up that things will act differently. When called back up, your app will appear without the URL bar or the bottom bar: only the status bar continues to eat space in your web app.
Because your user will not be able to navigate using the URL bar, you have to be very careful when using this metatag. You should only do so when navigation is totally self-contained within the program—for example, if you’ve built it with iUI or Dashcode, both topics that we’ll return to in future chapters. This metatag is only appropriate for a true web app.
There’s one other metatag of note: apple-mobile-web-app-status-bar-style can have its content set to default, black, or black-translucent to change the way the status bar looks when a user re-enters your program:
<meta name="apple-mobile-web-app-status-bar-style"
content="black-translucent" />
That’s as much control as you have over the iPhone’s chrome; now let’s move on to the next iPhone-specific topic: touches and gestures.
4.5. Recognizing touches and gestures
In the previous chapter we introduced some rudimentary ways to access events on the iPhone. We showed you how to correlate iPhone-initiated touches with regular JavaScript events such as mouseup and mousedown. However, now that you’re diving deeper into iPhone web work, you’ll be happy to know that there’s a whole other way to do things. You can access touches and gestures directly.
The touch support built into the WebKit is similar to the gesture support built into the iPhone’s native SDK, revealing the programming power that you have no matter which method you use to write your iPhone programs. In both situations, Apple uses two standard abstractions: the touch and the event. A touch occurs when a finger comes down on the screen, when it moves across the screen, or when it’s pulled up off the screen. An event is a collection of touches. It begins when a finger is first placed on the screen and ends when the last finger comes off. All of the touch actions that occur between the one that began an event and the one that ended an event are stored in the same event record.
To facilitate ease of use, the WebKit also introduces an abstraction that you won’t find in the SDK: the gesture. A gesture begins when two or more fingers touch the screen and ends when there are one or zero fingers left. Like touches, gestures are collected together into events.
4.5.1. Accessing events
Based on its standard touch and gesture models, the WebKit recognizes seven Document Object Model (DOM) event classes, as shown in table 4.7.
Table 4.7. With touches and gestures, you can recognize iPhone touchscreen events.
|
Event |
Summary |
|---|---|
|
touchstart |
A finger touches the iPhone. |
|
touchmove |
A finger moves across the iPhone. |
|
touchend |
A finger leaves the iPhone. |
|
touchcancel |
The system cancels a touch. |
|
gesturestart |
Two or more fingers touch the iPhone. |
|
gesturechange |
Fingers are moved during a gesture. |
|
gestureend |
There are one or less fingers left on the iPhone. |
Depending on the complexity of input desired, you may use gestures or touches, or possibly both, in your website. We’ll look at both gestures and touches in this section, and you’ll see some of the amazing things you can do when you combine them with other WebKit functions.
Accessing an Event
You can access any of these new touch events by one of two methods, as you can with other events in HTML. First, you can link an event handler as part of an object’s HTML definition:
<div ontouchstart="myTouchStart(event);">
Second, you can load an event handler through JavaScript:
element.addEventListener("touchstart",myTouchStart,false);
Each of these methods will pass a standard event object to the function being called (myTouchStart in these examples), generally following all the standard rules for how JavaScript event handling works. We include the specifics here, for completeness, and suggest a JavaScript reference if you need any other information on JavaScript event handling.
Turning off Default Behavior
If you are writing your own touch or gesture functionality, you’ll probably need to turn off some or all of the default behaviors of Safari’s UI. For example, if you’re accepting touches, you won’t want the iPhone to scroll when a user touches the element in question. Similarly, if you’re accepting gestures you won’t want the iPhone to pinch-zoom while a user is trying to manipulate the page. You turn off these behaviors by running the preventDefault() method in the appropriate event handlers:
function myTouchStart(event) {
  event.preventDefault();
}
You’ll usually need to run preventDefault() method for touchstart and touchmove events if you’re looking at touches. If you’re looking at gestures, you’ll probably have to run preventDefault() for gesturestart and gesturechange events.
4.5.2. Converting events
Whether you’re using the touch or gesture events, you’re going to need to convert those events into individual touches in order to use them. You accomplish this by accessing a number of properties of the event object, as listed in table 4.8.
Table 4.8. Event properties mainly contain lists of touches.
|
Property |
Summary |
|---|---|
|
target |
The target object that generated the touch. |
|
changedTouches |
An array of all the most recently changed touches on the page. Usually contains just one touch. |
|
targetTouches |
An array of all the current touches for a target element. |
|
touches |
An array of all the touches on a page. |
Note that changedTouches, targetTouches, and touches each contain subtly different lists of touches. targetTouches and touches each contain a list of fingers that are currently on the screen, but changedTouches lists only the last touch that occurred. This is important if you’re working with the touchend or gestureend events. In both cases there will no longer be fingers on the screen, so targetTouches and touches should be empty, but you can still see the last thing that happened by looking at the changedTouches array.
Because the touch properties all produce arrays, you can use JavaScript array functions to access them. That means that event.touches[0] will return the first touch and that event.touches.length can be used to count the number of touches currently being stored.
We’ll see this all in use in the next couple of examples.
4.5.3. Accessing touches
Once you’re looking at an individual touch, by using a variable like event.touches[0] or event.targetTouches[0] you can access additional properties of that touch as shown in table 4.9.
Table 4.9. Touch properties contain specific information about a touch.
|
Property |
Summary |
|---|---|
|
clientX or clientY |
X or Y location relative to the current browser screen (absent any scroll offset for the overall web page) |
|
identifier |
Unique identifying number for the event |
|
pageX or pageY |
X or Y location relative to the overall web page |
|
screenX or screenY |
X or Y location relative to the user’s overall computer screen (which is of limited use) |
|
target |
The target object that generated the touch |
The majority of these properties tell you where on a page a touch occurred, using a variety of different X,Y coordinate systems. Putting this together with the basic event information we’ve already discussed, you can begin to build sophisticated programs that track where a user is touching the screen and take appropriate actions based on that information.
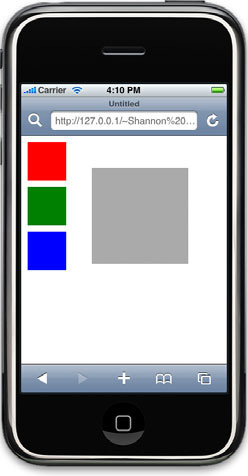
Listing 4.6 shows an example of a simple touch-based program that allows you to drag a color from one box into another.
Listing 4.6. Detecting and measuring touches

What’s impressive about listing 4.6 is how little work was required to interpret touch commands. You start off with a set of <div>s—three RGB-colored boxes ![]() , which are small boxes filled with the named color, and a special colorbox
, which are small boxes filled with the named color, and a special colorbox ![]() , which is another small box, this one located at 110x60, which can be filled with the color in question. The layout information
for all of these boxes is contained in styles
, which is another small box, this one located at 110x60, which can be filled with the color in question. The layout information
for all of these boxes is contained in styles ![]() , which we’ve opted to leave out since they’re pretty simple CSS, though we’ve shown the results in figure 4.5.
, which we’ve opted to leave out since they’re pretty simple CSS, though we’ve shown the results in figure 4.5.
Figure 4.5. Ready for touchdown! Four boxes set the scene for color dragging.
Each of the three RGB boxes refers to three touch-related event handlers. When touches start or move ![]() , the only thing that happens is that the default behavior is prevented, so that scrolling doesn’t occur. All of the code
in your program instead occurs in the touchend event handler
, the only thing that happens is that the default behavior is prevented, so that scrolling doesn’t occur. All of the code
in your program instead occurs in the touchend event handler ![]() .
.
If the touch ends beyond x=110 (which is about where the box to be filled is located), then the background of that box is filled with the color of the box where the touch began. The result is an intuitive interface in which it feels as if you’re dragging color from one object to another.
One of the most important things to note in this example is that it’s the event handlers from the object where the touch began that are used throughout. Even if the touch ended inside the box to be filled, it’s the RGB boxes event handler that runs. Similarly, target continues to refer to the object where the event began. A bit non-intuitive, this is nevertheless the most important thing to remember when monitoring touch events through the WebKit.
Unfortunately, unlike with the SDK, there isn’t yet a sophisticated manner to measure which object contains a particular touch; we hope to see that in future releases.
4.5.4. Accessing gestures
Having now worked with touches, you’ll find the WebKit’s gestures are quite easy to use. Essentially, they work identically to touches, but the events trigger only when there are at least two fingers on the screen.
Gestures also have a huge advantage: the WebKit does its best to measure two-fingered pinches and rotations for you. This is done through a pair of two new event properties that only appear for gestures, as described in table 4.10.
Table 4.10. Gestures add two new properties to event objects.
|
Property |
Summary |
|---|---|
|
rotation |
How much the fingers have rotated |
|
scale |
How much a pinch has zoomed in (<1) or out (>1) |
These new properties can allow for simple manipulation of objects using relatively complex gestures. To demonstrate, let’s expand our coloring example by allowing the user to scale and rotate the box that’s being filled in.
This new example begins by adding a set of four event handlers to the colorbox:
<div id="colorbox" class="colorbox" ongesturestart="boxStart(event)"
  ongesturechange="boxChange(event)" ontouchstart="colorStart(event)"
  ontouchmove="colorMove(event)"></div>
We’ve reused the touch start and move handlers, because they just prevent the default behavior, and thus ensure that scrolling won’t occur after users put their first finger on the screen. The gesture handlers, which are all new, are shown in listing 4.7.
Listing 4.7. Using WebKit gestures to model pinches and rotations
The boxStart handler ![]() is more of the same: you again turn off default behavior, here to prevent accidental pinch-zooming of the overall web page.
It’s the boxChange function
is more of the same: you again turn off default behavior, here to prevent accidental pinch-zooming of the overall web page.
It’s the boxChange function ![]() that contains your actual code. First, you set some variables for the default angle and scale of the box
that contains your actual code. First, you set some variables for the default angle and scale of the box ![]() . Then, you use the webkitTransform property (which we met earlier) to scale and rotate the box based on the gesture
. Then, you use the webkitTransform property (which we met earlier) to scale and rotate the box based on the gesture ![]() .
.
This complex function is easy to write because the WebKit provides you with the movement information of the gesture, rather than you having to figure it out yourself.
4.6. Recognizing orientation
The iPhone supports two different types of gestures. Touching the screen is what more immediately comes to mind when you think about user input, but moving the iPhone around—as measured by the accelerometers—is another way in which users can manipulate their iPhone. If you need precise accelerometer data, you’ll have to design using the SDK (as discussed in chapter 17), but with the WebKit you can at least recognize orientation changes.
The orientationchange event notifies you when a user has rotated the iPhone after your web page has loaded. Besides just notifying you that an orientation change has occurred, the iPhone maintains a special orientation property in the window object that advises you of the iPhone’s current orientation, as described in table 4.11.
Table 4.11. window.orientation always reflects the current orientation of an iPhone device.
|
window.orientation Value |
Description |
|---|---|
|
0 |
Portrait view. |
|
90 |
Landscape view, turned counterclockwise. |
|
–90 |
Landscape view, turned clockwise. |
|
180 |
Portrait view, flipped over. Not currently supported. |
Listing 4.8 shows how simple it is to detect an orientation change and take an action based on it.
Listing 4.8. An updating web page that always displays window.orientation

The example in listing 4.8 is simple: whenever the program detects an orientation change ![]() , it prints the new value of window.orientation on the screen
, it prints the new value of window.orientation on the screen ![]() —either 0, 90, or –90. This modifies the orAnnounce <span>, which is set to the starting value at startup
—either 0, 90, or –90. This modifies the orAnnounce <span>, which is set to the starting value at startup ![]() . Changing a CSS file or some other minor element would be equally easy. If you’d like to see a more attractive, graphical
version of this, we point you toward the first example of chapter 7, where we use Dashcode to create a more attractive orientation reporter.
. Changing a CSS file or some other minor element would be equally easy. If you’d like to see a more attractive, graphical
version of this, we point you toward the first example of chapter 7, where we use Dashcode to create a more attractive orientation reporter.
If you wanted to, you could do even more than some simple outputs or CSS changes. The authors maintain a sample chat program at http://www.iphonewebdev.com/chat/ that totally redesigns itself. In portrait mode it shows only a chat window, but in landscape mode it also shows a list of users online. You can see a bit less of the conversation in landscape mode, but what’s there is equally readable thanks to the increased width of the screen.
Alternatively, you could use an orientation change as a standard user-input device. A drum machine, for example, could offer a beat whenever the phone is rotated.
The orientation event is the last major WebKit element at the time of this writing. There’s also some neat upcoming stuff that we want to highlight, since it may be available by the time this book sees publication.
4.7. Upcoming features: CSS gradients and masks
The WebKit is constantly growing, and in upcoming years you’ll be able to build an increasing number of great features into your iPhone web pages that won’t be available to non-WebKit browsers. It can sometimes take a while for new features to make it from the WebKit “nightly builds” into an actual release from Apple, however.
This is the case with two interesting new graphical features that were announced in April 2008: gradients and masks. We have faith that both of these new CSS properties will soon be available in Safari and on the iPhone, but as of this writing they’re not yet available. Therefore, we’re just going to cover them in passing, with no guarantees that the properties will be quite the same when they actually appear.
If you’d like to use either of these properties, you should check on the internet to see if they’ve yet made it into an Apple build, and if they’ve changed any since the early documents that we’ve referenced (which come from http://webkit.org/blog, the top resource for information on new and upcoming WebKit features).
4.7.1. CSS gradients
CSS gradients will give you the opportunity to embed blended colors on your web page. This feature should be particularly useful on the iPhone, since gradients are already a part of the look and feel of iPhone home page icons, and will make individual programs feel more like native iPhone programs.
The Surfin’ Safari WebKit blog states that gradients will use the following syntax:
-webkit-gradient(<type>, <point> [, <radius>]?, <point> [, <radius>]? [,
<stop>]*)
The type might be linear or radial, while the points define the two edges of the gradient. Color stops then define where colors change, with each stop including a value from 0 to 1 and a color.
These gradients can currently be applied to background-image, border-image, list-style-image, and content properties.
The Surfin’ Safari blog also offers the following example of how a linear gradient should work:
  .linear {
    background: -webkit-gradient(linear, left top, left bottom,
       from(#00abeb), to(#fff), color-stop(0.5, #fff),
       color-stop(0.5, #66cc00));
  }
This particular example uses lots of shorthand to make gradients simpler. For example, the phrases left top and left bottom are shorthand for the endpoints of the gradient, and from and to are shorthand for color stops that use those same endpoints.
4.7.2. CSS masks
A mask is a black-and-white shape that you use to show only part of an image. In a mask, alpha values of 0 show nothing; alpha values of 1 display the image content. In other words, it’s a way to clip an image.
WebKit masks can be used in a variety of ways. The properties:
- –webkit-mask
- -webkit-mask-origin
- -webkit-mask-composite
- -webkit-mask-attachment
- -webkit-mask-image
- –webkit-mask-box-image
- -webkit-mask-clip
- -webkit-mask-repeat
can all be used to mask an underlying image in different ways.
-webkit-mask-image should provide the simplest masking:
<img src="yourimage.png" style="-webkit-mask-image: url(yourmask.png)">
-webkit-mask-box-image can provide some interesting border masking, if used correctly:
<img src="yourpic.png" style="-webkit-mask-box-image: url(anothermask.png)
75 stretch;">
Again, since this functionality has not yet made it into Apple builds, check online to find out how and when this functionality can be used.
4.7.3. The Canvas alternative
Although we can’t yet fully document these new features, we wanted to point them out as things that you should keep an eye on, because they should soon be available. Because we can’t predict when the features will become available in Safari, though, we’ll mention one alternative for these functions: Canvas.
We’ll be talking about Canvas in chapter 6. It’s a vector-based graphic design program that can be used on a variety of browsers, including Safari and mobile Safari. Among Canvas’s features are gradients (which work almost identically to the gradients in the WebKit) and masks (which you create by drawing the masking paths by hand). If you must use gradients or masks in your iPhone web app, and mobile Safari doesn’t yet include them, consider Canvas as an alternative.
The downside will be that you can’t integrate Canvas into a web page in quite the same way you can CSS. It’s a separate element, built around the <canvas> tag, rather than a CSS property, which means you’ll need to use some layered positioning or something similar to work it into your web page. However, if you need the functionality, then at least you have an alternative that will give you access to it.
Lessons for SDK developers
Engineers at Apple have been leading the charge in the design of the WebKit. It’s here that we really start to see commonalities between WebKit and SDK development patterns. Sometimes they’re close enough to help you bridge the gap between the two styles of programming, and other times they’re far enough apart to cause confusion.
Database programming based on SQLite is the first feature that we’ll see repeated in the SDK. Whereas the WebKit’s abstraction for the database is already advanced, cleanly breaking out responses from input, the SDK still depends on SQLite’s native API; as a result, if anything, database programming is easier in the WebKit than in the SDK at the time of this writing. The SDK’s SQLite is covered in chapter 16.
The WebKit’s touch event handling is another element that we’ll see closely mirrored in the SDK. Both use the same architecture of calling handlers when touches start, change, or end. They group touches into events in slightly different ways: in particular, the fact that a touchend event contains no touches in the WebKit will confuse a SDK programmer, since under the SDK an event will always contain the touches that triggered it. The WebKit’s gesture abstraction saves programmers some time; it’s not available in the SDK, though SDK programmers will discover that they have access to a lot more information about how and when gestures occur.
Despite these subtle differences, the big picture stays the same and will help programmers model similar user inputs in both web and native apps. The SDK’s event handlers are discussed in chapter 14.
We’ll see Apple programming patterns and methods two more times in the web part of the book: in chapter 6, when we look at Apple’s Canvas library, and in chapter 7, when we investigate their Dashcode developmental platform.
4.8. Summary
The WebKit represents some of the quickest changing technology available for web development on any platform. It’s the basis for the iPhone’s Safari, and that means that you can expect web development on the iPhone to become an increasingly good option as time goes on, further adjusting the balance of development choices that we discussed in chapter 2. The fact that we couldn’t fully document some of its features just emphasizes how quickly things are changing.
As an iPhone developer, you’ll probably be most excited by the iPhone-specific features that have been implemented. The touch and orientation event handlers provide direct access to some of the unique iPhone features that we’ve highlighted in this chapter. Some of the “normal” WebKit features are pretty great too. We think you should particularly consider how transitions and the built-in JavaScript database can change the way you program web pages.
When you’re building iPhone web apps with the WebKit features, you’re still very much building text-based web-centric applications. That’s not the only way to build iPhone web apps. As you’ll see over the next two chapters, there are two other models that you can use for your web app designs. Next up are iPhone-UI web apps, which look just like iPhone-native apps.