
Chapter 17. Positioning: accelerometers and location
|
This chapter covers |
|
|
When we first introduced the iPhone, we highlighted a number of its unique features. Among them were two components that allow the iPhone to figure out precisely where it is in space: a trio of accelerometers, which give it the ability to sense motion in three dimensions, and a locational device (using either GPS or faux GPS), which lets it figure out where in the world it is.
Other than accessing some basic orientation information, we haven’t done much with these features. That’s because most of the functionality isn’t available to the web interface, and because it lies beyond the basic concepts of the SDK that we’ve covered so far. But now we’ll dive into these positioning technologies and examine how to use them in your programming.
We’re going to start off with some new ways to look at orientation data, and then we’ll expand into some original possibilities.
17.1. The accelerometer and orientation
The easiest use of the accelerometers is to determine the iPhone’s current orientation. We already used the view controller’s interfaceOrientation property, back in chapter 13. As we mentioned at the time, though, you can also access orientation information through the UIDevice object. It can provide more information and realtime access that isn’t available using the view controller.
There are two ways to access the UIDevice information: through properties and through a notification.
17.1.1. The orientation property
The easy way to access the UIDevice’s orientation information is to look at its orientation property. You must first access the UIDevice itself, which you can do by calling a special UIDevice class method, pretty much the same way you access the UIApplication object:
UIDevice *thisDevice = [UIDevice currentDevice];
Once you’ve done this, you can get to the orientation property. It will return a constant drawn from UIDeviceOrientation. This looks exactly like the results from a view controller’s orientation property except there are three additional values, shown in table 17.1.
Table 17.1. UIDeviceOrientation lists seven values for a device’s orientation.
|
Constant |
Summary |
|---|---|
|
UIDeviceOrientationPortrait |
iPhone is vertical, right side up |
|
UIDeviceOrientationPortraitUpsideDown |
iPhone is vertical, upside down |
|
UIDeviceOrientationLandscapeLeft |
iPhone is horizontal, tilted left |
|
UIDeviceOrientationLandscapeRight |
iPhone is horizontal, tilted right |
|
UIDeviceOrientationFaceUp |
iPhone is lying on its back |
|
UIDeviceOrientationFaceDown |
iPhone is lying on its screen |
|
UIDeviceOrientationUnknown |
iPhone is in an unknown state |
These three additional values are one reason you might want to access the UIDevice object rather than examine orientation using a view controller.
17.1.2. The orientation notification
The UIDevice class can also give you instant access to an orientation change when it occurs. This is done through a notification (a topic we introduced in chapter 14). Listing 17.1 shows how to access this information.
Listing 17.1. Notification can give you INSTANT access to orientation changes

This is a two-step process. First you alert the iPhone that you’re ready to start listening for a notification about an orientation
change ![]() . This is one of a pair of UIDevice instance methods, the other being endGeneratingDeviceOrientationNotifications. You generally should only leave notifications on when you need them, because they take up CPU cycles and will increase your
power consumption.
. This is one of a pair of UIDevice instance methods, the other being endGeneratingDeviceOrientationNotifications. You generally should only leave notifications on when you need them, because they take up CPU cycles and will increase your
power consumption.
Second, you register to receive the UIDeviceOrientationDidChangeNotification messages ![]() , our first live example of the notification methods we introduced in chapter 14. Then, whenever an orientation change notification occurs, your deviceDidRotate: method will be called. Note that you won’t receive notification of what the new orientation is; you’ll simply know that a
change happened. For more details, you’ll have to query the orientation property.
, our first live example of the notification methods we introduced in chapter 14. Then, whenever an orientation change notification occurs, your deviceDidRotate: method will be called. Note that you won’t receive notification of what the new orientation is; you’ll simply know that a
change happened. For more details, you’ll have to query the orientation property.
We’ve now seen the two ways in which an iPhone’s orientation can be tracked with the UIDevice object, providing more information and more rapid notification than you received when using the view controller. But that only touches the surface of what you can do with the iPhone’s accelerometers. It’s probably the raw data about changes in three-dimensional space that you’ll really want to access.
17.2. The accelerometer and movement
When you’re using the iPhone’s orientation notification, the frameworks are doing your work for you: they’re taking low-level acceleration reports and turning them into more meaningful events. It’s similar to the concept of iPhone actions, which turn low-level touch events into high-level control events.
Warning
Accelerometer programs can’t be tested on the iPhone Simulator. Instead you’ll need to have a fully provisioned iPhone to test out your code. See appendix C for information on provisioning your iPhone.
Notifications aren’t going to be sufficient for many of you, who would prefer to program entire interfaces that effectively use the iPhone’s movement in three-dimensional space as a new user-input device. For that, you’ll need to access two iPhone classes: UIAccelerometer and UIAcceleration.
17.2.1. Accessing the UIAccelerometer
The UIAccelerometer is a class that you can use to register to receive acceleration-related data. It is a shared object, like UIApplication and UIDevice. The process of using it is shown in listing 17.2.
Listing 17.2. Accessing the UIAccelerometer takes just a few steps

The first step is to access the accelerometer, which is done with another call to a shared-object method ![]() . Having this step on its own line is probably unnecessary, because you could perform the other two steps as nested calls,
but we find this a lot more readable.
. Having this step on its own line is probably unnecessary, because you could perform the other two steps as nested calls,
but we find this a lot more readable.
Next, you select your update interval ![]() , which specifies how often you’ll receive information on acceleration. This is hardware-limited, with a current default of
100 updates per second. That’s probably just right if you’re creating a game using the accelerometer, but excessive for other
purposes. We’ve opted for 10 updates per second, which is an updateInterval of .1. You should always set the lowest acceptable input to preserve power on the iPhone.
, which specifies how often you’ll receive information on acceleration. This is hardware-limited, with a current default of
100 updates per second. That’s probably just right if you’re creating a game using the accelerometer, but excessive for other
purposes. We’ve opted for 10 updates per second, which is an updateInterval of .1. You should always set the lowest acceptable input to preserve power on the iPhone.
Finally, you must set a delegate for the accelerometer ![]() , which is how you receive data on accelerometer changes. The delegate will need to respond to only one method, accelerometer:didAccelerate:, which sends a message containing a UIAcceleration object whenever acceleration occurs (to the limit of the updateInterval).
, which is how you receive data on accelerometer changes. The delegate will need to respond to only one method, accelerometer:didAccelerate:, which sends a message containing a UIAcceleration object whenever acceleration occurs (to the limit of the updateInterval).
17.2.2. Parsing the UIAcceleration
The UIAcceleration information can be used to accurately and easily measure two things: the device’s relationship to gravity and its movement through three-dimensional space. These are both done through a set of three properties, x, y, and z, which refer to a three-dimensional axis, as shown in figure 17.1.
Figure 17.1. The accelerometers in the iPhone measure in three-dimensional space.

The x-axis measures along the short side of the iPhone, the y-axis measures along the long side of the iPhone, and the z-axis measures through the iPhone. All values are measured in units of “g”, which is to say g-force. A value of 1 g represents the force of gravity on Earth at sea level.
The thing to watch for when accessing your accelerometer is that it measures two types of force applied to the device: both the force of movement in any direction and the force of gravity, measured in units of g. That means that an iPhone at rest will always show an acceleration of 1 g toward the Earth’s core. This may require filtering if you’re doing more sophisticated iPhone work.
Filtering and the accelerometer
It might seem like the iPhone acceleration data is all mushed together, but it’s easy to isolate exactly the data that you need using basic electronics techniques.
A low-pass filter passes low-frequency signals and attenuates high-frequency signals. That’s what you’ll use to reduce the effects of sudden changes in your data, such as would be caused by an abrupt motion.
A high-pass filter passes high-frequency signals and attenuates low-frequency signals. That’s what you’ll use to reduce the effects of ongoing forces, such as gravity.
We’ll see examples of these two filtering methods in the upcoming sections.
17.2.3. Checking for gravity
When the accelerometers are at rest, they naturally detect gravity. This may be used to detect the precise orientation that an iPhone is currently held in, going far beyond the four or six states supported by the orientation variables.
Reading Acceleration Information
Listing 17.3 shows how the accelerometers could be used to modify redBall, a UIImage picture of a red ball, created in Interface Builder and initially set in the middle of the screen.
Listing 17.3. A short program that causes an image to respect gravity

Any accelerometer program begins with the accelerometer:didAccelerate: method ![]() , which is accessed by setting the current program as a delegate of the Accelerometer shared action. You then need to mark the current position of the redBall
, which is accessed by setting the current program as a delegate of the Accelerometer shared action. You then need to mark the current position of the redBall ![]() .
.
In order to access the accelerometer, all you do is look at the x and y coordinates of the UIAcceleration object ![]() and prepare to modify the redBall’s position based on those. The acceleration is multiplied by three here to keep the ball’s movement from being snail-like.
There’s also a z property for the third axis and a timestamp property indicating when the UIAcceleration object was created, none of which you’ll need in this example.
and prepare to modify the redBall’s position based on those. The acceleration is multiplied by three here to keep the ball’s movement from being snail-like.
There’s also a z property for the third axis and a timestamp property indicating when the UIAcceleration object was created, none of which you’ll need in this example.
You’ll note that we’re not yet talking about filtering; we’ll address that topic after we finish this example. Movement will have a pretty limited effect on our example anyway, because an abrupt movement won’t change the ball’s slow roll much.
After acquiring your gravitic information, you should also make sure that the 50x50 red ball will stay within the bounds of
the iPhone screen ![]() . If you wanted to be fancy, you could introduce vectors and bounce the ball when it hits the edge, but that’s beyond the
scope of this example. After that check, you can move your ball
. If you wanted to be fancy, you could introduce vectors and bounce the ball when it hits the edge, but that’s beyond the
scope of this example. After that check, you can move your ball ![]() .
.
With a minimal amount of work, you’ve created a program that’s acted on by gravity. This program could easily be modified to act as a leveler tool for pictures (by having it only move along one of the three axes) or could be turned into a game where a player tries to move a ball from one side of the screen to the other, avoiding pits on the way.
Now, what would it take to do this example totally right by filtering out all movement? The answer, it turns out, is not much more work at all.
Filtering Out Movement
To create a low-pass filter that will let through gravitic force but not movement, you need to average out the acceleration information that you’re receiving, so that at any time the vast majority of your input is coming from the steady force of gravity. This is shown in listing 17.4, which modifies the example in listing 17.3.
Listing 17.4. A low-pass filter isolates gravity in the accelerometers
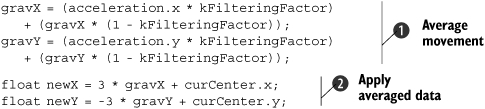
This example depends upon three predefined variables: kFilteringFactor is a constant set to .1, which means that only 10 percent of the active movement will be used at any time; gravX and gravY each maintains a cumulative average for its axis of movement as the program runs.
You filter things by averaging 10 percent of the active movement with 90 percent of the average ![]() . This smooths out any bumps, which means that sudden acceleration will be largely ignored. This example does this for the
x- and y-axes because that’s all that was used in the example. If you cared about the z-axis, you’d need to filter that too.
. This smooths out any bumps, which means that sudden acceleration will be largely ignored. This example does this for the
x- and y-axes because that’s all that was used in the example. If you cared about the z-axis, you’d need to filter that too.
Afterward, you use the averaged acceleration instead of the raw acceleration when you’re changing the position of your ball
![]() . The gravity information can be extracted from what looked like an imposing mass of data with a couple of lines of code.
. The gravity information can be extracted from what looked like an imposing mass of data with a couple of lines of code.
As we’ll see, looking at only the movement is just as easy.
17.2.4. Checking for movement
In the previous example, you isolated the gravitic portion of the accelerometer’s data by creating a simple low-pass filter. With that data in hand, it’s trivial to create a high-pass filter. All you need to do is subtract out the low-pass filtered data from the acceleration value; the result is the pure movement data.
This process is shown in listing 17.5
Listing 17.5. Subtracting out the gravity data leaves you only the movement data
gravX = (acceleration.x * kFilteringFactor)
      + (gravX * (1 - kFilteringFactor));
gravY = (acceleration.y * kFilteringFactor)
      + (gravY * (1 - kFilteringFactor));

float moveX = acceleration.x - gravX;
float moveY = acceleration.y - gravY;
This filter doesn’t entirely stop gravitic movement, because it takes several iterations for the program to cut out gravity completely. In the meantime, your program will be influenced by gravity for a few fractions of a second at startup. If that’s a problem, you could tell your program to ignore acceleration input for a second after it loads and after an orientation change. We’ll show the first solution in our next example.
With that exception, as soon as you start using these new moveX and moveY variables, you’ll be looking at the filtered movement information rather than the filtered gravity information. But when you start looking at movement information, you’ll see that it’s a bit trickier to use than gravity information. There are two reasons for this.
First, movement information is a lot more ephemeral. You’ll see it appear for a second, and then it will be gone again. If you’re displaying some type of continuous movement, as with the red ball example, you’d need to make your program much more sensitive to detect the movements. You’d have to multiply your moveX and moveY values by about 25 to see movement forces applied to that ball in any recognizable manner.
Second, it’s a lot noisier. As you’ll see when we look at some real movement data, motion occurs in a multitude of directions at the same time, forcing you to parse out the exact information that you want.
Ultimately, to interpret movement, you have to be more sophisticated, recognizing what are effectively gestures in three-dimensional space.
17.2.5. Recognizing simple accelerometer movement
If you want to write programs using acceleration gestures, we suggest that you download the Accelerometer Graph program available from Apple’s developer site. This is a nice, simple example of accelerometer use, but, more importantly, it also provides you with a clear display of what the accelerometers report as you make different gestures. Make sure you enable the high-pass filter to get the clearest results.
Figure 17.2 shows what the Accelerometer Graph looks like in use (but without movement occurring). As you move around an iPhone, you’ll quickly come to see how the accelerometers respond.
Figure 17.2. The Accelerometer Graph shows movement in all three directions.

Here are some details you’ll notice about how the accelerometers report information when you look at the Accelerometer Graph:
- Most gestures will cause all three accelerometers to report force; the largest force should usually be in the axis of main movement.
- Even though there’s usually a compensating stop force, the start force will typically be larger, and will show the direction of main movement.
- Casual movement usually results in forces of .1 g to .5 g.
- Slightly forceful movement usually tops out at 1 g.
- A shake or other more forceful action will usually result in a 2 g force.
- The accelerometers can show things other than simple movement. For example, when you’re walking with an iPhone, you can see the rhythm of your pace in the accelerometers.
All of this suggests a simple methodology for detecting basic accelerometer movement: you monitor the accelerometer over the course of movement, saving the largest acceleration in each direction. When the movement has ended, you can report the largest acceleration as the direction of movement.
Listing 17.6 puts these lessons together in a program that could easily be used to report the direction of the iPhone’s movement (which you could then use to take some action).
Listing 17.6. A movement reporter that could be applied as a program controller

As usual, you start by creating a low-pass filter ![]() and then taking the inverse of it
and then taking the inverse of it ![]() in order to get relatively clean movement data. Because the data can be a little dirty at the start, you don’t accept any
acceleration data sent in the first second
in order to get relatively clean movement data. Because the data can be a little dirty at the start, you don’t accept any
acceleration data sent in the first second ![]() . You could cut this down to a mere fraction of a second.
. You could cut this down to a mere fraction of a second.
You start looking for movement whenever one of the accelerometers goes above .3 g ![]() . When that occurs, you save the direction of highest movement
. When that occurs, you save the direction of highest movement ![]() , and keep measuring it until movement drops below .3 g. Afterward, you make sure that at least a tenth of a second has passed
, and keep measuring it until movement drops below .3 g. Afterward, you make sure that at least a tenth of a second has passed
![]() , so that you know you’re not in a lull during a movement.
, so that you know you’re not in a lull during a movement.
Finally, you do whatever you want to do with your movement data. Listing 17.6 reports the information in a label ![]() , but you’d doubtless do something much more intricate in a live program. Cleanup is required to get the next iteration of
movement reporting going
, but you’d doubtless do something much more intricate in a live program. Cleanup is required to get the next iteration of
movement reporting going ![]() .
.
This sample program works well, unless the movement is very subtle. In those cases, it occasionally reports the opposite direction because of the force when the device stops its motion. If this type of subtlety is a problem for your application, more work would be required. To resolve this, you’d need to make a better comparison of the start and stop forces for movements; if they’re similar in magnitude, you’ll usually want to use the first force measured, not necessarily the biggest one. But for the majority of cases, the code in listing 17.6 is sufficient. You’ve now got an iPhone application that can accurately report (and take action based upon) direction of movement.
Together gravity and force measurement represent the most obvious things that you can do with the accelerometers, but they’re by no means the only things. We suspect that using the accelerometers to measure three-dimensional gestures will be one of their best (and most frequent) uses as the iPhone platform matures.
17.3. The accelerometer and gestures
Three-dimensional gestures are one of the coolest results of having accelerometers inside your iPhone. They can allow your users to manipulate your iPhone programs without ever having to touch (or even look at) the screen.
To recognize a gesture, you must do two things. First, you must accurately track the movements that make up a gesture. Second, you must make sure that in doing so you won’t recognize a random movement that wasn’t intended to be a gesture at all.
Technically, recognizing a gesture requires only the coding foundation that we’ve discussed already. But we’re going to show one example that puts that foundation into real-world use by creating a method that recognizes a shake gesture.
We’re defining a shake as a rapid shaking back and forth of the iPhone, like you might shake dice in your hand before you throw them. As usual, Apple’s Accelerometer Graph is a great tool to use to figure out what’s going on. It shows a shake as primarily having these characteristics, presuming a program that’s running in portrait mode:
- Movement is primarily along the x-axis, with some movement along the y-axis, and even less along the z-axis.
- There are at least three peaks of movement, with alternating positive and negative forces.
- All peaks are at least +/-1 g, with at least one peak being +/-2 g for a relatively strong shake.
We can use the preceding characteristics to define the average requirements for a shake. If we wanted to tighten them up, we’d probably require four or more peaks of movement, but for now, this will do. Alternatively, we might want to decrease the g-force requirements so that users don’t have to shake their iPhone quite as much (and, in fact, we will). We’ve detailed the code that will watch for a shake in listing 17.7.
Listing 17.7. Shake, shake your iPhone

In this code, you’re generally following the logic we used when viewing the accelerometer graph, though with increased sensitivity, as promised. The didShake: method registers a shake if it sees three or more movements of at least .75 g, at least one of which is 1.25 g, with movements going in opposite directions.
You start by removing gravity from the accelerometer data ![]() , as you did in previous examples. This time you don’t worry about the quirk at the beginning of data collection; it won’t
register as a shake, because it’ll be a small fraction of a g.
, as you did in previous examples. This time you don’t worry about the quirk at the beginning of data collection; it won’t
register as a shake, because it’ll be a small fraction of a g.
The main work of the function is found in its latter half, which is called whenever movement continues to occur ![]() . First, you check whether the strongest movement is along the x-axis
. First, you check whether the strongest movement is along the x-axis ![]() . If so, you register the movement if it’s at least .75 g and if it’s in the opposite direction as the last x-axis move
. If so, you register the movement if it’s at least .75 g and if it’s in the opposite direction as the last x-axis move ![]() . You do the latter check by seeing if the product of the last two moves on that axis is negative; if so, one must have been
positive and the other negative, which means they were opposite each other.
. You do the latter check by seeing if the product of the last two moves on that axis is negative; if so, one must have been
positive and the other negative, which means they were opposite each other.
If the strongest move was instead on the y-axis ![]() , you check for a sufficiently strong y-axis move that’s in the opposite direction as the last y-axis move
, you check for a sufficiently strong y-axis move that’s in the opposite direction as the last y-axis move ![]() . We could have written a more restrictive shake checker that only looked for x-axis movement, or a less restrictive checker that also looked for z-axis movement, but we opted for this middle ground.
. We could have written a more restrictive shake checker that only looked for x-axis movement, or a less restrictive checker that also looked for z-axis movement, but we opted for this middle ground.
As long as movement continues without a break of more than a quarter of a second, the shakecount continues to increment, but when movement stops ![]() , the program is ready to determine whether a shake occurred. You check this by seeing if the shake count equals or exceeds
3 and if the largest movement exceeded 1.25 g
, the program is ready to determine whether a shake occurred. You check this by seeing if the shake count equals or exceeds
3 and if the largest movement exceeded 1.25 g ![]() . Afterward, all of the variables are reset to check for the next shake.
. Afterward, all of the variables are reset to check for the next shake.
By building this shake checker as a separate method, it could easily be integrated into a list of checks made in the accelerometer:didAccelerate: method. Listing 17.8 shows a simple use that changes the color of the iPhone’s screen every time a shake occurs. The nextColor method could be changed to do whatever you want.
Listing 17.8. Integrating didShake: is simple
- (void)accelerometer:(UIAccelerometer *)accelerometer
   didAccelerate:(UIAcceleration *)acceleration {

   if ([self didShake:(UIAcceleration *)acceleration]) {
        self.view.backgroundColor = [self nextColor];
   }

}
We expect that the shake is going to be the most common three-dimensional gesture programmed into the iPhone. With this code, you’ve already got it ready to go, though you may choose to change its sensitivity or to make it work in either one or three dimensions.
Other gestures, such as a tilt, a fan, a circle, or a swat may be of use, depending on the specifics of your program, but we leave that up to your own ingenuity. For now, we’ve covered all of the main points of the accelerometers: orientation, gravity, movement, and gestures.
We’re now ready to dive into the other major positioning-related tool, and one that we find a lot easier to program because the results are less noisy: Core Location.
17.4. All about Core Location
We’ve got only one unique iPhone feature left to look at: its ability to detect a user’s location. Up until now, we haven’t been able to show off the GPS, because it’s not currently available when doing web development on the iPhone. While this may change in the future, right now the only way to access the GPS’s Core Location data is through the SDK.
Warning
You can only minimally test Core Location using the iPhone Simulator. Longitude and latitude will work, but they’ll always report Apple’s Cupertino headquarters. Altitude won’t be displayed. For most realistic testing—particularly including distance or altitude—you must use a provisioned iPhone.
The original iPhone based its location information on the distance to cell phone towers and other set locations. Its accuracy could vary from a few blocks’ radius to a few miles, even in an urban area. The iPhone 3G has a built-in GPS, but it still has limitations. The iPhone’s antenna power is limited, which affects accuracy, and accuracy is further limited by concerns about power usage. As a result, even if you have an iPhone 3G, the device will make preferential use of cell tower data and will provide information on GPS locations using the minimal number of satellite contacts possible (though that minimum partially depends upon an accuracy requirement that you set).
With all that said, the iPhone 3G provides better location information than the original release, because cell tower triangulation is only one factor in its location information. But it may not be entirely accurate; in particular, altitude seems to be the least reliable information.
We offer this preamble both to describe a bit about how the iPhone’s location information is created, and to introduce a bit of skepticism about the results. What you get should be good enough for 99 percent of your programs, but you don’t want to do anything mission-critical unless you’re quite careful.
The good news is that you don’t have to worry about which type of iPhone device a user owns. The Core Location API will work identically whether they have a built-in GPS or not.
17.4.1. The location classes
The iPhone’s location awareness is built into two SDK classes and one protocol. CLLocationManager gives you the ability to access location information in a variety of ways. It includes a delegate protocol, CLLocationManagerDelegate, which defines methods that can tell you when new location information arrives. Finally, the location information itself appears as CLLocation objects, each of which defines a specific location at a specific time.
Table 17.2 describes the most important methods and properties associated with each of these classes. For more details, you should, as usual, consult the Apple class references.
Table 17.2. The most important methods and properties for accessing location information
|
Class |
Method/Property |
Type |
Summary |
|---|---|---|---|
|
CLLocationManager |
delegate |
Property |
Defines the object that will respond to CLLocationManagerDelegate |
|
CLLocationManager |
desiredAccuracy |
Property |
Sets the desired accuracy of location as a CLLocationAccuracy object |
|
CLLocationManager |
distanceFilter |
Property |
Specifies how much lateral movement must occur to cause a location update event |
|
location |
Property |
Specifies the most recent location |
|
|
CLLocationManager |
startUpdatingLocation |
Method |
Starts generating update events |
|
CLLocationManager |
stopUpdatingLocation |
Method |
Stops generating update events |
|
CLLocationManagerDelegate |
locationManager: didUpdateToLocation: fromLocation: |
Method |
Delegate method that reports whenever an update event occurs |
|
CLLocationManagerDelegate |
locationManager: didFailWithError: |
Method |
Delegate method that reports whenever an update event fails to occur |
|
CLLocation |
altitude |
Property |
Specifies the height of location in meters |
|
CLLocation |
coordinate |
Property |
Returns the location’s coordinates as a CLLocationCoordinate2D variable |
|
CLLocation |
timestamp |
Property |
Specifies an NSDate of when the location was measured |
There are a number of additional properties and methods that you should examine (particularly for the CLLocation class), but we’re staying with the basics here.
Generally, you’ll see that the location information is generated much like the accelerometer information. You access a shared object (CLLocationManager) and set some standard properties for how you want it to work, including how often to update (distanceFilter). Like the accelerometer, you also have to explicitly turn location updating on (startUpdatingLocation). Afterward, you keep an eye on certain methods (as defined by CLLocationManagerDelegate). These methods generate an object (CLLocation) when location changes; you read the object to get the specifics.
With those generalities out of the way, let’s see how CLLocation works in a real example.
17.4.2. An example using location and distance
Listing 17.9 shows an example of using Core Location to record a starting location, monitor the current location, and calculate the distance between them. It’s the first of two longer examples in this chapter.
Listing 17.9. An application of Core Location for distances

As usual, the foundation of this program is built in Interface Builder. Figure 17.3 displays the general setup that’s used.
Figure 17.3. This simple utility shows off locations and distance.

There are three labels: startLabel (at the top) and endLabel (at the bottom) each display information about a location; distanceLabel shows the distance between the two. There are two controls: a button control instantly updates the current location, and a segmented control chooses between miles and kilometers. They’re each linked to an IBAction, which executes a method that we’ll meet in the code.
This program generally follows the broad outline of steps that we’ve already discussed, but we’ll go through each step in turn.
You start off initializing a CLLocationManager object ![]() and then set some standard properties
and then set some standard properties ![]() —here a delegate, the desiredAccuracy, and the distanceFilter. The desired accuracy of tens of meters and the update interval of every 100 meters might be more than this particular application
requires, but you can tune these in your projects as seems appropriate. Remember that demanding more accuracy and updating
more frequently will decrease the battery life of your user’s iPhone. Finally, you have to start the CLLocationManager running
—here a delegate, the desiredAccuracy, and the distanceFilter. The desired accuracy of tens of meters and the update interval of every 100 meters might be more than this particular application
requires, but you can tune these in your projects as seems appropriate. Remember that demanding more accuracy and updating
more frequently will decrease the battery life of your user’s iPhone. Finally, you have to start the CLLocationManager running ![]() .
.
The locationManager:didUpdateToLocation:fromLocation: method is the workhorse of this program ![]() . It should get called shortly after the LocationManager starts updating and every time your user walks 100 meters or so. First, it saves the current location as the starting location
the first time it’s called, updating the startLabel at the same time
. It should get called shortly after the LocationManager starts updating and every time your user walks 100 meters or so. First, it saves the current location as the starting location
the first time it’s called, updating the startLabel at the same time ![]() . Then, every time it gets run, it updates the endLabel and the distance-Label
. Then, every time it gets run, it updates the endLabel and the distance-Label ![]() . Note that you don’t have to use the LocationManager’s location property here (or at almost any other time in the program), because this method always provides you with the current location
of the device, and seems to do so well before the location property is updated, based on our own tests. Caveat programmer.
. Note that you don’t have to use the LocationManager’s location property here (or at almost any other time in the program), because this method always provides you with the current location
of the device, and seems to do so well before the location property is updated, based on our own tests. Caveat programmer.
The next few methods have to do with I/O. setEnd: gets run whenever the button control is pushed, to update the current location ![]() . Unfortunately, there’s no particularly clean way to ask for an update, so you must stop and start the location updates,
as shown here. Letting the user force a location update is particularly important if you’re using a high distanceFilter or if you’re trying to measure altitude changes. In our altitude example, in the next section, we’ll see an alternative way
to do this, where the location manager usually isn’t running at all. The controlChange: method gets run whenever the segmented control is updated
. Unfortunately, there’s no particularly clean way to ask for an update, so you must stop and start the location updates,
as shown here. Letting the user force a location update is particularly important if you’re using a high distanceFilter or if you’re trying to measure altitude changes. In our altitude example, in the next section, we’ll see an alternative way
to do this, where the location manager usually isn’t running at all. The controlChange: method gets run whenever the segmented control is updated ![]() . It just updates the distance-Label. Note that this is the one time that you depend on the location property, because there isn’t a location event when you change the button.
. It just updates the distance-Label. Note that this is the one time that you depend on the location property, because there isn’t a location event when you change the button.
The last few methods are utilities. The updateDistanceLabel: method makes use of an interesting CLLocation method that we haven’t discussed, getDistanceFrom: ![]() . This measures the true distance between two locations, using complex calculations that correctly account for the curvature
of the Earth. Your method also converts meters to kilometers and alternatively converts them to miles, depending on the status
of the segmented control. Finally, updateLocationFor:toLocation: updates either the start-Label or the endLabel by extracting the latitude and longitude coordinates from the CLLocation object that it’s passed
. This measures the true distance between two locations, using complex calculations that correctly account for the curvature
of the Earth. Your method also converts meters to kilometers and alternatively converts them to miles, depending on the status
of the segmented control. Finally, updateLocationFor:toLocation: updates either the start-Label or the endLabel by extracting the latitude and longitude coordinates from the CLLocation object that it’s passed ![]() .
.
The result is a program that can show a simple distance traveled, as the crow flies. If we were going to improve it, we’d probably save the starting location to a file, and perhaps even make it possible to record multiple trips. But for the purposes of showing how Core Location works, this is sufficient.
There’s one thing that our example didn’t show: how to measure altitude. It’s just another CLLocation property, but we’ve written another short program to highlight this part of Core Location.
17.4.3. An example using altitude
Altitude is as easy to work with as longitude and latitude. It’s just another property that can be read from a CLLocation object. The biggest problem is that it won’t be available to all users. In particular, neither the iPhone Simulator nor the original iPhone report altitude at the time of this writing.
Apple suggests using following code to determine whether altitude is unavailable:
if (signbit(newLocation.verticalAccuracy)) {
If its return is non-zero, you need to bail out of checking for altitude information.
Even if a user has an iPhone 3G, there are two other gotchas that you must watch out for. First, altitude information can be perhaps 10 times more inaccurate than the rest of the location information. Adjust your desiredAccuracy accordingly. Second, remember that the Core Location information only updates when you move a certain distance, as determined by the distanceFilter, in a non-vertical direction. This probably means that you’ll need to allow the user to update the distance by hand rather than depending on automatic updates.
Listing 17.10 repeats the techniques that we used previously, applying them to altitude. It also shows another nice integration of user input with a slightly more complex program. As usual, its core objects were all built in Interface Builder: three UILabels, one UITextField, two UIImageViews, and a UIActivityIndicatorView. The last is the most interesting, because we haven’t seen it before; we’ll talk about it in our quick discussion of the code. You should be able to pick out all of the objects other than the activity indicator in figure 17.4, which follows the code.
Listing 17.10. You can climb any mountain with your iPhone keeping track for you
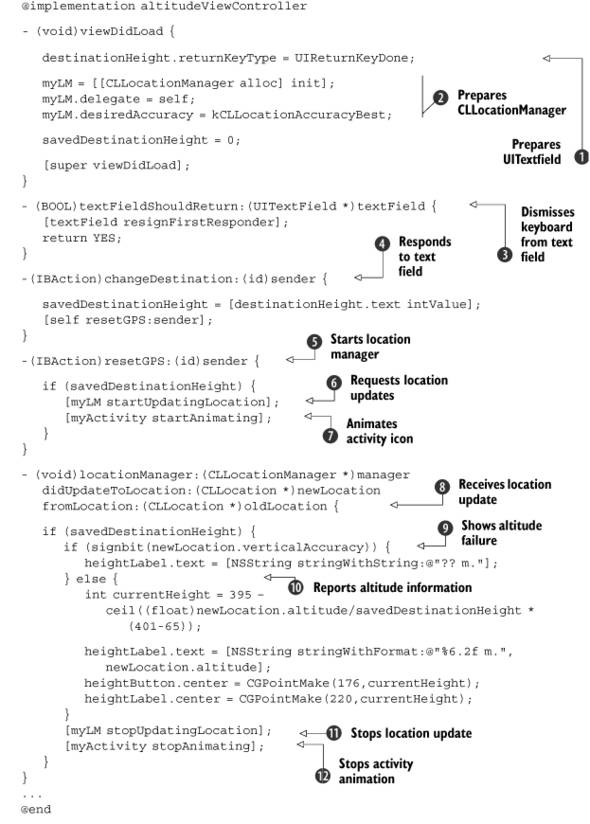
Figure 17.4. An altitude program measures how high you’ve climbed on a mountain of your choice.

Much of this code combines two SDK elements that you’ve already met: the flourishes necessary to make a UITextField work and the protocols that you must follow to use a location manager. You can see both of these elements in the viewDidLoad: method, which sets up the text field’s return key ![]() and then starts up the location manager
and then starts up the location manager ![]() . Note that you don’t start the location manager updating; you can’t depend on it to update when you’re only measuring vertical change, so it’s best to have the user do it by hand. Next, you finish up the text
field’s functionality with the textFieldShouldReturn: method, which you’ve met before
. Note that you don’t start the location manager updating; you can’t depend on it to update when you’re only measuring vertical change, so it’s best to have the user do it by hand. Next, you finish up the text
field’s functionality with the textFieldShouldReturn: method, which you’ve met before ![]() .
.
This project contains two Interface Builder objects that can generate actions. When the text field is adjusted ![]() , the project saves that destination height for future calculation, and then updates the current height using the resetGPS: method
, the project saves that destination height for future calculation, and then updates the current height using the resetGPS: method ![]() . The latter method is also used when the Check Height button is pressed. Figure 17.4 shows these input devices, for clarity.
. The latter method is also used when the Check Height button is pressed. Figure 17.4 shows these input devices, for clarity.
Note that resetGPS: does two things. First, it starts the location update ![]() , which you only turn on for brief one-time uses. Besides being more appropriate for monitoring altitude, this also helps
save energy. Second, it starts your activity indicator going
, which you only turn on for brief one-time uses. Besides being more appropriate for monitoring altitude, this also helps
save energy. Second, it starts your activity indicator going ![]() . This object was created in Interface Builder, where you should have marked it with the hidesWhenStopped property. Interface Builder also automatically hides the view so that it doesn’t appear when the program is loaded. As a
result, there’s nothing on the screen until you start the animation here, at which time a little activity indicator appears
and continues animating until it’s stopped (which we’ll see in a minute).
. This object was created in Interface Builder, where you should have marked it with the hidesWhenStopped property. Interface Builder also automatically hides the view so that it doesn’t appear when the program is loaded. As a
result, there’s nothing on the screen until you start the animation here, at which time a little activity indicator appears
and continues animating until it’s stopped (which we’ll see in a minute).
The heavy lifting is done when the location manager reports back its information ![]() . Here, you check whether you’re getting altitude information at all
. Here, you check whether you’re getting altitude information at all ![]() . If you are
. If you are ![]() , you move the red dot image and update its height label. To finish things off, you turn the location update back off
, you move the red dot image and update its height label. To finish things off, you turn the location update back off ![]() , and then stop the animation of the activity indicator
, and then stop the animation of the activity indicator ![]() , which makes it disappear.
, which makes it disappear.
Voila! You have a working altitude monitor (if you have an iPhone 3G) and a nice combination of a few different SDK elements.
17.4.4. Core Location and the Internet
In this section, we’ve seen a few real-world examples of how to use location information in meaningful ways, but you’ll find that you can make much better use of the information when you have an internet connection. When you do, you can feed longitudes and latitudes to various sites. For example, you can pull up maps with a site like Google Maps. You can also improve on the iPhone’s relatively poor (or nonexistent) altitude information by instead requesting the geographic altitude of a location using a site like GeoNames. This won’t be accurate if your user is in an airplane or a tall office building, but for the majority of situations, it’ll probably be better than what the iPhone can currently deliver.
Rather than address these possibilities here, we’ve decided to save them for chapter 20, where we’ll use them as examples of how to interact with the internet.
17.5. Summary
In this chapter, we’ve covered two of the most unique features available to you as SDK programmers.
The iPhone’s accelerometers can give you access to a variety of information about where an iPhone exists in space. By measuring gravity, you can easily discover an iPhone’s precise orientation. By measuring movement, you can see how an iPhone is being guided through space. Finally, you can build more complex movements into three-dimensional gestures, such as the shake.
We’ve usually talked about the iPhone’s touch screen when discussing iPhone input, but the accelerometers provide another method for allowing users to make simple adjustments to a program. We can imagine game controls and painting programs both built entirely around the accelerometers.
The iPhone’s GPS can give you information on an iPhone’s longitude, latitude, and altitude. The horizontal information is the most reliable, though it’ll prove more useful when you connect to the internet. The altitude information isn’t available to everyone, and even then it has a higher chance of being incorrect, so use it with caution.
Though the accelerometer and GPS data is cool, we expect there will be many programs that don’t use them at all. We can’t say the same for the topics of our next chapter. There we’ll be talking about media, highlighting pictures, videos, and sounds, which almost every iPhone project will incorporate.