
Chapter 5. Using iUI for web apps
|
This chapter covers |
|
|
Creating web apps with the WebKit gives you a lot of power and allows for a lot of diversity. But it doesn’t address a real concern: what if you want to create web apps that have the same look and feel as native applications on the iPhone?
The reasons for doing so are obvious. You can take advantage of lessons that users have already learned by using Apple’s standard iPhone user interfaces. The question of how to do so, however, is slightly more complex.
Certainly you could do so using the WebKit’s extensions atop HTML, and we’re going to give you the opportunity to do so here by dissecting what makes up the iPhone interface. Unless you have specific needs, however, creating your own interface is probably overkill.
Fortunately, we have another solution to this problem: a third-party library exists that you can use to model the iPhone interface. It’s called iUI, and it’ll be the focus of much of this chapter. But before we get into iUI, let’s see what the iPhone interface looks like.
5.1. Creating your own iPhone UI
The iPhone UI has quite a few unique (and distinctive) features. If you want to model its UI inside a web app, you must consider all of them. We’ll provide some guidance by highlighting the most important UI features in this section.
We’ll start out by looking at the iPhone’s graphic interface, but the UI goes far beyond that. The iPhone’s UI also depends on a data-driven content paradigm and the usage of those unique design choices that we highlighted back in chapter 1.
5.1.1. The graphical interface
As shown in figure 5.1, the standard look of an iPhone application is quite distinctive, and thus can be easily modeled in your own web pages.
Figure 5.1. The iPhone has a unique look and feel that should be emulated in iPhone web apps.

What follows are a number of simple guidelines that suggest how to easily model the iPhone’s graphical interface.
- Match the look and feel— When you’re building your own iPhone-UI web apps, the best thing you can do is match the general look and feel of the built-in iPhone programs. This ap-proach has two benefits. First, it gives your users a leg up on using your program, because they’re already familiar with the interface. Second, it takes advantage of the work that Apple programmers have already done to figure out what works on the iPhone. The downside is that there isn’t a totally consistent interface on all the iPhone applications, a rarity for Apple. The core iPhone programs—the iPod, Mail, and the various phone accessories—do the best job of presenting a consistent UI, but some of the other programs look slightly different. You’ll ultimately need to decide how much of the look and feel you want to model, and how much you want to change it to match your own site’s branding, a topic we’ll return to toward the end of this chapter.
- Use chrome— It’s most important to match the iPhone’s chrome. Put navigation and control bars to the top and the bottom of your App’s web pages. You might want to match the iPhone’s gray coloring, or you might want to match the colors of the rest of your site.
- Put action buttons in your chrome— In the chrome, it’s not just the navigation that’s important, but the action buttons as well. For example, several applications put a “+” action in their chrome to generate new content. Safari also includes search and bookmark actions.
- Create sliding menus— Menus of options should typically be display on subpages, not as a part of your web app’s main display. You might click an action button to pop up a menu. Alternatively, a list of options that fills the screen might each have a > symbol that leads to its own subpage, as with the iPod’s “more” pages. Though we call these sliding menus, for the way they animate on the iPhone, you probably won’t mimic that aspect in your web app (unless you use iUI).
- Include back buttons— Whenever you slide in a subpage, make sure there’s an explicit, labeled button that will bring you back to the page that you left from. Note that the iPhone creates a history stack that could be several levels deep. No matter how deep you go in the structure, you can always return to the top level with back buttons. This is a topic that we’ll return to a few times in this chapter.
- Separate your choices— Whenever you have a list of options, make sure they’re widely separated. The iPhone always includes both spaces and rules between options, giving “fat fingers” plenty of room to fit in.
- Use the viewport— If you’re creating a web app specifically for the iPhone, you no longer have to worry about creating a full-sized web page that will look good elsewhere. Either set your viewport to 480, or (if you want to be fancy) use either the device-width feature or vary your viewport based on orientation.
- Don’t be afraid to turn off zooming— Don’t be afraid to set minimum-scale and maximum-scale to 1 in your viewport metatag. After all, if you’ve designed a page specifically for the iPhone, there should be no reason for users to mess with it.
About views
iPhone programs often include multiple pages of information that are all part of the same application. Apple calls these individual pages of content views (though the term is also used to refer to individual objects, or subviews, within a page).
Many web apps will be built using the same concept, allowing pages to call up other pages using tab bars, navigational controllers, and other means. As you’ll see, the view model is well supported by various tools that you might use when creating iPhone web apps. iUI (which we’ll discuss in this chapter) supports it as part of its navigational methods, and Dashcode (which we’ll talk about in the next chapter) supports it using a stackLayout object.
We’ll see even more complex view hierarchies when we begin using the SDK, which is the ultimate model that these other libraries are imitating.
This advice is crucial for putting together an iPhone-UI web app, but it’s also primarily visual. When creating iPhone web apps, it’s important to think about the base paradigm that underlies your web development.
5.1.2. The iPhone data paradigm
We’ve already talked quite a bit about how the iPhone is technically different from last-generation mobile phones. We also believe that a core difference exists in the methods that people use to access information on the iPhone.
The desktop internet centers on the paradigm of browsing. Although users will sometimes go to a specific page for certain information, a lot of internet usage instead centers around idle viewing of interesting sites. Because browsing is so important, desktop-centric websites often center on immediately dumping unsorted piles of content on users, hoping to draw them further down into a site.
We believe that these priorities are reversed on the iPhone. You are less likely to attract casual browsers and more likely to attract users who already know what your site is and are visiting it to retrieve specific information. This more data-centric view of web usage has already been verified by the huge jumps that Google saw in iPhone searches. Likewise, some of our sample sites already reflect this paradigm, such as Facebook, which removed most of the information from their iPhone login page.
In other words, it’s all about the data.
When you’re building your iPhone-UI web apps, think about how the iPhone itself organizes data and try to mimic that. That means using trees of lists. Take a look at the iPod button on your iPhone if this concept isn’t immediately clear. When you push it, notice that you get no textual descriptions, just a set of options. When you click Composers, you get another list of options. You can dig down from there to a list of songs, and then you can finally listen to a song.
A similar model for your web app will omit most of your website’s text and replace it with the core of your data, easily accessible via sliding menus. It’s a pretty big paradigm change, and you may initially feel resistant to it, but we feel that it’ll give you best results, because it’s what iPhone users are used to and want.
5.1.3. Other iPhone design elements
Beyond the display UI and the data paradigm, you should also think about the iPhone’s six unique design elements when creating any web app interface.
- The always-on internet is a great benefit because it’s easy for you to access online pages and data. But your users may sometimes be accessing your pages via a slower web connection, thanks to EDGE. This all suggests Ajax as a great tool for any web app usage because it requires constant access, but at the same time allows redrawing of pages in bits and pieces. When thinking about an always-on internet, also consider the methodology that Apple uses in native apps like Mail. These programs only load small sets of data—such as 25 messages at a time—waiting to load more until you request it.
- Power consciousness won’t be a huge issue in your web app work, because you’ll be limited to what you can do by Safari. But you shouldn’t include JavaScript events that will constantly poll the internet or keep Safari active.
- Location awareness can’t be accessed from a web app.
- Orientation awareness is a topic we covered in chapter 4, when looking at the WebKit.
- Input was also covered in chapter 4. If you want, you can continue to use the WebKit’s orientation and gesture support as part of your iPhone-UI web apps.
- Output is the last of the design elements. One of the cool things about the iPhone’s Safari output is that it scales, but as we’ve already suggested, that’s something you might want to omit in an iPhone-UI web app.
By now you might have some great ideas for how to turn your website into an iPhone web app, but the idea of coding everything to look like and work like the iPhone can seem daunting. Unlike our discussions of Canvas and the WebKit, there isn’t an Apple library that we can point you to (though one is in process, from what we hear). But if you don’t mind using third-party libraries, you can use a free software package called iUI.
5.2. Getting ready for iUI
iUI is a library of JavaScript and CSS that is intended to mimic the look and feel of the iPhone in web pages. In other words, it’s precisely what you need to make an iPhone-UI web app of the sort that we’ve been describing. Software engineer Joe Hewitt, the author of iUI, said the following about it in his initial blog posting on the topic:
- First and foremost, iUI is not meant as a “JavaScript library.” Its goal is to turn ordinary standards-based HTML into a polished, usable interface that meets the high standards set by Apple’s own native iPhone apps. As much as possible, iUI maps common HTML idioms to iPhone interface conventions. For example, the <ul> and <li> tags are used to create hierarchical side-scrolling navigation. Ordinary <a> links load with a sliding animation while keeping you on the original page instead of loading an entirely new one. A simple set of CSS classes can be used to designate things like modal dialogs, preference panels, and on/off switches.
- Let me re-emphasize that all of this is done without the need for you to write any JavaScript. It is meant to feel as though HTML was the iPhone’s own UI language. http://www.joehewitt.com/blog/introducing_iui.php (July 11, 2007)
Thus, not only can you expect iUI to model the iPhone for your web app, but you can also expect it to be easy to use.
iUI is a community project that is offered for your free usage. At the time of this writing, there are two versions of the code. The officially released code is probably what you want to use for any live website, but you can also go to the current SVN repository for the rawest, most up-to-date code. Table 5.1 lists the current places that you can access the code.
Table 5.1. iUI can be freely downloaded from the internet, either in its officially released form or via a Subversion repository.
|
Location |
|
|---|---|
|
Release Bundle |
|
|
Subversion Repository |
Once you’ve downloaded iUI, you need to place the iui directory in a standard library location for your website so that you can load JavaScript and CSS files from it. Of course, if you’re using iUI in any corporate environment, you’ll also want to look at LICENSE.txt to make sure that it meets the requirements of your company. Fortunately, iUI’s license is a permissive new BSD license that places few restrictions on what you can do with the software.
Barring problems, you should now be ready to start programming a web app in iUI. But we’ll offer one last disclaimer before we talk about that: author Christopher Allen is currently one of the three owners of iUI, along with Joe Hewitt and Sean Gilligan. Naturally, this makes us biased toward iUI. But we wouldn’t be supporting it if we didn’t think it was a superb product for creating iPhone-specific web pages. We’re pretty sure you’ll agree too.
5.3. Developing with iUI
Once you’ve got iUI installed, you can include it in your code by referencing iUI’s JavaScript and CSS files. Listing 5.1 shows a typical iUI header, placed in the <head> section of your HTML file. This is the beginning of a color-selector application that we’re going to develop over the next couple of examples; it will allow you to look up your favorite shades of red (and other colors if you want to extend the example on your own).
Listing 5.1. The headers for an iUI page
<meta name="viewport" content="width=device-width; initial-scale=1.0;
maximum-scale=1.0; user-scalable=0;">
<style type="text/css" media="screen">@import "iui/iui.css";</style>
<script type="application/x-javascript" src="iui/iui.js"></script>
Note that besides the standard include statements for the style and the script, you’ll also set a viewport, following the suggestions we offered earlier for iPhone-UI web apps. This viewport is set to the iPhone screen width and also keeps users from scaling the window.
From here you can start building an application using the iUI classes. Table 5.2 shows all the major classes that you’ll be encountering. We’ll return to each of them in turn as we build up our color selector.
Table 5.2. iUI makes about a dozen classes available for you to use in creating iPhone-like web pages.
|
iUI class |
Element |
Summary |
|---|---|---|
|
button |
<a> |
The standard iPhone-UI toolbar button. Appears at top right ?normally, or at top left with an arrow pointing backward with id=”backButton”. |
|
leftButton |
<a> |
Moves a button left. |
|
blueButton |
<a> |
Turns a button blue. |
|
grayButton |
<a> |
A page-width gray button. This is the button to use for important links internal to your page. |
|
whiteButton |
<a> |
A page-width white button. This is the button to use for important links internal to your page. |
|
toolbar |
<div> |
The core class for iUI. Anchors the page. |
|
dialog |
<form> |
Creates a standard iPhone UI for data entry. |
|
group |
<li> |
A nonlinked list item, intended to organize links into groups. |
|
panel |
body element |
Creates a standard iPhone UI for settings. |
|
row |
body element |
Creates a left- and right-justified set of data. |
|
toggle |
.row |
Creates toggle buttons in a row. |
We’ll cover each of these in more detail as we step through our example, which we’re now ready to dive into, beginning with the all-important iUI toolbar.
5.3.1. The iUI toolbar
Once you’re working on the <body> of your iUI web page, you can start using the package’s unique styles. This will typically begin with a toolbar, as shown in listing 5.2.
Listing 5.2. A toolbar that anchors an iUI page

This is a standard toolbar that will appear almost unchanged in any iUI program that you create. Every toolbar should have
a pageTitle line ![]() . Most will also have a backButton line
. Most will also have a backButton line ![]() , unless your app contains no subsidiary pages. The button line
, unless your app contains no subsidiary pages. The button line ![]() —which is what we called an action button in section 5.1—is the most optional of the three, and will only appear when you have some action that you want a user to be able to take.
A few of these elements bear additional discussion.
—which is what we called an action button in section 5.1—is the most optional of the three, and will only appear when you have some action that you want a user to be able to take.
A few of these elements bear additional discussion.
First, notice that the pageTitle and backButton lines do not contain any content. This is because iUI’s Javascript automatically fills them. The pageTitle will be filled with the title of the element that’s currently selected. The backButton will be filled by the title of the previous element when you move forward a page (and won’t be used until then).
Second, be aware the backButton allows access to a whole stack of pages—just like on the iPhone itself. No matter how deep you are in your iUI page stack, you’ll always be able to get all the way back to your first page.
Third, note that we said “elements” when referring to the individual parts of an iUI screen. Although an iUI web app will look like several pages on an iPhone, it can all be in one file on your web server (using the standard model of views that we’ve already highlighted). Individual forms, lists, and <div>s are each named. iUI then redraws the page—using simple animations that model the iPhone—whenever a user moves to a new, named element.
5.3.2. iUI lists
Once you’ve written your (relatively standard) toolbar, you then need to prepare your default element. It’s what will get pulled up on the screen the first time a user visits your iUI page. To create your default element, you must write a <div>, form, list, or other element, then give it the selected=”true” attribute.
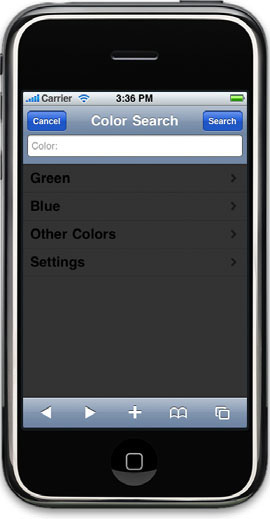
This selected element is the only one that will appear when your page is first drawn. All the other elements on your page should be available via links from your default element; they’ll only appear when those links are clicked. Figure 5.2 shows the results that you’re aiming for. As you can see, you’re creating a simple example of what the SDK will call a table view, one of the most frequently used iPhone user interfaces.
Figure 5.2. A list-based paradigm is easy to program in iUI, using just the <li> elements.

This table view is surprisingly easy to create in iUI, as shown in listing 5.3, which continues our example by showing the default element of our color selector. All that’s needed to create the table is a simple unordered list.
Listing 5.3. iUI’s default element
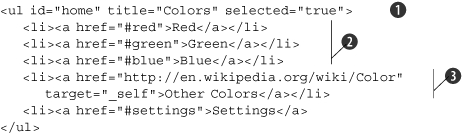
As promised, you start off your default element with the selected=”true” attribute. Note that you also use an id=”home” attribute ![]() . This isn’t a requirement, but helps keep things clear.
. This isn’t a requirement, but helps keep things clear.
The rest of the lines in this element are list items holding links. Although you’ll frequently be linking to other elements
that are part of the same iUI page, as you do in your first three list items ![]() , you’re creating a fully functional web page and can thus link to anywhere on the web.
, you’re creating a fully functional web page and can thus link to anywhere on the web.
Your penultimate anchor line ![]() shows an offsite link. The target=”_self” attribute is required when you’re linking to a complete (usually off-site) HTML page. This is because iUI assumes that external
links usually connect to iUI-style page fragments containing only elements. It therefore tries to load them via Ajax if you
don’t tell it otherwise. We’ll explain more about how you might want to use these page fragments and Ajax when we get to iUI
tips and tricks, later in this chapter, but for now just be aware that you need to set the target attribute to _self for normal links.
shows an offsite link. The target=”_self” attribute is required when you’re linking to a complete (usually off-site) HTML page. This is because iUI assumes that external
links usually connect to iUI-style page fragments containing only elements. It therefore tries to load them via Ajax if you
don’t tell it otherwise. We’ll explain more about how you might want to use these page fragments and Ajax when we get to iUI
tips and tricks, later in this chapter, but for now just be aware that you need to set the target attribute to _self for normal links.
About Ajax
Ajax stands for Asynchronous JavaScript and XML. It’s a technology that can be integrated into web pages, but it’s more a set of techniques than an actual language. It combines JavaScript and XML (as you’d expect from the name) with DOM.
The concept behind Ajax is that the web browser exchanges small amounts of data with the web server without redrawing complete pages. Typically, a form sends some data to the server, the server processes it, and then it sends back a command for the browser to update some small part of a page. Ajax is great for data entry where you want to indicate that the server has accepted the data. As it happens, it’s really good for low-bandwidth services too, like EDGE.
Once you’ve written your default element, you can add other elements in a similar manner. To correctly link these elements, you just have to make sure that their ID matches the originating href link. Figure 5.3 shows an example of how a subpage might appear when connected to the href=”#red” link in the default element. It also highlights another bit of iUI chrome: groups.
Figure 5.3. Groups help programs to organize lists into logical units.

The code required to create this new element is shown in listing 5.4. As you can see, it’s another unordered list, this time using some new attributes.
Note that you’re introducing an additional iUI class in this example. The group class can only be applied to <li> elements. You apply it to list items that are not links. The result will be a category head that you can use to organize several links below it.
Listing 5.4. Other elements defining subpages in your iUI web app
<ul id="red" title="Red Shades">
    <li class="group">Light Reds
    <li><font color="#ff0000"><b>Computer Red (#ff0000)</b></font>
    <li><font color="#ED1C24"><b>Pigment Red (#ED1C24)</b></font>
    <li><font color="#E0115F"><b>Ruby Red (#E0115F)</b></font>
    <li class="group">Dark Reds
    <li><font color="#DC143C"><b>Crimson (#DC143C)</b></font>
    <li><font color="#800000"><b>Maroon (#800000)</b></font>
</ul>
We could easily extend this example to also show pages for green and blue color selections, but doing so wouldn’t add anything to what you’ve already learned. Instead, we’re going to jump to the next major element of our color selector example: the searchForm.
5.3.3. iUI dialogs
The iPhone already has a standard way to display web searches. You can see it when you click the magnifying glass in mobile Safari. A search dialog pops up toward the top of the screen, complete with a cancel button in the chrome. Meanwhile, the rest of the page is grayed out but can still be faintly seen in the background.
This is the look and feel that is mimicked when you use the dialog class in iUI. It’s probably what you want to use whenever you’re creating a simple search, and you may find it useful for other types of simple interaction as well. Figure 5.4 shows how it will look when used as a part of your web app.
Figure 5.4. A dialog allows users to conduct searches.
Listing 5.5 shows how to create this dialog as part of our color selector example.
Listing 5.5. Creating a search-like form with the dialog class
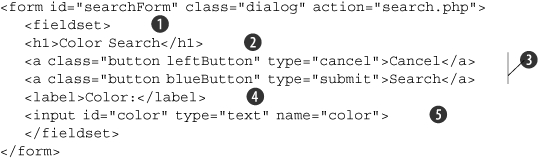
Although we listed dialog as a <form> class in table 5.2, it can technically be applied to anything; but it probably doesn’t make much sense for anything but a form.
Inside the dialog class, the order of the contents is important. You must have a <fieldset> ![]() , which is used to logically group form elements together and then draw a box around them. Then you must have a level one
header
, which is used to logically group form elements together and then draw a box around them. Then you must have a level one
header ![]() , which will appear amid the chrome at the top. Omitting either of these will cause your dialog to display incorrectly.
, which will appear amid the chrome at the top. Omitting either of these will cause your dialog to display incorrectly.
The buttons ![]() can be set in several configurations. Here you display both cancel and search buttons. This isn’t quite how the iPhone does
things by default, but it provides a more complete UI, thus trading off usability for conformity. If you prefer to stick with
the iPhone standard, replace the pair of buttons with a single Cancel line:
can be set in several configurations. Here you display both cancel and search buttons. This isn’t quite how the iPhone does
things by default, but it provides a more complete UI, thus trading off usability for conformity. If you prefer to stick with
the iPhone standard, replace the pair of buttons with a single Cancel line:
<a class="button" type="cancel">Cancel</a>
Note that this example also introduces how to apply the iUI button classes. The button class by itself always displays a right-justified gray button, but by applying multiple classes, you can move that button to the left (with leftButton) or turn it blue (with blueButton). We’ll return to all the ways in which buttons can be used later.
After placing your buttons, you can put together a long series of <label> ![]() and <input>
and <input> ![]() lines. In each case, the label is placed into the background of the input, showing what should be entered in that box. This
example only includes one such pair, but additional ones can be entered identically.
lines. In each case, the label is placed into the background of the input, showing what should be entered in that box. This
example only includes one such pair, but additional ones can be entered identically.
The one thing that this example doesn’t show is the actual back end, search.php. As it turns out, that works in a special manner under iUI.
5.3.4. iUI searches done right with Ajax
iUI’s search functions use Ajax, bringing us back to the idea of Ajax and page fragments, which we touched on when we looked at external links. iUI uses Ajax in a couple of places to replace individual elements rather than redrawing a whole web page. Not only does this make an application faster, but it also cleverly allows iUI to maintain its overall stack of history pages.
This is all easy to do because iUI takes care of the Ajax details for you in a relatively transparent manner. You don’t need to know that you’re using Ajax; you just need to know that in some situations you must supply fragmentary pages that contain only iUI elements rather than complete pages.
This is the case with iUI-based searches. Your search result pages should not draw full pages, nor should they forward you to full pages. Instead, they should output an individual element, just like those elements that you’ve been writing to model other iUI subpages.
Listing 5.6 shows what search.php might output after a search for “Maroon”.
Listing 5.6. A search page fragment
<ul id="search" title="Maroon">
  <li><font color="#800000"><b>Maroon (#800000)</b></font>
</ul>
How the back end of your search works is, of course, entirely up to you. All that matters is that the output supplies a fragment, because that’s what iUI’s Ajax engine expects to see.
5.3.5. iUI panels and rows
That leaves us with just one missing item from our iUI color selector example: the settings page. We’ll be laying this out with our remaining iUI classes for this example: panel and row (see listing 5.7). These classes are meant to mimic the Settings page found on your iPhone, with its rows of options that you can change.
Listing 5.7. Panels, rows, and toggles forming another user input model

The panel class ![]() works similarly to the dialog class by building data into a <fieldset>
works similarly to the dialog class by building data into a <fieldset> ![]() . The result is an inset panel. If you’d like, you can put an optional header above the <fieldset> but still inside the panel class, which will label your panel for you. We’ve opted not to do so in this example because you only have one panel on the
page, but if you had multiple panels, doing so might help your organization.
. The result is an inset panel. If you’d like, you can put an optional header above the <fieldset> but still inside the panel class, which will label your panel for you. We’ve opted not to do so in this example because you only have one panel on the
page, but if you had multiple panels, doing so might help your organization.
The Row
Within a panel, information is organized into rows ![]() . Again we see similarity to the layout of the dialog, because a <label> tag
. Again we see similarity to the layout of the dialog, because a <label> tag ![]() designates data that is pushed to the left of the element. Here, you also have the option of placing data to the right. In
the case of this example, you’re placing a special toggle class
designates data that is pushed to the left of the element. Here, you also have the option of placing data to the right. In
the case of this example, you’re placing a special toggle class ![]() in that location. The results are shown in figure 5.5.
in that location. The results are shown in figure 5.5.
Figure 5.5. Toggles support the standard preference UI.

You’ll most often use the panel and row classes in iUI just as you do here, for toggles. Note that the row class can be used elsewhere if you want to mimic the left/right row-based organization of data in other places. The downside is that rows are set up to contain buttons and graphics (like the toggle). If you try to put regular text here, it’ll end up top justified, and not looking that great.
The Toggle
toggle is a complex and somewhat special class. It can only be used inside rows, and it must include three additional classes: thumb, toggleOn, and toggleOff. The thumb class is left blank, as has been the case with other iUI classes in the past, and will be replaced with the thumb slider graphic. The contents of toggleOn and toggleOff define what the slider says in each of its on and off positions; this example makes the boring decision of the toggles being labeled ON and OFF, but you can modify that however you want.
The toggle class is managed by an onclick JavaScript event handler. The example includes return;, but you’ll want to instead call up something that makes an appropriate change based on the change in settings.
Usually a toggle starts in the off position, but if you instead want to set it on by default, you just need to set the toggled attribute in your toggle <div>:
<div class="toggle" onclick="return;" toggled="true">
If you’ve been following along on your home computer, by this point you should have a sparsely functional color selector with examples of all the major iUI classes. Having finished designing an iUI color selector, we’ve also finished our overview of most of the major classes for iUI. There’s still one set of classes that could use a bit of additional clarification: the buttons.
5.3.6. iUI buttons
There are a total of five different classes for buttons. We’ve already seen them in use both in the toolbar and the dialog classes, but we have not yet examined them in a more thorough manner. Generally, there are two types of buttons: the small buttons and the large buttons. The small buttons are slightly trickier to use.
The small buttons include three different classes: button, leftButton, and blue-Button. These three classes can be mixed together, with each of them providing slightly different utility. The button class is always required. It defines the general look and shape of a gray button. It also defaults placement of the button to the right. The leftButton can be stacked with the button to instead push the button to the left. The blueButton can be stacked with either button to make it blue instead of gray. These possibilities are all described in table 5.3.
Table 5.3. The three small button classes can be stacked together to place buttons in different locations and to tint them with different colors.
|
Classes |
Summary |
|---|---|
|
button |
Gray button to the right |
|
button leftButton |
Gray button to the left |
|
button blueButton |
Blue button to the right |
|
button leftButton blueButton |
Blue button to the left |
You should be careful about moving the colors and locations of buttons too far from the iPhone standards. Given those constraints, though, the small button classes provide considerable ability to easily create attractive iPhone-like graphics.
The large buttons, grayButton and whiteButton, work differently from the small buttons. They’re each used singularly, and each will entirely fill the width of an iPhone screen. You can embed them by adding a class to an <a> tag, just as with the other buttons:
<a class="grayButton" href="#confirm">I'm Sure!</a>
You should use these buttons when you want to make a notable impact on your document somewhere other than your toolbar or dialog box. The large buttons are similar in look and feel to the confirmation buttons that you’ll often see pop up on an iPhone, so your users should already be familiar with their usage.
Having completed our look at iUI classes, there’s only one other thing we want to look at in our overview of IUI: a few special attributes that are used by the JavaScript libraries.
5.3.7. iUI attributes
iUI recognizes a handful of special attributes that can be applied to various tags. These each tend to be related to one of the classes that we’ve already met (see table 5.4).
Table 5.4. A small set of attributes can help you to further differentiate your iUI-classed page elements.
|
Tag |
Attribute |
Related class |
|---|---|---|
|
<a> |
type=cancel |
button, backButton, blueButton |
|
<a> |
type=submit |
button, backButton, blueButton |
|
<div> |
toggled=”true” |
toggle |
|
element |
selected=”true” |
(none) |
|
element |
hideBackButton=”true” |
(none) |
|
<body> |
orient=”portrait” or orient=”landscape” |
(none) |
You’ve already seen the majority of these attributes. The cancel and submit anchor types both appeared in our dialog box, though they can appear in any type of form. They give plain links the necessary form-based functionality.
The toggled attribute appeared in our example of combining panels, rows, and toggle classes, while the selected attribute always defines which page element is currently being viewed. They were each covered thoroughly in the appropriate sections. That leaves just two brand-new attributes.
hideBackButton is placed on any element, just as selected is. You use it when, for whatever reason, you don’t want users to have a back button that would let them return to the previous page. If we didn’t want the settings page in our color selector app to have a back button, we’d replace the first line of that element with the following:
<div id="settings" title="Settings" class="panel" hideBackButton="true">
You probably won’t want to do this much (if ever) because it breaks the standard iPhone navigation model.
Finally, orient is a <body> attribute that iUI sets for you. It can be used to tell whether the iPhone is in portrait or landscape mode at any time without having to watch for orientation change events. Of course, it’s probably just as easy to use the WebKit’s orientation property, making this attribute somewhat redundant.
Having thoroughly described how iUI works, we’re now going to briefly revisit how iUI page design is done. What we’ve discussed thus far assumes a simplistic data model for your website, which probably won’t be the case, so let’s take a step back and see how iUI might be integrated in a more realistic manner.
5.4. Creating an iUI back end
With our color selector (with the exception of that search.php page), we assumed that you were working with static data. If you have unchanging data and you’re just looking for a handy way to access it on the iPhone, then our suggestions thus far will work fine. And there are plenty of handy applications that you could write for the iPhone using this methodology. Besides our color selector, you might set up a static contact list, an encyclopedia of municipal laws, or a simple template-based manufacturer’s site using the same methods.
But static web display hasn’t been common since the earliest days of web design. It’s much more likely that you’ve got a dynamic website that uses PHP, Perl, Ruby on Rails, or some other web development language to render live data from a database or some other dynamic source. As you’d expect, you can use that server-side language to output iUI-classed HTML code. We won’t dwell on this too much, as it’s a simple application of the iUI classes you’ve learned to the dynamic programming that you already know.
We’ve offered a quick example of integrating PHP and iUI in listing 5.8. There is a live program that we currently have running at http://index.xenagia.net/iphonerecent.phtml that shows a listing of some of the most recent fantasy, science fiction, and horror book releases (and then links users through to iPhone optimized web pages outside the iPhone web app).
Listing 5.8. iUI will typically be used as part of a dynamic web page
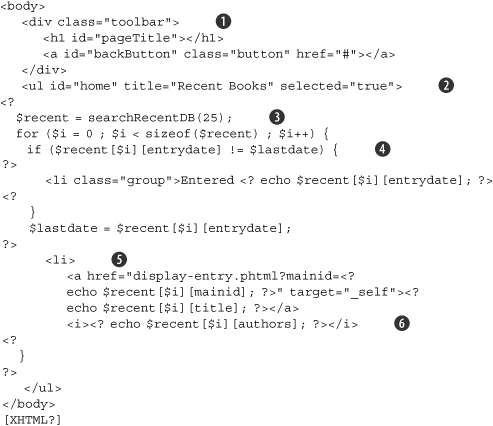
You will find nothing here surprising. You’ve got a standard toolbar ![]() , which you follow up with a default element
, which you follow up with a default element ![]() , once again using our old favorite, the unsorted list. The main body of this page is taken up by linked list items
, once again using our old favorite, the unsorted list. The main body of this page is taken up by linked list items ![]() . It’s interesting to note that iUI will place additional content included after an anchor link on its own output line
. It’s interesting to note that iUI will place additional content included after an anchor link on its own output line ![]() , as shown here. We’ve also included some group list items
, as shown here. We’ve also included some group list items ![]() , to help break up the page and give some order to what we’re showing.
, to help break up the page and give some order to what we’re showing.
The data lookup ![]() deserves some additional discussion because it purposefully mirrors the methodology of the iPhone by showing data in bite-sized
chunks, here 25 items. We’ll look at an even fancier way to do this when we get to iUI tips and tricks in a moment.
deserves some additional discussion because it purposefully mirrors the methodology of the iPhone by showing data in bite-sized
chunks, here 25 items. We’ll look at an even fancier way to do this when we get to iUI tips and tricks in a moment.
If we wanted to spend more time on this example, we’d start off by allowing the user to scroll back through more than just the last 25 books. We’d also try to make our search page look a little more attractive. Finally we’d rewrite our book display pages in iUI too. All of that is ultimately beyond the scope of this example, but we do want to underline one fact: using iUI dynamically is very, very easy. Our working example literally took 10 minutes to put together. If you go view the page in an iPhone browser, you can see that those 10 minutes paid off with a simple, attractive interface.
Now that we’ve looked at how iUI is likely to be used in a real web environment, we’ve only got one more iUI-related topic to discuss, one that we’ve been promising for a while: those tips and tricks that you can use to improve your iUI experience.
5.5. Other iUI tips and tricks
We’re going to finish up our look at iUI by discussing some tips and tricks that are easy to use but that go beyond the needs of many web app developers. These include a more intensive look at Ajax and how it can help you organize your code and your listings; a simple way to include slightly smaller iUI libraries; and some methods to change the standard look and feel of iUI. We’ll kick off with that code organization.
5.5.1. Organizing your code
You’ve already seen that iUI changes the way web pages are written by representing many subpages as elements in a single HTML file. But as files gets larger (and thus more unwieldy over EDGE), you have to decide when you should create a new page in iUI rather than a new element. It turns out that there are three ways organize your iUI pages, as summarized in table 5.5.
Table 5.5. You can keep elements on the same page, maintain fragmentary subpages, or write totally different pages, depending on the app.
|
Organization |
Summary |
|---|---|
|
Single file |
For small, singular applications |
|
Multiple fragments |
For larger, singular applications |
|
Multiple files |
For larger multipurpose applications |
Each of the three methods shown in table 5.5 should be used in different circumstances.
A single file is the standard process that we’ve been using so far. It keeps things nicely organized on your side of things. It also preserves iUI’s history stack, as we’ve briefly mentioned before.
Multiple fragments is an alternative that you can use if your file is getting too large and thus causing problems over EDGE. You need to start out with a single main file, as usual, but you can then put individual elements in subpages, and call them up through a normal URL. The trick is that the subpage must be a fragment, just like the fragment that we created for our search results. It can’t contain headers or any other information.
For example, in our color selector we might put each of our colors on a subpage, like red.html, green.html, and blue.html. Those subpages would then contain only the <ul> element in question. When the link on the main page is clicked, iUI will cleverly load your fragment into your main page, preserving the history stack. This is once more done with Ajax.
Multiple files are the last and least desirable option. Using them will break your history stack, which could be disorienting for your users. But if your file is much too large or too complex, you might want to use them. An even better reason would be if you have several somewhat different applications all glued together.
When you separate iUI pages in this manner, you should be careful to take the navigation between your separate pages outside of the normal iUI interface. That way, your users won’t have any expectation of being able to page back to previous screens.
The best method for doing so is a tabbed interface that sits on the first page of each of your iUI web apps, allowing users to move between them. It’s important that this only appear on the highest-level pages in your web app, because those will be the places where there isn’t any history on the stack.
Remember that whenever you link to an external web page that isn’t a fragment, you must include the target=”_self” attribute. Otherwise, iUI will assume you’re loading a fragment, and its JavaScript can get in the way of the new page popping up.
Another method for melding together multiple web apps is to create a home page for your site that has iPhone-like buttons on it, similar to those that appear on the iPhone’s home page. This has the advantage of being more attractive, but you’ll need to create special navigation to get back to it.
5.5.2. Improving data listings
iUI also uses Ajax in one other place, solving another common iPhone UI problem. As we mentioned a few times, when you’re listing data on an iPhone you should cut it down into bite-sized chunks to be easily loaded over the wireless network. We saw this demonstrated in the iPhone’s mail program and in our own recent books example.
There’s an even fancier way to create these partial listings in iUI. If you use the mail program on the iPhone, you’ll note that its Load 25 More Messages button doesn’t load a new web page (as would be standard for a desktop web page), but instead shows 25 additional messages at the bottom of the same page. This is the same methodology used for YouTube searches, and can generally be considered yet another bit of iPhone-specific chrome.
You can mimic this easily thanks to iUI’s next bit of Ajax magic. You just use target=”_replace” in your “more” <a> link. Returning once more to our color selector example, what if we had too many reds for a single page? All we’d need to do is include the following line at the bottom of our page:
<li><a href="darkred.html" target="_replace">See More Reds</a>
The darkred.html file would be another page fragment—just like those we’ve already created—but this one only including list items. When a user clicks on the link, the Ajax code entirely replaces the <a> link with the fragmentary page. You could continue this process ad infinitum by including a new replacement link at the bottom of each new fragment loaded.
Table 5.6 reminds us of the various ways in which Ajax can be used with iUI, now that we’ve met them all.
Table 5.6. iUI uses Ajax to provide speed improvements and also maintain a history stack. You need to remember when to include fragmentary files to make it work.
|
Tag |
Attribute |
Content |
Replaces |
|---|---|---|---|
|
<a> |
(default) |
Fragment |
iUI content |
|
<a> |
target=”_replace” |
Fragment |
<a> link |
|
<a> |
target=”_self” |
Web page |
iUI page |
|
<form> |
(default) |
Fragment |
iUI content |
Note that except in the case of target=”_replace”, your old iUI content page doesn’t stick around. Instead you’re loading a new view. What remains is the chrome—or if you prefer the overall iUI window—and it’s through that chrome that iUI remembers where it is and allows the user to move back through previous pages.
Having finished with Ajax, we can now look at one final feature hidden inside iUI: compression.
5.5.3. Compressing iUI
Do you need your pages to be more efficient because everyone is accessing them via EDGE? If so, you can use specially compressed versions of the iUI CSS and JavaScript files that are packaged with iUI. Just include them under the compressed names:
<style type="text/css" media="screen">@import "iui/iuix.css";</style>
<script type="application/x-javascript" src="iui/iuix.js"></script>
Don’t expect the savings from compression to be huge. As of the current version of iUI at the time of this writing, the CSS file decreases from 8k to 6k and the JavaScript file decreases from 10k to 6k. But every byte can help on an EDGE connection, and the only real cost is readability of the files.
5.5.4. Selecting a different look
In the last few sections we’ve taken advantage of iUI’s ability to look and work exactly like an iPhone. We’re now going to contradict ourselves by addressing the following problem: what if you have a standard look and feel for your website that you want to replicate with iUI, rather than sticking with the staid and normal iPhone look?
Because iUI is just a library of CSS and JavaScript, changing its look and feel is not only possible, but it’s also easy. At the time of this writing, an iUI web page at http://www.ampersandsoftware.com/NHLapp/ showed how this could be done by introducing some bright red and blue colors into its style. All you need to do is to create additional styles for your pages.
The simplest way to do this is to embed a style statement in the particular tag that you want to change. For example, if you wanted to change the <fieldset> background from your Settings example to make the background of the inner panel red, you could code it as follows:
<fieldset style="background: #ff0000">
This particular method is quick and easy, but it won’t work well if you want to make a regular change to lots of elements on your page. CSS doesn’t support true class inheritance, which would allow you to create a substyle, but it does allow you to stack multiple classes together. We saw this method used with the iUI buttons. You could similarly create a special style for your red-background <fieldset>:
.rpanel > fieldset {
  background: #ff0000;
}
Then instead of calling just the panel class, you call both panel and rpanel when you create this element:
<div id="settings" title="Settings" class="panel rpanel">
This method is much more viable for doing an app-wide change to the iUI styles, yet doesn’t require you to mess with the original iUI CSS file, thus preserving your ability to upgrade iUI in the future.
As for why in the world you’d want your panel box to be red, we’ll leave that as an exercise for the reader.
5.6. Integrating iUI with other libraries
Before we finish up with iUI entirely, let’s see how it can integrate with other libraries, including both the WebKit that was the subject of the previous chapter and jQuery, another library package that we haven’t discussed yet.
5.6.1. Using jQuery with iUI
The iPhone is a device that has elicited a lot of excitement in the user community, and iUI isn’t the only freely available library that’s come about as a result. In early 2008 Jonathan Neal released a jQuery library for the iPhone. You can download it from http://plugins.jquery.com/project/iphone.
jQuery is a lightweight JavaScript library that’s intended to make JavaScript and DOM manipulation simpler and more intuitive. You can learn more by checking out jQuery in Action by Bear Bibeault and Yehuda Katz (Manning, 2008). The iPhone extension adds a few common iPhone-related manipulations to jQuery. You can access them just by including the appropriate JavaScript scripts (jquery.iphone.js, jquery.js) or if you prefer the appropriate compressed scripts (jquery.iphone.min.js, jquery.min.js).
Once you’ve done that, you can use a handful of new functions. We’re not going to go in-depth into jQuery for the iPhone as we did with iUI. Table 5.7 summarizes the contents of the package, and you can find more complete examples in jQuery’s iPhone documentation.
Table 5.7. The jQuery iPhone package provides user-accessible JavaScript functions and variables to make your iPhone web app programming simple.
|
Function |
Type |
Summary |
|---|---|---|
|
disableTextSizeAdjust |
Function |
Stops iPhone from resizing text on page |
|
enableTextSizeAdjust |
Function |
Allows iPhone to again resize text on page |
|
hideURLbar |
Function |
Hides the URL bar chrome Can also move a user back to the top of the page |
|
orientchange |
Function |
Accepts a function that will be executed when the iPhone changes orientation |
|
version |
Variable |
Returns the current version of Safari or false if Safari is not being used |
iPhone’s jQuery is compatible with iUI; web apps have already been created that use both of them. But there is some overlap. In particular, the hideURLbar function is not needed in iUI, which already hides the URL bar whenever it’s used.
Lessons for SDK developers
Although iUI is a web-only library, it provides some of the best insights into SDK development, primarily because Joe Hewitt did such a careful job of not only mimicking the look and feel of the iPhone’s UI, but also its functionality.
The discussions that lead off the chapter, centering on the iPhone UI and the iPhone’s architectural paradigms, provide a great overview for your own SDK programming. A lot of the bells and whistles, such as the chrome and the way data is output, will already be laid out for you with the SDK. Thinking about the data-centric focus of iPhone users and the ways in which the six unique iPhone design elements will influence your program design remain important.
Finally, iUI itself really shows many of the features that SDK programs should have as well. Short data bursts, expanding lists, and special search and setting forms will all be part of a well-designed SDK programming experience. We’ll even return to the idea of a windows and views as one of the core concepts of the SDK.
One of the nice features of iUI is that it’s really easy to quickly knock out new content. It demonstrates one of the greatest strengths of web development versus SDK development, the quick development time, which you should keep in mind when engaging in any iPhone programming.
The rest of the jQuery functions may be useful even if you’re using iUI; the ultimate question is whether they’re worth adding more than 50k onto your page’s download size. If you’re not already using jQuery, they’re probably not, but if you are, the iPhone-specific functions should be nice icing on your jQuery cake.
5.6.2. Using iUI with WebKit
Finally, let’s return to WebKit and the question of how to integrate it with iUI. We think the answer to that is that it’s definitely easy but possibly unnecessary.
First, it’s easy because iUI just consists of some styles and JavaScript that won’t impact the way that most web page elements work. If you want to use a WebKit transition, transform, or animation as part of a web page, iUI won’t get in your way. In fact, we think some of elements of the advanced WebKit will work great with iUI. For example, you could use a client-side database to create dynamic iUI-based web pages, using methods similar to the PHP dynamic web page that we described earlier.
Second, it’s unnecessary because iUI tends to support a specific type of web design: the list-based data paradigm that we saw earlier was central to much iPhone development. If you’re following that paradigm, you probably won’t need the bells and whistles of the WebKit; if you’re not, then you probably won’t need iUI. There are situations when you might combine the two, such as creating a list-based application that had fancy end pages that could make use of WebKit features, but we expect those will be the minority of iUI designs.
Nonetheless, there’s little technical reason not to combine the two libraries if the opportunity arises to do something cool.
Alternatives to iUI
At the time of this writing, iUI was the only mature library that gave good access to an iPhone-UI for the web. But we occasionally hear word of alternatives either being freely developed or being developed for sale with fancy graphical interfaces. We’re not going to try and cover all of these here, other than to say there will probably be more stuff out there by the time this book sees print, but that we expect iUI to be the leader in the area for at least a while to come.
We will, however, make a special mention of Apple’s Dashcode, which is a graphical development platform that can be used to lay out many simple iPhone-UI web apps. If you don’t need anything other than JavaScript, CSS, and HTML in your web app, you’ll probably want to use Dashcode instead of iUI; it’s discussed in chapter 7. But for all those more complex programs that require PHP, Ruby on Rails, or another dynamic language, we think that iUI is a great foundation.
5.7. Summary
The iPhone user interface goes beyond just its chrome. It also includes browser methodologies, data paradigms, and the iPhone’s unique features that make iPhone browsing a new and different experience. When you’re working on an iPhone-UI web app—intended to model the look and feel of the iPhone and to be used primarily or exclusively by iPhone users—you need to consider all these elements so that you can produce a web page whose look and feel will match the UI that iPhone users are expecting.
You may have to program this yourself to meet the needs or requirements of whomever you’re producing web pages for. But if you can, you should use iUI, a handy bundle of CSS and JavaScript code. iUI matches not only the chrome and animations of the iPhone, but also some of its basic ideas for how to transport data in efficient ways.
Having now learned about the WebKit and iUI, you should have some great tools to create web pages that mix text and graphics in attractive ways. But what if you want to create pages with much more extensive graphics (and much less text)? For that purpose, there’s one more library which can be of great help, Canvas, which is the topic of our next chapter.