
Chapter 4. Using beans with Camel
This chapter covers
- Understanding the Service Activator EIP
- How Camel looks up beans using registries
- How Camel selects bean methods to invoke
- Bean parameter binding with single and multiple parameters
If you’ve been developing software for five years or longer, you’ve likely worked with different component models, such as CORBA, EJB, JBI, SCA, and lately OSGi. Some of these models, especially the earlier ones, imposed a great deal on the programming model, dictating what you could and couldn’t do, and they often required complex packaging and deployment models. This left the everyday engineer with a lot of concepts to learn and master. In some cases, much more time was spent working around the restrictive programming and deployment models than on the business application itself.
Because of this growing complexity and the resulting frustrations, a simpler, more pragmatic programming model arose from the open source community: the POJO model. Later this was formalized as the Spring Framework.
The Spring Framework has opened the door to the enterprise, proving that the POJO programming model and a lightweight container indeed meet the expectations of today’s businesses. In fact, the simple programming model and lightweight container concept proved superior to the heavyweight and over-complex enterprise application and integration servers that were used before.
So what does this have to do with Camel? Well, Camel doesn’t mandate using a specific component or programming model. It doesn’t mandate a heavy specification that you must learn and understand to be productive. Camel doesn’t require you to repackage any of your existing libraries or require you to use the Camel API to fulfill your integration needs. Camel is on the same page as the Spring Framework, with both of them being lightweight containers favoring the POJO programming model.
In fact, Camel recognizes the power of the POJO programming model and goes great lengths to work with your beans. By using beans, you fulfill an important goal in the software industry, which is to reduce coupling. Camel not only offers reduced coupling with beans, but you get the same loose coupling with Camel routes. For example, three teams can work simultaneously on their own sets of routes, which can easily be combined into one system.
We’ll start this chapter by showing you how not to use beans with Camel, which will make it clearer how you should use beans. After that, we’ll take a look at the theory behind the Service Activator EIP and dive inside Camel to see how this pattern is implemented. Finally, we’ll look at the bean-binding process, which gives you fine-grained control over binding information to the parameters on the invoked method from within Camel and the currently routed message. It may sound confusing at first, but don’t worry—it will make sense shortly.
4.1. Using beans the hard way and the easy way
In this section, we’ll walk through an example that shows how not to use beans with Camel—the hard way to use beans. Then we’ll look at how to use beans the easy way.
Suppose you have an existing bean that offers an operation (a service) you need to use in your integration application. For example, HelloBean offers the hello method as its service:
public class HelloBean {

    public String hello(String name) {
        return "Hello " + name;
    }
}
Let’s look at some different ways you could use this bean in your application.
4.1.1. Invoking a bean from pure Java
By using a Camel Processor, you can invoke a bean from Java code.
Listing 4.1. Using a Processor to invoke the hello method on the HelloBean

Listing 4.1 shows a RouteBuilder, which defines the route. You use an inlined Camel Processor ![]() , which gives you the process method, in which you can work on the message with Java code. First, you must extract the message body from the input message,
which is the parameter you’ll use when you invoke the bean later. Then you need to instantiate the bean and invoke it
, which gives you the process method, in which you can work on the message with Java code. First, you must extract the message body from the input message,
which is the parameter you’ll use when you invoke the bean later. Then you need to instantiate the bean and invoke it ![]() . Finally you must set the output from the bean on the output message.
. Finally you must set the output from the bean on the output message.
Now that you’ve done it the hard way using the Java DSL, let’s take a look at using Spring XML.
4.1.2. Invoking a bean defined in Spring
You’ll often use Spring as a bean container and define beans using its XML files. Listings 4.2 and 4.3 show how to revise listing 4.1 to work with a Spring bean this way.
Listing 4.2. Setting up Spring to use a Camel route that uses the HelloBean

First you define HelloBean in the Spring XML file with the id helloBean ![]() . You still want to use the Java DSL to build the route, so you need to declare a bean that contains the route. Finally, you
define a CamelContext, which is the way you get Spring and Camel to work together.
. You still want to use the Java DSL to build the route, so you need to declare a bean that contains the route. Finally, you
define a CamelContext, which is the way you get Spring and Camel to work together.
Now let’s take a closer look at the route.
Listing 4.3. A Camel route using a Processor to invoke HelloBean

The route in listing 4.3 is nearly identical to the route in listing 4.1. The difference is that now the bean is injected using the Spring @Autowired annotation ![]() , and instead of instantiating the bean, you use the injected bean directly
, and instead of instantiating the bean, you use the injected bean directly ![]() .
.
You can try these examples on your own; they’re in the chapter4/bean directory of the book’s source code. Run Maven with these goals to try the last two examples:
mvn test -Dtest=InvokeWithProcessorTest
mvn test -Dtest=InvokeWithProcessorSpringTest
So far you’ve seen two examples of using beans with a Camel route, and there’s a bit of plumbing to get it all to work. Here are some reasons why it’s hard to work with beans:
- You must use Java code to invoke the bean.
- You must use the Camel Processor, which clutters the route, making it harder to understand what happens (route logic is mixed in with implementation logic).
- You must extract data from the Camel message and pass it to the bean, and you must move any response from the bean back into the Camel message.
- You must instantiate the bean yourself, or have it dependency-injected.
Now let’s look at the easy way of doing it.
4.1.3. Using beans the easy way
Suppose you were to define the Camel route in the Spring XML file instead of using a RouteBuilder class. The following snippet shows how this might be done:

First you define the bean as a Spring bean, and then you define the Camel route with the direct:start input. At ![]() you want to invoke HelloBean, but you’re in trouble—this is XML, and you can’t add Java code in the XML file.
you want to invoke HelloBean, but you’re in trouble—this is XML, and you can’t add Java code in the XML file.
In Camel, the easy way to use beans is to use the <bean> tag at ![]() :
:
<bean ref="helloBean" method="hello"/>
That gives you the following route:
<camelContext id="camel" xmlns="http://camel.apache.org/schema/spring">
    <route>
        <from uri="direct:start"/>
        <bean ref="helloBean" method="hello"/>
    </route>
</camelContext>
Camel offers the same solution when using the Java DSL. You can simplify the route in listing 4.3 like this:
public void configure() throws Exception {
    from("direct:hello").beanRef("helloBean", "hello");
}
That’s a staggering reduction from eight lines of code to one. And on top of that, the one code line is much easier to understand. It’s all high-level abstraction, containing no low-level code details, which were required when using inlined Processors.
You could even omit the hello method, because the bean only has a single method:
public void configure() throws Exception {
    from("direct:hello").beanRef("helloBean");
}
Using the <bean> tag is an elegant solution for working with beans. Without using that tag, you had to use a Camel Processor to invoke the bean, which is a tedious solution.
Tip
In the Java DSL, you don’t have to preregister the bean in the registry. Instead, you can provide the class name of the bean, and Camel will instantiate the bean on startup. The previous example could be written simply as from("direct:hello").bean(HelloBean.class);.
Now let’s look at how you can work with beans in Camel from the EIP perspective.
4.2. The Service Activator pattern
The Service Activator pattern is an enterprise pattern described in Hohpe and Woolf’s Enterprise Integration Patterns book (http://www.enterpriseintegrationpatterns.com/). It describes a service that can be invoked easily from both messaging and non-messaging services. Figure 4.1 illustrates this principle.
Figure 4.1. The service activator mediates between the requestor and the POJO service.
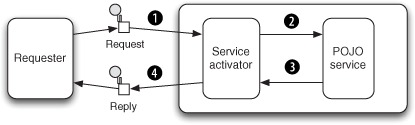
Figure 4.1 shows a service activator component that invokes a service based on an incoming request and returns an outbound reply. The
service activator acts as a mediator between the requester and the POJO service. The requester sends a request to the service
activator ![]() , which is responsible for adapting the request to a format the POJO service understands (mediating) and passing the request
on to the service
, which is responsible for adapting the request to a format the POJO service understands (mediating) and passing the request
on to the service ![]() . The POJO service then returns a reply to the service activator
. The POJO service then returns a reply to the service activator ![]() , which passes it back (requiring no translation on the way back) to the waiting requester
, which passes it back (requiring no translation on the way back) to the waiting requester ![]()
As you can see in figure 4.1, the service is the POJO and the service activator is something in Camel that can adapt the request and invoke the service. That something is the Camel Bean component, which eventually uses the org.apache.camel.component.bean.BeanProcessor to do the work. We’ll look at how this BeanProcessor works in section 4.4. You should regard the Camel Bean component as the Camel implementation of the Service Activator pattern.
Compare the Service Activator pattern in figure 4.1 to the Camel route example we looked at in section 4.1.3, as illustrated in figure 4.2.
Figure 4.2. Relationship between a Camel route and the Service Activator EIP
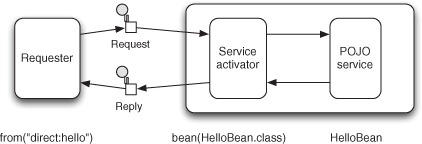
Figure 4.2 shows how the Camel route maps to the Service Activator EIP. The requester is the node that comes before the bean—it’s the from("direct:hello") in our example. The service activator itself is the bean node, which is represented by the BeanProcessor in Camel. And the POJO service is the HelloBean bean itself.
You now know the theory behind how Camel works with beans—the Service Activator pattern. But before you can use a bean, you need to know where to look for it. This is where the registry comes into the picture. Let’s look at how Camel works with different registries.
4.3. Camel’s bean registries
When Camel works with beans, it looks them up in a registry to locate them. Camel’s philosophy is to leverage the best of the available frameworks, so it uses a pluggable registry architecture to integrate them. Spring is one such framework, and figure 4.3 illustrates how the registry works.
Figure 4.3. A requester looks up a bean using the Camel registry, which then uses the Spring ApplicationContext to determine where the bean resides.
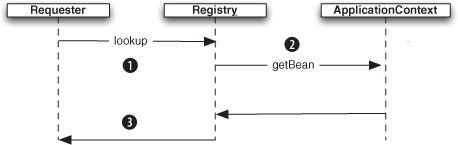
Figure 4.3 shows that the Camel registry is an abstraction that sits between the caller and the real registry. When a requester needs
to look up a bean ![]() , it uses the Camel Registry. The Camel Registry then does the lookup via the real registry
, it uses the Camel Registry. The Camel Registry then does the lookup via the real registry ![]() . The bean is then returned to the requester
. The bean is then returned to the requester ![]() . This structure allows loose coupling but also a pluggable architecture that integrates with multiple registries. All the
requester needs to know is how to interact with the Camel Registry.
. This structure allows loose coupling but also a pluggable architecture that integrates with multiple registries. All the
requester needs to know is how to interact with the Camel Registry.
The registry in Camel is merely a Service Provider Interface (SPI) defined in the org.apache.camel.spi.Registry interface, as follows:
Object lookup(String name);

<T> T lookup(String name, Class<T> type)

<T> Map<String, T> lookupByType(Class<T> type)
You’ll most often use one of the first two methods to look up a bean by its name. For example, to look up the HelloBean, you would do this:
HelloBean hello = (HelloBean) context.getRegistry().lookup("helloBean");
To get rid of that ugly typecast, you can use the second method instead:
HelloBean hello = context.getRegistry()
                      .lookup("helloBean", HelloBean.class);
Note
The second method offers typesafe lookups because you provide the expected class as the second parameter. Under the hood, Camel uses its type-converter mechanism to convert the bean to the desired type, if necessary.
The last method, lookupByType, is mostly used internally by Camel to support convention over configuration—it allows Camel to look up beans by type without knowing the bean name.
The registry itself is an abstraction and thus an interface. Table 4.1 lists the four implementations shipped with Camel.
Table 4.1. Registry implementations shipped with Camel
|
Registry |
Description |
|---|---|
| SimpleRegistry | A simple implementation to be used when unit testing or running Camel in the Google App engine, where only a limited number of JDK classes are available. |
| JndiRegistry | An implementation that uses an existing Java Naming and Directory Interface (JNDI) registry to look up beans. |
| ApplicationContextRegistry | An implementation that works with Spring to look up beans in the Spring ApplicationContext. This implementation is automatically used when you’re using Camel in a Spring environment. |
| OsgiServiceRegistry | An implementation capable of looking up beans in the OSGi service reference registry. This implementation is automatically used when using Camel in an OSGi environment. |
In the following sections, we’ll go over each of these four registries.
4.3.1. SimpleRegistry
The SimpleRegistry is a Map-based registry that’s used for testing or when running Camel standalone.
For example, if you wanted to unit test the HelloBean example, you could use the SimpleRegistry to enlist the HelloBean and refer to it from the route.
Listing 4.4. Using SimpleRegistry to unit test a Camel route

First you create an instance of SimpleRegistry and populate it with HelloBean under the helloBean name ![]() . Then, to use this registry with Camel, you pass the registry as a parameter to the DefaultCamelContext constructor
. Then, to use this registry with Camel, you pass the registry as a parameter to the DefaultCamelContext constructor ![]() . To aid when testing, you create a ProducerTemplate, which makes it simple to send messages to Camel, as can be seen in the test method. Finally, when the test is done, you
clean up the resources by stopping Camel
. To aid when testing, you create a ProducerTemplate, which makes it simple to send messages to Camel, as can be seen in the test method. Finally, when the test is done, you
clean up the resources by stopping Camel ![]() . In the route, you use the beanRef method to invoke HelloBean by the helloBean name you gave it when it was enlisted in the registry
. In the route, you use the beanRef method to invoke HelloBean by the helloBean name you gave it when it was enlisted in the registry ![]() .
.
You can try this test by going to the chapter4/bean directory and running this Maven goal:
mvn test -Dtest=SimpleRegistryTest
Now let’s look at the next registry: JndiRegistry.
4.3.2. JndiRegistry
The JndiRegistry, as its name implies, integrates with a JNDI-based registry. It was the first registry that Camel integrated, so it’s also the default registry if you create a Camel instance without supplying a specific registry, as this code shows:
CamelContext context = new DefaultCamelContext();
The JndiRegistry (like the SimpleRegistry) is often used for testing or when running Camel standalone. Many of the unit tests in Camel use the JndiRegistry because they were created before the SimpleRegistry was added to Camel.
The JndiRegistry is useful when you use Camel together with a Java EE application server that provides a JNDI-based registry out of the box. Suppose you need to leverage the JNDI registry of a WebSphere Application Server—you would have to set up the pieces as follows:

You need to use a Hashtable ![]() to store information about the JNDI registry you wish to use. After this, it’s a matter of creating the javax.naming.Context that the JndiRegistry should use
to store information about the JNDI registry you wish to use. After this, it’s a matter of creating the javax.naming.Context that the JndiRegistry should use ![]() .
.
Camel also allows you to use the JndiRegistry with Spring XML. All you have to do is define it as a Spring bean and Camel will automatically pick it up:
<bean id="registry" class="org.apache.camel.impl.JndiRegistry"/>
You can use the usual Spring lingo to pass the Hashtable parameter in the JndiRegistry constructor.
The next registry is for when you use Spring together with Camel.
4.3.3. ApplicationContextRegistry
The ApplicationContextRegistry is the default registry when Camel is used with Spring. More precisely, it’s the default when you set up Camel in the Spring XML, as this snippet illustrates:
<camelContext id="camel" xmlns="http://camel.apache.org/schema/spring">
    <route>
        <from uri="direct:start"/>
        <bean ref="helloBean" method="hello"/>
    </route>
</camelContext>
Defining Camel using the <camelContext> tag will automatically let Camel use the ApplicationContextRegistry. This registry allows you to define beans in Spring XML files as you would normally do when using Spring. For example, you could define the helloBean bean as follows:
<bean id="helloBean" class="camelinaction.HelloBean"/>
It can hardly be simpler than that. When you use Camel with Spring, you can keep on using Spring beans as you would normally, and Camel will use those beans seamlessly without any configuration.
The final registry applies when you use Camel with OSGi.
4.3.4. OsgiServiceRegistry
When Camel is used in an OSGi environment, Camel uses a two-step lookup process. First, it will look up whether a service with the name exists in the OSGi service registry. If not, Camel will fall back and look up the name in the regular registry, such as the Spring ApplicationContextRegistry.
Suppose you want to expose HelloBean as an OSGi service. You could do it as follows:
<osgi:service id="helloService" interface="camelinaction.HelloBean"
              ref="helloBean"/>

   <bean id="helloBean" class="camelinaction.HelloBean"/>
With help from the osgi:service namespace provided by Spring Dynamic Modules (Spring DM; http://www.springsource.org/osgi), you export the HelloBean into the OSGi registry under the name helloService. You can use the HelloBean from a Camel route the same way you’ve already learned, by referring to its OSG service name:
<camelContext id="camel" xmlns="http://camel.apache.org/schema/spring">
    <route>
        <from uri="direct:start"/>
        <bean ref="helloService" method="hello"/>
    </route>
</camelContext>
It’s that simple. All you have to remember is the name with which the bean was exported. Camel will look it up in the OSGi service registry and the Spring bean container for you. This is convention over configuration.
Note
We’ll look at OSGi again when we cover Camel deployment in chapter 13.
This concludes our tour of registries. Next we’ll focus on how Camel selects which method to invoke on a given bean.
4.4. Selecting bean methods
You’ve seen how Camel works with beans from the route perspective. Now it’s time to dig down and see the moving parts in action. You first need to understand the mechanism Camel uses to selects the method to invoke.
Remember, Camel acts as a service activator using the BeanProcessor, which sits between the caller and the actual bean. At compile time there are no direct bindings, and the JVM can’t link the caller to the bean—Camel must resolve this at runtime.
Figure 4.4 illustrates how the BeanProcessor leverages the registry to look up the bean to invoke.
Figure 4.4. To invoke a bean in Camel, the BeanProcessor looks it up in the registry, selects and adapts a method, invokes it, and passes the returned value as the reply to the Camel exchange.

At runtime, a Camel exchange is routed, and at a given point in the route, it reaches the BeanProcessor. The BeanProcessor then processes the exchange, performing these general steps:
- Looks up the bean in the registry
- Selects the method to invoke on the bean
- Binds to the parameters of the selected method (for example, using the body of the input message as a parameter; this is covered in detail in section 4.5)
- Invokes the method
- Handles any invocation errors that occur (any exceptions thrown from the bean will be set on the Camel exchange for further error handling)
- Sets the method’s reply (if there is one) as the body on the output message on the Camel exchange
We’ve covered how registry lookups are done in section 4.3. The next two steps (steps 2 and 3 in the preceding list) are more complex, and we’ll cover them in the remainder of this chapter. The reason why this is more complex in Camel is because Camel has to compute which bean and method to invoke at runtime, whereas Java code is linked at compile time.
Why is there more than one possible method name when you invoke a method? The answer is that beans can have overloaded methods, and in some cases the method name isn’t specified either, which means Camel has to pick among all methods on the bean.
Suppose you have the following methods:
String echo(String s);
int echo(int number);
void doSomething(String something);
There are a total of three methods for Camel to select among. If you explicitly tell Camel to use the echo method, you’re still left with two methods to choose from. We’ll look at how Camel resolves this dilemma.
We’ll first take a look at the algorithm Camel uses to select the method. Then we’ll look at a couple of examples and see what could go wrong and how to avoid problems.
4.4.1. How Camel selects bean methods
Unlike at compile time, when the Java compiler can link method invocations together, the Camel BeanProcessor has to select the method to invoke at runtime.
Suppose you have the following class:
public class EchoBean {
    String echo(String name) {
        return name + " " + name;
    }
}
At compile time, you can express your code to invoke the echo method like this:
EchoBean echo = new EchoBean();
String reply = echo.echo("Camel");
This will ensure that the echo method is invoked at runtime.
On the other hand, suppose you use the EchoBean in Camel in a route as follows:
from("direct:start").bean(EchoBean.class, "echo").to("log:reply");
When the compiler compiles this code, it can’t see that you want to invoke the echo method on the EchoBean. From the compiler’s point of view, EchoBean.class and "echo" are parameters to the bean method. All the compiler can check is that the EchoBean class exists; if you had misspelled the method name, perhaps typing "ekko", the compiler could not catch this mistake. The mistake would end up being caught at runtime, when the BeanProcessor would throw a MethodNotFoundException stating that the method named ekko does not exists.
Camel also allows you not to explicitly name a method. For example, you could write the previous route as follows:
from("direct:start").bean(EchoBean.class).to("log:reply");
Regardless of whether the method name is explicitly given or not, Camel has to compute which method to invoke. Let’s look at how Camel chooses.
4.4.2. Camel’s method-selection algorithm
The BeanProcessor uses a complex algorithm to select which method to invoke on a bean. You won’t need to understand or remember every step in this algorithm—we simply want to outline what goes on inside Camel to make working with beans as simple as possible for you.
Figure 4.5 shows the first part of this algorithm, and it’s continued in figure 4.6.
Figure 4.5. How Camel selects which method to invoke (part 1, continued in figure 4.6)
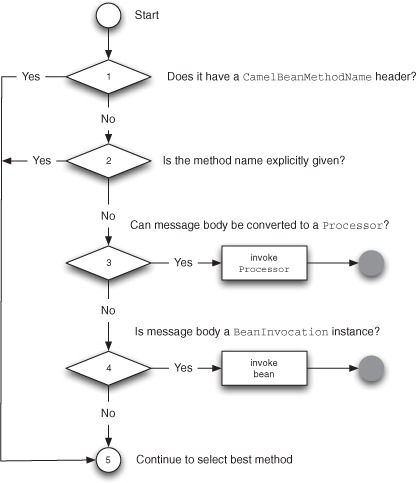
Here’s how the algorithm selects the method to invoke:
Figure 4.6. How Camel selects which method to invoke (part 2, continued from figure 4.5)

1. If the Camel message contains a header with the key CamelBeanMethodName, its value is used as the explicit method name. Go to step 5.
2. If a method is explicitly defined, Camel uses it, as we mentioned at the start of this section. Go to step 5.
3. If the bean can be converted to a Processor using the Camel type-converter mechanism, the Processor is used to process the message. This may seem a bit odd, but it allows Camel to turn any bean into a message-driven bean equivalent. For example, with this technique Camel allows any javax.jms.MessageListener bean to be invoked directly by Camel without any integration glue. This method is rarely used by end users of Camel, but it can be a useful trick.
4. If the body of the Camel message can be converted into an org.apache. camel.component.bean.BeanInvocation, that’s used to invoke the method and pass the arguments to the bean. This is also rarely used by end users of Camel.
5. Continued in the second part of the algorithm, shown in figure 4.6.
Figure 4.6 is a bit more complex, but its main goal is to narrow down the number of possible methods and select a method if one stands out. Don’t worry if you don’t entirely understand the algorithm; we’ll look at a couple of examples shortly that should make it much clearer.
Let’s continue with the algorithm and cover the last steps:
6. If a method name was given and no methods exist with that name, a MethodNotFoundException exception is thrown.
7. If only a single method has been marked with the @Handler annotation, it’s selected.
8. If only a single method uses any of the other Camel bean parameter-binding annotations, such as @Body, @Header, and so on, it’s selected. (We’ll look at how Camel binds to method parameters using annotations in section 4.5.3.)
9. If, among all the methods on the bean, there’s only one method with exactly one parameter, that method is selected. For example, this would be the situation for the EchoBean bean we looked at in section 4.4.1, which has only the echo method with exactly one parameter. Single parameter methods are preferred because they map easily with the payload from the Camel exchange.
10. Now the computation gets a bit complex. There are multiple candidate methods, and Camel must determine whether there’s a single method that stands out as the best fit. The strategy is to go over the candidate methods and filters out methods that don’t fit. Camel does this by trying to match the first parameter of the candidate method; if the parameter isn’t the same type and it’s not possible to coerce the types, the method is filtered out. In the end, if there is only a single method left, that method is selected.
11. If Camel can’t select a method, an AmbigiousMethodCallException exception is thrown with a list of ambiguous methods.
Clearly Camel goes through a lot to select the method to invoke on your bean. Over time you’ll learn to appreciate all this—it’s convention over configuration to the fullest.
Note
The algorithm laid out in this book is based on Apache Camel version 2.5. This method-selection algorithm may change in the future to accommodate new features.
Now it’s time to take a look at how this algorithm applies in practice.
4.4.3. Some method-selection examples
To see how this algorithm works, we’ll use the EchoBean from section 4.4.1 as an example, but we’ll add another method to it—the bar method—to better explain what happens when there are multiple candidate methods.
public class EchoBean {

    public String echo(String echo) {
        return echo + " " + eco;
    }
    public String bar() {
        return "bar";
    }
}
And we’ll start with this route:
from("direct:start").bean(EchoBean.class).to("log:reply");
If you send the String message "Camel" to the Camel route, the reply logger will surely output "Camel Camel" as expected. Despite the fact that EchoBean has two methods, echo and bar, only the echo method has a single parameter. This is what step 9 in figure 4.6 ensures—Camel will pick the method with a single parameter if there is only one of them.
To make the example a bit more challenging, let’s change the bar method as follows:
public String bar(String name) {
    return "bar " + name;
}
What do you expect will happen now? You now have two identical method signatures with a single method parameter. In this case, Camel can’t pick one over the other, so it throws an AmbigiousMethodCallException exception, according to step 11 in figure 4.6.
How can you resolve this? One solution would be to provide the method name in the route, such as specifying the bar method:
from("direct:start").bean(EchoBean.class, "bar").to("log:reply");
But there’s another solution that doesn’t involve specifying the method name in the route. You can use the @Handler annotation to select the method. This solution is dealt with in step 7 of figure 4.6. The @Handler is a Camel-specific annotation that you can add to a method. It simply tells Camel to use this method by default.
@Handler
public String bar(String name) {
    return "bar " + name;
}
Now the AmbigiousMethodCallException won’t be thrown because the @Handler annotation tells Camel to select the bar method.
Tip
It’s a good idea either to declare the method name in the route or to use the @Handler annotation. This ensures that Camel picks the method you want, and you won’t be surprised if Camel chooses another method.
Suppose you change EchoBean to include two methods with different parameter types:
public class EchoBean {

    public String echo(String echo) {
        return echo + " " + echo;
    }
    public Integer double(Integer num) {
        return num.intValue() * num.intValue();
    }
}
The echo method works with a String, and the double method with an Integer. If you don’t specify the method name, the BeanProcessor will have to choose between these two methods at runtime.
Step 10 in figure 4.6 allows Camel to be smart about deciding which method stands out. It does so by inspecting the message payloads of two or more candidate methods and comparing those with the message body type, checking whether there is an exact type match in any of the methods.
Suppose you send in a message to the route that contains a String body with the word "Camel". It’s not hard to guess that Camel will pick the echo method, because it works with a String. On the other hand, if you send in a message with the Integer value of 5, Camel will select the double method, because it uses the Integer type.
Despite this, things can still go wrong, so let’s go over a couple of common situations.
4.4.4. Potential method-selection problems
There are a few things that can go wrong when invoking beans at runtime:
- Specified method not found— If Camel can’t find any method with the specified name, a MethodNotFoundException exception is thrown. This only happens when you have explicitly specified the method name.
- Ambiguous method— If Camel can’t single out a method to call, an AmbigiousMethodCallException exception is thrown with a list of the ambiguous methods. This can happen even when an explicit method name was defined because the method could potentially be overloaded, which means the bean would have multiple methods with the same name; only the number of parameters would vary.
- Type conversion failure— Before Camel invokes the selected method, it must convert the message payload to the parameter type required by the method. If this fails, a NoTypeConversionAvailableException exception is thrown.
Let’s take a look at examples of each of these three situations using the following EchoBean:
public class EchoBean {

    public String echo(String name) {
        return name + name;
    }

    public String hello(String name) {
        return "Hello " + name;
    }
}
First, you could specify a method that doesn’t exist by doing this:
<bean ref="echoBean" method="foo"/>
Here you try to invoke the foo method, but there is no such method, so Camel throws a MethodNotFoundException exception.
On the other hand, you could omit specifying the method name:
<bean ref="echoBean"/>
In this case, Camel can’t single out a method to use because both the echo and hello methods are ambiguous. When this happens, Camel throws an AmbigiousMethodCallException exception containing a list of the ambiguous methods.
The last situation that could happen is when the message contains a body that can’t be converted to the type required by the method. Suppose you have the following OrderServiceBean:
public class OrderServiceBean {

    public String handleXML(Document xml) {
        ...
    }
}
And suppose you need to use that bean in this route:
from("jms:queue:orders")
    .beanRef("orderService", "handleXML")
    .to("jms:queue:handledOrders");
The handleXML method requires a parameter to be of type org.w3c.dom.Document, which is an XML type, but what if the JMS queue contains a javax.jms.TextMessage not containing any XML data, but just a plain text message, such as "Camel rocks". At runtime you’ll get the following stracktrace:
Caused by: org.apache.camel.NoTypeConversionAvailableException: No type
converter available to convert from type: java.lang.byte[] to the
required type: org.w3c.dom.Document with value [B@b3e1c9
    at
org.apache.camel.impl.converter.DefaultTypeConverter.mandatoryConvertTo
(DefaultTypeConverter.java:115)
    at
org.apache.camel.impl.MessageSupport.getMandatoryBody(MessageSupport.java
:101)
    ... 53 more
Caused by: org.apache.camel.RuntimeCamelException:
org.xml.sax.SAXParseException: Content is not allowed in prolog.
    at
org.apache.camel.util.ObjectHelper.invokeMethod(ObjectHelper.java:724)
    at
org.apache.camel.impl.converter.InstanceMethodTypeConverter.convertTo
(InstanceMethodTypeConverter.java:58)
    at
org.apache.camel.impl.converter.DefaultTypeConverter.doConvertTo
(DefaultTypeConverter.java:158)
    at
org.apache.camel.impl.converter.DefaultTypeConverter.mandatoryConvertTo
(DefaultTypeConverter.java:113)
    ... 54 more
What happened is that Camel tried to convert the javax.jms.TextMessage to a org. w3c.dom.Document type, but it failed. In this situation, Camel wraps the error and throws it as a NoTypeConverterException exception.
By further looking into this stacktrace, you may notice that the cause of this problem is that the XML parser couldn’t parse the data to XML. It reports, “Content is not allowed in prolog,” which is a common error indicating that the XML declaration (<?xml version="1.0"?>) is missing.
You may wonder what would happen if such a situation occurred at runtime. In this case, the Camel error-handling system would kick in and handle it. Error handling is covered thoroughly in chapter 5.
That’s all you need to know about how Camel selects methods at runtime. Now we need to look at the bean parameter-binding process, which happens after Camel has selected the method.
4.5. Bean parameter binding
In the last section, we covered the process that selects which method to invoke on a bean. This section covers what happens next—how Camel adapts to the parameters on the method signature. Any bean method can have multiple parameters and Camel must somehow pass in meaningful values. This process is known as bean parameter binding.
We’ve already seen parameter binding in action in the many examples so far in this chapter. What those examples had in common was using a single parameter to which Camel bound the input message body. Figure 4.7 illustrates this using EchoBean as an example.
Figure 4.7. How BeanProcessor binds the input message to the first parameter of the method being invoked

The BeanProcessor uses the input message ![]() to bind its body to the first parameter of the method
to bind its body to the first parameter of the method ![]() , which happens to be the String name parameter. Camel does this by creating an expression that type-converts the input message body to the String type. This ensures that when Camel invokes the echo method
, which happens to be the String name parameter. Camel does this by creating an expression that type-converts the input message body to the String type. This ensures that when Camel invokes the echo method ![]() , the parameter matches the expected type.
, the parameter matches the expected type.
This is important to understand, because most beans have methods with a single parameter. The first parameter is expected to be the input message body, and Camel will automatically convert the body to the same type as the parameter.
So what happens when a method has multiple parameters? That’s what we’ll look at in the remainder of the chapter.
4.5.1. Binding with multiple parameters
Figure 4.8 illustrates the principle of bean parameter binding when multiple parameters are used.
Figure 4.8. Parameter binding with multiple parameters involves a lot more options than with single parameters.

At first, figure 4.8 may seem a bit overwhelming. Many new types come into play when you deal with multiple parameters. The big box entitled “Bean parameter bindings” contains the following four boxes:
- Camel built-in types— Camel provides special bindings for a series of Camel concepts. We’ll cover them in section 4.5.2.
- Exchange— This is the Camel exchange, which allows binding to the input message, such as its body and headers. The Camel exchange is the source of the values that must be bound to the method parameters. It will be covered in the sections to come.
- Camel annotations— When dealing with multiple parameters, you use annotations to distinguish them. This is covered in section 4.5.3.
- Camel language annotations— This is a less commonly used feature that allows you to bind parameters to languages. It’s ideal when working with XML messages that allow you to bind parameters to XPath expressions. This is covered in section 4.5.4.
Using multiple parameters is more complex than using single parameters. It’s generally a good idea to follow these rules of thumb:
- Use the first parameter as the message body, which may or may not use the @Body annotation.
- Use either a built-in type or add Camel annotations for subsequent parameters.
In our experience, it becomes complicated when multiple parameters don’t follow these guidelines, but Camel will make its best attempt to adapt the parameters to the method signature.
Let’s start by looking at using the Camel built-in types.
4.5.2. Binding using built-in types
Camel provides a set of fixed types that are always bound. All you have to do is declare a parameter of one of the types listed in table 4.2.
Table 4.2. Parameter types that Camel automatically binds
|
Type |
Description |
|---|---|
| Exchange | The Camel exchange. This contains the values that will be bound to the method parameters. |
| Message | The Camel input message. It contains the body that is often bound to the first method parameter. |
| CamelContext | The CamelContext. This can be used in special circumstances when you need access to all Camel’s moving parts. |
| TypeConverter | The Camel type-converter mechanism. This can be used when you need to convert types. We covered the type-converter mechanism in section 3.6. |
| Registry | The bean registry. This allows you to look up beans in the registry. |
| Exception | An exception, if one was thrown. Camel will only bind to this if the exchange has failed and contains an exception. This allows you to use beans to handle errors. |
Let’s look at a couple of examples using the types from table 4.2. First, suppose you add a second parameter that’s one of the built-in types to the echo method:
public string echo(String echo, CamelContext context)
In this example, you bind the CamelContext, which gives you access to all the moving parts of Camel.
Or you could bind the registry, in case you need to look up some beans:
public string echo(String echo, Registry registry) {
   OtherBean other = registry.lookup("other", OtherBean.class);
   ...
}
You aren’t restricted to having only one additional parameter; you can have as many as you like. For example, you could bind both the CamelContext and the registry:
public string echo(String echo, CamelContext context, Registry registry)
So far, you’ve always bound to the message body; how would you bind to a message header? The next section will explain that.
4.5.3. Binding using Camel annotations
Camel provides a range of annotations to help bind from the exchange to bean parameters. You should use these annotations when you want more control over the bindings. For example, without these annotations, Camel will always try to bind the method body to the first parameter, but with the @Body annotation you can bind the body to any parameter in the method.
Suppose you have the following bean method:
public String orderStatus(Integer customerId, Integer orderId)
And you have a Camel message that contains the following data:
- Body, with the order ID, as a String type
- Header with the customer ID as an Integer type
With the help of Camel annotations, you can bind the Exchange to the method signature as follows:
public String orderStatus(@Header("customerId") Integer customerId,
                          @Body Integer orderId)
Notice how you can use the @Header annotation to bind the message header to the first parameter and @Body to bind the message body to the second parameter.
Table 4.3 lists all the Camel parameter-binding annotations.
Table 4.3. Parameter-binding annotations provided by Camel
|
Description |
|
|---|---|
| @Attachments | Binds the parameter to the message attachments. The parameter must be a java.util.Map type. |
| @Body | Binds the parameter to the message body. |
| @Header(name) | Binds the parameter to the given message header. |
| @Headers | Binds the parameter to all the input headers. The parameter must be a java.util.Map type. |
| @OutHeaders | Binds the parameter to the output headers. The parameter must be a java. util.Map type. This allows you to add headers to the output message. |
| @Property(name) | Binds the parameter to the given exchange property. |
| @Properties | Binds the parameter to all the exchange properties. The parameter must be a java.util.Map type. |
You’ve already seen the first two types in action, so let’s try a couple of examples with the other annotations. For example, you could use @Headers to bind the input headers to a Map type:
public String orderStatus(@Body Integer orderId, @Headers Map headers) {
    Integer customerId = (Integer) headers.get("customerId");
    String customerType = (String) headers.get("customerType");
   ...
}
You would use this when you have many headers, so you don’t have to add a parameter for every single header.
The @OutHeaders annotation is used when you’re working with request-response messaging (also identified as the InOut Message Exchange pattern). @OutHeaders provides direct access to the output message headers, which means you can manipulate these headers directly from the bean. Here’s an example:
public String orderStatus(@Body Integer orderId, @OutHeaders Map headers) {
   ...
   headers.put("status", "APPROVED");
   headers.put("confirmId", "444556");
   return "OK";
}
Notice that you use @OutHeaders as the second parameter. Unlike @Headers, @OutHeaders is empty when the method is invoked. The idea is that you put the headers that you want to preserve in the output message into this map.
Finally, let’s look at Camel’s language annotations, which bind parameters to a language.
4.5.4. Binding using Camel language annotations
Camel provides additional annotations that allow you to use other languages as parameters. This may sound a bit strange, but it will become clearer with an example.
The most common language to use is XPath, which allows you to evaluate XPath expressions on the message body. For example, suppose the message contains the following XML document:
<order customerId="123">
  <status>in progress</status>
</order>
By using XPath expressions, you can extract parts of the document and bind them to parameters, like this:
public void updateStatus(@XPath("/order/@customerId") Integer customerId,
                         @XPath("/order/status/text()") String status)
You can bind as many parameters as you like—the preceding example binds two parameters using the @XPath annotations. You can also mix and match annotations, so you can use @XPath for one parameter and @Header for another.
Table 4.4 lists the language annotations provided in Camel 2.5. In the future, we may add additional languages to Camel, which often also means that a corresponding annotation for bean parameter binding is added as well.
Table 4.4. Camel’s language-based bean binding annotations
|
Annotation |
Description |
Dependency |
|---|---|---|
| @Bean | Invokes a method on a bean | camel-core |
| @BeanShell | Evaluates a bean shell script | camel-script |
| @EL | Evaluates an EL script (unified JSP and JSF scripts) | camel-juel |
| @Groovy | Evaluates a Groovy script | camel-script |
| @JavaScript | Evaluates a JavaScript script | camel-script |
| @MVEL | Evaluates a MVEL script | camel-mvel |
| @OGNL | Evaluates an OGNL script | camel-ognl |
| @PHP | Evaluates a PHP script | camel-script |
| @Python | Evaluates a Python script | camel-script |
| @Ruby | Evaluates a Ruby script | camel-script |
| @Simple | Evaluates a Simple expression (Simple is a built-in language provided with Camel; see appendix A for more details) | camel-core |
| @XPath | Evaluates an XPath expression | camel-core |
| @XQuery | Evaluates an XQuery expression | camel-saxon |
It may seem a bit magical that you can use a @Bean annotation when invoking a method, because the @Bean annotation itself also invokes a method. Let’s try out an example.
Suppose you already have a service that must be used to stamp unique order IDs on incoming orders. The service is implemented as follows.
Listing 4.5. A service that stamps an order ID on an XML document

As you can see, the service creates a new XML attribute with the value of the given order ID ![]() . Then it inserts this attribute in the XML document
. Then it inserts this attribute in the XML document ![]() using the rather clumsy XML API from Java
using the rather clumsy XML API from Java ![]() .
.
To generate the unique order ID, you have the following class:
public final class GuidGenerator {
    public static int generate() {
        Random ran = new Random();
        return ran.nextInt(10000000);
    }
}
(In a real system, you’d generate unique order IDs based on another scheme.)
In Camel, you have the following route that listens for new order files and invokes the service before sending the orders to a JMS destination for further processing:
<bean id="xmlOrderService" class="camelinaction.XmlOrderService"/>

<camelContext id="camel" xmlns="http://camel.apache.org/schema/spring">
    <route>
        <from uri="file://riderautoparts/order/inbox"/>
        <bean ref="xmlOrderService"/>
        <to uri="jms:queue:order"/>
    </route>
</camelContext>
What is missing is the step that generates a unique ID and provides that ID in the handleIncomingOrder method (shown in listing 4.5). To do this, you need to declare a bean in the spring XML file with the ID generator, as follows:
<bean id="guid" class="camelinaction.GuidGenerator"/>
Now you’re ready to connect the last pieces of the puzzle. You need to tell Camel that it should invoke the generate method on the guid bean when it invokes the handleIncomingOrder method from listing 4.5. To do this, you use the @Bean annotation and change the method signature to the following:
public Document handleIncomingOrder(@Body Document xml,
                    @XPath("/order/@customerId") int customerId,
                    @Bean(ref = "guid", method="generate") int orderId);
We’ve prepared a unit test you can use to run this example. Use the following Maven goal from the chapter4/bean directory:
mvn test -Dtest=XmlOrderTest
When it’s running, you should see two log lines that output the XML order before and after the service has stamped the order ID. Here’s an example:
2009-10-28 16:18:58,485 [: FileComponent] INFO  before
Exchange[BodyType:org.apache.camel.component.file.GenericFile,
Body:<order customerId="4444"><item>Camel in action</item></order>]
2009-10-28 16:18:58,564 [: FileComponent] INFO  after
Exchange[BodyType:com.sun.org.apache.xerces.internal.dom.
DeferredDocumentImpl, Body:<order customerId="4444"
orderId="7303381"><item>Camel in action</item></order>]
Here you can see that the second log line has an orderId attribute with the value of 7303381, whereas the first doesn’t. If you run it again, you’ll see a different order ID because it’s a random value. You can experiment with this example, perhaps changing how the order ID is generated.
Using Namespaces with @XPath
In the preceding example the XML order did not include a namespace. When using namespaces the bean parameter binding must include the namespace(s) in the method signature as highlighted:
public Document handleIncomingOrder(
    @Body Document xml,
    @XPath(
        value = "/c:order/@customerId",
namespaces = @NamespacePrefix(
prefix = "c",
uri = "http://camelinaction.com/order")) int customerId,
    @Bean(ref = "guid", method = "generate") int orderId);
The namespace is defined using the @NamespacePrefix annotation embedded in the @XPath annotation. Notice the XPath expression value must use the prefix, which means the expression is changed from /order/@customerId to / c: order/@customerId.
The prefix value isn’t required to be a certain value; instead of c you can use any value you like.
The source code for the book contains this example in the chapter4/bean directory; you can try using the following Maven goal:
mvn test -Dtest=XmlOrderNamespaceTest
If your XML document includes multiple namespaces, you can define those as well in the @XPath annotation as it accepts an array of @NamespacePrefix.
Camel’s rules for bean parameter binding can be summarized as follows:
You’ve seen all there is to bean binding. Camel has a flexible mechanism that adapts to your existing beans, and when you have multiple parameters, Camel provides annotations to bind the parameters properly.
4.6. Summary and best practices
We’ve now covered another cornerstone of using beans with Camel. It’s important that end users of Camel can use the POJO programming model and have Camel easily leverage those beans (POJOs). Beans are just Java code, which is a language you’re likely to feel comfortable using. If you hit a problem that you can’t work around or figure out how to resolve using Camel and EIPs, you can always resort to using a bean and letting Camel invoke it.
We unlocked the algorithm used by Camel to select which method to invoke on a bean. You learned why this is needed—Camel must resolve method selection at runtime, whereas regular Java code can link method invocations at compile time.
We also covered what bean parameter binding is and how you can bind a Camel exchange to any bean method and its parameters. You learned how to use annotations to provide fine-grained control over the bindings, and even how Camel can help bind XPath expressions to parameters, which is a great feature when working with XML messages.
Let’s pull out some of the key practices you should take away from this chapter:
- Use beans. Beans are Java code and they give you all the horsepower of Java.
- Use loose coupling. Prefer using beans that don’t have a strong dependency on the Camel API. Camel is capable of adapting to existing bean method signatures, so you can leverage any existing API you may have, even if it has no dependency on the Camel API. Unit testing is also easier because your beans don’t depend on any Camel API. You can even have developers with no Camel experience develop the beans, and then have developers with Camel experience use those beans.
- Prefer simple method signatures. Camel bean binding is much simpler when method signatures have as few parameters as possible.
- Specify method names. Tell Camel which method you intend to invoke, so Camel doesn’t have to figure this out itself. You can also use @Handler in the bean to tell Camel which method it should pick and use.
- Use bean parameter annotations. Use the powers that the various Camel bean parameter annotations offer.
We’ve now covered three crucial features of integration kits: routing, transformations, and using beans. We’ll now take a leap into another world, one that’s often tackled as an afterthought in integration projects: how to handle situations when things go wrong. We’ve devoted an entire chapter to Camel’s extensive support for error handling.