
Chapter 3. Transforming data with Camel
This chapter covers
- Transforming data using EIPs and Java
- Transforming XML data
- Transforming using well-known data formats
- Writing your own data formats for transformations
- Understanding the Camel type-converter mechanism
In the previous chapter, we covered routing, which is the single most important feature any integration kit must provide. In this chapter, we’ll take a look at the second most important feature: data or message transformation.
Just as in the real world, where people speak different languages, the IT world speaks different protocols. Software engineers regularly need to act as mediators between various protocols when IT systems must be integrated. To address this, the data models used by the protocols must be transformed from one form to another, adapting to whatever protocol the receiver understands. Mediation and data transformation is a key feature in any integration kit, including Camel.
In this chapter, you’ll learn all about how Camel can help you with your data transformation challenges. We’ll start with a brief overview of data transformation in Camel and then look at how you can transform data into any custom format you may have. Then we’ll look at some Camel components that are specialized for transforming XML data and other well-known data formats. We’ll end the chapter by looking into Camel’s type-converter mechanism, which supports implicitly and explicitly type coercing.
After reading this chapter, you’ll know how to tackle any data transformation you’re faced with and which Camel solution to leverage.
3.1. Data transformation overview
Camel provides many techniques for data transformation, and we’ll cover them shortly. But first we’ll start with an overview of data transformation in Camel.
Data transformation is a broad term that covers two types of transformation:
- Data format transformation— The data format of the message body is transformed from one form to another. For example, a CSV record is formatted as XML.
- Data type transformation— The data type of the message body is transformed from one type to another. For example a java.lang.String is transformed into a javax.jms.TextMessage.
Figure 3.1 illustrates the principle of transforming a message body from one form into another. This transformation can involve any combination of format and type transformations. In most cases, the data transformation you’ll face with Camel is format transformation, where you have to mediate between two protocols. Camel has a builtin type-converter mechanism that can automatically convert between types, which greatly reduces the need for end users to deal with type transformations.
Figure 3.1. Camel offers many features for transforming data from one form to another.

Camel has many data-transformation features. We’ll introduce them in the following section, and then look at them one by one. After reading this chapter, you’ll have a solid understanding of how to use Camel to transform your data.
3.1.1. Data transformation with Camel
In Camel, data transformation typically takes places in the six ways listed in table 3.1.
Table 3.1. Six ways data transformation typically takes place in Camel
|
Description |
|
|---|---|
| Data transformation in routes | You can explicitly enforce transformation in the route using the Message Translator or the Content Enricher EIPs. This gives you the power to do data mapping using regular Java code. We’ll cover this in section 3.2. |
| Data transformation using components | Camel provides a range of components for transformation, such as the XSLT component for XML transformation. We’ll dive into this in section 3.3. |
| Data transformation using data formats | Data formats are Camel transformers that come in pairs to transform data back and forth between well-known formats. |
| Data transformation using templates | Camel provides a range of components for transforming using templates, such as Apache Velocity. We’ll look at this in section 3.5. |
| Data type transformation using Camel’s type-converter mechanism | Camel has an elaborate type-converter mechanism that activates on demand. This is convenient when you need to convert from common types such as java.lang.Integer to java.lang.String or even from java.io.File to java.lang.String. Type converters are covered in section 3.6. |
| Message transformation in component adapters | Camel’s many components adapt to various commonly used protocols and, as such, need to be able to transform messages as they travel to and from those protocols. Often these components use a combination of custom data transformations and type converters. This happens seamlessly, and only component writers need to worry about it. We’ll cover writing custom components in chapter 11. |
In this chapter, we’ll cover the first five of the data transformation methods listed in table 3.1. We’ll leave the last one for chapter 11.
3.2. Transforming data using EIPs and Java
Data mapping is the process of mapping between two distinct data models, and it’s a key factor in data integration. There are many existing standards for data models, governed by various organizations or committees. As such, you’ll often find yourself needing to map from a company’s custom data model to a standard data model.
Camel provides great freedom in data mapping because it allows you to use Java code—you aren’t limited to using a particular data mapping tool that at first might seem elegant but that turns out to make things impossible.
In this section, we’ll look at how you can map data using a Processor, which is a Camel API. Camel can also use beans for mapping, which is a good practice, because it allows your mapping logic to be independent of the Camel API.
3.2.1. Using the Message Translator EIP
The Message Translator EIP is illustrated in figure 3.2.
Figure 3.2. In the Message Translator EIP, an incoming message goes through a translator and comes out as a translated message.
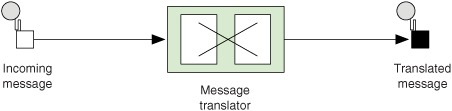
This pattern covers translating a message from one format to another. It’s the equivalent of the Adapter pattern from the Gang of Four book.
Note
The Gang of Four book is Design Patterns: Elements of Reusable Object-Oriented Software by Erich Gamma, Richard Helm, Ralph Johnson, and John Vlissides. See the “Design Patterns” Wikipedia article for more information: http://en.wikipedia.org/wiki/Design_Patterns_(book).
Camel provides three ways of using this pattern:
- Using a Processor
- Using beans
- Using <transform>
We’ll look at them each in turn.
Transforming Using a Processor
The Camel Processor is an interface defined in org.apache.camel.Processor with a single method:
public void process(Exchange exchange) throws Exception;
The Processor is a low-level API where you work directly on the Camel Exchange instance. It gives you full access to all Camel’s moving parts from the CamelContext, which you can obtain Exchange using the getCamelContext method.
Let’s look at an example. At Rider Auto Parts you’ve been asked to generate daily reports of newly received orders to be outputted to a CSV file. The company uses a custom format for order entries, but to make things easy, they already have an HTTP service that returns a list of orders for whatever date you input. The challenge you face is mapping the returned data from the HTTP service to a CSV format and writing the report to a file.
Because you want to get started on a prototype quickly, you decide to use the Camel Processor.
Listing 3.1. Using a Processor to translate from a custom format to CSV format
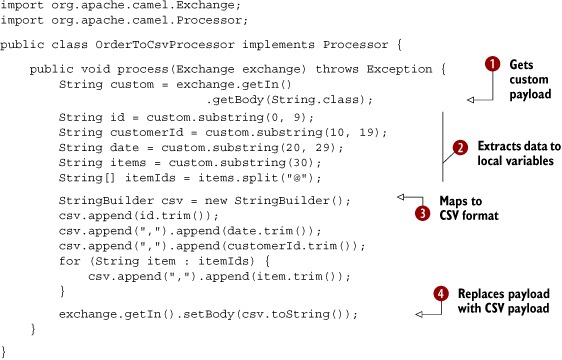
First you grab the custom format payload from the exchange ![]() . It’s a String type, so you pass String in as the parameter to have the payload returned as a String. Then you extract data from the custom format to the local variables
. It’s a String type, so you pass String in as the parameter to have the payload returned as a String. Then you extract data from the custom format to the local variables ![]() . The custom format could be anything, but in this example it’s a fixed-length custom format. Then you map the CSV format
by building a string with comma-separated values
. The custom format could be anything, but in this example it’s a fixed-length custom format. Then you map the CSV format
by building a string with comma-separated values ![]() . Finally, you replace the custom payload with your new CSV payload
. Finally, you replace the custom payload with your new CSV payload ![]() .
.
You can use the OrderToCsvProcessor from listing 3.1 in a Camel route as follows:
from("quartz://report?cron=0+0+6+*+*+?")
    .to("http://riders.com/orders/cmd=received&date=yesterday")
    .process(new OrderToCsvProcessor())
    .to("file://riders/orders?fileName=report-${header.Date}.csv");
The preceding route uses Quartz to schedule a job to run once a day at 6 a.m. It then invokes the HTTP service to retrieve the orders received yesterday, which are returned in the custom format. Next, it uses OrderToCSVProcessor to map from the custom format to CSV format before writing the result to a file.
The equivalent route in Spring XML is as follows:
<bean id="csvProcessor" class="camelinaction.OrderToCsvProcessor"/>
<camelContext xmlns="http://camel.apache.org/schema/spring">
<route>
<from uri="quartz://report?cron=0+0+6+*+*+?"/>
<to uri="http://riders.com/orders/cmd=received&date=yesterday"/>
<process ref="csvProcessor"/>
<to uri="file://riders/orders?fileName=report-${header.Date}.csv"/>
</route>
</camelContext>
You can try this example yourself—we’ve provided a little unit test with the book’s source code. Go to the chapter3/transform directory, and run these Maven goals:
mvn test -Dtest=OrderToCsvProcessorTest
mvn test -Dtest=SpringOrderToCsvProcessorTest
After the test runs, a report file is written in the target/orders/received directory.
The Camel Exchange defines two methods for retrieving messages: getIn and getOut. The getIn method returns the incoming message, and the getOut method accesses the outbound message.
There are two scenarios where the Camel end user will have to decide among using these methods:
- A read-only scenario, such as when you’re logging the incoming message
- A write scenario, such as when you’re transforming the message
In the second scenario, you’d assume getOut should be used. That’s correct according to theory, but in practice there’s a common pitfall when using getOut: the incoming message headers and attachments will be lost. This is often not what you want, so you must copy the headers and attachments from the incoming message to the outgoing message, which can be tedious. The alternative is to set the changes directly on the incoming message using getIn, and not to use getOut at all. This is the practice we use in this book.
Using a processor has one disadvantage: you’re required to use the Camel API. In the next section, we’ll look at how to avoid this by using a bean.
Transforming Using Beans
Using beans is a great practice because it allows you to use any Java code and library you wish. Camel imposes no restrictions whatsoever. Camel can invoke any bean you choose, so you can use existing beans without having to rewrite or recompile them.
Let’s try using a bean instead of a Processor.
Listing 3.2. Using a bean to translate from a custom format to CSV format
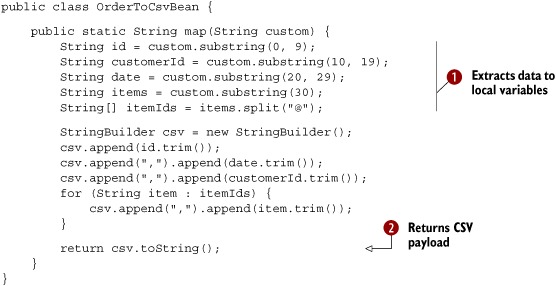
The first noticeable difference between listings 3.1 and 3.2 is that listing 3.2 doesn’t use any Camel imports. This means your bean is totally independent of the Camel API. The next difference is that you can name the method signature in listing 3.2—in this case it’s a static method named map.
The method signature defines the contract, which means that the first parameter, (String custom), is the message body you’re going to use for translation. The method returns a String, which means the translated data will be a String type. At runtime, Camel binds to this method signature. We won’t go into any more details here; we’ll cover much more about using beans in chapter 4.
The actual mapping ![]() is the same as with the processor. At the end, you return the mapping output
is the same as with the processor. At the end, you return the mapping output ![]() .
.
You can use OrderToCsvBean in a Camel route as shown here:
from("quartz://report?cron=0+0+6+*+*+?")
    .to("http://riders.com/orders/cmd=received&date=yesterday")
    .bean(new OrderToCsvBean())
    .to("file://riders/orders?fileName=report-${header.Date}.csv");
The equivalent route in Spring XML is as follows:
<bean id="csvBean" class="camelinaction.OrderToCsvBean"/>
<camelContext xmlns="http://camel.apache.org/schema/spring">
<route>
<from uri="quartz://report?cron=0+0+6+*+*+?"/>
<to uri="http://riders.com/orders/cmd=received&date=yesterday"/>
<bean ref="csvBean"/>
<to uri="file://riders/orders?fileName=report-${header.Date}.csv"/>
</route>
</camelContext>
You can try this example from the chapter3/transform directory by using the following Maven goals:
mvn test -Dtest=OrderToCsvBeanTest
mvn test -Dtest=SpringOrderToCsvBeanTest
It will generate a test report file in the target/orders/received directory.
Another advantage of using beans over processors for mappings is that unit testing is much easier. For example, listing 3.2 doesn’t require the use of Camel at all, as opposed to listing 3.1 where you need to create and pass in an Exchange instance.
We’ll leave the beans for now, because they’re covered extensively in the next chapter. But you should keep in mind that beans are very useful for doing message transformation.
Transforming Using the Transform() Method from the Java DSL
Transform() is a method in the Java DSL that can be used in Camel routes to transform messages. By allowing the use of expressions, transform() permits great flexibility, and using expressions directly within the DSL can sometimes save time. Let’s look at a little example.
Suppose you need to prepare some text for HTML formatting by replacing all line breaks with a <br/> tag. This can be done with a built-in Camel expression that searches and replaces using regular expressions:
from("direct:start")
    .transform(body().regexReplaceAll("
", "<br/>"))
    .to("mock:result");
What this route does is use the transform() method to tell Camel that the message should be transformed using an expression. Camel provides what is know as the Builder pattern to build expressions from individual expressions. This is done by chaining together method calls, which is the essence of the Builder pattern.
Note
For more information on the Builder pattern, see the Wikipedia article: http://en.wikipedia.org/wiki/Builder_pattern.
In this example, you combine body() and regexReplaceAll(). The expression should be read as follows: take the body and perform a regular expression that replaces all new lines ( ) with <br/> tags. Now you’ve combined two methods that conform to a compound Camel expression.
You can run this example from chapter3/transform directly by using the following Maven goal:
mvn test -Dtest=TransformTest
The example here uses the Direct component (http://camel.apache.org/direct) as the input source for the route (from("direct:start")). The Direct component provides direct invocation between a producer and a consumer. It only allows connectivity from within Camel, so external systems can’t send messages directly to it. This component is used within Camel to do things such as link routes together or for testing.
Camel also allows you to use custom expressions. This is useful when you need to be in full control and have Java code at your fingertips. For example, the previous example could have been implemented as follows:
from("direct:start")
    .transform(new Expression() {
        public <T> T evaluate(Exchange exchange, Class<T> type) {
            String body = exchange.getIn().getBody(String.class);
            body = body.replaceAll("
", "<br/>");
            body = "<body>" + body + "</body>";
            return (T) body;
        }
    })
    .to("mock:result");
As you can see, this code uses an inlined Camel Expression that allows you to use Java code in its evaluate method. This follows the same principle as the Camel Processor you saw before.
Now let’s see how you can transform data using Spring XML.
Transforming Using <Transform> from Spring XML
Using <transform> from Spring XML is a bit different than from Java DSL because the XML DSL isn’t as powerful. In Spring XML, the Builder pattern expressions aren’t available because with XML you don’t have a real programming language underneath. What you can do instead is invoke a method on a bean or use scripting languages.
Let’s see how this works. The following route uses a method call on a bean as the expression:
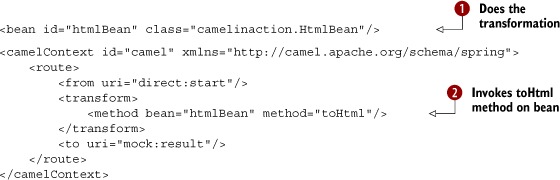
First, you declare a regular spring bean to be used to transform the message ![]() . Then, in the route, you use <transform> with a <method> call expression to invoke the bean
. Then, in the route, you use <transform> with a <method> call expression to invoke the bean ![]() .
.
The implementation of the htmlBean is very straightforward:
public class HtmlBean {
    public static String toHtml(String body) {
        body = body.replaceAll("
", "<br/>");
        body = "<body>" + body + "</body>";
        return body;
    }
}
You can also use scripting languages as expressions in Camel. For example, you can use Groovy, MVEL, JavaScript, or Camel’s own scripting language, called Simple (explained in some detail in appendix A). We won’t go in detail on how to use the other scripting languages at this point, but the Simple language can be used to build strings using placeholders. It pretty much speaks for itself—I’m sure you’ll understand what the following transformation does:
<transform>
    <simple>Hello ${body} how are you?</simple>
</transform>
You can try the Spring transformation examples provided in the book’s source code by running the following Maven goals from the chapter3/transform directory:
mvn test -Dtest= SpringTransformMethodTest
mvn test -Dtest= SpringTransformScriptTest
They’re located in the chapter3/transform directory and are named SpringTransformMethodTest and SpringTransformScriptTest.
We’re done covering the Message Translator EIP, so let’s look at the related Content Enricher EIP.
3.2.2. Using the Content Enricher EIP
The Content Enricher EIP is illustrated in figure 3.3. This pattern documents the scenario where a message is enriched with data obtained from another resource.
Figure 3.3. In the Content Enricher EIP, an existing message has data added to it from another source.

To help understand this pattern, we’ll turn back to Rider Auto Parts. It turns out that the data mapping you did in listing 3.1 wasn’t sufficient. Orders are also piled up on an FTP server, and your job is to somehow merge this information into the existing report. Figure 3.4 illustrates the scenario.
Figure 3.4. An overview of the route that generates the orders report, now with the content enricher pulling in data from an FTP server

In figure 3.4, a scheduled consumer using Quartz starts the route every day at 6 a.m. ![]() . It then pulls data from an HTTP server, which returns orders in a custom format
. It then pulls data from an HTTP server, which returns orders in a custom format ![]() , which is then transformed into CSV format
, which is then transformed into CSV format ![]() . At this point, you have to perform the additional content enrichment step
. At this point, you have to perform the additional content enrichment step ![]() with the data obtained from the FTP server
with the data obtained from the FTP server ![]() . After this, the final report is written to the file server
. After this, the final report is written to the file server ![]() .
.
Before we dig into the code and see how to implement this, we need to take a step back and look at how the Content Enricher EIP is implemented in Camel. Camel provides two operations in the DSL for implementing the pattern:
- pollEnrich—This operation merges data retrieved from another source using a consumer.
- enrich—This operation merges data retrieved from another source using a producer.
The difference between pollEnrich and enrich is that the former uses a consumer and the latter a producer to retrieve data from the source. Knowing the difference is important: the file component can be used with both, but using enrich will write the message content as a file; using pollEnrich will read the file as the source, which is most likely the scenario you’ll be facing when enriching with files. The HTTP component only works with enrich; it allows you to invoke an external HTTP service and use its reply as the source.
Camel uses the org.apache.camel.processor.AggregationStrategy interface to merge the result from the source with the original message, as follows:
Exchange aggregate(Exchange oldExchange, Exchange newExchange);
This aggregate method is a callback that you must implement. The method has two parameters: the first, named oldExchange, contains the original exchange; the second, newExchange, is the enriched source. Your task is to enrich the message using Java code and return the merged result. This may sound a bit confusing, so let’s see it in action.
To solve the problem at Rider Auto Parts, you need to use pollEnrich because it’s capable of polling a file from an FTP server.
Enriching Using Pollenrich
Listing 3.3 shows how you can use pollEnrich to retrieve the additional orders from the remote FTP server and aggregate this data with the existing message using Camel’s AggregationStrategy.
Listing 3.3. Using pollEnrich to merge additional data with an existing message

The route is triggered by Quartz to run at 6 a.m. every day. You invoke the HTTP service to retrieve the orders and transform them to CSV format using a processor.
At this point, you need to enrich the existing data with the orders from the remote FTP server. This is done by using pollEnrich ![]() , which consumes the remote file.
, which consumes the remote file.
To merge the data, you use AggregationStrategy ![]() . First, you check whether any data was consumed or not. If newExchange is null, there is no remote file to consume, and you just return the existing data. If there is a remote file, you merge the data
by concatenating the existing data with the new data and setting it back on the oldExchange. Then, you return the merged data by returning the oldExchange. To write the CSV report file, you use the file component
. First, you check whether any data was consumed or not. If newExchange is null, there is no remote file to consume, and you just return the existing data. If there is a remote file, you merge the data
by concatenating the existing data with the new data and setting it back on the oldExchange. Then, you return the merged data by returning the oldExchange. To write the CSV report file, you use the file component ![]() .
.
PollEnrich uses a polling consumer to retrieve messages, and it offers three timeout modes:
- pollEnrich(timeout = -1)—Polls the message and waits until a message arrives. This mode will block until a message exists.
- pollEnrich(timeout = 0)—Immediately polls the message if any exists; otherwise null is returned. It will never wait for messages to arrive, so this mode will never block. This is the default mode.
- pollEnrich(timeout > 0)—Polls the message, and if no message exists, it will wait for one, waiting at most until the timeout triggers. This mode will potentially block.
It’s a best practice to either use timeout = 0 or to assign a timeout value when using pollEnrich to avoid waiting indefinitely if no message arrives.
Neither enrich nor pollEnrich can leverage any information from the current exchange. This means, for example, that you can’t store a filename header on the exchange for pollEnrich to use to select a particular file. This may change in the future if the Camel team can find a solution.
Now let’s take a quick look at how to use enrich with Spring XML; it’s a bit different than when using the Java DSL.
Enriching Using Enrich
Enrich is used when you need to enrich the current message with data from another source using request-response messaging. A prime example would be to enrich the current message with the reply from a web service call. But we’ll look at another example, using Spring XML to enrich the current message using the TCP transport:

Here you use the Camel mina component for TCP transport, configured to use request-response messaging by using sync=true option. To merge the original message with data from the remote server, <enrich> must refer to an AggregationStrategy. This is done using the strategyRef attribute. As you can see in the example, the quoteStrategy being referred to is a bean id ![]() , which contains the actual implementation of the AggregationStrategy, where the merging takes place.
, which contains the actual implementation of the AggregationStrategy, where the merging takes place.
You’ve seen a lot about how to transform data in Camel, using Java code for the actual transformations. Now let’s take a peek into the XML world and look at the XSLT component, which is used for transforming XML messages using XSLT stylesheets.
3.3. Transforming XML
Camel provides two ways to perform XML transformations:
- XSLT component— For transforming an XML payload into another format using XSLT stylesheets
- XML marshaling— For marshaling and unmarshaling objects to and from XML
Both of these will be covered in following sections.
3.3.1. Transforming XML with XSLT
XSL Transformations (XSLT) is a declarative XML-based language used to transform XML documents into other documents. For example, XSLT can be used to transform XML into HTML for web pages or to transform an XML document into another XML document with a different structure. XSLT is powerful and versatile, but it’s also a complex language that takes time and effort to fully understand and master. Think twice before deciding to pick up and use XSLT.
Camel provides XSLT as a component in camel-spring.jar because it leverages Spring’s resource loading. This means greater flexibility in loading stylesheets because Spring enables them to be loaded from various locations, such as the classpath, file paths, and over HTTP.
Using the XSLT component is straightforward because it’s just another Camel component. The following route shows an example of how you could use it; this route is also illustrated in figure 3.5.
Figure 3.5. A Camel route using an XSLT component to transform an XML document before it’s sent to a JMS queue

from("file://rider/inbox")
    .to("xslt://camelinaction/transform.xsl")
    .to("activemq:queue:transformed")
The file consumer picks up new files and routes them to the XSLT component, which transforms the payload using the stylesheet. After the transformation, the message is routed to a JMS producer, which sends the message to the JMS queue. Notice in the preceding code how the URL for the XSLT component is defined: xslt://camelinaction/transform.xsl. The part after the scheme is the URI location of the stylesheet to use. Camel will look in the classpath by default.
As mentioned before, the Camel XSLT component leverages Spring to load the stylesheet. You can prefix the resource name with any of the three prefixes listed in table 3.2.
Table 3.2. Prefixes supported by the XSLT component for loading stylesheets
|
Prefix |
Example |
Description |
|---|---|---|
| <none> | xslt://camelinaction/transform.xsl | If no prefix is provided, Camel loads the resource from the classpath |
| classpath: | xslt://classpath:com/mycompany/transform.xml | Loads the resource from the classpath |
| file: | xslt://file:/rider/config/transform.xml | Loads the resource from the filesystem |
| http: | xslt://http://rider.com/styles/transform.xsl | Loads the resource from an URL |
Let’s leave the XSLT world now and take a look at how you can do XML-to-object marshaling with Camel.
3.3.2. Transforming XML with object marshaling
Any software engineer who has worked with XML knows that it’s a challenge to use the low-level XML API that Java offers. Instead, people often prefer to work with regular Java objects and use marshaling to transform between Java objects and XML representations.
In Camel, this marshaling process is provided in ready-to-use components known as data formats. We’ll cover data formats in full detail in section 3.4, but we’ll take a quick look at the XStream and JAXB data formats here as we cover XML transformations using marshaling.
Transforming Using XStream
XStream is a simple library for serializing objects to XML and back again. To use it, you need camel-xstream.jar on the classpath and the XStream library itself.
Suppose you need to send messages in XML format to a shared JMS queue, which is then used to integrate two systems. Let’s look at how this can be done.
Listing 3.4. Using XStream to transform a message into XML

When using the XML DSL, you can declare the data formats used at the top ![]() of the <camelContext>. By doing this, you can share the data formats in multiple routes. In the first route, where you send messages to a JMS queue,
you use marshal
of the <camelContext>. By doing this, you can share the data formats in multiple routes. In the first route, where you send messages to a JMS queue,
you use marshal ![]() , which refers to the id from
, which refers to the id from ![]() , so Camel knows that the XStream data format is being used.
, so Camel knows that the XStream data format is being used.
You can also use the XStream data format directly in the route, which can shorten the syntax a bit, like this:
<route>
    <from uri="direct:foo"/>
    <marshal><xstream/></marshal>
    <to uri="activemq:queue:foo"/>
</route>
The same route is a bit shorter to write in the Java DSL, because you can do it with one line per route:
from("direct:foo").marshal().xstream().to("uri:activemq:queue:foo");
Yes, using XStream is that simple. And the reverse operation, unmarshaling from XML to an object, is just as simple:
<route>
    <from uri="activemq:queue:foo"/>
    <unmarshal ref="myXstream"/>
    <to uri="direct:handleFoo"/>
</route>
You’ve now seen how easy it is to use XStream with Camel. Let’s take a look at using JAXB with Camel.
Transforming Using JAXB
JAXB (Java Architecture for XML Binding) is a standard specification for XML binding, and it’s provided out of the box in the Java runtime. Like XStream, it allows you to serialize objects to XML and back again. It’s not as simple, but it does offer more bells and whistles for controlling the XML output. And because it’s distributed in Java, you don’t need any special JAR files on the classpath.
Unlike XStream, JAXB requires that you do a bit of work to declare the binding between Java objects and the XML form. This is often done using annotations. Suppose you define a model bean to represent an order, as shown in listing 3.5, and you want to transform this into XML before sending it to a JMS queue. Then you want to transform it back to the order bean again when consuming from the JMS queue. This can be done as shown in listings 3.5 and 3.6.
Listing 3.5. Annotating a bean with JAXB so it can be transformed to and from XML

Listing 3.5 shows how to use JAXB annotations to decorate your model object (omitting the usual getters and setters). First you define
@XmlRootElement ![]() as a class-level annotation to indicate that this class is an XML element. Then you define the @XmlAccessorType to let JAXB access fields directly. To expose the fields of this model object as XML attributes, you mark them with the @XmlAttribute annotation.
as a class-level annotation to indicate that this class is an XML element. Then you define the @XmlAccessorType to let JAXB access fields directly. To expose the fields of this model object as XML attributes, you mark them with the @XmlAttribute annotation.
Using JAXB, you should be able to marshal a model object into an XML representation like this:
<purchaseOrder name="Camel in Action" price="4995" amount="1"/>
Listing 3.6 shows how you can use JAXB in routes to transform the PurchaseOrder object to XML before it’s sent to a JMS queue, and then back again from XML to the PurchaseOrder object when consuming from the same JMS queue.
Listing 3.6. Using JAXB to serialize objects to and from XML

First you need to declare the JAXB data format ![]() . Note that a contextPath attribute is also defined on the JAXB data format—this is a package name that instructs JAXB to look in this package for
classes that are JAXB-annotated.
. Note that a contextPath attribute is also defined on the JAXB data format—this is a package name that instructs JAXB to look in this package for
classes that are JAXB-annotated.
The first route then marshals to XML ![]() and the second route unmarshals to transform the XML back into the PurchaseOrder object
and the second route unmarshals to transform the XML back into the PurchaseOrder object ![]() .
.
You can try this example by running the following Maven goal from the chapter3/order directory:
mvn test -Dtest=PurchaseOrderJaxbTest
Note
To tell JAXB which classes are JAXB-annotated, you need to drop a special jaxb.index file into the context path. It’s a plain text file in which each line lists the class name. In the preceding example, the file contains a single line with the text PurchaseOrder.
That’s the basis of using XML object marshaling with XStream and JAXB. Both of them are implemented in Camel via data formats that are capable of transforming back and forth between various well-known formats.
3.4. Transforming with data formats
In Camel, data formats are pluggable transformers that can transform messages from one form to another and vice versa. Each data format is represented in Camel as an interface in org.apace.camel.spi.DataFormat containing two methods:
- marshal—For marshaling a message into another form, such as marshaling Java objects to XML, CSV, EDI, HL7, or other well-known data models
- unmarshal—For performing the reverse operation, which turns data from well-known formats back into a message
You may already have realized that these two functions are opposites, meaning that one is capable of reversing what the other has done, as illustrated in figure 3.6. We touched on data formats in section 3.3, where we covered XML transformations. This section will cover data formats in more depth and using other data types than XML, such as CSV and JSON. We’ll even look at how you can create your own data formats.
Figure 3.6. An object is marshaled to a binary representation; unmarshal can be used to get the object back.

We’ll start our journey by briefly looking at the data formats Camel provides out of the box.
3.4.1. Data formats provided with Camel
Camel provides data formats for a range of well-known data models, as listed in table 3.3.
Table 3.3. Data formats provided out of the box with Camel
As you can see, Camel provides 18 data formats out of the box. We’ve picked 3 to cover in the following section. They’re among the most commonly used, and what you learn about those will also apply for the remainder of the data formats. You can read more about all these data formats at the Camel website (http://camel.apache.org/data-format.html).
3.4.2. Using Camel’s CSV data format
The camel-csv data format is capable of transforming to and from CSV format. It leverages Apache Commons CSV to do the actual work.
Suppose you need to consume CSV files, split out each row, and send it to a JMS queue. Sounds hard to do, but it’s possible with little effort in a Camel route:
from("file://rider/csvfiles")
    .unmarshal().csv()
    .split(body()).to("activemq:queue.csv.record");
All you have to do is unmarshal the CSV files, which will read the file line by line and store all lines in the message body as a java.util.List<List> type. Then you use the splitter to split up the body, which will break the java.util.List<List<String>> into rows (each row represented as another List<String> containing the fields) and send each row to the JMS queue. You may not want to send each row as a List type to the JMS queue, so you can transform the row before sending, perhaps using a processor.
The same example in Spring XML is a bit different, as shown here:
<camelContext id="camel" xmlns="http://camel.apache.org/schema/spring">
    <route>
        <from uri="file://rider/csvfiles"/>
        <unmarshal><csv/></unmarshal>
        <split>
            <simple>body</simple>
            <to uri="activemq:queue.csv.record"/>
        </split>
    </route>
</camelContext>
The noticeable difference is how you tell <split> that it should split up the message body. To do this you need to provide <split> with an Expression, which is what the splitter should iterate when it performs the splitting. To do so, you can use Camel’s built-in expression language called Simple (see appendix A), which knows how to do that.
Note
The Splitter EIP is fully covered in section 8.1 of this book.
This example is in the source code for the book in the chapter3/order directory. You can try the examples by running the following Maven goals:
mvn test -Dtest=PurchaseOrderCsvTest
mvn test -Dtest=PurchaseOrderCsvSpringTest
At first, the data types that the CSV data format uses may seem a bit confusing. They’re listed in table 3.4.
Table 3.4. Data types that camel-csv uses when transforming to and from CSV format
|
Operation |
From type |
To type |
Description |
|---|---|---|---|
| marshal | Map<String, Object> | OutputStream | Contains a single row in CSV format |
| marshal | List<Map<String, Object>> | OutputStream | Contains multiple rows in CSV format where each row is separated by (newline) |
| unmarshal | InputStream | List<List<String>> | Contains a List of rows where each row is another List of fields |
One problem with camel-csv is that it uses generic data types, such as Maps or Lists, to represent CSV records. Often you’ll already have model objects to represent your data in memory. Let’s look at how you can use model objects with the camel-bindy component.
3.4.3. Using Camel’s Bindy data format
The two existing CSV-related data formats (camel-csv and camel-flatpack) are older libraries that don’t take advantage of the new features in Java 1.5, such as annotations and generics. In light of this deficiency, Charles Moulliard stepped up and wrote the camel-bindy component to take advantage of these new possibilities. It’s capable of binding CSV, FIX, and fixed-length formats to existing model objects using annotations. This is similar to what JAXB does for XML.
Suppose you have a model object that represents a purchase order. By annotating the model object with camel-bindy annotations, you can easily transform messages between CSV and Java model objects.
Listing 3.7. Model object annotated for CSV transformation

First you mark the class with the @CsvRecord annotation ![]() to indicate that it represents a record in CSV format. Then you annotate the fields with @DataField according to the layout of the CSV record
to indicate that it represents a record in CSV format. Then you annotate the fields with @DataField according to the layout of the CSV record ![]() . Using the pos attribute, you can dictate the order in which they’re outputted in CSV; pos starts with a value of 1. For numeric fields, you can additionally declare precision, which in this example is set to 2, indicating that the price should use two digits for cents. Bindy also has attributes for fine-grained layout of the fields,
such as pattern, trim, and length. You can use pattern to indicate a data pattern, trim to trim the input, and length to restrict a text description to a certain number of characters.
. Using the pos attribute, you can dictate the order in which they’re outputted in CSV; pos starts with a value of 1. For numeric fields, you can additionally declare precision, which in this example is set to 2, indicating that the price should use two digits for cents. Bindy also has attributes for fine-grained layout of the fields,
such as pattern, trim, and length. You can use pattern to indicate a data pattern, trim to trim the input, and length to restrict a text description to a certain number of characters.
Before we look at how to use Bindy in Camel routes, we need to take a step back and look at the data types Bindy expects to use. They’re listed in table 3.5.
Table 3.5. Data types that Bindy uses when transforming to and from CSV format
|
Operation |
From type |
To type |
Output description |
|---|---|---|---|
| marshal | List<Map<String, Object>> | OutputStream | Contains multiple rows in CSV format where each row is separated by a (newline) |
| unmarshal | InputStream | List<Map<String, Object>> | Contains a List of rows where each row contains 1..n data models contained in a Map |
The important thing to notice in table 3.5 is that Bindy uses a Map<String, Object> to represent a CSV row. At first, this may seem odd. Why doesn’t it just use a single model object for that? The answer is that you can have multiple model objects with the CSV record being scattered across those objects. For example, you could have fields 1 to 3 in one model object, fields 4 to 9 in another, and fields 10 to 12 in a third.
The map entry <String, Object> is distilled as follows:
- Map key (String)—Must contain the fully qualified class name of the model object
- Map value (Object)—Must contain the model object
If this seems a bit confusing, don’t worry. The following example should make it clearer.
Listing 3.8. Using Bindy to transform a model object to CSV format

In this listing, you first create and populate the order model using regular Java setters ![]() . Then you send the order model to the route by sending it to the direct:toCsv endpoint
. Then you send the order model to the route by sending it to the direct:toCsv endpoint ![]() that is used in the route. The route will then marshal the order model to CSV using Bindy
that is used in the route. The route will then marshal the order model to CSV using Bindy ![]() . Notice how Bindy is configured to use CSV mode via BindyType.Csv. To let Bindy know how to map to order model object, you need to provide a package name that will be scanned for classes
annotated with Bindy annotations. This is the same solution JAXB offers.
. Notice how Bindy is configured to use CSV mode via BindyType.Csv. To let Bindy know how to map to order model object, you need to provide a package name that will be scanned for classes
annotated with Bindy annotations. This is the same solution JAXB offers.
Note
Listing 3.8 uses MockEndpoint to easily test that the CSV record is as expected. Chapter 6 will covered testing with Camel, and you’ll learn all about using MockEndpoints.
You can try this example from the chapter3/order directory using the following Maven goal:
mvn test –Dtest=PurchaseOrderBindyTest
The source code for the book also contains a reverse example of how to use Bindy to transform a CSV record into a Java object. You can try it by using the following Maven goal:
mvn test –Dtest=PurchaseOrderUnmarshalBindyTest
CSV is only one of the well-known data formats that Bindy supports. Bindy is equally capable of working with fixed-length and FIX data formats, both of which follow the same principles as CSV.
It’s now time to leave CSV and look at a more modern format: JSON.
3.4.4. Using Camel’s JSON data format
JSON (JavaScript Object Notation) is a data-interchange format, and Camel provides two components that support the JSON data format: camel-xstream and camel-jackson. In this section, we’ll focus on camel-jackson because Jackson is a very popular JSON library.
Back at Rider Auto Parts, you now have to implement a new service that returns order summaries rendered in JSON format. Doing this with Camel is fairly easy, because Camel has all the ingredients needed to brew this service. Listing 3.9 shows how you could ramp up a prototype.
Listing 3.9. An HTTP service that returns order summaries rendered in JSON format

First you need to set up the JSON data format and specify that the Jackson library should be used ![]() . Then you define a route that exposes the HTTP service using the Jetty endpoint. This example exposes the Jetty endpoint
directly in the URI. By using http://0.0.0.0:8080/order, you tell Jetty that any client can reach this service on port 8080. Whenever a request hits this HTTP service, it’s routed
to the orderService bean
. Then you define a route that exposes the HTTP service using the Jetty endpoint. This example exposes the Jetty endpoint
directly in the URI. By using http://0.0.0.0:8080/order, you tell Jetty that any client can reach this service on port 8080. Whenever a request hits this HTTP service, it’s routed
to the orderService bean ![]() and the lookup method is invoked on that bean. The result of this bean invocation is then marshaled to JSON format and returned back to
the HTTP client.
and the lookup method is invoked on that bean. The result of this bean invocation is then marshaled to JSON format and returned back to
the HTTP client.
The order service bean could have a method signature such as this:
public PurchaseOrder lookup(@Header(name = "id") String id)
This signature allows you to implement the lookup logic as you wish. You’ll learn more about the @Header annotation in section 4.5.3, when we cover how bean parameter binding works in Camel.
Notice that the service bean can return a POJO that the JSON library is capable of marshaling. For example, suppose you used the PurchaseOrder from listing 3.7, and had JSON output as follows:
{"name":"Camel in Action","amount":1.0,"price":49.95}
The HTTP service itself can be invoked by an HTTP Get request with the id of the order as a parameter: http://0.0.0.0:8080/order/service?id=123.
Notice how easy it is with Camel to bind the HTTP id parameter as the String id parameter with the help of the @Header annotation.
You can try this example yourself from chapter3/order directory by using the following Maven goal.
mvn test –Dtest=PurchaseOrderJSONTest
So far we’ve used data formats with their default settings. But what if you need to configure the data format, such as to use another splitter character with the CSV data format? That’s the topic of the next section.
3.4.5. Configuring Camel data formats
In section 3.4.2, you used the CSV data format, but this data format offers many additional settings. This listing shows how you can configure the CSV data format.
Listing 3.10. Configuring the CSV data format

Configuring data formats in Camel is done using regular Java code; you use the API that the data format provides. In listing 3.10, the CSV data format offers a CSVConfig object ![]() that is used to set the semicolon as a delimiter and to specify the order of the fields. The data format itself is then created
that is used to set the semicolon as a delimiter and to specify the order of the fields. The data format itself is then created ![]() and set to use the configuration. The use of the data format stays the same, so all you need to do is refer to it from the
marshal
and set to use the configuration. The use of the data format stays the same, so all you need to do is refer to it from the
marshal ![]() or unmarshal methods. This same principle applies to all data formats in Camel. You can configure them using the APIs they provide.
or unmarshal methods. This same principle applies to all data formats in Camel. You can configure them using the APIs they provide.
Now that you know how to use data formats, let’s look at how you can write your own data format.
3.4.6. Writing your own data format
You may find yourself needing to transform data to and from a custom data format. In this section, we’ll look at how you can develop a data format that can reverse strings.
Developing your own data format is fairly easy, because Camel provides a single API you must implement: org.apache.camel.spi.DataFormat. Let’s look at how you could implement a string-reversing data format.
Listing 3.11. Developing a custom data format that can reverse strings

The custom data format must implement the DataFormat interface, which forces you to develop two methods: marshal ![]() and unmarshal
and unmarshal ![]() . That’s no surprise, as they’re the same methods you use in the route. The marshal method
. That’s no surprise, as they’re the same methods you use in the route. The marshal method ![]() needs to output the result to the OutputStream. To do this, you need to get the message payload as a byte[], and then reverse it with a helper method. Then you write that data to the OutputStream. Note that you use the Camel type converters to return the message payload as a byte[]. This is very powerful and saves you from doing a manual typecast in Java or trying to convert the payload yourself.
needs to output the result to the OutputStream. To do this, you need to get the message payload as a byte[], and then reverse it with a helper method. Then you write that data to the OutputStream. Note that you use the Camel type converters to return the message payload as a byte[]. This is very powerful and saves you from doing a manual typecast in Java or trying to convert the payload yourself.
The unmarshal method ![]() is nearly the same. You use the Camel type-converter mechanism again to provide the message payload as a byte[]. unmarshal also reverses the bytes to get the data back in its original order. Note that in this method you return the data instead
of writing it to a stream.
is nearly the same. You use the Camel type-converter mechanism again to provide the message payload as a byte[]. unmarshal also reverses the bytes to get the data back in its original order. Note that in this method you return the data instead
of writing it to a stream.
Tip
As a best practice, use the Camel type converters instead of typecasting or converting between types yourself. We’ll cover Camel’s type converters in section 3.6.
To use this new data format in a route, all you have to do is define it as a Spring bean and refer to it from <marshal> and <unmarshal> as follows:
<bean id="reverse" class="camelinaction.ReverseDataFormat"/>

<camelContext id="camel" xmlns="http://camel.apache.org/schema/spring">
    <route>
        <from uri="direct:marshal"/>
        <marshal ref="reverse"/>
        <to uri="log:marshal"/>
    </route>

    <route>
        <from uri="direct:unmarshal"/>
        <unmarshal ref="reverse"/>
        <to uri="log:unmarshal"/>
    </route>
</camelContext>
You’ll find this example in the chapter3/order directory, and you can try it by using the following Maven goal:
mvn test –Dtest=ReverseDataFormatTest
You’ve now learned all about data formats and even how to develop your own. It’s time to say goodbye to data formats and take a look at how you can use templating with Camel for data transformation. Templating is extremely useful when you need to generate automatic reply emails.
3.5. Transforming with templates
Camel provides slick integration with two different template languages:
- Apache Velocity— Probably the best known templating language (http://camel.apache.org/velocity.html)
- FreeMarker— Another popular templating language that may be a bit more advanced than Velocity (http://camel.apache.org/freemarker.html)
These two templating languages are fairly similar to use, so we’ll only discuss Velocity here.
3.5.1. Using Apache Velocity
Rider Auto Parts has implemented a new order system that must send an email reply when a customer has submitted an order. Your job is to implement this feature.
The reply email could look like this:
Dear customer

Thank you for ordering X piece(s) of XXX at a cost of XXX.

This is an automated email, please do not reply.
There are three pieces of information in the email that must be replaced at runtime with real values. What you need to do is adjust the email to use the Velocity template language, and then place it into the source repository as src/test/resources/email.vm:
Dear customer

Thank you for ordering ${body.amount} piece(s) of ${body.name} at a cost of
     ${body.price}.

This is an automated email, please do not reply.
Notice that we’ve inserted ${ } placeholders in the template, which instructs Velocity to evaluate and replace them at runtime. Camel prepopulates the Velocity context with a number of entities that are then available to Velocity. Those entities are listed in table 3.6.
Table 3.6. Entities prepopulated in the Velocity context and that are available at runtime
|
Entity |
Type |
Description |
|---|---|---|
| camelContext | org.apache.camel.CamelContext | The CamelContext. |
| exchange | org.apache.camel.Exchange | The current exchange. |
| in | org.apache.camel.Message | The input message. This can clash with a reserved word in some languages; use request instead. |
| request | org.apache.camel.Message | The input message. |
| body | java.lang.Object | The input message body. |
| headers | java.util.Map | The input message headers. |
| response | org.apache.camel.Message | The output message. |
| out | org.apache.camel.Message | The output message. This can clash with a reserved word in some languages; use response instead. |
Note
The entities in table 3.6 also apply for other templating languages, such as FreeMarker.
Using Velocity in a Camel route is as simple as this:
from("direct:sendMail")
    .setHeader("Subject", constant("Thanks for ordering"))
    .setHeader("From", constant("[email protected]"))
    .to("velocity://rider/mail.vm")
    .to("smtp://mail.riders.com?user=camel&password=secret");
All you have to do is route the message to the Velocity endpoint that’s configured with the template you want to use, which is the rider/mail.vm file that’s loaded from the classpath by default. All the template components in Camel leverage the Spring resource loader, which allows you to load templates from the classpath, file paths, and other such locations. You can use the same prefixes listed in table 3.2.
You can try this example by going to the chapter3/order directory in the book’s source code and running the following Maven goal:
mvn test -Dtest=PurchaseOrderVelocityTest
Tip
For more details on the Camel Velocity component, consult the online documentation (http://camel.apache.org/velocity.html).
We’ll now leave data transformation and look at type conversion. Camel has a powerful type-converter mechanism that removes all need for boilerplate type-converter code.
3.6. About Camel type converters
Camel provides a built-in type-converter system that automatically converts between well-known types. This system allows Camel components to easily work together without having type mismatches. And from the Camel user’s perspective, type conversions are built into the API in many places without being invasive. For example, you used it in listing 3.1:
String custom = exchange.getIn().getBody(String.class);
The getBody method is passed the type you want to have returned. Under the covers, the type-converter system converts the returned type to a String if needed.
In this section, we’ll take a look at the insides of the type-converter system. We’ll explain how Camel scans the classpath on startup to register type converters dynamically. We’ll also show how you can use it from a Camel route, and how to build your own type converters.
3.6.1. How the Camel type-converter mechanism works
To understand the type-converter system, you first need to know what a type converter in Camel is. Figure 3.7 illustrates the relationship between the TypeConverterRegistry and the TypeConverters it holds.
Figure 3.7. The TypeConverterRegistry contains many TypeConverters

The TypeConverterRegistry is where all the type converters are registered when Camel is started. At runtime, Camel uses the TypeConverterRegistry's lookup method to look up a suitable TypeConverter:
TypeConverter lookup(Class<?> toType, Class<?> fromType);
By using the TypeConverter, Camel can then convert one type to another using TypeConverter’s convertTo method, which is defined as follows:
<T> T convertTo(Class<T> type, Object value);
Note
Camel implements about 150 or more type converters out of the box, which are capable of converting to and from the most commonly used types.
Loading Type Converters into the Registry
On startup, Camel loads all the type converters into the TypeConverterRegistry by using a classpath-scanning solution. This allows Camel to pick up not only type converters from camel-core but also from any of the other Camel components, including your Camel applications—you’ll see this in section 3.6.3 when you build your own type converter.
To scan and load the type converters, Camel uses org.apache.camel.impl.converter.AnnotationTypeConverterLoader. To avoid scanning zillions of classes, it reads a service discovery file in the META-INF folder: META-INF/services/org/apache/camel/TypeConverter. This is a plain text file that has a list of packages that contain Camel type converters. The special file is needed to avoid scanning every possible JAR and all their packages, which would be time consuming. This special file tells Camel whether or not the JAR file contains type converters. For example, the file in camel-core contains the following three entries:
org.apache.camel.converter
org.apache.camel.component.bean
org.apache.camel.component.file
The AnnotationTypeConverterLoader will scan those packages and their subpackages for classes that have been annotated with @Converter, and it searches within them for public methods that are annotated with @Converter. Each of those methods is considered a type converter.
This is best illustrated with an example. The following code is a snippet from IOConverter class from camel-core JAR:
@Converter
public final class IOConverter {

    @Converter
    public static InputStream toInputStream(URL url) throws IOException {
        return url.openStream();
    }
}
Camel will go over each method annotated with @Converter and look at the method signature. The first parameter is the from type, and the return type is the to type—in this example you have a TypeConverter that can convert from a URL to an InputStream. By doing this, Camel loads all the built-in type converters, including those from the Camel components in use.
Now that you know how the Camel type converters are loaded, let’s look at using them.
3.6.2. Using Camel type converters
As we mentioned, the Camel type converters are used throughout Camel, often automatically. But you might want to use them to force a specific type to be used in a route, such as before sending data back to a caller or a JMS destination. Let’s look at how to do that.
Suppose you need to route files to a JMS queue using javax.jmx.TextMessage. To do so, you can convert each file to a String, which forces the JMS component to use TextMessage. This is easy to do in Camel—you use the convertBodyTo method, as shown here:
from("file://riders/inbox")
    .convertBodyTo(String.class)
    .to("activemq:queue:inbox");
If you’re using Spring XML, you provide the type as an attribute instead, like this:
<route>
    <from uri="file://riders/inbox"/>
    <convertBodyTo type="java.lang.String"/>
    <to uri="activemq:queue:inbox"/>
</route>
You can omit the java.lang. prefix on the type, which can shorten the syntax a bit:
<convertBodyTo type="String"/>.
Another reason for using convertBodyTo is to read files using a fixed encoding such as UTF-8. This is done by passing in the encoding as the second parameter:
from("file://riders/inbox")
    .convertBodyTo(String.class, "UTF-8")
    .to("activemq:queue:inbox");
Tip
If you have trouble with a route because of the payload or its type, try using .convertBodyTo(String.class) at the start of the route to convert to a String type, which is a well-supported type. If the payload cannot be converted to the desired type, a NoTypeConversionAvailableException exception is thrown.
That’s all there is to using type converters in Camel routes. Before we wrap up this chapter, though, let’s take a look at how you can write your own type converter.
3.6.3. Writing your own type converter
Writing your own type converter is easy in Camel. You already saw what a type converter looks like in section 3.6.1, when we looked at how type converters work.
Suppose you wanted to write a custom type converter that can convert a byte[] into a PurchaseOrder model object (an object you used in listing 3.7). As you saw earlier, you need to create a @Converter class containing the type-converter method.
Listing 3.12. A custom type converter to convert from byte[] to PurchaseOrder type

In listing 3.12, the Exchange gives you access to the CamelContext and thus to the parent TypeConverter ![]() , which you use in this method to convert between strings and numbers. The rest of the code is the logic for parsing the custom
protocol and returning the PurchaseOrder
, which you use in this method to convert between strings and numbers. The rest of the code is the logic for parsing the custom
protocol and returning the PurchaseOrder ![]() . Notice how you can use the converter to easily convert between well-known types.
. Notice how you can use the converter to easily convert between well-known types.
All you need to do now is add the service discovery file, named TypeConverter, in the META-INF directory. As explained previously, this file contains one line identifying each package to be scanned for @Converter classes.
If you cat the magic file, you’ll see this:
cat src/main/resources/META-INF/services/org/apache/camel/TypeConverter
camelinaction
This example can be found in the chapter3/converter directory of the book’s source code, which you can try using the following Maven goal:
mvn test -Dtest=PurchaseOrderConverterTest
And that completes this chapter on transforming data with Camel.
3.7. Summary and best practices
Data transformation is the cornerstone of any integration kit; it bridges the gap between different data types and formats. It’s also essential in today’s industry because more and more disparate systems need to be integrated to support the ever-changing businesses and world we live in.
This chapter covered many of the possibilities Camel offers for data transformation. You learned how to format messages using EIPs and beans. You also learned that Camel provides special support for transforming XML documents using XSLT components and XML-capable data formats. Camel provides data formats for well-known data models, which you learned to use, and it even allows you to build your own data formats. We also took a look into the templating world, which can be used to format data in specialized cases, such as generating email bodies. Finally, we looked at how the Camel type-converter mechanism works and learned that it’s used internally to help all the Camel components work together. You learned how to use it in routes and how to write your own converters.
Here are a few key tips you should take away from this chapter:
- Data transformation is often required. Integrating IT systems often requires you to use different data formats when exchanging data. Camel can act as the mediator and has strong support for transforming data in any way possible. Use the various features in Camel to aid with your transformation needs.
- Java is powerful. Using Java code isn’t a worse solution than using a fancy mapping tool. Don’t underestimate the power of the Java language. Even if it takes 50 lines of grunt boilerplate code to get the job done, you have a solution that can easily be maintained by fellow engineers.
- Prefer to use beans over processors. If you’re using Java code for data transformation, you can use beans or processors. Processors are more dependent on the Camel API, whereas beans allow loose coupling. We’ll cover how to use beans in chapter 4.
In the preceding two chapters, we’ve covered two crucial features of integration kits: routing and transformation. The next chapter dives into the world of beans, and you’ll see how Camel can easily adapt to and leverage your existing beans. This allows a higher degree of reuse and loose coupling, so you can keep your business and integration logic clean and apart from Camel and other middleware APIs.