
Chapter 11. Developing Camel projects
- Creating Camel projects with Maven
- Creating Camel projects in the Eclipse IDE
- Creating custom components
- Creating custom interceptors
- Using Camel in alternative languages
At this point you should know a thing or two about how to develop Camel routes and how to take advantage of many Camel features. But do you know how to best start a Camel project from scratch? You could take an existing example and modify it to fit your use case, but that’s not always ideal. And what if you need to integrate with a system that isn’t supported out of the box by Camel?
In this chapter, we’ll show you how to build your own Camel applications. We’ll go over the Maven archetype tooling that’ll allow you to skip the boring boilerplate project setup and create new Camel projects with a single command. We’ll also show you how to start a Camel project from Eclipse, when you need the extra power that an IDE provides.
After that, we’ll show you how to extend Camel by creating custom components and custom interceptors. Finally, we’ll wrap up by showing you how Camel projects can be created in languages other than Java, like Scala.
11.1. Managing projects with Maven
Camel was built using Apache Maven right from the start, so it makes sense that creating new Camel projects is easiest when using Maven. In this section, we’ll show you Camel’s Maven archetypes, which are preconfigured templates for creating various types of Camel projects. After that, we’ll talk about using Maven dependencies to load Camel modules and their third-party dependencies into your project.
Section 1.2 of chapter 1 has an overview of Apache Maven. If you need a Maven refresher, you might want to review that section before continuing on here.
11.1.1. Using Camel Maven archetypes
Creating Maven-based projects is a pretty simple task. You mainly have to worry about creating a POM file and the various standard directories that you’ll be using in your project. But if you’re creating many projects, this can get pretty repetitive because there’s a lot of boilerplate setup required for new projects.
Archetypes in Maven provide a means to define project templates and generate new projects based on those templates. They make creating new Maven-based projects easy because they create all the boilerplate POM elements, as well as key source and configuration files useful for particular situations.
Note
For more information on Maven archetypes, see the guide on the official Maven website: http://maven.apache.org/guides/introduction/introduction-to-archetypes.html. Sonatype also provides a chapter on archetypes in the freely available Maven: The Complete Reference book: http://www.sonatype.com/books/mvnref-book/reference/archetypes.html.
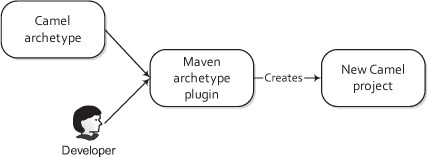
As illustrated in figure 11.1, this is all coordinated by the Maven archetype plugin. This plugin accepts user input and replaces portions of the archetype to form a new project.
Figure 11.1. A Camel archetype and user input are processed by the Maven archetype plugin, which then creates a new Camel project.
To demonstrate how this works, let’s look at the Maven quickstart archetype, which will generate a plain Java application (no Camel dependencies). It’s the default option when you run this command:
mvn archetype:generate
The archetype plugin will ask you various questions, like what groupId and artifactId to use for the generated project. When it’s complete, you’ll have a directory structure similar to this:
myApp
|-- pom.xml
`-- src
    |-- main
    |    `-- java
    |        `-- camelinaction
    |           `-- App.java
     `-- test
         `-- java
             `-- camelinaction
                `-- AppTest.java
In this structure, myApp is the artifactId and camelinaction is the groupId. The archetype plugin created a pom.xml file, a Java source file, and a unit test, all in the proper locations.
Note
Maven follows the convention over configuration paradigm, so locations are very important.
Without any additional configuration, Maven knows that it should compile the Java source under the src/main/java directory and run all unit tests under the src/test/java directory. To kick off this process, you just need to run the following Maven command:
mvn test
If you want to take it a step further, you could tell Maven to create a JAR file after compiling and testing by replacing the test goal with package.
You could start using Camel right from this example project, but it would involve adding Camel dependencies like camel-core, starting up the CamelContext, and creating the routes. Although this wouldn’t take that long, there’s a much quicker solution: you can use one of the six archetypes provided by Camel to generate all this boilerplate Camel stuff for you. Table 11.1 lists these archetypes and their main use cases.
Table 11.1. Camel’s Maven archetypes
|
Archetype name |
Description |
|---|---|
| camel-archetype-activemq | Creates a Camel project that has an embedded Apache ActiveMQ broker. |
| camel-archetype-component | Creates a new Camel component. |
| camel-archetype-java | Creates a Camel project that loads up a CamelContext in Spring and defines a sample route in Java. |
| camel-archetype-scala | Creates a Camel project with a sample route in the Scala DSL. In section 11.5, we’ll talk more about the Scala DSL. |
| camel-archetype-spring | Creates a Camel project that loads up a CamelContext in Spring and defines a sample route in the Spring DSL (similar to camel-archetype-java, but with the route transposed to the Spring DSL). |
| camel-archetype-war | Creates a Camel project that includes the Camel web console, REST API, and a few sample routes as a WAR file. |
Out of these six archetypes, the most commonly used one is probably the camel-archetype-java archetype. We’ll try this out next.
Using the Camel-Archetype-Java Archetype
The camel-archetype-java archetype listed in table 11.1 boots up a Spring-based CamelContext and a Java DSL route. With this, we’ll show you how to re-create the order-routing service for Rider Auto Parts as described in chapter 2. The project will be named order-router and the package name in the source will be camelinaction.
To create the skeleton project for this service, run the following Maven command:
mvn archetype:create
  -DarchetypeGroupId=org.apache.camel.archetypes
  -DarchetypeArtifactId=camel-archetype-java
  -DarchetypeVersion=2.5.0
  -DgroupId=camelinaction
  -DartifactId=order-router
You specify the archetype to use by setting the archetypeArtifactId property to camel-archetype-java. You could replace this with any of the archetype names listed in table 11.1. The archetypeVersion property is set to the version of Camel that you want to use.
The Maven archetype plugin has two main goals: archetype:generate and archetype:create. The generate goal is used when you need an interactive shell, prompting you through what you want to create. You can select the Camel archetypes through this interactive shell as well, so it’s a useful option for developers new to Camel. The create goal is useful when you know what you want to create up front and can enter it all on one command line.
After a few seconds of activity, Maven will have created an order-router subdirectory in the current directory. The order-router directory layout is shown in the following listing.
Listing 11.1. Layout of the project created by camel-archetype-java
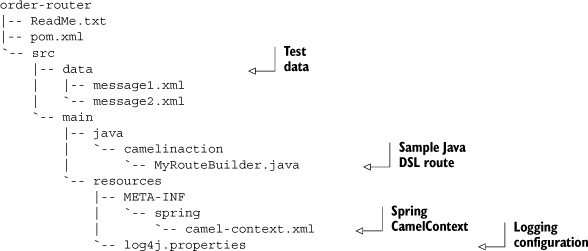
The archetype gives you a runnable Camel project, with a sample route and test data to drive it. The Readme.txt file tells you how to run this sample project: run mvn camel:run. Camel will continue to run until you press Ctrl-C, which causes the context to stop.
While running, the sample route will consume files in the src/data directory and, based on the content, will route them to one of two directories. If you look in the target/messages directory, you should see something like this:
target/messages
|-- others
|    `-- message2.xml
`-- uk
    `-- message1.xml
Now you know that Camel is working on your system, so you can start editing MyRouteBuilder.java to look like the order-router application. You can start by setting up FTP and web service endpoints that route to a JMS queue for incoming orders:
from("ftp://rider@localhost:21000/order?password=secret&delete=true")
  .to("jms:incomingOrders");
from("cxf:bean:orderEndpoint")
  .inOnly("jms:incomingOrders")
  .transform(constant("OK"));
At this point, if you try to run the application again using mvn camel:run, you’ll get the following error message:
Failed to resolve endpoint: ftp://rider@localhost:21000/order?password=secret
     due to: No component found with scheme: ftp
Camel couldn’t find the FTP component because it isn’t on the classpath. You’d get the same error message for the CXF and JMS endpoints. There are, of course, other bits you have to add to your project to make this a runnable application: a test FTP server running on localhost, a CXF configuration, a JMS connection factory, and so on. A complete project is available in the book’s source under chapter11/order-router-full.
For now, we’ll focus on adding component dependencies using Maven.
11.1.2. Camel Maven dependencies
Technically, Camel is just a Java application. To use it, you just need to add its JARs to your project’s classpath. But using Maven to access these JARs will make your life a whole lot easier. Camel itself was developed using Maven for this very reason.
In the previous section, you saw that using an FTP endpoint with only the camel-core module as a dependency won’t work. You need to add the camel-ftp module as a dependency to your project. Back in chapter 7 you saw that this was accomplished by adding the following to the dependencies section of the POM file:
<dependency>
  <groupId>org.apache.camel</groupId>
  <artifactId>camel-ftp</artifactId>
  <version>2.5.0</version>
</dependency>
This dependency element will tell Maven to download the camel-ftp JAR from Maven’s central repository at http://repo2.maven.org/maven2/org/apache/camel/camel-ftp/2.5.0/camel-ftp-2.5.0.jar. This download URL is built up from Maven’s central repository URL (http://repo2.maven.org/maven2) and Maven coordinates (groupId, artifactId, and so on) specified in the dependency element. After the download is complete, Maven will add the JAR to the project’s classpath.
One detail that may not be obvious at first is that this dependency also has transitive dependencies. What are transitive dependencies? Well, in this case you have a project called order-router and you’ve added a dependency on camel-ftp. The camel-ftp module also has a dependency on commons-net, among others. So you can say that commons-net is a transitive dependency of order-router. Transitive dependencies are dependencies that a dependency has—the dependencies of the camel-ftp module, in this case.
When you add camel-ftp as a dependency, Maven will look up camel-ftp’s POM file from the central Maven repository and look at the dependencies it has. Maven will then download and add those dependencies to this project’s classpath.
The camel-ftp module adds a whopping 24 transitive dependencies to our project! Luckily only 5 of them are needed at runtime; the other 19 are used during testing. The 5 transitive runtime dependencies can be viewed as a tree, as shown in figure 11.2.
Figure 11.2. Transitive runtime dependencies of the camel-ftp module. When you add a dependency on camel-ftp to your project, you’ll also get its transitive dependencies added to your classpath. In this case, commons-net, camel-core, commons-logging-api, and jsch are added. Additionally, camel-core has a dependency on commons-management, so that’s added to the classpath as well.
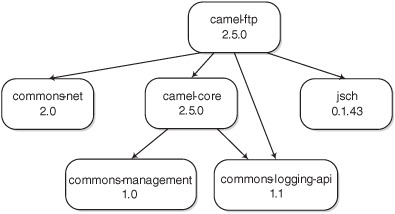
You’re already depending on camel-core in the order-router project, so only two dependencies—commons-net and jsch—are brought in by camel-ftp.
This is a view of only a small number of dependencies, but you can recognize that the dependency tree can get quite complex. Fortunately, Maven finds these dependencies for you and resolves any duplicate dependencies. The bottom line is that when you’re using Maven, you don’t need to worry much about your project’s dependencies.
If you want to know what your project’s dependencies are (including transitive ones), Maven offers the dependency:tree command. To see the dependencies in your project, run the following command:
mvn dependency:tree
After a few seconds of work, Maven will print out a listing like this:
+- org.apache.camel:camel-core:jar:2.5.0:compile
|  +- commons-logging:commons-logging-api:jar:1.1:compile
|  +- org.fusesource.commonman:commons-management:jar:1.0:compile
|  - com.sun:tools:jar:1.5.0:system
+- org.apache.camel:camel-spring:jar:2.5.0:compile
|  +- org.springframework:spring-context:jar:3.0.4.RELEASE:compile
|  |  +- org.springframework:spring-beans:jar:3.0.4.RELEASE:compile
|  |  +- org.springframework:spring-core:jar:3.0.4.RELEASE:compile
|  |  |  - commons-logging:commons-logging:jar:1.1.1:compile
|  |  +- org.springframework:spring-expression:jar:3.0.4.RELEASE:compile
|  |  - org.springframework:spring-asm:jar:3.0.4.RELEASE:compile
|  +- org.springframework:spring-aop:jar:3.0.4.RELEASE:compile
|  |  - aopalliance:aopalliance:jar:1.0:compile
|  - org.springframework:spring-tx:jar:3.0.4.RELEASE:compile
+- org.apache.camel:camel-ftp:jar:2.5.0:compile
|  +- com.jcraft:jsch:jar:0.1.43:compile
|  - commons-net:commons-net:jar:2.0:compile
- log4j:log4j:jar:1.2.16:compile
Here, you can see that Maven is adding 18 JARs to your project’s compile-time classpath, even though you only added camel-core, camel-spring, camel-ftp, and log4j. Some dependencies are coming from several levels deep in the dependency tree.
As you can imagine, adding all these dependencies to your project without the help of Maven would be a bit tedious. If you absolutely must use an alternative build system, you can still use Maven to get the required dependencies for you by following these steps:
1. Download the POM file of the artifact you want. For camel-ftp, this would be http://repo2.maven.org/maven2/org/apache/camel/camel-ftp/2.5.0/camel-ftp-2.5.0.pom.
2. Run mvn -f camel-ftp-2.5.0.pom dependency:copy-dependencies
3. The dependencies for camel-ftp will be located in the target/dependency directory. You can now use these in whatever build system you’re using.
If you absolutely can’t use Maven but would still like to use Maven repos, Apache Ivy (http://ant.apache.org/ivy) is a great dependency management framework for Apache Ant that can download from Maven repos. Other than that, you will have to download the JARs yourself from the Maven central repo.
You now know all you need to develop Camel projects using Maven. To make you an even more productive Camel developer, let’s now look at how you can develop Camel applications inside an IDE, like Eclipse.
11.2. Using Camel in Eclipse
We haven’t mentioned IDEs much so far, mostly because you don’t need an IDE to use Camel. Certainly, though, you can’t match the power and ease of use an IDE gives you. From a Camel point of view, having the Java or Spring DSLs autocomplete for you makes route development a whole lot easier. The common Java debugging facilities and other tools will further improve your experience.
Because Maven is used as the primary build tool for Camel projects, we’ll show you how to use Maven tools to load up your Camel project in Eclipse. In this section, we’ll demonstrate two ways of getting Camel projects into Eclipse: by using the Maven Eclipse plugin and by using the m2eclipse plugin for Eclipse.
11.2.1. Using the Maven Eclipse plugin
The Maven Eclipse plugin can take any Maven-based project and generate an Eclipse project. It allows you to get a Camel project into Eclipse as a plain Java project. It offers a quick way to start Camel development, but you don’t get any frills beyond what a regular Java project would give you.
You can run this plugin on a project by executing the following command in the project’s root directory:
mvn eclipse:eclipse
After this command completes, an Eclipse project will be available, having all the dependencies you listed in your POM as entries in the project’s build path.
If you run this command on the order-router project you created in the previous section, a directory listing will show that you now have three extra files and an additional directory:
order-router/
|-- .classpath
|-- .project
|-- .settings
|   `-- org.eclipse.jdt.core.prefs
|-- ReadMe.txt
|-- pom.xml
|-- src
These are files that Eclipse interprets as a Java project. The next step after this is to import the project into Eclipse. This is an easy task in Eclipse:
- Select File > Import > General > Existing Projects into Workspace.
- In the wizard, select the directory where the project is located, and then select the project name (chapter11-order-router,
in this case) from the list. The wizard dialog box should look something like what’s shown in figure 11.3.
Figure 11.3. Final screen of wizard to import the chapter11-order-router project into Eclipse
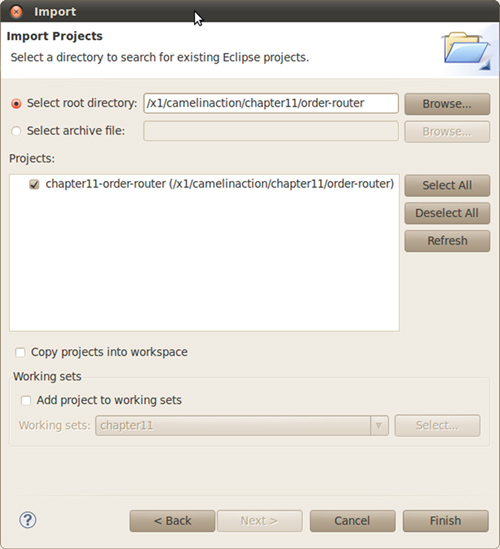
- Click Finish, and your project will be imported into your Eclipse workspace.
If you take a look at the Package Explorer view now, you should see the chapter11-order-router project listed. Figure 11.4 shows an expanded view of what is inside the project. It looks mostly like what you saw from the previous directory listing, but now it includes a list of project dependencies.
Figure 11.4. Package Explorer view of the order-router project
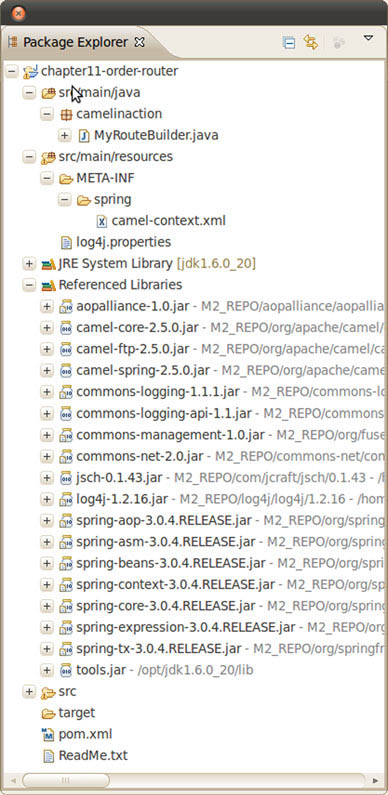
Listed to the right of each project dependency in figure 11.4 are details of where the artifact exists on your local disk. This information contains a variable named M2_REPO, which points to your local Maven repository. This is the area where Maven caches downloaded dependencies so you don’t download these things for every build. This variable needs to be defined for Eclipse to access your project’s dependencies. To specify this, follow these steps:
1. Open up the Preferences dialog box by selecting Window > Preferences.
2. Go to Java > Build Path > Classpath Variables.
3. In the Classpath Variables pane, you need to add a variable named M2_REPO with a path pointing to the directory of your local Maven repo (recall that this is Maven’s local cache of downloaded artifacts). For example, this could be something like /home/janstey/.m2/repository on Linux, C:Documents and Settingsjanstey .m2 epository on Windows XP, or C:Usersjanstey.m2 epository on Windows Vista/7.
From this point on, you can develop as if this project were a regular Java project in Eclipse. But keep in mind when adding new dependencies to your Maven POM that they won’t be automatically added to the Eclipse project. The mvn eclipse:eclipse command will have to be run again and the project will have to be refreshed in the Package Explorer view.
11.2.2. Using the m2eclipse plugin
When using the Maven Eclipse plugin, you’ll find yourself often darting back and forth between Eclipse and the command line. Eclipse will be where you develop, and the command line will be where you build. If you decide instead to use the m2eclipse plugin to develop your Camel project, you’ll experience a much nicer integration with Maven and never have to leave the IDE.
The m2eclipse plugin does add a bit of complexity to development, so in some cases the simpler Maven Eclipse plugin is a better choice. For instance, if you already have a Maven project created, and you know you probably won’t be adding new dependencies, it’s much quicker to use the Maven Eclipse plugin. It will also require a lot less system resources to develop the project in Eclipse.
M2eclipse has had performance issues in the past when you have many projects open at the same time. The recommendation is to turn off automatic building for all projects. This way you can control when builds get kicked off. New versions of the plugin are improving performance all the time, so this may not be an issue in future builds.
To install m2eclipse into your Eclipse runtime, follow the latest instructions at http://m2eclipse.sonatype.org. During the writing of this book, we used m2eclipse version 0.10.2.
One thing that some developers will like right away is that you don’t have to leave the IDE to run Maven command-line tools during development. You can even access the Camel archetypes right from Eclipse. To demonstrate this feature, let’s recreate the chapter11-order-router example we looked at previously.
Click File > New > Maven Project to start up the New Maven Project wizard. Click Next on the first screen, and you’ll be presented with a list of available archetypes, as shown in figure 11.5. This list includes the Camel archetypes.
Figure 11.5. The New Maven Project wizard allows you to generate a new Camel project right in Eclipse.

Using Camel archetypes in this way is equivalent to the technique you used back in section 11.1.1. The m2eclipse plugin will also allow you to add Maven dependencies without having to regenerate your project every time, which can be forgotten if you use the Maven Eclipse plugin.
Note
If you can only see version 2.2.0 of the Camel archetypes, you’ll need to perform a few additional steps. At the time of writing, an error at Maven’s central repository was preventing newer Camel archetypes from being shown in m2eclipse. To get around this you’ll need to do the following:
- Click the menu item Window > Preferences and drill down to Maven > Archetypes.
- Click Add Remote Catalog and enter http://camelinaction.googlecode.com/svn/trunk/misc/archetype-catalog.xml as the catalog file. Click OK and close out the Preferences dialog box.
- When creating a new project as in figure 11.5, make sure to select the catalog you just added.
To run the order-router project with m2eclipse, right-click on the project in the Package Explorer and click Run As > Maven Build. This will bring up an Edit Configuration dialog box where you can specify the Maven goals to use as well as any parameters. For the order-router project, use the camel:run goal, as shown in figure 11.6.
Figure 11.6. Right-clicking on the order-router project in the Package Explorer and clicking Run As > Maven Build will bring up the Edit Configuration dialog box shown here. The camel:run Maven goal has been entered.
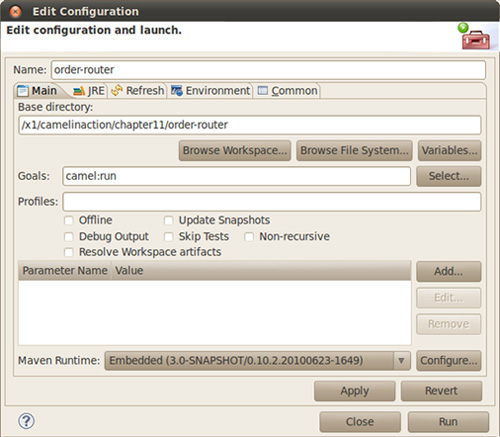
Clicking Run in this dialog box will execute the mvn camel:run command in Eclipse, with console output showing in the Eclipse Console view.
Now you can say that you know how to create Camel projects from the command line and from Eclipse. You’ve also seen the two ways you can develop Camel applications in Eclipse, and the pitfalls of each. These projects only leverage what is built into Camel itself. We’ll now move on to the more advanced topic of extending Camel itself, by developing custom components.
11.3. Developing custom components
For most integration scenarios, there’s a Camel component available to help. Sometimes, though, there’s no Camel component available, and you need to bridge Camel to another transport, API, data format, and so on. You can do this by creating your own custom component.
Creating a Camel component is relatively easy, which may be one of the reasons that custom Camel components frequently show up on other community sites, in addition to the official Camel distribution. In this section, we’ll look at how you can create your own custom component for Camel.
11.3.1. Setting up a new Camel component
Just like a regular Camel project, you can start creating a new component by using a Maven archetype to generate a skeleton project. To create a new Camel component with camelinaction.component as the package name and custom as the artifactId, run the following Maven command:
mvn archetype:create
  -DarchetypeGroupId=org.apache.camel.archetypes
  -DarchetypeArtifactId=camel-archetype-component
  -DarchetypeVersion=2.5.0
  -DgroupId=camelinaction.component
  -DartifactId=custom
This will generate a project structure like that shown here.
Listing 11.2. Layout of a project created by camel-archetype-component

This is a fully functional “Hello World” demo component containing a simple consumer that generates dummy messages at regular intervals, and a producer that prints a message to the console. You can run the test case included with this sample component by running the following Maven command:
mvn test
One of the first things to do when developing a custom component is to decide what endpoint name to use. This name is what
will be used to reference the custom component in an endpoint URI. You need to make sure this name doesn’t conflict with a
component that already exists by checking the online component list (http://camel.apache.org/components.html). For instance, to use mycomponent as the endpoint name, you need to rename the helloworld file ![]() to mycomponent. For an explanation on how this file is used to load Camel components, see section 7.1 in chapter 7.
to mycomponent. For an explanation on how this file is used to load Camel components, see section 7.1 in chapter 7.
You should also rename the skeleton implementation classes ![]() to better match your new component name. The src directory now looks like this:
to better match your new component name. The src directory now looks like this:
src
`-- main
     |-- java
    |    `-- camelinaction
    |        `-- component
    |           |-- MyComponent.java
    |            |-- MyConsumer.java
    |            |-- MyEndpoint.java
    |            `-- MyProducer.java
    |   `-- resources
    |       |-- log4j.properties
    |       `-- META-INF
    |           `-- services
    |               `-- org
    |                   `-- apache
    |                       `-- camel
    |                           `-- component
    |                               `-- mycomponent
     `-- test
        `-- java
             `-- camelinaction
                 `-- component
                    `-- MyComponentTest.java
This project, with the appropriate renaming, is available in the chapter11/custom directory of the book’s source.
When you change the component class name, to MyComponent, for example, you also need to modify the mycomponent file to point to this new class. It should now contain a line like this:
class=camelinaction.component.MyComponent
Your component can now be used in a Camel endpoint URI. But you shouldn’t stop here. To understand how these classes make up a functioning component, you need to understand the implementation details of each.
11.3.2. Diving into the implementation
The four classes that make up a component in Camel have been mentioned several times before. To recap, it all starts with the Component class, which then creates an Endpoint. An Endpoint, in turn, can create Producers and Consumers. This is illustrated in figure 11.7.
Figure 11.7. A Component creates an Endpoint, which then creates Producers and Consumers.

We’ll first look into the Component and Endpoint implementations of the custom MyComponent component.
Component and Endpoint Classes
The first entry point into a Camel component is the class implementing the Component interface. A component’s main job is to be a factory of new endpoints. It does a bit more than this under the hood, but typically you don’t have to worry about these details because they’re contained in the DefaultComponent class.
The component class generated by the camel-archetype-component archetype extends this default class and forms a pretty simple and typical component class structure, as shown here:
public class MyComponent extends DefaultComponent {

    protected Endpoint createEndpoint(
             String uri, String remaining,
             Map<String, Object> parameters) throws Exception {
        Endpoint endpoint = new MyEndpoint(uri, this);
        setProperties(endpoint, parameters);
        return endpoint;
    }
}
This class is pretty straightforward, except perhaps for the way in which properties are set with the setProperties method. This method takes in the properties set in the endpoint URI string, and for each will invoke a setter method on the endpoint through reflection. For instance, say you used the following endpoint URI:
mycomponent:endpointName?prop1=value1&prop2=value2
The setProperties method, in this case, would try to invoke setProp1("value1") and setProp2("value2") on the endpoint. Camel will take care of converting those values to the appropriate type.
The endpoint, itself, is also a relatively simple class, as shown here.
Listing 11.3. Custom Camel endpoint—MyEndpoint

The first thing you’ll notice is that you’re deriving from another default implementation class from camel-core ![]() . In this case, you’re extending the DefaultEndpoint class. It’s very common when creating a new Camel component to have the Component, Endpoint, Consumer, and Producer all derive from default implementations in camel-core. This isn’t necessary, but it makes new component development much
easier, and you always benefit from the latest improvements to the default implementations without having to code them yourself.
. In this case, you’re extending the DefaultEndpoint class. It’s very common when creating a new Camel component to have the Component, Endpoint, Consumer, and Producer all derive from default implementations in camel-core. This isn’t necessary, but it makes new component development much
easier, and you always benefit from the latest improvements to the default implementations without having to code them yourself.
As we mentioned in chapter 7, the Endpoint class acts as a factory for both consumers and producers. In this example, you’re creating both producers ![]() and consumers
and consumers ![]() , which means that this endpoint can be used in a to or from Java DSL method. Sometimes you may need to create a component that only has a producer or consumer, not both. In that case,
it’s recommended that you throw an exception, so users know that it isn’t supported:
, which means that this endpoint can be used in a to or from Java DSL method. Sometimes you may need to create a component that only has a producer or consumer, not both. In that case,
it’s recommended that you throw an exception, so users know that it isn’t supported:
public Producer createProducer() throws Exception {
    throw new UnsupportedOperationException(
      "You cannot send messages to this endpoint:" + getEndpointUri());
}
The real bulk of most components is in the producer and consumer. The Component and Endpoint classes are mostly designed to fit the component into Camel. In the producers and consumers, which we’ll look at next, you have to interface with the remote APIs or marshal data to a particular transport.
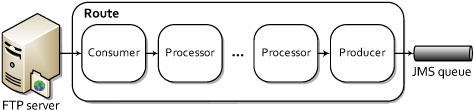
Producers and Consumers
The producer and consumer are where you get to implement how messages will get on or off a particular transport—in effect, bridging Camel to something else. This is illustrated in figure 11.8.
Figure 11.8. A simplified view of a route where the consumer and producer handle interfacing with external systems. Consumers take messages from an external system into Camel, and producers send messages to external systems.
In your skeleton component project that was generated from an archetype, a producer and consumer are implemented and ready to go. These were instantiated by the MyEndpoint class in listing 11.3. The producer, named MyProducer, is shown in this listing.
Listing 11.4. Custom Camel producer—MyProducer
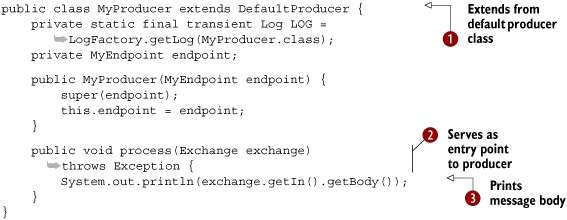
Like the component and endpoint classes, the producer also extends from a default implementation class from camel-core called
DefaultProducer ![]() . The Producer interface extends from the Processor interface, so you use a process method
. The Producer interface extends from the Processor interface, so you use a process method ![]() . As you can probably guess, a producer is called in the same way a processor is, so the entry point into the producer is
the process method.
. As you can probably guess, a producer is called in the same way a processor is, so the entry point into the producer is
the process method.
The sample component that was created automatically has a very basic producer—it just prints the body of the incoming message
to the screen ![]() . If you were sending to an external system instead of the screen, you’d have to handle a lot more here, such as connecting
to a remote system and marshaling data. In the case of data marshaling, it’s often a good idea to implement this using a custom
TypeConverter, as described in chapter 3, which makes the converters available to other parts of your Camel application.
. If you were sending to an external system instead of the screen, you’d have to handle a lot more here, such as connecting
to a remote system and marshaling data. In the case of data marshaling, it’s often a good idea to implement this using a custom
TypeConverter, as described in chapter 3, which makes the converters available to other parts of your Camel application.
You can see how messages could be sent out of a route, but how do they get into a route? Consumers, like the MyConsumer class generated in your custom component project, get the messages into a route. The MyConsumer class is shown in listing 11.5.
Listing 11.5. Custom Camel consumer—MyConsumer

The Consumer interface, itself, doesn’t impose many restrictions or give any guidelines as to how a consumer should behave, but the DefaultConsumer class does, so it’s helpful to extend from this class when implementing your own consumer. In listing 11.5, you extend from a subclass of DefaultConsumer, the ScheduledPollConsumer ![]() . This consumer has a timer thread that will invoke the poll method every 500 milliseconds
. This consumer has a timer thread that will invoke the poll method every 500 milliseconds ![]() .
.
Tip
See the discussion of the Timer and Quartz components in chapter 7 for more information on creating routes that need to operate on a schedule.
Typically, a consumer will either poll a resource for a message or set up an event-driven structure for accepting messages from remote sources. In this example, you have no remote resource, so you can create an empty exchange and populate it with a “Hello World” message. A real consumer still would need to do this.
A common pattern for consumers is something like this:
Exchange exchange = endpoint.createExchange();
// populate exchange with data
getProcessor().process(exchange);
Here you create an empty exchange, populate it with data, and send it to the next processor in the route.
At this point, you should have a good understanding of what is required to create a new Camel component. You may even have a few ideas about what you’d like to bridge Camel to next! Another useful way of extending Camel is by writing custom interceptors. Let’s look at this next.
11.4. Developing interceptors
Interceptors in Camel are used to perform some action on a message as it goes in and out of a processor. Features like the tracer discussed in chapter 12 use a custom interceptor to trace each message going in and out of processors. We also talked about interceptors back in chapter 6, where you used them to simulate errors occurring on a particular endpoint. Convenience methods built into Camel’s DSL were used in that case.
In this section, we’ll look at how you can create your own custom interceptor.
11.4.1. Creating an InterceptStrategy
To create a new interceptor, you need to use the InterceptStrategy interface. By implementing a custom InterceptStrategy, you gain complete control over what the interceptor does.
The InterceptStrategy interface only has a single method:
Processor wrapProcessorInInterceptors(
    CamelContext context,
    ProcessorDefinition<?> definition,
    Processor target,
    Processor nextTarget) throws Exception;
This method essentially wraps each processor within a route with another processor. This wrapper processor will contain the logic you want for your interceptor.
In Camel, InterceptStrategy classes are used to implement a delay after each node in a route, to trace messages as they flow through a route, and to record performance metrics. Figure 11.9 shows a conceptual view of how an InterceptStrategy modifies a route.
Figure 11.9. Applying an InterceptStrategy to a route essentially wraps each processor with an interceptor processor.
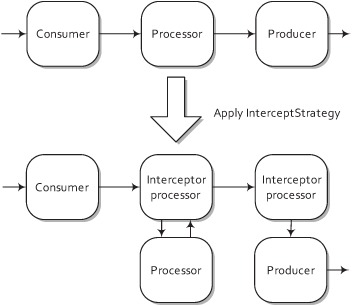
Every processor in the route shown in figure 11.9 is wrapped by an interceptor processor. This work of modifying the route is done automatically when you add the InterceptStrategy to the CamelContext. You can add an InterceptStrategy directly to the CamelContext with a single method call:
context.addInterceptStrategy(new MyInterceptor());
Adding an InterceptStrategy in Spring is also easy. You just add one as a bean, and Camel will automatically find it on startup and add it to the CamelContext. This is all you would need to write:
<bean id="myInterceptor" class="camelinaction.MyInterceptor"/>
What happens if you define more than one strategy? Figure 11.10 shows that in this case Camel will stack the interceptors used for each real processor.
Figure 11.10. Interceptors are stackable, meaning the more InterceptStrategy classes you add to the CamelContext, the more interceptor processors will be added before each real processor is executed.

You may be wondering what an actual interceptor looks like. In the simplest case, you could just log an entry message before the processor and an exit message after the processor has completed. This is demonstrated in listing 11.6.
Listing 11.6. A custom interceptor
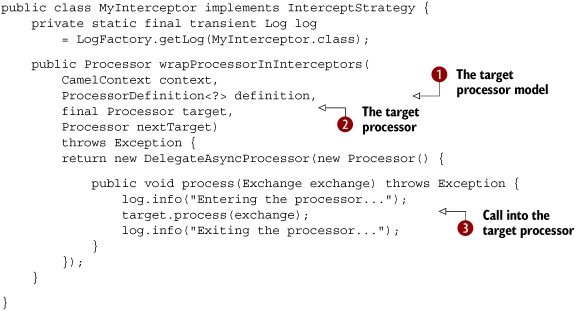
The wrapProcessorInInterceptors method gives the interceptor developer plenty of information to help create a custom interceptor. First off, you have access
to the entire CamelContext, which lets you access many different services, like the bean registry or the many type converters. Next, and most importantly,
you have access to the target processor ![]() that you need to call, and its DSL object equivalent
that you need to call, and its DSL object equivalent ![]() . Why was the DSL object provided? The DSL object provides richer description details than the runtime processor, so if your
interceptor is, for example, graphically reporting the structure of a Camel route as it’s being used, more detailed descriptions
of each node may be helpful.
. Why was the DSL object provided? The DSL object provides richer description details than the runtime processor, so if your
interceptor is, for example, graphically reporting the structure of a Camel route as it’s being used, more detailed descriptions
of each node may be helpful.
It isn’t enforced by the interface, but interceptors are supposed to call the target processor ![]() when they have done their work. After the target processor is finished, the interceptor can do some more work before returning
to the next node in the route. In this way, an interceptor allows you to do operations before and after each processor in
a route.
when they have done their work. After the target processor is finished, the interceptor can do some more work before returning
to the next node in the route. In this way, an interceptor allows you to do operations before and after each processor in
a route.
Sometimes, you don’t want to attach an interceptor to a particular processor. In this case, instead of always returning a wrapped processor, you could return the target processor. This would leave the target processor out of the interceptor scheme.
For example, you could ignore wireTap nodes from the interceptor scheme by using information from the processor’s model class:
if ("wireTap".equals(definition.getShortName())) {
    return target;
} else {
    return new Processor() {
        ...
    };
}
This checks the name of the processor through its DSL object, and if it’s a wire tap, it doesn’t wrap it with an interceptor.
You’ve now seen how to develop custom Camel components and interceptors. Let’s step outside the Java world and see how Camel can be used from other languages.
11.5. Using alternative languages
Throughout this book, we’ve focused on Camel’s two main methods of specifying routing rules: the Java DSL and Spring XML configuration. We did this to focus on the concepts themselves, rather than how they end up being implemented, but Camel does provide advanced users with a number of options for creating routes in other JVM languages. For instance, you can create routes in the Groovy, Scala, and Ruby languages.
The Scala DSL is probably the most mature of the three, having a custom DSL created to take advantage of language features in Scala. The Groovy DSL is well-used too. In fact, another open source project called the Open eHealth Integration Platform (IPF) is a Groovy-based project built on top of Apache Camel.
In this section, we’ll take a look at how you can create Camel applications using Scala. We’ll first look at some of the constructs you can use to create a route in Scala, and then we’ll see how to add these routes to a CamelContext.
11.5.1. The Scala DSL
As you may have assumed, when using the Scala DSL you’re coding in a real programming language—Scala. In this way it’s more comparable to the Java DSL than Spring XML configuration.
Recall the following route from section 11.1.1:
from("ftp://rider@localhost:21000/order?password=secret")
  .to("jms:incomingOrders");
Because this is the Java DSL, it also must be enclosed within a RouteBuilder class as follows:
class MyRouteBuilder extends RouteBuilder {
    public void configure() throws Exception {
        from("ftp://rider@localhost:21000/order?password=secret")
          .to("jms:incomingOrders");
    }
}
This should look pretty familiar to you now—it’s about the simplest Camel route you can get: consuming messages from one endpoint and producing them into another endpoint.
Now let’s see what the Scala version of this route looks like:
class MyRouteBuilder extends RouteBuilder {
   "ftp://rider@localhost:21000/order?password=secret"
 "jms:incomingOrders"
}
It starts off mostly the same as the Java DSL version, with a MyRouteBuilder class extending from RouteBuilder. In this case, RouteBuilder is in the org.apache.camel. scala.builder package.
This isn’t a book about Scala, so many assumptions are made in this section about your knowledge of Scala. Because Scala is quite different from Java, it’s recommended that you learn about the language fundamentals before trying to use the Scala DSL in Camel. Otherwise, you may get frustrated by language features that are very different from Java.
The main online resource for Scala is http://www.scala-lang.org, and if you want in-depth information about Scala, we recommend the book coauthored by the language’s creator, Programming in Scala by Martin Odersky, Lex Spoon, and Bill Venners.
Another must-have for Scala DSL development is a plugin for your IDE so you can avail yourself of code completion. The Scala IDE for Eclipse is available at http://www.scala-ide.org.
You may notice that the Scala DSL route is a lot less verbose. One of the aims of the Scala DSL was to eliminate text that didn’t add anything to the function of a route. In the Java DSL, there’s a lot of text used to conform to the Java language. Scala gives you a lot more freedom in creating your own operators and relaxes requirements for parentheses, dots, and semicolons.
In the previous one-line route, you have very few extraneous characters: there are two endpoint URI strings and a to operator. The from method used in other Camel DSLs isn’t needed here; simply specifying an endpoint URI is enough to start a route. The to operator can also be replaced with --> which may be more aesthetically pleasing to you, but it has exactly the same function as to. There’s also no need to specify a configure method as there is in the Java DSL. Route statements are entered directly into the class body.
Note that in order to break this simple route into several lines of code, you would need to introduce a code block, as follows:
class MyRouteBuilder extends RouteBuilder {
   "ftp://rider@localhost:21000/order?password=secret" ==> {
       to("jms:incomingOrders")
   }
}
The ==> operator is used to start the code block, and the braces indicate the start and end of the block. These code blocks can be nested arbitrarily. In this way, Camel will know how to end a route’s construction and add it into the CamelContext. In the Scala DSL, a route ends after either a code line ends in the simple case, or when the code block ends if you’re using code blocks.
The Scala DSL doesn’t support all the EIPs that are available in the Java and Spring DSLs, but it does support most of them. EIPs that don’t have a Scala DSL equivalent can be accessed from the Java DSL. You can find examples of what the EIPs look like in Scala at the Apache Camel website: http://camel.apache.org/scala-dsl-eip.html.
11.5.2. Adding Scala routes to the CamelContext
Scala routes are added to the CamelContext in much the same way as Java DSL routes are. We discussed the different approaches to this in chapter 2. The reason you can use the same approach is that Scala ultimately compiles down to Java bytecode, so when the CamelContext is searching for a RoutesBuilder in a package you specified, it doesn’t care whether it originated from Java or Scala. For example, to load a Scala-based route into a Spring CamelContext, you would just define the CamelContext like this:
<camelContext xmlns="http://camel.apache.org/schema/spring">
  <package>camelinaction</package>
</camelContext>
This will pick up all Scala routes in the camelinaction package—exactly the same as for Java routes. An example of this is provided in the chapter11/scala-router directory of the book’s source. To run this example, execute the following Maven command:
mvn camel:run
There may be times when you want to mix Java and Scala within a single project. For instance, you may already have a working Java-based system using Camel, and you want to add a new route using the Scala DSL. What do you do in this case?
11.5.3. Mixing Java and Scala
As we’ve said before, both Java and Scala compile down to Java bytecode, so it should be easy to mix the two. It mostly involves setting up your Maven project to compile both types of sources and put the resultant bytecode class files in the same location.
Suppose you have a project that has Java and Scala source files as follows:
scala-router-javacontext
|-- pom.xml
`-- src
    `-- main
        |-- java
        |    `-- camelinaction
        |        `-- Main.java
        `-- scala
            `-- camelinaction
                `-- MyRouteBuilder.scala
The Main class creates a new CamelContext and adds the Scala RouteBuilder MyRouteBuilder to the context as follows:
public class Main {
    public static void main(String args[]) throws Exception {
        CamelContext context = new DefaultCamelContext();
        context.addRoutes(new MyRouteBuilder());
        ...
Both Main and MyRouteBuilder are in the same package, so this should all work nicely, except that it doesn’t. If you try to run the Main class now, you’ll get a compilation error saying MyRouteBuilder can’t be found. It can’t be found because it hasn’t been compiled yet!
By default, Maven will compile all Java sources in src/main/java, but it has no such settings in place for Scala. You can get around this by configuring the maven-scala-plugin as shown here.
Listing 11.7. Configuring compilation of both Java and Scala sources

You can configure the maven-scala-plugin to compile the Scala source in the process-resources phase of your Maven build ![]() . The process-resources phase happens just before the compile phase
. The process-resources phase happens just before the compile phase ![]() , which is where the Java source is compiled. You didn’t specify where your Scala source was, so the maven-scala-plugin used
the default location of src/main/scala. Now all class files are saved into the target/classes folder and so will be on the
same classpath when you run your application.
, which is where the Java source is compiled. You didn’t specify where your Scala source was, so the maven-scala-plugin used
the default location of src/main/scala. Now all class files are saved into the target/classes folder and so will be on the
same classpath when you run your application.
The source for this example is in chapter11/scala-router-javacontext of the book’s source. To run the example, use the following Maven command:
mvn compile exec:java
You should now know some of the concepts needed to create routes in the Scala DSL. The next step would be to try out your own Scala route by either copying the example from this book, or by using the camel-archetype-scala archetype to create your own Scala DSL project. This archetype was mentioned in table 11.1, earlier in the chapter.
11.6. Summary and best practices
Knowing how to create Camel projects is very important, and you may have wondered why we chose to discuss this so late in the book. We felt it was best to focus on the core concepts first and worry about project setup details later. Also, you should now have a better idea of what cool Camel applications you can create, having read about the features first. At this point, though, you should be well-equipped to start your own Camel application and make it do useful work.
Before we move on, there are a few key ideas that you should take away from this chapter:
- The easiest way to create Camel applications is with Maven archetypes. Nothing is worse than having to type out a bunch of boilerplate code for new projects. The Maven archetypes that are provided by Camel will get you started much faster.
- The easiest way to manage Camel library dependencies is with Maven. Camel is just a Java framework, so you can use whatever build system you like to develop your Camel projects. Using Maven will eliminate many of the hassles of tracking down JAR files from remote repos, letting you focus more on your business code than the library dependencies.
- It’s easy to load up a Maven-based Camel project in Eclipse. Whether you use the maven-eclipse-plugin or m2eclipse, importing Camel projects is easy.
- If you find no component in Camel for your use case, create your own. Camel allows you to write and load up your own custom components easily. There’s even a Maven archetype for starting a custom component project.
- Use interceptors to inject processing around nodes in a route. It’s true, Camel interceptors are an advanced topic. They give you the additional power to control or monitor what’s happening inside a route.
- You don’t have to write routes in Java or Spring if you don’t want to. Camel also provides DSLs in Scala and Groovy.
Next on the agenda is how to monitor and manage your Camel application. Then we’ll look at how to deploy to a production environment.