
Chapter 6. Testing with Camel
- Introducing and using the Camel Test Kit
- Testing using multiple environments
- Using mocks
- Simulating real components
- Simulating errors
- Testing without mocks
In the last chapter, we covered error handling and learned that it’s hard to handle and cater for all difficulties that can possibly arise. To help address this problem, you can test as many situations as possible. In this chapter, we’ll look at how to test with Camel—not only testing your projects when everything goes well, but also simulating errors and testing whether your error handling strategies are up to the job.
Testing is vital to ensuring that your integration projects are successful. JUnit has become the standard API for unit testing, and the Camel Test Kit builds on top of JUnit, leveraging the existing JUnit tooling. If you aren’t familiar with JUnit, you can read about it in JUnit in Action, second edition (http://www.manning.com/tahchiev).
A good way to perform unit testing on a Camel application is to start the application, send messages to the application, and verify that the messages are routed as expected. This is illustrated in figure 6.1. You send a message to the application, which transforms the message to another format and returns the output. You can then verify that the output is as expected.
Figure 6.1. Testing a Camel application by sending a message to the application and then verifying the returned output

This is how the Camel Test Kit is used for testing. You’ll learn to set up expectations as preconditions for your unit tests, start the tests by sending in messages, and verify the results to determine whether the tests passed. The Mock component is based on this principle, and we’ll cover it thoroughly. Then we’ll look at several techniques for simulating errors, so you can test your error handling as well.
Let’s get started.
6.1. Introducing the Camel Test Kit
Camel provides rich facilities for testing your projects, and it includes a test kit that gets you writing unit tests quickly in familiar waters using the regular JUnit API. In fact, it’s the same test kit that Camel uses for testing itself. Figure 6.2 gives a high-level overview of the Camel Test Kit.
Figure 6.2. The Camel Test Kit is provided in two JAR files containing the JUnit extensions, Mock component, and producer template.
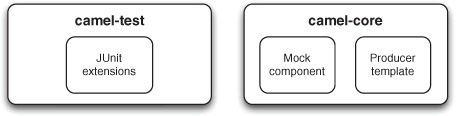
Figure 6.2 boils down to three parts. The JUnit extensions are a number of classes on top of JUnit that make unit testing with Camel much easier. We’ll cover them in the next section. The Mock component is covered in section 6.2. And you’re already familiar with the ProducerTemplate—it’s a convenient feature that allows you to easily send messages to Camel when testing.
Let’s now look at the Camel JUnit extensions and see how to use them to write Camel unit tests.
6.1.1. The Camel JUnit extensions
So what are the Camel JUnit extensions? They are six classes in a small JAR file, camel-test.jar, that ships with Camel. The classes are listed in table 6.1.
Table 6.1. Classes in the Camel Test Kit, provided in camel-test.jar
|
Class |
Description |
|---|---|
| org.apache.camel.test. TestSupport | JUnit 3.x abstract base test class with additional assertion methods. |
| org.apache.camel.test. CamelTestSupport | JUnit 3.x base test class prepared for testing Camel routes. This is the test class you should use when using JUnit 3.x. |
| org.apache.camel.test. CamelSpringTestSupport | JUnit 3.x base test class prepared for testing Camel routes defined using Spring DSL. This class extends CamelTestSupport and has additional Spring-related methods. |
| org.apache.camel.test.junit4. TestSupport | JUnit 4.x abstract base test class with additional assertion methods. |
| org.apache.camel.test.junit4. CamelTestSupport | JUnit 4.x base test class prepared for testing Camel routes. This is the test class you should use when using JUnit 4.x. |
| org.apache.camel.test.junit4. CamelSpringTestSupport | JUnit 4.x base test class prepared for testing Camel routes defined using Spring DSL. This class extends CamelTestSupport and has additional Spring-related methods. |
Of the six classes listed in table 6.1, you’ll often only use the ones suited for unit testing either the older JUnit 3.x or the newer JUnit 4.x version. Let’s get started using the Camel Test Kit.
6.1.2. Using the Camel Test Kit
We’ll start simply and use the following route for testing:
from("file:inbox").to("file:outbox");
This is the “Hello World” example for integration kits that moves files from one folder to another. So how do you go about unit testing this route?
You could do it the traditional way and write unit test code with the plain JUnit API. This would require at least 30 lines of code, because the API for file handling in Java is very low level, and you need a fair amount of code when working with files.
An easier solution is to use the Camel Test Kit. In the next couple of sections, you’ll work with the CamelTestSupport class—it’s the easiest to get started with. Then in section 6.1.5 you’ll try the CamelSpringTestSupport class and see how you can do unit testing based on Spring routes.
6.1.3. Unit testing with the CamelTestSupport class
In this chapter, we’ve kept the dependencies low when using the Camel Test Kit. All you need to include is the following dependency in the Maven pom.xml file:
<dependency>
    <groupId>org.apache.camel</groupId>
    <artifactId>camel-test</artifactId>
    <version>2.5.0</version>
    <scope>test</scope>
</dependency>

<dependency>
    <groupId>junit</groupId>
    <artifactId>junit</artifactId>
    <version>4.8.1</version>
    <scope>test</scope>
</dependency>
Warning
Spring 2.5 only works with JUnit 4.4 or lower. Spring 3.0 works with higher versions of JUnit such as 4.8.1, used in the preceding code.
We won’t go into detail here on how to set up your Java editor for developing with Camel; chapter 11 will cover this in detail. For now, you just need to know that the Camel Test Kit lives in the camel-test-2.5.jar file and that the other JARs needed are JUnit and camel-core, which are implied.
Let’s try it. You want to build a unit test to test a Camel route that copies files from one directory to another. The unit test is shown in listing 6.1.
Listing 6.1. A first unit test using the Camel Test Kit

The FirstTest class must extend the org.apache.camel.junit4.CamelTestSupport class to conveniently leverage the Camel Test Kit. By overriding the createRouteBuilder method, you can provide any route builder you wish. You use an inlined route builder, which allows you to write the route
directly within the unit test class. All you need to do is override the configure method ![]() and include your route.
and include your route.
The test methods are regular JUnit methods, so the method must be annotated with @Test to be included when testing. You’ll notice that the code in this method is fairly short. Instead of using the low-level Java File API, this example leverages Camel as a client by using ProducerTemplate to send a message to a file endpoint ![]() , which writes the message as a file.
, which writes the message as a file.
In the test, you sleep one second after dropping the file in the inbox folder; this gives Camel a bit of time to react and
route the file. By default, Camel scans twice per second for incoming files, so you wait one second to be on the safe side.
Finally you assert that the file was moved to the outbox folder ![]() .
.
The book’s source code includes this example. You can try it on your own by running the following Maven goal from the chapter6/firsttest directory:
mvn test -Dtest=FirstTest
When you run this example, it should output the result of the test as shown here:
Tests run: 1, Failures: 0, Errors: 0, Skipped: 0
This indicates that the test completed successfully; there are no failures or errors.
Tip
From Camel 2.6 onward it’s now even easier to debug Camel routes from within the IDE. See more details at http://camel.apache.org/debugger.
Improving the Unit Test
The unit test in listing 6.1 could be improved in a few areas, such as ensuring that the starting directory is empty and that the written file’s content is what you expect.
The former is easy, because the CamelTestSupport class has a method to delete a directory. You can do this in the setUp method:
public void setUp() throws Exception {
    deleteDirectory("target/inbox");
    deleteDirectory("target/outbox");
    super.setUp();
}
Camel can also test the written file’s content to ensure it’s what you expect. You may remember that Camel provides a very elaborate type converter system, and that this system goes beyond converting between simple types and literals. The Camel type system includes file-based converters, so there is no need to fiddle with the various cumbersome Java IO file streams. All you need to do is ask the type converter system to grab the file and return it to you as a String.
Just as you had access to the template in listing 6.1, the Camel Test Kit also gives you direct access to the CamelContext. The testMoveFile method in listing 6.1 could have been written as follows:
@Test
public void testMoveFile() throws Exception {
    template.sendBodyAndHeader("file://target/inbox", "Hello World",
                 Exchange.FILE_NAME, "hello.txt");

    File target = new File("target/outbox/hello.txt");
    assertTrue("File not moved", target.exists());

    String content = context.getTypeConverter()
                         .convertTo(String.class, target);
    assertEquals("Hello World", content);
}
The preceding examples cover the case where the route is defined in the unit test class as an anonymous inner class. But what if you have a route defined in another class? How do you go about unit testing that route instead? Let’s look at that next.
6.1.4. Unit testing an existing RouteBuilder class
It’s common to define Camel routes in separate RouteBuilder classes, as in the FileMoveRoute class here:
package camelinaction;

import org.apache.camel.builder.RouteBuilder;

public class FileMoveRoute extends RouteBuilder {

    @Override
    public void configure() throws Exception {
        from("file://target/inbox").to("file://target/outbox");
    }
}
How could you unit test this route from the FileMoveRoute class? You don’t want to copy the code from the configure method into a JUnit class. Fortunately, it’s quite easy to set up unit tests that use the FileMoveRoute, as you can see here:
protected RouteBuilder createRouteBuilder() throws Exception {
    return new FileMoveRoute();
}
Yes, it’s that simple! Just return a new instance of your route class.
Now you have learned how to use CamelTestSupport for unit testing routes based on the Java DSL. But there is also a Spring-based CamelSpringTestSupport class to be used for Spring XML routes. The next section shows how to test using Spring XML–based routes.
6.1.5. Unit testing with the SpringCamelTestSupport class
SpringCamelTestSupport is a base test class that’s used to unit test routes based on Spring XML.
We’ll look at unit testing the route in listing 6.2, which is a Spring version of the route in listing 6.1.
Listing 6.2. A Spring-based version of the route in listing 6.1 (firststep.xml)
<beans xmlns="http://www.springframework.org/schema/beans"
       xmlns:xsi="http://www.w3.org/2001/XMLSchema-instance"
       xsi:schemaLocation="
           http://www.springframework.org/schema/beans
           http://www.springframework.org/schema/beans/spring-beans-2.5.xsd
           http://camel.apache.org/schema/spring
           http://camel.apache.org/schema/spring/camel-spring.xsd">

    <camelContext id="camel" xmlns="http://camel.apache.org/schema/spring">
        <route>
            <from uri="file://target/inbox"/>
            <to uri="file://target/outbox"/>
        </route>
    </camelContext>

</beans>
Notice that the route is the same route defined in listing 6.1. So how can you unit test this route? Ideally you should be able to use unit tests regardless of the language used to define the route.
Camel is able to handle this; the difference between using SpringCamelTestSupport and CamelTestSupport is just a matter of how the route is loaded. The unit test in listing 6.3 illustrates this point.
Listing 6.3. A first unit test using Spring XML routes

You extend the CamelSpringTestSupport class so you can unit test with Spring XML–based routes. And unlike listing 6.1, you need to use a Spring-based mechanism to load the routes ![]() ; you use the ClassPathXmlApplicationContext, which loads your route from the classpath. This mechanism is entirely Spring-based, so you can also use the FileSystemXmlApplicationContext, include multiple XML files, and so on—Camel doesn’t impose any restrictions. The testMoveFile method is exactly the same as it was in listing 6.1, which means you can use the same unit testing code regardless of how the route is defined.
; you use the ClassPathXmlApplicationContext, which loads your route from the classpath. This mechanism is entirely Spring-based, so you can also use the FileSystemXmlApplicationContext, include multiple XML files, and so on—Camel doesn’t impose any restrictions. The testMoveFile method is exactly the same as it was in listing 6.1, which means you can use the same unit testing code regardless of how the route is defined.
In real life projects, you’ll have different deployment environments, such as local, test, preproduction, and production. In the next section, we’ll look at how you can test the same project in those different environments with minimal effort.
6.1.6. Unit testing in multiple environments
A Camel route is often tested in different environments—you may want to test it locally on your laptop, then later on a dedicated test platform, and so forth. But you don’t want to rewrite tests every time you move to a new environment. That’s why you externalize dynamic parts.
We’ll cover two solutions for externalizing dynamic parts using property files. The first solution is based on the Camel Properties component and the second leverages Spring property placeholders.
Using the Camel Properties Component
Camel has a Properties component to support externalizing properties defined in the routes. The Properties component works in much the same way as Spring property placeholders, but it has a few noteworthy improvements:
- It is built in the camel-core JAR, which means it can be leveraged without the need for Spring or any third-party framework.
- It can be used in all the DSLs, such as the Java DSL, and is not limited to Spring XML files.
- It supports using placeholders in property files.
Note
For more details on the Properties component, see the Camel documentation: http://camel.apache.org/properties.html.
Suppose you wanted to test the file-move unit test in two environments: production and test. To use the Camel Properties component in Spring XML, you have to declare it as a Spring bean with the id properties, as shown:
<bean id="properties"
      class="org.apache.camel.component.properties.PropertiesComponent">
    <property name="location" value="classpath:rider-prod.properties"/>
</bean>
In the rider-prod.properties file, you define the externalized properties as key/value pairs:
file.inbox=rider/files/inbox
file.outbox=rider/files/outbox
The camelContext element can then take advantage of the externalized properties directly in the endpoint URI, as shown in bold in this route:
<camelContext id="camel" xmlns="http://camel.apache.org/schema/spring">
    <route>
        <from uri="{{file.inbox}}"/>
        <to uri="{{file.outbox}}"/>
    </route>
</camelContext>
You should notice that the Camel syntax for property placeholders is a bit different than for Spring property placeholders. The Camel Properties component uses the {{key}} syntax, whereas Spring uses ${key}.
Instead of using a Spring bean to define the Camel Properties component, you can use a specialized <propertyPlaceholder> within the camelContext, as follows:
<camelContext id="camel" xmlns="http://camel.apache.org/schema/spring">
    <propertyPlaceholder id="properties"
                         location="classpath:rider-prod.properties"/>
    <route>
        <from uri="{{file.inbox}}"/>
        <to uri="{{file.outbox}}"/>
    </route>
</camelContext>
Your next goal is to create a reusable unit test that, with minimal effort, can be configured to test in either environment. Listing 6.4 shows how this can be done.
Listing 6.4. A reusable unit test for the test and production environments


In the testMoveFile method, you start the unit test by creating a file in the inbox directory, and to help with that you retrieve the ProducerTemplate. Note that you use the @EndpointInject annotation and refer to the inbox endpoint by the placeholder ![]() .
.
In the setUp method, you use the CamelContext to resolve the placeholders ![]() , because you’ll later need to know the actual values for file.inbox and file.outbox.
, because you’ll later need to know the actual values for file.inbox and file.outbox.
The createApplicationContext method loads the Spring XML files. You load two files ![]() to minimize effort. Spring allows you to load multiple files and have the next file override the previous file—the idea is
to define the CamelContext once, in the rider-camel-prod.xml file. Because rider-camel-test.xml is defined as the second file, it will override identical
beans from the former files. You leverage this to override the properties bean and instruct it to load a different properties
file, the rider-test.properties file.
to minimize effort. Spring allows you to load multiple files and have the next file override the previous file—the idea is
to define the CamelContext once, in the rider-camel-prod.xml file. Because rider-camel-test.xml is defined as the second file, it will override identical
beans from the former files. You leverage this to override the properties bean and instruct it to load a different properties
file, the rider-test.properties file.
The rider-camel-test.xml file is short and simple:
<bean id="properties"
      class="org.apache.camel.component.properties.PropertiesComponent">
    <property name="location" value="classpath:rider-test.properties"/>
</bean>
This way, CamelContext is only defined once. If you had the route defined in multiple files targeted for specific environments, you’d put the burden on yourself to synchronize those routes if you change something in the route.
By using this approach, you can unit test the route in different environments with minimal effort. All you have to do is specify the files in the createApplicationContext method targeted for the environment you’re testing.
This example is included in the book’s source code in the chapter6/firsttest directory. You can try it using the following Maven goal:
mvn test -Dtest=CamelRiderTest
Tip
If you’re not using Spring XML, you can still reuse Camel routes and unit tests for multiple environments. You can use @EndpointInject in your RouteBuilder class to dynamically inject endpoints for the environment you wish to test.
The Camel Properties component can also be used without Spring. The following listing sets up the Camel Properties component and uses it in a Java DSL–based route. The setUp and testMoveFile methods are omitted because they’re the same as in listing 6.4.
Listing 6.5. Using the Camel Properties component with the Java DSL
public class CamelRiderJavaDSLProdTest extends CamelTestSupport {

     protected CamelContext createCamelContext() throws Exception {
        CamelContext context = super.createCamelContext();

        PropertiesComponent prop = context.getComponent("properties",
                                           PropertiesComponent.class);
        prop.setLocation("classpath:rider-prod.properties");

        return context;
     }

     protected RouteBuilder createRouteBuilder() throws Exception {
        return new RouteBuilder() {
            public void configure() throws Exception {
                from("file:{{file.inbox}}").to("file:{{file.outbox}}");
            }
        };
     }
}
To ensure that the property placeholder is loaded and in use as early as possible, you have to configure the PropertiesComponent when the CamelContext is created. You can do this by overriding the createCamelContext method, which ensures the Properties component is available to the RouteBuilder when it encounters the property placeholders in the endpoints used in the route.
You can run try this example using the following Maven goals from the chapter6/firsttest directory:
mvn test -Dtest=CamelRiderJavaDSLTest
mvn test -Dtest=CamelRiderJavaDSLProdTest
Tip
You can use the Jasypt component to encrypt sensitive information in the properties file. For example, you may not want to have passwords in clear text in the properties file. You can read about the Jasypt component at the Camel website: http://camel.apache.org/jasypt.
We’ll now cover the same example but using Spring property placeholders instead of the Camel Properties component.
Using Spring Property Placeholders
The Spring Framework supports externalizing properties defined in the Spring XML files using a feature known as Spring property placeholders. We’ll review the example from the previous section using Spring property placeholders instead of the Camel Properties component.
The first thing you need to do is set up the route having the endpoint URIs externalized. This could be done as follows. Notice that Spring uses the ${key} syntax.
<context:property-placeholder properties-ref="properties"/>

<util:properties id="properties"
                 location="classpath:rider-prod.properties"/>

<camelContext id="camel" xmlns="http://camel.apache.org/schema/spring">
    <route>
        <from uri="${file.inbox}"/>
        <to uri="${file.outbox}"/>
    </route>
Unfortunately the Spring Framework doesn’t support using placeholders directly in endpoint URIs in the route, so you must define endpoints that include those placeholders by using the <endpoint> tag. The following code snippet shows how this is done:

To use Spring property placeholders, you must declare the <context:property-placeholder> tag where you refer to a properties bean ![]() that will load the properties file from the classpath. Note that this XML file is based on the production environment.
that will load the properties file from the classpath. Note that this XML file is based on the production environment.
In the camelContext element, you define two endpoints ![]() that use placeholders for dynamic file paths. The ${file.inbox} is a Spring property placeholder that refers to a property with the key file.inbox. The same goes for ${file.outbox}, which refers to the file.outbox property.
that use placeholders for dynamic file paths. The ${file.inbox} is a Spring property placeholder that refers to a property with the key file.inbox. The same goes for ${file.outbox}, which refers to the file.outbox property.
In the route, you must refer to these endpoints ![]() instead of using the regular URI notations. Notice the use of the ref attribute in the <from> and <to> tags.
instead of using the regular URI notations. Notice the use of the ref attribute in the <from> and <to> tags.
The rider-prod.properties properties file contains the following two lines:
file.inbox=rider/files/inbox
file.outbox=rider/files/outbox
This example is included in the book’s source code in the chapter6/firsttest directory. You can try it using the following Maven goal:
mvn test -Dtest=SpringRiderTest
The Camel Properties component is more powerful than the Spring property placeholder mechanism. The latter only works when defining routes using Spring XML, and you have to declare the endpoints in dedicated <endpoint> tags for the property placeholders to work.
The Camel Properties component is provided out of the box, which means you can use it without using Spring at all. And it supports the various DSL languages you can use to define routes, such as Java, Spring XML, Groovy, and Scala. On top of that, you can declare the placeholders anywhere in the route definitions.
You have now seen the Camel Test Kit and learned to use its JUnit extension to write your first unit tests. Camel helps a lot when working with files, but things get more complex when you use more protocols—especially complex ones such as Java Message Service (JMS) messaging. Testing an application that leverages many protocols has always been challenging.
This is why mocks were invented. By using mocks, you can simulate real components and reduce the number of variables in your tests. Mock components are the topic of the next section.
6.2. Using the Mock component
The Mock component is a cornerstone when testing with Camel—it makes testing much easier. In much the same way as a car designer uses a crash test dummy to simulate vehicle impact on humans, the Mock component is used to simulate real components in a controlled way.
Mock components are useful in several situations:
- When the real component doesn’t yet exist or isn’t reachable in the development and test phases. For example, if you only have access to the component in preproduction and production phases.
- When the real component is slow or requires much effort to set up and initialize, such as a database.
- When you would have to incorporate special logic into the real component for testing purposes, which isn’t practical or possible.
- When the component returns nondeterministic results, such as the current time, which would make it difficult to unit test at any given time of day.
- When you need to simulate errors caused by network problems or faults from the real component.
Without the Mock component, your only option would be to test using the real component, which is usually much harder. You may already have used mocking before; there are many frameworks out there that blend in well with testing frameworks like JUnit.
Camel takes testing very seriously, and the Mock component was included in the first release of Camel. The fact that it resides in camel-core JAR indicates its importance—the Mock component is used rigorously in unit testing Camel itself.
In this section, we’ll look at how to use the Mock component in unit tests and how to add mocking to existing unit tests. Then we’ll spend some time on how you can use mocks to set expectations to verify test results, as this is where the Mock component excels.
Let’s get started.
6.2.1. Introducing the Mock component
The three basic steps of testing are illustrated in figure 6.3.
Figure 6.3. Three steps for testing: set expectations, run the test, and verify the result.

Before the test is started, you set the expectations of what should happen ![]() . Then you run the test
. Then you run the test ![]() . Finally, you verify the outcome of the test against the expectations
. Finally, you verify the outcome of the test against the expectations ![]() . The Camel Mock component allows you to easily implement these steps when testing Camel applications. On the mock endpoints,
you can set expectations that are used to verify the test results when the test completes.
. The Camel Mock component allows you to easily implement these steps when testing Camel applications. On the mock endpoints,
you can set expectations that are used to verify the test results when the test completes.
Mock components can verify a rich variety of expectations, such as the following:
- That the correct number of messages are received on each endpoint
- That the messages arrive in the correct order
- That the correct payloads are received
- That the test ran within the expected time period
Mock components allow you to configure coarse- and fine-grained expectations and to simulate errors such as network failures.
Let’s get started and try using the Mock component.
6.2.2. Unit testing with the Mock component
As we look at how to use the Mock component, we’ll use the following basic route to keep things simple:
from("jms:topic:quote").to("mock:quote");
This route will consume messages from a JMS topic, named quote, and route the messages to a mock endpoint with the name quote.
The mock endpoint is implemented in Camel as the org.apache.camel.component.mock.MockEndpoint class; it provides a large number of methods for setting expectations. Table 6.2 lists the most commonly used methods on the mock endpoint. The expectedMessageCount method is exactly what you need to set the expectation that one message should arrive at the mock:quote endpoint. You can do this as shown in listing 6.6.
Table 6.2. Commonly used methods in the MockEndpoint class
|
Description |
|
|---|---|
| expectedMessageCount(int count) | Specifies the expected number of messages arriving at the endpoint |
| expectedMinimumMessageCount (int count) | Specifies the expected minimum number of messages arriving on the endpoint |
| expectedBodiesReceived (Object... bodies) | Specifies the expected message bodies and their order arriving at the endpoint |
| expectedBodiesReceivedInAnyOrder (Object... bodies) | Specifies the expected message bodies arriving at the endpoint; ordering doesn’t matter |
| assertIsSatisfied() | Validates that all expectations set on the endpoint are satisfied |
Listing 6.6. Using MockEndpoint in unit testing

To obtain the MockEndpoint, you use the getMockEndpoint method from the CamelTestSupport class. Then you set your expectations—in this case, you expect one message to arrive ![]() . You start the test by sending a message to the JMS topic, and the mock endpoint verifies whether the expectations were met
or not by using the assertIsSatisfied method
. You start the test by sending a message to the JMS topic, and the mock endpoint verifies whether the expectations were met
or not by using the assertIsSatisfied method ![]() . If a single expectation fails, Camel throws a java. lang. AssertionError stating the failure.
. If a single expectation fails, Camel throws a java. lang. AssertionError stating the failure.
You can compare what happens in listing 6.6 to what you saw in figure 6.3: you set expectations, ran the test, and verified the results. It can’t get any simpler than that.
Note
By default, the assertIsSatisfied method runs for 10 seconds before timing out. You can change the wait time with the setResultWaitTime(long timeInMillis) method if you have unit tests that run for a long time.
Replacing JMS with SEDA
Listing 6.6 uses JMS, but, for now, let’s keep things simple by simulating JMS using the SEDA component. (We’ll look at testing JMS with ActiveMQ in section 6.4.)
Note
For details about the SEDA component, see the Camel documentation: http://camel.apache.org/seda.html.
You can simulate JMS by registering the SEDA component as the JMS component, like this:
@Override
protected CamelContext createCamelContext() throws Exception {
    CamelContext context = super.createCamelContext();
    context.addComponent("jms", context.getComponent("seda"));
    return context;
}
You override the createCamelContext method and add the SEDA component as the JMS component. By doing this, you fool Camel into using the SEDA component when you refer to the JMS component.
The book’s source code contains this test. You can try it by running the following Maven goal from the chapter6/firsttest directory:
mvn test -Dtest=FirstMockTest
You may have noticed in listing 6.5 that the expectation was coarse-grained in the sense that you just expected a message to arrive. You did not specify anything about the message’s content or other characteristics, so you don’t know whether the message that arrived was the same “Camel rocks” message that was sent. The next section covers how to test this.
6.2.3. Verifying that the correct message arrived
The expectedMessageCount method can only be used to verify that a certain number of messages arrived. It doesn’t dictate anything about the content of the message. Let’s improve the unit test in listing 6.6 so that it expects the message being sent to match the message that arrives at the mock endpoint.
You can do this using the expectedBodiesReceived method, as follows:
@Test
public void testQuote() throws Exception {
    MockEndpoint mock = getMockEndpoint("mock:quote");
    mock.expectedBodiesReceived("Camel rocks");

    template.sendBody("jms:topic:quote", "Camel rocks");

    mock.assertIsSatisfied();
}
This is intuitive and easy to understand, but the method states bodies in plural as if there could be more bodies. Camel does support expectations of multiple messages, so you could send in two messages. Here’s a revised version of the test:
@Test
public void testQuotes() throws Exception {
    MockEndpoint mock = getMockEndpoint("mock:quote");
    mock.expectedBodiesReceived("Camel rocks", "Hello Camel");

    template.sendBody("jms:topic:quote", "Camel rocks");
    template.sendBody("jms:topic:quote", "Hello Camel");

    mock.assertIsSatisfied();
}
Camel now expects two messages to arrive in the specified order. Camel will fail the test if the “Hello Camel” message arrives before the “Camel rocks” message.
In cases where the order doesn’t matter, you can use the expectedBodiesReceivedInAnyOrder method instead, like this:
mock.expectedBodiesReceivedInAnyOrder("Camel rocks", "Hello Camel");
It could hardly be any easier than that.
But if you expect a much larger number of messages to arrive, the bodies you pass in as an argument will be very large. How can you do that? The answer is to use a List containing the expected bodies as a parameter:
List bodies = ...
mock.expectedBodiesReceived(bodies);
The Mock component has many other features we need to cover, so let’s continue and see how you can use expressions to set fine-grained expectations.
6.2.4. Using expressions with mocks
Suppose you want to set an expectation that a message should contain the word “Camel” in its content. One way of doing this is shown in listing 6.7.
Listing 6.7. Using expressions with MockEndpoint to set expectations

First you set up your expectation that the mock:quote endpoint will receive two messages ![]() . You then send in two messages to the JMS topic to start the test. Then you assert that the mock received the two messages
by using the assertMockEndpointsSatisfied method
. You then send in two messages to the JMS topic to start the test. Then you assert that the mock received the two messages
by using the assertMockEndpointsSatisfied method ![]() , which is a one-stop method for asserting all mocks. This method is more convenient to use than having to invoke the assertIsSatisfied method on every mock endpoint you may have in use.
, which is a one-stop method for asserting all mocks. This method is more convenient to use than having to invoke the assertIsSatisfied method on every mock endpoint you may have in use.
At this point, you can use the getReceivedExchanges method to access all the exchanges the mock:quote endpoint has received ![]() . You use this method to get hold of the two received message bodies so you can assert that they contain the word “Camel”.
. You use this method to get hold of the two received message bodies so you can assert that they contain the word “Camel”.
At first you may think it a bit odd to define expectations in two places—before and after the test has run. Is it not possible to define the expectations in one place, such as before you run the test? Yes, of course it is, and this is where Camel expressions come into the game.
Note
The getReceivedExchanges method still has its merits. It allows you to work with the exchanges directly, giving you the ability to do whatever you want with them.
Table 6.3 lists some additional MockEndpoint methods that let you use expressions to set expectations.
Table 6.3. Expression-based methods commonly used on MockEndpoint
You can use the message method to improve the unit test in listing 6.7 and group all your expectations together, as shown here:
@Test
public void testIsCamelMessage() throws Exception {
    MockEndpoint mock = getMockEndpoint("mock:quote");
    mock.expectedMessageCount(2);
    mock.message(0).body().contains("Camel");
    mock.message(1).body().contains("Camel");

    template.sendBody("jms:topic:quote", "Hello Camel");
    template.sendBody("jms:topic:quote", "Camel rocks");

    assertMockEndpointsSatisfied();
}
Notice that you can use the message(int index) method to set an expectation that the body of the message should contain the word “Camel”. Instead of doing this for each message based on its index, you can use the allMessages() method to set the same expectation for all messages:
mock.allMessages().body().contains("Camel");
So far you’ve only seen expectations based on the message body, but what if you want to set an expectation based on a header? That’s easy—you use header(name), as follows:
mock.message(0).header("JMSPriority").isEqualTo(4);
You probably noticed the contains and isEqualTo methods we used in the preceding couple of code snippets. They’re builder methods used to create predicates for expectations. Table 6.4 lists all the builder methods available.
Table 6.4. Builder methods for creating predicates to be used as expectations
At first it may seem odd that the methods in table 6.4 often use Object as the parameter type—why not a specialized type such as String? This is because of Camel’s strong type-converter mechanism, which allows you to compare apples to oranges—Camel can regard both of them as fruit and evaluate them accordingly. You can compare strings with numeric values without having to worry about type mismatches, as illustrated by the following two code lines:
mock.message(0).header("JMSPriority").isEqualTo(4);
mock.message(0).header("JMSPriority").isEqualTo("4");
Now suppose you want to create an expectation that all messages contain the word “Camel” and end with a period. You could use a regular expression to set this in a single expectation:
mock.allMessages().body().regex("^.*Camel.*\.$");
This will work, but Camel allows you to enter multiple expectations, so instead of using the regex method, you can create a more readable solution:
mock.allMessages().body().contains("Camel");
mock.allMessages().body().endsWith(".");
You have learned a lot about how to set expectations, including fine-grained ones using the builder methods listed in table 6.4. Now it’s time to move on and test the ordering of the messages received.
6.2.5. Testing the ordering of messages
Suppose you need to test that messages arrive in sequence-number order. For example, messages arriving in the order 1, 2, 3 are accepted, whereas the order 1, 3, 2 is invalid and the test should fail.
The Mock component provides features to test ascending and descending orders. For example, you can use the expectsAscending method like this:
mock.expectsAscending(header("Counter"));
The preceding expectation will test that the received messages are in ascending order, judged by the Counter value in the message header, but it doesn’t dictate what the starting value must be. If the first message that arrives has a value of 5, the expectation tests whether or not the next message has a value greater than 5, and so on.
What if you must test that the first message has a value of 1? In that case, you can add another expectation that tests the first message, using message(0), as follows:
mock.message(0).header("Counter").isEqualTo(1);
mock.expectsAscending(header("Counter"));
Together these expectations test that messages arrive in the order 1, 2, 3, ..., but orders such as 1, 2, 4, 5, 6, 8, 10, ... also pass the test. That’s because the expectsAscending and expectsDescending methods don’t detect whether there are gaps between messages. These methods use generic comparison functions that work on any types, not only numbers.
To detect gaps in the sequence, you need to use a custom expression that implements gap-detection logic.
Using a Custom Expression
When the provided expressions and predicates don’t cut it, you can use a custom expression. By using a custom expression, you have the full power of Java code at your fingertips to implement your assertions.
Let’s look at the problem of gap detection. Camel doesn’t provide any expressions for that, so you must do it with a custom expression. Listing 6.8 shows how this can be done.
Listing 6.8. Using a custom expression to detect gaps in message ordering

To set up a custom expression, you use the expects method, which allows you to provide your own logic as a Runnable ![]() . In the Runnable, you can loop through the exchanges received and extract the current counter header. Then you can verify whether all the
counters are incremented by one and don’t have any gaps. You can use the JUnit fail method to fail when a gap is detected.
. In the Runnable, you can loop through the exchanges received and extract the current counter header. Then you can verify whether all the
counters are incremented by one and don’t have any gaps. You can use the JUnit fail method to fail when a gap is detected.
To test whether this works, you send in three messages, each of which contains a Counter. Notice that there is a gap in the sequence: 1, 2, 4. You expect this unit test to fail, so you instruct the mock to not be satisfied using the assertIsNotSatisfied method.
Next, you test a positive situation where no gaps exist. To do so, you use the assertIsSatisfied method and send in three messages in sequence, as follows:
template.sendBodyAndHeader("seda:topic:quote", "A", "Counter", 1);
template.sendBodyAndHeader("seda:topic:quote", "B", "Counter", 2);
template.sendBodyAndHeader("seda:topic:quote", "C", "Counter", 3);

mock.assertIsSatisfied();
That’s all there is to developing and using a custom expression.
Now let’s get back to the mock components and learn about using mocks to simulate real components. This is useful when the real component isn’t available or isn’t reachable from a local or test environment.
6.2.6. Using mocks to simulate real components
Suppose you have a route like the following one, in which you expose an HTTP service using Jetty so clients can obtain an order status:
from("jetty:http://web.rider.com/service/order")
    .process(new OrderQueryProcessor())
    .to("mina:tcp://miranda.rider.com:8123?textline=true")
    .process(new OrderResponseProcessor());
Clients send an HTTP GET, with the order ID as a query parameter, to the http://web.rider.com/service/order URL. Camel will use the OrderQueryProcessor to transform the message into a format that Rider Auto Parts’ mainframe (named Miranda) understands. The message is then sent to Miranda using TCP, and Camel waits for the reply to come back. The reply message is then processed using the OrderResponseProcessor before it’s returned to the HTTP client.
Now suppose you have been asked to write a unit test to verify that clients can obtain the order status. The challenge is that you don’t have access to Miranda, which contains the actual order status. You have been asked to simulate this server by replying with a canned response.
Camel provides the two methods listed in table 6.5 to help simulate a real component.
Table 6.5. Methods to control responses when simulating a real component
|
Method |
Description |
|---|---|
| whenAnyExchangeReceived (Processor processor) | Uses a custom processor to set a canned reply |
| whenExchangeReceived (int index, Processor processor) | Uses a custom processor to set a canned reply when the n’th message is received |
You can simulate a real endpoint by mocking it with the Mock component and controlling the reply using the methods in table 6.5. To do this, you need to replace the actual endpoint in the route with the mocked endpoint, which is done by replacing it with mock:miranda. Because you want to run the unit test locally, you also need to change the HTTP hostname to localhost, allowing you to run the test locally on your own laptop.
from("jetty:http://localhost:9080/service/order")
    .process(new OrderQueryProcessor())
    .to("mock:miranda")
    .process(new OrderResponseProcessor());
The unit test that leverages the preceding route follows.
Listing 6.9. Simulating a real component by using a mock endpoint

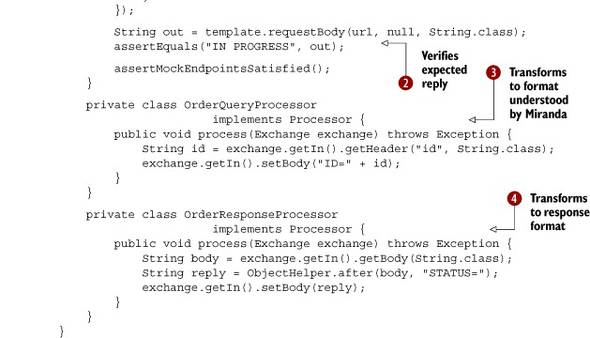
In the testMiranda method, you obtain the mock:miranda endpoint, which is the mock that simulates the Miranda server, and you set an expectation that the input message contains
the body "ID=123". To return a canned reply, you use the whenAnyExchangeReceived method ![]() , which allows you to use a custom processor to set the canned response. This response is set to be "ID=123,STATUS=IN PROGRESS".
, which allows you to use a custom processor to set the canned response. This response is set to be "ID=123,STATUS=IN PROGRESS".
Then you start the unit test by sending a message to the http://localhost:9080/service/order?id=123 endpoint; the message
is an HTTP GET using the requestBody method from the template instance. You then assert that the reply is "IN PROGRESS" using the regular JUnit assertEquals method ![]() . You use two processors (
. You use two processors (![]() and
and ![]() ) to transform the data to and from the format that the Miranda server understands.
) to transform the data to and from the format that the Miranda server understands.
You can find the code for this example in the chapter6/miranda folder of the book’s source code, which you can try using the following Maven goal:
mvn test -Dtest=MirandaTest
You’ve now learned all about the Camel Test Kit and how to use it for unit testing with Camel. We looked at using the Mock component to easily write tests with expectations, run tests, and have Camel verify whether the expectations were satisfied. You also saw how to use the Mock component to simulate a real component. You may wonder whether there is a more cunning way to simulate a real component than by using a mock, and there is. We’re going to look at how to simulate errors next, but the techniques involved could also be applied to simulating a real component.
6.3. Simulating errors
In the previous chapter, you learned how to use error handling to act upon errors. Now the question is how to test that your code works when errors happen.
You could test for errors by unplugging network cables and swinging an axe at the servers, but that’s a bit extreme. Instead we’ll look at how to simulate errors in unit tests using the three different techniques listed in table 6.6.
Table 6.6. Three techniques for simulating errors
|
Technique |
Summary |
|---|---|
| Processor | Using processors is easy, and they give you full control, as a developer. This technique is covered in section 6.3.1. |
| Mock | Using mocks is a good overall solution. Mocks are fairly easy to apply, and they provide a wealth of other features for testing, as you saw in section 6.2. This technique is covered in section 6.3.2. |
| Interceptor | This is the most sophisticated technique because it allows you to use an existing route without modifying it. Interceptors aren’t tied solely to testing; they can be used anywhere and anytime. We’ll cover interceptors in section 6.3.3. |
The following three sections cover these three techniques.
6.3.1. Simulating errors using a processor
Errors are simulated in Camel by throwing exceptions, which is exactly how errors occur in real life. For example, Java will throw an exception if it can’t connect to a remote server. Throwing such an exception is easy—you can do that from any Java code, such as from a Processor. That’s the topic of this section.
To illustrate this, we’ll take the use case from the previous chapter—you’re uploading reports to a remote server using HTTP, and you’re using FTP as a fallback method. This allows you to simulate errors with HTTP connectivity.
The route from listing 5.8 is repeated here.
Listing 6.10. Route using error handling with a failover to FTP
errorHandler(defaultErrorHandler()
    .maximumRedeliveries(5).redeliveryDelay(10000));

onException(IOException.class).maximumRedeliveries(3)
    .handled(true)
    .to("ftp://[email protected]?password=secret");

from("file:/rider/files/upload?delay=1h")
    .to("http://rider.com?user=gear&password=secret");
What you want to do now is simulate an error when sending a file to the HTTP service, and you’ll expect that it will be handled by onException and uploaded using FTP instead. This will ensure that the route is working correctly.
Because you want to concentrate the unit test on the error-handling aspect and not on the actual components used, you can just mock the HTTP and FTP endpoints. This frees you from the burden of setting up HTTP and FTP servers, and leaves you with a simpler route for testing:
errorHandler(defaultErrorHandler()
    .maximumRedeliveries(5).redeliveryDelay(1000));

onException(IOException.class).maximumRedeliveries(3)
    .handled(true)
    .to("mock:ftp");

from("direct:file")
       .to("mock:http");
This route also reduces the redelivery delay from 10 seconds to 1 second, to speed up unit testing. Notice that the file endpoint is stubbed with a direct endpoint that allows you to start the test by sending a message to the direct endpoint; this is much easier than writing an actual file.
To simulate a communication error when trying to send the file to the HTTP endpoint, you add a processor to the route that forces an error by throwing a ConnectException exception:
from("direct:file")
    .process(new Processor()) {
        public void process(Exchange exchange) throws Exception {
            throw new ConnectException("Simulated connection error");
        }
    })
    .to("mock:http");
You then write a test method to simulate this connection error, as follows:
@Test
public void testSimulateConnectionError() throws Exception {
    getMockEndpoint("mock:http").expectedMessageCount(0);

    MockEndpoint ftp = getMockEndpoint("mock:ftp");
    ftp.expectedBodiesReceived("Camel rocks");

    template.sendBody("direct:file", "Camel rocks");

    assertMockEndpointsIsSatisfied();
}
You expect no messages to arrive at the HTTP endpoint because you predicted the error would be handled and the message would be routed to the FTP endpoint instead.
The book’s source code contains this example. You can try it by running the following Maven goal from the chapter6/error directory:
mvn test -Dtest=SimulateErrorUsingProcessorTest
Using the Processor is easy, but you have to alter the route to insert the Processor. When testing your routes, you might prefer to test them as is without changes that could introduce unnecessary risks. What if you could test the route without changing it at all? The next two techniques do this.
6.3.2. Simulating errors using mocks
You saw in section 6.2.6 that the Mock component could be used to simulate a real component. But instead of simulating a real component, you can use what you learned there to simulate errors. If you use mocks, we don’t need to alter the route; you write the code to simulate the error directly into the test method, instead of mixing it in with the route. Listing 6.11 shows this.
Listing 6.11. Simulating an error by throwing an exception from the mock endpoint
@Test
public void testSimulateConnectionErrorUsingMock() throws Exception {
    getMockEndpoint("mock:ftp").expectedMessageCount(1);

    MockEndpoint http = getMockEndpoint("mock:http");
    http.whenAnyExchangeReceived(new Processor() {
        public void process(Exchange exchange) throws Exception {
            throw new ConnectException("Simulated connection error");
        }
    });

    template.sendBody("direct:file", "Camel rocks");

    assertMockEndpointsSatisfied();
}
To simulate the connection error, you need to get hold of the HTTP mock endpoint, where you use the whenAnyExchangeReceived method to set a custom Processor. That Processor can simulate the error by throwing the connection exception.
By using mocks, you put the code that simulates the error into the unit test method, instead of in the route, as is required by the processor technique.
Now let’s look at the last technique for simulating errors.
6.3.3. Simulating errors using interceptors
Suppose your boss wants you to write integration tests for listing 6.10 that should, among other things, test what happens when communication with the remote HTTP server fails. How can you do that? This is tricky because you don’t have control over the remote HTTP server, and you can’t easily force communication errors in the network layer. Luckily, Camel provides features to address this problem. We’ll get to that in a moment, but first we need to look at interceptors, which provide the means to simulate errors.
In a nutshell, an interceptor allows you to intercept any given message and act upon it. Figure 6.4 illustrates where the interception takes place in a route.
Figure 6.4. The channel acts as a controller, and it’s where messages are intercepted during routing.

Figure 6.4 shows a low-level view of a Camel route, where you route messages from a file consumer to an HTTP producer. In between sits the channel, which acts as a controller, and this is where the interceptors (among others) live.
This may look familiar—we looked at channels in figure 5.3. It’s the same channel that sits between every node in the route path and acts as a controller. Channels play a key role in the Camel routing engine, handling such things as routing the message to the next designated target, error handling, interception, tracing messages and gathering metrics.
The three types of interceptors that Camel provides out of the box are listed in table 6.7.
Table 6.7. The three flavors of interceptors provided out of the box in Camel
|
Interceptor |
Description |
|---|---|
| intercept | Intercepts every single step a message takes. This interceptor is invoked continuously as the message is routed. |
| interceptFromEndpoint | Intercepts incoming messages arriving on a particular endpoint. This interceptor is only invoked once. |
| interceptSendToEndpoint | Intercepts messages that are about to be sent to a particular endpoint. This interceptor is only invoked once. |
To write integration tests, you can use interceptSendToEndpoint to intercept messages sent to the remote HTTP server and redirect them to a processor that simulates the error, as shown here:
interceptSendToEndpoint("http://rider.com/rider")
    .skipSendToOriginalEndpoint();
    .process(new SimulateHttpErrorProcessor());
When a message is about to be sent to the HTTP endpoint, it’s intercepted by Camel and the message is routed to your custom processor, where you simulate an error. When this detour is complete, the message would normally be sent to the originally intended endpoint, but you instruct Camel to skip this step using the skipSendToOriginalEndpoint method.
Tip
The last two interceptors in table 6.7 support using wildcards (*) and regular expressions in the endpoint URL. You can use these techniques to intercept multiple endpoints or to be lazy and just match all HTTP endpoints. We’ll look at this in a moment.
Because you’re doing an integration test, you want to keep the original route untouched, which means you can’t add interceptors or mocks directly in the route. Because you still want to use interceptors in the route, you need another way to somehow add the interceptors. Camel provides the adviceWith method to address this.
Using Advicewith to Add Interceptors to an Existing Route
The adviceWith method is available during unit testing, and it allows you to add such things as interceptors and error handling to an existing route.
To see how this works, let’s look at an example. The following code snippet shows how you can use adviceWith in a unit test method:
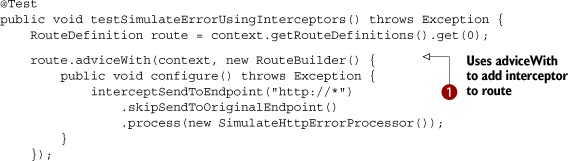
The key issue when using adviceWith is to know which route to use. Because you only have one route in this case, you can refer to the first route enlisted in the route definitions list. The route definitions list contains the definitions of all routes registered in the current CamelContext.
When you’ve got the route, it’s just a matter of using the adviceWith method ![]() , which leverages a RouteBuilder—this means that in the configure method you can use the Java DSL to define the interceptors. Notice that the interceptor uses a wildcard to match all HTTP
endpoints.
, which leverages a RouteBuilder—this means that in the configure method you can use the Java DSL to define the interceptors. Notice that the interceptor uses a wildcard to match all HTTP
endpoints.
Tip
If you have multiple routes, you’ll need to select the correct route to be used. To help select the route, you can assign unique IDs to the routes, which you then can use to look up the route, such as context.getRouteDefinition("myCoolRoute").
We’ve included this integration test in the book’s source code in the chapter6/error directory. You can try it using the following Maven goal:
mvn test -Dtest=SimulateErrorUsingInterceptorTest
Tip
Interceptors aren’t only for simulating errors—they’re a general purpose feature that can also be used for other types of testing. For example, when you’re testing production routes, you can use interceptors to detour messages to mock endpoints.
The last section of this chapter covers how to do integration testing without mocks.
6.4. Testing without mocks
So far in this chapter, you’ve learned that mocks play a central role when testing Camel applications. For example, integration testing often involves real live components, and substituting mocks isn’t an option, as the point of the integration test is to test with live components. In this section, we’ll look at how to test such situations without using mocks.
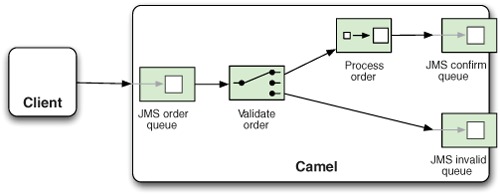
Rider Auto Parts has a client application that business partners can use to submit orders. The client dispatches orders over JMS to an incoming order queue at the Rider Auto Parts message broker. A Camel application is then used to further process these incoming orders. Figure 6.5 illustrates this.
Figure 6.5. The client sends orders to an order queue, which is routed by a Camel application. The order is either accepted and routed to a confirm queue, or it’s not accepted and is routed to an invalid queue.
The client application is written in Java, but it doesn’t use Camel at all. The challenge you’re facing is how to test that the client and the Camel application work as expected? How can you do integration testing?
6.4.1. Integration testing
Integration testing the scenario outlined in figure 6.5 requires you to use live components, which means you must start the test by using the client to send a message to the order queue. Then you let the Camel application process the message. When this is complete, you’ll have to inspect whether the message ended up in the right queue—the confirm or the invalid queue.
You have to perform these three tasks:
- Use the client to send an order message
- Wait for the Camel application to process the message
- Inspect the confirm and invalid queues to see if the message arrived as expected
So let’s tackle each step.
Use the Client to Send an Order Message
The client is easy to use. All you’re required to do is provide an IP address to the remote Rider Auto Parts message broker, and then use its sendOrder method to send the order.
The following code has been simplified in terms of the information required for order details:
OrderClient client = new OrderClient("localhost:61616");
client.sendOrder(123, date, "4444", "5555");
Wait for the Camel Application to Process the Message
The client has sent an order to the order queue on the message broker. The Camel application will now react and process the message according to the route outlined in figure 6.5.
The problem you’re facing now is that the client doesn’t provide any API you can use to wait until the process is complete. What you need is an API that provides insight into the Camel application. All you need to know is when the message has been processed, and optionally whether it completed successfully or failed.
Camel provides the NotifyBuilder, which provides such insight. We’ll cover the NotifyBuilder in more detail in section 6.4.2, but the following code shows how to have NotifyBuilder notify you when Camel is finished processing the message:
NotifyBuilder notify = new NotifyBuilder(context).whenDone(1).create();

OrderClient client = new OrderClient("tcp://localhost:61616");
client.sendOrder(123, date, "4444", "5555");

boolean matches = notify.matches(5, TimeUnit.SECONDS);
assertTrue(matches);
First, you configure NotifyBuilder to notify you when one message is done. Then you use the client to send the message. Invoking the matches method on the notify instance will cause the test to wait until the condition applies, or the 5-second timeout occurs.
The last task tests whether the message was processed correctly.
Inspect the Queues to See if the Message Arrived as Expected
After the message has been processed, you need to investigate whether the message arrived at the correct message queue. If you want to test that a valid order arrived in the confirm queue, you can use the BrowsableEndpoint to browse the messages on the JMS queue. By using the BrowsableEndpoint, you only peek inside the message queue, which means the messages will still be present on the queue.
Doing this requires a little bit of code, as shown in here:
BrowsableEndpoint be = context.getEndpoint("activemq:queue:confirm",
                                           BrowsableEndpoint.class);
List<Exchange> list = be.getExchanges();
assertEquals(1, list.size());
String body = list.get(0).getIn().getBody(String.class);
assertEquals("OK,123,2010-04-20T15:47:58,4444,5555", body);
By using BrowsableEndpoint, you can retrieve the exchanges on the JMS queue using the getExchanges method. You can then use the exchanges to assert that the message arrived as expected.
The source code for the book contains this example in the chapter6/notify directory, which you can try using the following Maven goal:
mvn test -Dtest=OrderTest
We’ve now covered an example of how to do integration testing without mocks. Along the road, we introduced the NotifiyBuilder, which has many more nifty features. We’ll review it in the next section.
6.4.2. Using NotifyBuilder
NotifyBuilder is located in the org.apache.camel.builder package. It uses the Builder pattern, which means you stack methods on it to build an expression. You use it to define conditions for messages being routed in Camel. Then it offers methods to test whether the conditions have been meet. We already used it in the previous section, but this time we’ll raise the bar and show how you can build more complex conditions.
In the previous example, you used a simple condition:
NotifyBuilder notify = new NotifyBuilder(context).whenDone(1).create();
This condition will match when one or more messages have been processed in the entire Camel application. This is a very coarse-grained condition. Suppose you have multiple routes, and another message was processed as well. That would cause the condition to match even if the message you wanted to test was still in progress.
To remedy this, you can pinpoint the condition so it applies only to messages originating from a specific endpoint, as shown in bold:
NotifyBuilder notify = new NotifyBuilder(context)
.from("activemq:queue:order").whenDone(1).create();
Now you’ve told the notifier that the condition only applies for messages that originate from the order queue.
Suppose you send multiple messages to the order queue, and you want to test whether a specific message was processed. You can do this using a predicate to indicate when the desired message was completed. This is done using the whenAnyDoneMatches method, as shown here in bold:
NotifyBuilder notify = new NotifyBuilder(context)
    .from("activemq:queue:order").whenAnyDoneMatches(
     body().isEqualTo("OK,123,2010-04-20'T'15:48:00,2222,3333"))
    .create();
In this example we want the predicate to determine if the body is equal to the expected result which is the string starting with "OK,123,...".
We’ve now covered some examples using NotifyBuilder, but the builder has many methods that allow you to build even more complex expressions. Table 6.8 lists the most commonly used methods.
Table 6.8. Noteworthy methods on NotifyBuilder
|
Method |
Description |
|---|---|
| from(uri) | Specifies that the message must originate from the given endpoint. You can use wildcards and regular expressions in the given URI to match multiple endpoints. For example, you could use from ("activemq:queue:*") to match any JMS queues. |
| filter(predicate) | Filters unwanted messages. |
| whenDone(number) | Matches when a minimum number of messages are done. |
| whenCompleted(number) | Matches when a minimum number of messages are completed. |
| whenFailed(number) | Matches when a minimum number of messages have failed. |
| whenBodiesDone(bodies...) | Matches when messages are done with the specified bodies in the given order. |
| whenAnyDoneMatches (predicate) | Matches when any message is done and matches the predicate. |
| create | Creates the notifier. |
| matches | Tests whether the notifier currently matches. This operation returns immediately. |
| matches(timeout) | Waits until the notifier matches or times out. Returns true if it matched, or false if a timeout occurred. |
The NotifyBuilder has over 30 methods, and we’ve only listed the most commonly used ones in table 6.8. Consult the online Camel documentation to see all the supported methods: http://camel.apache.org/notifybuilder.html.
Note
The NotifyBuilder works in principle by adding an EventNotifier to the given CamelContext. The EventNotifier then invokes callbacks during the routing of exchanges. This allows the NotifyBuilder to listen for those events and react accordingly. The EventNotifier is covered in section 12.3.5.
The NotifyBuilder identifies three ways a message can complete:
- Done— This means the message is done, regardless of whether it completed or failed.
- Completed— This means the message completed with success (no failure).
- Failed— This means the message failed (for example, an exception was thrown and not handled).
The names of these three ways are also incorporated in the names of the builder methods: whenDone, whenCompleted, and whenFailed (listed in table 6.8).
Tip
You can create multiple instances of NotifyBuilder if you want to be notified of different conditions. The NotifyBuilder also supports using binary operations (and, or, not) to stack together multiple conditions.
The source code for the book contains some example of using NotifyBuilder in the chapter6/notify directory. You can run them using the following Maven goal:
mvn test -Dtest=NotifyTest
We encourage you to take a look at this source code and also the online documentation.
That’s it for testing without mocks, and that marks the end of this chapter.
6.5. Summary and best practices
Testing is a challenge for every project. It’s generally considered bad practice to only do testing at the end of a project, so testing often begins when development starts and continues through the remainder of the project lifecycle.
Testing isn’t something you only do once, either. Testing is involved in most phases in a project. You should do unit testing while you develop the application. And you should also implement integration testing to ensure that the different components and systems work together. You also have the challenge of ensuring you have the right environments for testing.
Camel can’t eliminate these challenges, but it does provide a great Test Kit that makes writing tests with Camel applications easier and less time consuming. We looked at this Test Kit, and we also looked at how to externalize dynamic parts using property placeholders, so you can reuse and test the same test cases in different environments.
We also reviewed how you can simulate real components using mocks in the earlier phases of a project, allowing you to test against systems you may not currently have access to. In chapter 5 you learned about error handling, and in this chapter you saw how you can use the Camel Test Kit to test error handling by simulating errors.
We reviewed techniques for integration testing that don’t involve using mocks. Doing integration testing, using live components and systems, is often harder than unit testing, where mocks are a real advantage. In integration testing, mocks aren’t available to use, and you have to use other techniques such as setting up a notification scheme that can notify you when certain messages have been processed. This allows you to inspect the various systems to see whether the messages were processed as expected (such as by peeking into a JMS queue or looking at a database table).
Here are a few best practices to take away from the chapter:
- Use unit tests. Use the Camel Test Kit from the beginning, and write unit tests in your projects.
- Use the Mock component. The Mock component is a powerful component for unit testing. Use it rigorously in your unit tests.
- Test error handling. Integration is difficult, and unexpected errors can occur. Use the techniques you’ve learned in this chapter to simulate errors and test that your application is capable of dealing with these failures.
- Use integration tests. Build and use integration tests to test that your application works when integrated with real and live systems.
The next chapter will cover the use of components with Camel. You’ve already used components, such as the file and SEDA components. But there is much more to components, so we’ve devoted an entire chapter to cover them in detail.