
Chapter 7. Understanding components
- An overview of Camel components
- Working with files and databases
- Messaging with JMS
- Web services using Apache CXF
- Networking with Apache MINA
- In-memory messaging
- Automating tasks with the Quartz and Timer components
So far, we’ve only touched on a handful of ways that Camel can communicate with external applications, and we haven’t gone into much detail on most components. It’s time to take your use of the components you’ve already seen to the next level, and to introduce new components that will enable your Camel applications to communicate with the outside world.
First, we’ll discuss exactly what it means to be a component in Camel. We’ll also see how components are added to Camel. Then, although we can’t describe every component in Camel—that would at least triple the length of this book—we’ll look at the most commonly used components.
Table 7.1 lists the components we’ll cover in this chapter and lists the URLs for their official documentation.
Table 7.1. Components discussed in this chapter
|
Component function |
Component |
Camel documentation reference |
|---|---|---|
| File I/O | File | http://camel.apache.org/file2.html |
| FTP | http://camel.apache.org/ftp2.html | |
| Asynchronous messaging | JMS | http://camel.apache.org/jms.html |
| Using web services | CXF | http://camel.apache.org/cxf.html |
| Networking | MINA | http://camel.apache.org/mina.html |
| Working with databases | JDBC | http://camel.apache.org/jdbc.html |
| JPA | http://camel.apache.org/jpa.html | |
| In-memory messaging | Direct | http://camel.apache.org/direct.html |
| SEDA | http://camel.apache.org/seda.html | |
| VM | http://camel.apache.org/vm.html | |
| Automating tasks | Timer | http://camel.apache.org/timer.html |
| Quartz | http://camel.apache.org/quartz.html |
Let’s start off with an overview of Camel components.
7.1. Overview of Camel components
Components are the primary extension point in Camel. Over the years since Camel’s inception, the list of components has really grown. As of version 2.5.0, Camel ships with more than 80 components, and there are dozens more available separately from other community sites.[1] These components allow you to bridge to many different APIs, protocols, data formats, and so on. Camel saves you from having to code these integrations yourself, thus it achieves its primary goal of making integration easier.
1 See appendix D for information on some of these community sites.
What does a Camel component look like? Well, if you think of Camel routes as highways, components are roughly analogous to on and off ramps. A message traveling down a route will need to take an off ramp to get to another route or external service. If the message is headed for another route, it will need to take an on ramp to get onto that route.
From an API point of view, a Camel component is simple, consisting of a class implementing the Component interface, shown here:
public interface Component {
    Endpoint createEndpoint(String uri) throws Exception;
    CamelContext getCamelContext();
    void setCamelContext(CamelContext context);
}
The main responsibility of a component is to be a factory for endpoints. To do this, a component also holds on to a reference of the CamelContext. The CamelContext provides access to Camel’s common facilities, like the registry, class loader, and type converters. This relationship is shown in figure 7.1.
Figure 7.1. A component creates endpoints and may use the CamelContext’s facilities to accomplish this.

There are two main ways in which components are added to a Camel runtime: by manually adding them to the CamelContext and through autodiscovery.
7.1.1. Manually adding components
You’ve seen the manual addition of a component already. In chapter 2, you had to add a configured JMS component to the CamelContext to utilize a ConnectionFactory. This was done using the addComponent method of the CamelContext interface, as follows:
CamelContext context = new DefaultCamelContext();
context.addComponent("jms",
    JmsComponent.jmsComponentAutoAcknowledge(connectionFactory));
In this example, you add a component created by the JmsComponent.jmsComponentAutoAcknowledge method and assign it a name of “jms”. This component can be selected in a URI by using the “jms” scheme.
7.1.2. Autodiscovering components
The other way components can be added to Camel is through autodiscovery. The autodiscovery process is illustrated in figure 7.2.
Figure 7.2. To autodiscover a component named “bean”, the component resolver searches for a file named “bean” in a specific directory on the classpath. This file specifies that the component class that will be created is BeanComponent.
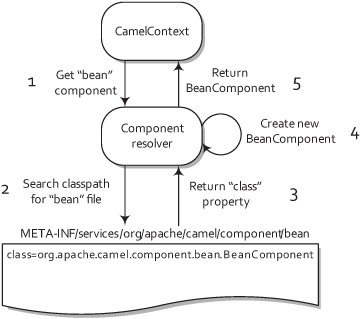
Autodiscovery is the way the components that ship with Camel are registered. In order to discover new components, Camel looks in the META-INF/services/org/apache/camel/component directory on the classpath for files. Files in this directory determine what the name of a component is and what the fully qualified class name is.
As an example, let’s look at the Bean component. It has a file named “bean” in the META-INF/services/org/apache/camel/component directory that contains a single line:
class=org.apache.camel.component.bean.BeanComponent
This class property tells Camel to load up the org.apache.camel.component. bean.BeanComponent class as a new component, and the filename gives the component the name of “bean”.
Tip
We’ll discuss how to create your own Camel component in section 11.3 in chapter 11.
Most of the components in Camel are in separate Java modules from the camel-core module, because they usually depend on third-party dependencies that would bloat the core. For example, the Atom component depends on Apache Abdera to communicate over Atom. We wouldn’t want to make every Camel application depend on Abdera, so the Atom component is included in a separate camel-atom module.
The camel-core module has 13 useful components built in, though. These are listed in table 7.2.
Table 7.2. Components in the camel-core module
|
Component |
Description |
Camel documentation reference |
|---|---|---|
| Bean | Invokes a Java bean in the registry. You saw this used extensively in chapter 4. | http://camel.apache.org/bean.html |
| Browse | Allows you to browse the list of exchanges that passed through a browse endpoint. This can be useful for testing, visualization tools, or debugging. | http://camel.apache.org/browse.html |
| DataSet | Allows you to create large numbers of messages for soak or load testing. | http://camel.apache.org/dataset.html |
| Direct | Allows you to synchronously call another endpoint with little overhead. We’ll look at this component in section 7.7.1. | http://camel.apache.org/direct.html |
| File | Reads or writes to files. We’ll discuss this component in section 7.2. | http://camel.apache.org/file2.html |
| Language | Executes a script against the incoming exchange using one of the languages supported by Camel. | http://camel.apache.org/language-component.html |
| Log | Logs messages to a number of different logging providers. | http://camel.apache.org/log.html |
| Mock | Tests that messages flow through a route as expected. You saw the Mock component in action in chapter 6. | http://camel.apache.org/mock.html |
| Properties | Allows you to use property placeholders in endpoint URIs. We talked about this in chapter 6. | http://camel.apache.org/properties.html |
| Ref | Looks up endpoints in the registry. | http://camel.apache.org/ref.html |
| SEDA | Allows you to asynchronously call another endpoint in the same CamelContext. We’ll look at this component in section 7.7.2. | http://camel.apache.org/seda.html |
| Timer | Sends out messages at regular intervals. You’ll learn more about the Timer component and a more powerful scheduling endpoint based on Quartz in section 7.8 of this chapter. | http://camel.apache.org/timer.html |
| VM | Allows you to asynchronously call another endpoint in the same JVM. We’ll discuss this component in section 7.7.2. | http://camel.apache.org/vm.html |
Now let’s look at each component in detail. We’ll start by looking at the File component.
7.2. Working with files (File and FTP components)
It seems that in integration projects, you always end up needing to interface with a filesystem somewhere. You may find this strange, as new systems often provide nice web services and other remoting APIs to serve as integration points. The problem is that in integration, we often have to deal with older legacy systems, and file-based integrations are common.
For example, you might need to read a file that was written by another application—it could be sending a command, an order to be processed, data to be logged, or anything else. This kind of information exchange, illustrated in figure 7.3, is called a file transfer in EIP terms.
Figure 7.3. A file transfer between two applications is a common way to integrate with legacy systems.

Another reason why file-based integrations are so common is that they’re easy to understand. Even novice computer users know something about filesystems.
Even though they’re easy to understand, file-based integrations are difficult to get right. Developers commonly have to battle with complex IO APIs, platform-specific filesystem issues, concurrent access, and the like.
Camel has extensive support for interacting with filesystems. In this section, we’ll look at how to use the File component to read files from and write them to the local filesystem. We’ll also cover some advanced options for file processing and discuss how to access remote files with the FTP component.
7.2.1. Reading and writing files with the File component
As you saw before, the File component is configured through URI options. Some common options are shown in table 7.3; for a complete listing, see the online documentation (http://camel.apache.org/file2.html).
Table 7.3. Common URI options used to configure the File component
|
Option |
Default value |
Description |
|---|---|---|
| delay | 500 | Specifies the number of milliseconds between polls of the directory. |
| recursive | false | Specifies whether or not to recursively process files in all subdirectories of this directory. |
| noop | false | Specifies file-moving behavior. By default, Camel will move files to the .camel directory after processing them. To stop this behavior and keep the original files in place, set the noop option to true. |
| fileName | null | Uses an expression to set the filename used. For consumers, this acts as a filename filter; in producers, it’s used to set the name of the file being written. |
| fileExist | Override | Specifies what a file producer will do if the same filename already exists. Valid options are Override, Append, Fail, and Ignore. Override will cause the file to be replaced. Append adds content to the file. Fail causes an exception to be thrown. If Ignore is set, an exception won’t be thrown and the file won’t be written. |
| delete | false | Specifies whether Camel will delete the file after processing. By default, Camel will not delete the file. |
| move | .camel | Specifies the directory to which Camel moves files after it’s done processing them. |
| include | null | Specifies a regular expression. Camel will process only those files that match this expression. |
| exclude | null | Specifies a regular expression. Camel will exclude files based on this expression. |
Let’s first see how Camel can be used to read files.
Reading Files
As you’ve seen in previous chapters, reading files with Camel is pretty straightforward. Here’s a simple example:
public void configure() {
    from("file:data/inbox?noop=true").to("stream:out");
}
This route will read files from the data/inbox directory and print the contents of each to the console. The printing is done by sending the message to the System.out stream, accessible by using the Stream component. As stated in table 7.3, the noop flag tells Camel to leave the original files as is. This is a convenience option for testing, because it means that you can run the route many times without having to repopulate a directory of test files.
To run this yourself, change to the chapter7/file directory in the book’s source code, and run this command:
mvn compile exec:java -Dexec.mainClass=camelinaction.FilePrinter
What if you removed the noop flag and changed the route to the following:
public void configure() {
    from("file:data/inbox").to("stream:out");
}
This would use Camel’s default behavior, which is to move the consumed files to a special .camel directory (though the directory can be changed with the move option); the files are moved after the routing has completed. This behavior was designed so that files would not be processed over and over, but it also keeps the original files around in case something goes wrong. If you don’t mind losing the original files, you can use the delete option listed in table 7.2.
By default, Camel will also lock any files that are being processed. The locks are released after routing is complete.
Both of the two preceding routes will consume any file not beginning with a period, so they will ignore files like .camel, .m2, and so on. You can customize which files are included by using the include and exclude options.
Writing Files
You just saw how to read files created by other applications or users. Now let’s see how Camel can be used to write files. Here’s a simple example:
public void configure() {
   from("stream:in?promptMessage=Enter something:").to("file:data/outbox");
}
This example uses the Stream component to accept input from the console. The stream:in URI will instruct Camel to read any input from System.in on the console and create a message from that. The promptMessage option displays a prompt, so you know when to enter text. The file:data/outbox URI instructs Camel to write out the message body to the data/outbox directory.
To see what happens firsthand, you can try the example by changing to the chapter7/file directory in the book’s source code and executing the following command:
mvn compile exec:java -Dexec.mainClass=camelinaction.FileSaver
When this runs, you’ll see an “Enter something:” prompt. Enter some text into the console, and press Enter, like this:
INFO: Apache Camel 2.5.0 (CamelContext: camel-1) started
Enter something:Hello
This text (in this case, “Hello”) will be read in by the Stream component and added as the body of a new message. This message’s body (the text you entered) will then be written out to a file in the data/outbox directory (which will be created if it doesn’t exist).
If you run a directory listing on the data/outbox directory now, you’ll see a single file that has a rather strange name:
f6a3a5ee-536b-43c3-8307-1b96e1ae7778
Because you did not specify a filename to use, Camel chose a unique filename based on the message ID.
To set the filename that should be used, you can add a fileName option to your URI. For example, you could change the route so it looks like this:
public void configure() {
    from("stream:in?promptMessage=Enter something:")
        .to("file:data/outbox?fileName=prompt.txt");
}
Now, any text entered into the console will be saved into the prompt.txt file in the data/outbox directory.
Camel will by default overwrite prompt.txt, so you now have a problem with this route. If text is frequently entered into the console, you may want new files created each time, so they don’t overwrite the old ones. To implement this in Camel, you can use an expression for the filename. You can use the Simple expression language to put the current time and date information into your filename:
public void configure() {
    from("stream:in?promptMessage=Enter something:")
        .to("file:data/outbox?fileName=${date:now:yyyyMMdd-hh:mm:ss}.txt");
}
The date:now expression returns the current date, and you can also use any formatting options permitted by java.text.SimpleDataFormat.
Now if you enter text into the console at 2:00 p.m. on January 31, 2010, the file in the data/outbox directory will be named something like this:
20100131-02:00:53.txt
The simple techniques for reading from and writing to files discussed here will be adequate for most of the cases you’ll encounter in the real world. For the trickier cases, there are a plethora of configuration possibilities listed in the online documentation.
We’ve started slowly with the File component, to get you comfortable with using components in Camel. Next we’ll look at the FTP component, which builds on the File component but introduces messaging across a network. After that, we’ll be getting into more complex topics.
7.2.2. Accessing remote files with the FTP component
Probably the most common way to access remote files is by using FTP, and Camel supports three flavors of FTP:
- Plain FTP mode transfer
- SFTP for secure transfer
- FTPS (FTP Secure) for transfer with the Transport Layer Security (TLS) and Secure Sockets Layer (SSL) cryptographic protocols enabled
The FTP component inherits all the features and options of the File component, and it adds a few more options, as shown in table 7.4. For a complete listing of options for the FTP component, see the online documentation (http://camel.apache.org/ftp2.html).
Table 7.4. Common URI options used to configure the FTP component
|
Option |
Default value |
Description |
|---|---|---|
| username | null | Provides a username to the remote host for authentication. If no username is provided, anonymous login is attempted. You can also specify the username by prefixing username@ to the hostname in the URI. |
| password | null | Provides a password to the remote host to authenticate the user. You can also specify the password by prefixing the hostname in the URI with username:password@. |
| binary | false | Specifies the transfer mode. By default, Camel will transfer in ASCII mode; set this option to true to enable binary transfer. |
| disconnect | false | Specifies whether Camel will disconnect from the remote host right after use. The default is to remain connected. |
| maximumReconnectAttempts | 3 | Specifies the maximum number of attempts Camel will make to connect to the remote host. If all these attempts are unsuccessful, Camel will throw an exception. A value of 0 disables this feature. |
| reconnectDelay | 1000 | Specifies the delay in milliseconds between reconnection attempts. |
Because the FTP component isn’t part of the camel-core module, you need to add an additional dependency to your project. If you use Maven, you just have to add the following dependency to your POM:
<dependency>
  <groupId>org.apache.camel</groupId>
  <artifactId>camel-ftp</artifactId>
  <version>2.5.0</version>
</dependency>
To demonstrate accessing remotes files, let’s use the Stream component as in the previous section to interactively generate and send files over FTP. A route that accepts text on the console and then sends it over FTP would look like this:
<route>
  <from uri="stream:in?promptMessage=Enter something:" />
  <to uri="ftp://rider:secret@localhost:21000/data/outbox"/>
</route>
This is a Spring-based route—Spring makes it easy to hook start and stop methods to an embedded FTP server. This FTP endpoint URI specifies that Camel should send the message to an FTP server on the localhost listening on port 21000, using rider as the username and secret as the password. It also specifies that messages are to be stored in the data/outbox directory of the FTP server.
To run this example for yourself, change to the chapter7/ftp directory and run this command:
mvn camel:run
After Camel has started, you’ll need to enter something into the console:
INFO  Apache Camel 2.5.0 (CamelContext: camelContext) started
Enter something:Hello
The example will keep running until you press Ctrl-C.
You can now check to see if the message made it into the FTP server. The FTP server’s root directory was set up to be the current directory of the application, so you can check data/outbox for a message:
cat data/outbox/8ff0787f-1eab-4d11-9a60-5c3f5a05e498
Hello
As you can see, using the FTP component is similar to using the File component. Now that you know how to do the most basic of integrations with files and FTP, let’s move on to more advanced topics, like JMS and web services.
7.3. Asynchronous messaging (JMS component)
JMS messaging is an incredibly useful integration technology. It promotes loose coupling in application design, has built-in support for reliable messaging, and is by nature asynchronous. As you saw in chapter 2, when we looked at JMS, it’s also easy to use from Camel. In this section, we’ll expand on what we covered in chapter 2 by going over some of the more commonly used configurations of the JMS component.
Camel doesn’t ship with a JMS provider; you need to configure it to use a specific JMS provider by passing in a ConnectionFactory instance. For example, to connect to an Apache ActiveMQ broker listening on port 61616 of the local host, you could configure the JMS component like this:
<bean id="jms" class="org.apache.camel.component.jms.JmsComponent">
  <property name="connectionFactory">
    <bean class="org.apache.activemq.ActiveMQConnectionFactory">
      <property name="brokerURL" value="tcp://localhost:61616" />
    </bean>
  </property>
</bean>
The tcp://localhost:61616 URI passed in to the ConnectionFactory is JMS provider-specific. In this example, you’re using the ActiveMQConnectionFactory so the URI is parsed by ActiveMQ. The URI tells ActiveMQ to connect to a broker using TCP on port 61616 of the local host.
If you wanted to connect to a broker over some other protocol, ActiveMQ supports connections over VM, SSL, UDP, multicast, and so on. Throughout this section, we’ll be demonstrating JMS concepts using ActiveMQ as the JMS provider, but any provider could have been used here.
By default, a JMS ConnectionFactory doesn’t pool connections to the broker, so it will spin up new connections for every message. The way to avoid this is to use connection factories that use connection pooling.
For convenience to Camel users, ActiveMQ ships with the ActiveMQ component, which configures connection pooling automatically for improved performance. The ActiveMQ component is used as follows:
<bean id="activemq"class="org.apache.activemq.camel.component.ActiveMQComponent">
<property name="brokerURL" value="tcp://localhost:61616" />
</bean>
When using this component, you’ll also need to depend on the activemq-camel module from ActiveMQ:
<dependency>
  <groupId>org.apache.activemq</groupId>
  <artifactId>activemq-camel</artifactId>
  <version>5.4.1</version>
</dependency>
This module contains the ActiveMQ component and type converters for ActiveMQ data types.
Camel’s JMS component has a daunting list of configuration options—over 60 to date. Many of these will only be seen in very specific JMS usage scenarios. The common ones are listed in table 7.5.
Table 7.5. Common URI options used to configure the JMS component
|
Option |
Default value |
Description |
|---|---|---|
| autoStartup | true | Controls whether consumers start listening right after creation. If set to false, you’ll need to invoke the start() method on the consumer manually at a later time. |
| clientId | null | Sets the JMS client ID, which must be unique among all connections to the JMS broker. The client ID set in the ConnectionFactory overrides this one if set. |
| concurrentConsumers | 1 | Sets the number of consumer threads to use. It’s a good idea to increase this for high-volume queues, but it’s not advisable to use more than one concurrent consumer for JMS topics, because this will result in multiple copies of the same message. |
| disableReplyTo | false | Specifies whether Camel should ignore the JMSReplyTo header in any messages or not. Set this if you don’t want Camel to send a reply back to the destination specified in the JMSReplyTo header. |
| durableSubscriptionName | null | Specifies the name of the durable topic subscription. If clientId is also set, the topic subscription is made durable automatically. |
| maxConcurrentConsumers | 1 | Sets the maximum number of consumer threads to use. If this value is higher than concurrentConsumers, new consumers are started dynamically as load demands. If load drops down, these extra consumers will be freed and the number of consumers will be equal to concurrentConsumers again. Increasing this value isn’t advisable when using topics. |
| replyTo | null | Sets the destination that the reply is sent to. This overrides the JMSReplyTo header in the message. By setting this, Camel will use a fixed reply queue. By default, Camel will use a temporary reply queue. |
| requestTimeout | 20000 | Specifies the time in milliseconds before Camel will timeout sending a message. |
| selector | null | Sets the JMS message selector expression. Only messages passing this predicate will be consumed. |
| timeToLive | null | When sending messages, sets the amount of time the message should live. After this time expires, the JMS provider may discard the message. |
| transacted | false | Enables transacted sending and receiving of messages in InOnly mode. |
To use the JMS component in your project, you’ll need to include the camel-jms module on your classpath as well as any JMS provider JARs. If you’re using Maven, the JMS component can be added with the following dependency:
<dependency>
  <groupId>org.apache.camel</groupId>
  <artifactId>camel-jms</artifactId>
  <version>2.5.0</version>
</dependency>
The best way to show that Camel is a great tool for JMS messaging is with an example. Let’s look at how to send and receive messages over JMS.
7.3.1. Sending and receiving messages
In chapter 2, you saw how orders are processed at Rider Auto Parts. It started out as a step-by-step process: they were first sent to accounting to validate the customer standing and then to production for manufacture. This process was improved by sending orders to accounting and production at the same time, cutting out the delay involved when production waited for the OK from accounting. A multicast EIP was used to implement this scenario.
Figure 7.4 illustrates another possible solution, which is to use a JMS topic following a publish-subscribe model. In that model, listeners such as accounting and production could subscribe to the topic, and new orders would be published to the topic. In this way, both accounting and production would receive a copy of the order message.
Figure 7.4. Orders are published to the xmlOrders topic, and the two subscribers (the accounting and production queues) get a copy of the order.
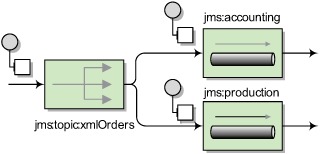
To implement this in Camel, you’d set up two consumers, which means there will be two routes needed:
from("jms:topic:xmlOrders").to("jms:accounting");
from("jms:topic:xmlOrders").to("jms:production");
When a message is sent (published) to the xmlOrders topic, both the accounting and production queues will receive a copy.
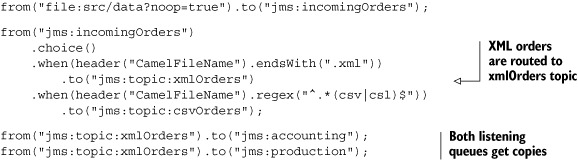
As you saw in chapter 2, an incoming order could originate from another route (or set of routes), like one that receives orders via a file, as shown in listing 7.1.
Listing 7.1. Topics allow multiple receivers to get a copy of the message
To run this example, go to the chapter7/jms directory in the book’s source, and run this command:
mvn clean compile camel:run
This will output the following on the command line:
Accounting received order: message1.xml
Production received order: message1.xml
Why did you get this output? Well, you had a single order file named message1.xml, and it was published to the xmlOrders topic. Both the accounting and production queues were subscribed to the topic, so each received a copy. Testing routes consumed the messages on those queues and output the messages.
Messages can also be sent “by hand” to a JMS destination using a ProducerTemplate. A template class, in general, is a utility class that simplifies access to an API; in this case, the Producer interface. For example, to send an order to the topic using a ProducerTemplate, you could use the following snippet:
ProducerTemplate template = camelContext.createProducerTemplate();
template.sendBody("jms:topic:xmlOrders", "<?xml ...");
This is a useful feature for getting direct access to any endpoint in Camel. For more on the ProducerTemplate, see appendix C.
All of the JMS examples so far have been one-way only. Let’s look at how you can deliver a reply to the sent message.
7.3.2. Request-reply messaging
JMS messaging with Camel (and in general) is asynchronous by default. Messages are sent to a destination, and the client doesn’t wait for a reply. But there are times when it’s useful to be able to wait and get a reply after sending to a destination. One obvious application is when the JMS destination is a frontend to a service—in this case, a client sending to the destination would be expecting a reply from the service.
JMS supports this type of messaging by providing a JMSReplyTo header, so that the receiver knows where to send the reply, and a JMSCorrelationID, used to match replies to requests if there are multiple replies awaiting. This flow of messages is illustrated in figure 7.5.
Figure 7.5. In request-reply messaging, a requestor sends a message to a request queue and then waits for a reply in the reply queue. The replier waits for a new message in the request queue, inspects the JMSReplyTo address, and then sends a reply back to that destination.

Camel takes care of this style of messaging, so you don’t have to create special reply queues, correlate reply messages, and the like. By changing the message exchange pattern (MEP) to InOut, Camel will enable request-reply mode for JMS.
To demonstrate, let’s take a look at an order validation service within Rider Auto Parts’ backend systems that checks orders against the company database to make sure the parts listed are actual products. This service is exposed via a queue named validate. The route exposing this service over JMS could be as simple as this:
from("jms:validate").bean(ValidatorBean.class);
When calling this service, you just need to tell Camel to use request-reply messaging by setting the MEP to InOut. You can use the exchangePattern option to set this as follows:
from("jms:incomingOrders").to("jms:validate?exchangePattern=InOut")...
You can also specify the MEP using the inOut DSL method:
from("jms:incomingOrders").inOut().to("jms:validate")...
With the inOut method, you can even pass in an endpoint URI as an argument, which shortens your route:
from("jms:incomingOrders").inOut("jms:validate")...
By specifying an InOut MEP, Camel will send the message to the validate queue and wait for a reply on a temporary queue that it creates automatically. When the ValidatorBean returns a result that message is propagated back to the temporary reply queue, and the route continues on from there.
Rather than using temporary queues, you can also explicitly specify a reply queue. This can be done by setting the JMSReplyTo header on the message or by using the replyTo URI option described in table 7.5.
A handy way of calling an endpoint that can return a response is by using the request methods of the ProducerTemplate. For example, you can send a message into the incomingOrders queue and get a response back with the following call:
Object result = template.requestBody("jms:incomingOrders",
    "<order name="motor" amount="1" customer="honda"/>");
This will return the result of the ValidatorBean.
To try this out for yourself, go to the chapter7/jms directory in the book’s source, and run this command:
mvn test -Dtest=RequestReplyJmsTest
The command will run a unit test demonstrating request-reply messaging as we’ve discussed in this section.
In the JMS examples we’ve looked at so far, several data mappings have been happening behind the scenes—mappings that are necessary to conform to the JMS specification. Camel could be transporting any type of data, so that data needs to be converted to a type that JMS supports. We’ll look into this next.
7.3.3. Message mappings
Camel hides a lot of the details when doing JMS messaging, so you don’t have to worry about them. But one detail you should be aware of is that Camel maps both bodies and headers from the arbitrary types and names allowed in Camel to JMS-specific types.
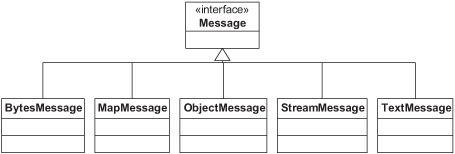
Body Mapping
Although Camel poses no restrictions on what a message’s body contains, JMS specifies different message types based on what the body type is. Figure 7.6 shows the five concrete JMS message implementations.
Figure 7.6. The javax.jms.Message interface has five implementations, each of which is built for a different body type.
The conversion to one of these five JMS message types occurs when the exchange reaches a JMS producer; said another way, it happens when the exchange reaches a route node like this:
to("jms:jmsDestinationName")
At this point, Camel will examine the body type and determine which JMS message to create. This newly created JMS message is then sent to the JMS destination specified.
Table 7.6 shows what body types are mapped to JMS messages.
Table 7.6. When sending messages to a JMS destination, Camel body types are mapped to specific JMS message types.
|
Camel body type |
JMS message type |
|---|---|
| String, org.w3c.dom.Node | TextMessage |
| byte[], java.io.File, java.io.Reader, java.io.InputStream, java.nio.ByteBuffer | BytesMessage |
| java.util.Map | MapMessage |
| java.io.Serializable | ObjectMessage |
Another conversion happens when consuming a message from a JMS destination. Table 7.7 shows the mappings in this case.
Table 7.7. When receiving messages from a JMS destination, JMS message types are mapped to Camel body types
|
JMS message type |
Camel body type |
|---|---|
| TextMessage | String |
| BytesMessage | byte[] |
| MapMessage | java.util.Map |
| ObjectMessage | Object |
| StreamMessage | No mapping occurs |
Although this automatic message mapping allows you to utilize Camel’s transformation and mediation abilities fully, you may sometimes need to keep the JMS message intact. An obvious reason would be to increase performance; not mapping every message means it will take less time for each message to be processed. Another reason could be that you’re storing an object type that doesn’t exist on Camel’s classpath. In this case, if Camel tried to deserialize it, it would fail when finding the class.
Tip
You can also implement your own custom Spring org.springframework.jms.support.converter.MessageConverter by using the messageConverter option.
To disable message mapping for body types, set the mapJmsMessage URI option to false.
Header Mapping
Headers in JMS are even more restrictive than body types. In Camel, a header can be named anything that will fit in a Java String and its value can be any Java object. This presents a few problems when sending to and receiving from JMS destinations.
These are the restrictions in JMS:
- Header names that start with “JMS” are reserved; you can’t use these header names.
- Header names must be valid Java identifiers.
- Header values can be any primitive type and their corresponding object types. These include boolean, byte, short, int, long, float, and double. Valid object types include Boolean, Byte, Short, Integer, Long, Float, Double, and String.
To handle these restrictions, Camel does a number of things. First, any headers that you set starting with “JMS” will be dropped before sending to a JMS destination. Camel also attempts to convert the header names to be JMS-compliant. Any period (.) characters are replaced by “_DOT_” and any hyphens (-) are replaced with “_HYPHEN_”. For example, a header named org.apache.camel.Test-Header would be converted to org_DOT_apache_DOT_camel_DOT_Test_HYPHEN_Header before being sent to a JMS destination. If this message is consumed by a Camel route at some point down the line, the header name will be converted back.
To conform to the JMS specification, Camel will drop any header that has a value not listed in the list of primitives or their corresponding object types. Camel also allows CharSequence, Date, BigDecimal, and BigInteger header values, all of which are converted to their String representations to conform to the JMS specification.
You should now have a good grasp of what Camel can do for your JMS messaging applications.
JMS messaging applications are typically used within an organization—users outside the corporate firewall rarely send JMS messages to internal systems. For messaging with the external world, web services can be used. We’ll look at how Camel uses Apache CXF to access and serve up web services next.
7.4. Web services (CXF component)
You would be hard pressed to find any modern enterprise project that doesn’t use web services of some sort. They’re an extremely useful integration technology for distributed applications. Web services are often associated with service-oriented architecture (SOA), where each service is defined as a web service.
You can think of a web service as an API on the network. The API itself is defined using the Web Services Description Language (WSDL), specifying what operations you can call on a web service and what the input and output types are, among other things. Messages are typically XML, formatted to comply with the Simple Object Access Protocol (SOAP) schema. In addition, these messages are typically sent over HTTP. As illustrated in figure 7.7, web services allow you to write Java code and make that Java code callable over the Internet, which is pretty neat!
Figure 7.7. A client invokes a remote web service over HTTP. To the client, it looks as if it’s calling a Java method on the service endpoint interface (SEI). Under the hood, this method invocation passes through the web services framework, across a network, and finally calls into the service endpoint implementation on the remote server.

For accessing and publishing web services, Camel uses Apache CXF (http://cxf.apache.org). CXF is a popular web services framework that supports many web services standards, most of which we won’t discuss here. We’ll mainly be focusing on developing web services using the Java API for XML Web Services (JAX-WS) specification. JAX-WS defines annotations that allow you to tell a tool like CXF how your POJO should be represented on the web.
We’ll be covering two types of web services development with CXF in this section:
- Contract-first development— Recall that WSDLs define what operations and types a web service provides. This is often referred to as a web services contract, and in order to communicate with a web service, you must satisfy the contract. Contract-first development means that you start out by writing a WSDL file (either by hand or with the help of tooling), and then generating stub Java class implementations from the WSDL file by using a tool like CXF.
- Code-first development— The other way to develop web services is by starting out with a Java class and then letting the web service framework handle the job of generating a WSDL contract for you. This is by far the easiest mode of development, but it also means that the tool (CXF in this case) is in control of what the contract will be. When you want to fine-tune your WSDL file, it may be better to go the contract-first route.
To show these concepts in action, let’s going back to Rider Auto Parts, where they need a new piece of functionality implemented. In chapter 2 (figure 2.2) you saw how customers could place orders in two ways:
- Uploading the order file to an FTP server
- Submitting the order from the Rider Auto Parts web store via HTTP
What we didn’t say then was that this HTTP link to the backend order processing systems needed to be a web service.
Before you jump into creating this web service, let’s take a moment to go over how CXF can be configured within Camel.
7.4.1. Configuring CXF
There are two main ways to configure a CXF component URI: by referencing a bean containing the configuration or by configuring it within the URI.
Configuring Using URI Options
When configuring CXF using only URI options, a CXF endpoint URI looks like this,
cxf://anAddress[?options]
where anAddress is a URL like http://rider.com:9999/order, and options are appended as usual from the possible options in table 7.8.
Table 7.8. Common URI options used to configure the CXF component
|
Option |
Default value |
Description |
|---|---|---|
| wsdlURL | Retrieved from the endpoint address | Specifies the location of the WSDL contract file. |
| serviceClass | null | Specifies the name of the service endpoint interface (SEI). Typically this interface will have JAX-WS annotations. The SEI is required if the CXF data format mode is POJO. If you already have an instance of a concrete class, you can reference it using the #beanName style. |
| serviceName | Obtained from the WSDL | Specifies the service to use. The format is a qualified name (QName) that has a namespace and name like {http://order.camelinaction}OrderEndpointService. Note that if there is only one service in a WSDL, Camel will choose this as the default service. If there is more than one service defined, you need to set the serviceName property. |
| portName | Obtained from the WSDL | Specifies the port to use. The format is a qualified name (QName) that has a namespace and name like {http://order.camelinaction}OrderService. |
| Note that if there is only one port in a WSDL, Camel will choose this as the default port. If there is more than one port defined per service, you need to set the portName property. | ||
| dataFormat | POJO | Sets the data format type that CXF uses for its messages. The possible values are POJO, PAYLOAD, and MESSAGE. We’ll only be covering POJO mode in this chapter; you can find more information on the other two modes on the CXF component page in the Camel online documentation: http://camel.apache.org/cxf.html. |
These options can also be used to configure a reusable CXF endpoint bean in Spring.
Configuring Using a CXF Endpoint Bean
When using a CXF endpoint bean in Spring, you have much more power than by configuring CXF via URI options. In the CXF endpoint bean, you can configure things like CXF interceptors, JAX-WS handlers, and the CXF bus. The URI for configuring the CXF component looks like this:
cxf:bean:beanName
The beanName name specifies the ID of the CXF endpoint bean defined in your Spring XML file. This bean supports the URI options listed in table 7.8 as well as an address attribute that tells Camel what address to use for the web service.
Listing 7.2 shows how a CXF endpoint bean is configured.
Listing 7.2. The CXF endpoint bean format

After configuring an endpoint as shown in listing 7.2, you can use it in a producer or consumer using the following URI:
cxf:bean:orderEndpoint
There is a notable difference when using producers versus consumers.
Producers Versus Consumers
In the context of a web service, a producer in Camel calls a remote web service. This web service could be defined by Camel or by some other web framework.
To invoke a web service in Camel, you use the familiar to Java DSL method:
...to("cxf:bean:orderEndpoint");
Consumers are a little more interesting, as they expose an entire route to the world as a web service. This is a powerful concept. A Camel route could be a complex process, with many branches and processing nodes, but the caller will only see it as a web service with input parameters and a reply.
Say you start out with a route that consists of several steps, like this:
from("jms:myQueue").
to("complex step 1").
...
to("complex step N");
To expose this route to the web, you can add a CXF endpoint to the beginning:
from("cxf:bean:myCXFEndpointBean").
to("complex step 1").
...
to("complex step N");
Now, when the web service configured by myCXFEndpointBean is called, the whole route will be invoked.
Tip
If you’re coming from a background in SOA or have used web services before, you may be scratching your head about consumers in Camel. In the web services world, a consumer is typically a client that calls a remote service. In Camel, a consumer is a server, so the definition is reversed!
Maven Dependencies
In order to use the CXF component, you’ll have to add some dependencies. First, you need to depend on the camel-cxf module:
<dependency>
  <groupId>org.apache.camel</groupId>
  <artifactId>camel-cxf</artifactId>
  <version>2.5.0</version>
</dependency>
That will get you most of the way to a usable CXF component, but you also need to add a module for the CXF transport you’re using. In most cases, this will be HTTP, so you’ll need to add another dependency to your POM:
<dependency>
  <groupId>org.apache.cxf</groupId>
  <artifactId>cxf-rt-transports-http-jetty</artifactId>
  <version>2.2.10</version>
</dependency>
CXF supports several other transports as well, and you can find more information about them on the CXF website at http://cxf.apache.org/docs/transports.html.
Now that you have a sense of the configuration details, let’s take a hands-on look at how to develop web services with Camel.
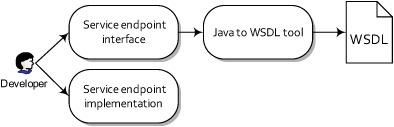
7.4.2. Using a contract-first approach
In contract-first development, you start by creating a WSDL document and then getting a web service tool to generate the necessary Java code. This process is illustrated in figure 7.8.
Figure 7.8. In contract-first web service development, you start out by creating a WSDL document and letting a tool generate the required source interfaces and stubs.

Creating the WSDL contract for a particular web service is a non-trivial task. It’s often best to think about what methods, types, and parameters you’ll need before starting.
In this case, to place an order at Rider Auto Parts with a web service, you need a single method call named order. This method will accept part name, amount, and customer name parameters. When the method is complete, it will return a result code to the client. The web service should be exposed on the server’s http://localhost:9000/order address.
The WSDL for this web service is shown in listing 7.3.
Listing 7.3. The WSDL for an order service


As you can see in listing 7.3, a WSDL contract is quite a mouthful! Writing this kind of document from scratch would be pretty hard to get right. Typically, a good way to start one of these is to use a wizard or GUI tooling. For instance, in Eclipse you can use the File > New > Other > Web Services > WSDL wizard to generate a skeleton WSDL file based on several options. Tweaking this skeleton file is much easier than starting from scratch.
CXF also has command-line tools to help you create a WSDL contract properly. Once you have a portType element defined, you can pass the WSDL fragment through CXF’s wsdl2xml tool (http://cxf.apache.org/docs/wsdl-to-xml.html), which will add a binding element for you. When the binding element is defined, the wsdl2service tool (http://cxf.apache.org/docs/wsdl-to-service.html) can then generate a service element for you.
If you’ve used WSDL documents before, you may have picked up on the version of the WSDL specification we used in listing 7.3. We used WSDL version 1.1 because the current version of CXF only supports 1.1. This is also the most common WSDL version you’ll see in use. WSDL 2.0 changes things substantially, and to date few web services tools (like CXF) support it.
There are five main elements specified in the WSDL file shown in listing 7.3, and all WSDL files follow this same basic structure:
- types—Data types used by the web service
- message—Messages used by the web service
- portType—Interface name and operation performed by the web service
- binding—Transport type and message encoding used by the web service
- service—Web service definition, which specifies the binding to use as well as the network address to use
You first define what parameters the web service will be passing around ![]() . This configuration is done using the XML schema, which may make it a bit more familiar to you. You specify a name and a
type for each parameter.
. This configuration is done using the XML schema, which may make it a bit more familiar to you. You specify a name and a
type for each parameter.
The next section of listing 7.3 defines the messages used by the web service ![]() . These messages allow you to assign parameters to use as input versus output.
. These messages allow you to assign parameters to use as input versus output.
You then define the portType ![]() , which is the interface that you’ll be exposing over the web. On this interface, you define a single operation (method) that
takes a purchaseOrder message as input and returns an orderResult message.
, which is the interface that you’ll be exposing over the web. On this interface, you define a single operation (method) that
takes a purchaseOrder message as input and returns an orderResult message.
The binding section ![]() then specifies the use of the HTTP transport for the messages and that the messages should be encoded over the wire using
document literal style. Document literal means that the SOAP message body will be an XML document. The format of this XML document is specified
using the XML schema.
then specifies the use of the HTTP transport for the messages and that the messages should be encoded over the wire using
document literal style. Document literal means that the SOAP message body will be an XML document. The format of this XML document is specified
using the XML schema.
Note
There are more options to choose from for WSDL binding and encoding. An excellent introduction is available from the IBM developerWorks website: http://www.ibm.com/developerworks/webservices/library/ws-whichwsdl.
Finally, the service section ![]() exposes a port using a specific binding on an address. There can be more than one port listed here. In this example, you
use the port and binding definitions from before and set the web service address to http://localhost:9000/order.
exposes a port using a specific binding on an address. There can be more than one port listed here. In this example, you
use the port and binding definitions from before and set the web service address to http://localhost:9000/order.
The next step in contract-first web service development is taking the WSDL and generating Java code that implements it. CXF provides the wsdl2java tool (http://cxf.apache.org/docs/wsdl-to-java.html) to do this for you. Listing 7.4 shows how this tool can be used from a Maven POM file.
Listing 7.4. Using CXF’s wsdl2java tool

The tool accepts your WSDL file ![]() and an output location for the generated source
and an output location for the generated source ![]() . To run this tool for yourself, change to the chapter7/cxf/contract_first directory and run the following command:
. To run this tool for yourself, change to the chapter7/cxf/contract_first directory and run the following command:
mvn generate-sources
After this completes, you can look in the output directory and see that there are four files generated:
ObjectFactory.java
OrderEndpointImpl.java
OrderEndpoint.java
OrderEndpointService.java
These files implement a stubbed-out version of the order web service. If you were not using Camel, you would write your business logic in the OrderEndpointImpl file that was generated.
To use this web service in Camel, you need to define a CXF endpoint. Listing 7.5 shows how to do this in Spring.
Listing 7.5. CXF endpoint configuration in camel-cxf.xml
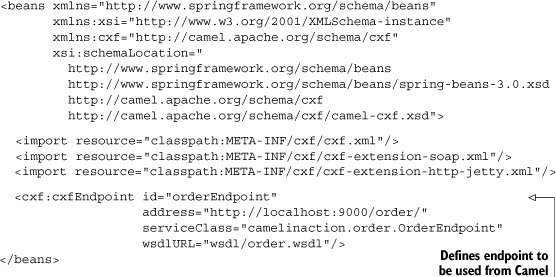
This endpoint configures CXF under the hood to use the web service located at http://localhost:9000/order and using the camelinaction.order.OrderEndpoint interface. Because there is only one service defined in order.wsdl, CXF will choose that automatically. If there were more than one service, you would need to set the serviceName and endpointName attributes on the endpoint bean. The serviceName is the name of the WSDL service element, and endpointName is the name of the port element.
You can browse a web service’s WSDL yourself by appending ?wsdl to any web service URL in your browser. For this address, that would be http://localhost:9000/order?wsdl. This WSDL is the same as the file provided in the wsdlURL attribute of the endpoint bean.
Adding a Web Service to Your Route
With all that set up, you’re ready to start using the order web service within a Camel route. Listing 7.6 shows a route using the web service.
Listing 7.6. Web-enabled route configuration

Because you defined your CXF web service as an endpoint bean in listing 7.5, you just had to import the bean configuration ![]() and refer to the bean ID to set up the consumer
and refer to the bean ID to set up the consumer ![]() . Recall that setting up a CXF consumer effectively turns the entire route into a web service, so once the order data is sent
to an internal queue for processing, the output produced by the route
. Recall that setting up a CXF consumer effectively turns the entire route into a web service, so once the order data is sent
to an internal queue for processing, the output produced by the route ![]() is returned to the caller of the web service
is returned to the caller of the web service ![]() .
.
How does one call this web service? Well, you could use pure CXF or another web services framework compatible with CXF. In this case, you’ll use Camel. You used an endpoint bean to configure CXF earlier, so you can use that to send to the web service as well.
You first need to prepare the parameters to be passed into the web service:
List<Object> params = new ArrayList<Object>();
params.add("motor");
params.add(1);
params.add("honda");
Recall that, in the WSDL, you specified that the web service accepted parameters for part name, number of parts, and customer name.
Next, you can use a ProducerTemplate to send a message to the web service:
String reply = template
  .requestBody("cxf:bean:orderEndpoint", params, String.class);
assertEquals("OK", reply);
To try this out for yourself, change to the chapter7/cxf/contract_first directory, and run the following Maven command:
mvn test
This will run the wsdl2java tool to generate the code from the WSDL, and then run a test that loads up the web-enabled route and calls it using a ProducerTemplate.
Selecting the Operation when Invoking Web Services
If you call a web service with multiple operations, you need to specify which operation Camel should invoke. You can do this by setting the operationName header on the message before sending it to a CXF endpoint. Here is an example:
<route>
  <from uri="direct:startOrder" />
  <setHeader headerName="operationName">
    <constant>order</constant>
  </setHeader>
  <to uri="cxf:bean:orderEndpoint"/>
</route>
In this case, you’re invoking the orderEndpoint, which only has one operation, but this demonstrates how you can use this header. The header is set to the operation name order, which you can find in the WSDL under the wsdl:operation element.
The CXF component provides extensive support for many web services standards. In some cases, you may not need to or won’t be able to use those standards and you’ll just need to communicate over HTTP. For example, you may be interfacing with an HTTP-based service that has been up since before the WS-* specifications were created. You could also need a barebones web service where you manually handle things like parsing the messages. Or maybe you want to download a remote file over HTTP—there are lots of reasons you might need HTTP support.
Camel provides two main ways of doing raw communications over HTTP: the Jetty component and the HTTP component. The HTTP component can only be used for sending (producing) to a remote service, whereas the Jetty component can handle consuming and producing.
For the special case where you can’t start up an embedded Jetty server and need to hook in to the existing servlet container (like Apache Tomcat), you can use the Servlet component.
You can find more information on these components on the Camel website:
- HTTP component—http://camel.apache.org/http.html
- Jetty component—http://camel.apache.org/jetty.html
- Servlet component—http://camel.apache.org/servlet.html
Think contract-first development is hard? Well, some developers do, even though it gives you complete control over your web service contract—an important detail. Next we’ll look at how to develop web services using a code-first approach.
7.4.3. Using a code-first approach
Code-first web services development is often touted as a much easier alternative to contract-first development. In code-first development, you start out with Java that’s annotated with JAX-WS annotations, and then you get the web services framework to generate the underlying WSDL contract for you. This process is illustrated in figure 7.9.
Figure 7.9. In code-first web services development, you start out by coding the service interface and implementation and then using a tool to generate the required WSDL.
To see how this is possible with Camel, let’s try implementing the solution presented in the previous section in a code-first manner.
You start much as you do with contract-first development—you need to think about what methods, types, and parameters you need. Because you’re starting with Java, you’ll need an interface to represent the web service:
@WebService
public interface OrderEndpoint {
    String order(String partName, int amount, String customerName);
}
The JAX-WS javax.jws.WebService annotation will tell CXF that this interface is a web service. There are many annotations that allow you to fine-tune the generated WSDL, but for many cases the defaults work quite well.
In order to use this interface as a web service, you don’t have to change any of your Camel configuration from the previous section. Yes, you read that correctly. Your CXF endpoint bean is still defined as follows:
<cxf:cxfEndpoint id="orderEndpoint"
                 address="http://localhost:9000/order/"
                 serviceClass="camelinaction.order.OrderEndpoint"/>
To use this bean in a Camel route, you can reference it as before:
<from uri="cxf:bean:orderEndpoint" />
To try this out for yourself, change to the chapter7/cxf/code_first directory and run the following Maven command:
mvn test
This will run a test that loads up the web-enabled route and calls it using a ProducerTemplate. The Java to WSDL process happens automatically in the background.
Certainly, the code-first approach allows you to implement web services quickly. But it’s good to understand what is happening under the hood of a web service, because it’s a complex technology.
Speaking of under the hood, several types of messaging that we’ve looked at before, like FTP, JMS, and now web services, all run on top of other protocols. Let’s look at how you can use Camel for these kinds of low-level communications.
7.5. Networking (MINA component)
So far in this chapter, you’ve seen a mixture of old integration techniques, such as file-based integration, and newer technologies like JMS and web services. All of these can be considered essential in any integration framework. Another essential mode of integration is using low-level networking protocols, such as the Transmission Control Protocol (TCP) and the User Datagram Protocol (UDP). Even if you haven’t heard of these protocols before, you’ve definitely used them—protocols like email, FTP, and HTTP run on top of TCP.
To communicate over these and other protocols, Camel uses Apache MINA and Netty. Both MINA and Netty are networking frameworks that provide asynchronous event-driven APIs and communicate over various protocols like TCP and UDP. In this section, we’ll be using MINA to demonstrate low-level network communication with Camel. For more information on using Netty with Camel, see the camel-netty component’s documentation (http://camel.apache.org/netty.html).
The MINA component is located in the camel-mina module of the Camel distribution. You can access this by adding it as a dependency to your Maven POM like this:
<dependency>
  <groupId>org.apache.camel</groupId>
  <artifactId>camel-mina</artifactId>
  <version>2.5.0</version>
</dependency>
The most common configuration options are listed in table 7.9.
Table 7.9. Common URI options used to configure the MINA component
|
Default value |
Description |
|
|---|---|---|
| codec | null | Specifies the codec used to marshal the message body. Codecs need to be loaded into the registry and referenced using the #beanName style. |
| textline | false | Enables the textline codec when you’re using TCP and no other codec is specified. The textline codec understands bodies that have string content and end with a line delimiter. |
| textlineDelimiter | DEFAULT | Sets the delimiter used for the textline codec. Possible values include: DEFAULT, AUTO, WINDOWS, UNIX, or MAC. |
| sync | true | Sets the synchronous mode of communication. This means that clients will be able to get a response back from the server. |
| timeout | 30000 | Sets the time in milliseconds to wait for a response from a remote server. |
| encoding | JVM default | Specifies the java.nio.charset.Charset used to encode the data. |
| transferExchange | false | Specifies whether only the message body is transferred. Enable this property to serialize the entire exchange for transmission. |
| filters | null | Specifies what MINA org.apache.mina.common.IoFilter beans to use. It should be specified as a comma-separated list of bean references, like "#filter1,#filter2". |
In addition to the URI options, you also have to specify the transport type and port you want to use. In general, a MINA component URI will look like this,
mina:transport://hostname[:port][?options]
where transport is one of tcp, udp, multicast/mcast, or vm.
Let’s now see how you can use the MINA component to solve a problem at Rider Auto Parts.
7.5.1. Using MINA for network programming
Back at Rider Auto Parts, the production group has been using automated manufacturing robots for years to assist in producing parts. What they’ve been lacking, though, is a way of tracking the whole plant’s health from a single location. They currently have floor personnel monitoring the machines manually. What they’d like to have is an operations center with a single-screen view of the entire plant.
To accomplish this, they’ve purchased sensors that communicate machine status over TCP. The new operations center needs to consume these messages over JMS. Figure 7.10 illustrates this setup.
Figure 7.10. Sensors feed status messages over TCP to a server, which then forwards them to a JMS operations queue.
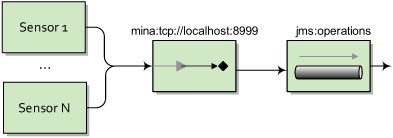
Hand-coding a TCP server such as this wouldn’t be a trivial exercise. You’d need to spin up new threads for each incoming socket connection, as well as transform the body to a format suitable for JMS. Not to mention the pain involved in managing the low-level networking protocols.
In Camel, a possible solution is accomplished with a single line:
from("mina:tcp://localhost:8999?textline=true&sync=false")
    .to("jms:operations");
Here you set up a TCP server on port 8999 using MINA, and it parses messages using the textline codec. The sync property is set to false to make this route InOnly—any clients sending a message won’t get a reply back.
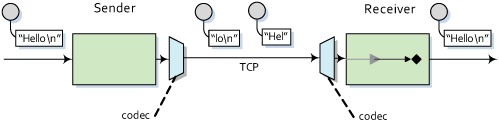
You may be wondering what a textline codec is, and maybe even what a codec is! In TCP communications, a single message payload going out may not reach its destination in one piece. All will get there, but it may be broken up or fragmented into smaller packets. It’s up to the receiver (in this case, the server) to wait for all the pieces and assemble them back into one payload.
A codec decodes or encodes the message data into something that the applications on either end of the communications link can understand. As figure 7.11 illustrates, the textline codec is responsible for grabbing packets as they come in and trying to piece together a message that’s terminated by a specified character.
Figure 7.11. During TCP communications, a payload may be broken up into multiple packets. A MINA textline codec can assemble the TCP packets into a full payload by appending text until it encounters a delimiter character.
This example is provided in the book’s source in the chapter7/mina directory. Try it out using the following command:
mvn test -Dtest=MinaTcpTest
Object Serialization Codec
If you had not specified the textline URI option in the previous example, the MINA component would have defaulted to using the object serialization codec. This codec will take any Serializable Java object and send its bytes over TCP. This is a pretty handy codec if you aren’t sure what payload format to use. If you’re using this codec, you’ll also need to ensure that the classes are on the classpath of both the sender and the receiver.
There are times when your payload will have a custom format that neither textline or object serialization accommodates. In this case, you’ll need to create a custom codec.
7.5.2. Using custom codecs
The TCP server you set up for Rider Auto Parts in the previous section has worked out well. Sensors have been sending back status messages in plain text, and you used the MINA textline codec to successfully decode them. But one type of sensor has been causing an issue: the sensor connected to the welding machine sends its status back in a custom binary format. You need to interpret this custom format and send a status message formatted like the ones from the other sensors. We can do this with a custom MINA codec.
In MINA, a codec consists of three parts:
- ProtocolEncoder—The ProtocolEncoder has the job of taking an input payload and putting bytes onto the TCP channel. In this example, the sensor will be transmitting the message over TCP, so you don’t have to worry about this too much, except for testing that the server works.
- ProtocolDecoder—The ProtocolDecoder interprets the custom binary message from the sensor and returns a message that your application can understand.
- ProtocolCodecFactory—As implied by the name, the ProtocolCodecFactory creates the encoder and decoder.
You can specify a custom codec in a Camel URI by using the codec property and specifying a reference to a ProtocolCodecFactory instance in the registry.
The custom binary payload that you have to interpret with your codec is 8 bytes in total; the first 7 bytes are the machine ID and the last byte is a value indicating the status. You need to convert this to the plain text format used by the other sensors, as illustrated in figure 7.12.
Figure 7.12. The custom welder sensor decoder is used to interpret an 8-byte binary payload and construct a plain text message body. The first 7 bytes are the machine ID and the last byte represents a status. In this case, a value of 1 means “Good”.

Your route looks similar to the previous example:
from("mina:tcp://localhost:8998?codec=#welderCodec&sync=false")
    .to("jms:operations");
Note that you need to change the port that it listens on, so as not to conflict with your other TCP server. You also add a reference to the custom codec loaded into the registry. In this case, the codec is loaded into a JndiRegistry like this:
JndiRegistry jndi = ...
jndi.bind("welderCodec", new WelderSensorCodec());
The WelderSensorCodec is defined as a MINA ProtocolCodecFactory object. It merely creates the encoder and decoder, as shown here:
public class WelderSensorCodec implements ProtocolCodecFactory {
    public ProtocolEncoder getEncoder() throws Exception {
        return new WelderEncoder();
    }

    public ProtocolDecoder getDecoder() throws Exception {
        return new WelderDecoder();
    }
}
Now that the setup is complete, you can get to the real meat of the custom codec. If you recall, decoding the custom binary format into a plain text message was the most important task for this particular application. This decoder is shown in listing 7.7.
Listing 7.7. The decoder for the welder sensor

The decoder shown in listing 7.7 may look a bit complex, but it’s only doing three main things: waiting for 8 bytes of payload to arrive on the TCP channel
![]() , extracting the first 7 bytes and using that as the machine ID string
, extracting the first 7 bytes and using that as the machine ID string ![]() , and checking the last byte for a status of 1, which means “Good”
, and checking the last byte for a status of 1, which means “Good” ![]() .
.
To try this example yourself, go to the chapter7/mina directory of the book’s source and run the following unit test:
mvn test -Dtest=MinaCustomCodecTest
Now that you’ve tried out low-level network communications, its time to interact with one of the most common applications in the enterprise. That’s the database.
7.6. Working with databases (JDBC and JPA components)
In pretty much every enterprise-level application, you’ll need to integrate with a database at some point. So it makes sense that Camel has first-class support for accessing databases. Camel has five components that let you access databases in a number of ways:
- JDBC component— Allows you to access JDBC APIs from a Camel route.
- SQL component— Allows you to write SQL statements directly into the URI of the component for utilizing simple queries.
- JPA component— Persists Java objects to a relational database using the Java Persistence Architecture.
- Hibernate component— Persists Java objects using the Hibernate framework. This component isn’t distributed with Apache Camel due to licensing incompatibilities. You can find it at the camel-extra project (http://code.google.com/p/camel-extra).
- iBATIS component— Allows you to map Java objects to relational databases.
In this section, we’ll be covering both the JDBC and JPA components. These are the most-used database-related components in Camel. You can do pretty much any database-related task with them that you can do with the others. For more information on the other components, see the relevant pages on the Camel website’s components list (http://camel.apache.org/components.html).
Let’s look first at the JDBC component.
7.6.1. Accessing data with the JDBC component
The Java Database Connectivity (JDBC) API defines how Java clients can interact with a particular database. It tries to abstract away details about the actual database being used. To use this component, you need to add the camel-jdbc module to your project:
<dependency>
  <groupId>org.apache.camel</groupId>
  <artifactId>camel-jdbc</artifactId>
  <version>2.5.0</version>
</dependency>
The most common URI options are shown in table 7.10.
Table 7.10. Common URI options used to configure the JDBC component
|
Option |
Default value |
Description |
|---|---|---|
| readSize | 0 | Sets the maximum number of rows that can be returned. The default of 0 causes the readSize to be unbounded. |
| statement.propertyName | null | Sets the property with name propertyName on the underlying java.sql.Statement. |
| useJDBC4ColumnNameAndLabelSemantics | true | Sets the column and label semantics to use. Default is to use the newer JDBC 4 style, but you can set this property to false to enable JDBC 3 style. |
The endpoint URI for the JDBC component points Camel to a javax.sql.DataSource loaded into the registry, and, like other components, it allows for configuration options to be set. The URI syntax is as follows:
jdbc:dataSourceName[?options]
After this is specified, the component is ready for action. But you may be wondering where the actual SQL statement is specified.
The JDBC component is a dynamic component in that it doesn’t merely deliver a message to a destination but takes the body of the message as a command. In this case, the command is specified using SQL. In EIP terms, this kind of message is called a command message. Because a JDBC endpoint accepts a command, it doesn’t make sense to use it as a consumer, so, you can’t use it in a from DSL statement. Of course, you can still retrieve data using a select SQL statement as the command message. In this case, the query result will be added as the outgoing message on the exchange.
To demonstrate the SQL command-message concept, let’s revisit the order router at Rider Auto Parts. In the accounting department, when an order comes in on a JMS queue, the accountant’s business applications can’t use this data. They can only import data from a database. So any incoming orders need to be put into the corporate database. Using Camel, a possible solution is illustrated in figure 7.13.
Figure 7.13. A message from the JMS accounting queue is transformed into an SQL command message by the OrderToSqlBean bean. The JDBC component then executes this command against its configured data source.

The main takeaway from figure 7.13 is that you’re using a bean to create the SQL statement from the incoming message body. This is the most common way to prepare a command message for the JDBC component. You could use the DSL directly to create the SQL statement (by setting the body with an expression), but you have much more control when you use a custom bean.
The route for the implementation of figure 7.13 is simple on the surface:
from("jms:accounting")
    .to("bean:orderToSql")
    .to("jdbc:dataSource");
There are two things that require further explanation here. First, the JDBC endpoint is configured to load the javax.sql.DataSource with the name dataSource in the registry. The bean endpoint here is using the bean with the name orderToSql to convert the incoming message to an SQL statement.
The orderToSql bean is shown in listing 7.8.
Listing 7.8. A bean that converts an incoming order to an SQL statement
public class OrderToSqlBean {

    public String toSql(@XPath("order/@name") String name,
                        @XPath("order/@amount") int amount,
                        @XPath("order/@customer") String customer) {

        StringBuilder sb = new StringBuilder();
        sb.append("insert into incoming_orders ");
        sb.append("(part_name, quantity, customer) values (");
        sb.append("'").append(name).append("', ");
        sb.append("'").append(amount).append("', ");
        sb.append("'").append(customer).append("') ");

        return sb.toString();
    }
}
The orderToSql bean uses XPath to parse an incoming order message with a body something like this:
<?xml version="1.0" encoding="UTF-8"?>
<order name="motor" amount="1" customer="honda"/>
The data in this order is then converted to an SQL statement like this:
insert into incoming_orders (part_name, quantity, customer)
values ('motor', '1', 'honda')
This SQL statement then becomes the body of a message that will be passed into the JDBC endpoint. In this case, you’re updating the database by inserting a new row. So you won’t be expecting any result back. But Camel will set the CamelJdbcUpdateCount header to the number of rows updated. If there were any problems running the SQL command, an SQLException would be thrown.
If you were running a query against the database (an SQL select command), Camel would return the rows as an ArrayList<HashMap<String, Object>>. Each entry in the ArrayList is a HashMap that maps the column name to a column value. Camel would also set the CamelJdbcRowCount header to the number of rows returned from the query.
To run this example for yourself, change to the chapter7/jdbc directory of the book’s source, and run the following command:
mvn test -Dtest=JdbcTest
Having raw access to the database through JDBC is a must-have ability in any integration framework. There are times, though, that you need to persist more than raw data—sometimes you need to persist whole Java objects. You can do this with the JPA component, which we’ll look at next.
7.6.2. Persisting objects with the JPA component
There is a new requirement at Rider Auto Parts: instead of passing around XML order messages, management would like to adopt a POJO model for orders.
A first step would be to transform the incoming XML message into an equivalent POJO form. In addition, the order persistence route in the accounting department would need to be updated to handle the new POJO body type. You could manually extract the necessary information as you did for the XML message in listing 7.8, but there is a better solution for persisting objects.
The Java Persistence Architecture (JPA) is a wrapper layer on top of object-relational mapping (ORM) products such as Hibernate, OpenJPA, TopLink, and the like. These products map Java objects to relational data in a database, which means you can save a Java object in your database of choice, and load it up later when you need it. This is a pretty powerful ability, and it hides many details. Because this adds quite a bit of complexity to your application, plain JDBC should be considered first to see if it meets your requirements.
To use the JPA component, you need to add the camel-jpa module to your project:
<dependency>
  <groupId>org.apache.camel</groupId>
  <artifactId>camel-jpa</artifactId>
  <version>2.5.0</version>
</dependency>
You’ll also need to add JARs for the ORM product and database you’re using. The examples in this section will use OpenJPA and the HyperSQL database, so you need the following dependencies as well:
<dependency>
  <groupId>org.apache.openjpa</groupId>
  <artifactId>openjpa-persistence-jdbc</artifactId>
  <version>1.2.2</version>
</dependency>
<dependency>
  <groupId>hsqldb</groupId>
  <artifactId>hsqldb</artifactId>
  <version>1.8.0.7</version>
</dependency>
The JPA component has a number of URI options, many of which can only be applied to either a consumer or producer endpoint. The possible URI options are shown in table 7.11.
Table 7.11. Common URI options used to configure the JPA component
|
Option |
Consumer/producer mode |
Default value |
Description |
|---|---|---|---|
| persistenceUnit | Both | camel | Specifies the JPA persistence unit name used. |
| transactionManager | Both | null | Sets the transaction manager to be used. If transactions are enabled and this property isn’t specified, Camel will use a JpaTransactionManager. For more on transactions, see chapter 9. |
| maximumResults | Consumer | -1 | Specifies the maximum number of objects to be returned from a query. The default of -1 means an unlimited number of results. |
| maxMessagesPerPoll | Consumer | 0 | Sets the maximum number of objects to be returned during a single poll. The default of 0 means an unlimited number of results. |
| consumeLockEntity | Consumer | true | Specifies whether the entities in the database will lock while they’re being consumed by Camel. By default, they will lock. |
| consumeDelete | Consumer | true | Specifies whether the entity should be deleted in the database after it’s consumed. |
| consumer.delay | Consumer | 500 | Sets the delay in milliseconds between each poll. |
| consumer.initialDelay | Consumer | 1000 | Sets the initial delay in milliseconds before the first poll. |
| consumer.query | Consumer | Sets the custom SQL query to use when consuming objects. | |
| consumer.namedQuery | Consumer | References a named query to consume objects. | |
| consumer.nativeQuery | Consumer | Specifies a query in the native SQL dialect of the database you’re using. This isn’t very portable, but it allows you to take advantage of features specific to a particular database. | |
| flushOnSend | Producer | Causes objects that are sent to a JPA producer to be persisted to the underlying database immediately. Otherwise, they may stay in memory with the ORM tool until it decides to persist. |
A requirement in JPA is to annotate any POJOs that need to be persisted with the javax.persistence.Entity annotation. The term entity is borrowed from relational database terminology and roughly translates to an object in object-oriented programming. This means that your new POJO order class needs to have this annotation if you wish to persist it with JPA. The new order POJO is shown in listing 7.9.
Listing 7.9. An annotated POJO representing an incoming order
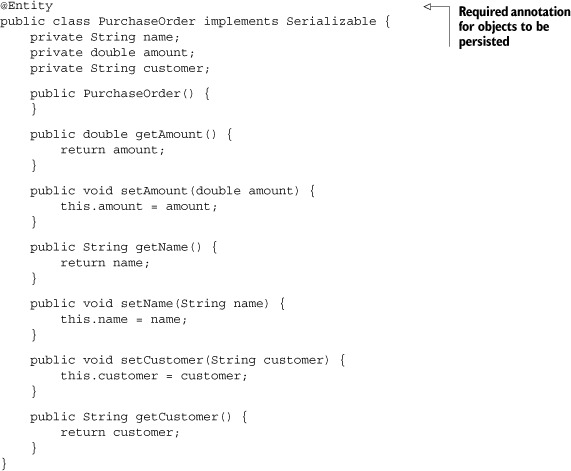
This POJO can be created from the incoming XML order message easily with a message translator, as shown in chapter 3. For testing purposes, you can use a producer template to send a new PurchaseOrder to the accounting JMS queue, like so:
PurchaseOrder purchaseOrder = new PurchaseOrder();
purchaseOrder.setName("motor");
purchaseOrder.setAmount(1);
purchaseOrder.setCustomer("honda");
template.sendBody("jms:accounting", purchaseOrder);
Your route from section 7.6.1 is now a bit simpler. You send directly to the JPA endpoint after an order is received on the queue:
from("jms:accounting").to("jpa:camelinaction.PurchaseOrder");
Now that your route is in place, you have to configure the ORM tool. This is by far the most configuration you’ll have to do when using JPA with Camel. As we’ve mentioned, ORM tools can be complex.
There are two main bits of configuration: hooking the ORM tool’s entity manager up to Camel’s JPA component, and configuring the ORM tool to connect to your database. For demonstration purposes here, we’ll be using Apache OpenJPA, but you could use any other JPA-compliant ORM tool.
The beans required to set up the OpenJPA entity manager are shown in listing 7.10.
Listing 7.10. Hooking up the Camel JPA component to OpenJPA

The Spring beans file shown in listing 7.10 does a number of things to set up JPA. First off, it creates a Camel JpaComponent and specifies the entity manager to be used ![]() . This entity manager
. This entity manager ![]() is then hooked up to OpenJPA and the HyperSQL order database
is then hooked up to OpenJPA and the HyperSQL order database ![]() . It also sets up the entity manager so it can participate in transactions
. It also sets up the entity manager so it can participate in transactions ![]() .
.
There is one more thing left to configure before JPA is up and running. When the entity manager was created in listing 7.10 ![]() , you set the persistenceUnitName to "camel". This persistence unit defines what entity classes will be persisted, as well as the connection information for the underlying database. In JPA, this configuration is stored in the persistence.xml file in the
META-INF directory on the classpath. Listing 7.11 shows the configuration required for your application.
, you set the persistenceUnitName to "camel". This persistence unit defines what entity classes will be persisted, as well as the connection information for the underlying database. In JPA, this configuration is stored in the persistence.xml file in the
META-INF directory on the classpath. Listing 7.11 shows the configuration required for your application.
Listing 7.11. Configuring the ORM tool with the persistence.xml file

There are two main things in listing 7.11 to be aware of. First, classes that you need persisted need to be defined here ![]() , and there can be more than one class element. Also, if you need to connect to another database or otherwise change the connection information to the database,
you’ll need to do so here
, and there can be more than one class element. Also, if you need to connect to another database or otherwise change the connection information to the database,
you’ll need to do so here ![]() .
.
Now that all of the setup is complete, your JPA route is complete. To try out this example, browse to the chapter7/jpa directory and run the JpaTest test case with this Maven command:
mvn test -Dtest=JpaTest
This example sends a PurchaseOrder to the accounting queue and then queries the database to make sure the entity class was persisted.
Manually querying the database via JPA is a useful ability, especially in testing. In JpaTest, the query was performed like so:
JpaEndpoint endpoint =
  (JpaEndpoint) context.getEndpoint("jpa:camelinaction.PurchaseOrder");
jpaTemplate = endpoint.getTemplate();

List list =
  jpaTemplate.find("select x from camelinaction.PurchaseOrder x");

assertEquals(1, list.size());
assertIsInstanceOf(PurchaseOrder.class, list.get(0));
First off, you grab the instance of the JpaTemplate on the JpaEndpoint. You then search for instances of your entity class in the database using JPQL, which is similar to SQL but deals with JPA entity objects instead of tables. A simple check is then performed to make sure the object is the right type and that there is only one result.
Now that we’ve covered accessing databases, and messaging that can span the entire web, we’re going to shift our attention to communication within the JVM.
7.7. In-memory messaging (Direct, SEDA, and VM components)
Having braved so many of Camel’s different messaging abilities in this chapter, you might think there couldn’t be more. Yet there is still another important messaging topic to cover: in-memory messaging.
Camel provides three main components in the core to handle in-memory messaging. For synchronous messaging, there is the Direct component. For asynchronous messaging, there are the SEDA and VM components. The only difference between SEDA and VM is that the SEDA component can be used for communication within a single CamelContext, whereas the VM component is a bit broader and can be used for communication within a JVM. If you have two CamelContexts loaded into an application server, you can send messages between them using the VM component.
Note
For more information on staged event-driven architecture (SEDA) in general, see Matt Welsh’s SEDA page at http://www.eecs.harvard.edu/~mdw/proj/seda/.
Let’s look first at the Direct component.
7.7.1. Synchronous messaging with the Direct component
The Direct component is about as simple as a component can get, but it’s extremely useful. It’s probably the most common Camel endpoint you’ll see in a route.
A direct endpoint URI looks like this:
direct:endpointName
There are no options that you can specify or backends to configure; there is just an endpoint name.
So what does this give you? The Direct component lets you make a synchronous call to a route or, conversely, expose a route as a synchronous service.
To demonstrate, say you have a route that’s exposed by a direct endpoint as follows:
from("direct:startOrder")
  .to("cxf:bean:orderEndpoint");
Sending a message to the direct:startOrder endpoint will invoke a web service defined by the orderEndpoint CXF endpoint bean. Let’s also say that you send a message to this endpoint using a ProducerTemplate, as you saw in section 7.4.2:
String reply =
  template.requestBody("direct:startOrder", params, String.class);
The ProducerTemplate will create a Producer under the hood that sends to the direct:startOrder endpoint. In most other components, some processing happens in between the producer and the consumer. For instance, in a JMS component, the message could be sent to a queue on a JMS broker. With the Direct component, the producer directly calls the consumer. And by directly, we mean that in the producer there is a method invocation on the consumer. The only overhead of using the Direct component is a method call!
This simplicity and minimal overhead make the Direct component a great way of starting routes and synchronously breaking up routes into multiple pieces. But even though there is little overhead to using the Direct component, its synchronous nature doesn’t fit well with all applications. If you need to operate asynchronously, you need the SEDA or VM components, which we’ll look at next.
7.7.2. Asynchronous messaging with SEDA and VM
As you saw in the discussion of JMS earlier in the chapter (section 7.3), there are many benefits to using message queuing as a means of sending messages. You also saw how a routing application can be broken up into many logical pieces (routes) and connected by using JMS queues as bridges. But using JMS for this purpose in an application on a single host adds unnecessary complexity for some use cases.
If you want to reap the benefits of asynchronous messaging but aren’t concerned with JMS specification conformance or the built-in reliability that JMS provides, you may want to consider an in-memory solution. By ditching the specification conformance and any communications with a message broker (which can be costly), an in-memory solution can be much faster. Note that there is no message persistence to the disk, like in JMS, so you run the risk of losing messages in the event of a crash—your application should be tolerant of losing messages.
Camel provides two in-memory queuing components: SEDA and VM. They both share the options listed in table 7.12.
Table 7.12. Common URI options used to configure the SEDA and VM components
|
Option |
Default value |
Description |
|---|---|---|
| size | Unbounded | Sets the maximum number of messages the queue can hold. |
| concurrentConsumers | 1 | Sets the number of threads servicing incoming exchanges. Increase this number to process more exchanges concurrently. |
| waitForTaskToComplete | IfReplyExpected | Specifies whether or not the client should wait for an asynchronous task to complete. The default is to only wait if its an InOut MEP. Other values include Always and Never. |
| timeout | 30000 | Sets the time in milliseconds to wait for an asynchronous send to complete. A value less than or equal to 0 will disable the timeout. |
| multipleConsumers | false | Specifies whether to allow the SEDA queue to have behavior like a JMS topic (a publish-subscribe style of messaging). |
One of the most common uses for SEDA queues in Camel is to connect routes together to form a routing application. For example, recall the example presented in 7.3.1 where you used a JMS topic to send copies of an incoming order to the accounting and production departments. In that case, you used JMS queues to connect your routes together. Because the only parts that are hosted on separate hosts are the accounting and production queues, you can use SEDA queues for everything else. This new faster solution is illustrated in figure 7.14.
Figure 7.14. SEDA queues can be used as a low-overhead replacement for JMS when messaging is within a CamelContext. For messages being sent to other hosts, JMS can be used. In this case, all order routing is done via SEDA until the order needs to go to the accounting and production departments.
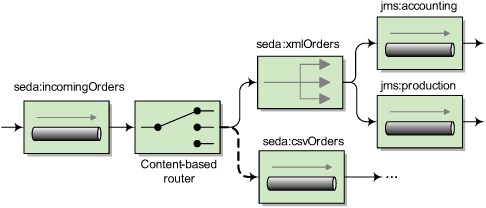
Any JMS messaging that you were doing within a CamelContext could be switched over to SEDA. You still need to use JMS for the accounting and production queues, because they’re located in physically separate departments.
You may have noticed that the JMS xmlOrders topic has been replaced with a SEDA queue in figure 7.14. In order for this SEDA queue to behave like a JMS topic (using a publish-subscribe messaging model), you need to set the multipleConsumers URI option to true, as shown in listing 7.12.
Listing 7.12. A topic allows multiple receivers to get a copy of the message
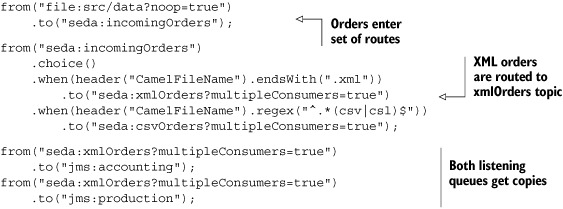
This example behaves in the same way as the example in section 7.3.1, except that it uses SEDA endpoints instead of JMS. Another important detail in this listing is that SEDA endpoint URIs that are reused in consumer and producer scenarios need to be exactly the same as each other. It’s not enough to specify the correct SEDA queue name; you need to use the queue name and all options.
To run this example, go to the chapter7/seda directory in the book’s source, and run this command:
mvn compile exec:java -Dexec.mainClass=camelinaction.OrderRouter
This will output the following on the command line:
Accounting received order: message1.xml
Production received order: message1.xml
Why did you get this output? Well, you had a single order file named message1.xml, and it was published to the xmlOrders topic. Both the accounting and production queues were subscribed to the topic, so each received a copy. The testing routes consumed the messages on those queues and output the messages.
So far you’ve been kicking off routes either by hand or by consuming from a filesystem directory. How can you kick off routes automatically? Or better yet, how can you schedule a route’s execution to occur?
7.8. Automating tasks (Timer and Quartz components)
Often in enterprise projects you’ll need to schedule tasks to occur either at a specified time or at regular intervals. Camel supports this kind of service with the Timer and Quartz components. The Timer component is useful for simple recurring tasks, but when you need more control of when things get started, the Quartz component is a must.
In this section, we’re first going to look at the Timer component and then move on to the more advanced Quartz component.
7.8.1. Using the Timer component
The Timer component comes with Camel’s core library and uses the JRE’s built-in timer mechanism to generate message exchanges at regular intervals. This component only supports consuming, because sending to a timer doesn’t really make sense.
Some common URI options are listed in table 7.13.
Table 7.13. Common URI options used to configure the Timer component
|
Option |
Default value |
Description |
|---|---|---|
| period | 1000 | Specifies the time in milliseconds between generated events. |
| delay | 0 | Specifies the time in milliseconds before the first event is generated. |
| fixedRate | false | Specifies whether to create events at a fixed rate based on the period. |
| daemon | true | Sets the timer thread to run as a daemon. |
As an example, let’s print a message stating the time to the console every 2 seconds. The route looks like this:
from("timer://myTimer?period=2000")
.setBody().simple("Current time is ${header.firedTime}")
.to("stream:out");
The timer URI is configuring the underlying java.util.Timer to have the name myTimer and an execution interval of 2000 milliseconds.
Tip
When the value of milliseconds gets large, you can opt for a shorter notation using the s, m, and h keywords. For example, 2000 milliseconds can be written as 2s, meaning 2 seconds. 90000 milliseconds can be written as 1m30s, and so on.
When this timer fires an event, Camel creates an exchange with an empty body and sends it along the route. In this case, you’re setting the body of the message using a Simple language expression. The firedTime header was set by the Timer component; for a full list of headers set, see the online documentation (http://camel.apache.org/timer.html).
Note
The Timer object and corresponding thread can be shared. If you use the same timer name in another route, it will reuse the same Timer object.
You can run this simple example by changing to the chapter7/timer directory of the book’s source and running this command:
mvn compile exec:java -Dexec.mainClass=camelinaction.TimerExample
You’ll see output similar to the following:
Current time is Wed Feb 10 00:43:31 NST 2010
Current time is Wed Feb 10 00:43:33 NST 2010
Current time is Wed Feb 10 00:43:35 NST 2010
As you can see, an event was fired every 2 seconds. But suppose you wanted to schedule a route to execute on the first day of each month? You couldn’t do this easily with the Timer component. You now have a need for Quartz.
7.8.2. Enterprise scheduling with Quartz
Like the Timer component, the Quartz component allows you to schedule the generation of message exchanges. But the Quartz component gives you much more control over how this scheduling happens. You can also take advantage of Quartz’s many other enterprise features.
We won’t be covering all of Quartz’s features here—only ones exposed directly in Camel. For a complete look at how to use Quartz, please see the Quartz website: http://www.quartz-scheduler.org.
The common URI options for the Quartz component are listed in table 7.14.
Table 7.14. Common URI options used to configure the Quartz component
|
Default value |
Description |
|
|---|---|---|
| cron | none | Specifies a cron expression used to determine when the timer fires. |
| trigger.repeatCount | 0 | Specifies the number of times to repeat the trigger. A value of -1 causes the timer to repeat indefinitely. |
| trigger.repeatInterval | 0 | Specifies the interval in milliseconds at which to generate events. |
| job.propertyName | null | Sets the property with name propertyName on the underlying Quartz JobDetail. |
| trigger.propertyName | null | Sets the property with name propertyName on the underlying Quartz Trigger. |
Before you can use the Quartz component, you’ll need to add the following dependency to your Maven POM file:
<dependency>
  <groupId>org.apache.camel</groupId>
  <artifactId>camel-quartz</artifactId>
  <version>2.5.0</version>
</dependency>
Let’s now reproduce the timer example from the previous section with Quartz. To do this, you can use the trigger.repeatInterval option, which is similar to the period option for the Timer component. The route looks like this:
from("quartz://myTimer?trigger.repeatInterval=2000&trigger.repeatCount=-1")
.setBody().simple("Current time is ${header.firedTime}")
.to("stream:out");
Although this behaves in the same way as the Timer example, there are a few different things going on under the covers.
First off, myTimer sets the underlying Trigger object’s name. Timers in Quartz are made up of a Trigger and a JobDetail. Triggers can also have a group name associated with them, which you can specify by adding the group name to your URI, as follows:
quartz://myGroupName/myTimer?options...
If the group name is omitted, as in the previous route, “Camel” is used as the group name. By default, a SimpleTrigger is created to schedule events.
The trigger.repeatInterval and trigger.repeatCount properties configured this trigger to fire every 2000 milliseconds for as long as the application is running (a repeat count of -1 causes the trigger to repeat indefinitely). You may be thinking that the option names are a bit long, but there is a reason for this. As stated in table 7.14, options starting with trigger allow you to set properties on the Trigger object. In the case of the trigger.repeatInterval URI option, this will call the setRepeatInterval method on the SimpleTrigger object.
You can similarly set options on the JobDetail by using properties that start with job, followed by a valid property name. For instance, you can set the job name by using the job.name URI option.
Using Cron Triggers
So far, you’ve replaced the Timer component example with a functionally equivalent Quartz-based example. How would you schedule something more complex, like kicking off a route on the first day of each month? The answer is by using cron expressions. Readers familiar with Linux or Unix will probably have heard of the cron scheduling application. Quartz allows you to use scheduling syntax similar to the venerable cron application.
A cron expression is a string consisting of 6–7 fields separated by white space. Each field denotes a date or range of dates. The structure of a cron expression is as follows:
<Seconds> <Minutes> <Hours> <Day of Month> <Month> <Day of week> <Year>
These accept numeric values (and optional textual ones) for the times you want a trigger to fire. More information on cron expressions can be found on the Quartz website (http://www.quartz-scheduler.org/docs/tutorials/crontrigger.html).
The cron expression for occurring on the first day of each month at 6:00 a.m. is the following:
0 0 6 1 * ?
In this expression, the third digit denotes the hour at which to execute, and the fourth digit is the day of the month. You can also see that a star was placed in the month column so that every month would be triggered.
Setting up Quartz to use cron triggers in Camel is easy. You just need to use the cron option and make sure to replace all white space with plus characters (+). Your URI becomes the following:
quartz://firstDayOfTheMonth?cron=0+0+6+1+*+?
Using this URI in a route will cause a message exchange to be generated (running the route) on the first day of each month.
You should be able to see now how the scheduling components in Camel can allow you to execute routes at specified times. This is an important ability in time-sensitive enterprise applications.
7.9. Summary and best practices
Congratulations on making it through the barrage of components we covered in this chapter. By now, you should have a good understanding of how to use them in your own applications.
Here are some of the key ideas you should take away from this chapter:
- There are tons of Camel components. One of the great things about Camel is its extensive component library. You can rest easy knowing that most things you’ll ever need to connect to are covered by Camel.
- The Camel website has documentation on all components available. We could only cover the most widely used and important components in this book, so you should be aware that if you need to use one of the many other components, documentation is available at http://camel.apache.org/components.html.
- Camel’s component model allows for your own extensions. We briefly touched on how components are resolved at runtime in Camel. Camel imposes no restrictions on where your components come from, so you can easily write your own (as described in chapter 11) and include it in your Camel application.
- Don’t write to files manually; use the File and FTP components. Camel’s File and FTP components have many options that will suit most file-processing scenarios. Don’t reinvent the wheel—use what Camel has to offer.
- Use the JMS component for asynchronous messaging with JMS. Camel makes it easy to send messages to and receive them from JMS providers. You will no longer have to write dozens of lines of JMS API calls to send or receive a simple message.
- Use the CXF component for all your web services needs. The CXF component allows you to make calls to a variety of web service types or to expose your Camel route to the world as a web service.
- Use the MINA component for network communications. Network programming can be difficult, given the low-level concepts you need to deal with. The MINA component handles these details for you, making it easy to communicate over network protocols such as TCP and UDP.
- Hook your routes into databases using the JDBC and JPA components. The JDBC component allows you to access databases using tried-and-true SQL, whereas the JPA component is all about persisting Java objects into databases.
- Use in-memory messaging when reliability isn’t a concern but speed is. Camel provides three choices for in-memory messaging: the Direct, SEDA, and VM components.
- Kick off routes at specified intervals using the Quartz or Timer components. Camel routes can do useful things. Some tasks need to be executed at specified intervals, and the Quartz and Timer components come into play here.
Components in Camel fill the role of bridging out to other transports, APIs, and data formats. They’re also the on and off ramps to Camel’s routing abilities.
Back in chapter 2, you were exposed to some of Camel’s routing capabilities by using some standard EIPs. In the next chapter, we’ll look at some of the more complex EIPs available in Camel. Unlike when you read chapter 2, you’re now armed with the knowledge of how to connect to many different services with Camel. Keep your knowledge of components handy—you can think up some interesting integration scenarios!