
Chapter 8. Enterprise integration patterns
This chapter covers
- The Aggregator EIP
- The Splitter EIP
- The Routing Slip EIP
- The Dynamic Router EIP
- The Load Balancer EIP
Today’s businesses aren’t run on a single monolithic system, and most businesses have a full range of disparate systems. There is an ever-increasing demand for those systems to integrate with each other and with external business partners and government systems.
Let’s face it, integration is hard. To help deal with the complexity of integration problems, enterprise integration patterns (EIPs) have become the standard way to describe, document, and implement complex integration problems. We explain the patterns we discuss in this book, but to learn more about them and others, see the Enterprise Integration Patterns website and the associated book: http://www.enterpriseintegrationpatterns.com/.
8.1. Introducing enterprise integration patterns
Apache Camel implements EIPs, and because the EIPs are essential building blocks in the Camel routes, you’ll bump into EIPs throughout this book, starting in chapter 2. It would be impossible for this book to cover all the EIPs Camel supports, which currently total around 60 patterns. This chapter is devoted to covering five of the most powerful and feature-rich patterns. The patterns discussed in this chapter are listed in table 8.1.
Table 8.1. EIPs covered in this chapter
|
Pattern |
Summary |
|---|---|
| Aggregator | Used to combine results of individual but related messages into a single outgoing message. You can view this as the reverse of the Splitter pattern. This pattern is covered in section 8.2. |
| Splitter | Used to split a message into pieces that are routed separately. This pattern is covered in section 8.3. |
| Routing Slip | Used to route a message in a series of steps, where the sequence of steps isn’t known at design time and may vary for each message. This pattern is covered in section 8.4. |
| Dynamic Router | Used to route messages with a dynamic router dictating where the message goes. This pattern is covered in section 8.5. |
| Load Balancer | Used to balance the load to a given endpoint using a variety of different balancing policies. This pattern is covered in section 8.6. |
Let’s look at these patterns in a bit more detail.
8.1.1. The Aggregator and Splitter EIPs
The first two patterns listed in table 8.1 are related. The Splitter can split out a single message into multiple submessages, and the Aggregator can combine those submessages back into a single message. They’re opposite patterns.
The EIPs allow you to build patterns LEGO style, which means that patterns can be combined together to form new patterns. For example, you can combine the Splitter and the Aggregator into what is known as the Composed Message Processor EIP, as illustrated in figure 8.1.
Figure 8.1. The Composed Message Processor EIP splits up the message, routes the sub-messages to the appropriate destinations, and re-aggregates the response back into a single message.

The Aggregator EIP is likely the most sophisticated and most advanced EIP implemented in Camel. It has many use cases, such as aggregating incoming bids for auctions or throttling stock quotes.
8.1.2. The Routing Slip and Dynamic Router EIPs
A question that is often asked on the Camel mailing list is how to route messages dynamically. The answer is to use EIPs such as Recipient List, Routing Slip, and Dynamic Router. We covered Recipient List in chapter 2, and in this chapter we’ll show you how to use the Routing Slip and Dynamic Router patterns.
8.1.3. The Load Balancer EIP
The EIP book doesn’t list the Load Balancer, which is a pattern implemented in Camel. Suppose you route PDF messages to network printers, and those printers come and go online. You can use the Load Balancer to send the PDF messages to another printer if one printer is unresponsive.
That covers the five EIPs we’ll cover in this chapter. It’s now time to look at the first one in detail, the Aggregator EIP.
8.2. The Aggregator EIP
The Aggregator EIP is important and complex, so we’ll cover it well. Don’t despair if you don’t understand the pattern in the first few pages.
The Aggregator combines many related incoming messages into a single aggregated message, as illustrated in figure 8.2.
Figure 8.2. The Aggregator stores incoming messages until it receives a complete set of related messages. Then the Aggregator publishes a single message distilled from the individual messages.

The Aggregator EIP supports many use cases, such as the loan broker example from the EIP book, where brokers send loan requests to multiple banks and aggregate the replies to determine the best deal.
You could also use the Aggregator in an auction system to aggregate current bids. Also imagine a stock market system that continuously receives a stream of stock quotes, and you want to throttle this to publish the latest quote every 5 seconds. This can be done using the Aggregator to choose the latest message and thus trigger a completion every 5 seconds.
The Aggregator receives a stream of messages and identifies messages that are related, which are then aggregated into a single combined message. Once a completion condition occurs, the aggregated message is sent to the output channel for further processing. We’ll cover how this process works in detail in the next section.
When using the Aggregator, you have to pay attention to the following three configuration settings, which must be configured. Failure to do so will cause Camel to fail on startup and to report an error regarding the missing configuration.
- Correlation identifier— An Expression that determines which incoming messages belong together
- Completion condition— A Predicate or time-based condition that determines when the result message should be sent
- Aggregation strategy— An AggregationStrategy that specifies how to combine the messages into a single message
In this section, we’ll look at a simple example that will aggregate messages containing alphabetic characters, such as A, B, and C. This will keep things simple, making it easier to follow what’s going on. The Aggregator is equally equipped to work with big loads, but that can wait until we’ve covered the basic principles.
8.2.1. Introducing the Aggregator EIP
Suppose you want to collect any three messages together and combine them together. Given three messages containing A, B, and C, you want the aggregator to output a single message containing “ABC”.
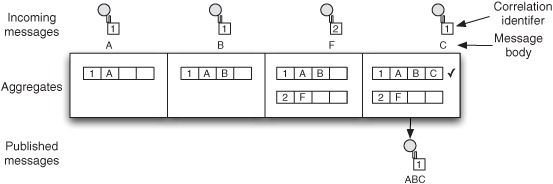
Figure 8.3 shows how this would work. When the first message with correlation identifier 1 arrives, the aggregator initializes a new aggregate and stores the message inside the aggregate. In this example, the completion condition is when three messages have been aggregated, so the aggregate isn’t yet complete. When the second message with correlation identifier 1 arrives, the EIP adds it to the already existing aggregate. The third message specifies a different correlation identifier value of 2, so the aggregator starts a new aggregate for that value. The fourth message relates to the first aggregate (identifier 1), so the aggregate has now aggregated three messages and the completion condition is fulfilled. As a result, the aggregator marks the aggregate as complete and publishes the resulting message:
Figure 8.3. Illustrates the Aggregator EIP in action, with partial aggregated messages updated with arriving messages.
As mentioned before, there are three configurations in play when using the Aggregator EIP: correlation identifier, completion condition, and aggregation strategy. To understand how these three are specified and how they work, let’s start with the example of a Camel route in the Java DSL (with the configurations in bold):
public void configure() throws Exception {
    from("direct:start")
        .log("Sending ${body} with correlation key ${header.myId}")
        .aggregate(header("myId"), new MyAggregationStrategy())
            .completionSize(3)
            .log("Sending out ${body}")
            .to("mock:result");
The correlation identifier is header("myId"), and it’s a Camel Expression. It returns the header with the key "myId". The second configuration element is the AggregationStrategy, which is a class. We’ll cover this class in more detail in a moment. Finally, the completion condition is based on size (there are five kinds of completion conditions, listed in table 8.3). It simply states that when three messages have been aggregated, the completion should trigger.
The same example in Spring XML is as follows:
<bean id="myAggregationStrategy"
      class="camelinaction.MyAggregationStrategy"/>

<camelContext xmlns="http://camel.apache.org/schema/spring">
    <route>
        <from uri="direct:start"/>
        <log message="Sending ${body} with key ${header.myId}"/>
        <aggregate strategyRef="myAggregationStrategy" completionSize="3">
<correlationExpression>
<header>myId</header>
</correlationExpression>
            <log message="Sending out ${body}"/>
            <to uri="mock:result"/>
        </aggregate>
    </route>
</camelContext>
The Spring XML is a little different than the Java DSL because you define the AggregationStrategy using the strategyRef attribute on the <aggregate> tag. This refers to a Spring <bean>, which is listed in the top of the Spring XML file. The completion condition is also defined as a completionSize attribute. The most noticeable difference is how the correlation identifier is defined. In Spring XML, it is defined using the <correlationExpression> tag, which has a child tag that includes the Expression.
The source code for the book contains this example in the chapter8/aggregator directory. You can run the examples using the following Maven goals:
mvn test -Dtest=AggregateABCTest
mvn test -Dtest=SpringAggregateABCTest
The examples use the following unit test method:
public void testABC() throws Exception {
    MockEndpoint mock = getMockEndpoint("mock:result");
    mock.expectedBodiesReceived("ABC");

    template.sendBodyAndHeader("direct:start", "A", "myId", 1);
    template.sendBodyAndHeader("direct:start", "B", "myId", 1);
    template.sendBodyAndHeader("direct:start", "F", "myId", 2);
    template.sendBodyAndHeader("direct:start", "C", "myId", 1);

    assertMockEndpointsSatisfied();
}
This unit test sends the same messages as shown in figure 8.3—four messages in total. When you run the test, you will see the output on the console:
INFO route1 - Sending A with correlation key 1
INFO route1 - Sending B with correlation key 1
INFO route1 - Sending F with correlation key 2
INFO route1 - Sending C with correlation key 1
INFO route1 - Sending out ABC
Notice how the console output matches the sequence in which the messages were aggregated in the example from figure 8.3. As you can see from the console output, the messages with correlation key 1 were completed, because they met the completion condition, which was size based on three messages. The last line of the output shows the published message, which contains the letters “ABC.”
So what happens with the F message? Well, its completion condition has not been met, so it waits in the aggregator. You could modify the test method to send in additional two messages to complete that second group as well:
template.sendBodyAndHeader("direct:start", "G", "myId", 2);
template.sendBodyAndHeader("direct:start", "H", "myId", 2);
Let’s now turn our focus to how the Aggregator EIP combines the messages, which causes the A, B, and C messages to be published as a single message. This is where the AggregationStrategy comes into the picture, because it orchestrates this.
Using Aggregationstrategy
The AggregationStrategy class is located in the org.apache.camel.processor.aggregation package, and it defines a single method:
public interface AggregationStrategy {
    Exchange aggregate(Exchange oldExchange, Exchange newExchange);
}
If you are having a déjà vu moment, its most likely because AggregationStrategy is also used by the Content Enricher EIP, which we covered in chapter 3.
Listing 8.1 shows the strategy used in the previous example.
Listing 8.1. AggregationStrategy for merging messages together

At runtime, the aggregate method is invoked every time a new message arrives. In this example, it will be invoked four times: one for each arriving message A, B, F, and C. To show how this works, we’ve listed the invocations as they would happen, in table 8.2.
Table 8.2. Sequence of invocations of aggregate method occurring at runtime
|
Arrived |
oldExchange |
newExchange |
Description |
|---|---|---|---|
| A | null | A | The first message arrives for the first group |
| B | A | B | The second messages arrives for the first group |
| F | null | F | The first message arrives for the second group |
| C | AB | C | The third message arrives for the first group |
Notice in table 8.2 that the oldExchange parameter is null on two occasions. This occurs when a new correlation group is formed (no preexisting messages have arrived with the same
correlation identifier). In this situation, you simply want to return the message as is, because there are no other messages
to combine it with ![]() .
.
On the subsequent aggregations, neither parameter is null so you need to merge the data into one Exchange. In this example, you grab the message bodies and add them together ![]() . Then you replace the existing body in the oldExchange with the updated body.
. Then you replace the existing body in the oldExchange with the updated body.
Note
The Aggregator EIP uses synchronization, which ensures that the AggregationStrategy is thread safe—only one thread is invoking the aggregate method at any time. The Aggregator also ensures ordering, which means the messages are aggregated in the same order as they are sent into the Aggregator.
You should now understand the principles of how the Aggregator works. For a message to be published from the Aggregator, a completion condition must have been met. In the next section, we’ll discuss this and review the different conditions Camel provides out of the box.
8.2.2. Completion conditions for the Aggregator
Completion conditions play a bigger role in the Aggregator than you might think. Imagine a situation where a condition never occurs, causing aggregated messages never to be published. For example, suppose the C message never arrived in the example in section 8.2.1. To remedy this, you could add a timeout condition that would react if all messages aren’t received within a certain time period.
To cater for that situation and others, Camel provides five different completion conditions, which are listed in table 8.3. You can mix and match them according to your needs.
Table 8.3. Different kinds of completion conditions provided by the Aggregator EIP
|
Condition |
Description |
|---|---|
| completionSize | Defines a completion condition based on the number of messages aggregated together. You can either use a fixed value (int) or use an Expression to dynamically decide a size at runtime. |
| completionTimeout | Defines a completion condition based on an inactivity timeout. This condition triggers if a correlation group has been inactive longer than the specified period. Timeouts are scheduled for each correlation group, so the timeout is individual to each group. You can either use a fixed value (long) or use an Expression to dynamically decide a timeout at runtime. The period is defined in milliseconds. You can’t use this condition together with the completionInterval. |
| completionInterval | Defines a completion condition based on a scheduled interval. This condition triggers periodically. There is a single scheduled timeout for all correlation groups, which causes all groups to complete at the same time. The period (long) is defined in milliseconds. You can’t use this condition together with the completionTimeout. |
| completionPredicate | Defines a completion condition based on whether the Predicate matched. See also the eagerCheckCompletion option in table 8.5. |
| completionFromBatchConsumer | Defines a completion condition that is only applicable when the arriving Exchanges are coming from a BatchConsumer (http://camel.apache.org/batch-consumer.html). At the time of writing, the following components support this condition: File, FTP, Mail, iBatis, and JPA. |
The Aggregator supports using multiple completion conditions, such as using both the completionSize and completionTimeout conditions. When using multiple conditions, though, the winner takes all—the completion condition that completes first will result in the message being published.
Note
The source code for the book contains examples in the chapter8/aggregator directory for all conditions; you can refer to them for further details. Also the Aggregator documentation on the Camel website has more details: http://camel.apache.org/aggregator2.
We’ll now look at how you can use multiple completion conditions.
Using Multiple Completion Conditions
The source code for this book contains an example in the chapter8/aggregator directory showing how to use multiple completion conditions. You can run the example using the following Maven goals:
mvn test -Dtest=AggregateXMLTest
mvn test -Dtest=SpringAggregateXMLTest
The route in the Java DSL is as follows:
import static org.apache.camel.builder.xml.XPathBuilder.xpath;

public void configure() throws Exception {
    from("direct:start")
        .log("Sending ${body}")
        .aggregate(xpath("/order/@customer"), new MyAggregationStrategy())
.completionSize(2).completionTimeout(5000)
            .log("Sending out ${body}")
            .to("mock:result");
}
As you can see from the bold code in the route, using a second condition is just a matter of adding an additional completion condition.
The same example in Spring XML is shown here:
<bean id="myAggregationStrategy"
      class="camelinaction.MyAggregationStrategy"/>

<camelContext xmlns="http://camel.apache.org/schema/spring">
    <route>
        <from uri="direct:start"/>
        <log message="Sending ${body}"/>
        <aggregate strategyRef="myAggregationStrategy"
completionSize="2" completionTimeout="5000">
            <correlationExpression>
               <xpath>/order/@customer</xpath>
            </correlationExpression>
            <log message="Sending out ${body}"/>
            <to uri="mock:result"/>
        </aggregate>
    </route>
</camelContext>
If you run this example, it will use the following test method:
public void testXML() throws Exception {
    MockEndpoint mock = getMockEndpoint("mock:result");
    mock.expectedMessageCount(2);
    template.sendBody("direct:start",
        "<order name="motor" amount="1000" customer="honda"/>");
    template.sendBody("direct:start",
        "<order name="motor" amount="500" customer="toyota"/>");
    template.sendBody("direct:start",
       "<order name="gearbox" amount="200" customer="toyota"/>");
    assertMockEndpointsSatisfied();
}
This example should cause the aggregator to publish two outgoing messages, as shown in the following console output; one for Honda and one for Toyota.
09:37:35 - Sending <order name="motor" amount="1000" customer="honda"/>
09:37:35 - Sending <order name="motor" amount="500" customer="toyota"/>
09:37:35 - Sending <order name="gearbox" amount="200" customer="toyota"/>
09:37:35 - Sending out
           <order name="motor" amount="500" customer="toyota"/>
           <order name="gearbox" amount="200" customer="toyota"/>
09:37:41 - Sending out
           <order name="motor" amount="1000" customer="honda"/>
If you look closely at the test method and the output from the console, you should notice that the Honda order arrived first, but it was the last to be published. This is because its completion was triggered by the timeout, which was set to 5 seconds. In the meantime, the Toyota order had its completion triggered by the size of two messages, so it was published first.
Tip
The Aggregator EIP allows you to use up to four completion conditions; the completionTimeout and completionInterval conditions can’t be used at the same time.
Using multiple completion conditions makes good sense if you want to ensure that aggregated messages eventually get published. For example, the timeout condition ensures that after a period of inactivity the message will be published. In that regard, you can use the timeout condition as a fallback condition, with the price being that the published message will only be partly aggregated. Suppose you expected two messages to be aggregated into one, but you only received one message; the next section reveals how you can tell which condition triggered the completion.
Aggregated Exchange Properties
Camel enriches the published Exchange with the completion details listed in table 8.4.
Table 8.4. Properties on the Exchange related to aggregation
|
Property |
Type |
Description |
|---|---|---|
| Exchange.AGGREGATED SIZE | Integer | The total number of arrived messages aggregated. |
| Exchange.AGGREGATED COMPLETED BY | String | The condition that triggered the completion. Possible values are "size", "timeout", "interval", "predicate", and "consumer". The "consumer" value represents the completion from batch consumer. |
| Exchange.AGGREGATED CORRELATION KEY | String | The correlation identifier as a String. |
The information listed in table 8.4 allows you to know how a published aggregated Exchange was completed, and how many messages were combined. For example, you could log to the console which condition completed, simply by adding this to the Camel route:
.log("Completed by ${property.CamelAggregatedCompletedBy}")
This information might come in handy in your business logic, when you need to know whether or not all messages were aggregated. You can tell this by checking the AGGREGATED_COMPLETED_BY property, which could contain either the value "size" or "timeout". If the value is "size", all the messages were aggregated; if the value is "timeout", a timeout occurred, and not all expected message were aggregated.
The Aggregator has additional configuration options that you may need to use. For example, you can specify how it should react when an arrived message contains an invalid correlation identifier.
Additional Configuration Options
The Aggregator is the most sophisticated EIP implemented in Camel, and table 8.5 lists the additional configuration options you can use to tweak it to fit your needs.
Table 8.5. Additional configuration options available for the Aggregator EIP
If you want to learn more about the configuration options listed in table 8.5, there are examples for each option in the source code for the book in the chapter8/aggregator directory. You can run test examples using the following Maven goals:
mvn test -Dtest=AggregateABCEagerTest
mvn test -Dtest=SpringAggregateABCEagerTest
mvn test -Dtest=AggregateABCCloseTest
mvn test -Dtest=SpringAggregateABCCloseTest
mvn test -Dtest=AggregateABCInvalidTest
mvn test -Dtest=SpringAggregateABCInvalidTest
mvn test -Dtest=AggregateABCGroupTest
mvn test -Dtest=SpringAggregateABCGroupTest
In the next section, we’ll look at solving the problems with persistence. The Aggregator, by default, uses an in-memory repository to hold the current in-progress aggregated messages, and those messages will be lost if the application is stopped or the server crashes. To remedy this, you need to use a persisted repository.
8.2.3. Using persistence with the Aggregator
The Aggregator is a stateful EIP because it needs to store the in-progress aggregates until completion conditions occur and the aggregated message can be published. By default, the Aggregator will keep state in memory only. If the application is shut down or the host container crashes, the state will be lost.
To remedy this problem, you need to store the state in a persistent repository. Camel provides a pluggable feature so you can use a repository of your choice. This comes in two flavors:
- AggregationRepository—An interface that defines the general operations for working with a repository, such as adding data to and removing data from it. By default, Camel uses MemoryAggregationRepository, which is a memory-only repository.
- RecoverableAggregationRepository—An interface that defines additional operations supporting recovery. Camel provides such a repository out of the box in the camel-hawtdb component. We’ll cover recovery in section 8.2.4.
HawtDB is a lightweight and embeddable file-based key/value database. It allows Camel to provide persistence for various Camel features, such as the Aggregator. In the future, other Camel features will leverage HawtDB.
You can find more information about HawtDB at its website: http://hawtdb.fusesource.org.
We’ll look at how you can use HawtDB as a persistent repository.
Using Camel-HawtDB
To demonstrate how to use HawtDB with the Aggregator, we’ll return to the ABC example. In essence, all you need to do is instruct the Aggregator to use HawtDBAggregationRepository as its repository.
First, though, you must set up HawtDB, which is done as follows:
AggregationRepository myRepo = new
    HawtDBAggregationRepository("myrepo", "data/myrepo.dat");
Or, in Spring XML you would do this:
<bean id="myRepo
    class="org.apache.camel.component.hawtdb.HawtDBAggregationRepository">
    <property name="repositoryName" value="myrepo"/>
    <property name="persistentFileName" value="data/myrepo.dat"/>
</bean>
As you can see, this creates a new instance of HawtDBAggregationRepository and provides two parameters: the repository name, which is a symbolic name, and the physical filename to use as persistent storage. The repository name must be specified because you can have multiple repositories in the same file.
Tip
You can find information about the additional supported options for the HawtDB component at the Camel website: http://camel.apache.org/hawtdb
To use HawtDBAggregationRepository in the Camel route, you can instruct the Aggregator to use it as shown here.
Listing 8.2. Using HawtDB with Aggregator in Java DSL
AggregationRepository myRepo = new
    HawtDBAggregationRepository("myrepo", "data/myrepo.dat");

from("file://target/inbox")
    .log("Consuming ${file:name}")
    .aggregate(constant(true), new MyAggregationStrategy())
.aggregationRepository(myRepo)
        .completionSize(3)
        .log("Sending out ${body}")
        .to("mock:result");
Here’s the same example in Spring XML.
Listing 8.3. Using HawtDB with Aggregator in Spring XML
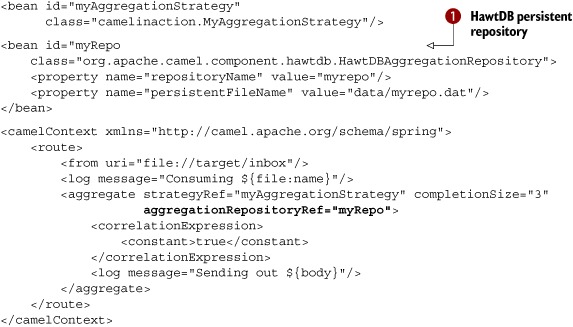
As you can see from listing 8.3, a Spring bean tag is defined with the ID "myRepo" ![]() , which sets up the persistent AggregationRepository. The name for the repository and the filename are configured as properties on the bean tag. In the Camel route, you then refer to this repository using the aggregationRepositoryRef attribute on the aggregate tag.
, which sets up the persistent AggregationRepository. The name for the repository and the filename are configured as properties on the bean tag. In the Camel route, you then refer to this repository using the aggregationRepositoryRef attribute on the aggregate tag.
Running the Example
The source code for the book contains this example in the chapter8/aggregator directory. You can run it using the following Maven goals:
mvn test -Dtest=AggregateABCHawtDBTest
mvn test -Dtest=SpringAggregateABCHawtDBTest
To demonstrate how the persistence store works, the example will start up and run for 20 seconds. In that time, you can copy files in the target/inbox directory and have those files consumed and aggregated. On every third file, the Aggregator will complete and publish a message.
The example will display instructions on the console about how to do this:
Copy 3 files to target/inbox to trigger the completion
Files to copy:
  copy src/test/resources/a.txt target/inbox
  copy src/test/resources/b.txt target/inbox
  copy src/test/resources/c.txt target/inbox

Sleeping for 20 seconds
You can let the test terminate (or press ctrl + c) and then start it again
Which should let you be able to resume.
For example, if you copy the first two files and then let the example terminate, you’ll see the following:
cd chapter8/aggregator
chapter8/aggregator$ cp src/test/resources/a.txt target/inbox
chapter8/aggregator$ cp src/test/resources/b.txt target/inbox
The console should indicate that it consumed two files and was shut down:
2010-04-25 INFO route1 -  Consuming file a.txt
2010-04-25 INFO route1 -  Consuming file b.txt
...
2010-04-25 INFO DefaultCamelContext - Apache Camel 2.5.0 is shutdown
The next time you start the example, you can resume where you left off, and copy the last file:
chapter8/aggregator$ cp src/test/resources/c.txt target/inbox
Then the Aggregator should complete and publish the message:
2010-04-25 INFO HawtDBAggregationRepository - On startup there are 1
    aggregate exchanges (not completed) in repository: myrepo
2010-04-25 INFO DefaultCamelContext - Apache Camel 2.5.0 is started
...
2010-04-25 INFO route1 - Consuming file c.txt
2010-04-25 INFO route1 - Sending out ABC
Notice how it logs on startup how many exchanges are in the persistent repository. In this example there is one existing Exchange on startup.
Now you’ve seen the persistent Aggregator in action. Let’s move on to look at using recovery with the Aggregator, which ensures that published messages can be safely recovered and be routed in a transactional way.
8.2.4. Using recovery with the Aggregator
The examples covered in the previous section focused on ensuring that messages are persisted during aggregation. But there’s another place where messages may be lost: messages that have been published (send out) from the Aggregator, could potentially fail during routing as well.
To remedy this problem you could use one of these two approaches:
- Camel error handlers (covered in chapter 5)—these provide redelivery and dead letter channel capabilities.
- The Hawt DB component—the HawtDBAggregationRepository provides recovery, redelivery, dead letter channel, and transactional capabilities.
Camel error handlers aren’t tightly coupled with the Aggregator, so message handling is in the hands of the error handler. If a message repeatedly fails, the error handler can only deal with this by retrying or eventually giving up and moving the message to a dead letter channel.
Note
RecoverableAggregationRepository is an interface extending AggregationRepository, which offers the recovery, redelivery, and dead letter channel features. The HawtDBAggregationRepository implements this interface.
The HawtDBAggregationRepository on the other hand, is tightly integrated into the Aggregator, which allows additional benefits such as leveraging the persistence store for recovery and offering transactional capabilities. It ensures published messages that fail will be recovered and redelivered. You can think of this as what a JMS broker, such as Apache ActiveMQ, can do by bumping failed messages back up on the JMS queue for redelivery.
Understanding Recovery
To better understand how recovery works, we’ve provided the following two figures.
Figure 8.4 shows what happens when an aggregated message is being published for the first time, and the message fails during processing. This could also be the situation when a server crashes while processing the message.
Figure 8.4. An aggregated message is completed  , it’s published from the Aggregator
  , and processing fails
  , so the message is rolled back.
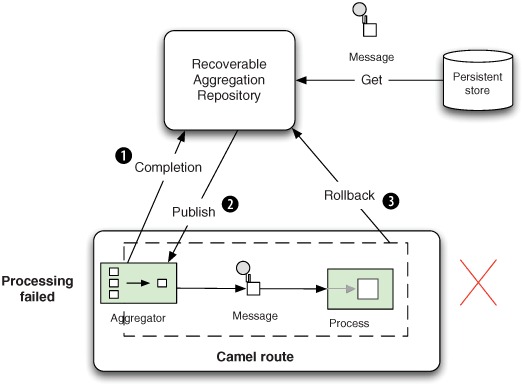
An aggregated message is complete, so the Aggregator signals ![]() this to the RecoverableAggregationRepository, which fetches the aggregated message to be published
this to the RecoverableAggregationRepository, which fetches the aggregated message to be published ![]() . The message is then routed in Camel—but suppose it fails during routing
. The message is then routed in Camel—but suppose it fails during routing ![]() . A signal is sent from the Aggregator to the RecoverableAggregationRepository, which can act accordingly.
. A signal is sent from the Aggregator to the RecoverableAggregationRepository, which can act accordingly.
Now imagine the same message is recovered and redelivered, as shown in figure 8.5.
Figure 8.5. The Aggregator recovers failed messages, which are published again , and this time the messages completed successfully  .
.
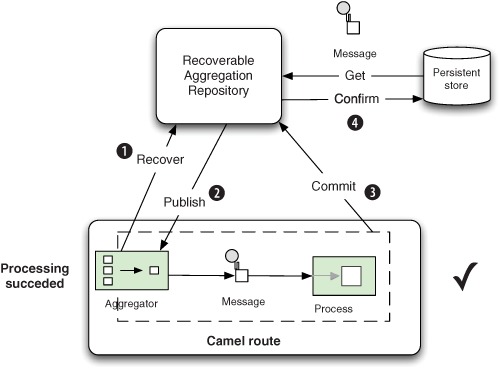
The Aggregator uses a background task, which runs every 5 seconds, to scan for previously published messages to be recovered
![]() . Any such messages will be republished
. Any such messages will be republished ![]() , and the message will be routed again. This time, the message could be processed successfully, which lets the Aggregator
issue a commit
, and the message will be routed again. This time, the message could be processed successfully, which lets the Aggregator
issue a commit ![]() . The repository confirms
. The repository confirms ![]() the message, ensuring it won’t be recovered on subsequent scans.
the message, ensuring it won’t be recovered on subsequent scans.
Note
The transactional behavior provided by RecoverableAggregationRepository isn’t based on Spring’s TransactionManager (which we’ll cover in chapter 9). The transactional behavior is based on HawtDB’s own transaction mechanism.
Running the Example
The source code for the book contains this example in the chapter8/aggregator directory. You can run it using the following Maven goals:
mvn test -Dtest=AggregateABCRecoverTest
mvn test -Dtest=SpringAggregateABCRecoverTest
The example is constructed to fail when processing the published messages, no matter what. This means that eventually you’ll have to move the message to a dead letter channel.
To use recovery with routes in the Java DSL, you have to set up HawtDBAggregationRepository as shown here:
HawtDBAggregationRepository hawtDB = new
    HawtDBAggregationRepository("myrepo", "data/myrepo.dat");
hawtDB.setUseRecovery(true);
hawtDB.setMaximumRedeliveries(4);
hawtDB.setDeadLetterUri("mock:dead");
hawtDB.setRecoveryInterval(3000);
In Spring XML, you can set this up as a spring <bean> tag, as follows:
<bean id="myRepo"
    class="org.apache.camel.component.hawtdb.HawtDBAggregationRepository">
    <property name="repositoryName" value="myrepo"/>
    <property name="persistentFileName" value="data/myrepo.dat"/>
    <property name="useRecovery" value="true"/>
    <property name="recoveryInterval" value="3000"/>
    <property name="maximumRedeliveries" value="4"/>
    <property name="deadLetterUri" value="mock:dead"/>
</bean>
The options may make sense as you read them now, but we’ll revisit them in table 8.7. In this example, the Aggregator will check for messages to be recovered every 3 seconds. To avoid a message being repeatedly recovered, the maximum redeliveries are set to 4. This means that after 4 failed recovery attempts, the message is exhausted and is moved to the dead letter channel. If you omit the maximum redeliveries option, Camel will keep recovering failed messages forever until they can be processed successfully.
If you run the example, you’ll notice that the console outputs the failures as stack traces, and at the end you’ll see a WARN entry that indicates the message has been moved to the dead letter channel:
2010-04-26 [AggregateRecoverChecker] WARN - The recovered exchange is
exhausted after 4 attempts, will now be moved to dead letter channel:
mock:dead
We encourage you to try this example and read the code comments in the source code to better understand how this works.
The preceding log output identifies the number of redelivery attempts, but how does Camel know this? Obviously Camel stores this information on the Exchange. Table 8.6 reveals where this information is stored.
Table 8.6. Headers on Exchange related to redelivery
|
Header |
Type |
Description |
|---|---|---|
| Exchange.REDELIVERY_ COUNTER | int | The current redelivery attempt. The counter starts with the value of 1. |
| Exchange.REDELIVERED | boolean | Whether this Exchange is being redelivered. |
| Exchange.REDELIVERY_ EXHAUSTED | boolean | Whether this Exchange has attempted all redeliveries and still failed (also known as being exhausted). |
The information in table 8.6 is only available when Camel performs a recovery. These headers are absent on the regular first attempt. It’s only when a recovery is triggered that these headers are set on the Exchange.
Table 8.7 lists the options for the RecoverableAggregationRepository that are related to recovery.
Table 8.7. RecoverableAggregationRepository configuration options related to recovery
|
Option |
Default |
Description |
|---|---|---|
| useRecovery | true | Whether or not recovery is enabled. |
| recoveryInterval | 5000 | How often the recovery background tasks are executed. The value is in milliseconds. |
| deadLetterUri | null | An optional dead letter channel, where published messages that are exhausted should be sent. This is similar to the DeadLetterChannel error handler, which we covered in chapter 5. This option is disabled by default. When in use, the maximumRedeliveries option must be configured as well. |
| maximumRedeliveries | null | A limit that defines when published messages that repeatedly fail are considered exhausted and should be moved to the dead letter URI. This option is disabled by default. |
We won’t go into more detail regarding the options in table 8.7, as we’ve already covered an example using them.
This concludes our extensive coverage of the sophisticated and probably most complex EIP implemented in Camel—the Aggregator. In the next section, we’ll look at the Splitter pattern.
8.3. The Splitter EIP
Messages passing through an integration solution may consist of multiple elements, such as an order, which typically consists of more than a single line item. Each line in the order may need to be handled differently, so you need an approach that processes the complete order, treating each line item individually. The solution to this problem is the Splitter EIP, illustrated in figure 8.6.
Figure 8.6. The Splitter breaks out the incoming message into a series of individual messages.

In this section, we’ll teach you all you need to know about the Splitter. We’ll start with a simple example and move on from there.
8.3.1. Using the Splitter
Using the Splitter in Camel is straightforward, so let’s try a basic example that will split one message into three messages, each containing one of the letters A, B, and C. Listing 8.4 shows the example using a Java DSL–based Camel route and a unit test.
Listing 8.4. A basic example of the Splitter EIP

The test method sets up a mock endpoint that expects three messages to arrive, in the order A, B, and C. Then you construct a single combined message body that consists of a List of Strings containing the three letters. The Camel route will use the Splitter EIP to split up the message body ![]() .
.
If you run this test, the console should log the three messages, as follows:
INFO  route1 - Split line A
INFO  route1 - Split line B
INFO  route1 - Split line C
When using the Splitter EIP in Spring XML, you have to do this a bit differently because the Splitter uses an Expression to return what is to be split.
In the Java DSL we defined the Expression shown in bold:
.split(body())
Here, body() is a method available on the RouteBuilder, which returns an org.apache.camel.Expression instance. In Spring XML you need to do this as shown in bold:
<camelContext xmlns="http://camel.apache.org/schema/spring">
    <route>
        <from uri="direct:start"/>
        <split>
<simple>${body}</simple>
            <log message="Split line ${body}"/>
            <to uri="mock:split"/>
        </split>
    </route>
 </camelContext>
In Spring XML, you use the Camel’s expression language, known as Simple (discussed in appendix A), to tell the Splitter that it should split the message body.
The source code for the book contains this example in the chapter8/splitter directory. You can run it using the following Maven goals:
mvn test -Dtest=SplitterABCTest
mvn test -Dtest=SpringSplitterABCTest
Now you’ve seen the Splitter in action. To better understand how you can tell Camel what it should split, you need to understand how it works.
How the Splitter Works
The Splitter works something like a big iterator that iterates through something and processes each entry. The sequence diagram in figure 8.7 shows more details about how this big iterator works.
Figure 8.7. A sequence diagram showing how the Splitter works internally, by using an iterator to iterate through the message and process each entry.
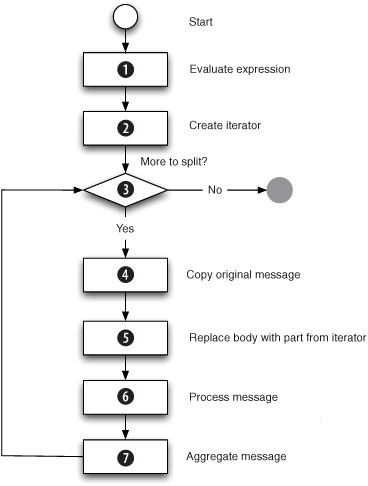
When working with the Splitter, you have to configure an Expression, which is evaluated ![]() when a message arrives. In listing 8.4, the evaluation returned the message body. The result from the evaluation is used to create a java.util.Itetator
when a message arrives. In listing 8.4, the evaluation returned the message body. The result from the evaluation is used to create a java.util.Itetator ![]() .
.
When Camel creates the iterator ![]() , it supports a range of types. Camel knows how to iterate through the following types: Collection, Iterator, Array, org.w3c. dom.NodeList, String (with entries separated by commas). Any other type will be iterated once.
, it supports a range of types. Camel knows how to iterate through the following types: Collection, Iterator, Array, org.w3c. dom.NodeList, String (with entries separated by commas). Any other type will be iterated once.
Then the Splitter uses the iterator ![]() until there is no more data. Each message to be sent out of the iterator is a copy of the message
until there is no more data. Each message to be sent out of the iterator is a copy of the message ![]() , which has had its message body replaced with the part from the iterator
, which has had its message body replaced with the part from the iterator ![]() . In listing 8.4, there would be three parts: each of the letters A, B, and C. The message to be sent out is then processed
. In listing 8.4, there would be three parts: each of the letters A, B, and C. The message to be sent out is then processed ![]() , and when the processing is done, the message may be aggregated
, and when the processing is done, the message may be aggregated ![]() (more about this in section 8.3.4).
(more about this in section 8.3.4).
The Splitter will decorate each message it sends out with properties on the Exchange, which are listed in table 8.8.
Table 8.8. Properties on the Exchange related to the Splitter EIP
|
Property |
Type |
Description |
|---|---|---|
| Exchange.SPLIT_ INDEX | Integer | The index for the current message being processed. The index is zero-based. |
| Exchange.SPLIT_ SIZE | Integer | The total number of messages the original message has been split into. Note that this information isn’t available in streaming mode (see section 8.3.3 for more details about streaming). |
| Exchange.SPLIT_ COMPLETE | Boolean | Whether or not this is the last message being processed. |
You may find yourself in a situation where you need more power to do the splitting, such as to dictate exactly how a message should be split. And what better power is there than Java? By using Java code, you have the ultimate control and can tackle any situation.
8.3.2. Using beans for splitting
Suppose you need to split messages that contain complex payloads. Suppose the message payload is a Customer object containing a list of Departments, and you want to split by Department, as illustrated in figure 8.8:
Figure 8.8. Splitting a complex message into submessages by department

The Customer object is a simple bean containing the following information (getter and setter methods omitted):
public class Customer {
    private int id;
    private String name;
    private List<Department> departments;
}
The Department object is simple as well:
public class Department {
    private int id;
    private String address;
    private String zip;
    private String country;
}
You may wonder why you can’t split the message as in the previous example, using split(body())? The reason is that the message payload (the message body) isn’t a List, but a Customer object. Therefore you need to tell Camel how to split, which you do as follows:
public class CustomerService {
    public List<Department> splitDepartments(Customer customer) {
        return customer.getDepartments();
    }
}
The splitDepartments method returns a List of Department objects, which is what you want to split by.
In the Java DSL, you can use the CustomerService bean for splitting by telling Camel to invoke the splitDepartments method. This is done by using the method call expression as shown in bold:
public void configure() throws Exception {
    from("direct:start")
        .split().method(CustomerService.class, "splitDepartments")
            .to("log:split")
            .to("mock:split");
}
In Spring XML, you’d have to declare the CustomerService in a Spring bean tag, as follows:
<bean id="customerService" class="camelinaction.CustomerService"/>

<camelContext xmlns="http://camel.apache.org/schema/spring">
    <route>
        <from uri="direct:start"/>
        <split>
<method bean="customerService" method="splitDepartments"/>
            <to uri="log:split"/>
            <to uri="mock:split"/>
        </split>
    </route>
</camelContext>
The source code for the book contains this example in the chapter8/splitter directory. You can run it using the following Maven goals:
mvn test -Dtest=SplitterBeanTest
mvn test -Dtest=SpringSplitterBeanTest
The logic in the splitDepartments method is simple, but it shows how you can use a method on a bean to do the splitting. In your use cases, you may need more complex logic.
Tip
The logic in the splitDepartments method seems trivial, and it’s possible to use Camel’s expression language (Simple) to invoke methods on the message body. In Java DSL you could define the route as follows: .split().simple ("${body.departments}"). In Spring XML you would use the <simple> tag instead of the <method> tag: <simple>${body.departments}</simple>.
The Splitter will usually operate on messages that are loaded into memory. But there are situations where the messages are so big that it’s not feasible to have the entire message in memory at once.
8.3.3. Splitting big messages
Rider Auto Parts has an ERP system that contains inventory information from all its suppliers. To keep the inventory updated, each supplier must submit updates to Rider Auto Parts. Some suppliers do this once a day using good old-fashioned files as a means of transport. Those files could potentially be very large, so you have to split those files without loading the entire file into memory.
This can be done by using streams, which allow you to read on demand from a stream of data. This resolves the memory issue, because you can read in a chunk of data, process the data, read in another chunk, process the data, and so on.
Figure 8.9 shows the flow of the application used by Auto Rider Parts to pick up the files from the suppliers and update the inventory.
Figure 8.9. A route that picks up incoming files, splits them, and transforms them so they’re ready for updating the inventory in the ERP system

We’ll revisit this example again in chapter 10, and cover it in much greater detail when we cover concurrency.
Implementing the route outlined in figure 8.9 is easy to do in Camel, as follows.
Listing 8.5. Splitting big files using streaming mode

As you can see in listing 8.5, all you have to do is enable streaming mode using .streaming() ![]() . This tells Camel to not load the entire payload into memory, but instead to iterate the payload in a streaming fashion.
Also notice the use of end()
. This tells Camel to not load the entire payload into memory, but instead to iterate the payload in a streaming fashion.
Also notice the use of end() ![]() to indicate the end of the splitting route. The end() in the Java DSL is the equivalent of the end tag </split> when using Spring XML.
to indicate the end of the splitting route. The end() in the Java DSL is the equivalent of the end tag </split> when using Spring XML.
In Spring XML, you enable streaming using the streaming attribute on the <split> tag, as follows.
Listing 8.6. Splitting big files using streaming mode in Spring XML
<camelContext xmlns="http://camel.apache.org/schema/spring">
    <route>
        <from uri="file:target/inventory"/>
        <log message="Processing big file: ${header.CamelFileName}"/>
        <split streaming="true">
            <tokenize token="
"/>
            <bean beanType="camelinaction.InventoryService"
                  method="csvToObject"/>
            <to uri="direct:update"/>
        </split>
        <log message="Done processing big file: ${header.CamelFileName}"/>
     </route>

     <route>
        <from uri="direct:update"/>
        <bean beanType="camelinaction.InventoryService"
              method="updateInventory"/>
     </route>
</camelContext>
You may have noticed in listings 8.5 and 8.6 that the files are split using a tokenizer. The tokenizer is a powerful feature that works well with streaming. The tokenizer leverages java.util.Scanner, which supports streaming. The Scanner is capable of iterating, which means that it only reads chunks of data into memory. A token must be provided to indicate the boundaries of the chunks. In the preceding code, you use a newline ( ) as the token. So, in this example, the Scanner will only read the file into memory on a line-by-line basis, resulting in low memory consumption.
Note
When using streaming mode, be sure the message you’re splitting can be split into well-known chunks that can be iterated. You can use the tokenizer or convert the message body to a type that can be iterated, such as an Iterator.
The Splitter EIP in Camel includes an aggregation feature that lets you recombine split messages into single outbound messages, while they are being routed.
8.3.4. Aggregating split messages
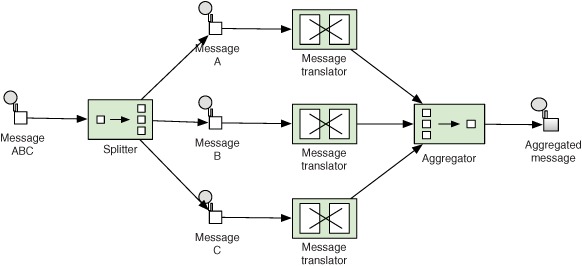
Being able to split and aggregate messages again is a powerful mechanism. You could use this to split an order into individual order lines, process them, and then recombine them into a single outgoing message. This pattern is known as the Composed Message Processor, which we briefly touched on in section 8.1. It’s shown in figure 8.1.
The Camel Splitter provides a built-in aggregator, which makes it even easier to aggregate split messages back into single outgoing messages. Figure 8.10 illustrates this principle, with the help of the “ABC” message example.
Figure 8.10. The Splitter has a built-in aggregator that can recombine split messages into a combined outgoing message.
Suppose you want to translate each of the A, B, and C messages into a phrase, and have all the phrases combined into a single message again. This can easily be done with the Splitter—all you need to provide is the logic that combines the messages. This logic is created using an AggregationStrategy implementation.
Implementing the Camel route outlined in figure 8.10 can be done as follows in the Java DSL. The configuration of the AggregationStrategy is shown in bold:
from("direct:start")
    .split(body(), new MyAggregationStrategy())
        .log("Split line ${body}")
        .bean(WordTranslateBean.class)
        .to("mock:split")
    .end()
    .log("Aggregated ${body}")
    .to("mock:result");
In Spring XML, you have to declare the AggregationStrategy as a Spring bean tag, as shown in bold:
<bean id="translate" class="camelinaction.WordTranslateBean"/>

<bean id="myAggregationStrategy"
      class="camelinaction.MyAggregationStrategy"/>

<camelContext xmlns="http://camel.apache.org/schema/spring">
    <route>
        <from uri="direct:start"/>
        <split strategyRef="myAggregationStrategy" >
            <simple>body</simple>
            <log message="Split line ${body}"/>
            <bean ref="translate"/>
            <to uri="mock:split"/>
        </split>
        <log message="Aggregated ${body}"/>
        <to uri="mock:result"/>
    </route>
</camelContext>
To combine the split messages back into a single combined message, you use the AggregationStrategy.
Listing 8.7. Combining split messages back into a single outgoing message
public class MyAggregationStrategy implements AggregationStrategy {

    public Exchange aggregate(Exchange oldExchange, Exchange newExchange) {
        if (oldExchange == null) {
            return newExchange;
        }

        String body = newExchange.getIn().getBody(String.class);
        String existing = oldExchange.getIn().getBody(String.class);

        oldExchange.getIn().setBody(existing + "+" + body);
        return oldExchange;
    }
}
As you can see from listing 8.7, you combine the messages into a single String body, with individual phrases (from the message bodies) being separated with + signs.
The source code for the book contains this example in the chapter8/splitter directory. You can run it using the following Maven goals:
mvn test -Dtest=SplitterAggregateABCTest
mvn test -Dtest=SpringSplitterAggregateABCTest
The example uses the three phrases: “Aggregated Camel rocks”, “Hi mom”, and “Yes it works”. When you run the example, you’ll see the console output the aggregated message at the end.
INFO  route1 - Split line A
INFO  route1 - Split line B
INFO  route1 - Split line C
INFO  route1 - Aggregated Camel rocks+Hi mom+Yes it works
Before we wrap up our coverage of the Splitter, let’s take a look at what happens if one of the split messages fails with an exception.
8.3.5. When errors occur during splitting
The Splitter processes messages and those messages can fail when some business logic throws an exception. Camel’s error handling is active during the splitting, so the errors you have to deal with in the Splitter are errors that Camel’s error handling couldn’t handle.
You have two choices for handling errors with the Splitter:
- Stop— The Splitter will split and process each message in sequence. Suppose the second message failed. In this situation, you could either immediately stop and let the exception propagate back, or you could continue splitting the remainder of the messages, and let the exception propagate back at the end (default behavior).
- Aggregate— You could handle the exception in the AggregationStrategy and decide whether or not the exception should be propagated back.
Let’s look into the choices.
Using StopOnException
The first solution requires you to configure the stopOnException option on the Splitter as follows:
from("direct:start")
    .split(body(), new MyAggregationStrategy())
        .stopOnException()
        .log("Split line ${body}")
        .bean(WordTranslateBean.class)
        .to("mock:split")
    .end()
    .log("Aggregated ${body}")
    .to("mock:result");
In Spring XML, you use the stopOnException attribute on the <split> tag, as follows:
<split strategyRef="myAggregationStrategy" stopOnException="true">
The source code for the book contains this example in the chapter8/splitter directory. You can run it using the following Maven goals:
mvn test -Dtest=SplitterStopOnExceptionABCTest
mvn test -Dtest=SpringSplitterStopOnExceptionABCTest
The second option is to handle exceptions from the split messages in the AggregationStrategy.
Handling Exceptions Using AggregationStrategy
The AggregationStrategy allows you to handle the exception by either ignoring it or letting it be propagated back. Here’s how you could ignore the exception.
Listing 8.8. Handling an exception by ignoring it
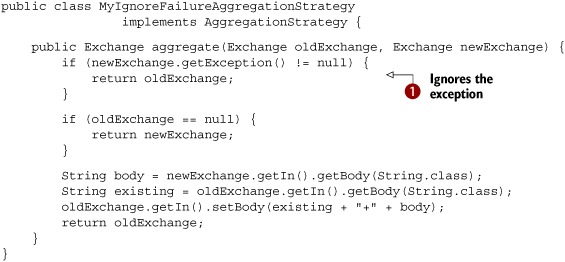
When handling exceptions in the AggregationStrategy, you can detect whether an exception occurred or not by checking the getException method from the newExchange parameter. The preceding example ignores the exception by returning the oldExchange ![]() .
.
If you want to propagate back the exception, you need to keep it stored on the aggregated exception, which can be done as follows.
Listing 8.9. Propagating back an exception
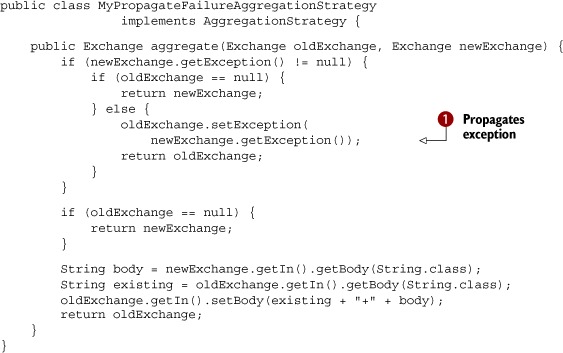
As you can see, it requires a bit more work to keep the exception. On the first invocation of the aggregate method, the oldExchange parameter is null and you simply return the newExchange (which has the exception). Otherwise you must transfer the exception to the oldExchange ![]() .
.
Warning
When using a custom AggregationStrategy with the Splitter, it’s important to know that you’re responsible for handling exceptions. If you don’t propagate the exception back, the Splitter will assume you have handled the exception and will ignore it.
The source code for the book contains this example in the chapter8/splitter directory. You can run it using the following Maven goals:
mvn test -Dtest=SplitterAggregateExceptionABCTest
mvn test -Dtest=SpringSplitterAggregateExceptionABCTest
Now you’ve learned all there is to know about the Splitter. Well, almost all. We’ll revisit the Splitter in chapter 10 when we look at concurrency. In the next two sections, we’ll look at EIPs that support dynamic routing, starting with the Routing Slip pattern.
8.4. The Routing Slip EIP
There are times when you need to route messages dynamically. For example, you may have an architecture that requires incoming messages to undergo a sequence of processing steps and business rule validations. Because the steps and validations vary widely, you can implement each step as a separate filter. The filter acts as a dynamic model to apply the business rule and validations.
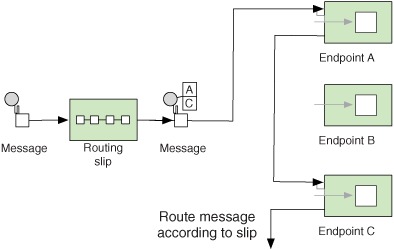
This architecture could be implemented using the Pipes and Filters EIP together with the Filter EIP. But as often happens with EIPs, there’s a better way, known as the Routing Slip EIP. The Routing Slip acts as a dynamic router that dictates the next step a message should undergo. Figure 8.11 shows this principle.
Figure 8.11. The incoming message has a slip attached that specifies the sequence of the processing steps. The Routing Slip EIP reads the slip and routes the message to the next endpoint in the list.
The Camel Routing Slip EIP requires a preexisting header or Expression as the attached slip. Either way, the initial slip must be prepared before the message is sent to the Routing Slip EIP.
8.4.1. Using the Routing Slip EIP
We’ll start with a simple example that shows how to use the Routing Slip EIP to perform the sequence outlined in figure 8.11.
In the Java DSL, the route is as simple as this:
from("direct:start").routingSlip("mySlip");
It’s also easy in Spring XML:
<route>
    <from uri="direct:start"/>
    <routingSlip>
        <header>mySlip</header>
    </routingSlip>
</route>
This example assumes the incoming message contains the slip in the header with the key "mySlip". The following test method shows how you should fill out the key:
public void testRoutingSlip() throws Exception {
    getMockEndpoint("mock:a").expectedMessageCount(1);
    getMockEndpoint("mock:b").expectedMessageCount(0);
    getMockEndpoint("mock:c").expectedMessageCount(1);

    template.sendBodyAndHeader("direct:start", "Hello World",
                               "mySlip", "mock:a,mock:c");
    assertMockEndpointsSatisfied();
}
As you can see, the value of the key is the endpoint URIs separated by commas. The comma is the default delimiter, but the routing slip supports using custom delimiters. For example, to use a semicolon, you could do this:
from("direct:start").routingSlip("mySlip", ";");
And in Spring XML, you’d do this:
<routingSlip uriDelimiter=";">
    <header>mySlip</header>
</routingSlip>
This example expects a preexisting header containing the routing slip. But what if the message doesn’t contain such a header? In those situations, you have to compute the header in any way you like. In the next example, we look at how to compute the header using a bean.
8.4.2. Using a bean to compute the routing slip header
To keep things simple, the logic to compute a header that contains two or three steps has been kept in a single method, as follows:
public class ComputeSlip {
    public String compute(String body) {
        String answer = "mock:a";
        if (body.contains("Cool")) {
            answer += ",mock:b";
        }
        answer += ",mock:c";
        return answer;
    }
}
All you how to do now is leverage this bean to compute the header to be used as routing slip.
In the Java DSL, you can use the method call expression to invoke the bean and set the header:
from("direct:start")
    .setHeader("mySlip").method(ComputeSlip.class)
    .routingSlip("mySlip");
In Spring XML, you can do it as follows:
<route>
    <from uri="direct:start"/>
    <setHeader headerName="mySlip">
        <method beanType="camelinaction.ComputeSlip"/>
    </setHeader>
    <routingSlip>
        <header>mySlip</header>
    </routingSlip>
</route>
In this example, you use a method call expression to set a header that is then used by the routing slip. But you might want to skip the step of setting the header and instead use the expression directly.
8.4.3. Using an Expression as the routing slip
Instead of setting a header, you can use an Expression, such as the method call expression we covered in the previous section. Here’s how you’d do so with the Java DSL:
from("direct:start")
    .routingSlip("mySlip").method(ComputeSlip.class);
The equivalent Spring XML is as follows:
<route>
    <from uri="direct:start"/>
    <routingSlip>
        <method beanType="camelinaction.ComputeSlip"/>
    </routingSlip>
</route>
Another way of using the Routing Slip EIP in Camel is to use beans and annotations.
8.4.4. Using @RoutingSlip annotation
The @RoutingSlip annotation allows you to turn a regular bean method into the Routing Slip EIP. Let’s go over an example.
Suppose you have the following SlipBean:
public class SlipBean {

    @RoutingSlip
    public String slip(String body) {
        String answer = "mock:a";
        if (body.contains("Cool")) {
            answer += ",mock:b";
        }
        answer += ",mock:c";
        return answer;
    }
}
As you can see, all this does is annotate the slip method with @RoutingSlip. When Camel invokes the slip method, it detects the @RoutingSlip annotation and continues routing according to the Routing Slip EIP.
Warning
When using @RecipientList it’s important to not use recipientList in the DSL at the same time. By doing this, Camel will double up using Recipient List EIP, which is not the intention. Instead, do as shown in the example below.
Notice that there’s no mention of the routing slip in the DSL. The route is just invoking a bean.
from("direct:start").bean(SlipBean.class);
Here it is in the Spring DSL:
<bean id="myBean" class="camelinaction.SlipBean"/>

<route>
    <from uri="direct:start"/>
    <bean ref="myBean"/>
</route>
Why might you want to use this? Well, by using @RoutingSlip on a bean, it becomes more flexible in the sense that the bean is accessible using a endpoint URI. Any Camel client or route could easily send a message to the bean and have it continued being routed as a routing slip.
For example, using a ProducerTemplate you could send a message to the bean:
ProducerTemplate template = ...
template.sendBody("bean:myBean", "Camel rocks");
That "Camel rocks" message would then be routed as a routing slip with the slip generated as the result of the myBean method invocation.
The source code for the book contains the examples we’ve covered in the chapter8/routingslip directory. You can try them using the following Maven goals:
mvn test -Dtest=RoutingSlipSimpleTest
mvn test -Dtest=SpringRoutingSlipSimpleTest
mvn test -Dtest=RoutingSlipHeaderTest
mvn test -Dtest=SpringRoutingSlipHeaderTest
mvn test -Dtest=RoutingSlipTest
mvn test -Dtest=SpringRoutingSlipTest
mvn test -Dtest=RoutingSlipBeanTest
mvn test -Dtest=SpringRoutingSlipBeanTest
You’ve now seen the Routing Slip EIP in action.
8.5. The Dynamic Router EIP
In the previous section, you learned that the Routing Slip pattern acts as a dynamic router. So what’s the difference between the Routing Slip and Dynamic Router EIPs? The difference is minimal: the Routing Slip needs to compute the slip up front, whereas the Dynamic Router will evaluate on-the-fly where the message should go next.
8.5.1. Using the Dynamic Router
Just like the Routing Slip, the Dynamic Router requires you to provide logic, which determines where the message should be routed. Such logic is easily implemented using Java code, and in this code you have total freedom to determine where the message should go next. For example, you might query a database or a rules engine to compute where the message should go.
Listing 8.10 shows the Java bean used in the example.
Listing 8.10. Java bean deciding where the message should be routed next
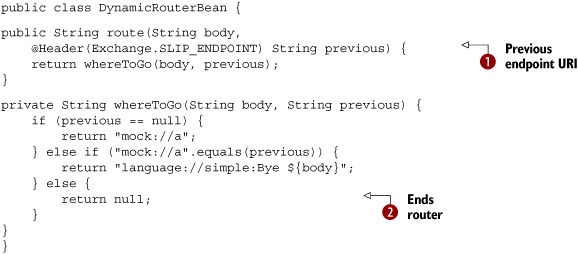
The idea with the Dynamic Router is to let Camel keep invoking the route method until it indicates the end. The first time the route method is invoked, the previous parameter will be null ![]() . On every subsequent invocation, the previous parameter contains the endpoint URI of the last step.
. On every subsequent invocation, the previous parameter contains the endpoint URI of the last step.
As you can see in the whereToGo method, you use this fact and return different URIs depending on the previous step. When the dynamic router is to end, you
return null ![]() .
.
Using the Dynamic Router from the Java DSL is easy to do:
from("direct:start")
    .dynamicRouter(bean(DynamicRouterBean.class, "route"))
    .to("mock:result");
The same route in Spring XML is just as easy as shown:
<bean id="myDynamicRouter" class="camelinaction.DynamicRouterBean"/>

<camelContext xmlns="http://camel.apache.org/schema/spring">
    <route>
        <from uri="direct:start"/>
        <dynamicRouter>
            <method ref="myDynamicRouter" method="route"/>
        </dynamicRouter>
        <to uri="mock:result"/>
    </route>
</camelContext>
The source code for the book contains this example in the chapter8/dynamicrouter directory. You can try it using the following Maven goals:
mvn test -Dtest=DynamicRouterTest
mvn test -Dtest=SpringDynamicRouterTest
There is also a Dynamic Router annotation you can use.
8.5.2. Using the @DynamicRouter annotation
To demonstrate how to use the @DynamicRouter annotation let’s change the previous example to use the annotation instead. To do that, just annotate the Java code from listing 8.10 as follows:
@DynamicRouter
public String route(String body,
                    @Header(Exchange.SLIP_ENDPOINT) String previous) {
    ...
}
The next step is to invoke the route method on the bean, as if it were a regular bean. That means you should not use the Routing Slip EIP in the route, but use a bean instead.
In the Java DSL, this is done as follows:
from("direct:start")
    .bean(DynamicRouterBean.class, "route")
    .to("mock:result");
In Spring XML, you likewise change the <dynamicRouter> to a <bean> tag:
<camelContext xmlns="http://camel.apache.org/schema/spring">
    <route>
        <from uri="direct:start"/>
        <bean ref="myDynamicRouter" method="route"/>
        <to uri="mock:result"/>
    </route>
</camelContext>
Warning
When using @DynamicRouter its important to not use dynamicRouter in the DSL at the same time. Instead do as shown above.
The source code for the book contains this example in the chapter8/dynamicrouter directory. You can try it using the following Maven goals:
mvn test -Dtest=DynamicRouterAnnotationTest
mvn test -Dtest=SpringDynamicRouterAnnotationTest
This concludes the coverage of the dynamic routing patterns. In the next section, you’ll learn about Camel’s built-in Load Balancer EIP, which is useful when an existing load-balancing solution isn’t in place.
8.6. The Load Balancer EIP
You may already be familiar with the load balancing concept in computing. Load balancing is a technique to distribute workload across computers or other resources, “in order to get optimal resource utilization, maximize throughput, minimize response time, and avoid overload” (http://en.wikipedia.org/wiki/Load_balancer). This service can be provided either in the form of a hardware device or as a piece of software, such as the Load Balancer EIP in Camel.
Note
The Load Balancer was not distilled in the EIP book, but it will likely be added if there is a second edition of the book.
In this section, we’ll introduce the Load Balancer EIP by walking through an example. Then, in section 8.6.2, we’ll look at the various types of load balancers Camel offers out of the box. We’ll focus on the failover type in section 8.6.3 and finally show how you can build your own load balancer in section 8.6.4.
8.6.1. Introducing the Load Balancer EIP
The Camel Load Balancer EIP is a Processor that implements the org.apache.camel.processor.loadbalancer.LoadBalancer interface. The LoadBalancer offers methods to add and remove Processors that should participate in the load balancing.
By using Processors instead of Endpoints, the load balancer is capable of balancing anything you can define in your Camel routes. But, that said, you’ll most often balance across a number of remote services. Such an example is illustrated in figure 8.12, where a Camel application needs to load balance across two services.
Figure 8.12. A Camel application load balances across two services.

When using the Load Balancer EIP, you have to select a balancing strategy. A common and understandable strategy is to take turns among the services—this is known as the round robin strategy. In section 8.6.2, we’ll take a look at all the strategies Camel provides out of the box.
Let’s look at how you can use the Load Balancer with the round robin strategy. Here’s the Java DSL with the Load Balancer:
from("direct:start")
    .loadBalance().roundRobin()
        .to("seda:a").to("seda:b")
    .end();

from("seda:a")
    .log("A received: ${body}")
    .to("mock:a");

from("seda:b")
    .log("B received: ${body}")
    .to("mock:b");
The equivalent route in Spring XML is as follows:
<route>
    <from uri="direct:start"/>
    <loadBalance>
        <roundRobin/>
        <to uri="seda:a"/>
        <to uri="seda:b"/>
    </loadBalance>
</route>

<route>
    <from uri="seda:a"/>
    <log message="A received: ${body}"/>
    <to uri="mock:a"/>
</route>

<route>
    <from uri="seda:b"/>
    <log message="B received: ${body}"/>
    <to uri="mock:b"/>
</route>
In this example, you use the SEDA component to simulate the remote services. In a real-life situation, the remote services could be a web service.
Suppose you start sending messages to the route. The first message would be sent to the "seda:a" endpoint, and the next would go to "seda:b". The third message would start over and be sent to "seda:a", and so forth.
The source code for the book contains this example in the chapter8/loadbalancer directory. You can try it by using the following Maven goals:
mvn test -Dtest=LoadBalancerTest
mvn test -Dtest=SpringLoadBalancerTest
If you run the example, the console will output something like this:
[Camel Thread 0 - seda://a] INFO route2 - A received: Hello
[Camel Thread 1 - seda://b] INFO route3 - B received: Camel rocks
[Camel Thread 0 - seda://a] INFO route2 - A received: Cool
[Camel Thread 1 - seda://b] INFO route3 - B received: Bye
In the next section, we’ll review the various load-balancing strategies you can use with the Load Balancer EIP.
8.6.2. Load-balancing strategies
A load-balancing strategy dictates which Processor should process an incoming message—it’s up to each strategy how the Processor is chosen. Camel allows the six different strategies listed in table 8.9.
Table 8.9. Load-balancing strategies provided by Camel
|
Strategy |
Description |
|---|---|
| Random | Chooses a processor randomly. |
| Round robin | Chooses a processor in a round robin fashion, which spreads the load evenly. This is a classic and well-known strategy. We covered this in section 8.6.1. |
| Sticky | Uses an expression to calculate a correlation key that dictates the processor chosen. You can think of this as the session ID used in HTTP requests. |
| Topic | Sends the message to all processors. This is like sending to a JMS topic. |
| Failover | Retries using another processor. We’ll cover this in section 8.6.3. |
| Custom | Uses your own custom strategy. This is covered in section 8.6.4. |
The first four strategies in table 8.9 are easy to set up and use in Camel. For example, using the random strategy is just a matter of specifying it in the Java DSL:
from("direct:start")
    .loadBalance().random()
        .to("seda:a").to("seda:b")
    .end();
It’s similar in Spring XML:
<route>
    <from uri="direct:start"/>
    <loadBalance>
         <random/>
         <to uri="seda:a"/>
         <to uri="seda:b"/>
    </loadBalance>
</route>
The sticky strategy requires you provide a correlation expression, which is used to calculate a hashed value to indicate which processor should be used. Suppose your messages contain a header indicating different levels. By using the sticky strategy, you can have messages with the same level chose the same processor over and over again.
In the Java DSL, you would provide the expression using a header expression as shown here:
from("direct:start")
    .loadBalance().sticky(header("type"))
        .to("seda:a").to("seda:b")
    .end();
In Spring XML, you’d do the following:
<route>
    <from uri="direct:start"/>
     <loadBalance>
        <sticky>
            <correlationExpression>
                <header>type</header>
            </correlationExpression>
         </sticky>
         <to uri="seda:a"/>
         <to uri="seda:b"/>
    </loadBalance>
</route>
The source code for the book contains examples of using the strategies listed in table 8.9 in the chapter8/loadbalancer directory. To try the random, sticky, or topic strategies, use the following Maven goals:
mvn test -Dtest=RandomLoadBalancerTest
mvn test -Dtest=SpringRandomLoadBalancerTest
mvn test -Dtest=StickyLoadBalancerTest
mvn test -Dtest=SpringStickyLoadBalancerTest
mvn test -Dtest=TopicLoadBalancerTest
mvn test -Dtest=SpringTopicLoadBalancerTest
The failover strategy is a more elaborate strategy, which we’ll cover next.
8.6.3. Using the failover load balancer
Load balancing is often used to implement failover—the continuation of a service after a failure. The Camel failover load balancer detects the failure when an exception occurs and reacts by letting the next processor take over processing the message.
Given the following route snippet, the failover will always start by sending the messages to the first processor ("direct:a") and only in the case of a failure will it let the next processor ("direct:b") take over.
from("direct:start")
    .loadBalance().failover()
        .to("direct:a").to("direct:b")
    .end();
The equivalent snippet in Spring XML is as follows:
<route>
    <from uri="direct:start"/>
    <loadBalance>
        <failover/>
        <to uri="direct:a"/>
        <to uri="direct:b"/>
    </loadBalance>
</route>
The source code for the book contains this example in the chapter8/loadbalancer directory. You can try it using the following Maven goals:
mvn test -Dtest=FailoverLoadBalancerTest
mvn test -Dtest=SpringFailoverLoadBalancerTest
If you run the example, it will send in four messages. The second message will failover and be processed by the "direct:b" processor. The other three messages will be processed successfully by "direct:a".
In this example, the failover load balancer will react to any kind of exception being thrown, but you can provide it with a number of exceptions to react to.
Suppose you only want to failover if an IOException is thrown (which indicates communication errors with remote services, such as no connection). This is easy to configure, as shown in the Java DSL:
from("direct:start")
    .loadBalance().failover(IOException.class)
        .to("direct:a").to("direct:b")
     .end();
Here it is configured in Spring XML:
<route>
    <from uri="direct:start"/>
    <loadBalance>
        <failover>
            <exception>java.io.IOException</exception>
        </failover>
        <to uri="direct:a"/>
        <to uri="direct:b"/>
     </loadBalance>
</route>
In this example, only one exception is specified, but you can specify multiple exceptions, as follows:
from("direct:start")
    .loadBalance().failover(IOException.class, SQLException.class)
        .to("direct:a").to("direct:b")
     .end();
In Spring XML, you do as follows:
<route>
    <from uri="direct:start"/>
    <loadBalance>
        <failover>
            <exception>java.io.IOException</exception>
            <exception>java.sql.SQLException</exception>
        </failover>
        <to uri="direct:a"/>
        <to uri="direct:b"/>
    </loadBalance>
</route>
You may have noticed in the failover examples that it always chooses the first processor, and sends the failover to subsequent processors. You can think of this as the first processor being the master, and the others slaves. But the failover load balancer also offers a strategy that combines round robin with failure support.
Using Failover with Round Robin
The Camel failover load balancer in round robin mode gives you the best of both worlds; it distributes the load evenly between the services, and it provides automatic failover.
In this scenario, you have three configuration options on the load balancer to dictate how it operates, as listed in table 8.10.
Table 8.10. Failover load balancer configuration options
|
Configuration option |
Default |
Description |
|---|---|---|
| maximumFailoverAttempts | -1 | Specifies how many failover attempts to try before exhausting (giving up):
|
| inheritErrorHandler | true | Specifies whether or not Camel error handling is being used. When enabled, the load balancer will let the error handler be involved. If disabled, the load balancer will failover immediately if an exception is thrown. |
| roundRobin | false | Specifies whether or not the load balancer operates in round robin mode. |
To better understand the options in table 8.10 and how the round robin mode works, we’ll start with a fairly simple example.
In the Java DSL, you have to configure failover with all the options in bold:
from("direct:start")
    .loadBalance().failover(1, false, true)
        .to("direct:a").to("direct:b")
    .end();
In this example, the maximumFailoverAttempts option is set to 1, which means it will at most try to failover once (it will make one attempt for the initial request and one more for the failover attempt). If both attempts fail, Camel will propagate the exception back to the caller.
The second parameter is set to false, which means it isn’t inheriting Camel’s error handling. This allows the failover load balancer to failover immediately when an exception occurs, instead of having to wait for the Camel error handler to give up first.
The last parameter indicates that it’s using the round robin mode.
In Spring XML, you configure the options as attributes on the failover tag:
<route>
    <from uri="direct:start"/>
    <loadBalance>
        <failover roundRobin="true" maximumFailoverAttempts="1"/>
        <to uri="direct:a"/>
        <to uri="direct:b"/>
    </loadBalance>
</route>
The source code for the book contains this example in the chapter8/loadbalancer directory. You can try it using the following Maven goals:
mvn test -Dtest=FailoverLoadBalancerTest
mvn test -Dtest=SpringFailoverLoadBalancerTest
If you’re curious about the inheritErrorHandler configuration option, take a look at the following examples in the source code for the book:
mvn test -Dtest=FailoverInheritErrorHandlerLoadBalancerTest
mvn test -Dtest=SpringFailoverInheritErrorHandlerLoadBalancerTest
This concludes our tour of the failover load balancer. The next section explains how to implement and use your own custom strategy, which you may want to do when you need to use special load-balancing logic.
8.6.4. Using a custom load balancer
Custom load balancers allow you to be in full control of the balancing strategy in use. For example, you could build a strategy that acquires load statistics from various services and picks the service with the lowest load.
Let’s look at an example. Suppose you want to implement a priority-based strategy that sends gold messages to a certain processor and the remainder to a secondary destination. Figure 8.13 illustrates this principle.
Figure 8.13. Using a custom load balancer to route gold messages to processor 1 and other messages to processor 2
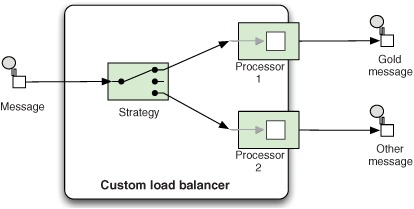
When implementing a custom load balancer, you will often extend the SimpleLoadBalancerSupport class, which provides a good starting point. Listing 8.11 shows how you can implement a custom load balancer.
Listing 8.11. Custom load balancer
import org.apache.camel.Exchange;
import org.apache.camel.Processor;
import org.apache.camel.processor.loadbalancer.SimpleLoadBalancerSupport;

public class MyCustomLoadBalancer extends SimpleLoadBalancerSupport {

    public boolean process(Exchange exchange) throws Exception {
        Processor target = chooseProcessor(exchange);
        target.process(exchange);
     }

    @Override
    protected Processor chooseProcessor(Exchange exchange) {
        String type = exchange.getIn().getHeader("type", String.class);
        if ("gold".equals(type)) {
            return getProcessors().get(0);
        } else {
            return getProcessors().get(1);
        }
     }
}
As you can see, it doesn’t take much code. In the process() method, you invoke the chooseProcessor() method, which is the strategy that picks the processor to process the message. In this example, it will pick the first processor if the message is a gold type, and the second processor if not.
In the Java DSL, you use a custom load balancer as shown in bold:
from("direct:start")
    .loadBalance(new MyCustomLoadBalancer())
        .to("seda:a").to("seda:b")
    .end();
In Spring XML, you need to declare a Spring bean tag:
<bean id="myCustom" class="camelinaction.MyCustomLoadBalancer"/>
Which you then refer to from the <loadBalance> tag:
<route>
    <from uri="direct:start"/>
    <loadBalance ref="myCustom">
        <to uri="seda:a"/>
        <to uri="seda:b"/>
    </loadBalance>
</route>
The source code for the book contains this example in the chapter8/loadbalancer directory. You can try it using the following Maven goals:
mvn test -Dtest=CustomLoadBalancerTest
mvn test -Dtest=SpringCustomLoadBalancerTest
We’ve now covered the Load Balancer EIP in Camel, which brings us to the end of our long journey to visit five great EIPs implemented in Camel.
8.7. Summary and best practices
Since the arrival of the Enterprise Integration Patterns book on the scene, we have had a common vocabulary, graphical notation, and concepts for designing applications to tackle today’s integration challenges. You have encountered these EIPs throughout this book. In chapter 2 we reviewed the most common patterns, and this chapter reviews five of the most complex and sophisticated patterns in great detail. You may view the EIP book as the theory and Camel as the software implementation of the book.
Here are some EIP best practices to take away from this chapter:
- Learn the patterns. Take the time to study the EIPs, especially the common patterns we covered in chapter 2 and those we presented in this chapter. Consider getting the EIP book to read more about the patterns—there’s great advice given in the book. The patterns are universal and the knowledge you gain when using EIPs with Camel is something you can take with you.
- Use the patterns. If you have a problem you don’t know how to resolve, there’s a good chance others have scratched that itch before. Consult the EIP book and the online Camel patterns catalog: http://camel.apache.org/enterprise-integration-patterns.html.
- Start simply. When learning to use an EIP, you should create a simple test to try out the pattern and learn how to use it. Having too many new moving parts in a Camel route can clutter your view and make it difficult to understand what’s happening and maybe why it doesn’t do what you expected.
- Come back to this chapter. If you’re going to use any of the five EIPs covered in this chapter, we recommend you reread the relevant parts of the chapter. These patterns are very sophisticated and have many features and options to tweak.
The Transactional Client EIP is useful for controlling transactions, and it’s the topic of the next chapter.