
Chapter 2. Routing with Camel
- An overview of routing
- Introducing the Rider Auto Parts scenario
- The basics of FTP and JMS endpoints
- Creating routes using the Java DSL
- Configuring routes from Spring
- Routing using enterprise integration patterns (EIPs)
One of the most important features of Camel is routing; without it, Camel would essentially be a library of transport connectors. In this chapter, we’ll dive into routing with Camel.
Routing happens in many aspects of everyday life. When you mail a letter, for instance, it may be routed through several cities before reaching its final address. An email you send will be routed through many different computer network systems before reaching its final destination. In all cases, the router’s function is to selectively move the message forward.
In the context of enterprise messaging systems, routing is the process by which a message is taken from an input queue and, based on a set of conditions, sent to one of several output queues, as shown in figure 2.1. This effectively means that the input and output queues are unaware of the conditions in between them. The conditional logic is decoupled from the message consumer and producer.
Figure 2.1. A message router consumes messages from an input channel and, depending on a set of conditions, sends the message to one of a set of output channels.

In Apache Camel, routing is a more general concept. It’s defined as a step-by-step movement of the message, which originates from an endpoint in the role of a consumer. The consumer could be receiving the message from an external service, polling for the message on some system, or even creating the message itself. This message then flows through a processing component, which could be an enterprise integration pattern (EIP), a processor, an interceptor, or some other custom creation. The message is finally sent to a target endpoint that’s in the role of a producer. A route may have many processing components that modify the message or send it to another location, or it may have none, in which case it would be a simple pipeline.
In this chapter, we’ll first introduce the fictional company that we’ll use as the running example throughout the book. To support this company’s use case, you’ll learn how to communicate over FTP and Java Message Service (JMS) using Camel’s endpoints. Following this, we’ll look in depth at the Java-based domain-specific language (DSL) and the Spring-based configuration format for creating routes. We’ll also give you a glimpse of how to design and implement solutions to enterprise integration problems using EIPs and Camel. By the end of the chapter, you’ll be proficient enough to create useful routing applications with Camel.
To start, let’s look at the example company that we’ll use to demonstrate the concepts throughout the book.
2.1. Introducing Rider Auto Parts
Our fictional motorcycle parts business, Rider Auto Parts, supplies parts to motorcycle manufacturers. Over the years, they’ve changed the way they receive orders several times. Initially, orders were placed by uploading comma-separated value (CSV) files to an FTP server. The message format was later changed to XML. Currently they provide a website through which orders are submitted as XML messages over HTTP.
Rider Auto Parts asks new customers to use the web interface to place orders, but because of service level agreements (SLAs) with existing customers, they must keep all the old message formats and interfaces up and running. All of these messages are converted to an internal Plain Old Java Object (POJO) format before processing. A high-level view of the order processing system is shown in figure 2.2.
Figure 2.2. A customer has two ways of submitting orders to the Rider Auto Parts order-handling system: either by uploading the raw order file to an FTP server or by submitting an order through the Rider Auto Parts web store. All orders are eventually sent via JMS for processing at Rider Auto Parts.

Rider Auto Parts faces a pretty common problem: over years of operation, they have acquired software baggage in the form of transports and data formats that were popular at the time. This is no problem for an integration framework like Camel, though. In this chapter, and throughout the book, you’ll help Rider Auto Parts implement their current requirements and new functionality using Camel.
As a first assignment, you’ll need to implement the FTP module in the Rider order frontend system. Later in the chapter, you’ll see how backend services are implemented too. Implementing the FTP module will involve the following steps:
- Polling the FTP server and downloading new orders
- Converting the order files to JMS messages
- Sending the messages to the JMS incomingOrders queue
To complete steps 1 and 3, you’ll need to understand how to communicate over FTP and JMS using Camel’s endpoints. To complete the entire assignment, you’ll need to understand routing with the Java DSL. Let’s first take a look at how you can use Camel’s endpoints.
2.2. Understanding endpoints
As you read in chapter 1, an endpoint is an abstraction that models the end of a message channel through which a system can send or receive messages. In this section, we’re going to explain how you can use URIs to configure Camel to communicate over FTP and JMS. Let’s first look at FTP.
2.2.1. Working with files over FTP
One of the things that make Camel easy to use is the endpoint URI. By specifying a URI, you can identify the component you want to use and how that component is configured. You can then decide to either send messages to the component configured by this URI, or to consume messages from it.
Take your first Rider Auto Parts assignment, for example. To download new orders from the FTP server, you need to do the following:
- Connect to the rider.com FTP server on the default FTP port of 21
- Provide a username of “rider” and password of “secret”
- Change the directory to “orders”
- Download any new order files
As shown in figure 2.3, you can easily configure Camel to do this by using URI notation.
Figure 2.3. A Camel endpoint URI consists of three parts: a scheme, a context path, and a list of options.

Camel will first look up the ftp scheme in the component registry, which will resolve to the FtpComponent. The FtpComponent then works as a factory, creating the FtpEndpoint based on the remaining context path and options.
The context path of rider.com/orders tells the FtpComponent that it should log into the FTP server at rider.com on the default FTP port and change the directory to “orders”. Finally, the only options specified are username and password, which are used to log in to the FTP server.
Tip
For the FTP component, you can also specify the username and password in the context path of the URI. So the following URI is equivalent to the one in figure 2.3: ftp://rider:[email protected]/orders.
The FtpComponent isn’t part of the camel-core module, so you have to add an additional dependency to your project. Using Maven you just have to add the following dependency to the POM:
<dependency>
  <groupId>org.apache.camel</groupId>
  <artifactId>camel-ftp</artifactId>
  <version>2.5.0</version>
</dependency>
Although this endpoint URI would work equally well in a consumer or producer scenario, you’ll be using it to download orders from the FTP server. To do so, you need to use it in a from node of Camel’s DSL:
from("ftp://rider.com/orders?username=rider&password=secret")
That’s all you need to do to consume files from an FTP server.
The next thing you need to do, as you may recall from figure 2.2, is send the orders you downloaded from the FTP server to a JMS queue. This process requires a little more setup, but it’s still easy.
2.2.2. Sending to a JMS queue
Camel provides extensive support for connecting to JMS-enabled providers, and we’ll cover all the details in chapter 7. For now, though, we’re just going to cover enough so that you can complete your first task for Rider Auto Parts. Recall that you need to download orders from an FTP server and send them to a JMS queue.
What is JMS?
JMS (Java Message Service) is a Java API that allows you to create, send, receive, and read messages. It also mandates that messaging is asynchronous and has specific elements of reliability, like guaranteed and once-and-only-once delivery. JMS is the de facto messaging solution in the Java community.
In JMS, message consumers and producers talk to one another through an intermediary—a JMS destination. As shown in figure 2.4, a destination can be either a queue or a topic. Queues are strictly point-to-point, where each message has only one consumer. Topics operate on a publish/subscribe scheme; a single message may be delivered to many consumers if they have subscribed to the topic.
Figure 2.4. There are two types of JMS destinations: queues and topics. The queue is a point-to-point channel, where each message has only one recipient. A topic delivers a copy of the message to all clients who have subscribed to receive it.

JMS also provides a ConnectionFactory that clients (like Camel) can use to create a connection with a JMS provider. JMS providers are usually referred to as brokers because they manage the communication between a message producer and a message consumer.
How to Configure Camel to Use a JMS Provider
To connect Camel to a specific JMS provider, you need to configure Camel’s JMS component with an appropriate ConnectionFactory.
Apache ActiveMQ is one of the most popular open source JMS providers, and it’s the primary JMS broker that the Camel team uses to test the JMS component. As such, we’ll be using it to demonstrate JMS concepts within the book. For more information on Apache ActiveMQ, we recommend ActiveMQ in Action by Bruce Snyder, Dejan Bosanac, and Rob Davies, available from Manning Publications.
So in the case of Apache ActiveMQ, you can create an ActiveMQConnectionFactory that points to the location of the running ActiveMQ broker:
ConnectionFactory connectionFactory =
  new ActiveMQConnectionFactory("vm://localhost");
The vm://localhost URI means that you should connect to an embedded broker named “localhost” running inside the current JVM. The vm transport connector in ActiveMQ creates a broker on demand if one isn’t running already, so it’s very handy for quickly testing JMS applications; for production scenarios, it’s recommended that you connect to a broker that’s already running. Furthermore, in production scenarios we recommend that connection pooling be used when connecting to a JMS broker. See chapter 7 for details on these alternate configurations.
Next, when you create your CamelContext, you can add the JMS component as follows:
CamelContext context = new DefaultCamelContext();
context.addComponent("jms",
    JmsComponent.jmsComponentAutoAcknowledge(connectionFactory));
The JMS component and the ActiveMQ-specific connection factory aren’t part of the camel-core module. In order to use these, you’ll need to add some dependencies to your Maven-based project. For the plain JMS component, all you have to add is this:
<dependency>
  <groupId>org.apache.camel</groupId>
  <artifactId>camel-jms</artifactId>
  <version>2.5.0</version>
</dependency>
The connection factory comes directly from ActiveMQ, so you’ll need the following dependency:
<dependency>
  <groupId>org.apache.activemq</groupId>
  <artifactId>activemq-core</artifactId>
  <version>5.3.2</version>
</dependency>
Now that you’ve configured the JMS component to connect to an actual JMS broker, it’s time to look at how URIs can be used to specify the destination.
Using URIs to Specify the Destination
Once the JMS component is configured, you can start sending and receiving JMS messages at your leisure. Because you’re using URIs, this is a real breeze to configure.
Let’s say you want to send a JMS message to the queue named incomingOrders. The URI in this case would be
jms:queue:incomingOrders
This is pretty self-explanatory. The “jms” prefix indicates that you’re using the JMS component you configured before. By specifying “queue”, the JMS component knows to send to a queue named incomingOrders. You could even have omitted the queue qualifier, because the default behavior is to send to a queue rather than a topic.
Note
Some endpoints can have an intimidating list of endpoint URI properties. For instance, the JMS component has about 60 options, many of which are only used in specific JMS scenarios. Camel always tries to provide built-in defaults that fit most cases, and you can always find out what the default values are by browsing to the component’s page in the online Camel documentation. The JMS component is discussed here: http://camel.apache.org/jms.html.
Using Camel’s Java DSL, you can send a message to the incomingOrders queue by using the to keyword like this:
...to("jms:queue:incomingOrders")
This can be read as sending to the JMS queue named incomingOrders.
Now that you know the basics of communicating over FTP and JMS with Camel, you can get back to the routing theme of this chapter and start routing some messages!
2.3. Creating routes in Java
In chapter 1, you saw how each CamelContext can contain multiple routes and also how a RouteBuilder could be used to create a route. It may not have been obvious, though, that the RouteBuilder isn’t the final route that the CamelContext will use at runtime; it’s a builder of one or more routes, which are then added to the CamelContext. This is illustrated in figure 2.5.
Figure 2.5. RouteBuilders are used to create routes in Camel. Each RouteBuilder can create multiple routes.

The addRoutes method of the CamelContext accepts a RoutesBuilder, not just a RouteBuilder. The RoutesBuilder interface has a single method defined:
void addRoutesToCamelContext(CamelContext context) throws Exception;
This means that you could use your own custom class to build Camel routes. The most common way to build routes, though, is to use the RouteBuilder class, which implements RoutesBuilder. The RouteBuilder class also gives you access to Camel’s Java DSL for route creation.
In the next sections, you’ll learn how to use a RouteBuilder and the Java DSL to create simple routes. Once you know that, you’ll be well prepared to take on the Spring DSL in section 2.4 and routing using EIPs in section 2.5.
2.3.1. Using the RouteBuilder
The abstract org.apache.camel.builder.RouteBuilder class in Camel is one that you’ll see frequently. You’ll need to use it any time you create a route in Java.
To use the RouteBuilder class, you extend a class from it and implement the configure method, like this:
class MyRouteBuilder extends RouteBuilder {
    public void configure() throws Exception {
        ...
    }
}
You then need to add the class to the CamelContext with the addRoutes method:
CamelContext context = new DefaultCamelContext();
context.addRoutes(new MyRouteBuilder());
Alternatively, you can combine the RouteBuilder and CamelContext configuration by adding an anonymous RouteBuilder class directly into the CamelContext, like this:
CamelContext context = new DefaultCamelContext();
context.addRoutes(new RouteBuilder() {
    public void configure() throws Exception {
        ...
    }
});
Within the configure method, you define your routes using the Java DSL. We’ll discuss the Java DSL in detail in the next section, but you can start a route now to get an idea of how it works.
In chapter 1, you should have downloaded the source code from the book’s website and set up Apache Maven. If you didn’t do this, please do so now. Change to the chapter2/ftp-jms directory in your terminal, and type this command:
mvn eclipse:eclipse
This will generate an Eclipse project file.
Note
Eclipse is a popular open source IDE that you can find at http://eclipse.org. During the book’s development, we used Eclipse 3.5.2.
When the command has completed, you can import this project by selecting File > Import > Existing Projects into Workspace in the Eclipse menus and selecting the chapter2/ftp-jms directory. For more information on developing Camel projects in Eclipse, see chapter 11.
Note
You don’t need an IDE to use Camel, but it does make it a lot easier! Feel free to skip to the next section if you don’t want to see the IDE-related setup.
When the ftp-jms project is loaded in Eclipse, open the src/main/java/camelinaction/RouteBuilderExample.java file. As shown in figure 2.6, when you try autocomplete (Ctrl-space in Eclipse) in the configure method, you’ll be presented with a number of methods. To start a route, you should use the from method.
Figure 2.6. Use autocomplete to start your route. All routes start with a from method.

The from method accepts an endpoint URI as an argument. You can add a FTP endpoint URI to connect to Rider Auto Parts’ order server as follows:
from("ftp://rider.com/orders?username=rider&password=secret")
The from method returns a RouteDefinition object, on which you can invoke a number of different methods that implement EIPs and other messaging concepts.
Congratulations, you’re now using Camel’s Java DSL! Let’s take a closer look at what’s going on here.
2.3.2. The Java DSL
Domain-specific languages (DSLs) are computer languages that target a specific problem domain, rather than a general purpose domain like most programming languages.
For example, you have probably used the regular expression DSL to match strings of text and found it to be a clear and concise way of matching strings. Doing the same string matching in Java wouldn’t be so easy. The regular expression DSL is an external DSL—it has a custom syntax and so requires a separate compiler or interpreter to execute.
Internal DSLs, in contrast, use an existing general purpose language, such as Java, in such a way that the DSL feels like a language from a particular domain. The most obvious way of doing this is by naming methods and arguments to match concepts from the domain in question.
Another popular way of implementing internal DSLs is by using fluent interfaces (aka fluent builders). When using a fluent interface, you build up objects with methods that perform an operation and then return the current object instance; another method is then invoked on this object instance, and so on.
Note
For more information on internal DSLs, see Martin Fowler’s “Domain Specific Language” entry on his bliki (blog plus wiki) at http://www.martinfowler.com/bliki/DomainSpecificLanguage.html. He also has an entry on “Fluent Interfaces” at http://www.martinfowler.com/bliki/FluentInterface.html. For more information on DSLs in general, we recommend DSLs in Action by Debasish Ghosh, available from Manning Publications.
Camel’s domain is enterprise integration, so the Java DSL is essentially a set of fluent interfaces that contain methods named after terms from the EIP book. In the Eclipse editor, take a look at what is available using autocomplete after a from method in the RouteBuilder. You should see something like what’s shown in figure 2.7. The screenshot shows several EIPs—Pipeline, Enricher, and Recipient List—and there are many others that we’ll discuss later.
Figure 2.7. After the from method, use your IDE’s autocomplete feature to get a list of EIPs (such as Pipeline, Enricher, and Recipient List) and other useful integration functions.

For now, select the to method and finish the route with a semicolon. Each Java statement that starts with a from method in the RouteBuilder creates a new route. This new route now completes your first task at Rider Auto Parts—consuming orders from an FTP server and sending them to the incomingOrders JMS queue.
If you want, you can load up the completed example from the book’s source code, in chapter2/ftp-jms and open src/main/java/camelinaction/FtpToJMSExample.java. The code is shown in listing 2.1.
Listing 2.1. Polling for FTP messages and sending them to the incomingOrders queue

Note
Because you’re consuming from ftp://rider.com, which doesn’t exist, you can’t run this example. It’s only useful for demonstrating the Java DSL constructs. For runnable FTP examples, please see chapter 7.
As you can see, this listing includes a bit of boilerplate setup and configuration, but the actual solution to the problem
is concisely defined within the configure method as a single Java statement ![]() . The from method tells Camel to consume messages from an FTP endpoint, and the to method instructs Camel to send messages to a JMS endpoint.
. The from method tells Camel to consume messages from an FTP endpoint, and the to method instructs Camel to send messages to a JMS endpoint.
The flow of messages in this simple route can be viewed as a basic pipeline, where the output of the consumer is fed into the producer as input. This is depicted in figure 2.8.
Figure 2.8. The route shown in listing 2.1 forms a simple pipeline. The output of the FTP consumer is fed into the input of the JMS producer. The payload conversion from file to JMS message is done automatically.

One thing you may have noticed is that we didn’t do any conversion from the FTP file type to the JMS message type—this was done automatically by Camel’s TypeConverter facility. You can force type conversions to occur at any time during a route, but often you don’t have to worry about them at all. Data transformation and type conversion is covered in detail in chapter 3.
You may be thinking now that although this route is nice and simple, it would be really nice to see what’s going on in the middle of the route. Fortunately, Camel always lets the developer stay in control by providing ways to hook into flows or inject behavior into features. There is a pretty simple way of getting access to the message by using a processor, and we’ll discuss that next.
Adding a Processor
The Processor interface in Camel is an important building block of complex routes. It’s a simple interface, having a single method:
public void process(Exchange exchange) throws Exception;
This gives you full access to the message exchange, letting you do pretty much whatever you want with the payload or headers.
All EIPs in Camel are implemented as processors. You can even add a simple processor to your route inline, like so:
from("ftp://rider.com/orders?username=rider&password=secret").
process(new Processor() {
    public void process(Exchange exchange) throws Exception {
        System.out.println("We just downloaded: "
            + exchange.getIn().getHeader("CamelFileName"));
    }
}).
to("jms:incomingOrders");
This route will now print out the filename of the order that was downloaded before sending it to the JMS queue.
By adding this processor into the middle of the route, you’ve effectively added it to the conceptual pipeline we mentioned earlier, as illustrated in figure 2.9. The output of the FTP consumer is fed into the processor as input; the processor doesn’t modify the message payload or headers, so the exchange moves on to the JMS producer as input.
Figure 2.9. With a processor in the mix, the output of the FTP consumer is now fed into the processor, and then the output of the processor is fed into the JMS producer.

Note
Many components, like the FileComponent and the FtpComponent, set useful headers describing the payload on the incoming message. In the previous example, you used the CamelFileName header to retrieve the filename of the file that was downloaded via FTP. The component pages of the online documentation contain information about the headers set for each individual component. You’ll find information about the FTP component at http://camel.apache.org/ftp2.html.
Camel’s main method for creating routes is through the Java DSL. It is, after all, built into the camel-core module. There are other ways of creating routes though, some of which may better suit your situation. For instance, Camel provides extensions for writing routes in Groovy, Scala, and, as we’ll discuss next, Spring XML.
2.4. Creating routes with Spring
Spring is the most popular Inversion of Control (IoC) Java container out there. The core framework allows to you “wire” beans together to form applications. This wiring is done through an XML configuration file.
In this section, we’ll give you a quick introduction to creating applications with Spring. For a more comprehensive view of Spring, we recommend Spring in Action, by Craig Walls (http://www.manning.com/walls4/).
We’ll then go on to show you how Camel uses Spring to form a replacement or complementary solution to the Java DSL.
2.4.1. Bean injection and Spring
Creating an application from beans using Spring is pretty simple. All you need are a few Java beans (classes), a Spring XML configuration file, and an ApplicationContext. The ApplicationContext is similar to the CamelContext, in that it’s the runtime container for Spring. Let’s look at a simple example.
Consider an application that prints out a greeting followed by your username. In this application you don’t want the greeting to be hardcoded, so you can use an interface to break this dependency. Consider the following interface:
public interface Greeter {
    public String sayHello();
}
This interface is implemented by the following classes:
public class EnglishGreeter implements Greeter {
    public String sayHello() {
        return "Hello " + System.getProperty("user.name");
    }
}
public class DanishGreeter implements Greeter {
    public String sayHello() {
       return "Davs " + System.getProperty("user.name");
    }
}
You can now create a greeter application as follows:
public class GreetMeBean {
    private Greeter greeter;

    public void setGreeter(Greeter greeter) {
        this.greeter = greeter;
    }
    public void execute() {
        System.out.println(greeter.sayHello());
    }
}
This application will output a different greeting depending on how you configure it. To configure this application using Spring, you could do something like this:
<beans xmlns="http://www.springframework.org/schema/beans"
       xmlns:xsi="http://www.w3.org/2001/XMLSchema-instance"
       xsi:schemaLocation="
       http://www.springframework.org/schema/beans
       http://www.springframework.org/schema/beans/spring-beans-3.0.xsd">

  <bean id="myGreeter" class="camelinaction.EnglishGreeter"/>

  <bean id="greetMeBean" class="camelinaction.GreetMeBean">
    <property name="greeter" ref="myGreeter"/>
  </bean>

</beans>
This XML file instructs Spring to do the following:
- Create an instance of EnglishGreeter and names the bean myGreeter
- Create an instance of GreetMeBean and names the bean greetMeBean
- Set the reference of the greeter property of the GreetMeBean to the bean named myGreeter
This configuring of beans is called wiring.
In order to load this XML file into Spring, you can use the ClassPathXmlApplicationContext, which is a concrete implementation of the ApplicationContext that’s provided with the Spring framework. This class loads Spring XML files from a location specified on the classpath.
Here is the final version of GreetMeBean:
public class GreetMeBean {
    ...

    public static void main(String[] args) {
        ApplicationContext context =
            new ClassPathXmlApplicationContext("beans.xml");
        GreetMeBean bean = (GreetMeBean) context.getBean("greetMeBean");
        bean.execute();
    }
}
The ClassPathXmlApplicationContext you instantiate here loads up the bean definitions you saw previously in the beans.xml file. You then call getBean on the context to look up the bean with the greetMeBean ID in the Spring registry. All beans defined in this file are accessible in this way.
To run this example, go to the chapter2/spring directory in the book’s source code and run this Maven command:
mvn compile exec:java -Dexec.mainClass=camelinaction.GreetMeBean
This will output something like the following on the command line:
Hello janstey
If you had wired the DanishGreeter in instead, you’d have seen something like this on the console:
Davs janstey
This example may seem pretty simple, but it should give you an understanding of what Spring and, more generally, an IoC container, really is.
So how does Camel fit into this? Essentially, Camel can be configured as if it were another bean. For instance, you configured the JMS component to connect to an ActiveMQ broker in section 2.2.2, but you could have done this in Spring by using the bean terminology, as follows:
<bean id="jms" class="org.apache.camel.component.jms.JmsComponent">
  <property name="connectionFactory">
    <bean class="org.apache.activemq.ActiveMQConnectionFactory">
      <property name="brokerURL" value="vm://localhost" />
    </bean>
  </property>
</bean>
In this case, Camel will know to look for beans of type org.apache.camel.Component and add them to the CamelContext automatically—a task you did manually in section 2.2.2.
But where is the CamelContext defined in Spring? Well, to make things easier on the eyes, Camel utilizes Spring extension mechanisms to provide custom XML syntax for Camel concepts within the Spring XML file. To load up a CamelContext in Spring, you can do the following:
<beans xmlns="http://www.springframework.org/schema/beans"
       xmlns:xsi="http://www.w3.org/2001/XMLSchema-instance"
       xsi:schemaLocation="
       http://www.springframework.org/schema/beans
       http://www.springframework.org/schema/beans/spring-beans-3.0.xsd
http://camel.apache.org/schema/spring
http://camel.apache.org/schema/spring/camel-spring.xsd">

 ...

<camelContext xmlns="http://camel.apache.org/schema/spring"/>

</beans>
This will automatically start a SpringCamelContext, which is a subclass of the DefaultCamelContext you used for the Java DSL. Also notice that you had to include the http://camel.apache.org/schema/spring/camel-spring.xsd XML schema definition in the XML file—this is needed to import the custom XML elements.
This snippet alone isn’t going to do much for you. You need to tell Camel what routes to use, as you did when using the Java DSL. The following code uses Spring to produce the same results as the code in listing 2.1.
Listing 2.2. A Spring configuration that produces the same results as listing 2.1
<beans xmlns="http://www.springframework.org/schema/beans"
       xmlns:xsi="http://www.w3.org/2001/XMLSchema-instance"
       xsi:schemaLocation="
       http://www.springframework.org/schema/beans
       http://www.springframework.org/schema/beans/spring-beans-3.0.xsd
       http://camel.apache.org/schema/spring
       http://camel.apache.org/schema/spring/camel-spring.xsd">

  <bean id="jms" class="org.apache.camel.component.jms.JmsComponent">
    <property name="connectionFactory">
      <bean class="org.apache.activemq.ActiveMQConnectionFactory">
        <property name="brokerURL" value="vm://localhost" />
      </bean>
    </property>
  </bean>

  <bean id="ftpToJmsRoute" class="camelinaction.FtpToJMSRoute"/>

  <camelContext xmlns="http://camel.apache.org/schema/spring">
    <routeBuilder ref="ftpToJmsRoute"/>
  </camelContext>

</beans>
You may have noticed that we’re referring to the camelinaction.FtpToJMSRoute class as a RouteBuilder. In order to reproduce the Java DSL example in listing 2.1, you have to factor out the anonymous RouteBuilder into its own named class. The FtpToJMSRoute class looks like this:
public class FtpToJMSRoute extends RouteBuilder {
  public void configure() {
    from("ftp://rider.com" +
      "/orders?username=rider&password=secret")
      .to("jms:incomingOrders");
  }
}
Now that you know the basics of Spring and how to load Camel inside it, we can go further by looking at how to write Camel routing rules purely in XML—no Java DSL required.
2.4.2. The Spring DSL
What we’ve seen of Camel’s integration with Spring is adequate, but it isn’t taking full advantage of Spring’s methodology of configuring applications using no code. To completely invert the control of creating applications using Spring XML, Camel provides custom XML extensions that we call the Spring DSL. The Spring DSL allows you to do almost everything you can do in the Java DSL.
Let’s continue with the Rider Auto Parts example shown in listing 2.2, but this time you’ll specify the routing rules defined in the RouteBuilder purely in XML. The following Spring XML does this.
Listing 2.3. A Spring DSL example that produces the same results as listing 2.1
<beans xmlns="http://www.springframework.org/schema/beans"
       xmlns:xsi="http://www.w3.org/2001/XMLSchema-instance"
       xsi:schemaLocation="
       http://www.springframework.org/schema/beans
       http://www.springframework.org/schema/beans/spring-beans-3.0.xsd
       http://camel.apache.org/schema/spring
       http://camel.apache.org/schema/spring/camel-spring.xsd">

  <bean id="jms" class="org.apache.camel.component.jms.JmsComponent">
    <property name="connectionFactory">
      <bean class="org.apache.activemq.ActiveMQConnectionFactory">
        <property name="brokerURL" value="vm://localhost" />
      </bean>
    </property>
  </bean>

  <camelContext xmlns="http://camel.apache.org/schema/spring">
    <route>
      <from
uri="ftp://rider.com/orders?username=rider&password=secret"/>
      <to uri="jms:incomingOrders"/>
    </route>
  </camelContext>

</beans>
In this listing, under the camelContext element you replace routeBuilder with the route element. Within the route element, you specify the route using elements with names similar to ones used inside the Java DSL RouteBuilder. This listing is functionally equivalent to the Java DSL version in listing 2.1 and the Spring plus Java DSL combo in listing 2.2.
In the book’s source code, we changed the from method to consume messages from a local file directory instead. The new route looks like this:
<route>
  <from uri="file:src/data?noop=true"/>
  <to uri="jms:incomingOrders"/>
</route>
The file endpoint will load order files from the relative src/data directory. The noop property configures the endpoint to leave the file as is after processing; this option is very useful for testing. In chapter 7, you’ll also see how Camel allows you to delete or move the files after processing.
This route won’t display anything interesting yet. You need to add an additional processing step for testing.
Adding a Processor
Adding additional processing steps is simple, as in the Java DSL. Here you’ll add a custom processor like you did in section 2.3.2.
Because you can’t refer to an anonymous class in Spring XML, you need to factor out the anonymous processor into the following class:
public class DownloadLogger implements Processor {
    public void process(Exchange exchange) throws Exception {
        System.out.println("We just downloaded: "
                + exchange.getIn().getHeader("CamelFileName"));
    }
}
You can now use it in your Spring DSL route as follows:
<bean id="downloadLogger" class="camelinaction.DownloadLogger"/>

<camelContext xmlns="http://camel.apache.org/schema/spring">
  <route>
    <from uri="file:src/data?noop=true"/>
    <process ref="downloadLogger"/>
    <to uri="jms:incomingOrders"/>
  </route>
</camelContext>
Now you’re ready to run the example. Go to the chapter2/spring directory in the book’s source code and run this Maven command:
mvn clean compile camel:run
Because there is only one message file named message1.xml in the src/data directory, this will output something like the following on the command line:
We just downloaded: message1.xml
What if you wanted to print this message after consuming it from the incomingOrders queue? To do this, you’ll need to create another route.
Using Multiple Routes
You may recall that in the Java DSL each Java statement starting with a from creates a new route. You can also create multiple routes with the Spring DSL. To do this, simply add an additional route element within the camelContext element.
For example, move the DownloadLogger bean into a second route, after the order gets sent to the incomingOrders queue:
<camelContext xmlns="http://camel.apache.org/schema/spring">
  <route>
    <from uri="file:src/data?noop=true"/>
    <to uri="jms:incomingOrders"/>
  </route>
  <route>
    <from uri="jms:incomingOrders"/>
    <process ref="downloadLogger"/>
  </route>
</camelContext>
Now you are consuming the message from the incomingOrders queue in the second route. So, the downloaded message will be printed after the order is sent to the queue.
Choosing Which DSL to Use
Which DSL is best to use in a particular scenario is a common question for Camel users, but it mostly comes down to personal preference. If you like working with Spring or like defining things in XML, you may prefer a pure Spring approach. If you want to be hands-on with Java, maybe a pure Java DSL approach is better for you.
In either case, you’ll be able to access nearly all of Camel’s functionality. The Java DSL is a slightly richer language to work with because you have the full power of the Java language at your fingertips. Also, some Java DSL features, like value builders (for building expressions and predicates[1]), aren’t available in the Spring DSL. On the other hand, using Spring gives you access to the wonderful object construction capabilities as well as commonly used Spring abstractions for things like database connections and JMS integration.
1 See appendix B for more information on expressions and predicates.
A common compromise (and our favorite usage) is to use both Spring and the Java DSL, which is one of the topics we’ll cover next.
2.4.3. Using Camel and Spring
Whether you write your routes in the Java or Spring DSL, running Camel in a Spring container gives you many other benefits. For one, if you’re using the Spring DSL, you don’t have to recompile any code when you want to change your routing rules. Also, you gain access to Spring’s portfolio of database connectors, transaction support, and more.
Let’s take a closer look at what other Spring integrations Camel provides.
Finding Route Builders
Using the Spring CamelContext as a runtime and the Java DSL for route development is a great way of using Camel. In fact, it’s the most frequent usage of Camel.
You saw before that you can explicitly tell the Spring CamelContext what route builders to load. You can do this by using the routerBuilder element:
<camelContext xmlns="http://camel.apache.org/schema/spring">
  <routeBuilder ref="ftpToJmsRoute"/>
</camelContext>
Being this explicit results in a clean and concise definition of what is being loaded into Camel.
Sometimes, though, you may need to be a bit more dynamic. This is where the packageScan and contextScan elements come in:
<camelContext xmlns="http://camel.apache.org/schema/spring">
  <packageScan>
    <package>camelinaction.routes</package>
  </packageScan>
</camelContext>
This packageScan element will load all RouteBuilder classes found in the camelinaction.routes package, including all subpackages.
You can even be a bit more picky about what route builders are included:
<camelContext xmlns="http://camel.apache.org/schema/spring">
  <packageScan>
    <package>camelinaction.routes</package>
    <excludes>**.*Test*</excludes>
    <includes>**.*</includes>
  </packageScan>
</camelContext>
In this case, you’re loading all route builders in the camelinaction.routes package, except for ones with “Test” in the class name. The matching syntax is similar to what is used in Apache Ant’s file pattern matchers.
The contextScan element takes advantage of Spring’s component-scan feature to load any Camel route builders that are marked with the @org.springframework. stereotype.Component annotation. Let’s modify the FtpToJMSRoute class to use this annotation:
@Component
public class FtpToJMSRoute extends SpringRouteBuilder {

    public void configure() {
    from("ftp://rider.com" +
        "/orders?username=rider&password=secret")
        .to("jms:incomingOrders");
    }
}
Notice that this version uses the org.apache.camel.spring.SpringRouteBuilder class, which is an extension of RouteBuilder that contains extra Spring utility functions. You can now enable the component scanning by using the following configuration in your Spring XML file:
<context:component-scan base-package="camelinaction.routes"/>

<camelContext xmlns="http://camel.apache.org/schema/spring">
  <contextScan/>
</camelContext>
This will load up any Spring route builders within the camelinaction.routes package that have the @Component annotation.
Under the hood, some of Camel’s components, like the JMS component, are built on top of abstraction libraries from Spring. It makes sense that configuring those components is easy in Spring.
Configuring Components and Endpoints
You saw in section 2.4.1 that components could be defined in Spring XML and would be picked up automatically by Camel. For instance, look at the JMS component again:
<bean id="jms" class="org.apache.camel.component.jms.JmsComponent">
  <property name="connectionFactory">
    <bean class="org.apache.activemq.ActiveMQConnectionFactory">
      <property name="brokerURL" value="vm://localhost" />
    </bean>
  </property>
</bean>
The bean id defines what this component will be called. This gives you the flexibility to give the component a more meaningful name based on the use case. Your application may require the integration of two JMS brokers, for instance. One could be for Apache ActiveMQ and another could be for SonicMQ:
<bean id="activemq" class="org.apache.camel.component.jms.JmsComponent">
  ...
</bean>
<bean id="sonicmq" class="org.apache.camel.component.jms.JmsComponent">
  ...
</bean>
You could then use URIs like activemq:myActiveMQQueue or sonicmq:mySonicQueue.
Endpoints can also be defined using Camel’s Spring XML extensions. For example, you can break out the FTP endpoint for connecting to Rider Auto Parts’ legacy order server and see what the route looks like:
<camelContext xmlns="http://camel.apache.org/schema/spring">
  <endpoint id="ridersFtp"
uri="ftp://rider.com/orders?username=rider&password=secret"/>
  <route>
    <from ref="ridersFtp"/>
    <to uri="jms:incomingOrders"/>
  </route>
</camelContext>
Note
You may notice that credentials have been added directly into the endpoint URI, which isn’t always the best solution. A better way would be to refer to credentials that are defined and sufficiently protected elsewhere. In section 6.1.6 of chapter 6, you can see how the Camel Properties component or Spring property placeholders are used to do this.
Importing Configuration and Routes
A common practice in Spring development is to separate out an application’s wiring into several XML files. This is mainly done to make the XML more readable; you probably wouldn’t want to wade through thousands of lines of XML in a single file without some separation.
Another reason to separate an application into several XML files is the potential for reuse. For instance, some other application may require a similar JMS setup, so you can define a second Spring XML file called jms-setup.xml with these contents:
<beans xmlns="http://www.springframework.org/schema/beans"
       xmlns:xsi="http://www.w3.org/2001/XMLSchema-instance"
       xsi:schemaLocation="
       http://www.springframework.org/schema/beans
       http://www.springframework.org/schema/beans/spring-beans-3.0.xsd">

  <bean id="jms" class="org.apache.camel.component.jms.JmsComponent">
    <property name="connectionFactory">
      <bean class="org.apache.activemq.ActiveMQConnectionFactory">
        <property name="brokerURL" value="vm://localhost" />
      </bean>
    </property>
  </bean>
</beans>
This file could then be imported into the XML file containing the CamelContext by using the following line:
<import resource="jms-setup.xml"/>
Now the CamelContext can use the JMS component configuration even though it’s defined in a separate file.
Other useful things to define in separate files are the Spring DSL routes themselves. Because route elements need to be defined within a camelContext element, an additional concept is introduced to define routes. You can define routes within a routeContext element, as shown here:
<routeContext id="ftpToJms" xmlns="http://camel.apache.org/schema/spring">
  <route>
    <from uri="ftp://rider.com/orders?username=rider&password=secret"/>
    <to uri="jms:incomingOrders"/>
  </route>
</routeContext>
This routeContext element could be in another file or in the same file. You can then import the routes defined in this routeContext with the routeContextRef element. You use the routeContextRef element inside a camelContext as follows:
<camelContext xmlns="http://camel.apache.org/schema/spring">
  <routeContextRef ref="ftpToJms"/>
</camelContext>
If you import the routeContext into multiple CamelContexts, a new instance of the route is created in each. In the preceding case, two identical routes, with the same endpoint URIs, will lead to them competing for the same resource. In this case, only one route at a time will receive a particular file from FTP. In general, you should take care when reusing routes in multiple CamelContexts.
Advanced Configuration Options
There are many other configuration options available when using the Spring CamelContext:
- Pluggable bean registries are discussed in chapter 4.
- The Tracer and Delay mechanisms are covered in chapter 12.
- Custom class resolvers, tracing, fault handling and startup are mentioned in chapter 13.
- The configuration of interceptors is covered in chapter 6.
With these route configuration techniques behind us, you’re ready to tackle more advanced routing topics using Camel’s implementation of the EIPs.
2.5. Routing and EIPs
So far we haven’t touched much on the EIPs that Camel was built to implement. This was intentional. We wanted to make sure you had a good understanding of what Camel is doing in the simplest cases before moving on to more complex examples.
As far as EIPs go, we’ll be looking at the Content-Based Router, Message Filter, Multicast, Recipient List, and Wire Tap right away. Other patterns will be introduced throughout the book, and in chapter 8 we’ll be covering the most complex EIPs. The complete list of EIPs supported by Camel is available from the Camel website (http://camel.apache.org/enterprise-integration-patterns.html).
For now, let’s start by looking at the most well known EIP, the Content-Based Router.
2.5.1. Using a content-based router
As the name implies, a Content-Based Router (CBR) is a message router that routes a message to a destination based on its content. The content could be a message header, the payload data type, part of the payload itself—pretty much anything in the message exchange.
To demonstrate, let’s go back to Rider Auto Parts. Some customers have started uploading orders to the FTP server in the newer XML format rather than CSV. That means you have two types of messages coming in to the incomingOrders queue. We didn’t touch on this before, but you need to convert the incoming orders into an internal POJO format. You obviously need to do different conversions for the different types of incoming orders.
As a possible solution, you could use the filename extension to determine whether a particular order message should be sent to a queue for CSV orders or a queue for XML orders. This is depicted in figure 2.10.
Figure 2.10. The CBR routes messages based on their content. In this case, the filename extension (as a message header) is used to determine which queue to route to.

As you saw earlier, you can use the CamelFileName header set by the FTP consumer to get the filename.
To do the conditional routing required by the CBR, Camel introduces a few keywords in the DSL. The choice method creates a CBR processor, and conditions are added by following choice with a combination of a when method and a predicate.
Camel’s creators could have chosen contentBasedRouter for the method name, to match the EIP, but they stuck with choice because it reads more naturally. It looks like this:
from("jms:incomingOrders")
.choice()
    .when(predicate)
        .to("jms:xmlOrders")
    .when(predicate)
        .to("jms:csvOrders");
You may have noticed that we didn’t fill in the predicates required for each when method. A predicate in Camel is a simple interface that only has a matches method:
public interface Predicate {
    boolean matches(Exchange exchange);
}
For example, you can think of a predicate as a Boolean condition in a Java if statement.
You probably don’t want to look inside the exchange yourself and do a comparison. Fortunately, predicates are often built up from expressions, and expressions are used to extract a result from an exchange based on the expression content. There are many different expression languages to choose from in Camel, some of which include Simple, EL, JXPath, Mvel, OGNL, PHP, BeanShell, JavaScript, Groovy, Python, Ruby, XPath, and XQuery. As you’ll see in chapter 4, you can even use a method call to a bean as an expression in Camel. In this case, you’ll be using the expression builder methods that are part of the Java DSL.
Within the RouteBuilder, you can start by using the header method, which returns an expression that will evaluate to the header value. For example, header("CamelFileName") will create an expression that will resolve to the value of the CamelFileName header on the incoming exchange. On this expression you can invoke a number of methods to create a predicate. So, to check whether the filename extension is equal to .xml, you can use the following predicate:
header("CamelFileName").endsWith(".xml")
The completed CBR is shown here.
Listing 2.4. A complete content-based router

To run this example, go to the chapter2/cbr directory in the book’s source code and run this Maven command:
mvn clean compile exec:java -Dexec.mainClass=camelinaction.OrderRouter
This will consume two order files in the chapter2/cbr/src/data directory and output the following:
Received CSV order: message2.csv
Received XML order: message1.xml
The output comes from the two routes at the end of the configure method ![]() . These routes consume messages from the xmlOrders and csvOrders queues and then print out messages. You use these routes to test that the router
. These routes consume messages from the xmlOrders and csvOrders queues and then print out messages. You use these routes to test that the router ![]() is working as expected. More advanced route-testing techniques will be discussed in chapter 6.
is working as expected. More advanced route-testing techniques will be discussed in chapter 6.
Using the Otherwise Clause
One of Rider Auto Parts’ customers sends CSV orders with the .csl extension. Your current route only handles .csv and .xml files and will drop all orders with other extensions. This isn’t a good solution, so you need to improve things a bit.
One way to handle the extra extension is to use a regular expression as a predicate instead of the simple endsWith call. The following route can handle the extra file extension:
from("jms:incomingOrders")
.choice()
    .when(header("CamelFileName").endsWith(".xml"))
        .to("jms:xmlOrders")
    .when(header("CamelFileName").regex("^.*(csv|csl)$"))
        .to("jms:csvOrders");
This solution still suffers from the same problem, though. Any orders not conforming to the file extension scheme will be dropped. Really, you should be handling bad orders that come in so someone can fix the problem. For this you can use the otherwise clause:
from("jms:incomingOrders")
.choice()
    .when(header("CamelFileName").endsWith(".xml"))
         .to("jms:xmlOrders")
     .when(header("CamelFileName").regex("^.*(csv|csl)$"))
         .to("jms:csvOrders")
     .otherwise()
        .to("jms:badOrders");
Now, all orders not having an extension of .csv, .csl, or .xml are sent to the badOrders queue for handling.
To run this example, go to the chapter2/cbr directory in the book’s source and run this command:
mvn clean compile exec:java-Dexec.mainClass=camelinaction.OrderRouterOtherwise
This will consume four order files in the chapter2/cbr/src/data directory and output the following:
Received CSV order: message2.csv
Received XML order: message1.xml
Received bad order: message4.bad
Received CSV order: message3.csl
You can now see that a bad order has been received.
Routing After a CBR
The CBR may seem like it’s the end of the route; messages are routed to one of several destinations, and that’s it. Continuing the flow means you need another route, right?
Well, there are several ways you can continue routing after a CBR. One is by using another route, like you did in listing 2.4 for printing a test message to the console. Another way of continuing the flow is by closing the choice block and adding another processor to the pipeline after that.
You can close the choice block by using the end method:
from("jms:incomingOrders")
.choice()
.when(header("CamelFileName").endsWith(".xml"))
.to("jms:xmlOrders")
.when(header("CamelFileName").regex("^.*(csv|csl)$"))
.to("jms:csvOrders")
.otherwise()
.to("jms:badOrders")
.end()
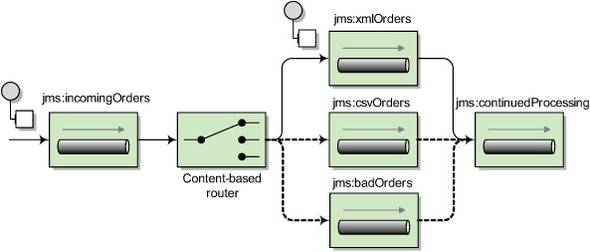
.to("jms:continuedProcessing");
Here, the choice has been closed and another to has been added to the route. Now, after each destination with the choice, the message will be routed to the continuedProcessing queue as well. This is illustrated in figure 2.11.
Figure 2.11. By using the end method, you can route messages to a destination after the CBR.
You can also control what destinations are final in the choice block. For instance, you may not want bad orders continuing through the rest of the route. You’d like them to be routed to the badOrders queue and stop there. In this case, you can use the stop method in the DSL:
from("jms:incomingOrders")
.choice()
    .when(header("CamelFileName").endsWith(".xml"))
        .to("jms:xmlOrders")
    .when(header("CamelFileName").regex("^.*(csv|csl)$"))
        .to("jms:csvOrders")
    .otherwise()
        .to("jms:badOrders").stop()
.end()
.to("jms:continuedProcessing");
Now, any orders entering into the otherwise block will only be sent to the badOrders queue—not to the continuedProcessing queue.
Using the Spring DSL, this route looks a bit different:
<route>
  <from uri="jms:incomingOrders"/>
  <choice>
    <when>
      <simple>${header.CamelFileName} regex '^.*xml$'</simple>
      <to uri="jms:xmlOrders"/>
    </when>
    <when>
      <simple>${header.CamelFileName} regex '^.*(csv|csl)$'</simple>
      <to uri="jms:csvOrders"/>
    </when>
    <otherwise>
      <to uri="jms:badOrders"/>
      <stop/>
    </otherwise>
  </choice>
  <to uri="jms:continuedProcessing"/>
</route>
Other than being in XML rather than Java, there are two main differences to note here, compared to the Java DSL version:
- You use a Simple expression instead of the Java-based predicate. The Simple expression language is typically used as a replacement for predicates from the Java DSL. A complete guide on the Simple expression language can be found in appendix A.
- You don’t have to use an end() call to end the choice block because XML requires an explicit end block in the form of the closing element </choice>.
2.5.2. Using message filters
Rider Auto Parts now has a new issue—their QA department has expressed the need to be able to send test orders into the live web frontend of the order system. Your current solution would accept these orders as real and send them to the internal systems for processing. You’ve suggested that QA should be testing on a development clone of the real system, but management has shot down this idea, citing a limited budget. What you need is a solution that will discard these test messages while still operating on the real orders.
The Message Filter EIP, shown in figure 2.12, provides a nice way of dealing with this kind of problem. Incoming messages only pass through the filter if a certain condition is met. Messages failing the condition will be dropped.
Figure 2.12. A Message Filter allows you to filter out uninteresting messages based on some condition. In this case, test messages are filtered out.

Let’s see how you can implement this using Camel. Recall that the web frontend that Rider Auto Parts uses only sends orders in the XML format, so you can place this filter after the xmlOrders queue, where all orders are XML. Test messages have an extra test attribute set, so you can use this to do the filtering. A test message looks like this:
<?xml version="1.0" encoding="UTF-8"?>
<order name="motor" amount="1" customer="foo" test="true"/>
The entire solution is implemented in OrderRouterWithFilter.java, which is included with the chapter2/filter project in the book’s source distribution. The filter looks like this:
from("jms:xmlOrders").filter(xpath("/order[not(@test)]"))
.process(new Processor() {
    public void process(Exchange exchange) throws Exception {
        System.out.println("Received XML order: "
                + exchange.getIn().getHeader("CamelFileName"));
    }
});
To run this example, execute the following Maven command on the command line:
mvn clean compile exec:java
This will output the following on the command line:
Received XML order: message1.xml
You’ll only receive one message after the filter because the test message was filtered out.
You may have noticed that this example filters out the test message with an XPath expression. XPath expressions are useful for creating conditions based on XML payloads. In this case, the expression will evaluate true for orders that don’t have the test attribute.
As you saw back in section 2.4.2, when the Spring DSL is used, you cannot use an anonymous inner class for a processor. You must name the Processor class and add a bean entry in the Spring XML file. So a message filter route in the Spring DSL looks like this:
<route>
  <from uri="jms:xmlOrders"/>
  <filter>
    <xpath>/order[not(@test)]</xpath>
    <process ref="orderLogger"/>
  </filter>
</route>
The flow remains the same as in the Java DSL version of this route, but here you reference the processor as orderLogger, which is defined as a bean entry in the Spring XML file.
So far, the EIPs we’ve looked at only sent messages to a single destination. Next we’ll take a look at how you can send to multiple destinations.
2.5.3. Using multicasting
Often in enterprise applications you’ll need to send a copy of a message to several different destinations for processing. When the list of destinations is known ahead of time and is static, you can add an element to the route that will consume messages from a source endpoint and then send the message out to a list of destinations. Borrowing terminology from computer networking, we call this the Multicast EIP.
Currently at Rider Auto Parts, orders are processed in a step-by-step manner. They’re first sent to accounting for validation of customer standing and then to production for manufacture. A bright new manager has suggested that they could improve the speed of operations by sending orders to accounting and production at the same time. This would cut out the delay involved when production waits for the OK from accounting. You’ve been asked to implement this change to the system.
Using a multicast, you could envision the solution shown in figure 2.13.
Figure 2.13. A multicast sends a message to a number of specified recipients.

With Camel, you can use the multicast method in the Java DSL to implement this solution:
from("jms:xmlOrders").multicast().to("jms:accounting", "jms:production");
To run this example, go to the chapter2/multicast directory in the book’s source code and run this command:
mvn clean compile exec:java
-Dexec.mainClass=camelinaction.OrderRouterWithMulticast
You should see the following output on the command line:
Accounting received order: message1.xml
Production received order: message1.xml
These two lines of output are coming from two test routes that consume from the accounting and production queues and then output text to the console that qualifies the message.
Tip
For dealing with responses from services invoked in a multicast, an aggregator is used. See more about aggregation in chapter 8.
By default, the multicast sends message copies sequentially. In the preceding example, a message is sent to the accounting queue and then to the production queue. But what if you wanted to send them in parallel?
Parallel Multicasting
Sending messages in parallel using the multicast involves only one extra DSL method: parallelProcessing. Extending the previous multicast example, you can add the parallelProcessing method as follows:
from("jms:xmlOrders")
    .multicast().parallelProcessing()
    .to("jms:accounting", "jms:production");
This will set up the multicast to distribute messages to the destinations in parallel.
A default thread pool size of 10 is used if you don’t specify anything else. If you want to change this default, you can set the underlying java.util.concurrent.ExecutorService that’s used to launch new asynchronous message sends by using the executorService DSL method. Here’s an example:
ExecutorService executor = Executors.newFixedThreadPool(16);

from("jms:xmlOrders")
    .multicast().parallelProcessing().executorService(executor)
    .to("jms:accounting", "jms:production");
This code increases the maximum number of threads to 16, in order to handle a larger number of incoming requests. For more information on the Camel threading model and thread pools, please see chapter 10.
By default, the multicast will continue sending messages to destinations even if one fails. In your application, though, you may consider the whole process as failed if one destination fails. What do you do in this case?
Stopping the Multicast on Exception
Our multicast solution at Rider Auto Parts suffers from a problem: if the order failed to send to the accounting queue, it might take longer to track down the order from production and bill the customer. To solve this problem, you can take advantage of the stopOnException feature of the multicast. When enabled, this feature will stop the multicast on the first exception caught, so you can take any necessary action.
To enable this feature, use the stopOnException method as follows:
from("jms:xmlOrders")
    .multicast().stopOnException()
    .parallelProcessing().executorService(executor)
    .to("jms:accounting", "jms:production");
To handle the exception coming back from this route, you’ll need to use Camel’s error-handling facilities, which are described in detail in chapter 5.
When using the Spring DSL, this route looks a little bit different:
<route>
<from uri="jms:xmlOrders"/>
<multicast stopOnException="true" parallelProcessing="true"
<to uri="jms:accounting"/>
<to uri="jms:production"/>
</multicast>
</route>
The main difference is that the methods used to set flags such as stopOnException in the Java DSL are now attributes on the multicast element. Also, the executor service is now specified as a reference to a Spring bean defined as follows:
<bean id="executor" class="java.util.concurrent.Executors"
<constructor-arg index="0" value="16"/>
</bean>
Now you know how to multicast messages in Camel, but you may be thinking that this seems like a pretty static solution, because changing the destinations means changing the route. Let’s see how you can make sending to multiple recipients more dynamic.
2.5.4. Using recipient lists
In the previous section, you implemented a new manager’s suggestion to parallelize the accounting and production queues so orders could be processed more quickly. Rider Auto Parts’ toptier customers first noticed the problem with this approach: now that all orders are going directly into production, toptier customers are not getting priority over the smaller customers. Their orders are taking longer, and they’re losing business opportunities. Management suggested immediately going back to the old scheme, but you suggested a simple solution to the problem: by parallelizing only toptier customers’ orders, all other orders would have to go to accounting first, thereby not bogging down production.
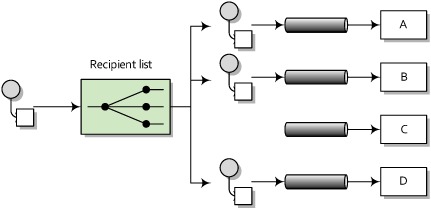
This solution can be realized by using the Recipient List EIP. As shown in figure 2.14, a recipient list first inspects the incoming message, then generates a list of desired recipients based on the message content, and sends the message to those recipients. A recipient is specified by an endpoint URI. Note that the recipient list is different from the multicast because the list of recipients is dynamic.
Figure 2.14. A recipient list inspects the incoming message and determines a list of recipients based on the content of the message. In this case, the message is only sent to the A, B, and D destinations.
Camel provides a recipientList method for implementing the Recipient List EIP. For example, the following route will take the list of recipients from a header named recipients, where each recipient is separated from the next by a comma:
from("jms:xmlOrders")
.recipientList(header("recipients"));
This is useful if you already have some information in the message that can be used to construct the destination names—you could use an expression to create the list. In order for the recipient list to extract meaningful endpoint URIs, the expression result must be iterable. Values that will work are java.util.Collection, java.util.Iterator, Java arrays, org.w3c.dom.NodeList, and, as shown in the example, a String with comma-separated values.
In the Rider Auto Parts situation, the message doesn’t contain that list. You need some way of determining whether the message is from a toptier customer or not. A simple solution could be to add a custom processor to do this:
from("jms:xmlOrders")
.setHeader("customer", xpath("/order/@customer"))
.process(new Processor() {
    public void process(Exchange exchange) throws Exception {
        String recipients = "jms:accounting";
        String customer =
            exchange.getIn().getHeader("customer", String.class);
        if (customer.equals("honda")) {
            recipients += ",jms:production";
        }
        exchange.getIn().setHeader("recipients", recipients);
    }
})
.recipientList(header("recipients"));
The processor now sets the recipients header to "jms:accounting, jms:production" only if the customer is at the gold level of support. The check for gold-level support here is greatly simplified—ideally you’d query a database for this check. Any other orders will be routed only to accounting, which will send them to production after the checks are complete.
The Spring DSL version of this route follows a very similar layout:
<route>
  <from uri="jms:xmlOrders" />
  <setHeader headerName="customer">
    <xpath>/order/@customer</xpath>
  </setHeader>
  <process ref="calculateRecipients" />
  <recipientList>
    <header>recipients</header>
  </recipientList>
</route>
As you may have expected, the anonymous processor specified in the Java DSL route had to be separated out into a named processor. This processor was then loaded as a Spring bean and given the name calculateRecipients, which is then referenced in the process element by using the ref attribute.
It’s common for recipients to not be embedded in the message as headers or parts of the body, and using a custom processor for this case is perfectly functional, but not very nice. In using a custom processor, you have to manipulate the exchange and message APIs directly. Fortunately, Camel supports a better way of implementing a recipient list.
Recipient List Annotation
Rather than using the recipientList method in the DSL, you can add a @RecipientList annotation to a method in a plain Java class (a Java bean). This annotation tells Camel that the annotated method should be used to generate the list of recipients from the exchange. This behavior only gets invoked, however, if the class is used with Camel’s bean integration.
For example, replacing the custom processor you used in the previous section with an annotated bean results in a greatly simplified route:
from("jms:xmlOrders").bean(RecipientListBean.class);
Now all the logic for calculating the recipients and sending out messages is captured in the RecipientListBean class, which looks like this:
public class RecipientListBean {
    @RecipientList
    public String[] route(@XPath("/order/@customer") String customer) {
        if (isGoldCustomer(customer)) {
            return new String[] {"jms:accounting", "jms:production"};
        } else {
            return new String[] {"jms:accounting"};
        }
    }
    private boolean isGoldCustomer(String customer) {
        return customer.equals("honda");
    }
}
Notice that the return type of the bean is a list of the desired recipients. Camel will take this list and send a copy of the message to each destination in the list.
One nice thing about implementing the recipient list this way is that it’s entirely separated from the route, which makes it a bit easier to read. You also have access to Camel’s bean-binding annotations, which allow you to extract data from the message using expressions, so you don’t have to manually explore the exchange. This example uses the @XPath bean-binding annotation to grab the customer attribute of the order element in the body. We’ll cover these annotations in chapter 4, which is all about using beans.
To run this example, go to the chapter2/recipientlist directory in the book’s source code and run this command:
mvn clean compile exec:java
-Dexec.mainClass=camelinaction.OrderRouterWithRecipientListBean
This will output the following on the command line:
Accounting received order: message1.xml
Production received order: message1.xml
Accounting received order: message2.xml
Why do you get this output? Well, you had the following two orders in the src/data directory:
- message1.xml
<?xml version="1.0" encoding="UTF-8"?>
<order name="motor" amount="1000" customer="honda"/> - message2.xml
<?xml version="1.0" encoding="UTF-8"?>
<order name="motor" amount="2" customer="joe's bikes"/>
The first message is from a gold customer, according to the Rider Auto Parts rules, so it was routed to both accounting and production. The second order is from a smaller customer, so it went to accounting for verification of the customer’s credit standing.
What this system lacks now is a way to inspect these messages as they’re flowing through the route, rather than waiting until they reach the end. Let’s see how a wire tap can help.
2.5.5. Using the wireTap method
Often in enterprise applications it’s useful and necessary to inspect messages as they flow through a system. For instance, when an order fails, you need a way to look at which messages were received to determine the cause of the failure.
You could use a simple processor, as you’ve done before, to output information about a incoming message to the console or append it to a file. Here is a processor that outputs the message body to the console:
from("jms:incomingOrders")
.process(new Processor() {
    public void process(Exchange exchange) throws Exception {
        System.out.println("Received order: " +
            exchange.getIn().getBody());
    }
})
...
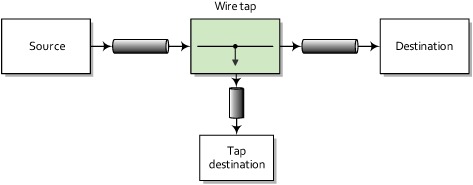
This is fine for debugging purposes, but it’s a pretty poor solution for production use. What if you wanted the message headers, exchange properties, or other data in the message exchange? Ideally you could copy the whole incoming exchange and send that to another channel for auditing. As shown in figure 2.15, the Wire Tap EIP defines such a solution.
Figure 2.15. A wire tap is a fixed recipient list that sends a copy of a message traveling from a source to a destination to a secondary destination.
By using the wireTap method in the Java DSL, you can send a copy of the exchange to a secondary destination without affecting the behavior of the rest of the route:
from("jms:incomingOrders")
.wireTap("jms:orderAudit")
.choice()
    .when(header("CamelFileName").endsWith(".xml"))
        .to("jms:xmlOrders")
    .when(header("CamelFileName").regex("^.*(csv|csl)$"))
        .to("jms:csvOrders")
    .otherwise()
        .to("jms:badOrders");
The preceding code sends a copy of the exchange to the orderAudit queue, and the original exchange continues on through the route, as if you hadn’t used a wire tap at all. Camel doesn’t wait for a response from the wire tap because the wire tap sets the message exchange pattern (MEP) to InOnly. This means that the message will be sent to the orderAudit queue in a fire-and-forget fashion—it won’t wait for a reply.
In the Spring DSL, you can configure a wire tap just as easily:
<route>
  <from uri="jms:incomingOrders"/>
  <wireTap uri="jms:orderAudit"/>
  ..
What can you do with a tapped message? A number of things could be done at this point:
- You could print the information to the console like you did before. This is useful for simple debugging purposes.
- You could save the message in a persistent store (in a file or database) for retrieval later.
The wire tap is a pretty useful monitoring tool, but it leaves most of the work up to you. We’ll discuss some of Camel’s more powerful tracing and auditing tools in chapter 12.
2.6. Summary and best practices
In this chapter, we’ve covered one of the core abilities of Camel: routing messages. By now you should know how to create routes in either the Java or Spring DSL and know the differences in their configuration. You should also have a good grasp of when to apply several EIP implementations in Camel and how to use them. With this knowledge, you can create Camel applications that do useful tasks.
Here are some of the key concepts you should take away from this chapter:
- Routing occurs in many aspects of everyday life. Whether you’re surfing the Internet, doing online banking, booking a flight or hotel room, messages are being routed behind the scenes using some sort of router.
- Use Apache Camel for routing messages. Camel is primarily a message router that allows to you route messages from and to a variety of transports and APIs.
- Camel’s DSLs are used to define routing rules. The Java DSL allows you to write in the popular Java language, which gives you autocompletion of terms in most IDEs. It also allows you to use the full power of the Java language when writing routes. It’s considered the main DSL in Camel. The Spring DSL allows you to write routing rules without any Java code at all.
- The Java DSL and Spring CamelContext are a powerful combination. In section 2.4.3 we described our favorite way to write Camel applications, which is to boot up the CamelContext in Spring and write routing rules in Java DSL RouteBuilders. This gives you the best of both: the most expressive DSL that Camel has in the Java DSL, and a more feature-rich and standard container in the Spring CamelContext.
- Use enterprise integration patterns (EIPs) to solve integration and routing problems. EIPs are like design patterns from object oriented programming, but for the enterprise integration world.
- Use Camel’s built-in EIP implementations rather than creating your own. Camel implements most EIPs as easy-to-use DSL terms, which allows you to focus on the actual business problem rather than the integration architecture.
In the coming chapters we’ll build on this foundation to show you things like data transformation, error handling, testing, sending data over other transports, and more. In the next chapter, we’ll look at how Camel makes data transformation a breeze.