
Chapter 13. Running and deploying Camel
- Starting Camel
- Starting and stopping routes at runtime
- Shutting down Camel
- Deploying Camel
In the previous chapter, you learned all about monitoring and managing Camel. We’ll now shift focus to another topic that’s important to master: running and deploying Camel applications.
We’ll start with the topic of running Camel—you’ll need to fully understand how to start, run, and shut down Camel reliably and safely, which is imperative in a production environment. We’ll also review various options you can use to tweak how Camel and routes are started. We’ll continue on this path, looking at how you can dynamically start and stop routes at runtime. Your applications won’t run forever, so we’ll spend some time focusing on how to shut down Camel in a safe manner.
The other part of the chapter covers various strategies for deploying Camel. We’ll take a look at four common runtime environments supported by Camel.
As we discuss these topics, we’ll work through an example involving Rider Auto Parts. You’ve been asked to help move a recently developed application safely into production. The application receives inventory updates from suppliers, provided via a web service or files. Figure 13.1 shows a high-level diagram of the application.
Figure 13.1. A Rider Auto Parts application accepting incoming inventory updates from either files or a web service

13.1. Starting Camel
In chapter 1, you learned how to download, install, and run Camel. That works well in development, but the game plan changes when you take an application into production.
Starting up a Camel application in production is harder than you might think, because the order in which the routes are started may have to be arranged in a certain way to ensure a reliable startup. It’s critical that the operations staff can safely manage the application in their production environment.
Let’s look now at how Camel starts.
13.1.1. How Camel starts
Camel doesn’t start magically by itself. Often it’s the server (container) that Camel is running inside that invokes the start method on CamelContext, starting up Camel. This is also what you saw in chapter 1, where you used Camel inside a standalone Java application. A standalone Java application isn’t the only deployment choice—you can also run Camel inside a container such as Spring or OSGi.
Regardless of which container you use, the same principle applies. The container must prepare and create an instance of CamelContext up front, before Camel can be started, as illustrated in figure 13.2.
Figure 13.2. Using Camel with containers often requires the container in question to prepare and create CamelContext up front before it can be started.

Because Spring is a common container, we’ll outline how Spring and Camel work together to prepare a CamelContext.
Preparing Camelcontext in a Spring Container
Spring allows third-party frameworks to integrate seamlessly with Spring. To do this, the third-party frameworks must provide a org.springframework.beans.factory. xml.NamespaceHandler, which is the extension point for using custom namespaces in Spring XML files. Camel provides the CamelNamespaceHandler.
When using Camel in the Spring XML file, you would define the <camelContext> tag as follows:
<camelContext xmlns="http://camel.apache.org/schema/spring">
The http://camel.apache.org/schema/spring namespace is the Camel custom namespace. To let Spring know about this custom namespace, it must be identified in the META-INF/spring.handlers, where you map the namespace to the class implementation:
http://camel.apache.org/schema/spring=
     org.apache.camel.spring.handler.CamelNamespaceHandler
The CamelNamespaceHandler is then responsible for parsing the XML and delegating to other factories for further processing. One of these factories is the CamelContextFactoryBean, which is responsible for creating the CamelContext that essentially is your Camel application.
When Spring is finished initializing, it signals to third-party frameworks that they can start by broadcasting the Context-RefreshedEvent event.
Starting CamelContext
At this point, CamelContext is ready to be started. What happens next is the same regardless of which container or deployment option you’re using with Camel. Figure 13.3 shows a flow diagram of the startup process.
Figure 13.3. Flow diagram showing how Camel starts by starting internal services, computing the starting order of routes, and preparing and starting the routes.
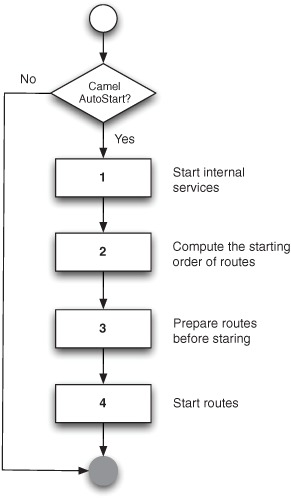
CamelContext is started by invoking its start method. The first step in figure 13.3 determines whether or not autostartup is enabled for Camel. If it’s disabled, the entire startup process is skipped. By default, Camel is set to autostart, which involves the following four steps.
1. Start internal services—Prepares and starts internal services used by Camel, such as the type-converter mechanism.
2. Compute starting order—Computes the order in which the routes should be started. By default, Camel will start up all the routes in the order they are defined in the Spring XML files or the RouteBuilder classes. We’ll cover how to configure the order of routes in section 13.1.3.
3. Prepare routes—Prepares the routes before they’re started.
4. Start routes—Starts the routes by starting the consumers, which essentially opens the gates to Camel and lets the messages start to flow in.
After step 4, Camel writes a message to the log indicating that it has been started and that the startup process is complete.
In some cases, you may need to influence how Camel is started, and we’ll look at that now.
13.1.2. Camel startup options
Camel offers various options when it comes to starting Camel. For example, you may have a maintenance route that should not be autostarted on startup. You may also want to enable tracing on startup to let Camel log traces of messages being routed. Table 13.1 lists all the options that influence startup.
Table 13.1. Camel startup options
|
Option |
Description |
|---|---|
| AutoStartup | This option is used to indicate whether or not the route should be started automatically when Camel starts. This option is enabled by default. |
| StartupOrder | This option dictates the order in which the routes should be started when Camel starts. We’ll cover this in section 13.1.3. |
| ShutdownRoute | This option is used to configure whether or not the route in question should stop immediately or defer while Camel is shutting down. We’ll cover shutdown in section 13.3. |
| ShutdownRunningTask | This option is used to control whether Camel should continue to complete pending running tasks at shutdown or stop immediately after the current task is complete. We’ll cover shutdown in section 13.3. |
| Tracing | This option is used to trace how an exchange is being routed within that particular route. This option is disabled by default. |
| Delayer | This option is used to set a delay in milliseconds that slows down the processing of a message. You can use this during debugging to reduce how quickly Camel routes messages, which may help you track what happens when you watch the logs. This option is disabled by default. |
| HandleFault | This option is used to turn fault messages into exceptions. This is not a typical thing to do in a pure Camel application, but when deployed into a JBI container like Apache ServiceMix, you’ll need to set this option to let the Camel error handler react to faults. This option is disabled by default. We’ll cover this in more detail shortly. |
| StreamCaching | This option is used to cache streams that otherwise couldn’t be accessed multiple times. You may want to use this when you use redelivery during error handling, which requires being able to read the stream multiple times. This option is disabled by default. We’ll cover this in more detail shortly. |
The options from table 13.1 can be divided into two kinds. The first four options are related to startup and shutdown, and the remainder are miscellaneous options. We’ll look at how to use the miscellaneous options first, and then we’ll turn our attention to the startup and shutdown options.
Configuring Streamcaching
The miscellaneous options are often used during development to turn on additional logging, such as the Tracing option, which we covered in the last chapter. Or you may need to turn on stream caching if you use Camel with other stream-centric systems. For example, to enable stream caching, you can do the following with the Java DSL:
public class MyRoute extends RouteBuilder {
    public void configure() throws Exception {
        context.setStreamCaching(true);

        from("jbi:service:http://rider.com/AutoPartService")
            .to("xslt:html-parts.xsl")
            .to("jbi:service:http://rider.com/HtmlService");
    }
}
The same example using Spring XML would look like this:
<camelContext streamCache="true"
              xmlns="http://camel.apache.org/schema/spring">
    <route>
        <from uri="jbi:service:http://rider.com/AutoPartService"/>
        <to uri="xslt:html-parts.xsl"/>
        <to uri="jbi:service:http://rider.com/HtmlService"/>
    </route>
</camelContext>
All the options from table 13.1 can be scoped at either context or route level. The preceding stream cache example was scoped at context level. You could also configure it on a particular route:
public class MyRoute extends RouteBuilder {
    public void configure() throws Exception {
        from("jbi:service:http://rider.com/AutoPartService")
            .streamCaching()
            .to("xslt:html-parts.xsl")
            .to("jbi:service:http://rider.com/HtmlService");
    }
}
You can configure route-scoped stream caching in Spring XML as follows:
<camelContext xmlns="http://camel.apache.org/schema/spring">
    <route streamCache="true">
        <from uri="jbi:service:http://rider.com/AutoPartService"/>
        <to uri="xslt:html-parts.xsl"/>
        <to uri="jbi:service:http://rider.com/HtmlService"/>
    </route>
</camelContext>
Note
Java DSL uses the syntax noXXX to disable an option, such as noStream-Caching or noTracing.
There is one last detail to know about the context and route scopes. The context scope is used as a fallback if a route doesn’t have a specific configuration. The idea is that you can configure the default setting on the context scope and then override when needed at the route scope. For example, you could enable tracing on the context scope and then disable it on the routes you don’t want traced.
Configuring Handlefault
In the preceding example, you route messages using the JBI component. The HandleFault option is used to control whether or not Camel error handling should react to faults.
Suppose sending to the jbi:service:http://rider.com/HtmlService endpoint fails with a fault. Without HandleFault enabled, the fault would be propagated back to the consumer. By enabling HandleFault, you can let the Camel error handler react when faults occur.
The following code shows how you can let the DeadLetterChannel error handler save failed messages to files in the error directory:
public class MyRoute extends RouteBuilder {
    public void configure() throws Exception {
        errorHandler(deadLetterChannel("file:errors"));

        from("jbi:service:http://rider.com/AutoPartService")
            .streamCaching().handleFault()
            .to("xslt:html-parts.xsl")
            .to("jbi:service:http://rider.com/HtmlService");
    }
}
The equivalent example in Spring XML is as follows:
<camelContext xmlns="http://camel.apache.org/schema/spring">
    <errorHandler id="EH" type="DeadLetterChannel"
                  deadLetterUri="file:errors"/>

    <route streamCache="true" errorHandlerRef="EH" handleFault="true">
        <from uri="jbi:service:http://rider.com/AutoPartService"/>
        <to uri="xslt:html-parts.xsl"/>
        <to uri="jbi:service:http://rider.com/HtmlService"/>
    </route>
</camelContext>
We’ll now look at how to control the ordering of routes.
13.1.3. Ordering routes
The order in which routes are started and stopped becomes more and more important the more interdependent the routes are. For example, you may have reusable routes that must be started before being leveraged by other routes. Also, routes that immediately consume messages that are bound for other routes may have to be started later to ensure that the other routes are ready in time.
To control the startup order of routes, Camel provides two options: AutoStartup and StartupOrder. The former dictates whether the routes should be started or not. The latter is a number that dictates the order in which the routes should be started.
Using StartupOrder to Control Ordering of Routes
Let’s return to our Rider Auto Parts example, outlined at the beginning of the chapter. Figure 13.4 shows the high-level diagram again, this time numbering the three routes in use, ![]() ,
, ![]() , and
, and ![]() .
.
Figure 13.4. Camel application with two input routes  and
and  which depend on a common route

![]() The file-based route will poll incoming files and split each line in the file. The lines are then converted to an internal
camelinaction.inventory.UpdateInventoryInput object, which is sent to the
The file-based route will poll incoming files and split each line in the file. The lines are then converted to an internal
camelinaction.inventory.UpdateInventoryInput object, which is sent to the ![]() route.
route.
![]() The web service route is much simpler because incoming messages are automatically converted to the UpdateInventoryInput object. The web service endpoint is configured to do this.
The web service route is much simpler because incoming messages are automatically converted to the UpdateInventoryInput object. The web service endpoint is configured to do this.
![]() This route is a common route that’s reused by the first two routes.
This route is a common route that’s reused by the first two routes.
You now have a dependency among the three routes. Routes ![]() and
and ![]() depend upon route
depend upon route ![]() , and that’s why you need to use StartupOrder to ensure that the routes are started in correct order.
, and that’s why you need to use StartupOrder to ensure that the routes are started in correct order.
The following listing shows the Camel routes with the StartupOrder options in boldface.
Listing 13.1. Starting routes in a specific order
public class InventoryRoute extends RouteBuilder {

    @Override
    public void configure() throws Exception {
        from("cxf:bean:inventoryEndpoint")
.routeId("webservice").startupOrder(3)
            .to("direct:update")
            .transform().method("inventoryService", "replyOk");

        from("file://target/inventory/updates")
.routeId("file").startupOrder(2)
            .split(body().tokenize("
"))
                .convertBodyTo(UpdateInventoryInput.class)
                .to("direct:update")
            .end();

        from("direct:update")
.routeId("update").startupOrder(1)
            .to("bean:inventoryService?method=updateInventory");
    }
}
Listing 13.1 shows how easy it is in the Java DSL to configure the order of the routes using StartupOrder. Listing 13.2 shows the same example using Spring XML.
Note
In listing 13.1, routeId is used to assign each route a meaningful name, which will then show up in the management console or in the logs. If you don’t assign an ID, Camel will auto-assign an ID using the scheme route1, route2, and so forth.
Listing 13.2. Spring XML version of listing 13.1
<camelContext xmlns="http://camel.apache.org/schema/spring">

    <route id="webservice" startupOrder="3">
        <from uri="cxf:bean:inventoryEndpoint"/>
        <to uri="direct:update"/>
        <transform>
            <method bean="inventoryService" method="replyOk"/>
        </transform>
    </route>

    <route id="file" startupOrder="2">
        <from uri="file://target/inventory/updates"/>
        <split>
            <tokenize token="
"/>
            <convertBodyTo
                type="camelinaction.inventory.UpdateInventoryInput"/>
            <to uri="direct:update"/>
        </split>
    </route>

    <route id="update" startupOrder="1">
        <from uri="direct:update"/>
        <to uri="bean:inventoryService?method=updateInventory"/>
    </route>

</camelContext>
You should notice that the numbers 1, 2 and 3 are used to dictate the order of the routes. Let’s take a moment to see how this works in Camel.
How Startuporder Works
The StartupOrder option in Camel works much like the load-on-startup option for Java servlets. As with servlets, you can specify a positive number to indicate the order in which the routes should be started.
The numbers don’t have to be consecutive. For example, you could have used the numbers 5, 20, and 87 instead of 1, 2, and 3. All that matters is that the numbers must be unique.
You can also omit assigning a StartupOrder to some of the routes. In that case, Camel will assign these routes a unique number starting with 1,000 upwards. This means that the numbers from 1 to 999 are free for Camel users, and the numbers from 1,000 upward are reserved by Camel.
Tip
The routes are stopped in the reverse order in which they were started.
In practice, you may not need to use StartupOrder often. It’s only important when you have route dependencies, as in the previous example.
The source code for the book contains this example in the chapter13/startup directory. You can try it out using the following Maven goals:
mvn test -Dtest=InventoryJavaDSLTest
mvn test -Dtest=InventorySpringXMLTest
You’ve now learned to control the order in which routes are started. Let’s move on and take a look at how you can omit starting certain routes and start them on demand later, at runtime.
13.1.4. Disabling autostartup
Table 13.1 listed the AutoStartup option, which is used to specify whether or not a given route should be automatically started when Camel starts. Sometimes you may not want to start a route automatically—you may want to start it on demand at runtime to support business cases involving human intervention.
At Rider Auto Parts, there has been a demand to implement a manual process for updating the inventory based on files. As usual, you’ve been asked to implement this in the existing application depicted in figure 13.4.
You come up with the following solution: add a new route to the existing routes in listing 13.1. The new route listens for files being dropped in the manual directory, and uses these files to update the inventory.
from("file://target/inventory/manual")
    .routeId("manual")
    .log("Doing manual update with file ${file:name}")
    .split(body().tokenize("
"))
        .convertBodyTo(UpdateInventoryInput.class)
        .to("direct:update")
    .end();
As you can see, the route is merely a copy of the file-based route in listing 13.1. Unfortunately, your boss isn’t satisfied with the solution. The route is always active, so if someone accidentally drops a file into the manual folder, it would be picked up.
To solve this problem, you use the AutoStartup option to disable the route from being activated on startup:
from("file://target/inventory/manual")
    .routeId("manual").noAutoStartup()
    .log("Doing manual update with file ${file:name}")
    .split(body().tokenize("
"))
        .convertBodyTo(UpdateInventoryInput.class)
        .to("direct:update")
    .end();
You can start the route when a manual file is meant to be picked up. This can be done by using a management console, such as JConsole, to manually start the route, waiting until the file has been processed, and manually stopping the route again.
Tip
There is a subtle difference between using Boolean-based options in the Java DSL and Spring XML. For example, AutoStartup is implemented as autoStartup="false" in Spring XML and as noAutoStartup() in the Java DSL.
You’ve now learned how to configure Camel with various options that influence how it starts up. In the next section, we’ll look at various ways of programmatically controlling the lifecycle of routes at runtime.
13.2. Starting and stopping routes at runtime
In chapter 12, you learned how to use management tooling, designed for operations staff, to start and stop routes at runtime. Being able to programmatically control routes at runtime is also desirable. For example, you might want business logic to automatically turn routes on or off at runtime. In this section, we’ll look at how to do this.
You can start and stop routes at runtime in several ways, including these:
- Using CamelContext—By invoking the startRoute and stopRoute methods.
- Using RoutePolicy—By applying a policy to routes that Camel enforces automatically at runtime.
- Using JMX—By obtaining the ManagedRoute MBean for the particular routes and invoking its start or stop methods. If you have remote management enabled, you can control the routes from another machine.
The use of JMX was covered in the previous chapter, so we’ll discuss using CamelContext and RoutePolicy in this chapter.
13.2.1. Using CamelContext to start and stop routes at runtime
The CamelContext provides methods to easily start and stop routes.
To illustrates this, we’ll continue with the Rider Auto Parts example from section 13.1.4. About a month into production with the new route, one of the operations staff forgot to manually stop the route after use, as he was supposed to. Not stopping the route leads to a potential risk because files accidentally dropped into the manual directory will be picked up by the route.
You are again summoned to remedy this problem, and you quickly improve the route with the two changes shown in bold in the following listing.
Listing 13.3. After a file has been processed, the route is stopped
from("file://target/inventory/manual?maxMessagesPerPoll=1")
    .routeId("manual").noAutoStartup()
    .log("Doing manual update with file ${file:name}")
    .split(body().tokenize("
"))
        .convertBodyTo(UpdateInventoryInput.class)
        .to("direct:update")
    .end()
    .process(new Processor() {
        public void process(Exchange exchange) throws Exception {
exchange.getContext().getInflightRepository().remove(exchange);
exchange.getContext().stopRoute("manual");
        }
    });
The first change uses the maxMessagesPerPoll option to tell the file consumer to only pick up one file at a time. The second change stops the route after that one file has been processed. This is done with the help of the inlined Processor, which can access the CamelContext and tell it to stop the route by name. (CamelContext also provides a startRoute method for starting a route.) Before you stop the route, you must unregister the current exchange from the in-flight registry, which otherwise would prevent Camel from stopping the route, because it detects there is an exchange in progress.
The source code for the book contains this example, which you can try from the chapter13/startup directory using the following Maven goal:
mvn test -Dtest=ManualRouteWithStopTest
Even though the fix to stop the route was simple, using the inlined processor at the end of the route isn’t an optimal solution. It would be better to keep the business logic separated from the stopping logic. This can be done with a feature called OnCompletion.
Using Oncompletion
OnCompletion is a feature that allows you to do additional routing after the original route is done. The classic example would be to send an email alert if a route fails, but it has a broad range of uses.
Instead of using the inlined processor to stop the route, you can use OnCompletion in the RouteBuilder to process the StopRouteProcessor class containing the logic to stop the route. This is shown in bold in the following code:
public void configure() throws Exception {
onCompletion().process(new StopRouteProcessor("manual"));

    from("file://target/inventory/manual?maxMessagesPerPoll=1")
        .routeId("manual").noAutoStartup()
        .log("Doing manual update with file ${file:name}")
        .split(body().tokenize("
"))
        .convertBodyTo(UpdateInventoryInput.class)
        .to("direct:update");
}
The implementation of the StopRouteProcessor is simple, as shown here:
public class StopRouteProcessor implements Processor {
    private final String name;

    public StopRouteProcessor(String name) {
        this.name = name;
    }

    public void process(Exchange exchange) throws Exception {
        exchange.getContext().getInflightRepository().remove(exchange);
        exchange.getContext().stopRoute(name);
    }
}
This improves the readability of the route, as it’s shorter and doesn’t mix high-level routing logic with low-level implementation logic. By using OnCompletion, the stopping logic has been separated from the original route.
Scopes can be used to define OnCompletions at different levels. Camel supports two scopes: context scope (high level) and route scope (low level). In the preceding example, you used context scope. If you wanted to use route scope, you’d have to define it within the route as follows:
from("file://target/inventory/manual?maxMessagesPerPoll=1")
    .onCompletion().process(new StopRouteProcessor("manual")).end()
    .routeId("manual").noAutoStartup()
    .log("Doing manual update with file ${file:name}")
    .split(body().tokenize("
"))
        .convertBodyTo(UpdateInventoryInput.class)
        .to("direct:update")
    .end;
Notice the use of .end() to indicate where the OnCompletion route ends. You have to do this when using route scope so Camel knows which pieces belong to the additional route and which to the original route. This is the same principle as when you use OnException at route scope.
Tip
OnCompletion also supports filtering using the OnWhen predicate so that you can trigger the additional route only if the predicate is true. In addition, OnCompletion can be configured to only trigger when the route completes successfully or when it fails by using the OnCompleteOnly or OnFailureOnly options. For example, you can use OnFailureOnly to build a route that sends an alert email to support personnel when a route fails.
The source code for the book contains this example in the chapter13/startup directory. You can try it using the following Maven goal:
mvn test -Dtest=ManualRouteWithOnCompletionTest
We’ve now covered how to stop a route at runtime using the CamelContext API. We’ll now look at another feature called RoutePolicy, which can also be used to control the lifecycle of routes at runtime.
13.2.2. Using RoutePolicy to start and stop routes at runtime
A RoutePolicy is a policy that can control routes at runtime. For example, a RoutePolicy can control whether or not a route should be active. But you aren’t limited to such scenarios—you can implement any kind of logic you wish.
The org.apache.camel.spi.RoutePolicy is an interface that defines two callback methods Camel will automatically invoke at runtime:
void onExchangeBegin(Route route, Exchange exchange);
void onExchangeDone(Route route, Exchange exchange);
The idea is that you implement this interface, and Camel will invoke the callbacks when a route has just begun and when it’s done. You’re free to implement whatever logic you want in these callbacks. For convenience, Camel provides the org.apache. camel.impl.RoutePolicySupport class, which you can use as a base class to extend when implementing your custom policies.
Let’s build a simple example using RoutePolicy to demonstrate how to flip between two routes, so only one route is active at any time. Figure 13.5 shows this principle.
Figure 13.5. RoutePolicy changes the active state between the two routes so only one route is active at any time.

As you can see in this figure, the RoutePolicy is being used to control the two routes, starting and stopping them so only one is active at a time. The following listing shows how this can be implemented.
Listing 13.4. A RoutePolicy that flips two routes being active at runtime

In the constructor, you identify the names of the two routes to flip ![]() . As you extend the RoutePolicySupport class, you only override the onExchangeDone method, as the flipping logic should be invoked when the route is done. You then compute which of the two routes to stop
and start with the help of the route parameter, which denotes the current active route. Having computed that, you then use CamelContext to flip the routes
. As you extend the RoutePolicySupport class, you only override the onExchangeDone method, as the flipping logic should be invoked when the route is done. You then compute which of the two routes to stop
and start with the help of the route parameter, which denotes the current active route. Having computed that, you then use CamelContext to flip the routes ![]() . If an exception is thrown, you let the ExceptionHandler take care of it, which by default will log the exception.
. If an exception is thrown, you let the ExceptionHandler take care of it, which by default will log the exception.
To use FlipRoutePolicy, you must assign it to the two routes. In the Java DSL, this is done using the RoutePolicy method, as shown in the following RouteBuilder:
public void configure() throws Exception {
    RoutePolicy policy =  new FlipRoutePolicy("foo", "bar");

    from("timer://foo")
        .routeId("foo").routePolicy(policy)
        .setBody().constant("Foo message")
        .to("log:foo").to("mock:foo");

    from("timer://bar")
        .routeId("bar").routePolicy(policy).noAutoStartup()
        .setBody().constant("Bar message")
        .to("log:bar").to("mock:bar");
}
If you’re using Spring XML, you can use RoutePolicy as shown here:
<bean id="flipPolicy" class="camelinaction.FlipRoutePolicy">
    <constructor-arg index="0" value="foo"/>
    <constructor-arg index="1" value="bar"/>
</bean>
<camelContext xmlns="http://camel.apache.org/schema/spring">
    <route id="foo" routePolicyRef="flipPolicy">
        <from uri="timer://foo"/>
        <setBody><constant>Foo message</constant></setBody>
        <to uri="log:foo"/>
        <to uri="mock:foo"/>
    </route>

    <route id="bar" routePolicyRef="flipPolicy" autoStartup="false">
        <from uri="timer://bar"/>
        <setBody><constant>Bar message</constant></setBody>
        <to uri="log:bar"/>
        <to uri="mock:bar"/>
    </route>
</camelContext>
As you can see, you use the routePolicyRef attribute on the <route> tag to reference the flipPolicy bean defined in the top of the XML file.
The source code for the book contains this example in the chapter13/routepolicy directory. You can try it using the following Maven goals:
mvn test -Dtest=FlipRoutePolicyJavaDSLTest
mvn test -Dtest=FlipRoutePolicySpringXMLTest
When running either of the examples, you should see the two routes being logged interchangeably (foo and bar).
INFO  foo - Exchange[BodyType:String, Body:Foo message]
INFO  bar - Exchange[BodyType:String, Body:Bar message]
INFO  foo - Exchange[BodyType:String, Body:Foo message]
INFO  bar - Exchange[BodyType:String, Body:Bar message]
INFO  foo - Exchange[BodyType:String, Body:Foo message]
INFO  bar - Exchange[BodyType:String, Body:Bar message]
We’ve now covered both starting and controlling routes at runtime. It’s time to learn about shutting down Camel, which is more complex than it sounds.
13.3. Shutting down Camel
The new inventory application at Rider Auto Parts is scheduled to be in production at the end of the month. You’re on the team to ensure its success and help run the final tests before it’s handed over to production. These tests also cover reliably shutting down the application.
Shutting down the Camel application is complex because there may be numerous in-flight messages being processed. Shutting down while messages are in flight may harm your business because those messages could potentially be lost. So the goal of shutting down a Camel application reliably is to shut it down when its quiet—when there are no in-flight messages. All you have to do is find this quiet moment.
This is hard to do because while you wait for the current messages to complete, the application may take in new messages. You have to stop taking in new messages while the current messages are given time to complete. This process is known as graceful shutdown, which means shutting down in a reliable and controlled manner.
13.3.1. Graceful shutdown
When CamelContext is being stopped, which happens when its stop() method is invoked, it uses a strategy to shut down. This strategy is defined in the ShutdownStrategy interface. The default implementation of this ShutdownStrategy interface uses the graceful shutdown technique.
For example, when you stop the Rider Auto Parts example, you’ll see these log lines:
DefaultCamelContext       - Apache Camel 2.5.0 is shutting down
DefaultShutdownStrategy   - Starting to graceful shutdown routes
                            (timeout 300 seconds)
DefaultShutdownStrategy   - Route: update shutdown complete.
DefaultShutdownStrategy   - Route: file suspended and shutdown deferred.
DefaultShutdownStrategy   - Route: webservice shutdown complete.
DefaultShutdownStrategy   - Route: file shutdown complete.
DefaultShutdownStrategy   - Graceful shutdown of routes completed in
                            0 seconds
DefaultInflightRepository - Shutting down with no inflight exchanges.
DefaultCamelContext       - Uptime: 7.422 seconds
DefaultCamelContext       - Apache Camel 2.5.0 is shutdown
This tells you a few things. You can see the graceful shutdown is using a 300-second timeout. This is the maximum time Camel allows for shutting down gracefully before it starts to shut down more aggressively by forcing routes to stop immediately. The default value is 300 seconds, which you can configure on the CamelContext. For example, to use 20 seconds as the default timeout value, you can do as follows:
camelContext.getShutdownStrategy().setTimeout(20);
Doing this in Spring XML requires a bit more work, because you have to define a Spring bean to set the timeout value:
<bean id="shutdown" class="org.apache.camel.impl.DefaultShutdownStrategy">
    <property name="timeout" value="20"/>
</bean>
Notice that the timeout value is in seconds.
Then Camel logs the progress of the routes as they shut down, one by one, according to the order in which they were started. Notice that the file route is suspended and deferred, and then later is shut down.
This is a little glimpse of the complex logic the graceful shutdown process uses to shut down Camel in a reliable manner. We’ll cover what suspension and defer mean in a moment.
At the end, Camel logs the completion of the graceful shutdown, which in this case was really fast and completed in less than one second. Camel also logs whether there were any in-flight messages just before it stops completely.
If Camel did not complete the graceful shutdown, it would log at WARN level how many in-flight messages were still in progress:
WARN - DefaultInflightRepository - Shutting down while there are still
                                   5 inflight exchanges.
Shutting Down the Rider Auto Parts Application
At Rider Auto Parts, you’re in the final testing of the application before it’s handed over to production. One of the tests is based on processing a big inventory file, and you wanted to test what happens if you shut down Camel while it was working on the big file. You expected Camel would continue processing the big file and only shut down when the file was completed. But the log shows something else.
At first, you see the usual logging about the shutdown in progress:
DefaultShutdownStrategy - Starting to graceful shutdown routes
                          (timeout 300 seconds)
DefaultShutdownStrategy - Route: update shutdown complete.
DefaultShutdownStrategy - Route: file suspended and shutdown deferred.
DefaultShutdownStrategy - Route: webservice shutdown complete.
Then there is a log line indicating that Camel has noticed the one in-flight exchange, which is the big file. This is expected behavior:
DefaultShutdownStrategy - Waiting as there are still 1 inflight and
               pending exchanges to complete before we can shutdown
Then the application logs the progress of the inventory update, which should happen for each line in the big file:
Inventory 58004 updated
Next come a lot of WARN logs about there being no consumers to process the Exchange:
WARN - DirectProducer - No consumers available on endpoint:
Endpoint[direct://update] to process: Exchange[Message:
camelinaction.inventory.UpdateInventoryInput@e9d110]
WARN - DirectProducer - No consumers available on endpoint:
Endpoint[direct://update] to process: Exchange[Message:
camelinaction.inventory.UpdateInventoryInput@5735c4]
Finally, you see the last log lines, which report the end of the shutdown.
DefaultShutdownStrategy   - Route: file shutdown complete.
DefaultShutdownStrategy   - Graceful shutdown of routes completed in
                            13 seconds
DefaultInflightRepository - Shutting down with no inflight exchanges.
DefaultCamelContext       - Uptime: 18.742 seconds
DefaultCamelContext       - Apache Camel 2.5.0 is shutdown
So what went wrong? The clues have been shown in the logs. First, you noticed the WARN logs, which indicated that the direct:update consumer had been stopped. This consumer is from the first route, which has startup order 1:
from("direct:update")
    .routeId("update").startupOrder(1)
    .to("bean:inventoryService?method=updateInventory");
You then noticed that Camel stops this route as the first route during the shutdown process:
DefaultShutdownStrategy - Route: update shutdown complete.
This is a shared route that the other routes depend upon, as illustrated in figure 13.4. That’s why it needed to be started before the other routes. Now the problem is that this route is also stopped before the other routes. You’ve got a catch-22 situation.
The good news is that it’s possible to remedy this in Camel. What you need to do is somehow tell Camel to defer shutting down this shared route. This is done using the ShutdownRoute option, which was listed in table 13.1. All you have to do is add the option in the route as shown in bold here:
from("direct:update")
    .routeId("update").startupOrder(1)
.shutdownRoute(ShutdownRoute.Defer)
    .to("bean:inventoryService?method=updateInventory");
The same route in Spring XML is as follows:
<route id="update" startupOrder="1" shutdownRoute="Defer">
    <from uri="direct:update"/>
    <to uri="bean:inventoryService?method=updateInventory"/>
</route>
Now when you run the test, the application shuts down in a reliable manner. The log shows that Camel detects that the big file is still in progress and patiently waits:
DefaultShutdownStrategy - Waiting as there are still 1 inflight
       and pending exchanges to complete before we can shutdown
Inventory 58026 updated
Inventory 58027 updated
DefaultShutdownStrategy - Waiting as there are still 1 inflight
       and pending exchanges to complete before we can shutdown
Inventory 58028 updated
Inventory 58029 updated
Inventory 58030 updated
DefaultShutdownStrategy - Waiting as there are still 1 inflight
       and pending exchanges to complete before we can shutdown
The application is now ready to be handed over to operations for deployment.
Note
Apache Camel 2.5 has been improved to handle the example we’ve just covered. Camel now always defers direct endpoints, which means you no longer have to configure this manually. The example illustrates the principle of how to shut down a Camel application in a reliable manner.
The source code for the book contains this example in the chapter13/shutdown directory. You can try it by using the following Maven goals:
mvn test -Dtest=GracefulShutdownBigFileTest
mvn test -Dtest=GracefulShutdownBigFileXmlTest
As you’ve just learned, Camel end users are responsible for configuring routes correctly to support reliable shutdown. Some may say this is a trade-off, but we, the Camel team, think of it as flexibility and don’t believe computer logic can substitute for human logic in ensuring a reliable shutdown. We think it’s best to give Camel users the power to configure their routes to support their use cases.
About Stopping and Shutting Down
Camel will leverage the graceful shutdown mechanism when it stops or shuts down routes. That means the example in listing 13.3 will stop the route in a graceful manner. As a result, you can reliably stop routes at runtime, without the risk of losing inflight messages.
The difference between using the stopRoute and shutdownRoute methods is that the latter will also unregister the route from management (JMX). Use stopRoute when you want to be able to start the route again. Only use shutdownRoute if the route should be permanently removed.
That’s all there is to shutting down Camel. It’s now time to review some of the deployment strategies that are possible.
13.4. Deploying Camel
Camel is described as a lightweight and embeddable integration framework. This means that it supports more deployment strategies and flexibility than traditional ESBs and application servers. Camel can be used in a wide range of runtime environments, from standalone Java applications, to web containers, to the cloud.
In this section, we’ll look at four different deployment strategies that are possible with Camel and present their strengths and weaknesses.
- Embedding Camel in a Java application
- Running Camel in a web environment on Apache Tomcat
- Running Camel inside JBoss Application Server
- Running Camel in an OSGi container such as Apache Karaf
These four deployment strategies are the common ways of deploying Camel.
13.4.1. Embedded in a Java application
It’s appealing to embed Camel in a Java application if you need to communicate with the outside world. By bringing Camel into your application, you can benefit from all the transports, routes, EIPs, and so on, that Camel offers. Figure 13.6 shows Camel embedded in a standard Java application.
Figure 13.6. Camel embedded in a standalone Java application

In the embedded mode, you must add to the classpath all the necessary Camel and third-party JARs needed by the underlying transports. Because Camel is built with Maven, you can use Maven for your own project and benefit from its dependency-management system. We discussed building Camel projects with Maven in chapter 11.
Bootstrapping Camel for your code is easy. In fact, you did that in your first ride on the Camel in chapter 1. All you need to do is create a CamelContext and start it, as shown in the following listing.
Listing 13.5. Bootstrapping Camel in your Java application
public class FileCopierWithCamel {

    public static void main(String args...) throws Exception {
        CamelContext context = new DefaultCamelContext();
        context.addRoutes(new RouteBuilder() {
            public void configure() {
                from("file:data/inbox").to("file:data/outbox");
            }
        });
        context.start();

        Thread.sleep(10000);

        context.stop();
    }
}
It’s important to keep a reference to CamelContext for the lifetime of your application, because you’ll need to perform a shutdown of Camel. As you may have noticed in listing 13.5, the code execution continues after starting the CamelContext. To avoid shutting down your application immediately, the listing includes code to sleep for 10 seconds. In your application, you’ll need to use a different means to let your application continue and only shut down when requested to do so.
Let’s look at the Rider Auto Parts application illustrated in figure 13.1, and embed it in a Java application.
Embedding the Rider Auto Parts Example in a Java Application
The Rider Auto Parts Camel application can be run as a standalone Java application. Because the application is using Spring XML files to set up Camel, you just need to start Spring to start the application.
Starting Spring from a main class can be done as follows:
public class InventoryMain {
    public static void main(String[] args) throws Exception {
        String filename = "META-INF/spring/camel-context.xml";
        AbstractXmlApplicationContext spring =
               new ClassPathXmlApplicationContext(filename);
        spring.start();

        Thread.sleep(10000);

        spring.stop();
        spring.destroy();
    }
}
To start Spring, you create an ApplicationContext, which in the preceding example means loading the Spring XML file from the classpath. This code also reveals the problem of having the main method wait until you terminate the application. The preceding code uses Thread.sleep to wait 10 seconds before terminating the application.
To remedy this, Camel provides a Main class that you can leverage instead of writing your own class. You can change the previous InventoryMain class to leverage this Main class as follows:
import org.apache.camel.spring.Main;

public class InventoryMain {
    public static void main(String[] args) throws Exception {
        Main main = new Main();
        main.setApplicationContextUri("META-INF/spring/camel-context.xml");
        main.enableHangupSupport();
        main.start();
    }
}
This approach also solves the issue of handling the lifecycle of the application. By enabling hang-up support, you tell Camel to shut down gracefully when the JVM is being terminated, such as when the Ctrl-C key combination is pressed. You can obviously also stop the Camel application by invoking the stop method on the main instance.
The source code for the book contains this example in the chapter13/standalone directory. You can try it out using the following Maven goal:
mvn compile exec:java
Tip
You may not need to write your own main class. For example, the org.apache.camel.spring.Main class can be used directly. It has parameters to dictate which Spring XML file it should load. By default, it loads all XML files from the classpath in the META-INF/spring location, so by dropping your Spring XML file in there, you don’t even have to pass any arguments to the Main class. You can start it directly.
Table 13.2 summarizes the pros and cons of embedding Camel in a standalone Java application.
Table 13.2. Pros and cons of embedding Camel in a standalone Java application
|
Pros |
Cons |
|---|---|
|
|
You now know how to make your standalone application leverage Camel. Let’s look at what you can do for your web applications.
13.4.2. Embedded in a web application
Embedding Camel in a web application brings the same benefits as were mentioned in section 13.4.1. Camel provides all you need to connect to your favorite web container. If you work in an organization, you may have existing infrastructure to be used for deploying your Camel applications. Deploying Camel in such a well-known environment gives you immediate support for installing, managing, and monitoring your applications.
When Camel is embedded in a web application, as shown in figure 13.7, you need to make sure all JARs are packaged in the WAR file. If you use Maven, this will be done automatically.
Figure 13.7. Camel embedded in a web application

The Camel instance embedded in your web application is bootstrapped by Spring. By leveraging Spring, which is such a ubiquitous framework, you let end users use well-known approaches for deployment. This also conveniently ties Camel’s lifecycle with Spring’s lifecycle management and ensures that the Camel instance is properly started and stopped in the web container.
The following code demonstrates that you only need a standard Spring context listener in the web.xml file to bootstrap Spring and thereby Camel.
<?xml version="1.0" encoding="UTF-8"?>
<web-app xmlns="http://java.sun.com/xml/ns/javaee"
         xmlns:xsi="http://www.w3.org/2001/XMLSchema-instance"
         xsi:schemaLocation="
           http://java.sun.com/xml/ns/javaee
           http://java.sun.com/xml/ns/javaee/web-app_2_5.xsd"
           version="2.5">

    <listener>
        <listener-class>
            org.springframework.web.context.ContextLoaderListener
        </listener-class>
    </listener>
</web-app>
This context listener also takes care of shutting down Camel properly when the web application is stopped. Spring will, by default, load the Spring XML file from the WEB-INF folder using the name applicationContext.xml. In this file, you can embed Camel, as shown in listing 13.6.
If you want to use another name for your Spring XML file, you’ll need to add a context parameter which specifies the filename as follows:
<context-param>
    <param-name>contextConfigLocation</param-name>
    <param-value>/WEB-INF/camel-context.xml</param-value>
</context-param>
Listing 13.6. The Spring applicationContext.xml file with Camel embedded
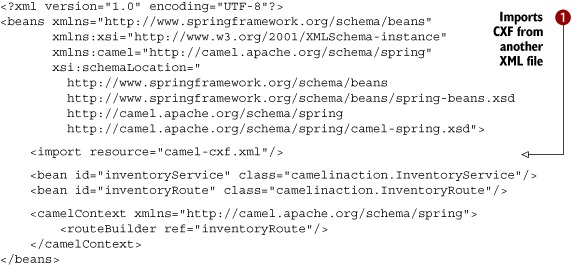
Listing 13.6 is a regular Spring XML file in which you can use the <import> tag to import other XML files. For example, this is done by having CXF defined in the camel-cxf.xml file ![]() . Camel, itself, is embedded using the <camelContext> tag.
. Camel, itself, is embedded using the <camelContext> tag.
The source code for the book contains this example in the chapter13/war directory. You can try it out by using the following Maven goal:
mvn jetty:run
If you run this Maven goal, a Jetty plugin is used to quickly boot up a Jetty web container running the web application. To use the Jetty plugin in your projects, you must remember to add it to your pom.xml file in the <build><plugins> section:
<plugin>
    <groupId>org.mortbay.jetty</groupId>
    <artifactId>maven-jetty-plugin</artifactId>
    <version>7.1.6.v20100715</version>
</plugin>
If you run this goal, you should notice in the console that Jetty has been started:
2010-05-28 [main] INFO  DefaultCamelContext
- Apache Camel 2.5.0 (CamelContext: camelContext) started
2010-05-28 [main] INFO  ContextLoader
- Root WebApplicationContext: initialization completed in 3198 ms
2010-05-28 INFO::Started [email protected]:8080
[INFO] Started Jetty Server
Let’s look at how you can run Camel as a web application in Apache Tomcat.
Deploying to Apache Tomcat
To package the application as a WAR file, you can run the mvn package command, which creates the WAR file in the target directory. Yes, it’s that easy with Maven.
You want to leverage the hot deployment of Apache Tomcat, so you must first start it. Here’s how you can start it on a Unix-based system, such as our Mac OS X laptop, using the bin/startup.sh script:
davsclaus:~/apache-tomcat-6.0.26$ bin/startup.sh
Using CATALINA_BASE:   /Users/davsclaus/apache-tomcat-6.0.26
Using CATALINA_HOME:   /Users/davsclaus/apache-tomcat-6.0.26
Using CATALINA_TMPDIR: /Users/davsclaus/apache-tomcat-6.0.26/temp
Using JRE_HOME:        /System/Library/Frameworks/JavaVM.framework/Versions/
     1.5/Home
Using CLASSPATH:       /Users/davsclaus/apache-tomcat-6.0.26
/bin/bootstrap.jar
This will start Tomcat in the background, so you need to tail the log file to see what happens:
davsclaus:~/apache-tomcat-6.0.26$ tail -f logs/catalina.out
May 28, 2010 5:37:53 PM org.apache.catalina.startup.HostConfig
deployDirectory
INFO: Deploying web application directory ROOT
May 28, 2010 5:37:53 PM org.apache.coyote.http11.Http11Protocol start
INFO: Starting Coyote HTTP/1.1 on http-8080
May 28, 2010 5:37:53 PM org.apache.jk.common.ChannelSocket init
INFO: JK: ajp13 listening on /0.0.0.0:8009
May 28, 2010 5:37:53 PM org.apache.jk.server.JkMain start
INFO: Jk running ID=0 time=0/17  config=null
May 28, 2010 5:37:53 PM org.apache.catalina.startup.Catalina start
INFO: Server startup in 4351 ms
To deploy the application, you need to copy the WAR file to the Apache Tomcat webapps directory:
cp target/riderautoparts-war-1.0.war ~/apache-tomcat-6.0.26/webapps/
Then Apache Tomcat should show the application being started in the log file. You should see the familiar logging of Camel being started:
2010-05-28 [gine[Catalina]]] INFO DefaultCamelContext - Started 3 routes
2010-05-28 [gine[Catalina]]] INFO DefaultCamelContext
- Apache Camel 2.5.0 (CamelContext: camelContext) started
2010-05-28 [gine[Catalina]]] INFO ContextLoader
- Root WebApplicationContext: initialization completed in 2812 ms
Now you need to test that the deployed application runs as expected. This can be done by sending a web service request using SoapUI, as shown in figure 13.8. Doing this requires you to know the URL to the WSDL the web service runs at, which is http://localhost:9000/inventory?wsdl.
Figure 13.8. Using SoapUI testing the web service from the deployed application in Apache Tomcat
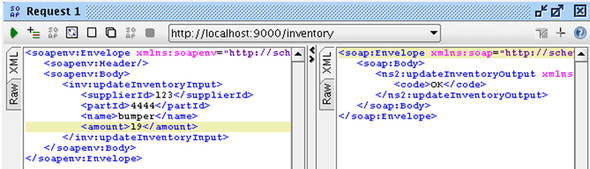
The web service returns “OK” as its reply, and you can also see from the log file that the application works as expected, outputting the inventory being updated:
Inventory 4444 updated
There’s another great benefit of this deployment model, which is that you can tap the servlet container directly for HTTP endpoints. In a standalone Java deployment scenario, you have to rely on the Jetty transport, but in the web deployment scenario, the container already has its socket management, thread pools, tuning, and monitoring facilities. Camel can leverage this if you use the servlet transport for your inbound HTTP endpoints.
In the previously deployed application, you let Apache CXF rely on the Jetty transport. Let’s change this to leverage the existing servlet transports provided by Apache Tomcat.
Using Apache Tomcat for Http Inbound Endpoints
When using Camel in an existing servlet container, such as Apache Tomcat, you may have to adjust Camel components in your application to tap into the servlet container. In the Rider Auto Parts application, it’s the CXF component you must adjust.
First, you have to add CXFServlet to the web.xml file.
Listing 13.7. The web.xml file with CXFServlet to tap into Apache Tomcat
<?xml version="1.0" encoding="UTF-8"?>
<web-app xmlns="http://java.sun.com/xml/ns/javaee"
         xmlns:xsi="http://www.w3.org/2001/XMLSchema-instance"
         xsi:schemaLocation="
           http://java.sun.com/xml/ns/javaee
           http://java.sun.com/xml/ns/javaee/web-app_2_5.xsd"
           version="2.5">

    <listener>
        <listener-class>
            org.springframework.web.context.ContextLoaderListener
        </listener-class>
    </listener>

    <servlet>
        <servlet-name>CXFServlet</servlet-name>
        <servlet-class>
            org.apache.cxf.transport.servlet.CXFServlet
        </servlet-class>
    </servlet>
    <servlet-mapping>
        <servlet-name>CXFServlet</servlet-name>
        <url-pattern>/services/*</url-pattern>
    </servlet-mapping>
</web-app>
Maven users need to adjust the pom.xml file to depend upon the HTTP transport instead of Jetty, as follows:
<dependency>
    <groupId>org.apache.cxf</groupId>
    <artifactId>cxf-rt-transports-http</artifactId>
    <version>2.2.11</version>
</dependency>
Next, you must adjust the camel-cxf.xml file, as shown in the following listing.
Listing 13.8. Setting up the Camel CXF component to tap into Apache Tomcat
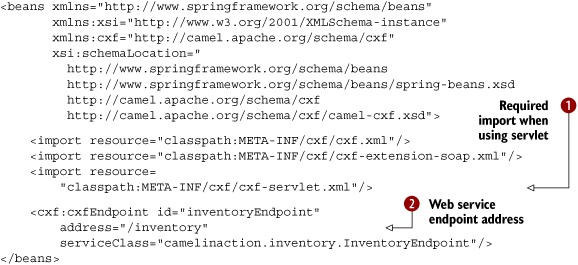
To use Apache CXF in a servlet container, you have to import the cxf-servlet.xml resource ![]() . This exposes the web service via the servlet container, which means the endpoint address has to be adjusted to a relative
context path
. This exposes the web service via the servlet container, which means the endpoint address has to be adjusted to a relative
context path ![]() .
.
In the previous example, the web service was available at http://localhost:9000/inventory?wsdl. By using Apache Tomcat, the web service is now exposed at this address:

Notice that the TCP port is 8080, which is the default Apache Tomcat setting.
The source code for the book contains this example in the chapter13/war-servlet directory. You can package the application using mvn package and then copy the riderautoparts-war-servlet-1.0.war file to the webapps directory of Apache Tomcat to hot-deploy the application. Then the web service should be available at this address: http://localhost:8080/riderautoparts-war-servlet-1.0/services/inventory?wsdl.
Note
Camel also provides a lightweight alternative to using CXF in the servlet container. The Servlet component that we discussed in section 7.4.2 of chapter 7 allows you to consume HTTP requests coming into the Servlet container in much the same way as you saw here with CXF. You can find more information on the Apache Camel website at http://camel.apache.org/servlet.html.
Table 13.3 lists the pros and cons of the web application deployment model of Camel.
Table 13.3. Pros and cons of embedding Camel in a web application
|
Pros |
Cons |
|---|---|
|
|
Embedding Camel in a web application is a popular, proven, and powerful way to deploy Camel. Another choice for running Camel applications is using an application server such as JBoss Application Server.
13.4.3. Embedded in JBoss Application Server
A common way of deploying Camel applications in JBoss Application Server (JBoss AS) is using the web deployment model we discussed in the previous section. But JBoss AS has a pesky classloading mechanism, so you need to leverage a special Camel JBoss component to remedy this. This component isn’t provided out of the box at the Apache Camel distribution, because of license implications with JBoss AS’s LGPL license. This component is hosted at Camel Extra (http://code.google.com/p/camel-extra/), which is a project site for additional Camel components that can’t be shipped from Apache.
In the true open source spirit, you can download the source code and build the component yourself, but the source code for the book also contains this component in the example located in the chapter13/war-jboss directory.
This example is based on the previous example with two minor additions. First, the camel-jboss-2.5.0.jar is added to the src/main/webapp/WEB-INF/lib directory, which ensures that this JAR is included when you package the application using mvn package.
The second change is to leverage the JBoss-specific classloader, which is done by adding the following bean definition in the applicationContext.xml file:
<bean id="jbossResolver"
      class="org.apache.camel.jboss.JBossPackageScanClassResolver"/>
That’s all there is to it.
To deploy the application to JBoss, you start it and copy the WAR file into the server/default/deploy directory. For example, on our laptop, JBoss AS 5.1 is started as follows:
davsclaus:~/jboss$ bin/run.sh
After a while, JBoss AS is ready, and this is logged to the console:
15:16:43,882 INFO [ServerImpl] JBoss (Microcontainer) [5.1.0.GA (build:
     SVNTag=JBoss_5_1_0_GA date=200905221053)] Started in 27s:452ms
Then the WAR file is copied:
cp target/riderautoparts-war-jboss-1.0.war
 ~/jboss/server/default/deploy
You can then keep an eye on the JBoss console as it outputs the progress of the deployment. For example, Camel reports that it has picked up the JBoss classloader, as shown here:
15:18:42,636 INFO [STDOUT] 2010-05-30 15:18:42,636 [main] INFO
CamelContextFactoryBean - Using custom PackageScanClassResolver:
org.apache.camel.jboss.JBossPackageScanClassResolver@75d8af
JBoss AS uses an embedded Apache Tomcat as the servlet container, which means the web service of the application is available in a familiar location:
http://localhost:8080/riderautoparts-war-jboss-1.0/services/inventory?wsdl
Table 13.4 lists the pros and cons of deploying Camel in JBoss Application Server.
Table 13.4. Pros and cons of embedding Camel in JBoss AS
|
Pros |
Cons |
|---|---|
|
|
Deploying Camel as a web application in JBoss AS is a fairly easy solution. All you have to remember is to use the special Camel JBoss component to let the classloading work.
The last strategy we’ll cover is in a totally different ballpark: using OSGi. OSGi is a fairly new deployment model in the Java enterprise space and brings promises of modularity to the extreme.
13.5. Camel and OSGi
OSGi is a layered module system for the Java platform that offers a complete dynamic component model. It’s a truly dynamic environment where components can come and go without requiring a reboot (hot deployment). Apache Camel is OSGi-ready, in the sense that all the Camel JAR files are OSGi-compliant and are deployable in OSGi containers.
This section will show you how to prepare and deploy the Rider Auto Parts application in the Apache Karaf OSGi runtime. Karaf provides functionality on top of the OSGi container, such as hot deployment, provisioning, local and remote shells, and many other goodies. You can choose between Apache Felix or Eclipse Equinox for the actual OSGi container. The example presented here is included with the source code for the book in the chapter13/osgi directory.
Note
In this book, we won’t go deep into the details of OSGi, which is a complex topic. The basics are covered on Wikipedia (http://en.wikipedia.org/wiki/OSGi), and if you’re interested in more information, we highly recommend OSGi in Action, by Richard S. Hall, Karl Pauls, Stuart McCulloch, and David Savage (Manning). For more information on the Apache Karaf OSGi runtime, see the Karaf website: http://karaf.apache.org.
The first thing you need to do with the Rider Auto Parts application is make it OSGi-compliant. This involves setting up Maven to help prepare the packaged JAR file so it includes OSGi metadata in the MANIFEST.MF entry.
13.5.1. Setting up Maven to generate an OSGi bundle
In the pom.xml file, you have to set the packaging element to bundle, which means the JAR file will be packaged as an OSGi bundle:
<packaging>bundle</packaging>
To generate the MANIFEST.MF entry in the JAR file, you can use the Apache Felix Maven Bundle plugin, which is added to the pom.xml file under the <build> section:
<build>
  <plugin>
    <groupId>org.apache.felix</groupId>
    <artifactId>maven-bundle-plugin</artifactId>
    <version>2.1.0</version>
    <extensions>true</extensions>
    <configuration>
       <instructions>
        <Bundle-Name>${project.artifactId}</Bundle-Name>
        <Bundle-SymbolicName>riderautoparts-osgi</Bundle-SymbolicName>
        <Export-Package>
            camelinaction,
            camelinaction.inventory
        </Export-Package>
        <Import-Package>*</Import-Package>
        <DynamicImport-Package>*</DynamicImport-Package>
        <Implementation-Title>Rider Auto Parts OSGi</Implementation-Title>
        <Implementation-Version>${project.version}</Implementation-Version>
      </instructions>
    </configuration>
  </plugin>
</build>
The interesting part of the maven-bundle-plugin is its ability to set the packages to be imported and exported. The plugin is set to export two packages: camelinaction and camelinaction.inventory. The camelinaction package contains the InventoryRoute Camel route, and it needs to be accessible by Camel so it can load the routes when the application is started. The camelinaction.inventory package contains the generated source files needed by Apache CXF when it exposes the web service.
In terms of imports, the preceding code defines it as dynamic by using an asterisk, which means the OSGi container will figure it out. When needed, you can specify the imports by package name.
The source code for the book contains this example in the chapter13/osgi directory. If you run the mvn package goal, you can see the MANIFEST.MF entry being generated in the target/classes/META-INF directory.
You have now set up Maven to build the JAR file as an OSGi bundle, which can be deployed to the container. The next step is to download and install Apache Karaf.
13.5.2. Installing and running Apache Karaf
For this example, you can download and install the latest version of Apache Karaf from http://karaf.apache.org. (At the time of writing, this was Apache Karaf 2.1.2.) Installing is just a matter of unzipping the zip file.
Apache Karaf version 2.1 has an issue that requires you to adjust its configuration in order to use Apache CXF. You need to download a file and save it in the etc directory with the name custom.properties.
From a Unix shell, you can do this as follows:
curl http://svn.apache.org/repos/asf/servicemix/smx4/features/trunk/assembly/src/main/filtered-resources/etc/jre.properties > etc/
This command will download and save the file as etc/custom.properties. The Apache Karaf team will fix this problem in the 2.2 release.
To run Apache Karaf, start it from the command line using one of these two commands:
bin/karaf        (Unix)
bin/karaf.bat    (Windows)
This should start up Karaf and display a logo when it’s ready. This will run in a shell mode, which means you can enter commands to manage the container.
Now you need to install Camel and Apache CXF before you install the Rider Auto Parts application. Karaf makes installing easier by using features, which are like super bundles that contain a set of bundles installed as a group. Installing features requires you to add the Camel feature descriptions to Karaf, which you do by typing the following command in the shell:
features:addUrl mvn:org.apache.camel.karaf/apache-camel/2.5.0/xml/features
You can then type features:list to see all the features that are available to be installed. Among these should be several Camel-related features.
The example application requires the http, camel, and camel-cxf features. Type these commands in the shell:
features:install http
features:install camel
features:install camel-cxf
And then wait a bit.
Tip
You can type osgi:list to see which bundles have already been installed and their status. The shell has autocompletion, so you can press Tab to see the possible choices. For example, type osgi and then press Tab to see the choices.
You’re now ready to deploy the Rider Auto Parts application.
13.5.3. Deploying the example
Karaf can install OSGi bundles from various sources, such as the filesystem or the local Maven repository.
To install using Maven, you first need to install the application in the local Maven repository, which can easily be done by running mvn install from the chapter13/osgi directory. After the JAR file has been copied to the local Maven repository, you can deploy it to Apache Karaf using the following command from the shell:
osgi:install mvn:com.camelinaction/riderautoparts-osgi/1.0
Upon installing any JAR to Karaf (a JAR file is known as a bundle in OSGi terms), Karaf will output on the console the bundle ID it has assigned to the installed bundle, as shown:
Bundle ID: 98
You can then type osgi:list to see the application being installed:
[98] [Installed] [] [] [60] riderautoparts-osgi (1.0.0)
Notice that the application isn’t started. You can start it by entering osgi:start 98, which changes the application’s status when you do an osgi:list again:
[98] [Installed] [] [Started] [60] riderautoparts-osgi (1.0.0)
The application is now running in the OSGi container.
Tip
You can install and start the bundle in a single command using the -s option on the osgi:install command, like this: osgi:install -s mvn:com.camelinaction/riderautoparts-osgi/1.0.
So how can you test that it works? You can start by checking the log with the log:display command. Among other things, it should indicate that Apache Camel has been started:
15:46:32,396 | INFO  | ExtenderThread-6 | DefaultCamelContext |
e.camel.impl.DefaultCamelContext 1025 | Apache Camel 2.5.0 (CamelContext:
myCamelContext) started
You can then use SoapUI to send a test request. The WSDL file is available at http://localhost:9000/inventory?wsdl.
When you’re done testing the application, you may want to stop the OSGi container, which you can do by executing the osgi:shutdown command from the shell.
Tip
You can tail the Apache Karaf log file using tail -f log/karaf.log. Note that this isn’t done from within the Karaf shell but from the regular shell on your operating system.
You’ve now seen how to deploy the example into an OSGi container, which marks the end of our practical coverage of OSGi in this book.
Table 13.5 lists the pros and cons of deploying Camel in an OSGi container.
Table 13.5. Pros and cons of using OSGi as a deployment strategy
|
Pros |
Cons |
|---|---|
|
|
You’ve now seen the most popular deployment strategies for Camel and other products.
We’ve only scratched the surface of OSGi in this chapter. If you go down that path, you’ll need to pick up some other books, because OSGi is a big concept to grasp and master. The path of the web application is the beaten track, and there are plenty of materials and people who can help you if you come up against any problems.
13.6. Summary and best practices
In this chapter, we explored the internal details of how Camel starts up. You learned which options you can control and whether routes should be autostarted. You also learned how to dictate the order in which routes should be started.
More important, you learned how to shut down a running application in a reliable way without compromising the business. You learned about Camel’s graceful shutdown procedures and what you can do to reorder your routes to ensure a better shutdown process.
You also learned how to stop and shut down routes at runtime. You can do this programmatically, which allows you to fully control when routes are operating and when they are not.
In the second part of this chapter, we explored the art of deploying Camel applications as standalone Java applications, as web applications, and by running Camel in an OSGi container. Remember that the deployment strategies covered in this book aren’t all of your options. For example, Camel can also be deployed in the cloud, or they can be started using Java Web Start.
Here are some pointers to help you out with running and deployment:
- Ensure reliable shutdown. Take the time to configure and test that your application can be shut down in a reliable manner. You application is bound to be shut down at some point, whether for planned maintenance, upgrades, or unforeseen problems. In those situations, you want the application to shut down in a controlled manner without negatively affecting your business.
- Use an existing runtime environment. Camel is agile, flexible, and can be embedded in whatever production setup you may want to use. Don’t introduce a new production environment just for the sake of using Camel. Use what’s already working for you, and test early on in the project that your application can be deployed and run in the environment.
In the next (and final) chapter, we’ll revisit Camel’s routing capabilities, but we’ll focus on the power of using annotations on beans. We’ll also see how you can hide the Camel API from clients but still let clients interact with Camel by hiding the middleware layer.