
Chapter 9. Using transactions
This chapter covers
- Why you need transactions
- How to use and configure transactions
- The differences between local and global transactions
- How to return custom reply messages on rollback
- How to compensate when transactions aren’t supported
To help explain what transactions are, let’s look at an example from real life. You may well have ordered this book from Manning’s online bookstore, and if you did, you likely followed these steps:
- Find the book Camel in Action
- Put the book into the basket
- Maybe continue shopping and look for other books
- Go to the checkout
- Enter shipping and credit card details
- Confirm the purchase
- Wait for the confirmation
- Leave the web store
What seems like an everyday scenario is actually a fairly complex series of events. You have to put books in the basket before you can check out; you must fill in the shipping and credit card details before you can confirm the purchase; if your credit card is declined, the purchase won’t be confirmed; and so on. The ultimate resolution of this transaction is either of two states: either the purchase was accepted and confirmed, or the purchase was declined, leaving your credit card balance uncharged.
This particular story involves computer systems because it’s about using an online bookstore, but the same main points happen when you shop in the supermarket. Either you leave the supermarket with your groceries or without.
In the software world, transactions are often explained in the context of SQL statements manipulating database tables—updating or inserting data. While the transaction is in progress, a system failure could occur, and that would leave the transaction’s participants in an inconsistent state. That’s why the series of events is described as atomic: either they all are completed or they all fail—it’s all or nothing. In transactional terms, they either commit or roll back.
Note
I expect you know about the database ACID properties, so I won’t explain what atomic, consistent, isolated, and durable mean in the context of transactions. If you aren’t familiar with ACID, the Wikipedia page is a good place to start learning about it: http://en.wikipedia.org/wiki/ACID.
In this chapter, we’ll first look at the reasons why you should use transactions (in the context of Rider Auto Parts). Then we’ll look at transactions in more detail and at Spring’s transaction management, which orchestrates the transactions. You’ll learn about the difference between local and global transactions and how to configure and use transactions. Toward the end of the chapter, you’ll see how to compensate for when you’re using resources that don’t support transactions.
9.1. Why use transactions?
There are many good reasons why using transactions makes sense. But before we focus on using transactions with Camel, let’s look at what can go wrong when you don’t use transactions.
In this section, we’ll review an application Rider Auto Parts uses to collect metrics that will be published to an incident management system. We’ll see what goes wrong when the application doesn’t use transactions, and then we’ll apply transactions to the application.
9.1.1. The Rider Auto Parts partner integration application
Lately Rider Auto Parts has had a dispute with a partner about whether or not their service meets the terms of the service level agreement (SLA). When such incidents occur, it’s often a labor-intensive task to investigate and remedy the incident.
In light of this, Rider Auto Parts has developed an application to record what happens, as evidence for when a dispute comes up. The application periodically measures the communication between Rider Auto Parts and its external partner servers. The application records performance and uptime metrics, which are sent to a JMS queue, where the data awaits further processing.
Rider Auto Parts already has an existing incident management application with a web user interface for upper management. What’s missing is an application to populate the collected metrics to the database used by the incident management application. Figure 9.1 illustrates the scenario.
Figure 9.1. Partner reports are received from the JMS broker, transformed in Camel to SQL format, and then written to the database.
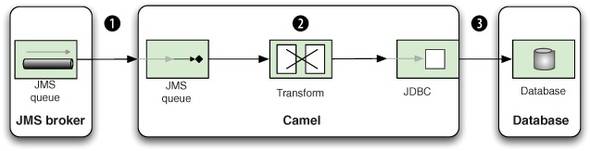
It’s a fairly simple task: a JMS consumer listens for new messages on the JMS queue ![]() . Then the data is transformed from XML to SQL
. Then the data is transformed from XML to SQL ![]() before it’s written to the database
before it’s written to the database ![]() .
.
In no time, you can come up with a route that matches figure 9.1:
<camelContext id="camel" xmlns="http://camel.apache.org/schema/spring">
    <route id="partnerToDB">
        <from uri="activemq:queue:partners"/>
        <bean ref="partner" method="toSql"/>
        <to uri="jdbc:myDataSource"/>
    </route>
</camelContext>
The reports are sent to the JMS queue in a simple in-house XML format, like this:
<?xml version="1.0"?>
<partner id="123">
    <date>200911150815</date>
    <code>200</code>
    <time>4387</time>
</partner>
The database table that stores the data is also mapped easily because it has the following layout:
create table partner_metric
    ( partner_id varchar(10), time_occurred varchar(20),
      status_code varchar(3), perf_time varchar(10) )
That leaves you with the fairly simple task of mapping the XML to the database. Because you’re pragmatic and want to make a simple and elegant solution that anybody should be capable of maintaining in the future, you decide not to bring in the big guns with the Java Persistence API (JPA) or Hibernate. You put the following mapping code in a good old-fashioned bean.
Listing 9.1. Using a bean to map from XML to SQL
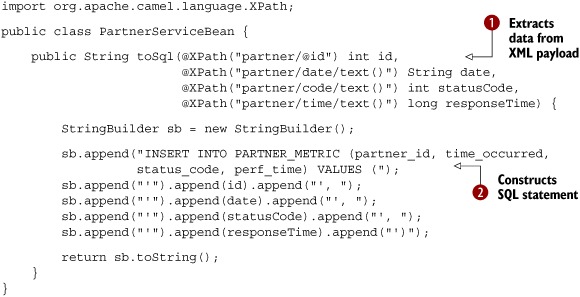
Coding the 10 or so lines in listing 9.1 was faster than getting started on the JPA wagon or opening any heavyweight and proprietary mapping software. The code speaks for itself, but let’s go over it anyway.
First you define the method to accept the four values to be mapped. Notice that you use the @XPath annotation to grab the data from the XML document ![]() Then you use a StringBuilder to construct the SQL INSERT statement with the input values
Then you use a StringBuilder to construct the SQL INSERT statement with the input values ![]() .
.
To test this, you can crank up a unit test as follows:

This test method outlines the principle. First you check that the database is empty ![]() . Then you construct sample XML data and send it to the JMS queue using the Camel ProducerTemplate. Because the processing of the JMS message is asynchronous, you must wait a bit to let it process. At the end, you check
that the database contains one row
. Then you construct sample XML data and send it to the JMS queue using the Camel ProducerTemplate. Because the processing of the JMS message is asynchronous, you must wait a bit to let it process. At the end, you check
that the database contains one row ![]() .
.
9.1.2. Setting up the JMS broker and the database
To run this unit test, you need to use a local JMS broker and a database. You can use Apache ActiveMQ as the JMS broker and HSQLDB (HyperSQL Database) as the database. HSQLDB can be used as an in-memory database without the need to run it separately. Apache ActiveMQ is an extremely versatile broker, and it’s even embeddable in unit tests.
All you have to do is master a bit of Spring XML magic to set up the JMS broker and the database. This is shown in listing 9.2.
Listing 9.2. XML configuration for the Camel route, JMS broker, and database

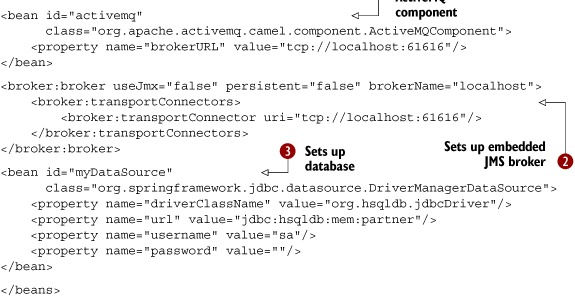
In listing 9.2, you first define the partner bean from listing 9.1 as a Spring bean that you’ll use in the route. Then, to allow Camel to connect to ActiveMQ, you must define it as a Camel
component ![]() . The brokerURL property is configured with the URL for the remote ActiveMQ broker, which, in this example, happens to be running on the same machine. Then you set up a local embedded
ActiveMQ broker
. The brokerURL property is configured with the URL for the remote ActiveMQ broker, which, in this example, happens to be running on the same machine. Then you set up a local embedded
ActiveMQ broker ![]() , which is configured to use TCP connectors. Finally, you set up the JDBC data source
, which is configured to use TCP connectors. Finally, you set up the JDBC data source ![]() .
.
If you use an embedded ActiveMQ broker, you can use the VM protocol instead of TCP; doing so bypasses the entire TCP stack and is much faster. For example, in listing 9.2, you could use vm://localhost instead of tcp://localhost:61616.
Actually, the localhost in vm://localhost is the broker name, not a network address. For example, you could use vm://myCoolBroker as the broker name and configure the name on the broker tag accordingly: brokerName="myCoolBroker".
A plausible reason why you’re using vm://localhost in listing 9.2 is that the engineers are lazy, and they changed the protocol from TCP to VM but left the broker name as localhost.
The full source code for this example is located in the chapter9/riderautopartspartner directory, and you can try out the example by running the following Maven goal:
mvn test -Dtest=RiderAutoPartsPartnerTest
In the source code, you’ll also see how we prepared the database by creating the table and dropping it after testing.
9.1.3. The story of the lost message
The previous test is testing a positive situation, but what happens if the connection to the database fails. How can you test that?
Chapter 6 covered how to simulate a connection failure using Camel interceptors. Writing a unit test is just a matter of putting all that logic in a single method, as shown in listing 9.3.
Listing 9.3. Simulating a connection failure that causes lost messages

To test a failed connection to the database, you need to intercept the routing to the database and simulate the error. You
do this with the RouteBuilder, where you define this scenario ![]() . Next you need to add the interceptor with the existing route
. Next you need to add the interceptor with the existing route ![]() , which is done using the adviceWith method. The remainder of the code is almost identical to the previous test, but you test that no rows are added to the database
, which is done using the adviceWith method. The remainder of the code is almost identical to the previous test, but you test that no rows are added to the database
![]() .
.
Note
You can read about simulating errors using interceptors in chapter 6, section 6.3.3.
The test runs successfully. But what happened to the message you sent to the JMS queue? It was not stored in the database, so where did it go?
It turns out that the message is lost because you’re not using transactions. By default, the JMS consumer uses auto-acknowledge mode, which means the client acknowledges the message when it’s received, and the message is dequeued from the JMS broker.
What you must do instead is use transacted acknowledge mode. We’ll look at how to do this in section 9.3, but first we’ll discuss how transactions work in Camel.
9.2. Transaction basics
A transaction is a series of events. The start of a transaction is often named begin, and the end is commit (or rollback if the transaction isn’t successfully completed). Figure 9.2 illustrates this.
Figure 9.2. A transaction is a series of events between begin and commit.

To demonstrate the sequence in figure 9.2, you could write what are known as locally managed transactions, where the transaction is managed manually in the code. The following code illustrates this; it’s based on using JPA-managed transactions.
EntityManager em = emf.getEntityManager();
EntityTransaction tx = em.getTransaction();
try {
    tx.begin();
    tx.commit();
} catch (Exception e) {
    tx.rollback();
}
em.close();
You start the transaction using the begin method. Then you have a series of events to do whatever work needs to be done. At the end, you either commit or roll back the transaction, depending on whether an exception was thrown or not.
You may already be familiar with this principle, and transactions in Camel use the same principle at a higher level of abstraction. In Camel transactions, you don’t invoke begin and commit methods from Java code—you use declarative transactions, which are configured in the Spring XML file. We’ll look at the details of how this works in the next section, so don’t worry if it’s still a bit unclear.
What are the benefits of defining transactions declaratively? With Spring’s approach, you configure all this in the Spring XML regardless of which runtime environment you’re using. This removes the need for changing Java code to match the targeted environment. Spring also makes it easy to set up diverse environments using minimal configuration. Spring’s transaction support is a great piece of technology, and that’s why Camel leverages it instead of rolling out it’s own transaction framework.
Note
For more information on Spring’s transaction management, see chapter 10, “Transaction Management,” in the Spring Framework Reference Documentation: http://static.springsource.org/spring/docs/3.0.x/spring-framework-reference/html/transaction.html.
Now that we’ve established that Camel works with Spring’s transaction support, let’s look at how they work together.
9.2.1. About Spring’s transaction support
To understand how Camel works together with Spring’s transaction support, take a look at figure 9.3. This figure shows that Spring orchestrates the transaction while Camel takes care of the rest.
Figure 9.3. Spring’s TransactionManager orchestrates the transaction by issuing begins and commits. The entire Camel route is transacted, and the transaction is handled by Spring.

Figure 9.4 adds more details, to illustrate that the JMS broker also plays an active part in the transaction. In this figure you can
see how the JMS broker, Camel, and the Spring JmsTransactionManager work together. The JmsTransactionManager orchestrates the resources that participate in the transaction ![]() , which in this example is the JMS broker.
, which in this example is the JMS broker.
Figure 9.4. The Spring JmsTransactionManager orchestrates the transaction with the JMS broker. The Camel route completes successfully and signals the commit to the JmsTransactionManager.
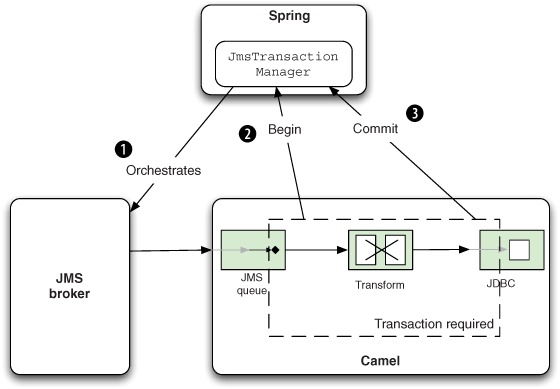
When a message has been consumed from the queue and fed into the Camel application, Camel issues a begin ![]() to the JmsTransactionManager. Depending on whether the Camel route completes with success or failure
to the JmsTransactionManager. Depending on whether the Camel route completes with success or failure ![]() , the JmsTransactionManager will ensure the JMS broker commits or rolls back.
, the JmsTransactionManager will ensure the JMS broker commits or rolls back.
It’s now time to see how this works in practice. In the next section, we’ll fix the lost-message problem by adding transactions.
9.2.2. Adding transactions
At the end of section 9.1, you left Rider Auto Parts with the problem of losing messages because you did not use transactions. Your task now is to apply transactions, which should remedy the problem.
You’ll start by introducing Spring transactions to the Spring XML file and adjusting the configuration accordingly. Listing 9.4 shows how this is done.
Listing 9.4. XML configuration using Spring transactions
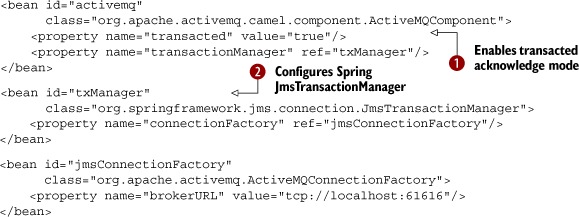
The first thing you do is turn on transacted for the ActiveMQ component ![]() , which instructs it to use transacted acknowledge mode. Then you need to refer to the transaction manager, which is a Spring
JmsTransactionManager
, which instructs it to use transacted acknowledge mode. Then you need to refer to the transaction manager, which is a Spring
JmsTransactionManager ![]() that manages transactions when using JMS messaging. The transaction manager needs to know how to connect to the JMS broker,
which refers to the connection factory. In the jmsConnectionFactory definition, you configure the brokerURL to point at the JMS broker.
that manages transactions when using JMS messaging. The transaction manager needs to know how to connect to the JMS broker,
which refers to the connection factory. In the jmsConnectionFactory definition, you configure the brokerURL to point at the JMS broker.
Tip
The JmsTransactionManager has other options for configuring transaction behavior, such as timeouts, strategies for rollback on commit failure, and so on. Consult the Spring documentation for details: http://static.springsource.org/spring/docs/3.0.x/spring-framework-reference/html/transaction.html.
So far you’ve only reconfigured beans in the Spring XML file, which is mandatory when using Spring. In Camel, itself, you have not yet configured anything in relation to transactions. Camel offers great convention over configuration for transaction support, so all you have to do is to add <transacted/> to the route, right after <from>, as highlighted here:
<camelContext id="camel" xmlns="http://camel.apache.org/schema/spring">
    <route id="partnerToDB">
        <from uri="activemq:queue:partners"/>
<transacted/>
        <bean ref="partner" method="toSql"/>
        <to uri="jdbc:myDataSource"/>
    </route>
</camelContext>
When you specify <transacted/> in a route, Camel uses transactions for that particular route. Under the hood, Camel looks up the Spring transaction manager and leverages it. This is the convention over configuration kicking in.
Using transacted in the Java DSL is just as easy, as shown here:
from("activemq:queue:partners")
.transacted()
    .beanRef("partner", "toSql")
    .to("jdbc:myDataSource");
The convention over configuration only applies when you have a single Spring transaction manager configured. In more complex scenarios, with multiple transaction managers, you have to do additional configuration to set up transactions. We’ll cover that in section 9.4.1.
Note
When using transacted() in the Java DSL, you must add it right after from() to ensure that the route is properly configured to use transactions. This isn’t enforced in the DSL because the DSL is loosely defined to make it easy to maintain and develop Camel. There are a few tradeoffs such as this.
In this example, all you had to do to configure Camel was to add <transacted/> in the route. You relied on the transactional default configurations, which greatly reduces the effort required to set up the various bits. In section 9.4, we’ll go deeper into configuring transactions.
Let’s see if this configuration is correct by testing it.
9.2.3. Testing transactions
When you test Camel routes using transactions, it’s common to test with live resources, such as a real JMS broker and a database. For example, the source code for this book uses Apache ActiveMQ and HSQLDB as live resources. We picked these because they can be easily downloaded using Apache Maven and they’re lightweight and embeddable, which makes them perfect for unit testing. There is no upfront work needed to install them. To demonstrate how this works, we’ll return to the Rider Auto Parts example.
Last time you ran a unit test, you lost the message when there was no connection to the database. Let’s try that unit test again, but this time with transactional support. You can do this by running the following Maven goal from the chapter9/riderautopartspartner directory:
mvn test -Dtest=RiderAutoPartsPartnerTXTest
When you run the unit test, you’ll notice a lot of stacktraces printed on the console, and they’ll contain the following snippet:
2009-11-22 12:47:22,158 [enerContainer-1] ERROR EndpointMessageListener
 - java.net.ConnectException: Cannot connect to the database
org.apache.camel.spring.spi.TransactedRuntimeCamelException:
java.net.ConnectException: Cannot connect to the database
        at
org.apache.camel.spring.spi.TransactionErrorHandler.wrapTransacted
RuntimeException(TransactionErrorHandler.java:173)
        at
org.apache.camel.spring.spi.TransactionErrorHandler$1.doInTransaction
WithoutResult(TransactionErrorHandler.java:123)
        at
org.springframework.transaction.support.TransactionCallbackWithout
Result.doInTransaction(TransactionCallbackWithoutResult.java:33)
        at
org.springframework.transaction.support.TransactionTemplate.execute
(TransactionTemplate.java:128)
        at
org.apache.camel.spring.spi.TransactionErrorHandler.process
(TransactionErrorHandler.java:86)
You can tell from the stacktrace that EndpointMessageListener (shown in bold) logged an exception at ERROR level, which indicates the transaction is being rolled back. This happens because EndpointMessageListener is a javax.jms.MessageListener, which is invoked when a new message arrives on the JMS destination. It will roll back the transaction if an exception is thrown.
So where is the message now? It should be on the JMS queue, so let’s add a little code to the unit test to check that. Add the following code at the end of the unit test method in listing 9.3.
Object body = consumer.receiveBodyNoWait("activemq:queue:partners");
assertNotNull("Should not lose message", body);
Now you can run the unit test to ensure that the message wasn’t lost—and the unit test will fail with this assertion error:
java.lang.AssertionError: Should not lose message
    at org.junit.Assert.fail(Assert.java:74)
    at org.junit.Assert.assertTrue(Assert.java:37)
    at org.junit.Assert.assertNotNull(Assert.java:356)
    at
camelinaction.RiderAutoPartsPartnerTXTest.testNoConnectionToDatabase
(RiderAutoPartsPartnerTXTest.java:96)
We’re using transactions, and they’ve been configured correctly, but the message is still being lost. What’s wrong? If you dig into the stacktraces, you’ll discover that the message is always redelivered six times, and then no further redelivery is conducted.
Tip
If you’re using Apache ActiveMQ, we recommend you pick up a copy of ActiveMQ in Action, by Bruce Snyder, Dejan Bosanac, and Rob Davies. Among other things, this book explains how to use transactions and redelivery in more detail.
What happens is that ActiveMQ performs the redelivery according to its default settings, which say it will redeliver at most six times before giving up and moving the message to a dead letter queue. This is, in fact, the Dead Letter Channel EIP. You may remember that we covered this in chapter 5 (look back to figure 5.4). ActiveMQ implements this pattern, which ensures that the broker won’t be doomed by a poison message that can’t be successfully processed and that would cause arriving messages to stack up on the queue.
Instead of looking for the message on the partner’s queue, you should look for the message in the default ActiveMQ dead letter queue, which is named ActiveMQ.DLQ. If you change the code accordingly (as shown in bold), the test will pass:
Object body = consumer.receiveBodyNoWait("activemq:queue:ActiveMQ.DLQ");
assertNotNull("Should not lose message", body);

Tests run: 2, Failures: 0, Errors: 0, Skipped: 0
You need to do one additional test to cover the situation where the connection to the database only fails at first, but works on subsequent calls. Here’s that test.
Listing 9.5. Testing a simulated rollback on the first try and a commit on the second try
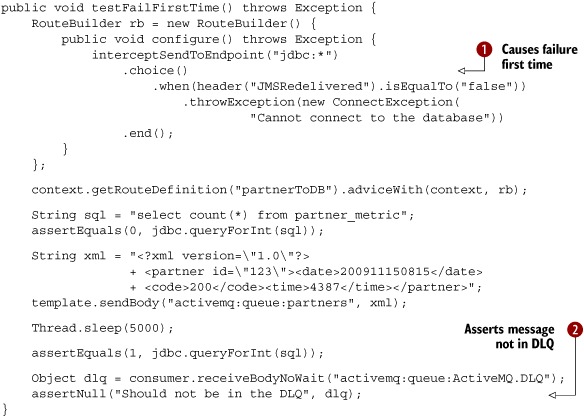
The idea is to throw a ConnectionException only the first time. You do this by relying on the fact that any message consumed from a JMS destination has a set of standard JMS headers, and the JMSRedelivered header is a Boolean type indicating whether the JMS message is being redelivered or not.
The interceptor logic is done in a Camel RouteBuilder, so you have the full DSL at your disposal. You use the Content-Based Router EIP ![]() to test the JMSRedelivered header and only throw the exception if it’s false, which means it’s the first delivery. The rest of the unit test should verify correct behavior, so you first check that the
database is empty before sending the message to the JMS queue. Then you sleep a bit to let the routing complete. After completion,
you check that the database has one row. Because you previously were tricked by the JMS broker’s dead letter queue, you also
check that it’s empty
to test the JMSRedelivered header and only throw the exception if it’s false, which means it’s the first delivery. The rest of the unit test should verify correct behavior, so you first check that the
database is empty before sending the message to the JMS queue. Then you sleep a bit to let the routing complete. After completion,
you check that the database has one row. Because you previously were tricked by the JMS broker’s dead letter queue, you also
check that it’s empty ![]() .
.
The example we’ve just covered uses what are called local transactions, because they’re based on using only a single resource in the transaction—Spring was only orchestrating the JMS broker. But there was also the database resource, which, in the example, was not under transactional control. Leveraging both the JMS broker and the database as resources participating in the same transaction requires more work, and the next section explains about using single and multiple resources in a transaction. First, we’ll look at this from the EIP perspective.
9.3. The Transactional Client EIP
The Transactional Client EIP distills the problem of how a client can control transactions when working with messaging. It’s depicted in figure 9.5.
Figure 9.5. A transactional client handles the client’s session with the receivers so the client can specify transaction boundaries that encompass the receiver.

Figure 9.5 shows how this pattern was portrayed in Gregor Hohpe and Bobby Woolf’s Enterprise Integration Patterns book, so it may be a bit difficult to understand how it relates to using transactions with Camel. What the figure shows is that both a sender and a receiver can be transactional by working together. When a receiver initiates the transaction, the message is neither sent nor removed from the queue until the transaction is committed. When a sender initiates the transaction, the message isn’t available to the consumer until the transaction has been committed. Figure 9.6 illustrates this principle.
Figure 9.6. A message is being moved from queue A to queue B. Transactions ensure the message is moved in what appears to be an atomic operation.

The top section of figure 9.6 illustrates the route using EIP icons, with a message being moved from queue A to B using a transaction. The remainder of the figure shows a use case when one message is being moved.
The middle section shows a snapshot in time when the message is being moved. The message still resides in queue A and has not yet arrived in queue B. The message stays on queue A until a commit is issued, which ensures that the message isn’t lost in case of a severe failure.
The bottom section shows the situation when a commit has been issued. The message is then deleted from queue A and inserted into queue B. Transactional clients make this whole process appear as an atomic, isolated, and consistent operation.
When talking about transactions, we need to distinguish between single- and multiple-resource transactions. The former are also known as local transactions and the latter as global transactions. In the next two sections, we’ll look at these two flavors.
9.3.1. Using local transactions
Figure 9.7 depicts the situation of using a single resource, which is the JMS broker.
Figure 9.7. Using JmsTransactionManager as a single resource in a transaction. The database isn’t a participant in the transaction.
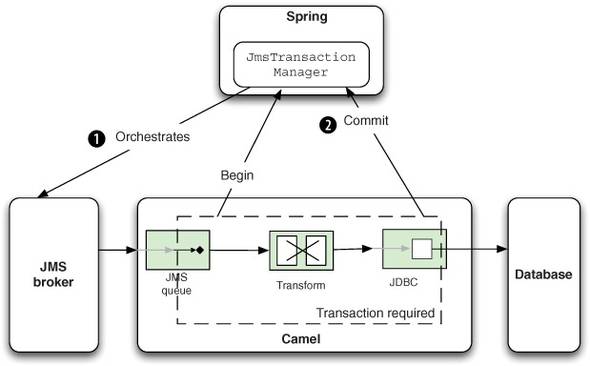
In this situation, the JmsTransactionManager orchestrates the transaction with the single participating resource, which is the JMS broker ![]() . The JmsTransactionManager from Spring can only orchestrate JMS-based resources, so the database isn’t orchestrated.
. The JmsTransactionManager from Spring can only orchestrate JMS-based resources, so the database isn’t orchestrated.
In the Rider Auto Parts example in section 9.1, the database didn’t participate as a resource in the transaction, but the approach seemed to work anyway. That was because if the database decides to roll back the transaction, it will throw an exception that the Camel TransactionErrorHandler propagates back to the JmsTransactionManager, which reacts accordingly and issues a rollback ![]() .
.
This scenario isn’t exactly equivalent to enrolling the database in the transaction, because it still has failure scenarios that could leave the system in an inconsistent state. For example, the JMS broker could fail after the database is successfully updated, but before the JMS message is committed. To be absolutely sure that both the JMS broker and the database are in sync in terms of the transaction, you must use the much heavier global transactions. Let’s take a look at that now.
9.3.2. Using global transactions
Using transactions with a single resource is appropriate when a single resource is involved. But the situation changes dramatically when you need to span multiple resources in the same transaction, such as JMS and JDBC resources, as depicted in figure 9.8.
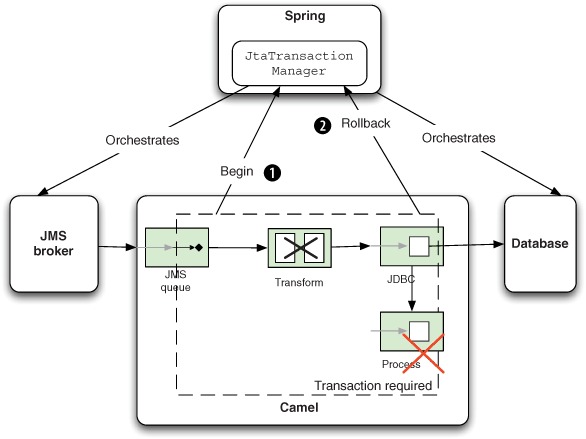
Figure 9.8. Using JtaTransactionManager with multiple resources in a transaction. Both the JMS broker and the database participate in the transaction.
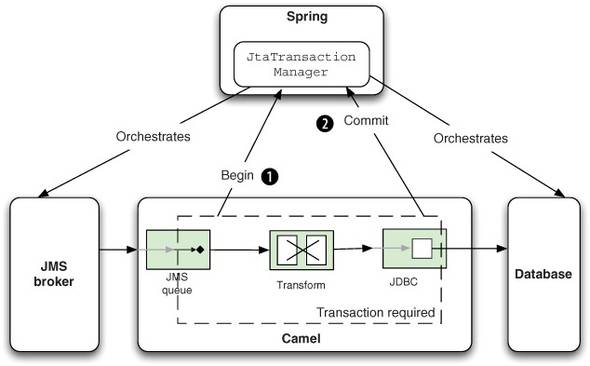
In this figure, we’ve switched to using the JtaTransactionManager, which handles multiple resources. Camel consumes a message from the queue, and a begin is issued ![]() . The message is processed, updating the database, and it completes successfully
. The message is processed, updating the database, and it completes successfully ![]() .
.
So what is the JtaTransactionManager, and how is it different from the JmsTransactionManager used in the previous section (see figure 9.7)? To answer this, you first need to learn a bit about global transactions and where the Java Transaction API (JTA) fits in.
In Java, JTA is an implementation of the XA standard protocol, which is a global transaction protocol. To be able to leverage XA, the resource drivers must be XA-compliant, which some JDBC and most JMS drivers are. JTA is part of the JAVA EE specification, which means that any JAVA EE-compliant application server must provide JTA support. This is one of the benefits of JAVA EE servers, which have JTA out of the box, unlike some lightweight alternatives, such as Apache Tomcat.
Using JTA outside a JAVA EE server takes some work to set up because you have to find and use a JTA transaction manager, such as one of these:
- JOTM—http://jotm.ow2.org/xwiki/bin/view/Main/WebHome
- Atomikos—http://www.atomikos.com
- Bitronix—http://www.bitronix.be
Then you need to figure out how to install and use it in your container and unit tests. The good news is that using JTA with Camel and Spring is just a matter of configuration.
Note
For more information on JTA, see the Wikipedia page on the subject: http://en.wikipedia.org/wiki/Java_Transaction_API. XA is also briefly discussed: http://en.wikipedia.org/wiki/X/Open_XA.
When using JTA (XA), there are a couple of differences from using local transactions. First, you have to use XA-capable drivers, which means you have to use the ActiveMQXAConnectionFactory to let ActiveMQ participate in global transactions.
<bean id="jmsXaConnectionFactory"
      class="org.apache.activemq.ActiveMQXAConnectionFactory">
    <property name="brokerURL" value="tcp://localhost:61616"/>
</bean>
The same applies for the JDBC driver—you need to use an XA-capable driver. HSQLDB doesn’t support XA, so you can fall back and use an Atomikos feature that’s capable of simulating XA for non-XA JDBC drivers:
<bean id="myDataSource"
      class="com.atomikos.jdbc.nonxa.AtomikosNonXADataSourceBean">
    <property name="uniqueResourceName" value="hsqldb"/>
    <property name="driverClassName" value="org.hsqldb.jdbcDriver"/>
    <property name="url" value="jdbc:hsqldb:mem:partner"/>
    <property name="user" value="sa"/>
    <property name="password" value=""/>
    <property name="poolSize" value="3"/>
</bean>
In a real production system, you should prefer to use a JDBC driver that’s XA-capable, because the simulation has a few drawbacks. You can find out more about this at the Atomikos website listed previously.
Having configured the XA drivers, you also need to use the Spring JtaTransactionManager. It should refer to the real XA transaction manager, which is Atomikos in this example:
<bean id="jtaTransactionManager"
      class="org.springframework.transaction.jta.JtaTransactionManager">
    <property name="transactionManager" ref="atomikosTransactionManager"/>
    <property name="userTransaction" ref="atomikosUserTransaction"/>
</bean>
The remainder of the configuration involves configuring Atomikos itself, which you can see in the book’s source code, in the file chapter9/xa/src/test/resources/camel-spring.xml.
Suppose you want to add an additional step in the route shown in figure 9.8. You’ll process the message after it has been inserted into the database. This additional step will influence the outcome of the transaction, whether or not it throws an exception.
Suppose it does indeed throw an exception, as portrayed in figure 9.9.
Figure 9.9. A failure to process a message at the last step in the route causes the JtaTransactionManager to issue rollbacks to both the JMS broker and the database.
In figure 9.9, the message is being routed ![]() and, at the last step in the route (in the bottom-right corner with the X), it fails by throwing an exception. The JtaTransactionManager handles this by issuing rollbacks
and, at the last step in the route (in the bottom-right corner with the X), it fails by throwing an exception. The JtaTransactionManager handles this by issuing rollbacks ![]() to both the JMS broker and the database. Because this scenario uses global transactions, both the database and the JMS broker
will roll back, and the final result is as if the entire transaction hadn’t taken place.
to both the JMS broker and the database. Because this scenario uses global transactions, both the database and the JMS broker
will roll back, and the final result is as if the entire transaction hadn’t taken place.
The source code for the book contains this example in the chapter9/xa directory. You can test it using the following Maven goals:
mvn test -Dtest=AtomikosXACommitTest
mvn test -Dtest=AtomikosXARollbackBeforeDbTest
mvn test -Dtest=AtomikosXARollbackAfterDbTest
We’ll leave the topic of global transactions here and move on to learn more about configuring and using transactions.
9.4. Configuring and using transactions
So far, we’ve used convention over configuration when configuring transactions in Camel, by just adding <transacted/> to the route. This is often all you’ll need to use, but there can be situations where you need more fine-grained control, such as when specifying transaction propagation settings.
That’s the first thing we’ll look at in this section. Then we’ll look at how transactions work when multiple routes are used. At the end of the section, we’ll look at how you can return custom responses to the caller when a transaction fails.
9.4.1. Configuring transactions
When you configure transactions, you’ll come across the term transaction propagation. In this section, you’ll learn what that term means and why it’s related to configuring transactions.
If you have ever worked with Enterprise JavaBeans (EJBs), you may be familiar with transaction propagation already. Transaction propagation options specify what will happen if a method is invoked and a transaction context already exists. For example, should it join the existing transaction? Should a new transaction be started? Or should it fail?
In most use cases, you end up using one of two options: joining the existing transaction (PROPAGATION_REQUIRED) or starting a new transaction (PROPAGATION_ REQUIRES_NEW).
To use transaction propagation, you must configure it in the Spring XML file as shown in the following example. This example uses PROPAGATION_REQUIRED as indicated in bold:

First you define a bean with the id "required", which is a SpringTransactionPolicy type ![]() . The bean must refer to both the transaction manager and the choice of transaction propagation to be used. In the Camel route,
you then refer to the required bean from within the <transacted> tag, using the ref attribute
. The bean must refer to both the transaction manager and the choice of transaction propagation to be used. In the Camel route,
you then refer to the required bean from within the <transacted> tag, using the ref attribute ![]() .
.
If you want to use PROPAGATION_REQUIRES_NEW, it’s just a matter of changing the property on the bean as shown in bold:
<property name="propagationBehaviorName"
          value="PROPAGATION_REQUIRES_NEW"/
If you have ever used Spring transactions, you may have named beans with the transaction propagation type directly, like this:
<bean id="PROPAGATION_REQUIRED"
      class="org.apache.camel.spring.spi.SpringTransactionPolicy">
    <property name="transactionManager" ref="txManager"/>
</bean>
There is no practical difference between these two styles—it’s a matter of taste as to which you prefer.
Notice that you don’t have to specify the propagationBehaviorName property on the bean. This is because Camel uses convention over configuration to detect whether the bean id matches any of the known propagation behavior names. In this example, the bean id is "PROPAGATION_REQUIRED", which tells Camel to use this propagating behavior. All together, it allows you to avoid repeating yourself by specifying the propagationBehaviorName property as well.
Let’s look at what else is specified by convention over configuration.
Using Convention Over Configuration for Transactions in Camel Routes
In section 9.2, you used the default transaction configuration, which relies on convention over configuration. This works well when you want to use the required transaction propagation, because it removes the need for some boilerplate configuration.
The first example from section 9.2.2 could be reduced to only the Camel route, as follows:
<camelContext id="camel" xmlns="http://camel.apache.org/schema/spring">
    <route id="partnerToDB">
        <from uri="activemq:queue:partners"/>
        <transacted/>
        <bean ref="partner" method="toSql"/>
        <to uri="jdbc:myDataSource"/>
    </route>
</camelContext>
All you do here is declare <transacted/> in the Camel route, and Camel takes it from there. Camel will use PROPAGATION_REQUIRED by convention, and will look up the Spring transaction manager for you.
Note
This is a common situation. Usually all you have to do is configure the Spring transaction manager and add <transacted/> in the Camel route.
You have now learned how to configure and use transactions with Camel. But there’s more to learn. In the next section, we’ll look at how transactions work when you have multiple routes and when you need different propagation behavior.
9.4.2. Using transactions with multiple routes
In Camel, it’s common to have multiple routes and to let one route reuse another by sending messages to it. In this section, we’ll look at how this works when one or all routes are transacted. Then we’ll look at some of the implications of using transactions with request-response messaging style.
We’ll start out simply and look at what happens when you use a non-transacted route from a transacted route.
Using Transactions with a Non-Transacted Route
Listing 9.6 shows the parts of a unit test that you can use to see what happens when a transacted route calls a non-transacted route.
Listing 9.6. Unit test with a transacted route calling a non-transacted route

In listing 9.6, you first import the Spring XML file, which contains all the Spring configuration to set up the JMS broker, Spring, and the Camel ActiveMQ component. The content of the spring-context.xml file is the same as in listing 9.4.
The getExpectedRouteCount method may at first seem a bit odd, but it’s needed to indicate to CamelSpringTestSupport that the Spring XML file doesn’t contain any Camel routes—it does this by saying that there are 0 routes. Next, you have
the two routes. First, the transacted route ![]() moves messages from queue A to B. During this move, the message is also processed by the non-transacted route
moves messages from queue A to B. During this move, the message is also processed by the non-transacted route ![]() , which transforms the message using a content-based router. Notice that if the message contains the word "Donkey", the route will force a failure by throwing an exception.
, which transforms the message using a content-based router. Notice that if the message contains the word "Donkey", the route will force a failure by throwing an exception.
You can run this unit test by running the following Maven goal from the chapter9/multuple-routes directory:
mvn test -Dtest=TXToNonTXTest
The unit test has three methods: two test situations that commit the transaction, and one rolls back the transaction because of the exception being thrown. Here are two tests showing the commit and rollback situations:
public void testWithCamel() throws Exception {
    template.sendBody("activemq:queue:a", "Hi Camel");
    Object reply = consumer.receiveBody("activemq:queue:b", 10000);
    assertEquals("Camel rocks", reply);
}

public void testWithDonkey() throws Exception {
    template.sendBody("activemq:queue:a", "Donkey");
    Object reply = consumer.receiveBody("activemq:queue:b", 10000);
    assertNull("There should be no reply", reply);

    reply = consumer.receiveBody("activemq:queue:ActiveMQ.DLQ", 10000);
    assertNotNull("It should have been moved to DLQ", reply);
}
What can you learn from this? The unit test proves that when a transacted route uses a non-transacted route, the transactional behavior works as if all routes are transacted, which is what you’d expect. The last unit test proves that when the non-transacted route fails by throwing an exception, the transacted route detected this and issued a rollback. You can see this because the message is moved to the JMS broker’s dead letter queue.
This is great news, because there are no surprises. It’s safe for transacted routes to reuse existing non-transacted routes.
Note
The transaction manager requires messages to be processed in the same thread context, to support the transaction. This means that when you use multiple routes, you must link them together in a way that ensures the message is processed in the same thread. Using the Direct component does this—the Direct component was used in listing 9.6 to link the two routes together. This won’t work with the SEDA component, which routes messages using another thread.
Let’s continue and see what happens when both routes are transacted.
Using Transactions with Another Transacted Route
Now let’s modify the unit test from listing 9.6 and create a new situation, where both routes are transacted, and see what happens. Here are the routes.
Listing 9.7. Two transacted routes
public void configure() throws Exception {
    from("activemq:queue:a")
        .transacted()
        .to("direct:quote")
        .to("activemq:queue:b");

    from("direct:quote")
        .transacted()
        .choice()
            .when(body().contains("Camel"))
                .to("activemq:queue:camel")
            .otherwise()
                .throwException(new IllegalArgumentException
                        ("Unsupported animal"));
}
You can run this example by running the following Maven goal:
mvn test -Dtest=TXToTXTest
Once again, the unit test will prove that there are no surprises here. When the exception is thrown, the entire route is rolled back, which is what you’d expect. When the message hits the second route and the second transacted, it participates in the existing transaction. This is because PROPAGATION_REQUIRED is the default propagation behavior when using transacted.
Next, we’ll make it more challenging by using two different transaction propagations.
Using Multiple Transactions with One Exchange
In some situations, you may need to use multiple transactions with the same exchange, as illustrated in figure 9.10.
Figure 9.10. Using two independent transactions in a single exchange
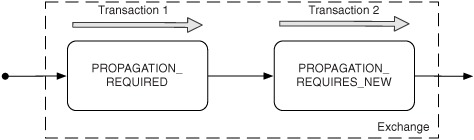
In figure 9.10 an exchange is being routed in Camel. It starts off using the required transaction, and then you need to use another transaction that’s independent of the existing transaction. You can do this by using PROPAGATION_REQUIRES_NEW, which will start a new transaction regardless of whether an existing transaction exists or not. When the exchange completes, the transaction manager will issue commits to these two transactions, which ensures that they both commit at the same point.
Note
The example outlined in figure 9.10 requires the transaction manager to support the suspension and resumption of transactions. This isn’t supported by all transaction manager implementations.
In Camel, a route can only be configured to use at most one transaction propagation, which means figure 9.10 must use two routes. The first route uses PROPAGATION_ REQUIRED and the second route uses PROPAGATION_REQUIRES_NEW.
Suppose you have an application that updates orders in a database. The application must store all incoming orders in an audit log, and then it either updates or inserts the order in the order database. The audit log should always insert a record, even if subsequent processing of the order fails. Implementing this in Camel should be done using two routes, as follows:
from("direct:orderToDB")
    .transacted("PROPAGATION_REQUIRED")
    .beanRef("orderDAO", "auditOrder")
    .to("direct:saveOrderInDB");

from("direct:saveOrderInDB")
    .onException(Exception.class).markRollbackOnlyLast().end()
    .transacted("PROPAGATION_REQUIRES_NEW")
    .beanRef("orderDAO", "updateOrInsertOrder");
The first route uses PROPAGATION_REQUIRED to make the route transactional. The second route, in contrast, uses PROPAGATION_REQUIRES_NEW to ensure that a new transaction is used within this route.
Now suppose an error occurs while processing the second route—you could either let both routes roll back, or only roll back the second route. Camel will, by default, roll back both routes, and because you only want the second route to roll back, you have to tell Camel this. This is done by declaring a route-level onException where you leverage markRollbackOnlyLast, to instruct Camel to only roll back the last (current) transaction. If you wanted to roll back both routes, you could either remove the onException declaration or use markRollbackOnly instead of markRollbackOnlyLast.
In the next section, we’ll return to Rider Auto Parts and look at an example that covers a common use case: using web services together with transactions. How do you return a custom web service response if a transaction fails?
9.4.3. Returning a custom response when a transaction fails
Rider Auto Parts has a Camel application that exposes a web service to a selected number of business partners. The partners use this application to submit orders. Figure 9.11 illustrates the application.
Figure 9.11. A web service used by business partners to submit orders. A copy of the order is stored in a database before it’s processed by the ERP system.
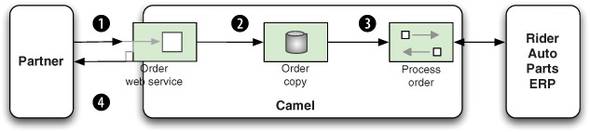
As you can see in the figure, the business partners invoke a web service to submit an order ![]() . The received order is stored in a database for audit purposes
. The received order is stored in a database for audit purposes ![]() . The order is then processed by the enterprise resource planning (ERP) system
. The order is then processed by the enterprise resource planning (ERP) system ![]() , and a reply is returned to the waiting business partner
, and a reply is returned to the waiting business partner ![]() .
.
The web service is deliberately kept simple so partners can easily leverage it with their IT systems. There is a single return code that indicates whether or not the order succeeded or failed. The following code snippet is part of the WSDL definition for the reply (outputOrder):
<xs:element name="outputOrder">
    <xs:complexType>
        <xs:sequence>
            <xs:element type="xs:string" name="code"/>
        </xs:sequence>
     </xs:complexType>
</xs:element>
The code field should contain "OK" if the order was accepted; any other value is considered a failure. This means that the Camel application must deal with any thrown exceptions and return a custom failure message, instead of propagating the thrown exception back to the web service.
Your Camel application needs to do the following three things:
- Catch the exception and handle it to prevent it propagating back
- Mark the transaction to roll back
- Construct a reply message with a code value of "ERROR"
Camel can support such complex use cases because you can leverage onException, which you learned about in chapter 5. What you do is add an onException to the CamelContext, as shown here:
<onException>
    <exception>java.lang.Exception</exception>
    <handled><constant>true</constant></handled>
    <transform><method bean="order" method="replyError"/></transform>
    <rollback markRollbackOnly="true"/>
</onException>
You first tell Camel that this onException should trigger for any kind of exception that’s thrown. You then mark the exception as handled, which removes the exception from the exchange, because you want to use a custom reply message instead of the thrown exception.
Note
The <rollback/> definition must always be at the end of the onException because it stops the message from being further routed. That means you must have prepared the reply message before you issue the <rollback/>.
To construct the reply message, you use the order bean, invoking its replyError method:
public OutputOrder replyError(Exception cause) {
    OutputOrder error = new OutputOrder();
    error.setCode("ERROR: " + cause.getMessage());
    return error;
}
This is easy to do, as you can see. You first define the replyError method to have an Exception as a parameter—this will contain the thrown exception. You then create the OutputOrder object, which you populate with the "ERROR" text and the exception message.
The source code for the book contains this example in the chapter9/riderautoparts-order directory. You can start the application by using the following Maven goal:
mvn camel:run
Then you can send web service requests to http://localhost:9000/order. The WSDL is accessible at http://localhost:9000/order?wsdl.
To work with this example, you need to use web services. SoapUI (http://www.soapui.org/) is a popular application for testing with web services. It’s also easy to set up and get started. You create a new project and import the WSDL file from http://localhost:9000/order?wsdl. Then you create a sample web service request and fill in the request parameters, as shown in figure 9.12. You then send the request by clicking the green play button, and it will display the reply in the pane on the right side.
Figure 9.12. A web service message causes the transaction to roll back, and a custom reply message is returned.

Figure 9.12 shows an example where we caused a failure to occur. Our example behaves according to what you specify in the refNo field. You can force different behavior by specifying either FATAL or FAIL-ONCE in the refNo field. Entering any other value will cause the request to succeed. As figure 9.12 shows, we entered FATAL, which causes an exception to occur and an ERROR reply to be returned.
So far we’ve been using resources that support transactions, such as JMS and JDBC, but the majority of components don’t support transactions. So what can you do instead? In the next section, we’ll look at compensating when transactions aren’t supported.
9.5. Compensating for unsupported transactions
The number of resources that can participate in transactions is limited—they’re mostly confined to JMS- and JDBC-based resources. This section covers what you can do to compensate for the absence of transactional support in other resources. Compensation, in Camel, involves the unit of work concept.
First, we’ll look at how a unit of work is represented in Camel and how you can use this concept. Then we’ll walk through an example demonstrating how the unit of work can help simulate the orchestration that a transaction manager does. We’ll also discuss how you can use a unit of work to compensate for the lack of transactions by doing the work that a transaction manager’s rollback would do in the case of failure.
9.5.1. Introducing UnitOfWork
The concept of the unit of work is to batch together a group of tasks as a single coherent unit. The idea is to use the unit of work as a way of mimicking transactional boundaries.
In Camel the unit of work is represented by the org.apache.camel.spi.UnitOfWork interface offering a range of methods including the following:
void addSynchronization(Synchronization synchronization);
void removeSynchronization(Synchronization synchronization);
void done(Exchange exchange);
The addSynchronization and removeSynchronization methods are used to register and unregister a Synchronization (a callback), which we’ll look at shortly. The done method is invoked when the unit of work is complete, and it invokes the registered callbacks.
The Synchronization callback is the interesting part for Camel end users because it’s the interface you use to execute custom logic when an exchange is complete. It’s represented by the org.apache.camel.spi.Synchronization interface and offers these two methods:
void onComplete(Exchange exchange);
void onFailure(Exchange exchange);
When the exchange is done, either the onComplete or onFailure method is invoked, depending on whether the exchange failed or not.
Figure 9.13 illustrates how these concepts are related to each other. As you can see from this figure, each Exchange has exactly one UnitOfWork, which you can access using the getUnitOfWork method from the Exchange. The UnitOfWork is private to the Exchange and is not shared with others.
Figure 9.13. An Exchange has one UnitOfWork, which in turn has from zero to many Synchronizations.

Camel will automatically inject a new UnitOfWork into an Exchange when it’s routed. This is done by an internal processor, UnitOfWorkProcessor, which is involved in the start of every route. When the Exchange is done, this processor invokes the registered Synchronization callbacks. The UnitOfWork boundaries are always at the beginning and end of Camel routes.
When an Exchange is done being routed, you hit the end boundary of the UnitOfWork, and the registered Synchronization callbacks are invoked one by one. This is the same mechanism the Camel components leverage to add their custom Synchronization callbacks to the Exchange. For example, the File and FTP components use this mechanism to perform after-processing operations such as moving or deleting processed files.
Tip
Use Synchronization callbacks to execute any after-processing you want done when the Exchange is complete. Don’t worry about throwing exceptions from your custom Synchronization—Camel will catch those and log them at WARN level, and will then continue to invoke the next callback. This ensures that all callbacks are invoked even if one happens to fail.
A good way of understanding how this works is to review an example, which we’ll do now.
9.5.2. Using Synchronization callbacks
Rider Auto Parts has a Camel application that sends email messages containing invoice details to customers. First, the email content is generated, and then, before the email is sent, a backup of the email is stored in a file for reference. Whenever an invoice is to be sent to a customer, the Camel application is involved. Figure 9.14 shows the principle of this application.
Figure 9.14. Emails are sent to customers listing their invoice details. Before the email is sent, a backup is stored in the file system.
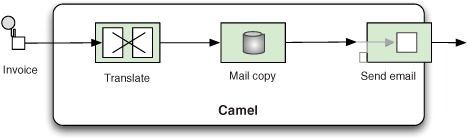
Imagine what would happen if there were a problem sending an email. You can’t use transactions to roll back, because filesystem resources can’t participate in transactions. Instead, you can perform custom logic, which compensates for the failure by deleting the file.
The compensation logic is trivial to implement, as shown here:
public class FileRollback implements Synchronization {

    public void onComplete(Exchange exchange) {
    }

    public void onFailure(Exchange exchange) {
        String name = exchange.getIn().getHeader(
                              Exchange.FILE_NAME_PRODUCED, String.class);
        LOG.warn("Failure occurred so deleting backup file: " + name);
        FileUtil.deleteFile(new File(name));
     }
}
In the onFailure method, you delete the backup file, retrieving the filename used by the Camel File component from the Exchange.FILE_NAME_PRODUCED header.
What you must do next is instruct Camel to use the FileRollback class to perform this compensation. To do so, you can add it to the UnitOfWork by using the addSynchronization method, which was depicted in figure 9.13. This can be done using the Java DSL as highlighted:
public void configure() throws Exception {
    from("direct:confirm")
        .process(new Processor() {
            public void process(Exchange exchange) throws Exception {
exchange.getUnitOfWork()
.addSynchronization(new FileRollback());
            }
        })
        .bean(OrderService.class, "createMail")
        .log("Saving mail backup file")
        .to("file:target/mail/backup")
        .log("Trying to send mail to ${header.to}")
        .bean(OrderService.class, "sendMail")
        .log("Mail send to ${header.to}");
}
The source code for the book contains this example in the chapter9/uow directory. You can try it by using the following Maven goal:
mvn test -Dtest=FileRollbackTest
If you run the example, it will output something like the following to the console:
INFO  route1 - Saving mail backup file
INFO  route1 - Trying to send to FATAL
ERROR DefaultErrorHandler - Failed delivery for exchangeId:
  9edc1ecb-43be-43ee-9f32-7371452967bd.
WARN  FileRollback - Failure occurred so deleting backup file:
  target/mail/backup/02630ec4-724d-4e73-8eb6-c969720578c
One thing that may bother you is that you must use an inlined Processor to add the FileRollback class as a Synchronization. Camel offers a convenient method on the Exchange, so you could do it with less code:
exchange.addOnCompletion(new FileRollback());
But it still requires the inlined Processor. Isn’t there a more convenient way? Yes there is, and that’s where onCompletion comes into the picture.
9.5.3. Using onCompletion
OnCompletion takes the Synchronization into the world of routing, enabling you to easily add the FileRollback class as Synchronization.
So let’s see how it’s done. OnCompletion is available in both Java DSL and Spring XML variations. Here’s how onCompletion is used with Spring XML.
Listing 9.8. Using onCompletion as a transactional rollback
<bean id="orderService" class="camelinaction.OrderService"/>

<bean id="fileRollback" class="camelinaction.FileRollback"/>

<camelContext xmlns="http://camel.apache.org/schema/spring">

    <onCompletion onFailureOnly="true">
        <bean ref="fileRollback" method="onFailure"/>
    </onCompletion>

    <route>
        <from uri="direct:confirm"/>
        <bean ref="orderService" method="createMail"/>
        <log message="Saving mail backup file"/>
        <to uri="file:target/mail/backup"/>
        <log message="Trying to send mail to ${header.to}"/>
        <bean ref="orderService" method="sendMail"/>
        <log message="Mail send to ${header.to}"/>
    </route>

</camelContext>
As you can see from the code, <onCompletion> is defined as a separate Camel route. It will be executed right after the regular route has completed. You’re only interested in executing onCompletion when the exchange fails, so you can specify this by setting the onFailureOnly attribute to true.
The source code for the book contains this example, which you can run using the following Maven goal:
mvn test -Dtest=SpringFileRollbackTest
When you run it, you’ll find that it acts just like the previous example. It will delete the backup file if the exchange fails.
There is one major difference between using onCompletion and using a Synchronization, and that’s the thread model in use. Synchronization uses the same thread to perform the tasks, so it will block and wait until it completes. In contrast, onCompletion transfers the exchange to be executed by a separate thread.
The reason for this design decision is that onCompletion should not affect the original exchange and its outcome. Suppose during onCompletion an exception was thrown—what should happen then? Or what if onCompletion unexpectedly or deliberately changed the content of the exchange, which would affect the reply being sent back to the caller?
The bottom line is that onCompletion uses a separate route based on a copy of the completed exchange. It will not affect the outcome of the original route.
OnCompletion can also be used in situations where the exchange did not fail. Suppose you want to log activity about exchanges being processed. For example, in the Java DSL you could do it as follows:
onCompletion().beanRef("logService", "logExchange");
OnCompletion also supports scoping, exactly the same onException does at either context or route scope (as you saw in chapter 5). You could create a Java DSL–based version of listing 9.8 using route-scoped onCompletion as follows:
from("direct:confirm")
    .onCompletion().onFailureOnly()
        .bean(FileRollback.class, "onFailure")
    .end()
    .bean(OrderService.class, "createMail")
    .log("Saving mail backup file")
    .to("file:target/mail/backup")
    .log("Trying to send mail to ${header.to}")
    .bean(OrderService.class, "sendMail")
    .log("Mail send to ${header.to}");
Now you’ve learned all there is to know about onCompletion, which brings us to the end of this chapter.
9.6. Summary and best practices
Transactions play a crucial role when grouping distinct events together so that they act as a single, coherent, atomic event.
In this chapter, we looked at how transactions work in Camel and discovered that Camel lets Spring orchestrate and manage transactions. By leveraging Spring transactions, Camel lets you use an existing and proven transaction framework that works well with the most popular application servers, message brokers, and database systems.
Here are the best practices you should take away from this chapter:
- Use transactions when appropriate. Transactions can only be used by a limited number of resources, such as JMS and JDBC. Therefore, it only makes sense to use transactions when you can leverage these kinds of resources. If transactions aren’t applicable, you can consider using your own code to compensate and to work as a rollback mechanism.
- Local or global transactions. If your route only involves one transactional resource, use local transactions. They’re simpler and much less resource-intensive. Only use global transactions if multiple resources are involved.
- Test your transactions. Build unit and integration tests to ensure that your transactions work as expected.
We’ll now turn our attention to using concurrency with Camel. You’ll learn to how to improve performance, understand the threading model used in Camel, and more.