Chapter 4. Using Interface Builder
This chapter covers
- Learning how Interface Builder works
- Writing a simple program using the interface
- Linking Interface Builder and Xcode
In the last chapter, you built a labeledwebview class that included both a label and a web view. As is typically the case with programmatic design, you had to crunch numbers to make sure all your objects fit correctly on the screen.
What if you didn’t have to do that? What if you could lay out objects using a graphical design program and then immediately start using them in Xcode? With the SDK, you can, thanks to Interface Builder.
As we write this, Apple doesn’t offer any extensive iPhone or iPad Interface Builder documentation. The “Interface Builder User Guide” contains some good information, but it’s more desktop-centric than we’d like. If you need more information than we provide here, you may still want to read that document, because it does have some iPhone specifics.
We consider Interface Builder to be an alternative to Xcode (in appropriate situations), so our exploration of it will mirror the structure of the last chapter’s look at Xcode. We’ll give an overview of the program, and then you’ll put together a simple first project using it. Afterward, we’ll explore a more complex but fundamental technology: connecting Interface Builder to Xcode. Finally, we’ll briefly touch upon other functionality.
With all that said, what exactly is Interface Builder, and how does it work?
4.1. An introduction to Interface Builder
Interface Builder is a graphical development environment integrally tied in to Xcode. Whenever you write an Xcode project, it includes a .xib file that contains Interface Builder definitions for where graphical objects are placed. Each of the different Xcode templates comes with different objects prebuilt this way. Some of them have multiple, linked .xib files, with one file representing each separate screen of information.
We’ll get into the specifics of how the two programs link over the course of this chapter. For now, be aware that Xcode and Interface Builder are designed to go together. Let’s look at what’s inside Interface Builder and then quickly look at how to mock up Interface Builder objects.
4.1.1. The anatomy of Interface Builder
You usually access Interface Builder by double-clicking a .xib file in your project. The default .xib file is generally called MainWindow.xib. Clicking it brings up the file in Interface Builder, showing how default objects have been designed.
Nib Versus .Xib
You’ll see talk of both .xib files and nib files in this and later chapters. They’re pretty much the same thing: a nib file is a compiled .xib file. They appear as .xib files in Xcode, but some methods call them nib files, as you’ll see later in this chapter. Apple documents refer to a nib document window in Interface Builder; we’ve done the same here.
The Interface Builder Windows
When you call up Interface Builder, you initially see three windows: the nib document window, the main display window, and the Library window. The fourth important window—the inspector window—doesn’t appear by default, but you’ll call it up pretty quickly. These windows are shown in figure 4.1.
Figure 4.1. The nib document window (middle top) and the main display window (middle bottom) are two of the fundamental displays in Interface Builder. The Library (right) also comes up when you start Interface Builder. You need to call up the inspector (left) by hand.

The nib document window displays top-level objects, which are objects without a parent. A default MainWindow.xib file includes four such objects. The window object is the one real object here; you can play with it in Interface Builder and also link it out to Xcode. As you’d expect, this is the window object that was created by default in the templates you’ve used so far.
The other three top-level objects are all proxies, which means they’re placeholders for objects not contained in Interface Builder. Generally, you can only see objects in Interface Builder that were created there; if you need to access something else in Interface Builder, you do so by creating a proxy.
The Webimage App Delegate is a proxy for the app delegate object. (This one is for a program you’ll create shortly.) File’s Owner refers to the object that manages the .xib file (usually either the application or a view controller), and First Responder refers to the top object in the responder chain (which we introduced in chapter 2 and will cover in depth in chapter 6). You’ll meet these proxies again when we touch on IBOutlets.
The main display window shows what the .xib file currently looks like. Because we used the Window-Based Application template in Xcode, there’s nothing here yet. If we’d used one of the other templates, you’d see tab bars or other prebuilt elements. In any case, this is where you arrange your user interface elements as you create them.
Together, the nib document and main display windows contain all the objects understood by Interface Builder (which will likely omit many objects you created in Xcode).
The Library window is where you can find all the UI elements you may want to add to your program. You can start exploring the library with a little mousing. Click the Library and Cocoa Touch Plugin toggles, and you’ll see four main classes of UI elements:
- Controllers gives you different ways to manage your views.
- Data Views gives you different ways to display data.
- Inputs & Values gives you a variety of simple input mechanisms.
- Windows, Views & Bars gives you the core window and view objects, plus a variety of other elements.
The inspector window gives you access to a wide variety of information about an object and lets you change it; but as we said earlier, it may or may not open automatically. If it isn’t visible, you can call up the inspector by choosing Tools > Inspector. Afterward, whenever you click an object, its data will appear in the inspector. By default, the inspector window has four tabs: Attributes, Connections, Size, and Identity.
We’ll talk about everything on these tabs in depth when you write your next program. Before that, though, we want to introduce two additional core concepts: IBOutlets and IBActions.
IBOutlets and IBActions
In order for Interface Builder–created objects to be useful, Xcode must be able to access their properties and respond to actions sent to them. This is done with IBOutlets and IBActions.
You saw an IBOutlet in the last chapter, as part of the default header file for your first project. You may not have noticed it because it was redeclared using @property (discussed in the last chapter), but it looked like this:
@interface helloworldxcAppDelegate : NSObject <UIApplicationDelegate> {
    UIWindow *window;
}
@property (nonatomic, retain) IBOutlet UIWindow *window;
An IBOutlet provides a link to an Interface Builder–created object. It’s what you use to access that object’s properties and methods.
You won’t see an IBAction until we get to chapter 6, where we’ll deal with events and actions, but it’s similar. You declare a method in your @interface, including IBAction as its return:
- (IBAction)changeSlider:(id)sender;
An IBAction is a message that’s executed when a specific action is applied to an Interface Builder–created object, such as when a slider moves or a button is clicked.
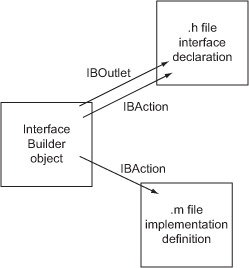
Figure 4.2 shows how these two types of actions link in to your Xcode files. As shown, all the declarations go into your header file. For IBActions, you also need to define the methods that should occur when the related actions happen. Those methods go in your main source-code file.
Figure 4.2. Using outlets and events, you can export Interface Builder information to different parts of your Xcode.
4.1.2. Simulating in Interface Builder
You can’t compile your full program in Interface Builder, but you can choose File > Simulate Interface, which mocks up all your Interface Builder objects without any additional Xcode work. That can sometimes be useful when you want to quickly see how your interface will look, but more often you’ll want to do a real compilation, which requires going back to Xcode and compiling there as normal. That’s what we’ll look at next.
4.2. A first project in Interface Builder: pictures and the web
With the overview of Interface Builder out of the way, you’re ready to create a simple first project that will show a web view atop a background image. In this section, we look at how to create new objects, manipulate them graphically, and use the inspector window.
We want to keep expanding the cool things you’re doing with the SDK, so in this example you’ll add one more object to the set you’ve worked with so far. In addition to labels and web views, you’ll also incorporate a picture. And because you’re using Interface Builder, it will all be quicker and more efficient to put together.
To begin the project, create a Window-Based Application and then double-click MainWindow.xib to call up the new project’s Interface Builder objects. Right now there’s nothing but a window, but you’ll quickly change that.
4.2.1. Creating new objects
Imagine a program that uses an image as a background, sets up a web view on top of that, and has a label running above everything. We’ll show you how easy it is to create those entirely usable objects in Interface Builder.
You’ll find the Image View object under Data Views in the Library. Drag it over to your main window, and it quickly resizes to suggest a full-screen layout. You should be able to arrange it to fit exactly over the screen, and then release your mouse button to let it go. One object created!
The Web View object will be near the Image View. Drag it over to the main window. If you move it toward the center of the view, dashed lines appear: they’re intended to help you center your object. If you mouse over the middle of the screen, a dashed line appears in each direction, forming a sort of crosshairs. When that happens, release the mouse button—you now have a web view in the middle of the screen. Two objects created!
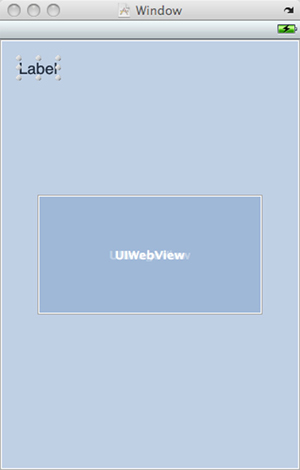
Finally, select Label, which is under Inputs & Values. Drag it toward the top left of your screen, and let go. You’re finished! You now have three objects laid out in Interface Builder, as shown in figure 4.3.
Figure 4.3. A few seconds of work results in three objects ready for use in Interface Builder, here shown with an iPhone view.
You can now either manipulate these objects in Interface Builder or create IBOutlets to manipulate them in Xcode. We’ll look at Interface Builder manipulations first, starting with the work you can do in the graphical interface.
4.2.2. Manipulating objects graphically
Interface Builder is fundamentally a user interface design program, so it makes sense that you can do some simple manipulation of your objects graphically. For example, if you want to change the text of your label, double-click it; you’re given the option to fill in your own text. You can similarly move and resize most objects using the main window.
If you want to engage in more complex manipulations of your Interface Builder–created objects, you’ll need to use the inspector window. If you don’t already have it available, you can call it up by selecting Tools > Inspector.
4.2.3. Using the inspector window
As we noted in our overview of Interface Builder, the inspector window contains four tabs: Attributes, Connections, Size, and Identity. We’ll look at each of these in turn, as we inspect the humble label.
The Attributes Tab
The Attributes tab contains all the basic information about your object. It will generally be your first stop whenever you want to modify an object that exists in Interface Builder. Figure 4.4 shows the Attributes tab for your label.
Figure 4.4. The Attributes tab shows all of an item’s basic information.

When you manipulated the label graphically, you changed the text to “My Apple Stock” for reasons that will become obvious shortly. You can see that this change has already been made in the label’s attributes. You can set a lot of other properties via this single window, with no programming required.
Do you want your text to be a nice maraschino red? No problem: click the Text Color box. Doing so leads you to a window that offers several ways to set colors. Choose the tab that allows selection by name, and you find maraschino on the list. You can also set shadows, alignments, and a number of other text options from this panel.
In addition to the label options, the Attributes tab contains several options that relate to the view—they’re the UIView properties that most graphical objects inherit. You can change alpha transparency, background color, and a number of other elements. For now, you can stop after having changed the color of the text and having generally seen what the Attributes tab can do.
The Attributes tab is available for all Interface Builder–generated objects, but it has different contents depending on the object in question. If you look at the attributes for the web-view and image-view objects you created, you’ll see that you can set them in specific ways as well, but we’ll save those for later. For now, we’re concentrating on that label.
The Connections Tab
The second tab in the inspector window is the Connections tab. It shows an object’s IBOutlets and IBActions.
The example label doesn’t have any IBOutlets, which means it can’t be accessed from Xcode. But this is fine; we’re happy with how the label is set up in Interface Builder, and you won’t need to adjust it during runtime for this example.
We’ll look at the Connections tab in depth in the next section.
The Size Tab
You can use the Size tab to adjust the size and position of an object. Figure 4.5 shows the options you can change here.
Figure 4.5. You can change an object’s position and size from the Size tab.

This tab leads off with values for size and position. Not only can you change an object’s starting point, but you can also define where that starting point is, relative to the object, using the grid at the upper left. Width and height are available here too.
The Autosizing box controls how your object resizes its subviews when it resizes. For now, leave it be; it’ll be of more importance when we talk about basic view controllers in chapter 5.
The Alignment section allows you to make multiple objects line up along an edge. Although you won’t use them for the label, this is a frequent desire in layout. To make this work, you select all the objects you want to align (by Shift-clicking) and then choose the appropriate box in the Alignment section.
Finally, the Placement section lets you align your current object relative to its parent. This works like the crosshairs you saw when you initially created your objects. If you click both placement buttons, your label will move to the center of the screen.
The Identity Tab
The final panel in the inspector window is the Identity tab. Like the Connections tab, it’s of little use for this label, but we cover its functionality for the sake of completeness. Figure 4.6 shows what it looks like.
Figure 4.6. The Identity tab contains some deeper stuff that’s mostly beyond the needs of this simple example program.

For simple Interface Builder objects (like this example label), you use only the Interface Builder Identity section at the bottom of the Identity tab. This lets you name your object, which makes it easier to see what you’re accessing in Interface Builder. It’s strictly for your own use. In this case, you named the label Hello Label.
The other three sections of the Identity tab are for more advanced purposes, and we’ll give them more attention later in this chapter.
You use Class Identity if you want to link in an external object. You’ll do this, for example, when you subclass a view controller and then want to make a link to that new controller in Interface Builder.
The Class Actions and Class Outlets sections show IBAction and IBOutlet declarations that you’ve made in your object’s header file. For example, the app delegate object has a window IBOutlet (which you’ve seen several times), and your web-view object has a few system-defined actions. These are the things to which you can build connections.
For now, leave them be. They’re not required for the label. But you have two more objects to work with in Interface Builder: the image view and the web view.
4.2.4. Working with pictures
We promised you that we were going to introduce a totally new object in this section: the image view. As with web views, we’ll get more into the guts of images several chapters down the line; for now, we want to show how easy it is to work with an unfamiliar object type—like the image view—in Interface Builder.
Adding the Image
To use an image in an SDK program, you need to load that image into your project. That means you drag the image file into Xcode’s sidebar, alongside all your other files. Generally, you should drag the images into the Resources folder. After dragging a file into Xcode, you’ll see a confirmation prompt. Make sure you select the Copy Items into Destination Group’s Folder check box; this will ensure that all of your resources are managed inside your project.
After you’ve done that, you can go to your image view’s Attributes tab in Interface Builder and select or type in the filename of your image file. In our case, it was apples.jpg. Most SDK programs use PNGs instead, but the JPG was much smaller, so we went with it. As soon as you enter this name, your picture should automatically pop up in Interface Builder’s main window.
You then may wish to use the Attributes tab to change how the picture displays in the window (including automatically resizing it if you didn’t build your image to be a specific size) or to adjust other elements. For example, we opted to change the image’s alpha transparency to .5, to make it easier to see the text over the image.
If you want, you can now go out to Xcode and compile this program, which was built entirely in Interface Builder. You can see the results in figure 4.7.
Figure 4.7. Combining graphics and text can be hard in some programming languages, but under the SDK it can be done entirely with Interface Builder. Here you see a background image with a text overlay.
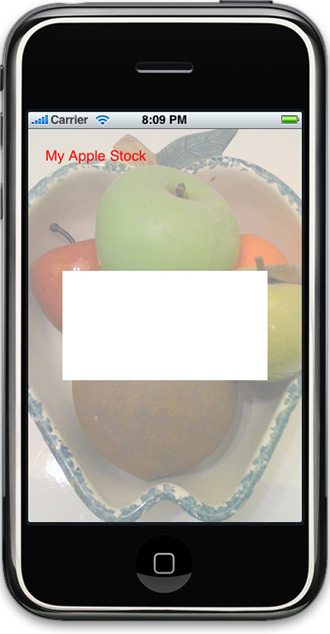
It’s clear that the program has a bit of a problem.
What’s Missing
The problem is that an unsightly white box is sitting in the middle of the display. That’s the web view. If you inspect the Attributes tab for the web view, you’ll see why we didn’t do anything more with it: you can’t set the starting URL from inside Interface Builder.
You can do other things in Interface Builder. Specifically, you can easily resize the view. We chose to set it to 280 x 391 pixels, which various Interface Builder guidelines suggested was the right size; but you can size it however you like by dragging the corners. We also opted to leave the Scales Page to Fit option off, which would make the web view act as if it had a viewport 980 pixels wide, like iPhone Safari. But to fill the web-view window, you have to access it from Xcode, which means building a new IBOutlet.
4.3. Building connections in Interface Builder
As we’ve already discussed, an IBOutlet gives you the ability to access an Interface Builder–created object from within Xcode. This is critical when you want to reset properties in Xcode or when you want to set a property that’s not available from within Interface Builder, as is the case with the web view’s URL.
Creating this connection is a three-step process, as outlined in table 4.1. We’ll now look at each of these steps in more depth.
Table 4.1. You can link together an Interface Builder object with an instance variable in Xcode through a few simple steps.
|
Description |
|
|---|---|
|
In Xcode, add an IBOutlet variable to the header file of the appropriate object. Save your Xcode files. |
|
In Interface Builder, drag a connection from your Interface Builder object to the appropriate Xcode top-level object, which should highlight. Select the appropriate variable name from the pop-up listing. |
|
You can now access your Interface Builder object from Xcode, as if it were created there. |
4.3.1. Declaring an IBOutlet
You met IBOutlets in the previous chapter. They’re declared like normal instance variables in your header file, but you precede them with the IBOutlet statement to show that the object was created in Interface Builder.
For the example web-view object, that means you need to update the header file of your app delegate class as shown here:
@interface webimageAppDelegate : NSObject <UIApplicationDelegate> {
    UIWindow *window;
    IBOutlet UIWebView *myWebView;
}
@property (nonatomic, retain) IBOutlet UIWindow *window;
- (void) refreshQuote;
@end
You’ve now finished the first step of connection building.
4.3.2. Connecting an object
At this point, you can build the physical connection from your object in Interface Builder to the IBOutlet in your Xcode. You start this process by bringing up the Connections tab for the object you want to connect: in this case, a web view. To access the Connections tab, choose Tools > Connections Inspector or click the second tab in the inspector window.
Each web view built in Interface Builder comes with five potential connections built in. You can automatically define your web view’s delegate in Interface Builder by creating a connection. You can also connect up a few actions—a topic we’ll return to shortly. For now, you want to connect the object to Xcode.
You do that by clicking the New Referencing Outlet circle in the object and then dragging a line to the top-level object that holds your new IBOutlet statement. In this case, you drag a connection from the web view to the app-delegate proxy. If the top-level object has IBOutlets that are waiting to accept connections, it’s highlighted as shown in figure 4.8.
Figure 4.8. You need to drag and release to build a connection in Interface Builder.

When you mouse over to the correct top-level object, release the mouse button. A menu pops up that lists all the available IBOutlets in that file. When you do this, you see the myWebView IBOutlet that you just built. Select the outlet, click the mouse, and your object and your IBOutlet are connected.
At this point, you’ve finished building a bridge between Interface Builder and Xcode. If you look at the Connections tab of the app delegate proxy, you’ll see that it acts as a referencing outlet for the web view.
If you want to look at both Connections tabs at the same time, you can do so by Ctrl-clicking each of the two objects to bring up standalone Connections panels, as shown in figure 4.9.
Figure 4.9. You can Ctrl-click to access Connections panels if you want to see multiple connections at the same time.
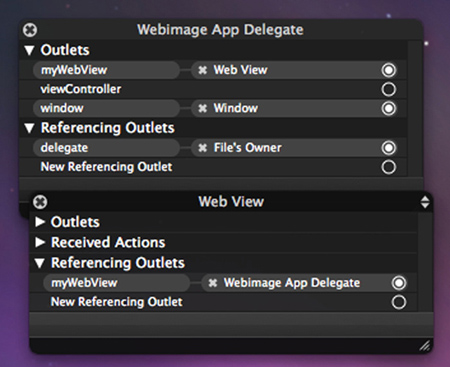
Through these Connections panels, you can see not only the reciprocal web view connection that you just built but also the app delegate’s existing connections: it acts as a delegate for the application (which is the .xib file’s owner), and it acts as an outlet (which you already used) for a window.
Now, all you need to do is fall back on your existing Xcoding skills to make the web view do what you want.
4.3.3. Coding with IBOutlets
Heading back into Xcode, you only need to input a few lines of new code to get the web view working, as follows:
- (BOOL)application:(UIApplication *)application
     didFinishLaunchingWithOptions:(NSDictionary *)launchOptions {
    [self refreshQuote];
    [NSTimer scheduledTimerWithTimeInterval:5 target:self
            selector:@selector(refreshQuote) userInfo:nil repeats:YES];

    [window makeKeyAndVisible];

    return YES;
}

- (void) refreshQuote {
     NSURL *requestURL = [NSURL URLWithString:@"http://quote-
web.aol.com/?syms=AAPL&e=NAS&action=hq&dur=1&type=mountain&hgl=1&v
gl=1&vol=1&splits=1&div=0&w=280&h=391&gran=d"];
     [myWebView loadRequest:[NSURLRequest requestWithURL:requestURL]];
}
Note how you call the refreshQuote method. It’s called using an NSTimer. This allows you to automatically call the refreshQuote method every so often—in this case, every 5 seconds.
Note that you don’t have to allocate the web view, nor do you have to initialize it, nor do you have to add it as a subview of your window; all those details are taken care of by Interface Builder. But after you link to the object via an outlet, you can access it like any object you created yourself.
As we promised earlier, we’ll take a more complete look at how web views work in chapter 14. But we wanted to include them here to demonstrate (again) how easy it is to incorporate an unfamiliar object into your code using Interface Builder.
In addition, a web view provides a nice example of client-server integration between web design and the SDK—a topic that we first touched on in chapter 2 and that turns out to be pretty simple to attain using the iPhone OS. By linking to a URL that sends dynamic content to your device, you can make a sophisticated, always-up-to-date program despite only designing the display engine on the SDK side of things. Figure 4.10 shows what the final product looks like.
Figure 4.10. An image, a label, and a dynamic web view are put together in Interface Builder with only a single line of Xcode required (plus a couple of declarations). This shows how simple it is to build a sophisticated interface with little work by using Interface Builder.

That brings us to the end of the Apple stock example. It presented some fundamental uses of Interface Builder that you’ll encounter again and again. In particular, creating objects in Interface Builder and then hooking them up to Xcode will likely become a regular part of your SDK coding experience, so you should make sure you’re entirely familiar with that process.
Now that you’ve seen some examples of how to work with Interface Builder, we’ll touch on some additional functionality that will become more important in the chapters to come.
4.4. Other Interface Builder functionality
When we finished our look at Xcode in chapter 3, we had a few slightly more advanced topics that we wanted to talk about: foundational stuff that nonetheless lay beyond the bounds of our first simple program. The same is true with Interface Builder. Now, we’ll explore other types of connections beyond IBOutlets, how to create external objects, how to initialize Interface Builder objects, and how to work with .xib files.
4.4.1. Building other connections
As we’ve noted, IBOutlets are only one of a few major types of connections that you can build into Interface Builder. You’ve also seen delegate connections, which allow you to tie one object to another for purposes of delegation. You do this without ever setting the delegate property in Xcode: you link one object to the other in Interface Builder.
The third major type of connection is the IBAction, which creates a connection that causes a method in your class file to be run whenever an action is sent to a UIControl. Building IBAction connections is almost exactly like building IBOutlet connections: you create a method declaration in the appropriate header file that uses IBAction as its return, and then you connect it to an appropriate action in Interface Builder; each object comes with all of the potential actions built in. Finally, in Xcode, you write the method that specifies what happens when the control is modified.
We’ll get into this in more depth in chapter 6.
4.4.2. Creating external objects
In the last chapter, you built your first subclass: the labeledwebview class. You’ll be building lots more subclasses in your SDK work, and you’ll often want to connect them into Interface Builder so you can connect outlets and actions to them. How do you access these new classes in Interface Builder when they don’t appear in the Library window? It turns out that you need to use the Identity tab, which you’ve already met (in figure 4.6). Table 4.2 outlines the two-step process.
Table 4.2. Creating a new proxy object to link to in Interface Builder takes a couple of steps.
|
Step |
Description |
|---|---|
|
From the Controllers section of the Library, drag an appropriate object to the nib document window. |
|
Open the Identity inspector tab, and change the class name to your new class. |
We say that you start the process with an “appropriate object.” For a totally new object, this will probably be the blank object; but if you’re making a subclass of an existing object, you should start with the object you’re subclassing from.
After you type your new subclass name into your object’s Class field, things are automatically linked up. You’ll use this technique in future chapters.
4.4.3. Initializing Interface Builder objects
Eventually, you’ll want to do some initialization when an Interface Builder object is created. But if you try to build your setup into a standard init method, it won’t work. As we’ve mentioned, Interface Builder objects use a special init method called initWithCoder:. You must create it by hand, as follows:
- (id)initWithCoder:(NSCoder *)decoder {
    if (self = [super initWithCoder:decoder]) {
        // Setup code goes here
    }
    return self;
}
Other than its decoder argument (which you should be able to ignore), it should work like any other init method.
4.4.4. Accessing .xib files
Finally, we come to the .xib file. We’ve taken it for granted so far; but there are ways you can specify a different .xib file than MainWindow.xib, and even ways to specify the use of multiple .xib files.
The Main File
The main .xib file is defined in <project name>-Info.plist, which you’ve seen is an XML file. You can look at its contents in Xcode, or you can read the XML from the command line. It’s easy to find where the main .xib file (or rather, its compiled .nib twin) is defined:
<key>NSMainNibFile</key>
<string>MainWindow</string>
If you ever need to change the name of your main .xib file, do it here, using either Xcode or a command-line editor.
Multiple Files
As we’ve mentioned, a .xib file should generally lay out the contents of a single program view. Although this has been fine for the programs so far, it becomes a limitation when you want to create more-complex programs. Fortunately, it’s easy to build multiple .xib files into a single program.
New .xib files are usually loaded through view controllers, which is the topic of the next chapter. As we’ve discussed previously, view controllers tend to control a page full of objects, and it makes sense that they use .xib files to help manage that. To use a new .xib file for a new page in your program, all you need to do is associate the new .xib file with the appropriate view controller.
The easiest way to do that is through Xcode’s File menu. Select File > New File > Cocoa Touch Class, and then select the UIViewController subclass. Make sure you select the With Xib for User Interface check box.
If you create a view controller, you can link in a new .xib file through its init method:
FlipsideViewController *viewController =
    [[FlipsideViewController alloc]
        initWithNibName:@"FlipsideViewController" bundle:nil];
If you’re a little fuzzy on the concept of view controllers, don’t worry, because we’re about to dive into the topic wholeheartedly. For now, note this connection between view controllers and Interface Builder.
4.4.5. Creating new .xib files
Now that you understand how to load additional .xib files, you may wish to create new ones. You do so from within Interface Builder, where you can choose File > New to begin. Afterward, you’re asked to choose a template: Application, Empty, View, or Window. You’ll most often create new .xib files for view controllers, in which case you should select View.
To make your new .xib file part of your existing project, save the .xib file to the main project directory. You’re asked if you want to add it to the project; answer Yes.
4.5. Summary
In the previous chapter, we showed you how to create some simple programs using Xcode alone. But Xcode is only half of the development environment that Apple provides. You also have access to Interface Builder, a powerful graphic design program that allows you to lay out objects by mousing and then to link those objects back to Xcode for use there.
The example in this chapter, which combines text, graphics, and web content, is both more complex than anything you wrote by hand in the previous chapter and a lot easier to put together. That’s the power of Interface Builder, and it’s something you’ll take full advantage of as you make your way through the SDK over the course of this book.
Although you now have the two fundamental tools of the SDK well in hand, we’ve neglected two of the SDK building blocks you’ll use to create projects: view controllers and events. In the next three chapters, we’ll cover those topics, and in the process, we’ll complete our look at the iPhone OS classes you’ll use in almost any SDK program you write.