Chapter 2. Learning Objective-C and the iPhone OS SDK
This chapter covers
- Learning about Apple’s SDK package
- Understanding Objective-C
- Looking at the iPhone OS
In this chapter, you’ll prepare to work with the Apple’s iPhone OS SDK. We also look at Objective-C, Apple’s native language, and then investigate the iPhone OS and its methods. We assume that you have a good understanding of a rigorous programming language (like C), that you know the basic concepts behind object-oriented programming (OOP), and that you understand what the MVC (Model-View-Controller) architectural model is.
We’re now ready to move into the world of SDK development. You’ll download the SDK first thing so that you can see what it consists of, but then we’ll take a step back to examine the programming language and frameworks that you’ll be using when you program with the SDK.
2.1. Getting ready for the SDK
The iPhone software development kit (SDK) is a suite of programs available in one gargantuan (over 1 GB) download from Apple. It gives you the tools you need to program (Xcode), debug (Instruments), and test (Simulator) your iPhone and iPad code. Note that you must have an Intel-based Apple Macintosh running Mac OS X 10.5.3 or higher to use the SDK.
2.1.1. Installing the SDK
To obtain the SDK, download it from Apple’s iPhone Dev Center, which at the time of this writing is accessible at http://developer.apple.com/iphone/. You’ll need to register as an iPhone Developer in order to get there, but it’s a fairly painless process. Note that you can also use this site to access Apple documents, as we’ve mentioned earlier.
The Apple Docs and the SDK
To see the full API documentation as well as sample code, visit http://developer.apple.com/iphone/. It contains a few introductory papers, of which we think the best are “iPhone OS Overview” and “Learning Objective-C: A Primer,” plus the complete class and protocol references for the SDK.
As we’ll discuss in the next chapter, you can also access all of these docs from inside Xcode. We usually find Xcode a better interface because it allows you to click through from your source code to your local documents. Nonetheless, the website is a great source of information when you don’t have Xcode handy.
Because they tend to be updated relatively frequently, we’ve been constantly aware of Apple’s documents while writing this book, and we’ve done our best to ensure that what we include complements Apple’s information. We’ll continue to provide you with introductions to topics and to point you toward the references when there’s a need for in-depth information.
After you’ve downloaded the SDK, you’ll find that it leaves a disk image sitting on your hard drive. Double-click it, and then click iPhone SDK in the folder that pops up, as shown in figure 2.1.
Figure 2.1. Clicking iPhone SDK starts your installation.

This will bring you through the entire install process, which will probably take 20–40 minutes. You’ll also get a few licensing agreements that you need to sign off on, including the iPhone Licensing Agreement, which lists some restrictions on what you’ll be able to build for the iPhone.
iPhone SDK Licensing Restrictions
Although Apple is making the iPhone SDK widely available for public programming, the company has placed some restrictions on what you can do with it. We expect these restrictions to change as the SDK program evolves, but what follows are some of the limitations at the time of this writing.
Among the most notable technical restrictions: you can’t use the code to create plug-ins, nor can you use it to download non-SDK code. It was the latter that apparently spoiled Sun’s original plans to port Java over to the iPhone. You also can use only Apple’s published APIs. In addition, there are numerous privacy-related restrictions, the most important of which is that you can’t log the user’s location without permission. Finally, Apple has some specific application restrictions, including apps that incorporate pornography or other objectionable content.
In order for your program to run on iPhones and iPads, you’ll need an Apple certificate, and Apple maintains the right to refuse those certs if it doesn’t like what you’re doing. If you’re planning to write anything that might be questionable, you should probably check whether Apple is likely to approve it first.
When the SDK finishes installing, you’ll find it in the /Developer area of your disk. Most of the programs appear in /Developer/Applications, which we suggest you make accessible using the Add to Sidebar feature in your Finder. The iPhone Simulator is located separately at /Developer/Platforms/iPhoneSimulator.platform/Developer/ Applications. Because this is off on its own, you may want to add it to your Dock.
The SDK development tools will replace any existing Apple development tools you have. You’ll still be able to do regular Apple development, but you’ll be working with a slightly more bleeding-edge development environment.
You now have everything you need to program for the iPhone, but you won’t be able to release iPhone or iPad programs. That takes a special certificate from Apple. See appendix C for complete information on this process, which is critical for moving your iPhone programs from the Simulator onto a real device. The Simulator turns out to be just one of several programs you’ve installed, each of which can be useful in SDK programming.
2.1.2. The anatomy of the SDK
Xcode, Instruments, and Dashcode were all available as part of the development library of Mac OS X before the iPhone came along. Many of these programs are expanded and revised for use on the iPhone, so we’ve opted to briefly summarize them all, in decreasing order of importance to an SDK developer:
- Xcode is the core of the SDK’s integrated development environment (IDE). It’s where you’ll set up projects, write code in a text editor, compile code, and generally manage your applications. It supports code written in Objective-C (a superset of C that we’ll cover in more depth shortly) and can also parse C++ code. You’ll learn the specifics of how to use it in chapter 3.
- Interface Builder is a tool that lets you put together the graphical elements of your program, including windows and menus, via a quick, reliable method. It’s tightly integrated with Xcode, and you’ll usually be using it, even when you don’t call up the program. We’ll introduce you to Interface Builder in chapter 4.
- iPhone Simulator allows you to view an iPhone screen on your desktop. You’ve already seen that it’s a great help for debugging web pages. It’s an even bigger help when you’re working on native apps, because you don’t have to get your code signed by Apple to test it out here.
- iPad Simulator simulates an iPad running on your desktop. Similar to the iPhone Simulator, it attempts to emulate the device as much as possible. The Simulator is useful for rapid debugging, but you should always test on a physical device before submitting an application to Apple.
- Instruments is a program that allows you to dynamically debug, profile, and trace your program. Whereas we had to point you to a slew of browsers, add-ons, and remote websites to do this sort of work for web apps, for your native apps that’s all incorporated into this one package. Space precludes us from talking much about this program.
- Dashcode we list here only for the sake of completeness because it’s part of the /Developer area. It’s a graphical development environment that is used to create web-based programs incorporating HTML, CSS, and JavaScript. Dashcode is used when developing for the web; you won’t use it with the iPhone SDK.
Figure 2.2 shows the most important developer tools.
Figure 2.2. The SDK includes Xcode (left), Interface Builder (center), iPad Simulator (not shown), and the iPhone Simulator (right).

In addition to the visible tools that you’ve downloaded into /Developer, you’ve also downloaded the entire set of iPhone OS frameworks: a huge collection of header files and source code—all written in Objective-C—that will greatly simplify your programming experience. Rather than jumping straight into your first program, we instead want to touch on these foundational topics. Let’s begin by looking at Objective-C, the SDK’s programming language, and then examine some of the basics of the iPhone OS, which contains that set of iPhone and iPad frameworks.
If you’d prefer to immediately dive into your first program, which will of course be Hello, World!, head to the next chapter. You can then pop back here to see what it all means.
2.2. Introducing Objective-C
All of the SDK’s programming is done in Objective-C, a full superset of C, allowing you to write any traditional C code. It adds powerful object-oriented capabilities as well. These extensions come by way of the design philosophies of Smalltalk, one of the earliest object-oriented languages. Because of its origin beyond the standard boundaries of C, Objective-C’s messaging code may look a little strange to you at first; but after you get the hang of it, you’ll discover that it’s elegant and easy to read, providing some nice improvements over traditional ANSI C code.
We look at Objective-C’s messages, class definitions, properties, compiler directives, categories, and protocols. Although this overview gives you enough to get started with Objective-C, it can’t provide all the details, particularly for more complex functionality like properties and categories. If you need more information than we’ve been able to provide, look at Apple’s own references on the topic, particularly “Object-Oriented Programming with Objective-C” and “The Objective-C 2.0 Programming Language,” both of which can be found in Apple’s iPhone developer library.
2.2.1. The big picture
Let’s start with a look at Objective-C’s big picture. It’s an object-oriented language, which means it’s full of classes and objects, instance variables, and methods.
As implemented by Apple and used throughout the iPhone OS’s frameworks, Objective-C is built entirely around objects. Windows, views, buttons, sliders, and controllers all exchange information with each other, respond to events, and pass actions in order to make your program run.
A header (.h) file and a source code (.m) file together represent each object in Objective-C. Sometimes you’ll access standard classes of objects that come built into the iPhone OS frameworks, but often you’ll instead subclass objects so that you can create new behaviors. When you do this, you’ll add a new header and source code file to your project that together represent the new subclass you’ve invented.
Although we won’t dwell on it much, note that C++ code can be mixed in with Objective-C code. We leave the specifics of that for the experienced object-oriented programmer (and, as usual, there’s more detail on Apple’s website). You can also freely insert older C syntax; as we’ll discuss shortly, this is necessary when you’re working with older libraries.
With all that said, we’re ready to dive into Objective-C’s unique syntax. Table 2.1 summarizes the six major elements of syntax.
Table 2.1. Objective-C code can look different from ANSI C; it depends on a handful of syntactic changes.
|
Syntax element |
Summary |
|---|---|
| Categories | Categories can be used to add to classes without subclassing. |
| Classes | Classes define object types in matched .h and .m files. |
| Messages | Messages send commands to objects in [bracketed] code. |
| Properties | Properties allow for the easy definition of accessors and mutators. |
| Protocols | Protocols define methods that a class promises to respond to. |
| @ | @ directives are used by the compiler for a variety of purposes. |
We offer a more technical summary at the end of this section, showing all the syntax of these elements. But first, we discuss these syntactic elements at length, in approximate order of importance.
2.2.2. The message
Objective-C’s most important extension to the C programming language is the message. A message is sent when one object asks another to perform a specific action; it’s Objective-C’s equivalent to the procedural functional call. Messages are also the place in which Objective-C’s syntax varies the most from ANSI C standards—which means that when you understand them, you’ll be able to read most Objective-C code.
A simple message call looks like this:
[receiver message];
Here’s a real-life example that you’ll meet in the next chapter:
[window makeKeyAndVisible];
That message sends the window object the makeKeyAndVisible command, which tells it to appear and start accepting user input.
There are three ways in which this message could be slightly more complex. First, it could accept arguments; second, it could be nested; and third, it could be a call to one of a few different recipients.
Messages with Arguments
Many messages include a simple command, as in the previous example. But sometimes you’ll want to send one or more arguments along with a message to provide more information about what you want done. When you send a single argument, you do so by adding a colon and the argument after the message, like so:
[receiver message:argument];
Here’s another real-world example:
[textView setText:@"These are the times ..."];
When you want to send multiple arguments, each additional argument is sent following a label, as shown here:
[receiver message:arg1 label2:arg2 label3:arg3];
For example:
[myButton setTitle:@"Goodbye” forState:UIControlStateNormal];
This is the way in which Objective-C’s messages vary the most from C’s functions. You’re going to come to love it. You no longer need to remember the ordering of the arguments because each gets its own title, clearly marking it. The result is much more readable.
Nested Messages
One of the most powerful elements of Objective-C’s messaging system is the fact that you can nest messages. This allows you to replace either the recipient or the argument of a message (or both) with another message. Then, the return of that nested message automatically fills in the appropriate space of the message it’s nested inside.
Object creation frequently replaces the receiver in this manner:
[[UITextView alloc] initWithFrame:textFieldFrame];
The object created by sending the alloc message to the UITextView class object is then initialized. (We’ll get to class objects in just a moment.)
When you’re passing a color as an argument, you almost always do so by nesting a call to the UIColor class object:
[textView setTextColor:[UIColor colorWithWhite:newColor alpha:1.0]];
Message nesting is a core Objective-C coding style, and thus you’ll see it frequently. It also shows why Objective-C’s bracketed messaging style is cool. With good use of code indentation, it can make complex concepts very readable.
Message Recipients
As you’ve seen over the last couple of examples, Objective-C uses two different types of objects. Class objects innately exist, and each represents one of the classes in your framework. They can be sent certain types of requests, such as a request to create a new object, by sending a message to the class name:
[class message];
For example:
UIButton *myButton =
    [UIButton buttonWithType:UIButtonTypeRoundedRect];
Instance objects are what you’re more likely to think of when you hear the term object. You create them yourself, and the majority of your programming time is spent manipulating them. Except for those examples of creating new objects, all of our real-life examples so far have involved instance objects.
In addition to calling an object by name, you can also refer to an object by one of two special keywords: self and super. The first always refers to the object itself, whereas the second always refers to the class’s parent.
You’ll often see self used internal to a class’s source code file:
[self setText:@"That try mens' souls. "];
You’ll often see super used as part of an overridden method, where the child calls the parent’s method before it executes its own behavior:
[super initWithFrame:frame]
All your message calls should follow one of these four patterns when naming its receiver: they can call something by its class name (for a class method), by its instance name (for an instance method), by the self keyword, or by the super keyword.
Now that you know how to send messages between objects, you’d probably like to know how to create those classes that your objects are instantiated from in the first place. That’s the topic of the next section.
2.2.3. Class definition
As we’ve noted, each class tends to be represented by a matched pair of files: a header file and a source code file. To define a class, each of these files must contain a special compiler directive, which is always marked in Objective-C with an @ symbol.
First, you define the interface for the class, which is a simple declaration of its public variables and methods. You do this in the header (.h) file. Next, you define the implementation for the class, which is the content of all its methods; this is done in a source (.m) file.
Figure 2.3 shows this bifurcation graphically; we’ll look at it in more depth in the next few sections.
Figure 2.3. Headers and source code files contain distinctive parts of your Objective-C classes.

The Interface
Interfaces begin with an @interface directive and finish with an @end directive. They contain instance variable declarations in curly brackets and then method declarations. The following snippet shows an example of their usage. It’s the first of several examples that we offer in this section that depict a fake class, AppleTree:

You begin the interface command with the @interface directive and end it with the @end directive. Note that the @interface directive includes not only the class name but also the name of its superclass, following a colon. It could also include a list of protocols, a topic we’ll return to later in this section.
The variable declaration ![]() is entirely normal. NSString is a type that you’ll meet when we look at the iPhone OS later in this chapter. Note that you don’t have to declare all your
variables in your @interface—just those instance variables that you want to be accessible outside their methods. You’ll declare variables that are used
within only individual methods inside those methods, as you’d expect.
is entirely normal. NSString is a type that you’ll meet when we look at the iPhone OS later in this chapter. Note that you don’t have to declare all your
variables in your @interface—just those instance variables that you want to be accessible outside their methods. You’ll declare variables that are used
within only individual methods inside those methods, as you’d expect.
The method declaration ![]() contains a typed description of a method with one argument, matching the syntax you’ve seen for messages. It also contains
one other new element: it starts with a hyphen (–). That means this is an instance method, which is a method that can only be used by an instance object. Its opposite number,
which is marked with a plus (+), is the class method, which is used by a class object.
contains a typed description of a method with one argument, matching the syntax you’ve seen for messages. It also contains
one other new element: it starts with a hyphen (–). That means this is an instance method, which is a method that can only be used by an instance object. Its opposite number,
which is marked with a plus (+), is the class method, which is used by a class object.
The id type used as the return of growFruit is another Objective-C innovation. Objective-C allows for dynamic typing, where type is decided at runtime. To support this, it includes the weak type of id, which can be a pointer to any object.
Before we finish our discussion of method declarations, we’d like to mention that, as with variables, you only have to declare those methods that can be called externally. Methods that remain internal to a class can remain hidden if you desire.
The Implementation
After you’ve declared a class with an @interface, you can then define it with the @implementation directive. Here’s a brief example of what the implementation might look like for the AppleTree class, including a single example method:
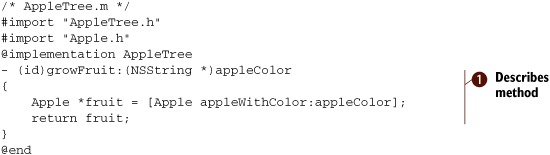
The code starts with the #import directive. This is Objective-C’s variant for the #include macro. It includes the file unless it’s already been included, and it’s the preferred alternative when using Objective-C. In this case, you include AppleTree.h, which should contain the interface described in the code snippet above. Without including it, you’d need to redefine all the instance variables and include the superclass in the @implementation statement. Thus, the #import helps you avoid redundant code. You also include the Apple.h file so that you can create an Apple.
As with the interface, the implementation code begins with a directive and ends with @end. In between, you describe what the method does ![]() , which includes sending a message to the Apple class object.
, which includes sending a message to the Apple class object.
What You’re Missing
You now have two parts of a puzzle: how to create new classes of objects and how to send messages among instantiated objects. What you’re missing is how to instantiate an object from a class.
Generally, object instantiation follows the same pattern. First, you allocate memory for the object, and then you initiate any variables and perform any other setup. The precise manner in which this is done can vary from class to class. A framework usually decides how object creation works—which for our purposes means the iPhone OS. As you’ll see later in this chapter, the iPhone OS specifies two methods for object instantiation: the alloc-init method and the class factory method. You’ll meet each of these soon, when we talk about the iPhone OS, but first let’s finish up with the core syntax of Objective-C.
2.2.4. Properties
What we’ve covered so far should be sufficient for you to understand (and write) most simple Objective-C code. One other major feature in Objective-C deserves some extended discussion because of its unique syntax: the property.
The Purpose of Properties
Because instance variables are encapsulated, you usually have to write tons of getter and setter methods when doing OOP. This can get tedious, and you must also be careful about consistency so you don’t have dozens of different syntaxes for your accessors and mutators.
Objective-C offers a solution to these problems: you can declare an instance variable as a property. When you do so, you standardize the variable’s accessor and mutator methods by automatically declaring a getter and a setter. The setter is called setVariable and the getter is called variable.
For example, returning to the apples that we’ve been talking about in our major examples, if you define the NSString *appleType; variable as a property, the following declarations automatically occur:
-(void)setAppleType:(NSString *)newValue;
-(NSString *)appleType;
You’ll never see these declarations, but they’re there.
Setting a Property
You declare an instance variable as a property by using the @property directive as part of your @interface statement. Here’s how to do so, in the full context of the example so far:

The header file shows that any property must start with the declaration of an instance variable ![]() . The @property directive then repeats that declaration. If you wish, you can stop here. You’ve now implicitly declared your accessor and
mutator methods, and you can go and write those methods on your own if you see fit.
. The @property directive then repeats that declaration. If you wish, you can stop here. You’ve now implicitly declared your accessor and
mutator methods, and you can go and write those methods on your own if you see fit.
Objective-C will also write these methods for you if you ask it to. This is done with the @synthesize declaration in the @implementation statement ![]() . This creates accessor methods that read and set the variable by the simple methods that you’d expect. The setter method
is by default of type assign, but you can choose a different method using property attributes, which we’ll talk about down the road.
. This creates accessor methods that read and set the variable by the simple methods that you’d expect. The setter method
is by default of type assign, but you can choose a different method using property attributes, which we’ll talk about down the road.
Using the Accessors
If you’re not doing anything fancy, you can immediately use your class’s default getter and setter methods, as shown in the following three examples:
NSString *chosenType = [AppleTree appleType];
[AppleTree setAppleType:@"Washington Red"];
[AppleTree setAppleType:myAppleType];
In addition to providing you with automatically created accessors and mutators, properties also give you access to a bit of syntactic sugar, which can make using them that much easier.
The Dot Syntax
Objective-C offers a dot syntax that makes it easy to use an object’s accessor and mutator methods (whether you synthesized them or created them yourself). The following are the dot-syntax equivalents to the messages you sent earlier:
NSString *chosenType = AppleTree.appleType;
AppleTree.appleType = @"Washington Red";
AppleTree.appleType = myAppleType;
The dot syntax can also be nested, just like you can nest messages. In the following example, the treeType property returns a tree object that has an AppleType property:
Apple.treeType.AppleType
With that in hand, you should now be able to write simpler and more intuitive code.
Property Complexities
There are several complexities of properties that we’ve opted not to delve into here. First, property declarations can include attributes. They let you change getter and setter names, change setter assignment methods, set non-atomic accessors (which are accessors that can be interrupted by the CPU scheduler while in usage), and determine whether the property is read-only or read-write. These can all be set as part of the @property line.
Second, another directive called @dynamic lets you add accessor and mutator methods at runtime.
Third, it’s possible to override default values that you’ve synthesized through normal method creation as part of your @implementation.
A variety of information about properties is available in Apple’s Objective-C reference; if you need to delve into any of these complexities, you should refer to that.
2.2.5. Other compiler directives
We’re almost done with our overview of Objective-C, but we want to alert you to one other frequently used bit of syntax. As you’ve seen, the @ symbol denotes a compile directive. It’s a core part of class definition, and it’s required for properties. You’ll also see it in a few other places in Objective-C code.
We have found that forgetting to mark a string with an @ is our most common error in iPhone and iPad programming, so keep an eye out for this one!
Sometimes an @ is used to create variables of certain types. This is most frequently used to create a variable of type NSString *. You saw this in a few of our messaging examples. You include the @ symbol, followed by the string value you want to set:
NSString *mySample = @"What does this have to do with apples?";
In chapter 6, you’ll also encounter the @selector directive, which is used to create a variable of type SEL. This is a method selector, which is what you use when you want to pass the name of a method as an argument, as will occur when we get to events and actions. A standard usage looks like this:
SEL mySelector = @selector(growFruit:);
There are many other directives you can use in Objective-C. Our purpose here is to highlight those you’re most likely to see in this book and most likely to use in introductory SDK programming.
2.2.6. Categories and protocols
We think it’s important to touch on two final elements of Objective-C: the category and the protocol. We broadly define what they do, but we won’t delve too deeply into their details. To learn more, refer to Apple’s Objective-C documentation.
The Category
Categories are used if you want to add behavior to a class without subclassing. As usual, you do so by creating a new pair of files containing @interface and @implementation code. This time, you no longer need to worry about the superclass name but must include a category name in parentheses, as follows:
@interface AppleTree (MyAppleChanges)
@implementation AppleTree (MyAppleChanges)
As a result, the categorized methods and variables that you describe for the classes are added to the core class definition in your program.
We don’t use categories in this book.
The Protocol
A protocol is effectively an interface that’s not tied to a class. It declares a set of methods, listing their arguments and their returns. Classes can then state that they’re using the protocol in their own @interface statements. For example, if you had a Growing protocol that was used by plants and animals alike, you could define its usage as follows:
@interface AppleTree : UrTree <Growing>
The AppleTree class would thus be promising that it would respond to all the methods defined in the Growing protocol.
You won’t be creating any new protocols in this book. But you’ll use existing ones, because within Apple’s iPhone OS, they’re tied integrally to the MVC model. Views hand off protocol descriptions of how they should be used to view controllers via datasource and delegate properties—both topics that we’ll introduce when we talk about the iPhone OS in a moment.
With that, we feel like the shine has gone off our apples, so we return to real-life examples when we move on to the iPhone OS. But first, having provided an overview of a whole new programming language in an impossibly short number of pages, we summarize what you’ve learned.
2.2.7. Wrapping up Objective-C
Table 2.2 summarizes the syntax specifics of the Objective-C elements that we’ve been discussing. This table can serve as a quick reference whenever you want to revisit how Objective-C code works differently from traditional C.
Table 2.2. Objective-C uses many typical object-oriented coding elements, but its syntax is somewhat unique.
|
Object-oriented element |
Syntax |
|---|---|
| Object messaging | [recipient message]; |
| Class creation |
/* .h file */ @interface class: super (declarations) @end /* .m file */ @implementation class (definitions) @end |
| Method declaration |
- (return type)instancemethod:arguments + (return type)classmethod:arguments |
| Property declaration | @property (declaration) variable; |
| Property synthesis | @synthesize property; |
| Property accessor | [object property]; |
| Property mutator | [object setProperty:value]; |
| Property dot syntax | object.property |
| Category declaration |
@interface class: super (category) @implementation class: super (category) |
| Protocol declaration | @interface class: super <protocol> |
And with that, we’ve completed our look at the syntax and structure of the Objective-C programming language. But that’s only half of the foundation you need in order to use the SDK. You also need to be familiar with the specific methods and programming styles provided by the iPhone OS’s extensive set of frameworks.
2.3. Introducing the iPhone OS
In the previous section, we started out not with a discussion of how to define objects, but with a look at how to send messages to them. That was our intent. Apple’s SDK provides you with a vast library of objects arranged into several frameworks. As a result, you’ll spend a lot more time sending messages to objects that are readymade for your use than creating new ones.
Let’s begin our look at the iPhone OS by exploring several of these objects and how they’re arranged. We’ll take a tour of the anatomy of the iPhone OS, look at how the object hierarchy is arranged, and also look at how the iPhone OS handles windows and views.
2.3.1. The anatomy of the iPhone OS
The iPhone OS’s frameworks are divided into four major layers, as shown in figure 2.4.
Figure 2.4. Apple provides you with four layers of frameworks to use when writing iPhone SDK programs.

Each of these layers contains a variety of frameworks that you can access when writing iPhone SDK programs. Generally, you should prefer the higher-level layers when you’re coding (those shown toward the top in the diagram).
Cocoa Touch is the framework that you’ll become most familiar with. It contains the UIKit framework—which is what we spend most of our time on in this book—and the address book UI framework. UIKit includes window support, event support, and user-interface management, and it lets you create both text and web pages. It further acts as your interface to the accelerometers, the camera, the photo library, and device-specific information.
Media is where you can get access to the major audio and video protocols built into the iPhone and iPad. Its four graphical technologies are OpenGL ES, EAGL (which connects OpenGL to your native window objects), Quartz (which is Apple’s vector-based drawing engine), and Core Animation (which is also built on Quartz). Other frameworks of note include Core Audio, Open Audio Library, and Media Player.
Core Services offers the frameworks used in all applications. Many of them are data related, such as the internal Address Book framework. Core Services also contains the critical Foundation framework, which includes the core definitions of Apple’s object-oriented data types, such as its arrays and sets.
Core OS includes the kernel-level software. You can access threading, files, networking, other I/O, and memory.
C Versus Objective-C
Most of your programming work will be done using the UIKit (UI) or Foundation (NS) frameworks. These libraries are collectively called Cocoa Touch; they’re built on Apple’s modern Cocoa framework, which is almost entirely object-oriented and, in our opinion, much easier to use than older libraries. The vast majority of code in this book will be built solely using Cocoa Touch.
But you’ll sometimes have to fall back on libraries that are instead based on simple C functionality. Examples include Apple’s Quartz 2D and Address Book frameworks, as well as third-party libraries like SQLite. Expect object creation, memory management, and even variable creation to work differently for these non-Cocoa libraries.
When you fall back on non-Cocoa libraries, you’ll sometimes have to use Apple’s Core Foundation framework, which lies below Cocoa. Your first encounter with Core Foundation will be when we discuss the Address Book framework in chapter 9; we’ll provide more details about how to use Core Foundation at that point.
Although Core Foundation and Cocoa are distinct classes of frameworks, many of their common variable types are toll-free bridged, which means they can be used interchangeably as long as you cast them. Thus, for example, CFStringRef and NSString * are toll-free bridged, as you’ll see when we talk about the Address Book. The Apple class references usually point out this toll-free bridging for you.
2.3.2. The object hierarchy of the iPhone OS
Within these frameworks, you can access an immense wealth of classes arranged in a huge hierarchy. You’ll see many of these used throughout this book, and you’ll find a listing of even more in appendix A. Figure 2.5 shows many of the classes that you’ll use over the next several chapters, arranged in a hierarchy. They’re just a fraction of what’s available.
Figure 2.5. This hierarchy graph shows just a small selection of the classes available in the iPhone OS.

The NS Classes
The NS classes come from Core Services’ Foundation framework (the Cocoa equivalent of the Core Foundation framework), which contains a huge number of fundamental data types and other objects.
You should use the fundamental Cocoa classes like NSString and NSArray whenever you can, rather than C fundamentals like char* or a plain array. This is because they tend to play nicely with each other and with the UIKit frameworks, and therefore you’re less likely to encounter bizarre errors. Although it isn’t shown, NSNumber is another class you should be aware of. Although it shouldn’t be used in place of an ordinary number, it serves as a great wrapper when you need a number expressed as an object. This is especially useful for sending numbers via message passing. NSNumber is capable of holding many sorts of numerical values, from floats to integers and more.
The objects that can hold collections of values like NSArray (a numerical array) and NSDictionary (an associative array) are picky about your sticking to their NS brethren. You’ll need to wrap C variables inside Cocoa classes whenever you hand off objects to these arrays. Finally, though NSString can take many sorts of objects when you’re formatting a string, you should be aware that Cocoa objects may require a different formatting string than their C equivalents.
In two situations, you’ll find that these NS classes can be a deficit. First, if you’re using the Core Foundation framework, you’ll often have to take advantage of toll-free bridging by casting variables, as you’ll see starting in chapter 9, when we look at the Address Book. Second, if you’re using external APIs, you may need to convert some classes into their C equivalents. Chapter 9’s look at the SQLite API explores this possibility, with NSString objects often being converted to their UTF-8 equivalent.
The most important of Cocoa’s Foundation objects is NSObject, which contains a lot of default behavior, including methods for object creation and memory management; you’ll learn about these later in this chapter.
The UI Classes
The second broad category contains the UI classes. These come from Cocoa Touch’s UIKit framework, which includes all the graphical objects you’ll be using as well as all the functionality for the iPhone OS’s event model, much of which appears in UIResponder. That’s another topic we’ll return to soon.
2.3.3. Windows and views
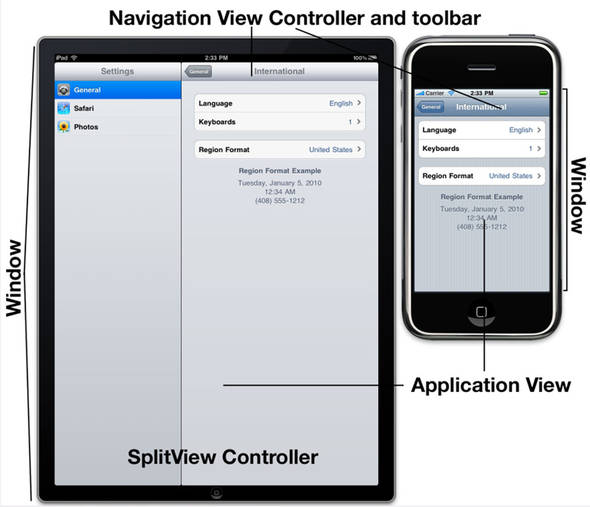
As the UI classes demonstrate, the iPhone OS is deeply rooted in the idea of a graphical user interface. Therefore, let’s finish our introduction to the iPhone OS by looking at some of the main graphical abstractions embedded in the UIKit. There are three major abstractions: windows, views, and view controllers.
A window is something that spans the device’s entire screen. An application has only one, and it’s the overall container for everything your application does.
A view is the content holder in your application. You may have several of them, each covering different parts of the window or doing different things at different times. They’re all derived from the UIView class. But don’t think of a view as a blank container. Almost any object you use from the UIKit will be a subclass of UIView that features a lot of behavior of its own. Among the major subclasses of UIView are UIControl, which gives you buttons, sliders, and other items with which users may manipulate your program, and UIScrollableView, which gives users access to more text than can appear at once.
A view controller does what its name suggests. It acts as the controller element of the Model-View-Controller triad and in the process manages a view, sometimes called an application view. As such, it takes care of events and updating for your view.
In this book, we’ve divided view controllers into two types. Basic view controllers manage a screenful of information (such as the table view controller), whereas advanced view controllers let a user move around among several subviews (such as the navigation bar controller and the tab bar controller). Figure 2.6 shows how these three types of objects interrelate.
Figure 2.6. A window contains one or more view controllers or views under the iPhone OS.
Windows, views, and view controllers are ultimately part of a view hierarchy. This is a tree of objects that begins with the window at its root. A simple program may have a window with a view under it. Most programs start with a window and have a view controller under that, perhaps supported by additional view controllers, each of which controls views that may have their own subviews. We’ll illustrate this concept more clearly in chapter 5 when we start looking at the basic view controllers that make this sort of hierarchy possible.
2.4. The iPhone OS’s methods
As you’ve seen, the iPhone OS has a complex and deep structure of classes. In this section, we look at object creation, memory management, event response, and lifecycle management.
Two of the most important classes are NSObject and UIResponder, which contain many of the methods and properties you’ll use throughout your programming. Thanks to inheritance, these important functions (and others) can be used by many different iPhone OS objects. We cover some of these foundational methods here to provide a single reference for their usage, but we’ll be sure to point them out again when you encounter them for the first time in future chapters.
2.4.1. Object creation
We talked earlier about how to define classes; but as we said at the time, the specifics of how instance objects are created from classes depend on the implementation of your framework. In the iPhone OS, the NSObject defines how object creation works.
You’ll meet a few different interfaces that are used to support object creation, but they all ultimately fall back to a two-step procedure that uses the alloc class method and the init instance method. The alloc method allocates the memory for your object and returns the object itself. The init method then sets some initial variables in that method. They usually occur through a single, nested message:
id newObject = [[objectClass alloc] init];
The alloc method from NSObject should always do the right thing for you. But when you write a new subclass, you’ll almost always want to write a new init method, because that’s where you define the variables that make your class what it is. Here’s a default setup for an init, which would appear as part of your @implementation:
- (id)init
{
    if (self = [super init]) {
// Instance variables go here
    }
    return self;
}
This code shows all the usual requirements of an init method. First, it calls its parent to engage in its class’s initialization. Then, it sets any instance variables that should be set. Last, it returns the object, usually with return self;.
The bare init is just one of a few major ways you can create objects in the iPhone OS.
The Argumentative Alternative
Sometimes you’ll want to send an argument with an init. You can do so with an initialization function that you name using the format initWithArgument:(argument). Other than the fact that you’re sending it an argument, it works exactly like a bare init. Here’s another example drawn from code you’ll see in upcoming chapters:
[[UITextView alloc] initWithFrame:textFieldFrame];
Initialization methods with arguments allow you to create nonstandard objects set up in ways that you choose. They’re common in the UIKit.
One initialization method with an argument deserves a bit of extra mention. initWithCoder: is a special initialization method that’s called whenever you create an object with Interface Builder—and thus is important if you want to do setup for such objects. We’ll return to Interface Builder in chapter 3.
The Factory Method Alternative
A final sort of init supported through the iPhone OS is the factory method. This is a one-step message that takes care of both the memory allocation and initialization for you. All factory methods are named with the format objecttypeWithArgument:(argument) Here’s another real example:
[UIButton buttonWithType:UIButtonTypeRoundedRect];
Class factory methods make messaging a little clearer. They also have the advantage of handling some memory management, which is the topic of the next major category of iPhone OS methods.
Object Creation Wrap-Up
We’ve summarized the four major ways that the iPhone OS supports the creation of objects in table 2.3. As witnessed by the examples, you’ll use all these methods as you move through the upcoming chapters.
Table 2.3. The iPhone OS supports several methods that you can use to create objects. Different methods are supported by different classes.
|
Method |
Code |
Summary |
|---|---|---|
| Simple | [[object alloc] init]; | Plain initialization |
| Argument |
[[object alloc] initWithArgument:argument]; |
An initialization where one or more arguments is passed to the method |
| Coder |
[[object alloc] initWithCoder:decoder]; |
An initialization with an argument used for Interface Builder objects |
| Factory |
[object objecttypeWithArgument:argument]; |
A one-step initialization process with an argument |
2.4.2. Memory management
Because of power considerations, the iPhone OS doesn’t support garbage collection. That means every object that’s created must eventually have its memory released by hand—at least, if you don’t want to introduce a memory leak into your program.
The fundamental rule of memory management in the iPhone OS is this: if you allocate memory for an object, you must release it. This is done via the release message (which is once again inherited from NSObject):
[object release];
Send that message when you’re all done using an object, and you’ve done your proper duty as a programmer.
Note that we said you only must release the memory if you allocated the memory for it. If you look back to the class factory methods we talked about in the previous section, you’ll see that you don’t allocate the memory for those (because you don’t send alloc messages), which means you’re not responsible for releasing it. Instead, the class object that does the creation has to clean up its memory.
How does the OS know when you’ve finished working with the object it created for you? That’s done through the wonders of autorelease.
The Autorelease Alternative
If you’re responsible for the creation of an object and you’re going to pass it off to some other class for usage, you should autorelease the object before you send it off. This is done with the autorelease method:
[object autorelease];
You’ll typically send the autorelease message just before you return the object at the end of a method. After an object has been autoreleased, it’s watched over by a special NSAutoreleasePool. The object is kept alive for the scope of the method to which it’s been passed, and then the NSAutoreleasePool cleans it up.
Retaining and Counting
What if you want to hold onto an object that has been passed to you and that will be autoreleased? In that case, you send it a retain message:
[object retain];
When you do this, you’re saying you want the object to stay around, but now you’ve become responsible for its memory as well: you must send a release message at some point to balance your retain.
At this point, we should probably back up and explain the underlying way that the iPhone OS manages memory objects. It does so by maintaining a count of object usage. By default, it’s set to 1. Each retain message increases that count by 1, and each release message reduces that count by 1. When the count drops to 0, the memory for the object is freed up.
Therefore, all memory management can be thought of as pairs of messages. If you balance every alloc and every retain with a release, your object will eventually be freed up when you’re done with it.
Memory Management Wrap-Up
Table 2.4 provides a quick summary of the methods we’ve looked at to manage the memory used by your objects.
Table 2.4. The memory-management methods help you keep track of the memory you’re using and clean it up when you’re done.
|
Method |
Summary |
|---|---|
| alloc | Part of the object-creation routine that allocates the memory for an object’s usage. |
| autorelease | Request to reduce an object’s memory count by 1 when it goes out of scope. This is maintained by an NSAutoreleasePool. |
| release | Reduces the object’s memory count by 1. |
| retain | Increases the object’s memory count by 1. |
For more information on memory management, including a look at the copy method and how this all interacts with properties, look at Apple’s Objective-C references.
2.4.3. Event response
The next-to-last category of methods that we examine for the iPhone OS is event response. Unlike with object creation and memory management, we only tackle this issue briefly, because it’s much better documented in chapter 6. The topic is important enough that we want to offer a quick overview of it now.
Events can appear on the iPhone or iPad in three main ways: through bare events (or actions), through delegated events, and through notification.
Whereas the methods of our earlier topics all derived from NSObject, event response instead comes from the UIResponder object, whereas notification comes from the NSNotificationCenter. You won’t have to worry about accessing responder methods and properties because UIResponder is the parent of most UIKit objects, but the NSNotificationCenter requires special access.
Events and Actions
Most user input results in an event being placed into a responder chain. This is a linked set of objects that, for the most part, goes backward up through the view hierarchy. Any input is captured by the first responder, which tends to be the object the user is directly interacting with. If that object can’t resolve the input, it sends it up to its superview (for example, a label might send it up to its full-screen view), then to its superview, all the way up the chain (up through the views, then up through the view controllers). If input gets all the way up the view hierarchy to the window object, it’s next sent to the application itself, which tends to pass it off to an application delegate as a last resort.
Any of these objects can choose to handle an event, which stops its movement up the responder chain. Following the standard MVC model, you’ll often build event response into UIViewController objects, which are pretty far up the responder chain.
For any UIControl objects, such as buttons, sliders, and toggles, events are often turned into actions. Whereas events report touches to the screen, actions instead report manipulations of the controls and are thus easier to read. Actions follow a slightly different hierarchy of response.
Delegates and Data Sources
Events can be sent to an object in a way other than via a first responder: through a delegate. This is an object (usually a view controller) that says it will take care of events for another object (usually a view). It’s close kin to a data source, which is an object (again, usually a view controller) that promises to do the data setup and control for another object (again, usually a view).
Delegation and data sourcing are each controlled by a protocol, which is a set of methods the delegate or data source agrees to respond to. For example, a table’s delegate might have to respond to a method that alerts it when a row in the table has been selected. Similarly, a table’s data source might describe what all the rows of the table look like.
Delegates and data sources fit cleanly into the MVC model used by Objective-C, because they allow a view to hand off its work to its controller without having to worry about where each of those objects is in the responder chain.
Notifications
Standard event response and delegation represent two ways that objects can be alerted to standard events, such as fingers touching the screen. A third method can also be used to program many different sorts of activities, such as the device’s orientation changing or a network connection closing: the notification.
Objects register to receive a certain type of notification with the NSNotificationCenter and afterward may process those notifications accordingly. Again, we’ll discuss this topic in chapter 6.
2.4.4. Lifecycle management
By now, you know how to create objects using the iPhone OS and how to release their memory when you’re done with them. In this discussion, we’ve neglected one other topic: how to recognize when objects are being created and destroyed—starting with your application.
Table 2.5 summarizes some of the important messages that will be sent as part of the lifecycle of your program. To respond to them, you fill in the contents of the appropriate methods in either an object or its delegate—which requires writing a subclass and is one of the prime reasons to do so.
Table 2.5. Several important methods let you respond to the lifecycle of your application or its individual objects.
|
Object |
Summary |
|
|---|---|---|
| applicationDidFinishLaunching: | UIApplicationDelegate | Application has loaded. You should create initial windows and otherwise start your program. |
| applicationDidReceiveMemoryWarning: | UIApplicationDelegate | Application received a low-memory warning. You should free up memory. |
| applicationWillTerminate: | UIApplicationDelegate | Application is about to end. You should free up memory and save state. |
| init | NSObject | Object is being created. You should initialize it here. |
| dealloc | NSObject | Object is freeing up its memory. You should release any objects that haven’t been autoreleased. |
Note that we’ve included our old friend init here, because it forms a natural part of the object lifecycle. You should look at the individual Apple class references, particularly UIApplicationDelegate, for other methods you may want to respond to when writing programs.
With that, we’ve completed our look at the big-picture methods of the iPhone OS. You’ve not yet seen them in real use, so bookmark these pages—we’ll refer back to them when you begin programming in a couple of pages.
2.5. Summary
The SDK is your toolbox. Its most important elements are Xcode, the IDE, and Interface Builder, the graphical object creator.
Objective-C is your programming language. It’s an object-oriented version of C that has some unique syntax thanks to its elegant Smalltalk inspiration. After you get used to it, you’ll find it simple and easy to read.
The iPhone OS is a layered set of frameworks, which contains everything you need to make your iPhone and iPad programming easy. Much of the rest of this book talks about how to make use of the right frameworks at the right time.
With all that in your back pocket, you’re ready to start programming using the SDK. This task will begin on the next page when you dive into the Xcode program that you downloaded at the start of this chapter.