Chapter 3 – Designing and Implementing Workloads
“Money doesn't bring happiness. People with ten million dollars are no happier than people with nine million dollars.”
How to Configure Priority Scheduler
- Schmon command-line utility will bring you back to your UNIX or LINIX days.
- Priority Scheduler Administrator (PSA) via Teradata Manager is a GUI that does the same thing as schmon, but in a prettier way.
- Teradata Dynamic Workload Manager (TDWM) or Viewpoint Workload Designer when TASM workloads are enabled.
The schmon uses a command-line interface, but Xschmon uses graphical user interface that uses the X-Window system.
Here is an example of schmon in action. Don't be prepared to understand it quite yet.
# schmon -b 1 Tactical 40 100
The Priority Scheduler Facility (PSF) provides a resource partition hierarchy that allows you to control CPU resource. This is like hitting the gas or the brake on a car because it gives the Teradata system the ability to speed up or slow down based on the circumstances in front of you. Now, queries designed for speed hit the gas and long-running queries, or batch queries, can travel long distances with steady speeds.
Workload Designer

Select the Add Content menu and then TASM and then Workload Designer. This is the first screen you will see. This is where you will create your Rulesets.
The Three Areas of the Workload Designer

Notice that there are three areas: Local, TDExpres and Active. Local is where you create and edit all Rulesets. The TDExpress is the current system that you will copy your Rulesets to and the Active will make the Ruleset Active.
How the Area of Workload Designer are Used

Before we begin creating our first Ruleset, let me first explain the concepts here. You will use the Local to Create the Ruleset. You can create many different Rulesets here. Once a Ruleset is created, you can drag that to the TDExpres (system name). You can have many different Rulesets here, also. You can then drag a Ruleset from the TDExpres to the Active area where it becomes the Active Ruleset. In the Active area, you can only have 1 Ruleset active.
How to Create a Ruleset

To create a ruleset, just click on the CREATE button (circled in red).
The First Step to Creating a Ruleset
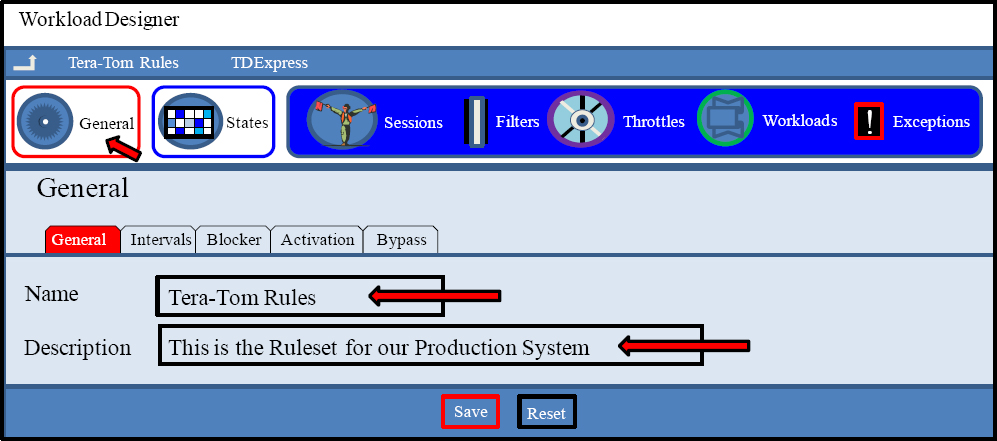
Click on General (small red arrow) and then provide a Name for your Ruleset. Then, give a Description of your Ruleset and hit Save (at the bottom). Congratulations! You have just created your first Ruleset. That is as basic as it gets. Soon, we will show you how to build the Ruleset with States and then Workloads.
Returning to the Workload Designer Main Screen
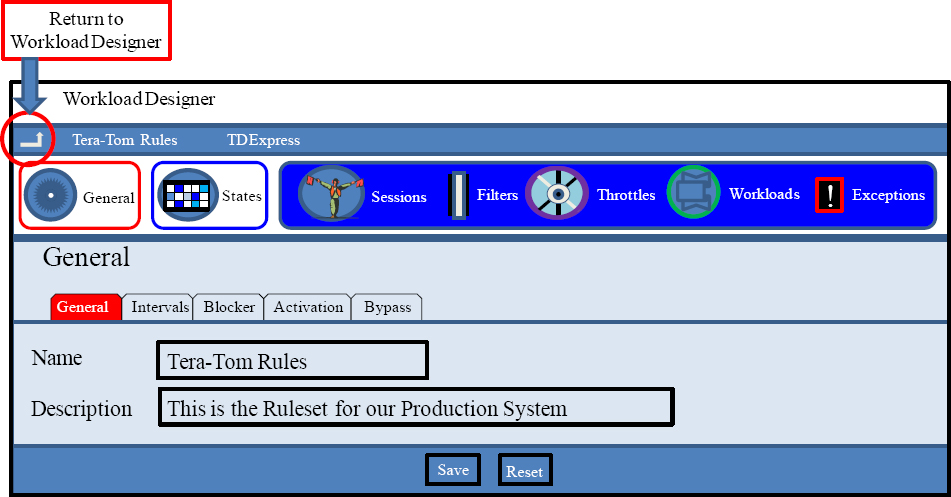
Let's return to the main screen of the Workload Designer and see what is now different since we have actually created a Ruleset called “Tera-Tom Rules”.
A Basic Ruleset in the Working Area

We have created a simple Ruleset called Tera-Tom Rules. We have NOT placed any real rules in there yet. I merely wanted to show you the bare basics to start. Once we edit the ruleset and add states, workloads, and other criteria for the rules, we will be ready to move it over the TDExpress. Then, we will move it to the Active area where our rules will be set, and then, and only then, will the Ruleset become Active on the TDExpres system.
Editing a Ruleset

Click on the Ruleset name, which is Tera-Tom Rules, and then hit the down arrow and you will see a menu. Choose View/Edit and you are ready to Edit.
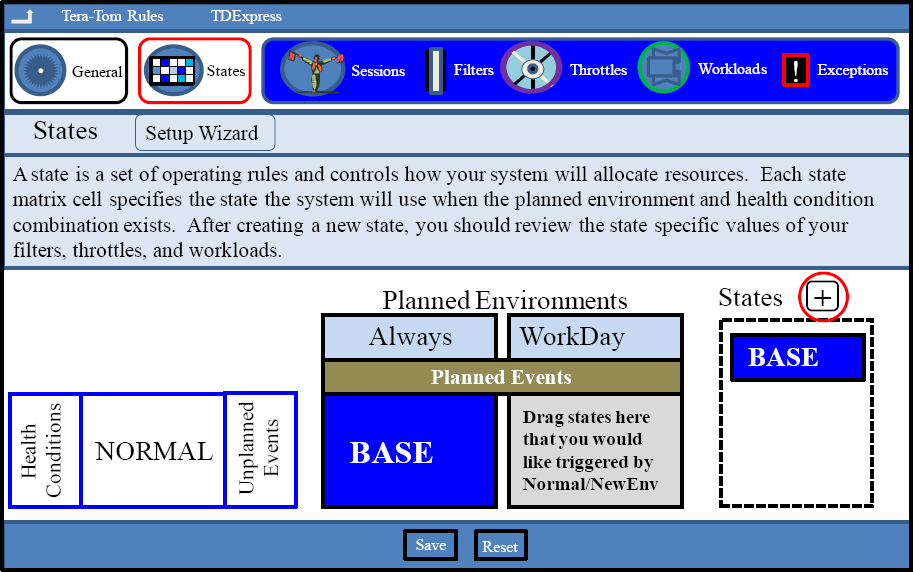
The States
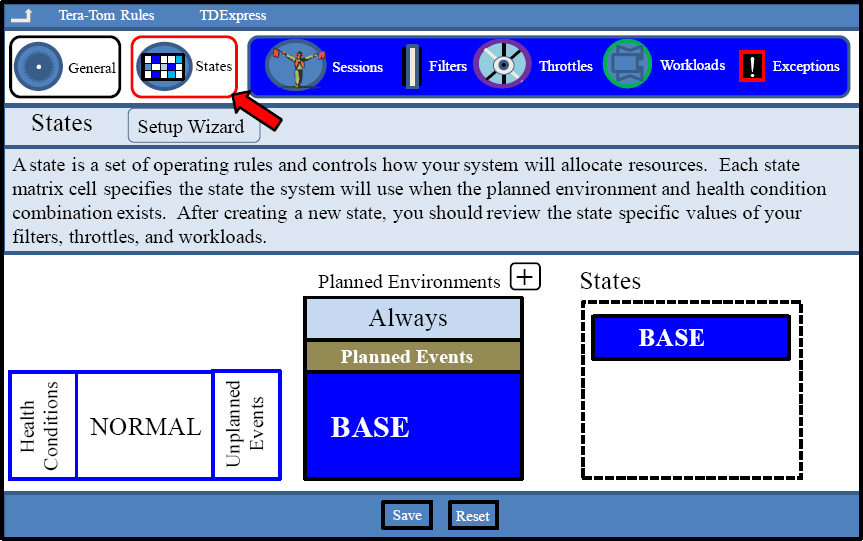
When you first come into the States, you will see the default environment and that Base is the only state. This means we only have one planned environment and one state.
States – Adding Another Planned Environment

Click on the plus sign (circled in red) to add a Planned Environment. You need to hover over Planned Environments (in red) to see + sign. See what happens on the next page.
Editing the Name of the NewEnv Planned Environment

We now have a new planned environment with the default name NewEnv. We will hover and then click on the edit icon (circled in red) to edit and change the name.
Changing the Planned Environment Name to a Good Name

As soon as we hit the edit button, we could change the name from NewEnv to what we wanted. This was changed this planned environment to WorkDay.
Adding a New State
We can add additional States by hovering near the States icon and the + sign will emerge (red circle). A single click and a new state will emerge. See the next page.
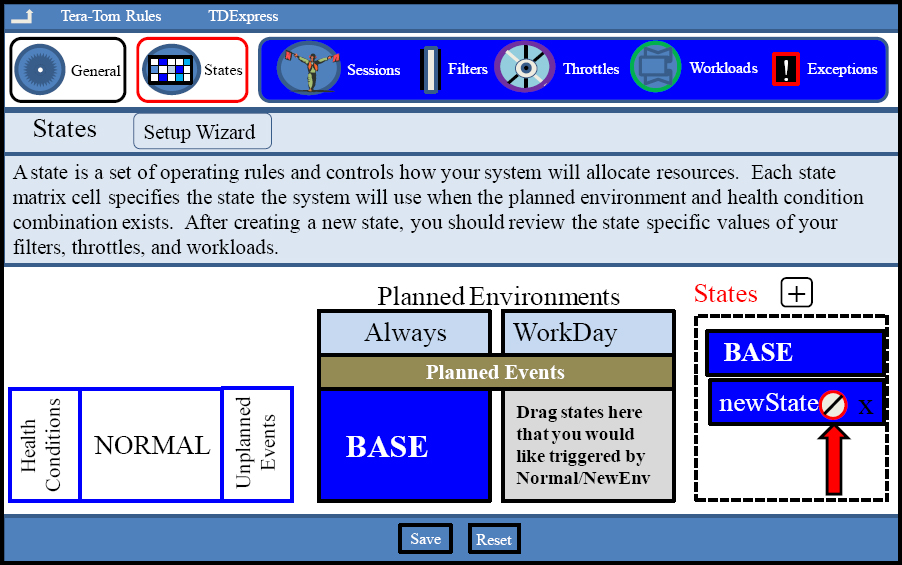
A New State is Born

As you can see, by merely hovering over the States keyword and clicking on the + sign, we have automatically added a new state with a default name of newState.
Editing the Default State Name of newState
If you now hover next to the keyword newState, the Edit icon (circled in red) appears. Click on this, and you can edit the name, but don't call it Base, Always, or WorkDay.
We Now have a New State named DayState

We hovered next to the keyword and used the Edit icon (circled in red), and then we changed the name from newState to DayState. This name has to be Unique.
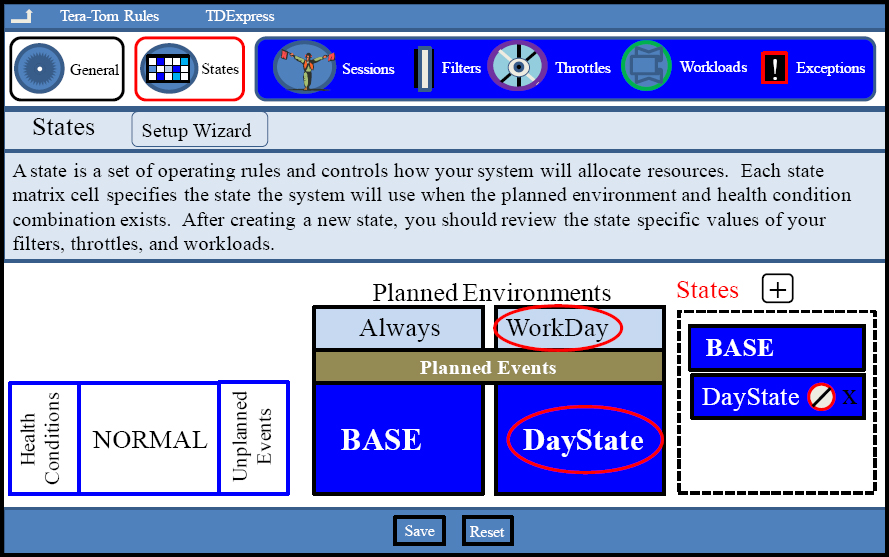
Drag a State (DayState) to a Planned Environment (WorkDay)
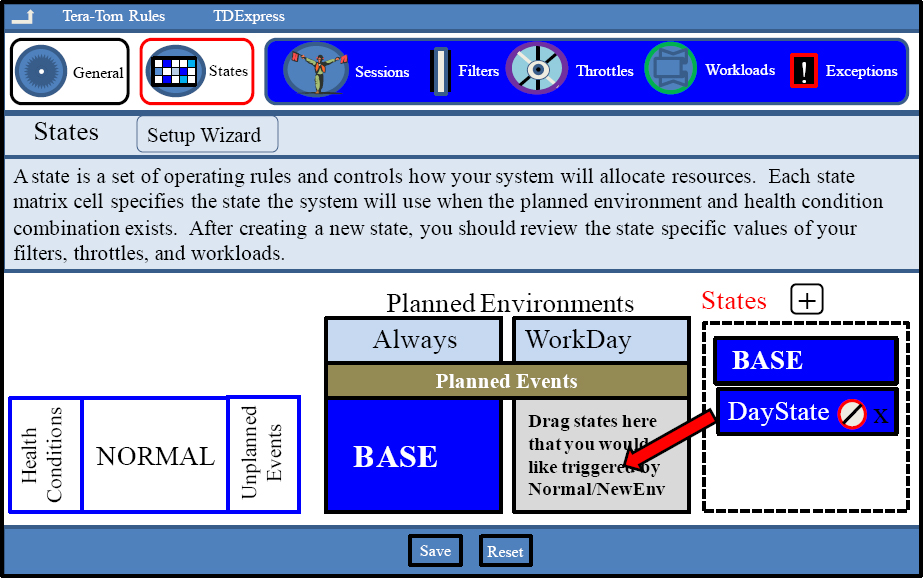
Drag the new state that we have named DayState to the Planned Environment box (under WorkDay) as the red arrow suggests, and then check out the next slide.
Drag a State (DayState) to a Planned Environment (WorkDay)

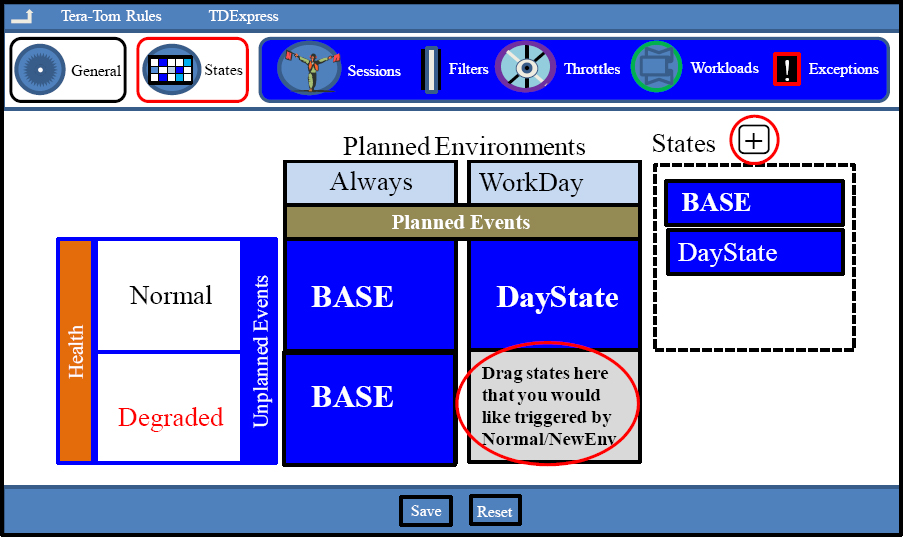
We have now placed the state called DayState in the Planned Events area under WorkDay. We now have a default planned environment and a DayState environment.
Do NOT Forget to Hit Save
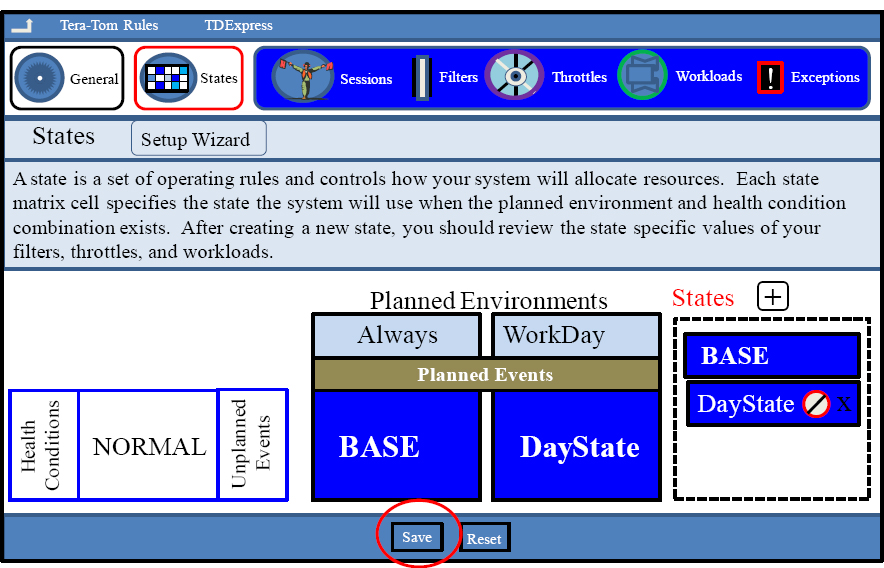
You must hit the SAVE button (in red) whenever you make changes. Forget at your own peril. Whenever you make any change, remember to hit Save.
We now Need to Create a Planned Event

Hover to the right of the Planned Events area (red arrow), and the Edit button will appear (red circle). Press the edit button to add a new event. Turn the page!
Create a Planned Event to Define the Timeframes
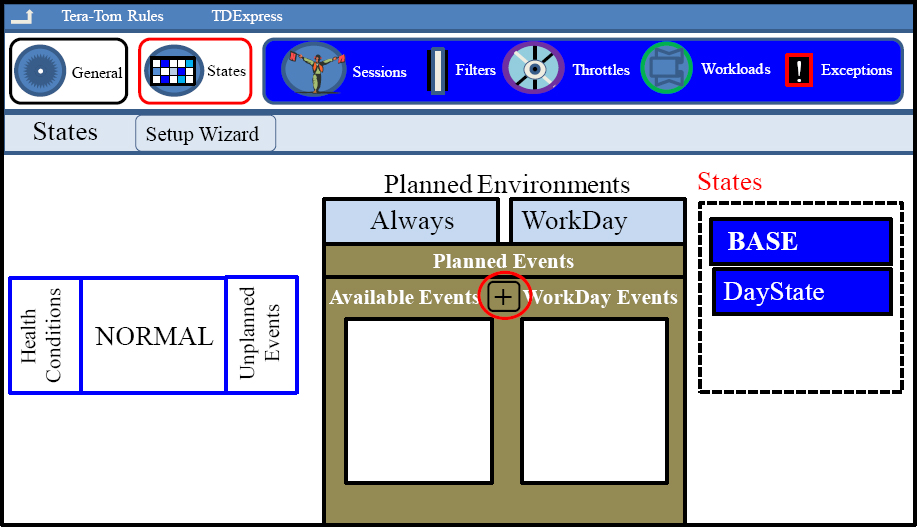
You will see Available Events and Workday Events. This is because there is always the Default Planned Environment and because we already created a WorkDay Environment. Click on the plus sign (+) circled in red to create your first event.
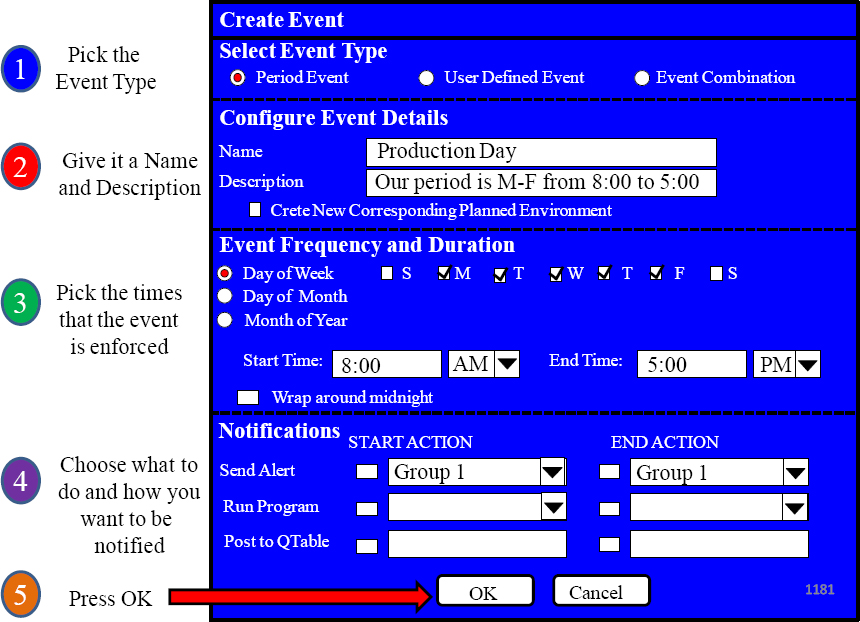
The Planned Event Screen
Your Event is now in the Available Events Tab
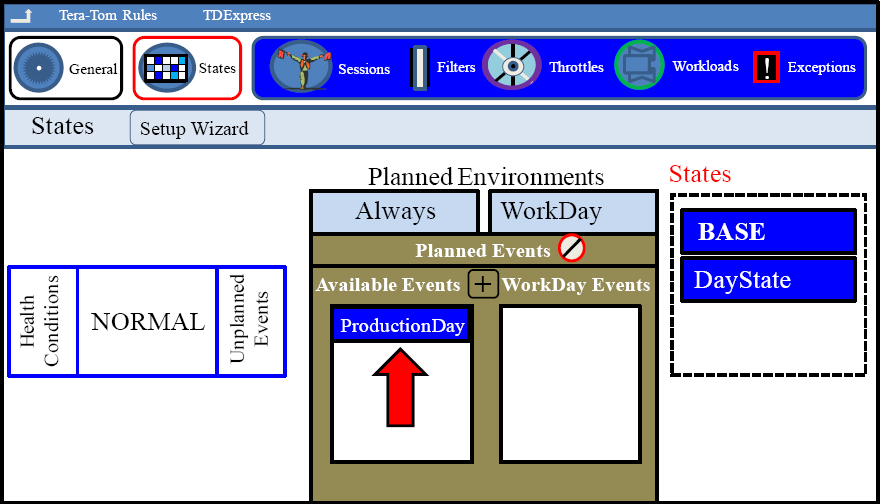
The event we just created in the previous slide we named ProductionDay. This is now under the Available Events tab (red arrow). This can only be seen if you hover and then hit the edit button next to Planned Events (![]() ).
).
Drag and Drop your Event to your Planned Environment
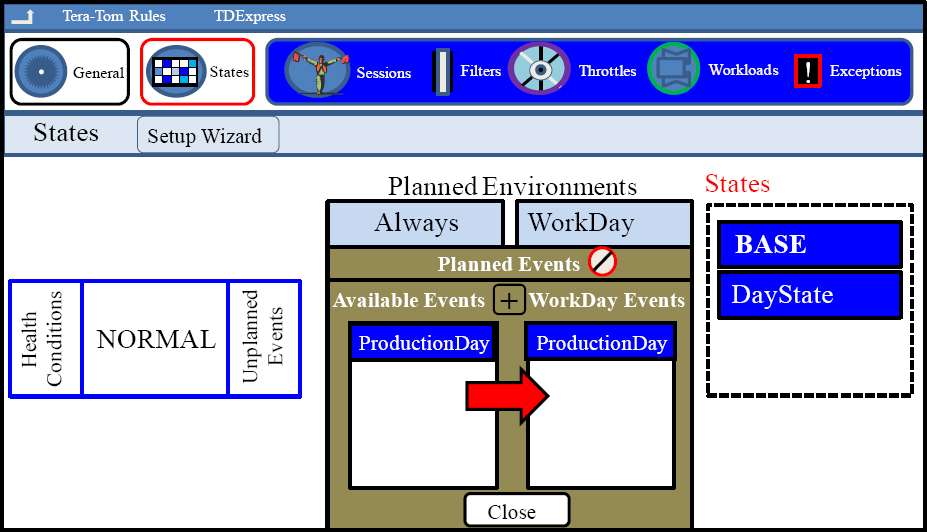
Drop and Drag from the Available Events into the Planned Environments in which you want the event to be active. We dragged ProductionDay to the WorkDay environment. Hit close and then turn the page to see what has happened.
You have a Timeframe for the Planned Environment DayState
The Planned Environment WorkDay has updated its DayState to have the Monday thru Friday from 8:00 AM to 5:00 PM timeframe. Your environment is taking shape!
Creating a Degraded Condition with our Normal Condition

We have a Planned Environment called Workday and a state called DayState defined under Normal Conditions. Hover and click the + sign to create a new Health condition.
Creating a Degraded Condition with our Normal Condition

We have a Planned Environment called Workday and a state called DayState defined under Normal Conditions. Hover and click the + sign to create a new Health condition.
Editing your New Condition to become a Degraded Condition

Now that we have a newCond for our Health (in addition to our Normal), we need to edit the newCond and give it a name. Hover and press the newCond edit button (red arrow).
Edit Health Conditions Screen

Once we hover and hit the edit button in the newCond Health area (red arrow), the Edit Health Condition Screen comes up. Turn the page to see our Edit Changes.
Our New Edited Health Condition named Degraded
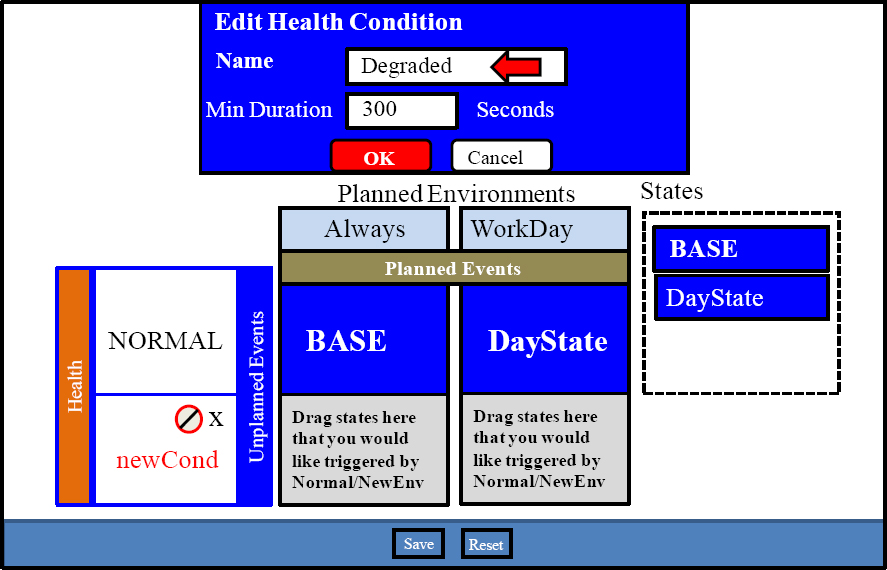
We have now changed the name from newCond to Degraded once we hit OK. Turn the page, and you will see the changes take effect.
We Now have a New Degraded Condition

As you can see, we have now added a new Health Condition called Degraded. We defined that if the system is degraded for 300 seconds (5 min), it is in Degraded mode. Now, let's next define what we want the system to do when in Degraded Health.
Don't Forget to Now Hit the Save Button
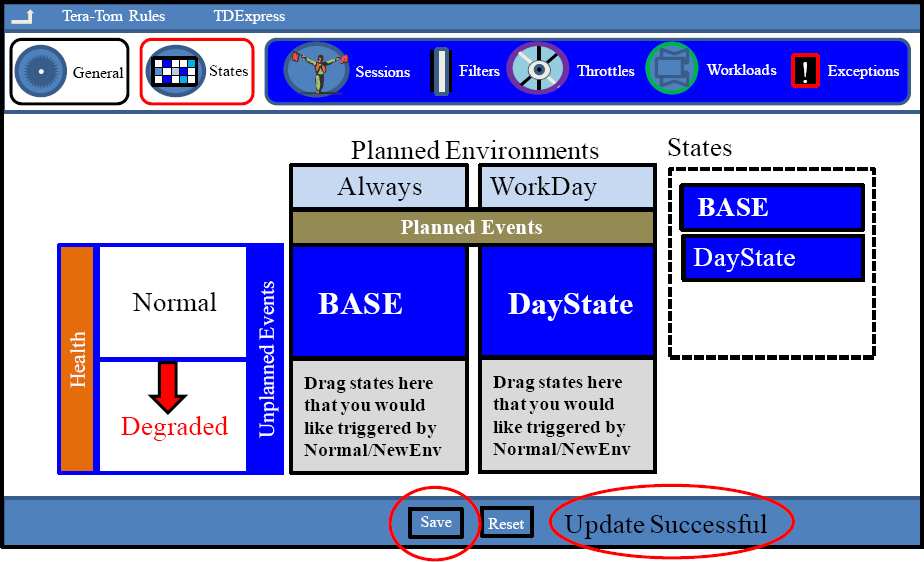
Hit the Save button (red circle) to ensure your changes will take effect. Notice the words Update Successful once you hit Save. It is there that you will see your success or an error message.
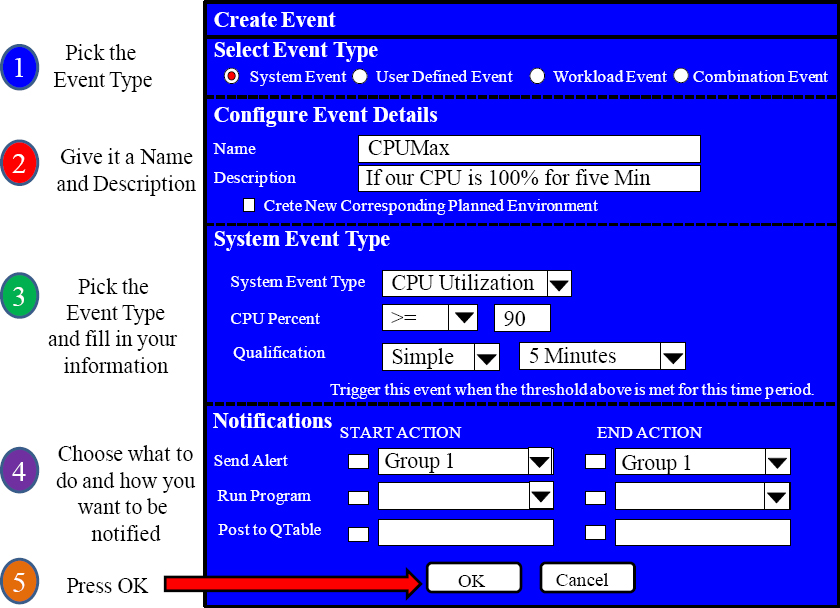
Let's Define our Degraded Health when CPU hits 100%
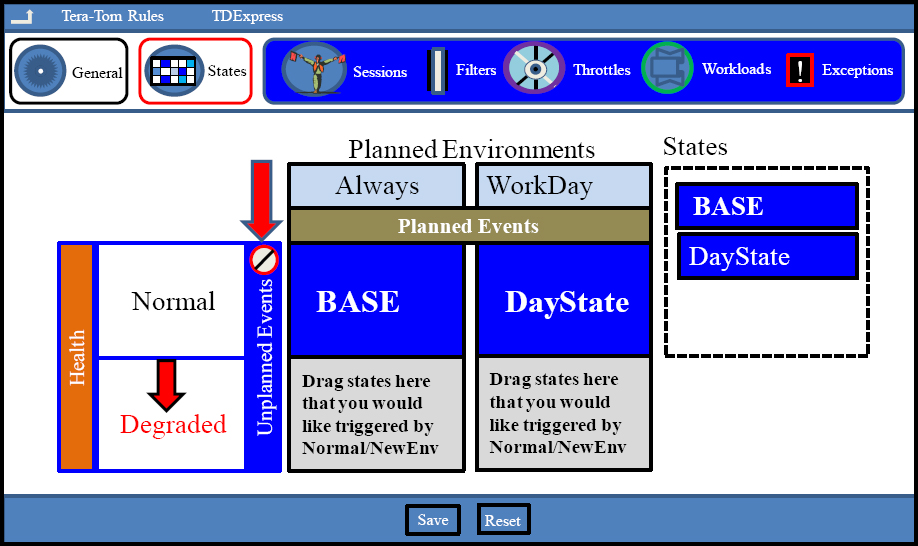
Now that we have a Degraded Health set up, we need to define what makes the system Degraded. The following slides will attempt to define Degraded when CPU hits 100% for five continuous minutes. To do so, you must hit the Unplanned Events Edit button.
The Available Events Screen
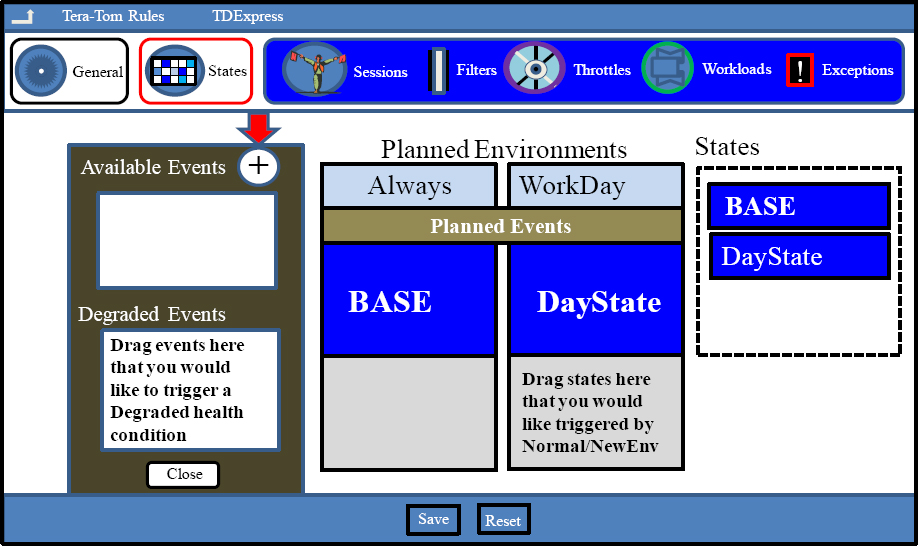
The Available Events screen appears and we can hit the plus sign (+) (red arrow) and define our event. Hit the plus sign, and then check out the next screen.
The Create Event Screen
The Available Events Screen Now Shows our Event

The Available Events screen now shows our CPUMax event that we just created. Now, Drag and Drop it in the Degraded Events area below. Turn the page to see the results.
After we Drag and Drop the Event into the Degraded Events

After we Drag and Drop our Available Event CPUMax in the Degraded Events area, it will now define our Degraded Events. Hit close and then Save for a successful update.
Drag the Base State to the Degraded/Always Environment
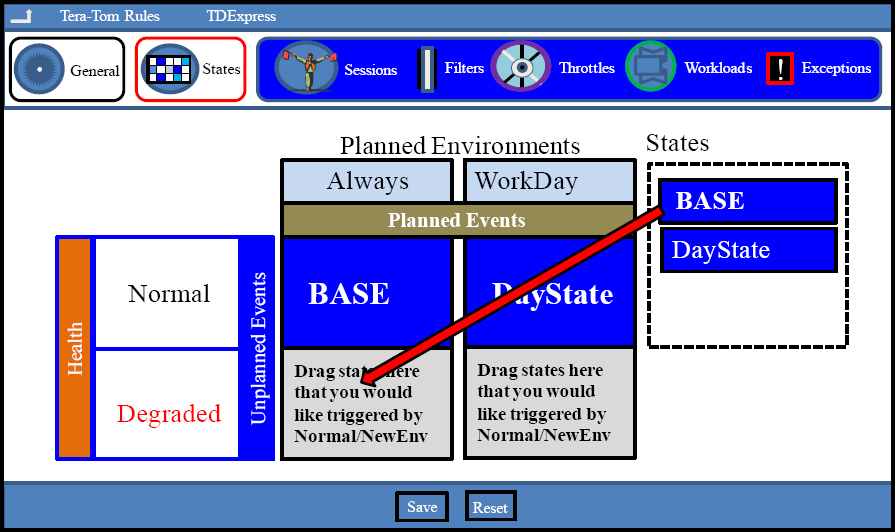
Drop and Drag the BASE state into the Degraded/Always Planned Environment. This means that if the system is in Degraded mode, we will keep the same BASE State as a default for this area. Turn the page to see what happens.
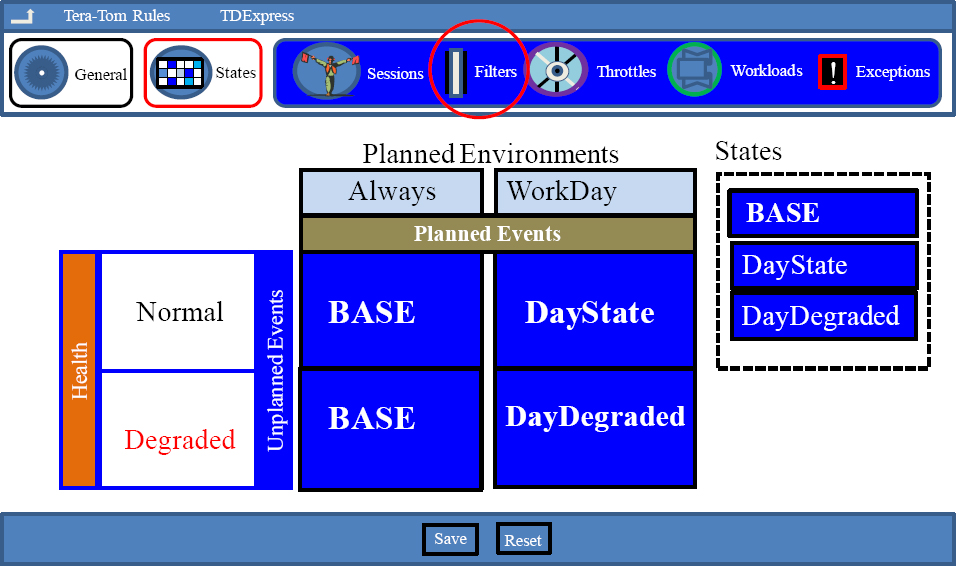
Our Default of BASE is Set in the Degraded Environment
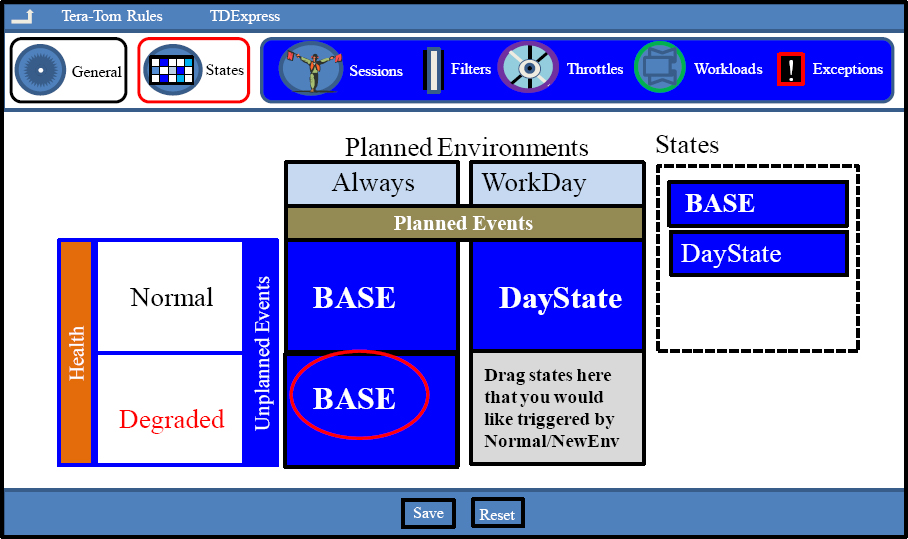
The Degraded Health has been defined and a default state of BASE has been dropped and dragged. So now, the system will follow the default rules (BASE) if the system is in Normal or Degraded health unless it is from Mon-Fri from 8:00 AM to 5:00 PM.
Let's Create a New State for our Degraded Workday
It is time to create a new state that we can eventually drop and drag into our Degraded Planned Environment. That will help us define what rules we want the system to follow during our work day when the system has Degraded health. Click on the plus sign (+).
Let's Create a New State for our Degraded Workday

Once we clicked on the plus sign (+) (red circle), a new state has been created with the default name newState. If we hover over newState, we can edit it (blue arrow). Let's do that now and give our newState a meaningful name such as DayDegraded.
Let's Create a New State for our Degraded Workday

Once we clicked on the plus sign (+) (red circle), and edited our newState, we then hovered on newState and edited its name to DayDegraded.
Drag the new state DayDegraded to our Planned Environment

Drag our new state DayDegraded to where the Degraded Health and the Planned Environments WorkDay intersect. Turn the page to see what happens.
Hit Save to keep your Changes

Our new state DayDegraded is now in its proper place. Make sure you hit Save (red circle) in order to keep your changes.
Limiting the Sessions

During a Degraded state, we might want to limit the number of sessions that are running on the system. To set the limit for sessions, click on the Sessions area (red circle).
When you First come to the Sessions Screen
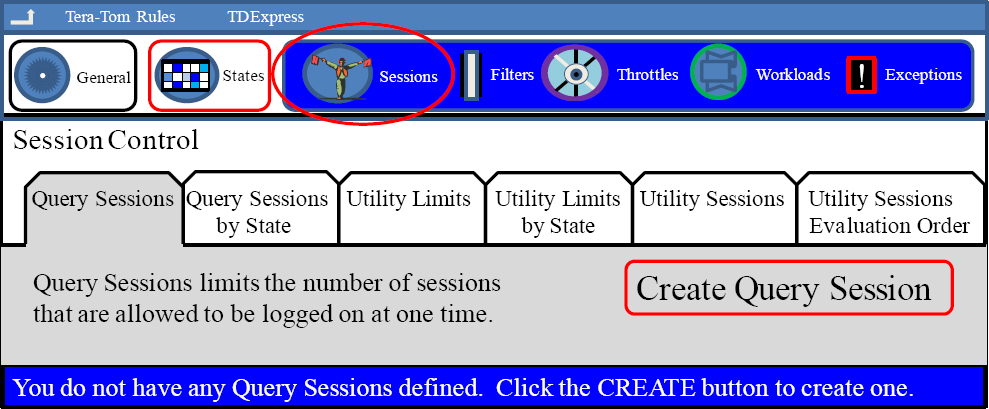
When you first enter the Sessions area (red circle), you will see the Session Control screen, and you will be able to create a query session (red rectangle). Click on the Create Query Session button, and turn the page to better understand the entire process.
Query Session Limit – The General Tab
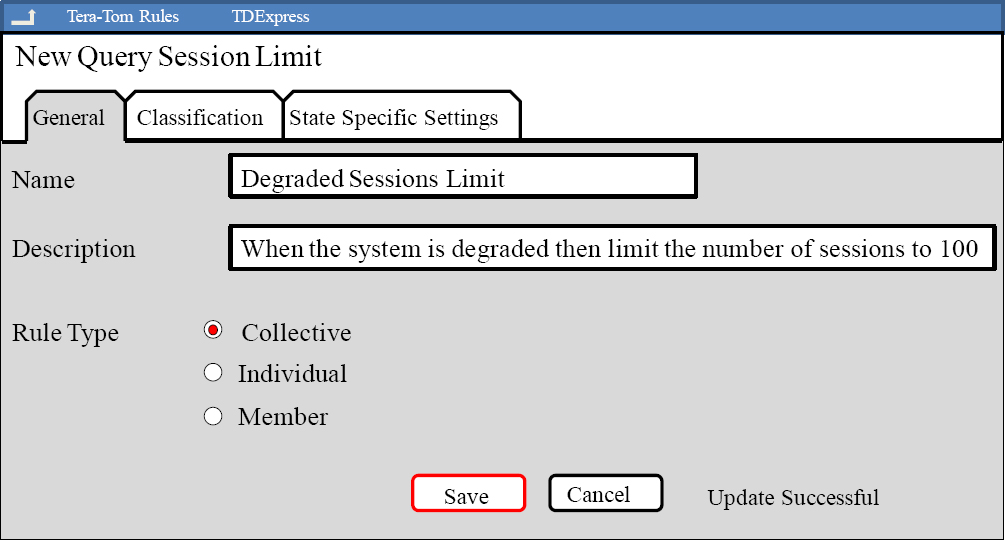
In the General Tab, give the Query Limit rule a Name, a Description and choose whether or not you want the session limit to be collective (everyone combined), individual where you choose a person or persons, or a member of a particular group. Then, remember to hit save and look for Update Successful.
Creating a Session Limit for the WorkDay when DayDegraded

Since we want to set the sessions limit for the degraded WorkDay, click on it (in red). Once you hover near it, you will see the Edit button. Turn the page to see what happens.
Creating a Session Limit for the WorkDay when DayDegraded
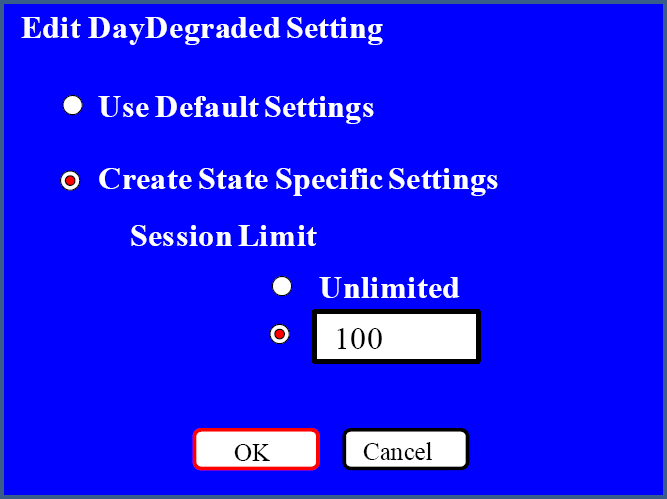
After we clicked on the Edit button in the Degraded DayDegraded state, we received this picture. Here, we have checked and placed 100 sessions as a limit. Hit OK.
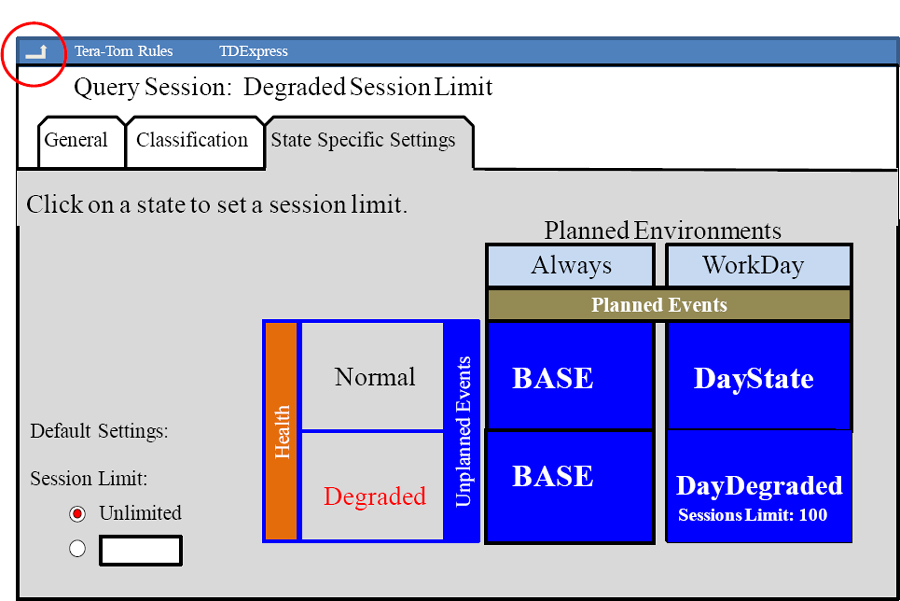
A Successful Creation of a Session Limit on DayDegraded

As you can now see, the DayDegraded (red box) now has a Sessions Limit of 100!
Creating Filters
During a Degraded state, we might want to place a Filter on the system. To create a Filter, click on the Filters area (red circle).
When you First come to the Filters Screen

When you first enter the Filters area (red circle), you will see the Filters screen and will be able to create a Filter (red rectangle). Click on the Create Filter button, and turn the page to better understand the entire process.
Creating a New Filter – The General Tab

In the General Tab, give the Filter rule a Name, a Description, and choose whether or not you want a warning only. Otherwise, we will make plans to have the system abort all product joins if the system is in a degraded mode. Don't forget to hit save.
Creating a New Filter – The Classification Tab

In the Classification Tab, click on the menu and choose Query Characteristics. We are attempting to abort all Query Characteristics that are product Joins. Don't forget to then choose Add, and remember to hit Save. The Save and Reset buttons are probably hidden until you scroll down to find them. Check out the next screen, and you will see.
Edit Query Characteristics Criteria

This screen above has more options than shown. We did, however, click on the Join Type, and from the menu, chose No Product Join. Then, we click OK.
Creating a New Filter – The General Tab
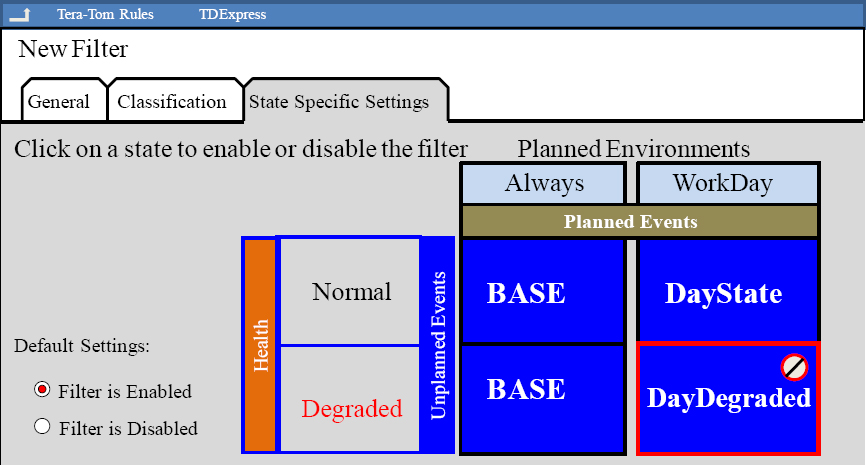
In the State Specifics Settings tab, you can now click on a state, and so we will click on DayDegraded (red box) and hit the edit button (red circle). Then turn the page.
Edit the Filter for the WorkDay when DayDegraded

After we clicked on the Edit button in the Degraded DayDegraded state, we received this picture. Here, we have checked the Filter is Enabled button and then Hit OK.
Creating a New Filter – The Classification Tab

In the Classification Tab, click on the menu and choose Query Characteristics. We are attempting to abort all Query Characteristics that are product Joins. Don't forget to then choose Add and remember to hit Save. The Save and Reset buttons are probably hidden until you scroll down to find them. Check out the next screen you will see.
Utilizing Throttles

During a Degraded state, we might want to put some throttles in place. A throttle is like a stop light where it will delay a query if throttle conditions are met. To create a throttle, first select the throttle icon (red circle), and then turn the page to see what happens.
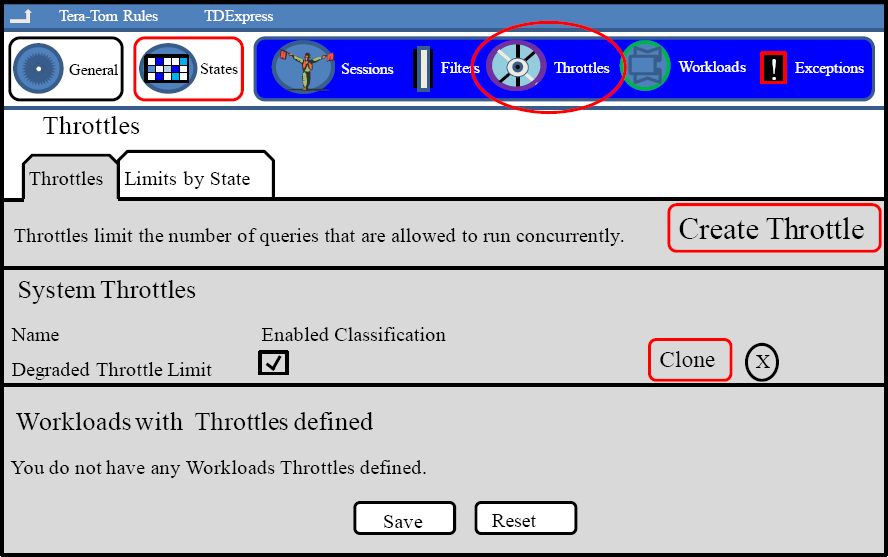
Throttles – The Throttles Tab

In the Throttles Tab, you see that we have no Throttles defined so we will hit the Create Throttle button (in red) and create our first throttle.
Throttles – New Throttles Tab
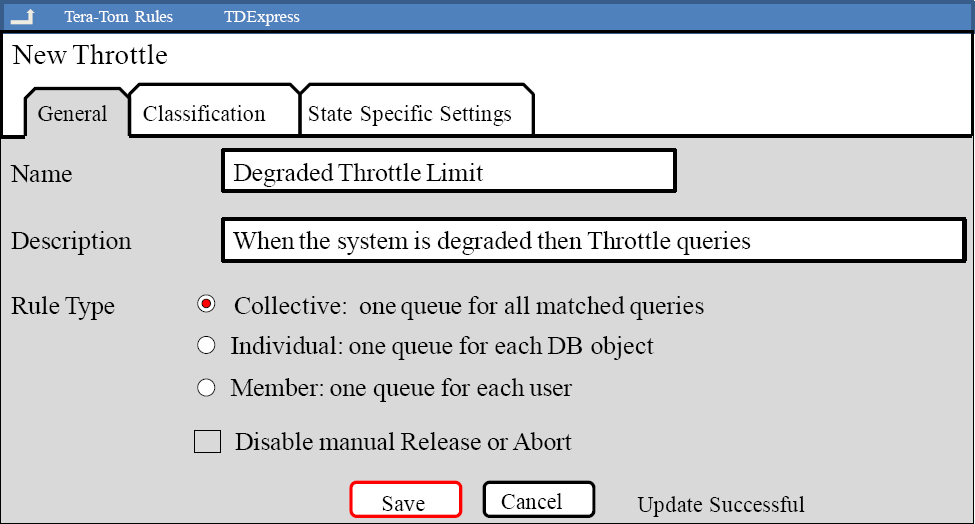
In the General Tab, give the Throttle rule a Name, a Description and choose whether or not you want the Throttle to be collective, individual, a member. You also have the option to disable manual Release or Abort. Then, remember to hit save, and look for Update Successful.
Throttles – New Throttles Tab

In the State Specific Settings Tab, choose the state of DayDegraded (red box), and then hover and then click on the edit button (circled in red). Check out what comes next.
Edit the Throttle for the WorkDay when DayDegraded
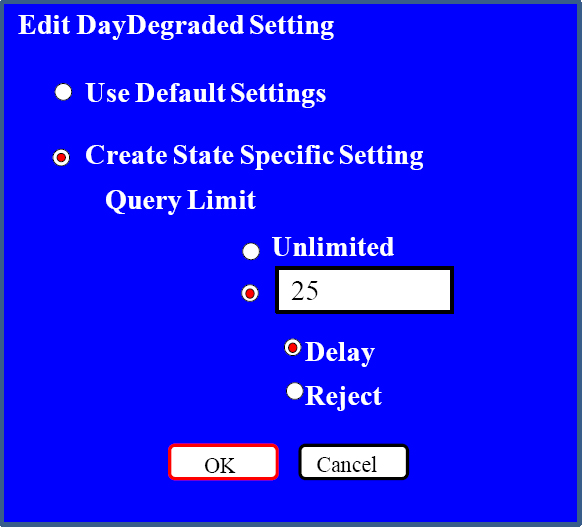
After we clicked on the Edit button in the Degraded DayDegraded state, we received this picture. Here, we have created a Throttle that will limit the queries running to 25. We will delay the queries after 25. Then, make sure you hit OK.
Throttles – New Throttles Tab

In the State Specific Settings Tab, we can now see (inside red box) that the Query Limit is 25 and the keyword Delay. Don't forget to scroll down and hit save.
Throttles – The Throttles Tab
In the Throttles Tab, you now see that we have our throttle named Degraded Throttle Limit defined. We have successfully defined a Throttle when the system is degraded.
Let's Go Back and Activate our Rule Set
To go back, just hit the back arrow (red circle).
To Prepare for Activation, Move the Ruleset to the Ready

In order to Activate the Rule Set named “Tera-Tom Rules”, just click on the menu and choose Make Ready. This will move it to our system TDExpress.
The Ruleset is in the Ready and now we can Activate
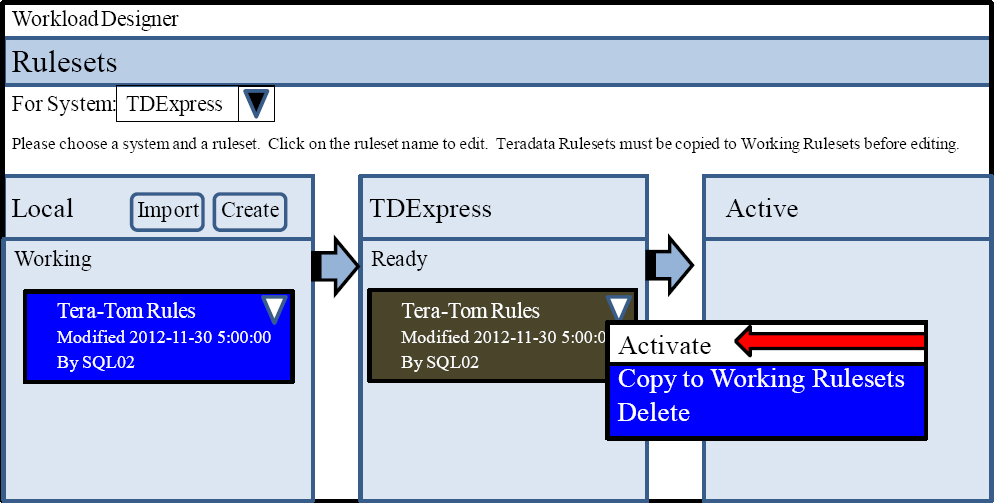
As you can now see, the Ready are for TDExpress now has the Tera-Tom Rules. Now, let's prepare to activate Tera-Tom Rules to the Active Area. Click on the menu, and choose Activate (red arrow). Now, turn the page, my friend, and check it out.
The Ruleset is in the Ready and now we can Activate
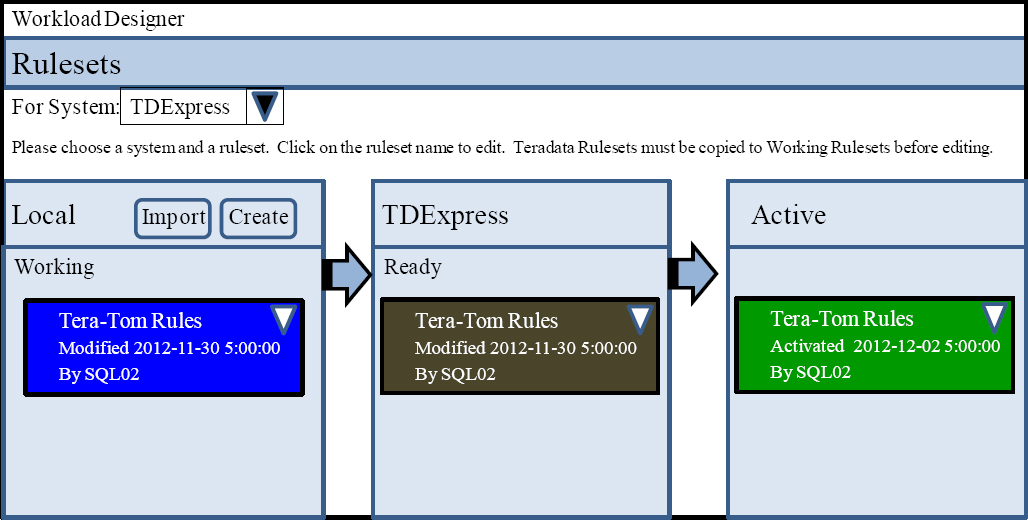
As you can now, see Tera-Tom Rules has been activated.
When you First come to the Workloads Screen

When you first enter the Workloads area (red circle), you will see the Workloads screen and notice that the default WD-Default is already there. You can Click on the Create Workload button (red square) and then turn the page to learn the entire process.
Workloads – New Workload General Tab

In the General Tab, you can now give your new workload a name, description and then choose between Tactical, Priority, Normal, or Background. We are choosing Tactical. Hit the Save button (red border).
Workloads – New Workload Classification Tab

In the Classification Tab, you can now determine how you will define users, queries, or utilities that you want in this workload. We are choosing Request Source. Hit the Add button (blue border) and then the Save button (red border).
Edit the Request Source Criteria

From the Source Type dropdown menu, we chose Username. This caused the Usernames to show and it was there we highlighted the Usernames we want to include. We have chosen SQL01, SQL02, SQL03, SQL04, SQL05. Hit OK and turn the page.
Workloads – New Workload Classification Tab

In the Classification Tab, you now see that we have a Request Source with our Usernames. Hit the Save button (red border) and Save your work.
Workloads – Throttles in a Workload

In the Throttles Tab, we will now hover in the DayDegraded Area (red box) and click on the edit button (red circle). This will then allow us to set a throttle for DayDegraded.
Edit the DayDegraded Settings

After we clicked on the Edit button in the Degraded DayDegraded state, we received this picture. Here, we have created a Throttle that will limit the queries running to 15. We will delay the queries after 15. Then, make sure you hit OK.
Workloads – Throttles are now Set for the State DayDegraded

As you can see in the DayDegraded state, we have set the Query Limit to 15, and after that, all TacticalDay queries will be delayed. Don't forget to hit Save!
Workloads – Service Level Goals
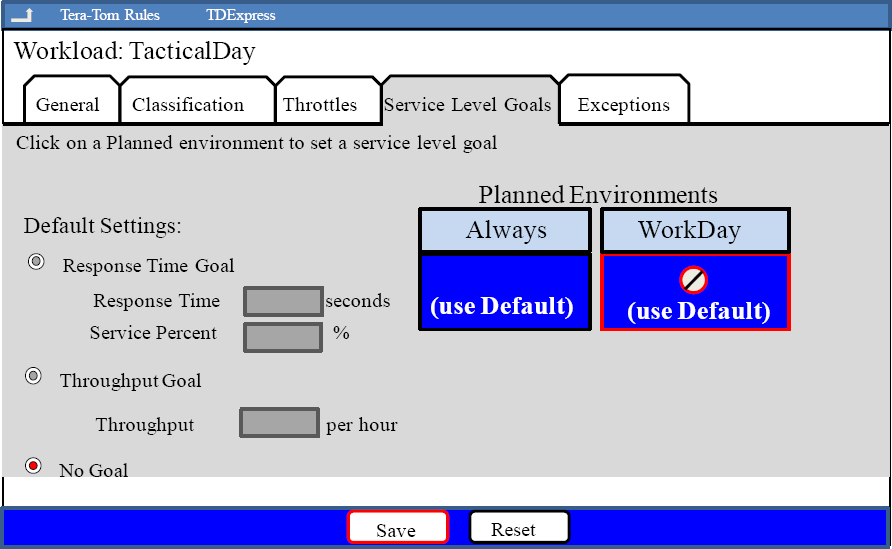
We will set our Service Level Goals for the WorkDay only. Hover in the WorkDay Planned Environment (red box), and click on the Edit Button (red circle).
Service Level Goals for the WorkDay
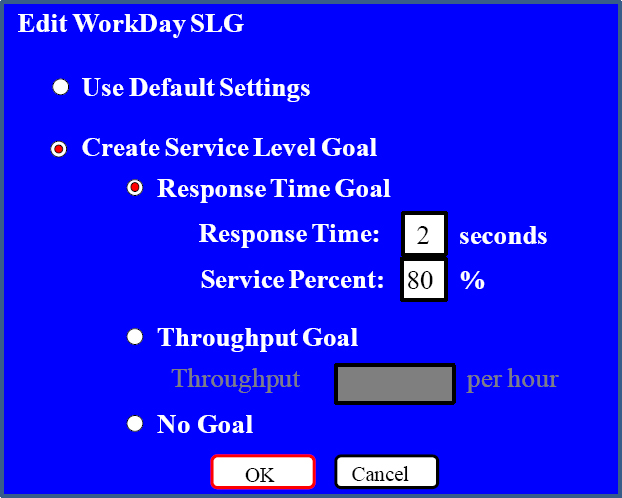
After we clicked on the Edit button in the WorkDay Planned Environment, this picture appears. Here, we have created a Service Level Goal with a response time of 2 seconds and a service percent of 80%. Then, make sure you hit OK.
Workloads – Service Level Goals

Our Service Level Goals for the WorkDay have changed for the WorkDay Planned Environment (red box) with our Response Time and Service Percent. Hit Save Now.
Workloads – Exceptions
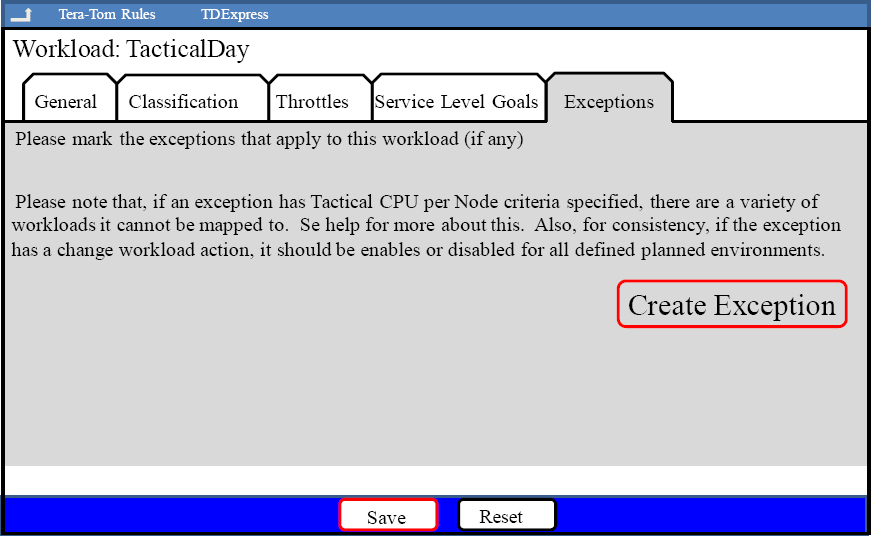
We will now create an Exception by hitting the Create Exception button (red box).
Workloads – The Exceptions Screen
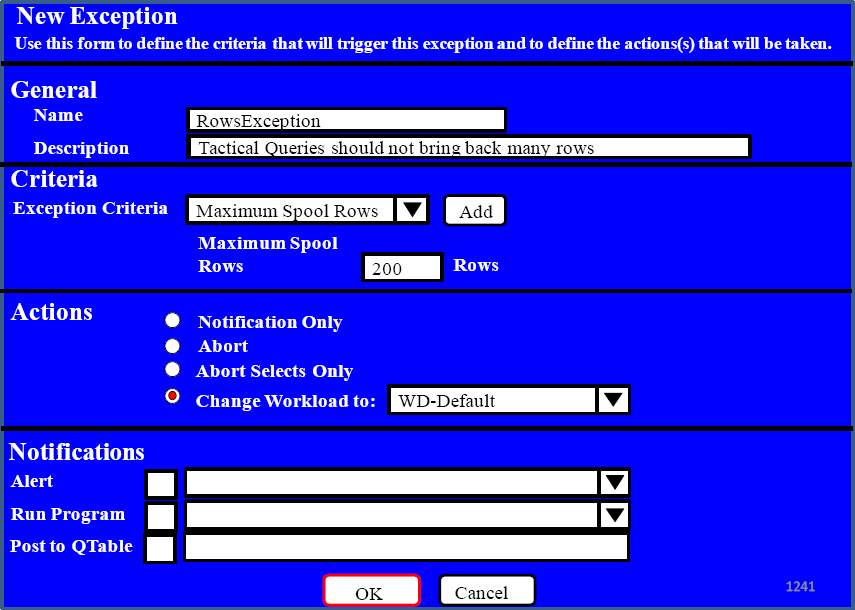
Workloads – The New Exceptions Screen

Our new exception is now showing, and it is time to hit Save.