Chapter 13. Adding Help
Hyperbola is a complete though basic chat client. Even with its modest capabilities, users can run into trouble getting it configured or dealing with connections. Fortunately, the Eclipse Platform includes support for static, dynamic, and context-sensitive Help. Adding Help capabilities to Hyperbola gives its users a place to go for answers. This is an integral part of real-world applications. Also, adding Help support also marks the first time that you need to use plug-ins that are not included by default.
In this chapter we show how to
• Set up your target environment to take advantage of Help support
• Add Help support to Hyperbola
• Add context-sensitive Help support
• Create and structure Help content
13.1 Adding to the Target Platform
The Hyperbola prototypes in previous chapters used plug-ins that were found in the RCP SDK (in the target platform) and some of our own code (in the workspace). In this chapter we are looking to expand the target platform and use Eclipse plug-ins from outside the RCP SDK. To do this, we must get the plug-ins from somewhere and add them to the target.
Early in Chapter 3, “Tutorial Introduction,” you set up separate IDE and target environments. This separation became important in Chapter 9, “Packaging Hyperbola,” when we used the delta pack to the target platform to allow for cross-platform exporting. Here we’ll see how the separation helps but also makes life a little harder.
13.1.1 Getting Plug-ins
At some point you will add capability to your application that you think someone else has already implemented. Instead of searching the Web, looking for plug-ins, you should start by looking at the list of plug-ins included in the Eclipse Platform. Over 100 plug-ins are included in the Platform, and many are useful in RCP applications. See Chapter 29, “Eclipse Ecosystem,” for more information on which of the 100-plus plug-ins can actually be used in your RCP applications.
Chances are you already have an Eclipse Platform plug-in somewhere on your system. For example, if you did exactly as we described when creating your target platform and IDE setups, the target platform and IDE are based on the same version of Eclipse. That means your IDE has many plug-ins that can be used in your application. Since they are the same version levels of Eclipse, the plug-ins are all compatible with each other.
If your IDE and target versions do not match (as often happens at some point during a project), or you need plug-ins that do not happen to be in the IDE install, you must acquire them from somewhere. Typically, going to the originator is the best bet. For Eclipse plug-ins, that means returning to http://eclipse.org/downloads. Once there, find the archive that has the plug-ins you need. For example, the Platform SDK contains all the plug-ins you need for the Hyperbola example in this book. If you are using the EMF, GEF, or one of the other Eclipse projects, they typically have reasonably obvious SDK downloads.
13.1.2 Adding Plug-ins
Once you have the plug-ins on your machine, they need to be added to the target platform. This is done with the following steps:
• In the target editor’s Definition page click Add... and select Software Site. Click Next.
• On the subsequent Add Software Site wizard page, choose Galileo in the Work with drop-down. If there is a more recent release repository available, feel free to choose it. If the site you want is not listed, click the Add... button and enter the Name and URL Location for the site. For example, the Galileo site is at http://download.eclipse.org/releases/galileo.
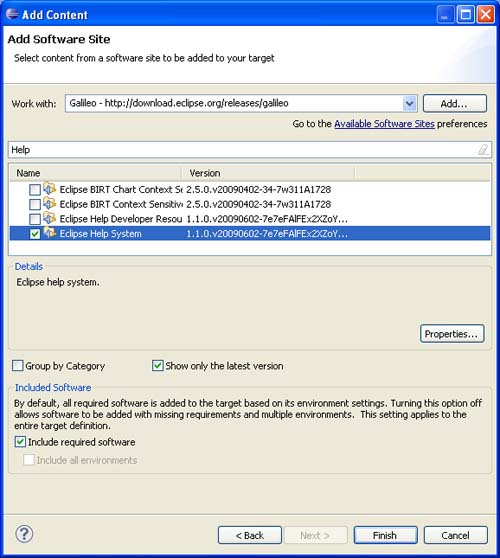
• Once the site is selected, the content area of the wizard should fill in as shown in Figure 13-1. Uncheck the Group by Category box under the content area and then type “Help” in the filter area. Select Eclipse Help System to add Help support.
Figure 13-1 Help system software site
• Important! You must uncheck the Include required software box at the bottom left of the wizard. Failure to do this will result in a bloated target that may not work for the Hyperbola scenario.
• Click Finish.
13.2 Configuring the Help Plug-ins
Now the desired plug-ins are available for use, but you have to configure the Hyperbola product to use them. Go back to the IDE and add the new plug-ins to the product configuration using the following steps. The org.eclipse.help plug-in is the stub of the Help support and is already in the configuration since it is part of the RCP base.
• Go to the Configuration page of the Hyperbola product editor and click Add... to add plug-ins.
• In the dialog choose org.eclipse.help.ui and org.eclipse.help.webapp and click OK.
• Select the check box to Include optional dependencies when computing required plug-ins.
• Click Add Required Plug-ins. Notice that several plug-ins, including org.apache.lucene, org.eclipse.help.appserver, and org.eclipse.help.base, are added to the configuration. These are the plug-ins directly or indirectly required by the plug-ins already in the list.
• Use File > Save to save the Hyperbola product configuration.
Note
Under the covers, the Eclipse Help system uses a Web server to serve its Help content. The Eclipse Help system isn’t tied to a specific Web server, but Jetty ships with the Eclipse platform so the Help system takes advantage of Jetty. You should notice Jetty in the list of your dependencies after you complete the preceding steps.
13.3 Add the Help Action
Now that the Help infrastructure is configured as part of the application, you are ready to add the Help actions and content. Hyperbola already has a Help menu (for the About action) to which you can add a Help action. The UI Workbench has a number of handy preconfigured actions (e.g., ActionFactory.HELP_CONTENTS) just for this purpose.
In the ApplicationActionBarAdvisor.makeActions() method, instantiate and register the Help contents action as follows:
Tip
When you added the create(IWorkbenchWindow) call, the helpAction field was not declared so the editor marked the line with an error. Use the Eclipse quick-fix feature to add the field. Click on the line and press Ctrl+1. Then pick the Create field ‘helpAction’ quick fix. The helpAction field is added at the top of the class.
Now add the action before the About action in the Help menu by updating fillMenuBar() as shown here:

Save the file and run Hyperbola. You should see a Help > Help Contents menu item. Select that item and you should get a dialog saying that the Help content is not installed.
13.4 Adding Help Content
Help content is written as a set of HTML documents and a set of table of contents (TOC) files that give the HTML structure. The easiest way to start adding Help content is by using an extension template to generate a skeleton document structure.
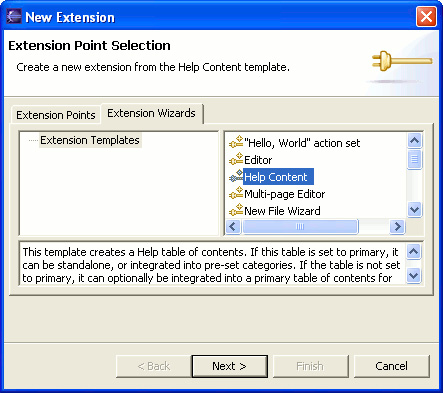
Open the Hyperbola plug-in editor, and on the Extensions page click on Add... to add an extension. In the New Extension dialog, uncheck the Show only extension points from the required plug-ins option. Then select the Extension Wizards tab and pick Extension Templates. You should see something like Figure 13-2.
Figure 13-2 New Extension wizard
Select the Help Content template and click Next. This shows you the Help template configuration page, as shown in Figure 13-3.
Figure 13-3 Help template configuration

Enter “Hyperbola Help” in the Label for table of contents field. Select the Primary check box to ensure that this Help is always shown at the top level in the Help outline. You can enable a set of categories that makes sense to you. Don’t worry about this too much; it is easy to change them later. Click Finish to generate the various files and extensions.
Run Hyperbola again and select Help > Help Contents. Hyperbola spawns a separate window that looks like Figure 13-4. Notice here the table of contents structure down the left side with the categories you selected in the template. The template generated sample topics for each.
Figure 13-4 Initial Help content

When you ran the Help > Help Contents action, you likely saw a page on the right offering information on how to use the Eclipse Help system. This is the default Help home page. Fortunately, you can change this for Hyperbola by overriding a public Help preference in your product description.
Public preferences are used by many plug-ins to allow applications and products to tweak specific configuration options. For example, the Workbench has preferences to control things such as the perspective bar location, fast view bar location, traditional versus curvy tabs, and so on. Similarly, Help has preferences to control many aspects of the Help UI. For a complete list of Help preferences, refer to the section called “Help System Preferences” in the Eclipse IDE online Help. The particular preference to change the Help home page is called org.eclipse.help.base/help_home.
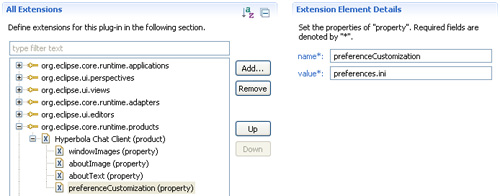
To override this Help preference, you need to specify a preference customization file and associate it with the Hyperbola product. Open Hyperbola’s plug-in editor, and on the Extensions page select the Hyperbola Chat Client product extension to the org.eclipse.core.runtime.products extension point. Using its context menu, select New > property to add the preferenceCustomization property, as shown in Figure 13-5.
Figure 13-5 Adding the preferenceCustomization property to the product
Create the preferences.ini file in the root of the Hyperbola plug-in and add the following line:
![]()
The preferences customization file is a standard Java properties file where the keys are preference IDs encoded as /plugin-id/preference-name and the values are the new values for the preferences. Create the home page at the root Hyperbola’s html directory and call it help_home.html. For now, you can simply show the Hyperbola splash screen, as shown here:
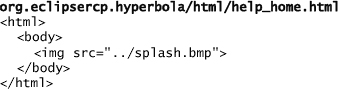
Of course it’s an HTML file, so you can make this as fancy as you like. Run Hyperbola again and launch Help. The first page shows the Hyperbola splash screen in the right pane. You could expand on the branding in this page to contain pointers on how to get started with Hyperbola.
Note
Adding Help to Hyperbola does not require that new dependencies be added. Notice that in the preceding steps you did not add any Help plug-ins to the Hyperbola plug-in’s prerequisite list. All you did was add the Help-related plug-ins to the Hyperbola product configuration, thus ensuring that the Help infrastructure is shipped as part of Hyperbola.
The Help actions used are supplied by the UI Workbench plug-in, which is already a prerequisite. The Hyperbola Help content is contributed via extensions to a Help plug-in extension point. Contributing extensions to a plug-in’s extension point does not imply that you depend on the plug-in.
13.5 Help Content Structure
The Help extension template added three things to the Hyperbola plug-in: a Help extension, an XML TOC, and HTML stub files for each Help page. You should think of the Help system as a mini Web site. The TOC files simply define the table of contents for HTML pages in the Help system. Of course, there is nothing hard-coded about this structure. You are free to set up whatever structure best suits your needs. You can have as many categories with whatever names and content you choose. Let’s look at what the template generated.
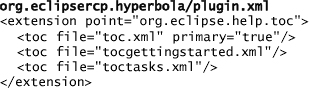
The Help extension informs the Help system of all the TOC files. The Help system uses these to knit together diverse sets of Help into a coherent structure that is presented in the left pane of the Help window. This extension identifies three XML TOC files: toc.xml at the top level and one for each category selected when instantiating the template. The file toc.xml is marked as primary to ensure that it is always shown in the Help outline.
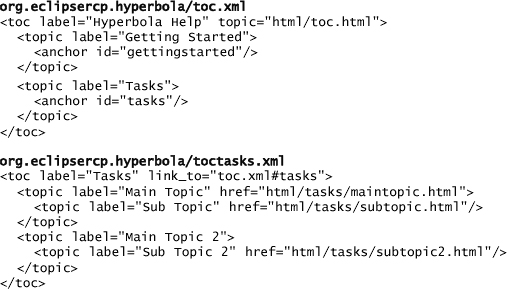
The toc.xml file simply defines an anchor for each category. Anchors are locations to which other TOC files link and add their substructure. Below are the contents of toc.xml and toctasks.xml. Notice how toc.xml defines the “tasks” anchor and toctasks.xml links to that anchor. That setup inserts the toctasks.xml structure in the main table of contents at the “Tasks” entry.
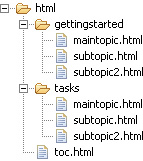
From toctasks.xml you can infer that the template laid down an HTML structure, as shown in Figure 13-6. There is one directory for each category and a top-level toc.html file. The HTML files are just stubs, but they represent the real Help content shown in the right pane of the Help window. It is up to you to fill in and link together the relevant content.
Figure 13-6 Help HTML content structure
13.6 Infopops or F1 Help
In Hyperbola we thought it would be good for users to be able to get context-sensitive Help. For example, when they are in a chat view, they should be able to find out how to send special messages, such as smileys. The infopop mechanism links UI elements such as views, menu items, and buttons to Help content. The user simply selects the element in question and presses the appropriate Help key—F1 on Windows, Ctrl+F1 on GTK. On older Macs there used to be a “Help” key but that has been replaced by going to the Help menu to request help. The associated Help is then displayed. Infopops are added by tagging UI elements (e.g., views and actions) with Help contexts. For example, the Contacts view is tagged by adding the following line in ContactsView.createPartControl(Composite):
The second argument to setHelp(Control, String) is a context ID. This is used as a key in a context table to look up Help content to display. The context table is maintained by the Help system and is constructed by gathering context extensions. The Hyperbola plug-in contributes the following context extension:

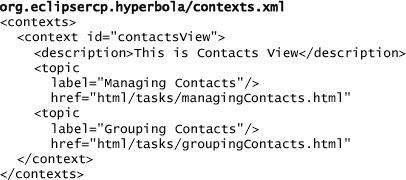
The extension simply identifies contexts.xml as a file containing any number of context IDs to content mappings. Notice in the snippet below that the context ID, contactsView, matches the context ID assigned to the ContactsView after adding on the ID of the defining plug-in. The Help content for this context includes two topics.
13.7 Exporting Plug-ins with Help
There is one final step to adding Help to Hyperbola. In the procedure described so far, we have added a number of files to the Hyperbola plug-in. These files need to be listed in build.properties so that PDE knows to include them when the plug-in is exported. Open Hyperbola’s build.properties and check off the following files or folders:
• html/
• toc.xml
• tocgettingstarted.xml
• toctasks.xml
• contexts.xml (if needed)
Save the file, export Hyperbola, and run the application. Try accessing the various Help contents and make sure that everything works. If it doesn’t, ensure that all the right files are in the exported Hyperbola.
13.8 Summary
Help is an important part of many applications. The Eclipse Help support is very easy to integrate and supports a wide range of options from static content to context-sensitive help. Help files can be shipped with an application or hosted remotely on a server.
13.9 Pointers
The Eclipse Help infrastructure supports many capabilities not discussed in this chapter. For an overview of these, refer to the following Eclipse IDE online Help topics:
• Platform Developer Guide > Programmer’s Guide > Plugging in Help
• Platform Developer Guide > Reference > Other reference information > Help System Preferences
• Platform Developer Guide > Reference > Other reference information > Installing the stand-alone help system
• Platform Developer Guide > Reference > Other reference information > Installing the help system as an infocenter
• Adding Eclipse Help to RCP applications article: www.eclipse.org/articles/article.php?file=Article-AddingHelpToRCP/index.html