Chapter 14. Adding Software Management
Hyperbola is ready to ship. But what about the next version? What if there is a bug? And what about all this XMPP extensibility we talked about earlier? How can users get updates or find cool new features? The Eclipse Platform includes a provisioning component called Equinox p2 that discovers and installs updates to both existing functionality and totally new functionality. This is exactly what we need for Hyperbola in the long run.
In this chapter you will
• Learn about the end-user facilities provided by p2, including API
• Add update capabilities provided by p2 to the target platform and to Hyperbola
• Learn about features and create a feature for Hyperbola
14.1 Getting p2
Using the steps outlined in Chapter 13, “Adding Help,” add Equinox p2 SDK to your target, as shown in Figure 14-1. Again, note the settings for the various check boxes.
Figure 14-1 Adding p2 to the target

Before we go into the exercise, we’ll discuss the problem of manually dealing with collections of plug-ins and introduce the concept of features. Human error and miscommunication can cause you to get a few too many plug-ins, miss a few plug-ins, or pick up the wrong versions of plug-ins.
14.2 Features
Features allow you to abstract away the packaging details and talk about arbitrarily complex collections of plug-ins that can be built and deployed.
14.2.1 Uses of Features
Features can be used to manage plug-ins in the following ways:
Install/update—Users and programs install and update features and, through the features, the listed plug-ins. Individual plug-ins are not updated directly.
Branding—Features can appear in a product’s About dialog. This gives feature creators an opportunity to both make their presence known within a larger product setting and give users access to any required legal information.
Building—Features describe complete sets of plug-ins that make up a system. These plug-ins also need to be built and managed during development. Features play a central role in PDE’s automated build process. Chapter 24, “Building Hyperbola,” covers this in detail.
14.2.2 What Is a Feature?
A feature is a list of related plug-ins and other features. They are defined in a feature.xml file that lives in a feature directory. At its simplest, a feature contains an ID, a version, and a list of plug-ins. As with plug-in IDs, feature IDs typically follow Java package naming conventions, and their version numbers take the form major.minor.micro.qualifier.
The example below shows an abbreviated version of the feature.xml for the org.eclipse.rcp feature in your Eclipse target platform. The body of the feature lists the plug-ins that make up the RCP base. These plug-ins are said to be included in the feature. This means that if you install the RCP base feature, all listed plug-ins are installed.

Note
It is important to note that features do not contain the plug-ins. Rather, features reference their constituent parts. This allows the same plug-in to appear in many features but be installed only once.
The preceding snippet shows the XML form of the feature—this reiterates the idea that a feature is really just a list of plug-ins and other features. In practice, you never have to edit the XML directly, as PDE includes a comprehensive feature editor. You can open the editor on the RCP feature using File > Open File... and navigating to the feature in your target or by double-clicking on the RCP base feature in the Included Features list of the Hyperbola feature. Either way, open the editor and flip to the Plug-ins page, as shown in Figure 14-2.
Figure 14-2 RCP feature plug-in list

Notice that the list shown has a number of entries related to SWT. These entries are the SWT fragments that contain the code specific to a given OS, window system, and processor architecture. If you install the RCP base feature on Windows, for example, the SWT fragment you need is different from the one you need on Linux using GTK. The Plug-in Details shown indicate that the selected fragment (org.eclipse.swt.gtk.linux.x86) is specific to linux, gtk, and x86. As such, p2 ignores this fragment on other configurations.
Only the relevant attributes need to be specified. For example, if your plug-in runs on all Cocoa systems, simply setting the Window System to cocoa is sufficient. Of course, if the plug-in or fragment includes native code, you must specify at least the Operating System and Architecture attributes.
Note
Notice also that the selected fragment is marked as not needing to be unpacked during installation. Plug-ins on a software site are stored as JARs. Traditionally, Eclipse has unpacked these JARs into plug-in directories after downloading. As of Eclipse 3.1, most plug-ins no longer need to be unpacked and therefore have this option deselected.
Now that you have the RCP base feature, you no longer have to laboriously list each of the RCP plug-ins when defining other features or products. Figure 14-3 shows the Included Features page for the Hyperbola feature editor. Included features are the RCP base feature and org.eclipsercp.hyperbola.muc.feature, an additional feature used to demonstrate the notion of optional features.
Figure 14-3 Including features
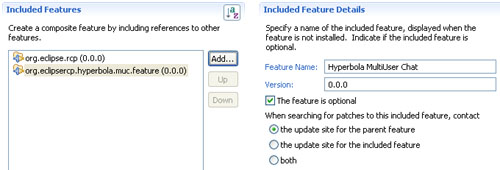
Here the Included Feature Details section shows the MUC feature marked as optional. Typically, a parent feature fails to install if some of its included features and plug-ins are not present. However, marking a feature as optional allows the parent to be installed even if the optional feature is not present or cannot be installed. This is ideal for defining products that are extensible according to user needs or OS facilities.
These examples illustrate the definition of feature content—features are made up of the plug-ins and features that are included in their definition. If you install a feature, all its constituents are also installed, if they are not already available.
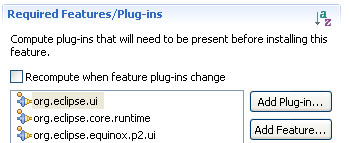
This is powerful, but the inclusion characteristic is limiting. Typically, when you include some plug-ins or features, you are committing to shipping them. If your product is to be installed with others, it is better to simply state a dependency on the parts that are needed. For example, the Hyperbola feature could specify a requirement that the RCP feature already be installed. This does not commit you to delivering the RCP base, but it does express the dependency so that it can be checked. On the Dependencies page, you can list the features and plug-ins that must be present to successfully install your feature.
Figure 14-4 shows a feature that declares the RCP feature and p2 plug-ins as required but not supplied. Installing this feature makes no attempt to download or install the listed elements; rather, the information is used by the p2 UI to verify the correctness of a configuration.
Figure 14-4 Feature dependencies
Tip
Features should have a license agreement. This agreement is shown to users as they go through the Update/Install wizard. To define the license, go to the License Agreement tab on the Information page of the feature editor. There you can fill in the license text and a URL to use when showing the license to the user.
14.3 Defining Features
Features collect sets of plug-ins that go together to form some coherent unit of functionality. Features have a very simple structure; they are a list of plug-ins and other features. They essentially constitute a bill of materials for a set of functions. This makes them very useful for organizing and managing systems.
Note
As discussed in Chapter 23, “RCP Everywhere,” features are also very useful for keeping your team organized during the development of your product.
When we started out with the Hyperbola product definition in Chapter 8, “Branding Hyperbola,” we chose to use a plug-in-based configuration (see the Overview page of the Hyperbola product editor). Let’s change that now and use features. Go back to the Hyperbola product editor, and on the Overview page change the product configuration to be based on features, as shown in Figure 14-5.
Figure 14-5 A feature-based product configuration
![]()
Next, flip over to the Configuration page and click on the New Feature... button to start the New Feature wizard shown in Figure 14-6. You can also create features using New > Project... > Plug-in Development > Feature Project. Enter org.eclipsercp.hyperbola.feature for the project name. By default, the project name matches the feature ID just as with plug-ins. Fill in the feature properties, as shown in Figure 14-6.
Figure 14-6 Defining the Hyperbola feature

Leave the Feature ID matching the project name. The Feature Name should be a human-readable string. It is shown to the user at various points when using the software management mechanisms. Similarly, the Feature Provider should be the readable name of your organization.
Click Next and the Plug-ins and Fragments page comes up, as shown in Figure 14-7. This page allows you to add plug-ins to the feature being created. Here you can take advantage of the RCP feature. The org.eclipse.rcp feature that is included with Eclipse lists the basic plug-ins (e.g., OSGi, Runtime, SWT, JFace, and UI) that make up the basic Eclipse RCP. So, you need only list the plug-ins either that you developed (e.g., org.eclipsercp.hyperbola) or that you have added to the target manually. Select the following plug-ins from the list (there should be three):
1. org.eclipse.ui.forms
2. org.eclipsercp.hyperbola
3. org.jivesoftware.smack
Figure 14-7 Listing feature plug-ins

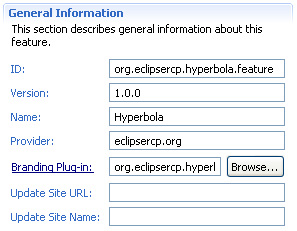
Click Finish. The Hyperbola feature project is created and opened in a feature editor. On the Overview page of the editor there is a General Information section, as shown in Figure 14-8. Here you see the values that you just entered in the wizard.
Figure 14-8 Filling in the feature information
The only thing left to do is connect the Hyperbola feature to a set of RCP features. Move over to the Included Features page and look for the Included Features section, as shown in Figure 14-9. Click on Add... to get a list of all the features known to the system. Select the following features from the list and click OK:
1. org.eclipse.equinox.p2.user.ui
2. org.eclipse.help
3. org.eclipse.rcp
Figure 14-9 Adding the included features

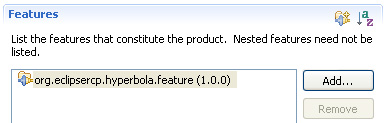
That completes feature creation, so now go back to the Hyperbola product editor. Notice that the org.eclipsercp.hyperbola.feature you just created is listed in the Features section of the Dependencies page, as in Figure 14-10.
Figure 14-10 The Hyperbola product with its feature
Now you are back in exactly the same position you were in a few minutes ago, but the Hyperbola product is described in terms of features rather than just a list of plug-ins. This allows you to directly use the software management functionality to manage Hyperbola installs.
14.4 Branding Features
Since an Eclipse-based system is a composition of features and plug-ins from different sources, the standard About dialog exposes branding for individual features. This allows feature vendors to have a user-visible presence in the system. For example, after following the steps below, the Hyperbola feature branding seen via Help > About Hyperbola displays as shown in Figure 14-11.
Figure 14-11 Hyperbola feature branding

The branding images and text are supplied by a branding plug-in defined in the Overview > General Information > Branding Plug-in field of the feature editor. The branding plug-in can be any plug-in included in the feature. Use the Browse... button and select org.eclipsercp.hyperbola as the branding plug-in.
The branding information is contained in a set of files, as shown below. The about.ini defines two properties: one for the informational About text and one for the feature image.

The aboutText property gives the text that is displayed when the feature is selected in the feature details dialog. The main reason for this information being in a plug-in is to enable translation. As such, the value %blurb is defined in an associated about.properties file, which is shown here:

Translations of this value are then supplied in language-specific files in fragments of the Hyperbola plug-in as discussed in Section 8.4, “Splash Screen.” The About text for features can be specialized for particular builds as described in Section 8.5, “About Information”; that is, the {0} in the About blurb can be replaced by values in an about.mappings file in the branding plug-in.
org.eclipsercp.hyperbola/about.mappings
0=1.0.0
Warning
Feature branding information is separate from the product branding that is defined in org.eclipsercp.hyperbola. That branding is specified in the product extension and is displayed on the main About dialog. Because of a naming overlap, however, the about.mappings files are shared between the two. Care should be taken when assigning and using properties from this file.
Add these files as described and update the Build page in the Hyperbola plug-in editor to have all the about.* files checked in the Binary Build list. Reexport Hyperbola, then run it and check that your feature branding worked.
14.5 Updating Hyperbola
Now that we have a description of Hyperbola that p2 can manage, there are three common software management scenarios to support that are typical of any extensible RCP application:
Searching for updates to existing features—This finds and installs updates to existing features. For example, if you are running Hyperbola 1.0 and 1.1 is released, p2 allows you to update to the new version of Hyperbola.
Searching for new features—Hyperbola is based on XMPP and is thus very extensible. It makes sense to allow users to search for new features to install.
Managing the existing configuration of features—If users can install new features, it makes sense to allow them to enable, disable, or remove these features.
Up to now we’ve been using a default configuration of the p2 user interface that is provided by the org.eclipse.equinox.p2.user.ui.sdk plug-in. When we launch Hyperbola, we get the default p2 user interface available via the Help > Install New Software... menu.
Tip
When you are testing the software management facilities of Hyperbola, the easiest thing to do is export the product and run it as a normal application. Equinox p2 expects a particular setup on disk and typical workspace configurations are not suitable; that is, p2 does not initialize properly if you run out of the IDE unless you take special steps. These steps are a bit of a distraction to the current discussion. For now, simply export Hyperbola and run its launcher to test the update functionality.
All three of the preceding scenarios are supported by the existing p2 user interface. To search for updates to existing features, we can simply use the Help > Check for updates menu. To search for new features, we can use the Help > Install New Software... menu. To manage the existing configuration of features, we can use the Help > About Hyperbola > Installation Details menu.
14.6 Customizing the p2 UI
So far we have been reusing the existing p2 user interface with all of its defaults. However, the defaults may not be good enough depending on your application. To maximize reuse, the p2 user interface allows for various customizations. For example, if you want to customize the set of p2-related menu items, you can provide your own bundle that makes p2 UI contributions in lieu of the p2 UI bundle. This allows you to rearrange the way users encounter the install/update functionality or provide more precise control of what can be done by the user.
In addition, you may wish to expose a subset of functionality, such as permitting updating but not installing or uninstalling software, or you may wish to change what is visible on the installed software page, or what software is visible when browsing a site or even what sites are available to users.
The customization of the p2 user interface is accomplished via the org.eclipse.equinox.internal.provisional.p2.ui.policy.Policy class which controls different aspects of the UI. A default implementation is provided, but the policy allows you to control things such as
• Which repositories (sites) are visible to the user
• Whether the user can manipulate (add, enable, disable, remove) the sites
• What software is visible to the user when browsing software sites
• What software is shown as the root of the Installed Software page
• How licenses are remembered and stored
To provide your own customization, you create a Policy implementation and register it as an OSGi service. As part of your policy you can implement a variety of helper classes, such as
• IUViewQueryContext—manages what software is displayed to the user
• LicenseManager—represents how licenses are accepted and stored
• RepositoryManipulator—controls which repositories are visible to the user
For example, if you want to modify Hyperbola to expose only the ability to update and not install anything else, create a HyperbolaPolicy class that extends Policy. Then disable the ability to select repositories by calling setRepositoryManipulator(null). Similarly, if you want the p2 user interface to show every potential update, create a new IUViewQueryContext, instantiate it with the IUViewQueryContext.AVAILABLE_VIEW_FLAT setting, and call setQueryContext() with the new query context as shown here:

If you want to view updates by category, use the IUViewQueryContext.AVAILABLE_VIEW_BY_CATEGORY setting. The final step is to register and unregister the HyperbolaPolicy service. Registering the HyperbolaPolicy makes the p2 user interface aware of the policy so it can adapt to your customizations. This can be done in Hyperbola’s Activator class as shown next or using Declarative Services (DS).

Another customization point is the org.eclipse.ui.about.installationPages extension point that allows customization of the installation page contributions if some of the default pages are not relevant to your application.
14.7 Defining Categories
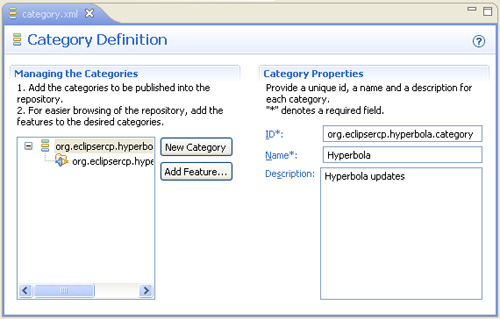
By default, the p2 user interface groups all installable software by repositories and categories and shows only categorized elements. In general, then, you have to categorize your software. Categories are created using a category definition. The first step is to create a category definition file using the New > Project... > Plug-in Development > Category Definition wizard. Leave the defaults and click Finish. Once the category definition file is open, select the default category created by the wizard and in the Category Properties section put org.eclipsercp.hyperbola.category in the ID field. In the Name field put “Hyperbola.” After filling out the category properties, click the Add Feature... button and add the org.eclipsercp.hyperbola.feature to the Hyperbola category as shown in Figure 14-12.
Figure 14-12 Hyperbola category definition
Now the defined categories need to be put into the software site or repository containing the software. The easiest way to accomplish this is via the category publisher command-line application. The category publisher is invoked using the generic Eclipse and the command line shown here:

14.8 Automatic Updates
The p2 update facilities include the ability to periodically poll for updates to Hyperbola. In essence, it is simply a scheduler that runs according to a policy that you or the end user defines. For example, it’s possible to check every day, on particular days of the week, or every time Hyperbola is started. Users are notified when updates are found. A preference controls whether or not p2 automatically downloads the updates for the user to install.
This functionality is included in the org.eclipse.equinox.p2.ui.sdk.scheduler plug-in that is already included in Hyperbola via the org.eclipse.equinox.p2.ui feature. Run Hyperbola and use Hyperbola > Preferences... > Install/Update > Automatic Updates to get to the preference page shown in Figure 14-13. These preferences can also be set in the Hyperbola product’s preference initialization file, as discussed in Section 13.4, “Adding Help Content.”
Figure 14-13 Automatic update preferences

14.9 Summary
With the addition of p2, Hyperbola is now future-proofed. Distributing bug fixes is easier—deployed clients can just download the new updates from the Hyperbola update site. The ability to update also allows new and optional features to be distributed over the Internet. All of this makes it easier and cheaper to manage.
This marks the end of the Hyperbola tutorial. Hyperbola is now a complete XMPP-based chat client that has an impressive feature list for such a small application (about 80K of source code). It has a pretty cool UI, is fully branded with its own launcher and splash screen, has integrated Help, and is packaged to enable updates.
14.10 Pointers
• Platform Developer Guide > Reference > Provisioning platform, p2.
• http://wiki.eclipse.org/Equinox/p2.
• http://wiki.eclipse.org/Equinox/p2/Adding_Self-Update_to_an_RCP_Applications.
• The OSGi and Equinox book contains another example of adding software management to an application using p2: McAffer, Jeff, Paul VanderLei, and Simon Archer. OSGi and Equinox: Creating Highly Modular Java Systems (Addison-Wesley, 2010), ISBN 0321585712.