
▶ 11.5 Network Inspection Tools
This section examines two tools for inspecting a computer network. The first tool, Wireshark, collects network traffic and displays it as a sequence of packets. The second tool is nmap, the “network mapper” utility. Nmap scans a network for host computers and tries to identify the services those computers provide.
Wireshark
Network traffic becomes easier to understand, both for beginners and experts, if we look at the messages firsthand. We use Wireshark to watch hosts exchange packets and to examine individual packets in detail. Wireshark provides a graphical interface organized around a single window, as shown in FIGURE 11.14.

FIGURE 11.14 Layout of the Wireshark window.
© Wireshark Foundation
The Wireshark window contains four major sections. The topmost section provides Wireshark’s functions and controls. The remaining three sections display packets or parts thereof:
Packet list pane lists the captured packets in sorted order, one packet per line. We can change the sort order by clicking on the column headings.
Each line summarizes the packet type and content.
The highlighted packet from this list appears in the next three sections.
Packet details pane lists the headers in the highlighted packet, one per header.
Each line summarizes the header’s contents.
Each header has an “expand” symbol on the left; clicking the symbol expands the header to display its detailed contents.
Packet bytes pane displays the entire packet in hexadecimal and ASCII. When we select part of the packet in the details pane, that part is highlighted in the packet bytes.
Wireshark contains built-in descriptions of most protocols used on the internet, and by typical commercial equipment. When we expand a header, Wireshark uses its library of descriptions to interpret the packet’s contents. Wireshark provides the following features:
■ Opens a packet capture file (pcap), a file containing a collection of network packets.
■ Collects packets from a network interface in real time. If Wireshark collects the packets itself, it may save them in a pcap for further inspection.
■ Displays a list of the captured packets in order of receipt or in other sorted orders.
■ Displays the detailed contents of individual packet headers in a readable format.
■ Displays the packet contents in raw hexadecimal.
Wireshark is an open-source program available for Windows and Unix-based systems, including Apple’s MacOS. The Wireshark website distributes it either as an easy-to-install binary or in source code form. To capture packets, the user must have administrator rights. The user needs no special permission to examine a previously collected pcap.
11.5.1 Wireshark Examples
When Wireshark collects a packet or it detects one in a pcap, it attaches a time stamp and sequence number. This information appears in the packet list pane and in the first line of the packet details pane. Wireshark lists these as “frame numbers.” FIGURE 11.15 shows the packet details pane for an Ethernet packet.

FIGURE 11.15 Ethernet header displayed in Wireshark.
© Wireshark Foundation
The second line in the pane provides the basic information about the Ethernet packet: its source and destination MAC addresses. In Figure 11.15, we also see Wireshark’s expanded Ethernet header display. These contents appear indented on the lines following the packet’s header.
The expanded Ethernet header doesn’t provide much additional information. It indicates some details about the MAC address assignments, and it specifically indicates the type of packet header residing inside the Ethernet packet. In practice, we don’t need to see this level of detail. The collapsed header provides us with the source and destination addresses already. The enclosed packet type also is indicated by the type of the packet following the Ethernet header.
Address Resolution Protocol
ARP is the most common protocol that travels by itself in Ethernet packets. FIGURE 11.16 shows the Wireshark display of an ARP Request packet.

FIGURE 11.16 ARP Request displayed in Wireshark.
© Wireshark Foundation
The packet list effectively summarizes the ARP packet’s contents: It identifies the host asking the question and the IP address being queried. The expanded packet shows the details, including the sender’s MAC address.
FIGURE 11.17 displays the ARP Response packet. Again, the packet list summarizes the essential contents. In practice, we rarely need to expand an ARP packet. Note how the contents displayed by Wireshark parallel those shown in Figure 11.16.

FIGURE 11.17 ARP Response displayed in Wireshark.
© Wireshark Foundation
IP Header
FIGURE 11.18 shows an expanded IP header displayed in Wireshark. The essential information is, of course, the host addresses. The expanded header shows the TTL (255), the checksum, and information about fragmentation.

FIGURE 11.18 IP header displayed in Wireshark.
© Wireshark Foundation
11.5.2 Mapping a LAN with Nmap
It is hard to account for all devices on a large LAN. It remains difficult even if the LAN is in a home or small business. To “map” the LAN, we need to find all IP and MAC addresses on the LAN and identify which machines own which addresses.
If we are working with a LAN that uses a commercial gateway, the gateway may keep a list of LAN devices. FIGURE 11.19 shows such a list. This list may be a combination of DHCP assignments and ARP discoveries, but it should be reasonably complete. However, it will not show hosts that have been offline for a long time. It might not show hosts that never visit the gateway.
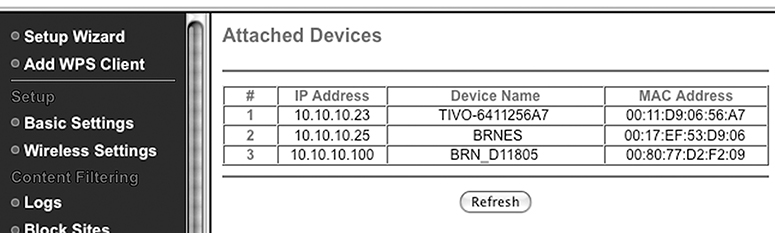
FIGURE 11.19 Network gateway display of hosts on the LAN.
© Netgear
The ARP cache is also a good source of information about LAN hosts. It lists every LAN device contacted by the host with the ARP table—but not all hosts visit each other on the LAN. Although most desktops and laptops might visit the printer, the Tivo digital video recorder probably never has. It would be tedious to visit each device and dump its ARP cache. Such a quest would be impractical on a moderately sized LAN.
The Nmap Network Mapper Utility
Nmap is a well-respected open source utility for mapping computer networks. It also helps with security scanning because it often can identify the versions of network protocol software each host is running. Although we can run nmap from a graphical interface, the features we need are most easily performed with the keyboard command. We type the nmap command as follows:
nmap <options> <addresses>
<options>may contain a list of options, each prefixed with a hyphen<addresses>contains a host name, an IP address, or a range of IP addresses in dotted decimal format
FIGURE 11.20 shows the output of a simple nmap command that identifies a single host to scan.

FIGURE 11.20 Output of a simple nmap command.
When we scan a single host, we receive a list of the open ports on that host, the services provided by those ports, and the time required to perform the search.
We can select the “service version” option “-sV” to add detail to the list of ports. Nmap will try to guess the specific type and version of protocol software being used on that port (FIGURE 11.21).

FIGURE 11.21 Nmap port listing using the -sV option.
If we give nmap a range of addresses to search, it searches for live hosts and for open ports. If a host ignores its initial ping, it assumes the host is down and goes to the next one. If nmap’s ping yields a response, it scans the service ports, testing for open ones. It reports each open port. This continues until it has scanned all ports of all hosts it finds. FIGURE 11.22 shows what happened when it scanned a running laptop with Windows 7 installed.

FIGURE 11.22 Nmap of a Windows 7 host.
Similar things happen when scanning other modern systems. Thus, ping is no longer very reliable for locating live hosts. If we know a host is up, we can direct nmap to scan it anyway by using the “-PN” option. In FIGURE 11.23, we combine it with the “-O” option, which tells nmap to try to identify the computer’s operating system.

FIGURE 11.23 Nmap of a Windows 7 host with -PN and -O options.
Use Nmap with Caution
Nmap is designed to search networks for active hosts and to search those hosts for visible services. Although this is useful when managing a network, it is disruptive and troublesome if done unnecessarily. At best, it generates a lot of unnecessary traffic—and we mean a lot of traffic, especially when scanning a larger network.
Even worse, it could uncover security weaknesses, which could open the network or its hosts to additional attacks.
Using nmap to scan other hosts on your ISP will almost certainly violate your ISP’s acceptable use policy. Your ISP then may terminate your internet service connection.
Using nmap at your school or place of business without permission also may get you into serious trouble. Do not scan hosts on someone else’s network without explicit, written permission. Thus, if anything goes wrong, you have evidence that your actions were legitimate.
Remember, if you are using nmap on someone else’s network, then you are doing security research on their behalf. Your scan results are sensitive data and must not be shared with or leaked to unauthorized people. Keep the information secret and under your personal control.