
2. This Sounds Like BASIC, So Why Doesn’t It Look Familiar?
In This Chapter
Understanding the Parts of VBA “Speech”
Examining Recorded Macro Code: Using the VB Editor and Help
Using Debugging Tools to Figure Out Recorded Code
Object Browser: The Ultimate Reference
Seven Tips for Cleaning Up Recorded Code
I Can’t Understand This Code
As mentioned in Chapter 1, “Unleashing the Power of Excel with VBA,” if you have taken a class in a procedural language such as BASIC or COBOL, you might be confused when you look at VBA code. Even though VBA stands for Visual Basic for Applications, it is an object-oriented version of BASIC. Here is a bit of VBA code:
Selection.End(xlDown).Select
Range("A11").Select
ActiveCell.FormulaR1C1 = "Total"
Range("E11").Select
Selection.FormulaR1C1 = _
"=SUM(R[-9]C:R[-1]C)"
Selection.AutoFill _
Destination:=Range("E11:G11"), _
Type:=xlFillDefault
This code likely makes no sense to anyone who knows only procedural languages. Unfortunately, your first introduction to programming in school (assuming that you are over 40 years old) would have been a procedural language.
Here is a section of code written in the BASIC language:
For x = 1 to 10
Print Rpt$(" ",x);
Print "*"
Next x
If you run this code, you get a pyramid of asterisks on your screen:
*
*
*
*
*
*
*
*
*
*
If you have ever been in a procedural programming class, you can probably look at the code and figure out what is going on because procedural languages are more English-like than object-oriented languages. The statement Print "Hello World" follows the verb–object format, which is how you would generally talk. Let’s step away from programming for a second and look at a concrete example.
Understanding the Parts of VBA “Speech”
If you were going to write code for instructions to play soccer using BASIC, the instruction to kick a ball would look something like this:
"Kick the Ball"
Hey, this is how you talk! It makes sense. You have a verb (kick) and then a noun (ball). The BASIC code in the preceding section has a verb (Print) and a noun (the asterisk, *). Life is good.
Here is the problem: VBA doesn’t work like this. In fact, no object-oriented language works like this. In an object-oriented language, the objects (nouns) are most important, hence the name: object-oriented. If you were going to write code for instructions to play soccer with VBA, the basic structure would be as follows:
Ball.Kick
You have a noun (Ball), which comes first. In VBA, this is an object. Then you have the verb (Kick), which comes next. In VBA, this is a method.
The basic structure of VBA is a bunch of lines of code with this syntax:
Object.Method
Needless to say, this is not English. If you took a romance language in high school, you will remember that those languages use a “noun–adjective” construct. However, no one uses “noun–verb” to tell someone to do something:
Water.Drink
Food.Eat
Girl.Kiss
That is why VBA is confusing to someone who previously took a procedural programming class.
Let’s carry the analogy a bit further. Imagine that you walk onto a grassy field, and there are five balls in front of you. There are a soccer ball, basketball, baseball, bowling ball, and tennis ball. You want to instruct a kid on your soccer team to “kick the soccer ball.”
If you tell him to kick the ball (or ball.kick), you really aren’t sure which one of the five balls he will kick. Maybe he will kick the one closest to him, which could be a problem if he is standing in front of the bowling ball.
For almost any noun, or object in VBA, there is a collection of that object. Think about Excel. If you can have one row, you can have a bunch of rows. If you can have one cell, you can have a bunch of cells. If you can have one worksheet, you can have a bunch of worksheets. The only difference between an object and a collection is that you add an s to the name of the object:
Row becomes Rows.
Cell becomes Cells.
Ball becomes Balls.
When you refer to something that is a collection, you have to tell the programming language to which item you are referring. There are a couple of ways to do this. You can refer to an item by using a number. For example, if the soccer ball is the second ball, you might say this:
Balls(2).Kick
This works fine, but it could be a dangerous way to program. For example, it might work on Tuesday. However, if you get to the field on Wednesday and someone has rearranged the balls, Balls(2).Kick might be a painful exercise.
A much safer way to go is to use a name for the object in a collection. You can say the following:
Balls("Soccer").Kick
With this method, you always know that it will be the soccer ball that is being kicked.
So far, so good. You know that a ball will be kicked, and you know that it will be the soccer ball. For most of the verbs, or methods in Excel VBA, there are parameters that tell how to do the action. These parameters act as adverbs. You might want the soccer ball to be kicked to the left and with a hard force. In this case, the method would have a number of parameters that tell how the program should perform the method:
Balls("Soccer").Kick Direction:=Left, Force:=Hard
When you are looking at VBA code, the colon–equal sign combination (:=) indicates that you are looking at parameters of how the verb should be performed.
Sometimes, a method will have a list of 10 parameters, some of which are optional. For example, if the Kick method has an Elevation parameter, you would have this line of code:
Balls("Soccer").Kick Direction:=Left, Force:=Hard, Elevation:=High
Here is the confusing part: Every method has a default order for its parameters. If you are not a conscientious programmer, and you happen to know the order of the parameters, you can leave off the parameter names. The following code is equivalent to the previous line of code:
Balls("Soccer").Kick Left, Hard, High
This throws a monkey wrench into our understanding. Without :=, it is not obvious that you have parameters. Unless you know the parameter order, you might not understand what is being said. It is pretty easy with Left, Hard, and High, but when you have parameters like the following:
ActiveSheet.Shapes.AddShape type:=1, Left:=10, Top:=20, _
Width:=100, Height:=200
it gets confusing if you instead have this:
ActiveSheet.Shapes.AddShape 1, 10, 20, 100, 200
The preceding line is valid code. However, unless you know that the default order of the parameters for this Add method is Type, Left, Top, Width, Height, this code does not make sense. The default order for any particular method is the order of the parameters as shown in the Help topic for that method.
To make life more confusing, you are allowed to start specifying parameters in their default order without naming them, and then you can switch to naming parameters when you hit one that does not match the default order. If you want to kick the ball to the left and high but do not care about the force (that is, you are willing to accept the default force), the following two statements are equivalent:
Balls("Soccer").Kick Direction:=Left, Elevation:=High
Balls("Soccer").Kick Left, Elevation:=High
However, keep in mind that as soon as you start naming parameters, they have to be named for the remainder of that line of code.
Some methods simply act on their own. To simulate pressing the F9 key, you use this code:
Application.Calculate
Other methods perform an action and create something. For example, you can add a worksheet by using the following:
Worksheets.Add Before:=Worksheets(1)
However, because Worksheets.Add creates a new object, you can assign the results of this method to a variable. In this case, you must surround the parameters with parentheses:
Set MyWorksheet = Worksheets.Add(Before:=Worksheets(1))
One final bit of grammar is necessary: adjectives. Just as adjectives describe a noun, properties describe an object. Because you are an Excel fan, let’s switch from the soccer analogy to an Excel analogy. There is an object to describe the active cell. Fortunately, it has a very intuitive name:
ActiveCell
Suppose you want to change the color of the active cell to red. There is a property called Interior.Color for a cell that uses a complex series of codes. However, you can turn a cell to red by using this code:
ActiveCell.Interior.Color = 255
You can see how this can be confusing. Again, there is the noun-dot-something construct, but this time it is Object.Property rather than Object.Method. How you tell them apart is quite subtle: There is no colon before the equal sign. A property is almost always set equal to something, or perhaps the value of a property is assigned to something else.
To make this cell color the same as cell A1, you might say this:
ActiveCell.Interior.Color = Range("A1").Interior.Color
Interior.Color is a property. By changing the value of a property, you can make things look different. It is kind of bizarre: Change an adjective, and you are actually doing something to the cell. Humans would say, “Color the cell red,” whereas VBA says this:
ActiveCell.Interior.Color = 255
Table 2.1 summarizes the VBA “parts of speech.”

VBA Is Not Really Hard
Knowing whether you are dealing with properties or methods helps you set up the correct syntax for your code. Don’t worry if it all seems confusing right now. When you are writing VBA code from scratch, it is tough to know whether the process of changing a cell to yellow requires a verb or an adjective. Is it a method or a property?
This is where the macro recorder is especially helpful. When you don’t know how to code something, you record a short little macro, look at the recorded code, and figure out what is going on.
VBA Help Files: Using F1 to Find Anything
Excel VBA Help is an amazing feature, provided that you are connected to the Internet. If you are going to write VBA macros, you absolutely must have access to the VBA Help topics installed. Follow these steps to see how easy it is to get help in VBA:
1. Open Excel and switch to the VB Editor by pressing Alt+F11. From the Insert menu, select Module.
2. Type these three lines of code:
Sub Test()
MsgBox "Hello World!"
End Sub
3. Click inside the word MsgBox.
4. With the cursor in the word MsgBox, press F1. If you can reach the Internet, you see the Help topic for the MsgBox function.
Using Help Topics
If you request help on a function or method, the Help topic walks you through the various available arguments. If you browse to the bottom of a Help topic, you can see a great resource: code samples under the Example heading (see Figure 2.1).

It is possible to select the code, copy it to the Clipboard by pressing Ctrl+C, and then paste it into a module by pressing Ctrl+V.
After you record a macro, if there are objects or methods about which you are unsure, you can get help by inserting the cursor in any keyword and pressing F1.
Examining Recorded Macro Code: Using the VB Editor and Help
Let’s take a look at the code you recorded in Chapter 1 to see whether it makes more sense now that you know about objects, properties, and methods. You can also see whether it’s possible to correct the errors created by the macro recorder.
Figure 2.2 shows the first code that Excel recorded in the example from Chapter 1.

Figure 2.2 Recorded code from the example in Chapter 1.
Now that you understand the concept of Noun.Verb or Object.Method, consider the first line of code that says Workbooks.OpenText. In this case, Workbooks is an object, and OpenText is a method. Click your cursor inside the word OpenText and press F1 for an explanation of the OpenText method (see Figure 2.3).

The Help file confirms that OpenText is a method, or an action word. The default order for all the arguments that can be used with OpenText appears in the gray box. Notice that only one argument is required: Filename. All the other arguments are listed as optional.
Optional Parameters
The Help file can tell you if you happen to skip an optional parameter. For StartRow, the Help file indicates that the default value is 1. If you leave out the StartRow parameter, Excel starts importing at row 1. This is fairly safe.
Now look at the Help file note about Origin. If this argument is omitted, you inherit whatever value was used for Origin the last time someone used this feature in Excel on this computer. That is a recipe for disaster. For example, your code might work 98% of the time. However, immediately after someone imports an Arabic file, Excel remembers the setting for Arabic and thereafter assumes that this is what your macro wants if you don’t explicitly code this parameter.
Defined Constants
Look at the Help file entry for DataType in Figure 2.3, which says it can be one of these constants: xlDelimited or xlFixedWidth. The Help file says these are the valid xlTextParsingType constants that are predefined in Excel VBA. In the VB Editor, press Ctrl+G to bring up the Immediate window. In the Immediate window, type this line and press Enter:
Print xlFixedWidth
The answer appears in the Immediate window. xlFixedWidth is the equivalent of saying 2 (see Figure 2.4). In the Immediate window type Print xlDelimited, which is really the same as typing 1. Microsoft correctly assumes that it is easier for someone to read code that uses the somewhat English-like term xlDelimited than to read 1.

Figure 2.4 In the Immediate window of the VB Editor, query to see the true value of constants such as xlFixedWidth.
If you were an evil programmer, you could certainly memorize all these constants and write code using the numeric equivalents of the constants. However, the programming gods (and the next person who has to look at your code) will curse you for this.
In most cases, the Help file either specifically calls out the valid values of the constants or offers a hyperlink that opens the Help topic showing the complete enumeration and the valid values for the constants (see Figure 2.5).

Figure 2.5 Click the hyperlink to see all the possible constant values. Here, the 10 possible xlColumnDataType constants are revealed in a new help topic.
One complaint with this excellent Help system is that it does not identify which parameters are new to a given version. In this particular case, TrailingMinusNumbers was introduced in Excel 2002. If you attempt to give this program to someone who is still using Excel 2000, the code does not run because Excel does not understand the TrailingMinusNumbers parameter. Sadly, the only way to learn to handle this frustrating problem is through trial and error.
If you read the Help topic on OpenText, you can surmise that it is basically the equivalent of opening a file using the Text Import Wizard. In step 1 of the wizard, you normally choose either Delimited or Fixed Width. You also specify the file origin and at which row to start. This first step of the wizard is handled by these parameters of the OpenText method:
Origin:=437
StartRow:=1
DataType:=xlDelimited
Step 2 of the Text Import Wizard enables you to specify that your fields be delimited by commas. Because you do not want to treat two commas as a single comma, the Treat Consecutive Delimiters as One check box should not be selected. Sometimes, a field may contain a comma, such as “XYZ, Inc.” In this case, the field should have quotes around the value, as specified in the Text Qualifier box. This second step of the wizard is handled by the following parameters of the OpenText method:
TextQualifier:=xlDoubleQuote
ConsecutiveDelimiter:=False
Tab:=False
Semicolon:=False
Comma:=True
Space:=False
Other:=False
Step 3 of the wizard is where you actually identify the field types. In this case, you leave all fields as General except for the first field, which is marked as a date in MDY (Month, Day, Year) format. This is represented in code by the FieldInfo parameter.
The third step of the Text Import Wizard is fairly complex. The entire FieldInfo parameter of the OpenText method duplicates the choices made on this step of the wizard. If you happen to click the Advanced button on the third step of the wizard, you have an opportunity to specify something other than the default decimal and thousands separators, as well as the setting Trailing Minus for Negative Numbers.
Tip
Note that the macro recorder does not write code for DecimalSeparator or ThousandsSeparator unless you change these from the defaults. The macro recorder does, however, always record the TrailingMinusNumbers parameter.
Remember that every action you perform in Excel while recording a macro gets translated to VBA code. In the case of many dialog boxes, the settings you do not change are often recorded along with the items you do change. When you click OK to close the dialog, the macro recorder often records all the current settings from the dialog in the macro.
Here is another example. The next line of code in the macro is this:
Selection.End(xlDown).Select
You can click to get help for three topics in this line of code: Selection, End, and Select. Assuming that Selection and Select are somewhat self-explanatory, click in the word End and press F1 for Help. A Context Help dialog box appears, saying that there are two possible Help topics for End—one in the Excel library and one in the VBA library.
If you are new to VBA, you might not know which Help library to select. Select one and then click Help. In this case, the End Help topic in the VBA library is talking about the End statement, which is not what you need.
Close Help, press F1 again, and select the End object in the Excel library. This Help topic says that End is a property. It returns a Range object that is equivalent to pressing End+up arrow or End+down arrow in the Excel interface (see Figure 2.6). If you click the blue hyperlink for xlDirection, you see the valid parameters that can be passed to the End function.
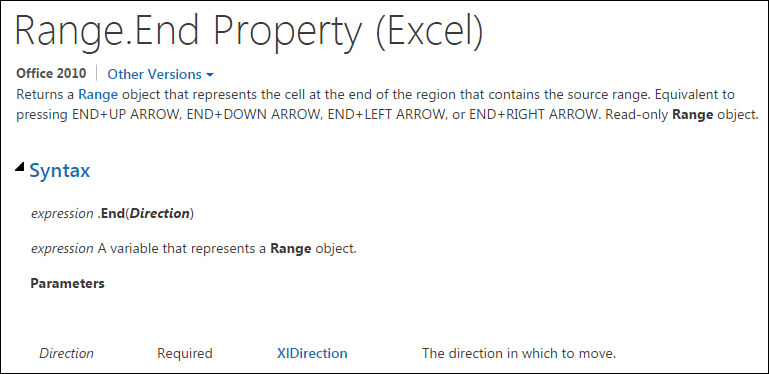
Properties Can Return Objects
Recall from earlier in this chapter that the basic syntax of VBA is Object.Method. Consider the line of code currently under examination:
Selection.End(xlDown).Select
In this particular line of code, the method is Select. The End keyword is a property, but from the Help file, you see that it returns a Range object. Because the Select method can apply to a Range object, the method is actually appended to a property.
Based on this information, you might assume that Selection is the object in this line of code. If you click the mouse in the word Selection and press F1, you will see that according to the Help topic, Selection is actually a property and not an object. In reality, the proper code would be Application.Selection. However, when you are running within Excel, VBA assumes you are referring to the Excel object model, so you can leave off the Application object. If you were to write a program in Word VBA to automate Excel, you would be required to include an object variable before the Selection property to qualify to which application you are referring.
In this case, the Application.Selection can return several types of objects. If a cell is selected, it returns the Range object.
Using Debugging Tools to Figure Out Recorded Code
The following sections introduce some awesome debugging tools that are available in the VB Editor. These tools are excellent for helping you see what a recorded macro code is doing.
Stepping Through Code
Generally, a macro runs quickly: You start it, and less than a second later, it is done. If something goes wrong, you do not have an opportunity to figure out what the macro is doing. However, using Excel’s Step Into feature makes it possible to run one line of code at a time.
To use this feature, make sure your cursor is in the procedure you want to run, such as the ImportInvoice procedure, and then from the menu select Debug, Step Into, as shown in Figure 2.7. Alternatively, you can press F8.

The VB Editor is now in Break mode. The line about to be executed is highlighted in yellow, with a yellow arrow in the margin before the code (see Figure 2.8).

In this case, the next line to be executed is the Sub ImportInvoice() line. This basically says, “You are about to start running this procedure.” Press the F8 key to execute the line in yellow and move to the next line of code. The long code for OpenText is then highlighted. Press F8 to run this line of code. When you see that Selection.End(xlDown).Select is highlighted, you know that Visual Basic has finished running the OpenText command. At this point, you can press Alt+Tab to switch to Excel and see that the Invoice.txt file has been parsed into Excel. Note that A1 is selected.
Note
If you have a wide monitor, you can use the Restore Down icon at the top right of the VBA window to arrange the window so that you can see both the VBA window and the Excel window. (Restore Down is the two-tiled-window icon between the Minimize “dash” and the Close Window X icon at the top of every window.)
This is also a great trick to use while recording new code. You can actually watch the code appear as you do things in Excel.
Switch back to the VB Editor by pressing Alt+Tab. The next line about to be executed is Selection.End(xlDown).Select. Press F8 to run this code. Switch to Excel to see that the last cell in your data set is selected.
Press F8 again to run the Range("A11").Select line. If you switch to Excel by pressing Alt+Tab, you see that this is where the macro starts to have problems. Instead of moving to the first blank row, the program moves to the wrong row.
Now that you have identified the problem area, you can stop the code execution by using the Reset command. You can start the Reset command either by selecting Run, Reset or by clicking the Reset button on the toolbar (it is a small blue square next to icons for Run and Pause). After clicking Reset, you should return to Excel and undo anything done by the partially completed macro. In this case, you need to close the Invoice.txt file without saving.
More Debugging Options: Breakpoints
If you have hundreds of lines of code, you might not want to step through each line one at a time. If you have a general idea that a problem is happening in one particular section of the program, you can set a breakpoint. You can then have the code start to run, but the macro breaks just before it executes the breakpoint line of code.
To set a breakpoint, click in the gray margin area to the left of the line of code on which you want to break. A large maroon dot appears next to this code, and the line of code is highlighted in brown (see Figure 2.9). (If you don’t see the margin area, go to Tools, Options, Editor Format and choose Margin Indicator Bar.) Or select a line of code and press F9 to toggle a breakpoint on or off.
Next, from the Start menu select Run, Run Sub or press F5. The program executes but stops just before running the line in the breakpoint. The VB Editor shows the breakpoint line highlighted in yellow. You can now press F8 to begin stepping through the code.
After you have finished debugging your code, remove the breakpoints by clicking the dark brown dot in the margin next to each breakpoint to toggle it off. Alternatively, you can select Debug, Clear All Breakpoints or press Ctrl+Shift+F9 to clear all breakpoints that you set in the project.
Backing Up or Moving Forward in Code
When you are stepping through code, you might want to jump over some lines of code, or you might have corrected some lines of code that you want to run again. This is easy to do when you are working in Break mode. One favorite method is to use the mouse to grab the yellow arrow. The cursor changes to a three-arrow icon, which allows you to move the next line up or down. Drag the yellow line to whichever line you want to execute next. The other option is to right-click the line to which you want to jump and then select Set Next Statement.
Not Stepping Through Each Line of Code
When you are stepping through code, you might want to run a section of code without stepping through each line, such as when you get to a loop. You might want VBA to run through the loop 100 times so you can step through the lines after the loop. It is particularly monotonous to press the F8 key hundreds of times to step through a loop. Instead, click the cursor on the line you want to step to and then press Ctrl+F8 or select Debug, Run to Cursor. This command is also available in the right-click menu.
Querying Anything While Stepping Through Code
Even though variables have not yet been discussed, you can query the value of anything while in Break mode. However, keep in mind that the macro recorder never records a variable.
Using the Immediate Window
Press Ctrl+G to display the Immediate window in the VB Editor. While the macro is in Break mode, ask the VB Editor to tell you the currently selected cell, the name of the active sheet, or the value of any variable. Figure 2.10 shows several examples of queries typed into the Immediate window.

Figure 2.10 Queries that can be typed into the Immediate window while a macro is in Break mode, shown along with their answers.
Instead of typing Print, you can type a question mark: ? Selection.Address. Read the question mark as, “What is.”
When invoked with Ctrl+G, the Immediate window usually appears at the bottom of the code window. You can use the resize handle, which is located above the blue Immediate title bar, to make the Immediate window larger or smaller.
There is a scrollbar on the side of the Immediate window that you can use to scroll backward or forward through past entries in the Immediate window.
It is not necessary to run queries only at the bottom of the Immediate window. For example, if you have just run a line of code, in the Immediate window you can ask for the Selection.Address to ensure that this line of code worked.
Press the F8 key to run the next line of code. Instead of retyping the same query, click in the Immediate window anywhere in the line that contains the last query and press Enter.
The Immediate window runs this query again, displays the results on the next line, and pushes the old results farther down the window. In this case, the selected address is $E$11:$G$11. The previous answer, $E$11, is pushed down the window.
You can also use this method to change the query by clicking to the right of the word Address in the Immediate window. Press the Backspace key to erase the word Address and instead type Columns.Count. Press Enter, and the Immediate window shows the number of columns in the selection.
This is an excellent technique to use when you are trying to figure out a sticky bit of code. For example, you can query the name of the active sheet (Print Activesheet.Name), the selection (Print Selection.Address), the active cell (Print ActiveCell.Address), the formula in the active cell (Print ActiveCell.Formula), the value of the active cell (Print ActiveCell.Value or Print ActiveCell because Value is the default property of a cell), and so on.
To dismiss the Immediate window, click the X in its upper-right corner.
Note
Ctrl+G does not toggle the window off. Use the X at the top right of the Immediate window to close it.
Querying by Hovering
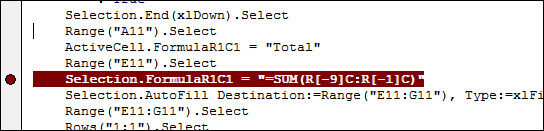
In many instances, you can hover the cursor over an expression in code and then wait a second for a tooltip to show the current value of the expression. This is incredibly helpful when you get to looping in Chapter 4, “Looping and Flow Control.” It also comes in handy with recorded code. Note that the expression that you hover over does not have to be in the line of code just executed. In Figure 2.11, Visual Basic just selected E1:G1, making E1 the active cell. If you hover the cursor over ActiveCell.FormulaR1C1, you see a tooltip showing that the formula in the active cell is "=SUM(R[-9]C:R[-1]C)".

Figure 2.11 Hover the mouse cursor over any expression for a few seconds, and a tooltip shows the current value of the expression.
Sometimes the VBA window seems to not respond to hovering. Because some expressions are not supposed to show values, it is difficult to tell whether VBA is not displaying a value on purpose or whether you are in the buggy “not responding” mode. Try hovering over something that you know should respond, such as a variable. If you get no response, hover, click into the variable, and continue to hover. This tends to wake Excel from its stupor, and hovering works again.
Are you impressed yet? This chapter started by complaining that VBA doesn’t seem much like BASIC. However, by now you have to admit that the Visual Basic environment is great to work in and that the debugging tools are excellent.
Querying by Using a Watches Window
In Visual Basic, a watch is not something you wear on your wrist; instead, it allows you to watch the value of any expression while you step through code. Let’s say that in the current example, you want to watch to see what is selected as the code runs. You can do this by setting up a watch for Selection.Address.
From the VB Editor Debug menu, select Add Watch. In the Add Watch dialog, enter Selection.Address in the Expression text box and click OK (see Figure 2.12).
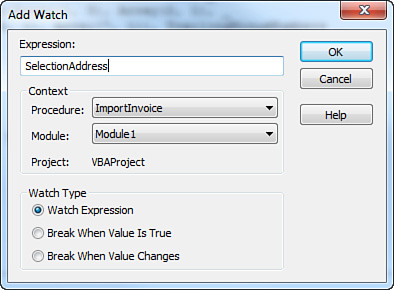
A Watches window is added to the busy Visual Basic window, usually at the bottom of the code window. When you start running the macro, import the file and press End+down arrow to move to the last row with data. The Watches window confirms that Selection.Address is $A$18 (see Figure 2.13).

Figure 2.13 Without having to hover or type in the Immediate window, you can always see the value of watched expressions.
Press the F8 key to run the code Rows("1:1").Select. The Watches window is updated to show that the current address of the Selection is now $1:$1.
In the Watches window, the value column is read/write (where possible)! You can type a new value here and see it change on the worksheet.
Using a Watch to Set a Breakpoint
Right-click any line in the Watches window and select Edit Watch. In the Watch Type section of the Edit Watch dialog, select Break When Value Changes. Click OK.
The glasses icon changes to a hand with triangle icon. You can now press F5 to run the code. The macro starts running lines of code until something new is selected. This is very powerful. Instead of having to step through each line of code, you can now conveniently have the macro stop only when something important has happened. A watch can also be set up to stop when the value of a particular variable changes.
Using a Watch on an Object
In the preceding example, you watched a specific property: Selection.Address. It is also possible to watch an object such as Selection. In Figure 2.14, when a watch has been set up on Selection, you get the glasses icon and a + icon.

By clicking the + icon, you can see all the properties associated with Selection. When you look at Figure 2.15, you can see more than you ever wanted to know about Selection! There are properties you probably never realized are available. You can also see that the AddIndent property is set to False and the AllowEdit property is set to True. There are useful properties in the list, and you can see the Formula of the selection.

In this Watches window, some entries can be expanded. For example, the Borders collection has a plus next to it, which means you can click any + icon to see more details.
Object Browser: The Ultimate Reference
In the VB Editor, press F2 to open the Object Browser, which lets you browse and search the entire Excel object library. I’ve previously owned large Excel books that devoted 400-plus pages to listing every object in the Object Browser. You can save a tree by learning to use the more-powerful Object Browser. The built-in Object Browser is always available at a press of F2. The next few pages show you how to use it.
When you press F2, the Object Browser appears where the code window normally appears. The topmost drop-down currently shows <All Libraries>. There are entries in this drop-down for Excel, Office, VBA, and each workbook that you have open, plus additional entries for anything you check in Tools, References. For now, go to the drop-down and select only Excel.
In the left window of the Object Browser is a list of all classes available for Excel. Click the Application class in the left window. The right window adjusts to show all properties and methods that apply to the Application object. Click something in the right window, such as ActiveCell. The bottom window of the Object Browser tells you that ActiveCell is a property that returns a range. It also tells you that ActiveCell is read-only (an alert that you cannot assign an address to ActiveCell to move the cell pointer).
You have learned from the Object Browser that ActiveCell returns a range. When you click the green hyperlink for Range in the bottom window, you see all the properties and methods that apply to Range objects and, hence, to the ActiveCell property. Click any property or method and then click the yellow question mark near the top of the Object Browser to go to the help topic for that property or method.
Type any term in the text box next to the binoculars and click the binoculars to find all matching members of the Excel library. Methods appear as green books with speed lines. Properties appear as index cards, each with a hand pointing to it.
The search capabilities and hyperlinks available in the Object Browser make it much more valuable than an alphabetic printed listing of all the information. Learn to make use of the Object Browser in the VBA window by pressing F2. To close the Object Browser and return to your code window, click the X in the upper-right corner.
Seven Tips for Cleaning Up Recorded Code
Chapter 1 gave you two tips for recording code. So far, this chapter has covered how to understand the recorded code, how to access VBA help for any word, and how to use the excellent VBA debugging tools to step through your code. The remainder of this chapter presents seven tips to use when cleaning up recorded code.
Tip 1: Don’t Select Anything
Nothing screams “recorded code” more than having code that selects things before acting on them. This makes sense in a way: In the Excel interface, you have to select row 1 before you can make it bold.
However, this is done rarely in VBA. There are a couple of exceptions to this rule. For example, you need to select a cell when setting up a formula for conditional formatting. And it is possible to directly turn on bold font to row 1 without selecting it.
To streamline the code the macro recorder gives you, in many cases you can remove the part of the code that performs the selection. The following two lines are macro recorder code before it has been streamlined:
Cells.Select
Selection.Columns.AutoFit
You can streamline the recorded code so it looks like this:
Cells.Columns.AutoFit
There are a couple of advantages to doing this streamlining. First, there will be half as many lines of code in your program. Second, the program will run faster.
To do this streamlining, after recording code, highlight from before the word Select at the end of one line all the way to the dot after the word Selection on the next line and press Delete (see Figures 2.16 and 2.17).


Tip 2: Use Cells(2,5) Because It’s More Convenient Than Range("E2")
The macro recorder uses the Range() property frequently. If you follow the macro recorder’s example, you will find yourself building a lot of complicated code. For example, if you have the row number for the total row stored in a variable, you might try to build this code:
Range("E" & TotalRow).Formula = "=SUM(E2:E" & TotalRow-1 & ")"
In this code, you are using concatenation to join the letter E with the current value of the TotalRow variable. This works, but eventually you have to refer to a range where the column is stored in a variable. Say that FinalCol is 10, which indicates column J. To refer to this column in a Range command, you need to do something like this:
FinalColLetter = MID("ABCDEFGHIJKLMNOPQRSTUVWXYZ",FinalCol,1)
Range(FinalColLetter & "2").Select
Alternatively, perhaps you could do something like this:
FinalColLetter = CHR(64 + FinalCol)
Range(FinalColLetter & "2").Select
These approaches work for the first 26 columns but fail for the remaining 99.85% of the columns.
You could start to write 10-line functions to calculate that the column letter for column 15896 is WMJ, but it is not necessary. Instead of using Range("WMJ17"), you can use the Cells(Row,Column) syntax.
Chapter 3, “Referring to Ranges,” covers this topic in complete detail. However, for now you need to understand that Range("E10") and Cells(10, 5) both point to the cell at the intersection of the fifth column and the tenth row. Chapter 3 also shows you how to use .Resize to point to a rectangular range. Cells(11, 5).Resize(1, 3) is E11:G11.
Tip 3: Use More Reliable Ways to Find the Last Row
It is difficult to trust data from just anywhere. If you are analyzing data in Excel, remember that the data can come from who-knows-what system written who-knows-how-long-ago. The universal truth is that eventually some clerk will find a way to break the source system and enter a record without an invoice number. Maybe it will take a power failure to do it, but invariably, you cannot count on having every cell filled in.
This is a problem when you’re using the End+down arrow shortcut. This key combination does not take you to the last row with data in the worksheet. It takes you to the last row with data in the current range. In Figure 2.18, pressing End+down arrow would move the cursor to cell A7 rather than the true last row with data.

Figure 2.18 End+down arrow fails in the user interface if a record is missing a value. Similarly, End(xlDown) fails in Excel VBA.
One better solution is to start at the bottom of the worksheet and look for the first non-blank cell by using this:
FinalRow = Cells(Rows.Count, 1).End(xlUp).Row
This method could fail if the very last record happens to contain the blank row. If the data is dense enough that there will always be a diagonal path of non-blank cells to the last row, you could use this:
FinalRow = Cells(1,1).CurrentRegion.Rows.Count
If you are sure that there are not any notes or stray activated cells below the data set, you might try this:
FinalRow = Cells(1, 1).SpecialCells(xlLastCell).Row
The xlLastCell property is often wrong. Say that you have data in A1:F500. If you accidentally press Ctrl+down arrow from A500 you will arrive at A1048576. If you then apply Bold to the empty cell, it becomes activated. Or, if you type Total and then clear the cell, it becomes activated. At this point, xlLastCell will refer to F1048576.
Another method is to use the Find method:
FinalRow = Cells.Find("*", SearchOrder:=xlByRows, _
SearchDirection:=xlPrevious).Row
You will have to choose from these various methods based on the nature of your data set. If you are not sure, you could loop through all columns. If you are expecting seven columns of data, you could use this code:
FinalRow = 0
For i = 1 to 7
ThisFinal = Cells(Rows.Count, i).End(xlUp).Row
If ThisFinal > FinalRow then FinalRow = ThisFinal
Next I
Tip 4: Use Variables to Avoid Hard-Coding Rows and Formulas
The macro recorder never records a variable. Variables are easy to use, but just as in BASIC, a variable can remember a value. Variables are discussed in more detail in Chapter 4.
It is recommended that you set the last row that contains data to a variable. Be sure to use meaningful variable names such as FinalRow:
FinalRow = Cells(Rows.Count, 1).End(xlUp).Row
When you know the row number of the last record, put the word Total in column A of the next row:
Cells(FinalRow + 1, 1).Value = "Total"
You can even use the variable when building the formula. This formula totals everything from E2 to the FinalRow of E:
Cells(FinalRow + 1, 5).Formula = "=SUM(E2:E" & FinalRow & ")"
Tip 5: Use R1C1 Formulas That Make Your Life Easier
The macro recorder often writes formulas in an arcane R1C1 style. However, most people change the code back to use a regular A1-style formula. After reading Chapter 5, “R1C1-Style Formulas,” you will understand that there are times when you can build an R1C1 formula that is much simpler than the corresponding A1-style formula. By using an R1C1 formula, you can add totals to all three cells in the total row with the following:
Cells(FinalRow+1, 5).Resize(1, 3).FormulaR1C1 = "=SUM(R2C:R[-1]C)"
Tip 6: Copy and Paste in a Single Statement
Recorded code is notorious for copying a range, selecting another range, and then doing an ActiveSheet.Paste. The Copy method as it applies to a range is actually much more powerful. You can specify what to copy and also specify the destination in one statement.
Here’s the recorded code:
Range("E14").Select
Selection.Copy
Range("F14:G14").Select
ActiveSheet.Paste
Here’s better code:
Range("E14").Copy Destination:=Range("F14:G14")
Tip 7: Use With...End With to Perform Multiple Actions
If you are making the total row bold with double underline and a larger font and special color, you might get recorded code like this:
Range("A14:G14").Select
Selection.Font.Bold = True
Selection.Font.Size = 12
Selection.Font.ColorIndex = 5
Selection.Font.Underline = xlUnderlineStyleDoubleAccounting
For four of these lines of code, VBA must resolve the expression Selection.Font. Because you have four lines that all refer to the same object, you can name the object once at the top of a With block. Inside the With...End With block, everything that starts with a period is assumed to refer to the With object:
With Range("A14:G14").Font
.Bold = True
.Size = 12
.ColorIndex = 5
.Underline = xlUnderlineStyleDoubleAccounting
End With
Follow these steps to clean up the recorded macro code:
1. Leave the Workbook.OpenText lines alone; they are fine as recorded.
2. Note that the following line of code attempts to locate the final row of data so that the program knows where to enter the total row:
Selection.End(xlDown).Select
You do not need to select anything to find the last row. It also helps to assign the row number of the final row and the total row to a variable so that they can be used later. To handle the unexpected case in which a single cell in column A is blank, start at the bottom of the worksheet and go up to find the last used row:
' Find the last row with data. This might change every day
FinalRow = Cells(Rows.Count, 1).End(xlUp).Row
TotalRow = FinalRow + 1
3. Note that these lines of code enter the word Total in column A of the total row:
ActiveCell.Offset(1,0).Select
ActiveCell.FormulaR1C1 = "'Total"
Better code uses the TotalRow variable to locate where to enter the word Total. Again, there is no need to select the cell before entering the label:
' Build a Total row below this
Cells(TotalRow,1).Value = "Total"
4. Note that these lines of code enter the Total formula in column E and copy it to the next two columns:
ActiveCell.Offset(0, 4).Range("A1").Select
Selection.FormulaR1C1 = "=SUM(R2C:R[-1]C)"
Selection.AutoFill Destination:=ActiveCell.Range("A1:C1"), Type:= _
xlFillDefault
ActiveCell.Range("A1:C1").Select
There is no reason to do all this selecting. The following line enters the formula in three cells:
Cells(TotalRow,5).Resize(1, 3).FormulaR1C1 = "=SUM(R2C:R[-1]C)"
(The R1C1 style of formulas is discussed in Chapter 5.)
5. Note that the macro recorder selects a range and then applies formatting:
ActiveCell.Rows("1:1").EntireRow.Select
ActiveCell.Activate
Selection.Font.Bold = True
Application.Goto Reference:="R1C1:R1C7"
Selection.Font.Bold = True
There is no reason to select before applying the formatting. These two lines perform the same action and do it much more quickly:
Cells(TotalRow, 1).Resize(1, 7).Font.Bold = True
Cells(1, 1).Resize(1, 7).Font.Bold = True
6. Note that the macro recorder selects all cells before doing the AutoFit command:
Selection.CurrentRegion.Select
Selection.Columns.AutoFit
There is no need to select the cells before doing the AutoFit:
Cells(1, 1).Resize(TotalRow, 7).Columns.AutoFit
7. Note that the macro recorder adds a short description to the top of each macro:
' ImportInvoice Macro
You have changed the recorded macro code into something that will actually work, so you should feel free to add your name as author to the description and mention what the macro does:
' Written by Bill Jelen. Import invoice.txt and add totals.
Here is the final macro with all the changes:
Sub FormatInvoiceFixed()
' Written by Bill Jelen. Import invoice.txt and add totals.
Workbooks.OpenText Filename:="C:Datainvoice.txt", Origin:=437, _
StartRow:=1, DataType:=xlDelimited, TextQualifier:=xlDoubleQuote, _
ConsecutiveDelimiter:=False, Tab:=False, Semicolon:=False, _
Comma:=True, Space:=False, Other:=False, FieldInfo:=Array(_
Array(1, 3), Array(2, 1), Array(3, 1), Array(4, 1), _
Array(5, 1), Array(6, 1), Array(7, 1))
FinalRow = Cells(Rows.Count, 1).End(xlUp).Row
TotalRow = FinalRow + 1
Cells(TotalRow, 1).Value = "Total"
Cells(TotalRow, 5).Resize(1, 3).FormulaR1C1 = "=SUM(R2C:R[-1]C)"
Cells(TotalRow, 1).Resize(1, 7).Font.Bold = True
Cells(1, 1).Resize(1, 7).Font.Bold = True
Cells(1, 1).Resize(TotalRow, 7).Columns.AutoFit
End Sub
Next Steps
By now, you should know how to record a macro. You should also be able to use Help and debugging to figure out how code works. This chapter provides seven tools for making the recorded code look like professional code.
The next chapters go into more detail about referring to ranges, looping, and the crazy but useful R1C1 style of formulas that the macro recorder loves to use.