7
Making Filmora Work for Us – Using AI
Welcome to Chapter 7! I hope you’re ready to do something really cool, which is to make Filmora do our work for us by using Artificial Intelligence (AI).
We will now gain insight on how to use AI features such as Auto Normalization, which adjusts our sounds based on our clips, or AR stickers, which automatically detects all the faces in the video and places stickers on them, similar to how face filters work.
In this chapter, we will learn about a few cool tricks, as mentioned here:
- Using Auto Normalization to analyze and adjust our volumes automatically
- Learn to remove video backgrounds with the AI Portrait feature
- Adding AR Stickers to make our videos more interesting
- How to automatically find the focal point of your video and crop it with Auto Reframe
Using Auto Normalization
The first lesson of this chapter is about Auto Normalization. Now, you may be asking, “what’s Auto Normalization?”, or you’re simply just reading along trying to find out, so let’s find out!
So, the simplest way to explain Auto Normalization is that it analyzes the volume of one or multiple clips and adjusts the volume to the standard loudness level of 23.0 Loudness Units Relative to Full Scale (LUFS), which is the standard loudness level for European audio programs. Now that we know what it does, let’s learn how to do it.
First and foremost, we need to double-click on an audio clip or a video clip that contains audio, and once that is done, we need to go to the Audio category and check the Auto Normalization checkbox, as can be seen in the following screenshot.

Figure 7.1: The Edit window for Auto Normalization in Wondershare Filmora 11
Now, you’ll notice the difference before and after activating Auto Normalization, as can be seen in the following screenshots
Here is before:

Figure 7.2: Before Auto Normalization
Here is after:

Figure 7.3: After Auto Normalization
That pretty much sums up Auto Normalization. I know – it’s pretty quick and easy, right? And that is exactly what AI does – it makes our job way easier! Now, on to the next AI feature.
Using AI Portrait
The second feature we will look at is AI Portrait. This feature allows us to remove video backgrounds easily without the use of green screens or the Chroma Key feature and allows users to add different effects and filters such as borders, noise, and glitches.
Something very important to keep in mind is that the AI Portrait feature works best for single objects facing the camera straight on, as multiple people, fast-moving objects, or different lighting can affect the quality of this feature.
So, let’s dig in:
- To get started with this, we need to add a video to the timeline first before going to the Effects library.
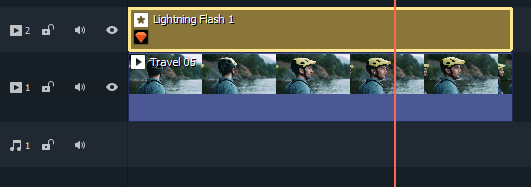
- Inside AI Portrait, we can choose one of the options and add it to a new video track on top of our previously added video:

Figure 7.4: An example timeline in AI Portrait
Now, I wish I could show you a video of the effect taking place but unfortunately, we are limited by the fact we can only attach images here, so I’ll leave it as a surprise for you and urge you to try out these effects by yourself and you’ll see how amazing they are!
- We can also change how they look by, you guessed it, going into the Edit window. Now, note that every AI Portrait case will have its own properties to change, so I will not go into the properties of this specific effect, as they change depending on which effect we use, but I’ll explain some common parameters that come up often:
- Percentage: This refers to the amount of the effect that will be shown in the viewport. 0% means there is no effect and 100% means the portrait may not be recognizable.
- Alpha: This is how transparent the effect is. 0% means it’s completely invisible and 100% means it’s completely visible.
- Edge Thickness: This is how thick the edges of the effect are.
- Edge Feather: This is how the effect and the background merge.
That brings us to the end of yet another feature that we can use to make our videos better with AI Portrait! Let’s look into AR Stickers now.
AR Stickers
AR Stickers is an image-based extension of the effects we’ve seen up to this point, as was the AI Portrait feature we just saw before this. Whereas the AI Portrait feature allows us to mess with the background and surroundings of images, AR Stickers are used to emphasize reactions, add stickers on top of your face, and things of that nature, with fun elements such as bunny ears, panda ears, and pirate features.
An important thing to keep in mind is that the AR Stickers feature works best when it’s applied to one or more people facing the camera, as long as it can detect their faces.
As with all our sections in this chapter, this will be another short one, but important nonetheless. So, let’s start:
- As usual, we will begin by adding a video on our timeline and adding our AR Stickers feature on another video track above our video.
We can find our AR Stickers options inside the Effects library and in the AR Stickers category, as can be seen here:

Figure 7.5: The AR Stickers library
- Once added, you can play the video to make sure that your AR Stickers functionality recognizes the face in the video. You can add multiple AR Stickers functionalities by placing them on different video tracks.
- You can also exclude AR Stickers from affecting a video by placing the specific video above the effect.
And that concludes yet another short section in this chapter about AI. As a side note, you may be interested to know that this is the kind of technology that goes into Instagram and Snapchat filters, as they have an AI to recognize a face and apply an AR Stickers-style feature to it.
Auto Reframe
Auto Reframe is one of the most ingenious and useful tools I have ever had the pleasure of working with within video editing software. This amazing feature uses AI to automatically detect the focal point of a video and crops it to different aspect ratios while always keeping the focal point in the frame. You can manually choose the aspect ratio you desire and the software does the rest!
Let’s get started with using this feature:
- The most efficient way of opening the Auto Reframe feature in Filmora is to start the software and instead of selecting New Project, as we’ve been doing so far, we click on the button that says Auto Reframe:

Figure 7.6: The startup window
- Once clicked, Filmora will open up with a new window that we’ve never seen before, which asks us to import a video. Once imported, set Aspect Ratio and Speed depending on how you want the video to play, and once that is done, click the Analyze button right below and the AI will do its magic!

Figure 7.7: The Auto Reframe window
Once done, the video will be cropped and played at the speed we set. We can preview it before clicking the Export button to export it.
And that is all we need to learn about Auto Reframe! This is a great, easy, and quick way of making videos for YouTube and social media or simply making specialized short films.
Summary
AI is a wonderful thing in many aspects and fields, but the fact that Filmora has been able to harness its power to make our video editing easier and more efficient is quite a remarkable feat.
In this chapter, we learned how to make our videos more appealing and engaging with the AI Portrait and AR Stickers features, how to make our audio consistent throughout our video with Auto Normalization, and lastly, how to create quick and easy videos for social media platforms and beyond using Auto Reframe, and all of this was done through an AI algorithm – now, isn’t that amazing?
I hope you enjoyed diving into AI as much as I enjoy using and writing about it. See you in the next chapter, where we will be delving into Filmora assets and how to access and acquire them, young filmmakers!
