
CHAPTER 10
Distributed Applications
Applications that use networks, called distributed applications, become more important every day. Fortunately, the .NET BCL and other libraries offer many constructs that make communicating over a network easy, so creating distributed applications in F# is straightforward.
Networking Overview
Several types of distributed applications exist; they're generally classified into either client-server applications, in which clients make requests to a central server, or peer-to-peer applications, in which computers exchange data among themselves. In this chapter, you'll focus on building client-server applications, since these are currently more common. Whichever type of distributed application you want to build, the way computers exchange data is controlled by a protocol. A protocol is a standard that defines the rules for communication over a network.
Building a network-enabled application is generally considered one of the most challenging tasks a programmer can perform, with good reason. When building a network application, you must consider three important requirements:
Scalability The application must remain responsive when used by many users concurrently; typically this means extensive testing and profiling of your server code to check that it performs when a high load is placed on it. You can find more information about profiling code in Chapter 12.
Fault tolerance Networks are inherently unreliable, and you shouldn't write code that assumes that the network will always be there. If you do, your applications will be very frustrating to end users. Every application should go to lengths to ensure communication failures are handled smoothly, which means giving the user appropriate feedback, displaying error messages, and perhaps offering diagnostic or retry facilities. Do not let your application crash because of a network failure. You should also consider data consistency (that is, can you be sure that all updates necessary to keep data consistent reached the target computer?). Using transactions and a relational database as a data store can help with this. Depending on the type of application, you might also want to consider building an offline mode where the user is offered access to locally stored data and network requests are queued up until the network comes back online. A good example of this kind of facility is the offline mode that most email clients offer.
Security: Although security should be a concern for every application you write, it becomes a hugely important issue in network programming. This is because when you expose your application to a network, you open it up to attack from any other user of the network; therefore, if you expose your application to the Internet, you might be opening it up to thousands or even millions of potential attackers. Typically you need to think about whether data traveling across the network needs to be secured, either signed to guarantee it has not been tampered with or encrypted to guarantee only the appropriate people can read it. You also need to ensure that the people connecting to your application are who they say they are and are authorized to do what they are requesting to do.
Fortunately, modern programmers don't have to tackle these problems on their own; network protocols can help you tackle these problems. For example, if it is important that no one else on the network reads the data you are sending, you should not attempt to encrypt the data yourself. Instead, you should use a network protocol that offers this facility. These protocols are exposed though components from libraries that implement them for you. The type of protocol, and the library used, is dictated by the requirements of the applications. Some protocols offer encryption and authentication, and others don't. Some are suitable for client-server applications, and others are suitable for peer-to-peer applications. You'll look at the following components and libraries, along with the protocols they implement, in this chapter:
TCP/IP sockets: Provide a great deal of control over what passes over a network for either client-server or peer-to-peer applications
HTTP/HTTPS requests: Support requests from web pages to servers, typically only for client-server applications
Web services: Expose applications so other applications can request services, typically used only for client-server applications
Windows Communication Foundation: Extends web services to support many features required by modern programmers including, but not limited to, security, transactions, and support for either client-server or peer-to-peer applications
A simple way of providing a user interface over a network is to develop a web application. Web applications are not covered here, but you can refer to the ASP.NET sections in Chapter 8.
Using TCP/IP Sockets
TCP/IP sockets provide a low level of control over what crosses over a network. A TCP/IP socket is a logical connection between two computers through which either computer can send or receive data at any time. This connection remains open until it is explicitly closed by either of the computers involved. This provides a high degree of flexibility but raises various issues that you'll examine in this chapter, so unless you really need a very high degree of control, you're better off using the more abstract network protocols you'll look at later in this chapter.
The classes you need in order to work with TCP/IP sockets are contained in the namespace System.Net, as summarized in Table 10-1.
Table 10-1. Classes Required for Working with TCP/IP Sockets
| Class | Description |
System.Net.Sockets.TcpListener |
This class is used by the server to listen for incoming requests. |
System.Net.Sockets.TcpClient |
This class is used by both the client and the server to control how data is sent over a network. |
System.Net.Sockets.NetworkStream |
This class can be used to both send and receive data over a network. It sends bytes over a network, so it is typically wrapped in another stream type to send text. |
System.IO.StreamReader |
This class can be used to wrap the NetworkStream class in order to read text from it. The StreamReader provides the methods ReadLine and ReadToEnd, which both return a string of the data contained in the stream. Various different text encodings can be used by supplying an instance of the System.Text.Encoding class when the StreamWriter is created. |
System.IO.StreamWriter |
This class can be used to wrap the NetworkStream class in order to write text to it. The StreamWriter provides the methods Write and WriteLine, which both take a string of the data to be written to the stream. Various different text encodings can be used by supplying an instance of the System.Text.Encoding class when the StreamWriter is created. |
In this chapter's first example, you'll build a chat application, consisting of a chat server (shown in Listing 10-1) and a client (shown in Listing 10-2). It is the chat server's job to wait and listen for clients that connect. Once a client connects, it must ask the client to provide a username, and then it must constantly listen for incoming messages from all clients. Once it receives an incoming message, it must push that message out to all clients. It is the job of the client to connect to the server and provide an interface to allow the user to read the messages received and to write messages to send to the other users. The TCP/IP connection works well for this type of application because the connection is always available, and this allows the server to push any incoming messages directly to the client without polling from the client.
Listing 10-1. A Chat Server
#light

open System

open System.IO

open System.Net

open System.Net.Sockets

open System.Threading

open System.Collections.Generic


type ClientTable() = class

    let clients = new Dictionary<string,StreamWriter>()

    /// Add a client and its stream writer

    member t.Add(name,sw:StreamWriter) =

        lock clients (fun () ->

            if clients.ContainsKey(name) then

                sw.WriteLine("ERROR - Name in use already!")

                sw.Close()

            else

                clients.Add(name,sw))


    /// Remove a client and close it, if no one else has done that first

    member t.Remove(name) =

        lock clients (fun () -> clients.Remove(name) |> ignore)


    /// Grab a copy of the current list of clients

    member t.Current =

        lock clients (fun () -> clients.Values |> Seq.to_array)


    /// Check whether a client exists

    member t.ClientExists(name) =

        lock clients (fun () -> clients.ContainsKey(name) |> ignore)


end


type Server() = class


    let clients = new ClientTable()


    let sendMessage name message =

        let combinedMessage =

            Printf.sprintf "%s: %s" name message

        for sw in clients.Current do

            try

                lock sw (fun () ->

                    sw.WriteLine(combinedMessage)

                    sw.Flush())

            with

            | _ -> () // Some clients may fail


    let emptyString s = (s = null || s = "")


    let handleClient (connection : TcpClient) =

        let stream = connection.GetStream()

        let sr = new StreamReader(stream)

        let sw = new StreamWriter(stream)

        let rec requestAndReadName() =

            sw.WriteLine("What is your name? ");

            sw.Flush()

            let rec readName() =

                let name = sr.ReadLine()

                if emptyString(name) then

                    readName()

                else

                    name

            let name = readName()

            if clients.ClientExists(name) then

                sw.WriteLine("ERROR - Name in use already!")

                sw.Flush()

                requestAndReadName()

            else

                name

        let name = requestAndReadName()

        clients.Add(name,sw)


        let rec listen() =

            let text = try Some(sr.ReadLine()) with _ -> None

            match text with

            | Some text ->

                if not (emptyString(text)) then

                    sendMessage name text

                Thread.Sleep(1)

                listen()

            | None ->

                clients.Remove name

                sw.Close()


        listen()


    let server = new TcpListener(IPAddress.Loopback, 4242)


    let rec handleConnections() =

        server.Start()

        if (server.Pending()) then

            let connection = server.AcceptTcpClient()

            printf "New Connection"

            let t = new Thread(fun () -> handleClient connection)

            t.Start()

        Thread.Sleep(1);

        handleConnections()


    member server.Start() = handleConnections()

end

(new Server()).Start()
Let's work our way through Listing 10-1 starting at the top and working down. The first step is to define a class to help you manage the clients connected to the server. The members Add, Remove, Current, and ClientExists share a mutable dictionary, defined by the binding:
let clients = new Dictionary<string,StreamWriter>()
This contains a mapping from client names to connections, hidden from other functions in the program. The Current member copies the entries in the map into an array to ensure there is no danger of the list changing while you are enumerating it, which would cause an error. You can still update the collection of clients using Add and Remove, and the updates will become available the next time Current is called. Because the code is multithreaded, the implementation of Add and Remove lock the client collection to ensure no changes to the collection are lost through multiple threads trying to update it at once.
The next function you define, sendMessage, uses the Current member to get the map of clients and enumerates it using a list comprehension, sending the message to each client as you go through the collection. Note here how you lock the StreamWriter class before you write to it:
lock sw (fun () ->

    sw.WriteLine(message)

    sw.Flush())
This is to stop multiple threads writing to it at once, which would cause the text to appear in a jumbled order on the client's screen.
After defining the emptyString function, which is a useful little function that wraps up some predicate that you use repeatedly, you define the handleClient function, which does the work of handling a client's new connection and is broken down into a series of inner functions. The handleClient function is called by the final function you will define, handleConnections, and will be called on a new thread that has been assigned specifically to handle the open connection. The first thing handleClient does is get the stream that represents the network connection and wrap it in both a StreamReader and a StreamWriter:
let stream = connection.GetStream()

let sr = new StreamReader(stream)

let sw = new StreamWriter(stream)
Having a separate way to read and write from the stream is useful because the functions that will read and write to the stream are actually quite separate. You have already met the sendMessage function, which is the way messages are sent to clients, and you will later see that a new thread is allocated specifically to read from the client.
The inner function requestAndReadName that you define next in handleClient is fairly straightforward; you just repeatedly ask the user for a name until you find a name that is not an empty or null string and is not already in use. Once you have the client name, you use the addClient function to add it to the collection of clients:
let name = requestAndReadName()

addClient name sw
The final part of handleConnection is defining the listen function, which is responsible for listening to messages incoming from the client. Here you read some text from the stream, wrapped in a try expression using the option type's Some/None values to indicate whether text was read:
let text = try Some(sr.ReadLine()) with _ -> None
You then use pattern matching to decide what to do next. If the text was successfully read, then you use the sendMessage function to send that message to all the other clients; otherwise, you remove yourself from the collection of clients and allow the function to exit, which will in turn mean that the thread handling the connections will exit.
Note Although the listen function is recursive and could potentially be called many times, there is no danger of the stack overflowing. This is because the function is tail recursive, meaning that the compiler emits a special tail instruction that tells the .NET runtime that the function should be called without using the stack to store parameters and local variables. Any recursive function defined in F# that has the recursive call as the last thing that happens in the function is tail recursive.
Next you create an instance of the TcpListener class. This is the class that actually does the work of listening to the incoming connections. You normally initialize this with the IP address and the port number on which the server will listen. When you start the listener, you tell it to listen on the IPAddress.Any address so that the listener will listen for all traffic on any of the IP addresses associated with the computer's network adapters; however, because this is just a demonstration application, you tell the TcpListener class to listen to IPAddress.Loopback, meaning it will pick up the request only from the local computer. The port number is how you tell that the network traffic is for your application and not another. Using the TcpListener class, it is possible for only one listener to listen to a port at once. The number you choose is somewhat arbitrary, but you should choose a number greater than 1023, because the port numbers from 0 to 1023 are reserved for specific applications. So, to create a listener on port 4242 that you code, you use the TcpListener instance in the final function you define, handleConnections:
let server = new TcpListener(IPAddress.Loopback, 4242)
This function is an infinite loop that listens for new clients connecting and creates a new thread to handle them. It's the following code that, once you have a connection, you use to retrieve an instance of the connection and start the new thread to handle it:
let connection = server.AcceptTcpClient()

print_endline "New Connection"

let t = new Thread(fun () -> handleClient connection)

t.Start()
Now that you understand how the server works, let's take a look at the client, which is in many ways a good deal simpler than the server. Listing 10-2 shows the full code for the client, which is followed by a discussion of how the code works.
Listing 10-2. A Chat Client
#light

open System

open System.ComponentModel

open System.IO

open System.Net.Sockets

open System.Threading

open System.Windows.Forms


let form =

    let temp = new Form()

    temp.Text <- "F# Talk Client"


    temp.Closing.Add(fun e ->

        Application.Exit()

        Environment.Exit(0))


    let output =

        new TextBox(Dock = DockStyle.Fill,

                     ReadOnly = true,

                     Multiline = true)

    temp.Controls.Add(output)


    let input = new TextBox(Dock = DockStyle.Bottom, Multiline = true)

    temp.Controls.Add(input)


    let tc = new TcpClient()

    tc.Connect("localhost", 4242)


    let load() =

        let run() =

            let sr = new StreamReader(tc.GetStream())

            while(true) do

                let text = sr.ReadLine()

                if text <> null && text <> "" then

                    temp.Invoke(new MethodInvoker(fun () ->

                        output.AppendText(text + Environment.NewLine)

                        output.SelectionStart <- output.Text.Length))

                    |> ignore

        let t = new Thread(new ThreadStart(run))

        t.Start()


    temp.Load.Add(fun _ -> load())


    let sw = new StreamWriter(tc.GetStream())

    let keyUp _ =

        if(input.Lines.Length > 1) then

            let text = input.Text

            if (text <> null && text <> "") then

                begin

                    try

                        sw.WriteLine(text)

                        sw.Flush()

                    with err ->

                        MessageBox.Show(sprintf "Server error

%O" err)

                        |> ignore

                end;

                input.Text <- ""


    input.KeyUp.Add(fun _ - > keyUp e)

    temp


[<STAThread>]

do Application.Run(form)
Figure 10-1 shows the resulting client-server application.

Figure 10-1 The chat client-server application
Now you'll look at how the client in Listing 10-2 works. The first portion of code in the client is taken up initializing various aspects of the form; this is not of interest to you at the moment, though you can find details of how WinForms applications work in Chapter 8. The first part of Listing 10-2 that is relevant to TCP/IP sockets programming is when you connect to the server. You do this by creating a new instance of the TcpClient class and calling its Connect method:
let tc = new TcpClient()

tc.Connect("localhost", 4242)
In this example, you specify localhost, which is the local computer, and port 4242, which is the same port on which the server is listening. In a more realistic example, you'd probably give the DNS name of the server or allow the user to give the DNS name, but localhost is good because it allows you to easily run the sample on one computer.
The function that drives the reading of data from the server is the load function. You attach this to the form's Load event; to ensure this executes after the form is loaded and initialized properly, you need to interact with the form's controls:
temp.Load.Add(fun _ -> load())
To ensure that you read all data coming from the server in a timely manner, you create a new thread to read all incoming requests. To do this, you define the function run, which is then used to start a new thread:
let t = new Thread(new ThreadStart(run))

t.Start()
Within the definition of run, you first create a StreamReader to read text from the connection, and then you loop infinitely, so the thread does not exit and reads from the connection. When you find data, you must use the form's Invoke method to update the form; you need to do this because you cannot update the form from a thread other than the one on which it was created:
temp.Invoke(new MethodInvoker(fun () ->

    output.AppendText(text + Environment.NewLine)

    output.SelectionStart <- output.Text.Length))
The other part of the client that is functionally important is writing messages to the server. You do this in the keyUp function, which is attached to the input text box's KeyUp event so that every time a key is pressed in the text box, the code is fired:
input.KeyUp.Add(fun _ -> keyUp e)
The implementation of the keyUp function is fairly straightforward: if you find that there is more than one line—meaning the Enter key has been pressed—you send any available text across the wire and clear the text box.
Now that you understand both the client and server, you'll take a look at a few general points about the application. In both Listings 10-1 and 10-2, you called Flush() after each network operation. Otherwise, the information will not be sent across the network until the stream cache fills up, which leads to one user having to type many messages before they appear on the other user's screen.
This approach has several problems, particularly on the server side. Allocating a thread for each incoming client ensures a good response to each client, but as the number of client connections grows, so will the amount of context switching needed for the threads, and the overall performance of the server will be reduced. Also, since each client requires its own thread, the maximum number of clients is limited by the maximum number of threads a process can contain. Although these problems can be solved, it's often easier to simply use one of the more abstract protocols discussed next.
Using HTTP
The Web uses Hypertext Transfer Protocol (HTTP) to communicate, typically with web browsers, but you might want to make web requests from a script or a program for several reasons, for example, to aggregate site content through RSS or Atom feeds.
To make an HTTP request, you use the static method Create from the System.Net.WebRequest class. This creates a WebRequest object that represents a request to the uniform resource locator (URL, an address used to uniquely address a resource on a network) that was passed to the Create method. You then use the GetResponse method to get the server's response to your request, represented by the System.Net.WebResponse class.
The following example (Listing 10-3) illustrates calling an RSS on the BBC's website. The core of the example is the function getUrlAsXml, which does the work of retrieving the data from the URL and loading the data into an XmlDocument. The rest of the example illustrates the kind of post-processing you might want to do on the data, in this case displaying the title of each item on the console and allowing users to choose which item to display.
Listing 10-3. Using HTTP
#light

open System.Diagnostics

open System.Net

open System.Xml


let getUrlAsXml (url : string) =

    let request = WebRequest.Create(url)

    let response = request.GetResponse()

    let stream = response.GetResponseStream()

    let xml = new XmlDocument()

    xml.Load(new XmlTextReader(stream))

    xml


let url = "http://newsrss.bbc.co.uk/rss/newsonline_uk_edition/sci/tech/rss.xml"

let xml = getUrlAsXml url


let mutable i = 1

for node in xml.SelectNodes("/rss/channel/item/title") do

    printf "%i. %s
" i node.InnerText

    i <- i + 1


let item = read_int()


let newUrl =

    let xpath = sprintf "/rss/channel/item[%i]/link" item

    let node = xml.SelectSingleNode(xpath)

    node.InnerText


let proc = new Process()

proc.StartInfo.UseShellExecute <- true

proc.StartInfo.FileName <- newUrl

proc.Start()
The results of this example at the time of writing (your results will vary) were as follows:
1. Five-step check for nano safety

2. Neanderthal DNA secrets unlocked

3. Stem cells 'treat muscle disease'

4. World Cup site threat to swallows

5. Clues to pandemic bird flu found

6. Mice star as Olympic food tasters

7. Climate bill sets carbon target

8. Physics promises wireless power

9. Heart 'can carry out own repairs'

10. Average European 'is overweight'

11. Contact lost with Mars spacecraft

12. Air guitar T-shirt rocks for real

13. Chocolate 'cuts blood clot risk'

14. Case for trawl ban 'overwhelming'

15. UN chief issues climate warning

16. Japanese begin annual whale hunt

17. Roman ship thrills archaeologists

18. Study hopeful for world's forests
Calling Web Services
Web services are based on standards (typically SOAP) that allow applications to exchange data using HTTP. Web services consist of web methods, that is, methods that have been exposed for execution over a network. You can think of this as somewhat similar to F# functions, since a web method has a name, can have parameters, and returns a result. The parameters and results are described in metadata that the web services also exposes, so clients know how to call it.
You can call a web service in F# in two ways. You can use the HttpRequest class and generate the XML you need to send, or you can use the wsdl.exe tool that comes with the .NET Framework SDK to generate a proxy for you. Generally, most people prefer using an automatically generated proxy, because it is much easier, but some like to generate the XML themselves since they think it's easier to handle changes to a web service this way. You'll look at both options, starting with generating the XML yourself.
The example in Listing 10-4 calls the Microsoft Developers Network (MSDN) web service. (MSDN is a vast library containing details about all the APIs and other software aimed at developers that Microsoft provides.) The call to the web service will retrieve details about a class or method in the BCL. The listing first defines a generic function, getWebService, to call the web service. This is slightly more complicated than the getUrlAsXml function in Listing 10-4, because you need to send extra data to the server; that is, you need to send the name of the web method you are calling and the request body—the data that makes up the request's parameters.
You need to use the HTTP POST protocol, rather than the default HTTP GET protocol, so you set this in the Method property of the WebRequest class. You also need to set the content type to "text/xml":
webRequest.Method <- "POST"

webRequest.ContentType <- "text/xml"
Then you add the web method name to the HTTP header:
webRequest.Headers.Add("Web-Method", methodName)
And finally you use the GetRequestStream method to get a stream of data into which you write requestBody, the data that makes up the parameters of the request:
using (new StreamWriter(webRequest.GetRequestStream()))

    (fun s -> s.Write(requestBody))
You then go on to define a more specific function, queryMsdn, just to query MSDN using the web service it exposes. This function calls the web service using a template of the request bound to the identifier requestTemplate. The rest of queryMsdn uses XPath to determine whether any results are available and if so writes them to the console. Listing 10-4 shows the full example.
Listing 10-4. Calling the MSDN Web Service
 #light

open System

open System.IO

open System.Net

open System.Windows.Forms

open System.Xml


let getWebService (url : string) (methodName : string) (requestBody : string) =

    let webRequest =

        WebRequest.Create(url, Method = "POST", ContentType = "text/xml")

    webRequest.Headers.Add("Web-Method", methodName)

    using (new StreamWriter(webRequest.GetRequestStream()))

        (fun s -> s.Write(requestBody))

    let webResponse = webRequest.GetResponse()

    let stream = webResponse.GetResponseStream()

    let xml = new XmlDocument()

    xml.Load(new XmlTextReader(stream))

    xml


let (requestTemplate : Printf.string_format<_>) =

    @"<soap:Envelope xmlns:soap=""http://schemas.xmlsoap.org/soap/envelope/""

    xmlns:xsi=""http://www.w3.org/2001/XMLSchema-instance""

    xmlns:xsd=""http://www.w3.org/2001/XMLSchema"">

  <soap:Body>

    <getContentRequest xmlns=""urn:msdn-com:public-content-syndication"">

      <contentIdentifier>%s</contentIdentifier>

      <locale xmlns=""urn:mtpg-com:mtps/2004/1/key"">en-us</locale>

      <version xmlns=""urn:mtpg-com:mtps/2004/1/key"">VS.80</version>

      <requestedDocuments>

        <requestedDocument type=""common"" selector=""Mtps.Search"" />

        <requestedDocument type=""primary"" selector=""Mtps.Xhtml"" />

      </requestedDocuments>

    </getContentRequest>

  </soap:Body>

</soap:Envelope>"


let url = "http://services.msdn.microsoft.com" +

            "/ContentServices/ContentService.asmx"

let xpath = "/soap:Envelope/soap:Body/c:getContentResponse/" +

            "mtps:primaryDocuments/p:primary"


let queryMsdn item =

    let request = Printf.sprintf requestTemplate item

    let xml = getWebService url "GetContent" request

    let namespaceManage =

        let temp = new XmlNamespaceManager(xml.NameTable)

        temp.AddNamespace("soap", "http://schemas.xmlsoap.org/soap/envelope/")

        temp.AddNamespace("mtps", "urn:msdn-com:public-content-syndication")

        temp.AddNamespace("c", "urn:msdn-com:public-content-syndication")

        temp.AddNamespace("p", "urn:mtpg-com:mtps/2004/1/primary")

        temp


    match xml.SelectSingleNode(xpath, namespaceManage) with

    | null -> print_endline "Not found"

    | html -> print_endline html.InnerText


queryMsdn "System.IO.StreamWriter"
Running the code in Listing 10-4 queries MSDN to find out about the System.IO.StreamWriter class. Figure 10-2 shows the results of such a query, which is run inside F# interactive hosted in Visual Studio. It's easy to define other queries to the web service—just call queryMsdn, passing it a different string parameter.
Although the results of this web service can appear poorly formatted, since the body text you grab is HTML and you simply strip the formatting tags, I often find this is the quickest way to search for information on MSDN. If I know that I'm going to be searching MSDN a lot, I load this script into fsi hosted in Visual Studio, and then I can query MSDN just by typing queryMsdn, which can be much quicker than loading a browser.
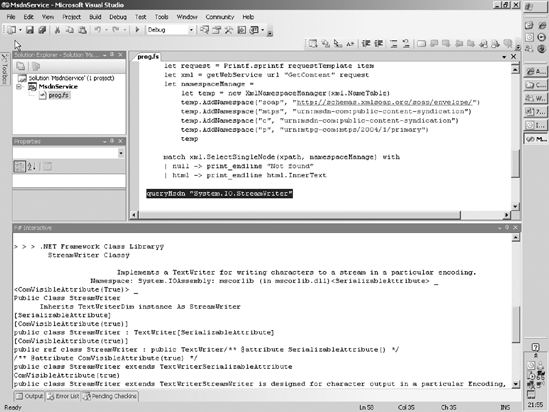
Figure 10-2. Querying MSDN in Visual Studio
This method of calling web services has its advocates who claim it's more resistant to changes in the service interface than generated proxies. However, this example is flawed for at least two reasons. It's not typically a good idea to place a large quantity of string data in source code, as you did with the requestTemplate identifier in Listing 10-4, and it's often easier to work with strongly typed objects rather than querying an XML document.
To explore the alternatives, let's look at an example that queries Google's web service using a generated proxy.
First, you need to generate the proxy; you do this using the wsdl.exe tool. Using wsdl.exe is straightforward. Just pass it the URL of the service you want to use, and wsdl.exe will generate a proxy. So, to create the Google proxy, use the command line wsdl.exe http://strangelights.com/EvilAPI/GoogleSearch.wsdl. This creates a C# proxy class that can easily be compiled into a .NET assembly and used in F#.
Note You will have noticed that the Google search is hosted on http://www.strangelights.com, my web site. This provides a copy of Google's old web service API implemented by screen scraping the results from Google. This idea was copied from EvilAPI.com, implemented originally by Collin Winter, in response to Google's decision to discontinue its SOAP API. Many companies use web services internally as a way of letting teams throughout the company, or partner companies, cooperate more easily. The services provided by Amazon.com and eBay.com are good examples of this but were not suitable for use in this example because they require a long sign-up process.
The huge advantage of using a proxy is that once the proxy has been created, there is very little plumbing to do. It's simply a matter of creating an instance of the proxy class and calling the service's methods.
This is illustrated in the following example (Listing 10-5) where you query Google for the first three pages of F#. Creating an instance of the GoogleSearchService class and calling its doGoogleSearch method is straightforward, and processing the result is straightforward since it's available in a strongly typed class.
Listing 10-5. Calling the Google Web Service
#light

#r "Proxy.dll";;


let key = "xxxx xxxx xxxx xxxx"


 let google =

    new GoogleSearchService(Url = "http://strangelights.com/EvilAPI/google.asmx")


let result =

    google.doGoogleSearch(key=key,

                            q="FSharp",

                            start=0,

                            maxResults=3,

                            filter=false,

                            restrict="",

                            safeSearch=false,

                            lr="",

                            ie="",

                            oe="")

result.resultElements

|> Array.iteri

    (fun i result ->

        printf "%i. %s
%s
%s

"

            i

            result.title

            result.URL

            result.snippet)


read_line() |> ignore
The results of this example, when executed (on the day of this writing), are as follows:
0. <b>F#</b>

http://research.microsoft.com/fsharp/fsharp.aspx

A .NET variant of ML with a core language similar to that of the OCaml programmi

ng <br> language.


1. <b>f#</b> language

http://research.microsoft.com/fsharp/fsharp.aspx

<b>F#</b> is a programming language that provides the much sought-after <b>...</

b> The only <br> language to provide a combination like this is <b>F#</b> (pron

ounced FSharp) - a <b>...</b>


2. F Sharp programming language - Wikipedia, the free encyclopedia

http://en.wikipedia.org/wiki/F_Sharp

The correct title of this article is <b>F#</b> programming language. <b>...</b>

NET components <br>  in <b>F#</b>. Consequently, the main <b>F#</b> libraries ar

e the .<b>...</b>
Creating Web Services
In addition to calling web services, you can create web services in F#, and this is also very straightforward. In fact, when creating a web service, the main problem is probably exposing code through a web server. Web servers receive requests for files, in the form of a URL; you must tell the web server to which .NET class this request will map. Typically you use an .asmx file to run a specific F# class that will responded to the web service request if the web server gets a request for the .asmx file. The exact way of doing this varies depending on your development environment and the web server on which you host your services.
Visual Studio 2005 comes with a built-in web server, so creating a new web site is just a matter of selecting File ![]() New
New ![]() Web Site and then choosing the location for the website.
Web Site and then choosing the location for the website.
This site will run only those pages written in C# or Visual Basic .NET, so you need to add an F# project to the solution and then manually alter the solution file so that it lives inside the website directory. This is easier than it sounds. You just need to copy the .fsharpp file to the website directory, open the .sln file in Notepad, and alter the path to the .fsharpp file. After this, you just need to configure the project file to output a library and write this to a bin subdirectory. This might seem like a lot of effort, but afterward you will just be able to press F5, and your project will compile and run.
If you don't have Visual Studio 2005, then the next best thing to do is to host the site in Internet Information Services (IIS, Microsoft's own web server for Windows). In some ways, this is easier than hosting in Visual Studio, but it doesn't have the convenience of just being able to execute your code once coding is completed. To host your code in IIS, you need to create an IIS virtual directory with a subdirectory called bin. You then need to copy your .asmx pages and your web.config file to the virtual directory.
Note Getting ASP.NET to work with F# and Apache is possible, but it is more difficult than the situation either with or without Visual Studio 2005; see the following page for more details: http://strangelights.com/FSharp/Foundations/default.aspx/FSharpFoundations.HostingWebServices.
The service itself is straightforward. The service should be a class that derives from System.Web.Service.WebService and has a parameterless constructor. It should also be marked with System.Web.Service.WebServiceAttribute. If you intend to expose your web service publicly, you must set the attribute's Namespace. The default is http://tempuri.org, and even if you don't intend to expose your service publicly, setting this attribute will lead to more manageable web services. The members of the class can then become web methods by simply marking them with System.Web.Service.WebServiceAttribute. This too has a number of useful properties; it's particularly worth setting the Description property so clients of your service know what they're getting.
Listing 10-6 shows the definition of a simple web service. You create a type Service with one member, Addition, that must have its parameters in the tuple style.
Listing 10-6. Creating a Simple Web Service
#light

namespace Strangelights.WebServices


open System.Web.Services


[<WebService(Namespace =

    "http://strangelights.com/FSharp/Foundations/WebServices")>]

type Service = class

    inherit WebService

    new() = {}

    [<WebMethod(Description = "Performs integer addition")>]

    member x.Addition (x : int, y : int) = x + y

end
To allow the web service to be found by the web server, you need to create an .asmx file. An example .asmx file is as follows; the most important thing for you is to set the Class attribute to the name of the class that is your service. When the server receives a request for this file, it invokes the appropriate service.
<%@ WebService Class="Strangelights.WebServices.Service" %>If you're running the service locally, you can test the service by simply opening it in a browser. In a browser, you'll see the interface shown in Figure 10-3, which allows you to give values for the web service's parameters and then invoke the service.

Figure 10-3. Invoking a local web service
Invoking this service with the arguments 46 and 28 produces the following XML:
<?xml version="1.0" encoding="utf-8" ?>

<int xmlns="http://strangelights.com/FSharp/Foundations/WebServices">74</int>
It is generally not efficient to send small amounts of data across the network, since there is a certain amount of metadata that must be sent with each request. In general, it is better to build applications that are not "chatty," that is, applications that make one big request rather than repeatedly making lots of small ones.
A web service will attempt to serialize any .NET object that is returned from one for its methods to XML; however, the results can be a little unpredictable, and the resulting XML data might not contain all the fields you expect it to and might be difficult to work with from other programming languages. To avoid this, it's best to use XSD schemas to define the objects that you want to pass across the web service. An XSD schema is a type of XML document that describes the structure of an XML document, stating things like which fields are mandatory and the order in which the fields should appear. These schemes then become part of the web service definition, and anyone using the web service will be able to understand what field they can expect from the web service. This is preferable to simply defining a web service that has a single field containing binary or hexadecimal data because the user of the web service has a much better chance of understanding what the results mean.
Although it is possible to define your own XML schemas, Visual Studio has several graphic modes and a text-based mode for creating them; it's also possible to build on the work of others in this field—many predefined schemas are available for download on the Web. For instance, the example you are going to look at next uses RNAML, a schema you can find at http://www-lbit.iro.umontreal.ca/rnaml/; it is one attempt to provide a schema for people who want exchange information on RNA (Ribonucleic acid, a substance studied by molecular biologist) in XML. Once you have downloaded the schema from the site, you can turn this into a .NET representation of the schema using the command-line tool xsd.exe. This tool produces C# classes that represent the XML data; typically, each tag in the XML will become a class in .NET. This C# file can then be compiled into a .NET assembly and used from F# like any other .NET library. The complete command line you would use is xsd rnaml.xsd /classes, and you need to rename the downloaded schema file from rnaml.xml to rnaml.xsd for the tool to work correctly.
Note For some complicated schemas, the code generated by xsd.exe does not always serialize perfectly into XML; unfortunately, this is the case for RNAML. Over time, a fix should become available for this bug in xsd.exe; the version of xsd.exe shipped with .NET Framework 2.0 is already considerably better than the previous version. There is a workaround available from the MSDN forums that needs to be applied to the generated code: http://forums.microsoft.com/MSDN/ShowPost.aspx?PostID=87289&SiteID=1. Or, because the affected classes are not used in the sample, you can do as I did and simply comment out the affected classes (numberingtable, coordinates, and revision) and about the half dozen references to them within the code.
The following example shows how to create a web service that returns the structure of a yeast RNA molecule. This is an abridged version of the sequence sample available from the RNAML website (http://www-lbit.iro.umontreal.ca/rnaml/). As before, you need an .asmx file to link the file requested to the .NET type that will handle the request; here it is:
<%@ WebService Class="Strangelights.WebServices.DnaWebService" %>
Listing 10-7 shows the web service; you will notice how the basic components of the service are the same as our simple web service. You have a class definition as before, marked with the WebService attribute. The code that actually does the work is the method definition GetYeastMolecule; here you create and populate various objects that are defined in the library you created from the rnaml.xsd file, such as a molecule object and a sequence object.
Listing 10-7. Creating a Web Service Returning the Definition of RNA Molecule
#light

namespace Strangelights.WebServices


open System.Web.Services


[<WebService(Namespace =

    "http://strangelights.com/FSharp/Foundations/DnaWebService")>]

type DnaWebService = class

    inherit WebService

    new() = {}

    [<WebMethod(Description = "Gets a representation of a yeast molecule")>]

    member x.GetYeastMolecule () =

        let yeast = new molecule(id = "Yeast-tRNA-Phe")

        let id = new identity(name = "Saccharomyces cerevisiae tRNA-Phe")

        let tax = new taxonomy(domain = "Eukaryota", kingdom = "Fungi",

                               phylum = "Ascomycota", ``class`` = "Saccharomycetes",

                               order = "Saccharomycetales",

                               family = "Saccharomycetaceae",

                               genus = "Saccharomyces",

                               species = "Saccharomyces cerevisiae")

        let numRange1 = new numberingrange(start = "1", Item = "10")

        let numRange2 = new numberingrange(start = "11", Item = "66")

        let numSys = new numberingsystem(id="natural", usedinfile=true)

        numSys.Items <- [|box numRange1; box numRange2|]

        let seqData = new seqdata()

        seqData.Value <- "GCGGAUUUAG CUCAGUUGGG AGAGCGCCAG ACUGAAGAUC

          UGGAGGUCCU GUGUUCGAUC CACAGAAUUC GCACCA"

        let seq = new sequence()

        seq.numberingsystem <- [|numSys|]

        seq.seqdata <- seqData

        id.taxonomy <- tax

        yeast.identity <- id

        yeast.sequence <- [|seq|]

        yeast

end
Again, the same simple web-based testing option is available, and the resulting XML is as follows:
<?xml version="1.0" encoding="utf-8"?>

<molecule xmlns:xsi="http://www.w3.org/2001/XMLSchema-instance"

  xmlns:xsd="http://www.w3.org/2001/XMLSchema" id="Yeast-tRNA-Phe">

  <identity>

    <name>Saccharomyces cerevisiae tRNA-Phe</name>

    <taxonomy>

      <domain>Eukaryota</domain>

      <kingdom>Fungi</kingdom>

      <phylum>Ascomycota</phylum>

      <class>Saccharomycetes</class>

      <order>Saccharomycetales</order>

      <family>Saccharomycetaceae</family>

      <genus>Saccharomyces</genus>

      <species>Saccharomyces cerevisiae</species>

    </taxonomy>

  </identity>

  <sequence>

    <numbering-system id="natural" used-in-file="true">

      <numbering-range>

        <start>1</start>

        <end>10</end>

      </numbering-range>

      <numbering-range>

        <start>11</start>

        <end>66</end>

      </numbering-range>

    </numbering-system>

    <seq-data>GCGGAUUUAG CUCAGUUGGG AGAGCGCCAG ACUGAAGAUC

          UGGAGGUCCU GUGUUCGAUC CACAGAAUUC GCACCA</seq-data>

  </sequence>

</molecule>
Although this example, just returning a static unchanging XML document, is not particularly realistic, it is easy to see the potential of this sort of application. Instead of a GetYeastMolecule method, you'd more realistically provide a GetMolecule method that took a name of a molecule, looked the details of the molecule up in a database, and returned the resulting molecule data. The advantage is that a program running on almost any platform can work with the resulting data; in this case, the example site already provides an API for working with the data in C++ and Java, and as you have seen, working with this kind of data in F# is already very straightforward. Of course, this technology is not limited to molecular biology; there are XML schemas becoming available for almost every field of science, engineering, math, and finance.
Web services such as these can be secured so that they can be accessed only by a subset of users or so that the information traveling over the network is encrypted or signed, via several methods. One option is to upgrade to Windows Communication Foundation (WCF), which is similar to web services but offers more flexibility in this area, discussed in the next section. The other is to configure your web server to handle these security requirements for you. I'll discuss these options as well as several troubleshooting options in the section "IIS Configuration and Troubleshooting Guide."
Windows Communication Foundation
It is the goal of the Windows Communication Framework (WCF) to provide a unified model for creating distributed applications. The idea is that you create a service, something very similar to a web service, containing the functionality you want to expose. This service can then be exposed in a variety of different ways. For example, web services always pass XML messages, but WCF services can be configured to pass binary data or XML messages. Further, WFC services can be hosted in any process, rather than just on a web server. This means you could create a desktop application that listens for incoming messages without having to install a web server on the desktop.
Note WCF is part of the .NET Framework 3, a group of APIs that were released at the same time as Windows Vista and come already installed on that operating system. They can also be downloaded from http://www.microsoft.com and installed on Windows XP and Windows Server 2003 (http://www.microsoft.com/downloads/details.aspx?FamilyId=10CC340B-F857-4A14-83F5-25634C3BF043&displaylang=en). The protocols that WCF uses are based on a group of specifications that extend web services and are sometimes referred to as the WS-* protocols because each protocol is generally given a name prefixed by WS-, such as WS-Security or WS-Reliability. Each of these protocols either has been standardized or is currently being put forward for standardization. To develop with WCF, you need to download the .NET Framework 3 SDK from http://www.microsoft.com/downloads.
In the first example, shown in Listing 10-8, you'll build a simple WCF service that is hosted on a web server and looks rather like a simple web service. You'll refine this service to show off some of the interesting features of WCF. To create a WCF service hosted in a web server, you follow the same steps discussed in the "Creating Web Services" section, except that hosting in Apache on Linux is not possible because WCF relies on some features that are specific to Windows.
Listing 10-8. Creating a Simple WCF Service
#light

namespace Strangelights.Services

open System.ServiceModel


[<ServiceContract

    (Namespace =

        "http://strangelights.com/FSharp/Foundations/WCFServices")>]

type IGreetingService = interface

    [<OperationContract>]

    abstract Greet : name:string -> string

end

type GreetingService() = class

    interface IGreetingService with

        member x.Greet(name)  = "Hello: " + name

    end

end
This service is defined in two parts, an interface that describes the service contract and an implementation of that contract. All WCF services are defined this way. This interface is named IGreetingService and exposes one function, named Greet. To make it a valid WCF contract, mark the interface with System.ServiceModel.ServiceContractAttribute, which should contain a namespace for the service. Use OperationContractAttribute to mark each function within the interface that the service will expose. It is important that each parameter has a name. It's possible to create interfaces in F# where the parameters don't have names but are simply defined by their types. An interface acting as a WCF contract whose functions do not have parameters will compile, but you'll receive an error when you invoke the service since the parameter names are used (via reflection) in the WCF framework to create the data that is sent across the wire. The class GreetingService provides the implementation of the contract. You simply offer a greeting by appending "hello: " to whatever name is passed.
To integrate the service with the web server, you need to create a .svc file, which plays a similar role to the web service's .asmx file, telling the web server what type should be used to handle the service request. An example of an .svc that goes with the service is as follows; the complete file is shown—they are typically only one line long. The most important attribute in the .svc file is the Service attribute that tells the web server which type it should use:
<% @ServiceHost Debug="true" Service="Strangelights.Services.GreetingService" %>
Finally, you must configure the service. Since WCF offers a choice of protocols, you use the configuration file to tell it which one to use. The configuration file in Listing 10-9 shows a configuration file that could be used to configure your service. The service element defines two endpoints; these are the protocols that a client can use to talk to this service. One of the endpoints is a standard web service HTTP binding, and the other is a metadata exchange binding; this allows the service to expose metadata about itself that will tell any potential client how it should talk to the service. This is the endpoint you'll use when you create the client proxy.
Listing 10-9. The Configuration File for a WCF Service
<configuration xmlns="http://schemas.microsoft.com/.NetConfiguration/v2.0">

  <system.serviceModel>

    <services>

      <service

        name="Strangelights.Services.GreetingService"

        behaviorConfiguration="MyServiceTypeBehaviors">

        <endpoint

          contract="Strangelights.Services.IGreetingService"

          binding="wsHttpBinding"/>

        <endpoint

          contract="Strangelights.Services.IGreetingService"

          binding="mexHttpBinding" address="mex"/>

      </service>

    </services>

    <behaviors>

      <serviceBehaviors>

        <behavior name="MyServiceTypeBehaviors" >

          <serviceDebug includeExceptionDetailInFaults="true" />

          <serviceMetadata httpGetEnabled="true" />

        </behavior>

      </serviceBehaviors>

    </behaviors>

  </system.serviceModel>


  <system.web>

    <compilation debug="true"/>

  </system.web>


</configuration>
To create a client for the service, you use the utility SvcUtil.exe, which has a similar purpose to the utility wsdl.exe that I discussed in the "Creating Web Services" section. To use SvcUtil.exe to create a proxy for your service, you need to use the following command line, taking care to adapt the URL appropriately:
svcutil.exe http://localhost:1033/WCFService/Service.svc?wsdl
This will generate a C# proxy file that can then be compiled into a .NET assembly that can be used from F#. It will also generate a .config file, which can be used to configure any client application.
Using the proxy is straightforward, once you've added a reference to the proxy .dll file. Simply create an instance of the proxy, and call its Greet method with the appropriate arguments. Listing 10-10 shows an example of a proxy; because it is important to call the proxy's Dispose method, I have created it wrapped in the using function.
Listing 10-10. Invoking the WCF Service
using (new GreetingServiceClient())

    (fun client ->

        print_endline (client.Greet("Rob"))

        read_line() |> ignore)
Listing 10-11 is an example of a generated configuration file that has had certain things removed from it to make the sample run more smoothly. The security settings have been removed, because these can cause the example to fail if it is run on a computer disconnected from its domain controller (a common case for programmers on the move!). Also, one of the two generated endpoints has been removed so there is no need to specify an endpoint in the code.
Listing 10-11. The Configuration File for Invoking the WCF Service
<configuration>

    <system.serviceModel>

        <bindings>

            <wsHttpBinding>

                <binding name="WSHttpBinding_IGreetingService"

                    closeTimeout="00:01:00" openTimeout="00:01:00"

                    receiveTimeout="00:10:00" sendTimeout="00:01:00"

                    bypassProxyOnLocal="false" transactionFlow="false"

                    hostNameComparisonMode="StrongWildcard"

                    maxBufferPoolSize="524288"

                    maxReceivedMessageSize="65536" messageEncoding="Text"

                    textEncoding="utf-8" useDefaultWebProxy="true"

                    allowCookies="false">

                    <readerQuotas maxDepth="32"

                        maxStringContentLength="8192"

                        maxArrayLength="16384"

                        maxBytesPerRead="4096"

                        maxNameTableCharCount="16384" />

                    <reliableSession ordered="true"

                        inactivityTimeout="00:10:00"

                        enabled="false" />

                </binding>

            </wsHttpBinding>

        </bindings>

        <client>

            <endpoint address="http://localhost:8080/service"

                binding="wsHttpBinding"

                bindingConfiguration="WSHttpBinding_IGreetingService"

                contract="IGreetingService"

                name="WSHttpBinding_IGreetingService">

            </endpoint>

        </client>

    </system.serviceModel>

</configuration>
The results of executing Listing 10-10 are as follows:
Hello: Rob
Caution Although removing security settings is great for getting examples to run smoothly, security is an important aspect that you should consider carefully throughout the development life cycle. If you are involved in serious WCF development, I strongly recommend that you look at the appropriate security settings for your application (for example, what kind of authentication do you want your users to provide?) as soon as possible. For further information about WCF security, please see http://strangelights.com/FSharp/Foundations/default.aspx/FSharpFoundations.WCFSecurity.
Hosting WCF Services
To me, the most exciting aspect of WCF is the ability to host a service in any program without the need for a web server. One possibility this opens up is the ability to create services whose implementation can be changed dynamically because they are hosted in fsi.exe. Although it is necessary to make some modifications to the previous sample to get it running in fsi.exe, these modification are surprisingly straightforward.
Listing 10-12 shows a modified version of the previous example, Listing 10-8, designed to run in fsi.exe.
Listing 10-12. A Service Designed to be Hosted in F# Interactive
#light

#I @"C:Program FilesReference AssembliesMicrosoftFrameworkv3.0";;

#r "System.ServiceModel.dll";;

open System

open System.ServiceModel

open System.Runtime.Serialization


let mutable f = (fun × -> "Hello: " + ×)

f <- (fun × -> "Bonjour: " + ×)

f <- (fun × -> "Goedendag: " + ×)


[<ServiceContract

    (Namespace =

        "http://strangelights.com/FSharp/Foundations/WCFServices")>]

type IGreetingService = interface

    [<OperationContract>]

    abstract Greet : name:string -> string

end

type GreetingService() = class

    interface IGreetingService with

        member ×.Greet( name ) = f name

    end

end


let myServiceHost =

    let baseAddress = new Uri("http://localhost:8080/service")


    let temp = new ServiceHost((type GreetingService), [|baseAddress|])


    let binding =

        let temp =

            new WSHttpBinding(Name = "binding1",

                              HostNameComparisonMode =

                                HostNameComparisonMode.StrongWildcard,

                              TransactionFlow = false)

        temp.Security.Mode <- SecurityMode.Message

        temp.ReliableSession.Enabled <- false

        temp


    temp.AddServiceEndpoint((type IGreetingService), binding, baseAddress)

    |> ignore

    temp


myServiceHost.Open()
Notice that in Listing 10-12 the IGreetingService and GreetingService types are pretty much unchanged from Listing 10-8, except that the GreetingService type has been modified to use a mutable function so you can manipulate what it does at runtime. You then need to create a service host to do what the web server and web.config did in the previous example. The web.config is shown in Listing 10-9, and the service itself is shown in Listing 10-8. Note that myServiceHost contains a baseAddress, which the service will listen for a request on, and a binding, which controls which protocols are used. Finally, you call the myServiceHost's Open method to set the service listening.
Then you make an alteration to the client to call the service repeatedly, shown in Listing 10-13, so you can see the service results change overtime.
Listing 10-13. A Client to Access the Service Hosted in F# Interactive
#light

using (new GreetingServiceClient()) (fun client ->

        while true do

            print_endline (client.Greet("Rob"))

            read_line() |> ignore)
You also need to alter the client's .config file to point to the correct address:
<endpoint address="http://localhost:8080/service"
The service is changed dynamically, as shown in Figure 10-4.

Figure 10-4. Invoking a dynamic WCF service
Another interesting reason to host services in a program is to create desktop applications that can listen for updates for some kind of central server. Traditionally, these kinds of applications have been to poll central server, which can lead to a large amount of unnecessary network traffic if polling is too frequent.
Listing 10-14 demonstrates how to do this. It shows a blank form that hosts a service that will listen to updates from a client; in this case, the update will be a background image to display. The service defines one function, ReceiveImage, which receives that binary data that makes up an image. The implementation of the service raises an event, newImgEvent, every time an image is received; this is so that the form can be updated every time a new image is received. Hooking the form up to the event is straightforward:
newImgEvent.Add(fun img -> form.BackgroundImage <- img)
You just need to call the event's Add method and pass it a function that updates the form. You will notice that the code required to host the service (that is, the code that defines myServiceHost) is unchanged from the previous example.
Listing 10-14. A Windows Form with a Service Built In
#light

open System

open System.IO

open System.Drawing

open System.ServiceModel

open System.Windows.Forms


[<ServiceContract

    (Namespace =

        "http://strangelights.com/FSharp/Foundations/WCFImageService")>]

type IImageService = interface

    [<OperationContract>]

    abstract ReceiveImage : image:array<Byte> -> unit

end


let newImgTrigger, newImgEvent = IEvent.create<Bitmap>()

type ImageService() = class


    interface IImageService with

        member x.ReceiveImage( image ) =

            let memStream = new MemoryStream(image)

            let bitmap = new Bitmap(memStream)

            newImgTrigger bitmap

    end

end


let myServiceHost =

    let baseAddress = new Uri("http://localhost:8080/service")


    let temp = new ServiceHost((type ImageService), [|baseAddress|])


    let binding =

        let temp =

            new WSHttpBinding(Name = "binding1",

                              HostNameComparisonMode =

                                HostNameComparisonMode.StrongWildcard,

                              TransactionFlow = false)

        temp.Security.Mode <- SecurityMode.Message

        temp.ReliableSession.Enabled <- false

        temp


    temp.AddServiceEndpoint((type IImageService), binding, baseAddress)

    |> ignore

    temp


myServiceHost.Open()

let form = new Form()


newImgEvent.Add(fun img ->

                   form.BackgroundImage <- img)


[<STAThread>]

do Application.Run(form)
To create the client, you must first create a proxy, using the same technique that you used in the example given in Listing 10-10. The utility SvcUtil.exe is run passing it the URL of the service, and this creates a proxy in C# that can be compiled into a .NET assembly and used from F#. In this case, the proxy is named ImageServiceClient. The definition of the client in Listing 10-15 might look a little complicated, but a lot of the code just lays out the form's controls or opens the image files. The really interesting code comes right at the end, where you add a function to the Send button's click event. This code reads an image from disk and loads it into a byte array. This byte array is then passed to the proxy's ReceiveImage method.
Listing 10-15. A Client That Sends Images to Its Server
#light

open System

open System.IO

open System.Windows.Forms


let form =

    let temp = new Form(Width=272, Height=64)


    let imagePath = new TextBox(Top=8, Left=8, Width=128)


    let browse = new Button(Top=8, Width=32, Left=8+imagePath.Right, Text = "...")

    browse.Click.Add(fun _ ->

        let dialog = new OpenFileDialog()

        if dialog.ShowDialog() = DialogResult.OK then

            imagePath.Text <- dialog.FileName)


    let send = new Button(Top=8, Left=8+browse.Right, Text = "Send")

    send.Click.Add(fun _ ->

        let buffer = File.ReadAllBytes(imagePath.Text)

        let service = new ImageServiceClient()

        service.ReceiveImage(buffer))


    temp.Controls.Add(imagePath)

    temp.Controls.Add(browse)

    temp.Controls.Add(send)

    temp


[<STAThread>]

do Application.Run(form)
Figure 10-5 shows the example being executed. The user is about to select an image to send to the client.

Figure 10.5 A WCF service hosted in a Windows form
This is not quite the whole story for a desktop application that listens for updates. The "client" that sends out updates needs to know the services and desktop applications to which it should send updates. In the services, you do this very simply—by hard-coding the address of the service. In the real world, you'd need to implement a service in the other direction as well. This service would tell the central "client" that a service was listening for updates and alert the central "client" when a service stops. Then the central "client" would need to loop through all services that were listening for updates and push the data out to each one of them.
Summary
This chapter covered the main options for creating distributed applications in F#. It showed that combining F# with .NET libraries allows the programmer to concentrate on the key technical challenges of creating distributed applications and allows them to use the features of F# to help control the complexity of these applications. In the next chapter, you will look at language-oriented programming, a technique that has been tried and trusted by functional programmers for years and can really make a programmer's life simpler.