
Chapter 4: Building a Feature Repository with SageMaker Feature Store
A feature store allows you to store features for machine learning (ML) training and inference. It serves as a central repository for teams collaborating on ML use cases to prevent duplicating and confusing efforts when creating features. Amazon SageMaker Feature Store makes storing and accessing training and inference data in the cloud easier, faster, and reproducible. With a SageMaker Feature Store instance built for your ML life cycle, you will be able to manage features, which are always evolving, and use them for training and inference with the confidence that you are using the right ones. You will also be able to collaborate with your colleagues more effectively by having a single source of truth when it comes to ML features.
In this chapter, we will be covering the following topics:
- Understanding the concept of a feature store
- Getting started with SageMaker Feature Store
- Accessing features from SageMaker Feature Store
Technical requirements
For this chapter, you need to access the code in https://github.com/PacktPublishing/Getting-Started-with-Amazon-SageMaker-Studio/tree/main/chapter04. You need to make sure your IAM execution role has the AmazonSageMakerFeatureStoreAccess policy.
Understanding the concept of a feature store
Consider the following scenario: you are a data scientist working on an ML project in the automotive industry with a fellow data scientist and a few data engineers. You are responsible for modeling vehicle fuel efficiency, while your fellow data scientist is responsible for modeling vehicle performance. Both of you are using data coming from car manufacturers that your company is working with that is preprocessed and stored in the cloud by the data engineers in the team as input to the models.
The data is stored in disparate sources, such as Amazon S3, Amazon Relational Database Service (RDS), and a data lake built on AWS, depending on the nature of the source data. You and your fellow data scientist have been reaching out separately to the data engineering team to get the data processed in certain ways that work best for your respective modeling exercises. You do not realize that your fellow data scientist's models actually share some common features, but a new set of features is created and maintained in both of your workspaces.
As the project goes on, the data engineering team is reporting that it has become a challenge to manage the constantly growing data and feature footprint. It is also cumbersome for you to track versions of features when there is a change in the data processing pipeline and/or the car manufacturers amend and update the catalogs. You find yourself in a constant struggle keeping track of what models are trained with what set or versions of features from a multitude of tables and files for your code and notebooks.
Here's a summary of the challenges that the team is facing:
- Data and features are not centrally stored, even though there is a central data engineering team.
- The data scientists do not have visibility and knowledge of features that are created and used by each other; therefore, the default is to create your own.
- Consequently, data and features are duplicated, burdening the data engineering team.
- An update to the feature means another copy of data that someone needs to manage.
- Model and data lineage are difficult to maintain over the iteration of the ML life cycle.
A feature store is a relatively new concept in an ML life cycle that is purposefully designed to address the challenges observed in the preceding scenario. The goal of a feature store is to have a centralized store for all features, for all models, for training and inference, and for all times. For all features means that we want to have features from various sources to funnel into one central place and to be able to find them easily. For all models means that we want teams building various models to use the features from only one central place. For training and inference means that we want to retrieve the same features for training and for hosting purposes while meeting different runtime requirements in training and inference applications. For all times means that we want to keep versions of features for their entire lifetime, regardless of updates and changes in one single feature store, so that data scientists can access different versions of the features for different time slices.
Let's look at the key components and concepts in SageMaker Feature Store that make it possible.
Understanding an online store
An online store is a feature storage option in SageMaker Feature Store that is designed to stay online at all times. Online means that the store should behave like an online application, one that responds to data read/write access requests immediately. Immediately can be subjective, but in technical terms, it means low response latency so that users do not feel the lapse. In addition to low latency, another aspect that makes the online store "online" is the high throughput of transactions that it can serve at the same time. Imagine hundreds of thousands of users visiting your application; you do not want to disappoint your awesome customers. You want your online application to be capable of handling traffic with high throughput and low latency.
Why do we need an online store that has low latency? In many ML use cases, the ML inference needs to respond to a user's action on the system immediately to provide the inference results back to the user. The inference process typically includes querying features for a particular data point and sending the features as a payload to the ML model. For example, an auto insurance online quote application has an ML model that takes a driver's information to predict their risk level and suggest a quote. This application needs to pull vehicle-related features from a feature store based on the car make provided by the user. You'd expect a modern application to return a quote immediately. Therefore, an ideal architecture should keep the latency of both pulling features from a feature store and making an ML inference low. We can't have a system where the ML model responds immediately but takes seconds or minutes to gather features from various databases and locations.
Understanding an offline store
An offline store in SageMaker Feature Store is designed to provide much more versatile functionality by keeping all the records over time for use. You will be able to access features at any given condition and time for a variety of use cases. But this comes at the cost of higher-latency response times for requests to an offline store, because the offline store uses slower and less expensive storage.
An offline store complements the online store for ML use cases where low latency isn't a requirement. For example, when building an ML training dataset to reproduce a particular model for compliance purposes, you need to access historic features in order to build a model that was created in the past. ML training is typically not expected to complete within seconds anyway, so you don't necessarily need sub-second performance when querying a feature store for training data.
Now that we've got a good understanding of the key components and concepts in SageMaker Feature Store, let's get hands-on with a use case.
Getting started with SageMaker Feature Store
Following the scenario we described earlier, we are a data science team in a company in the automotive industry. We are working on a fuel efficiency dataset to create ML models. Let's use an Auto MPG dataset from UCI (https://archive.ics.uci.edu/ml/datasets/Auto+MPG), which is a collection of vehicle data and fuel efficiency (measured by miles per gallon) by make from 1970 to 1982, to demonstrate the following:
- How to ingest features into a feature store
- How to access features from an online store and an offline store
- How to update the features year over year and access features using versioning (time travel)
As a prerequisite, please navigate to the code repository and open the chapter04/01-sagemaker_feature_store.ipynb notebook. First, execute the notebook until the following code to read the data from the source into a pandas DataFrame:
data_url='https://archive.ics.uci.edu/ml/machine-learning-databases/auto-mpg/auto-mpg.data'
col_names=['mpg','cylinders', 'displacement', 'horsepower', 'weight', 'acceleration', 'model_year', 'origin', 'car_name']
df=pd.read_csv(data_url, delimiter='s+', header=None, names=col_names, na_values='?')
df['car_name']=df['car_name'].astype('string')
Additionally, we convert the data type to string for the car_name column, which is required by SageMaker Feature Store. We will describe what this means later in the Creating a feature group section.
We are going to split the DataFrames by year in order to later ingest them to simulate the feature updates over the years. Therefore, it is easier to convert the type for one DataFrame now. The following cell creates a dictionary to hold DataFrames by year and adds a new event_time column to encode the time of feature creation. We simulate it by adding a Unix epoch time at 8:00 am on January 1 in each respective year using Python's datetime library:
d_df = {}
for yr in df['model_year'].unique():
print(yr)
d_df[str(yr)]=df[df['model_year']==yr]
d_df[str(yr)]['event_time']=datetime.datetime(1900+yr, 1, 1, 8, 0, 0).timestamp()
Important Note
A feature that denotes event time, event_time in this example, is required for any feature table that goes into a feature group in SageMaker Feature Store. This allows us to perform time travel and versioning of the features by time.
Next, we will start interacting with SageMaker Feature Store.
Creating a feature group
A feature group in SageMaker Feature Store defines the metadata, feature definition, unique identifier for the data entries, and other SageMaker Feature Store configurations.
There are two ways to create a feature group – using the SageMaker Python SDK or the Studio UI.
By following these steps (also in the notebook), we can create a feature group in SageMaker Feature Store using the SageMaker Python SDK:
- Firstly, we create a SageMaker feature group named auto-mpg-<timestamp> with the FeatureGroup class:
from sagemaker.feature_store.feature_group import FeatureGroup
feature_group = FeatureGroup(name=feature_group_name, sagemaker_session=sess)
- Next, we need to make the SageMaker feature group aware of the data schema and definition. feature_group.load_feature_definitions() is an API to load the schema and definition from a pandas DataFrame. The API automatically detects the data type. We also need to make sure that the features in the DataFrame are configured to have the data types supported by SageMaker Feature Store.
Important Note
The data types supported by SageMaker Feature Store are string, fractional, and integral. A pandas DataFrame infers a data column with strings as the object type for backward-compatibility reasons. With pandas 1.0 onwards, you can explicitly request to use the string type for columns containing strings. SageMaker Feature Store works with the string type from pandas, not the object type. The acceptable data type for the event_time column is either string or fractional. For the string type, event time has to be in the ISO-8601 format in UTC time with the yyyy-MM-dd'T'HH:mm:ssZ or yyyy-MM-dd'T'HH:mm:ss.SSSZ patterns. For the fractional type, the values are expected to be in seconds from Unix epoch time with millisecond precision. In our example, we used Unix epoch time returned by the datetime library.
We load the feature definition from the first DataFrame. You will see the definition and data types loaded into feature_group in the output:
feature_group.load_feature_definitions(data_frame=d_df['70'])
[FeatureDefinition(feature_name='mpg', feature_type=<FeatureTypeEnum.FRACTIONAL: 'Fractional'>),
FeatureDefinition(feature_name='cylinders', feature_type=<FeatureTypeEnum.INTEGRAL: 'Integral'>),
FeatureDefinition(feature_name='displacement', feature_type=<FeatureTypeEnum.FRACTIONAL: 'Fractional'>),
FeatureDefinition(feature_name='horsepower', feature_type=<FeatureTypeEnum.FRACTIONAL: 'Fractional'>),
FeatureDefinition(feature_name='weight', feature_type=<FeatureTypeEnum.FRACTIONAL: 'Fractional'>),
FeatureDefinition(feature_name='acceleration', feature_type=<FeatureTypeEnum.FRACTIONAL: 'Fractional'>),
FeatureDefinition(feature_name='model_year', feature_type=<FeatureTypeEnum.INTEGRAL: 'Integral'>),
FeatureDefinition(feature_name='origin', feature_type=<FeatureTypeEnum.INTEGRAL: 'Integral'>),
FeatureDefinition(feature_name='car_name', feature_type=<FeatureTypeEnum.STRING: 'String'>),
FeatureDefinition(feature_name='event_time', feature_type=<FeatureTypeEnum.FRACTIONAL: 'Fractional'>)]
- After the definition is loaded, we can create feature group in the system:
record_identifier_feature_name = 'car_name'
event_time_feature_name = 'event_time'
feature_group.create(
s3_uri=f's3://{bucket}/{prefix}',
record_identifier_name=record_identifier_feature_name,
event_time_feature_name=event_time_feature_name,
role_arn=role,
enable_online_store=True,
description=description
)
In the create() function, the following is configured for the feature group:
- We specify an S3 bucket location to the s3_uri argument to indicate that we want to set up an offline store at this location for the feature group. We could set it to False to disable the offline store.
- We set enable_online_store to True to create an online store for the feature group. Set it to False if you do not need an online store and avoid unnecessary charges.
- We indicate that the record identifier is the car_name column and the event_time feature is the event_time column in the feature group.
This creation is an asynchronous operation and takes a couple of seconds. The check_feature_group_status() function in the next cell checks the status every 5 seconds and returns the cell once the feature group is created successfully. You can also see a list of feature groups in the Studio UI in the SageMaker component and registry tab in the left sidebar, as shown in Figure 4.1. If you click on the feature group in the list, you can see all the information associated with the feature group, a description, a feature definition, and example queries:

Figure 4.1 – Viewing the feature group in the SageMaker Studio UI
Alternatively, you can also create a feature group from the UI. Because we have the data already in a pandas DataFrame, it was straightforward to load the definition using the SDK. The following steps demonstrate how to create a feature group in Studio UI:
- Click on Create feature group, as shown in Figure 4.1.
- In the first step, as shown in Figure 4.2, enter the feature group name, a description, and configurations for the online and offline stores. For the offline store, we put in an S3 bucket location to store the offline store data and an IAM Role ARN that has permission to access the bucket. In this example, we will use the SageMaker execution role that is also attached to the SageMaker Studio user profile. You can see the full ARN from the role variable in the notebook. For the DATA CATALOG options, let's check the Auto create AWS Glue table box and either have SageMaker assign names in the three fields or assign names ourselves. Click Continue:

Figure 4.2 – Configuring a feature group in the Studio UI
- In the second step, we need to create the feature definition. We can use JSON editor to paste in definition in bulk, as shown in Figure 4.3:

Figure 4.3 – Editing the feature definitions in JSON editor
- Or we can use the Table tab to edit the feature with an easy-to-use drop-down list, as shown in Figure 4.4. Click Continue once you've finished:

Figure 4.4 – Editing the feature definitions in Table
- In the third step, as shown in Figure 4.5, we need to choose a feature to be a record identifier (car_name) and another feature to identify event time (event_time). Click Continue to proceed:

Figure 4.5 – Selecting a record identifier and event time feature
- Then, we can optionally add tags to the feature group. Click Create feature group to continue.
Important Note
I demonstrated two ways of creating a feature group. We will only need one to proceed. Let's come back to the notebook and use the feature group created from the SageMaker Python SDK.
Once your feature group is created, we are ready to proceed to ingest data to the feature group.
Ingesting data to SageMaker Feature Store
You can ingest data into the SageMaker Feature Store feature group in a batch or streaming fashion. There is an API in the sagemaker.feature_store SDK that allows us to ingest pandas DataFrames asynchronously and in batch fashion. For streaming ingestion, the sagemaker-featurestore-runtime API makes it easy to put a single record with low latency into a feature group. These two approaches to make feature ingestion flexible can be implemented in different parts of the ML life cycle.
A data engineer or scientist can create a feature group and ingest the first batch of data, which is typically the case in the exploratory phase, using batch ingestion. Once a model is built and is ready to serve, it is critical to think about capturing new data and ingesting it into the feature store so that you can iterate over the model retraining with an enriched dataset. If your data come in batches, you can use batch ingestion that allow ingestion large amount of data efficiently. Alternatively, if your model is deployed as part of a real-time application, you can use the streaming ingestion approach. In this section, we will see how both batch and streaming ingestion work.
In our example, we are simulating data update annually, as we have chopped the dataset by year into multiple DataFrames with distinct event_time values for each year's data. We can ingest each DataFrame in a batch with the following code:
for yr, df_auto in d_df.items():
print(yr)
print(df_auto.shape)
feature_group.ingest(data_frame=df_auto, max_workers=1, max_processes = 1, wait=True)
We will loop through all the DataFrames in the d_df dictionary and call the feature_group.ingest() method to ingest each DataFrame. You can control the ingestion runtime with the max_workers and max_processes arguments where the max_processes number of processes will be created to ingest different partitions of the DataFrame in parallel, each with the max_worker threads. The wait=True argument in .ingest() waits for the ingestion of a DataFrame to finish before proceeding.
Important Note
While the SageMaker Python SDK allows you to create feature groups, work with feature definitions, ingest data, and query data from the offline store, the sagemaker-featurestore-runtime boto3 SDK allows you to interact (Get and Put) with the online store. Features are available in the online store immediately after ingestion, whereas it takes some time to make features available in the offline store.
After the ingestion, we can quickly verify it by pulling a sample record from the online store, as shown in the following code block, using the get_record function from the sagemaker-featurestore-runtime boto3 API:
car_name = 'amc concord'
featurestore_runtime = sess.boto_session.client(service_name='sagemaker-featurestore-runtime',
region_name=region)
sample_record = featurestore_runtime.get_record(
FeatureGroupName=feature_group_name, RecordIdentifierValueAsString=car_name
)
sample_record
To ingest features for a record in a streaming fashion, we could use the put_record API from the sagemaker-featurestore-runtime boto3 API to ingest a single data record, as shown in the following snippet. This API provides low latency that is typically required by a streaming application. Note that record is a list of dictionaries with a FeatureName and ValueAsString pair for each feature in a record:
record = [{'FeatureName': 'mpg',
'ValueAsString': str(mpg)},
{'FeatureName':'cylinders',
'ValueAsString': str(cylinders)},
{'FeatureName':'displacement',
'ValueAsString': str(displacement)},
{'FeatureName': 'horsepower',
'ValueAsString': str(horsepower)},
{'FeatureName': 'weight',
'ValueAsString': str(weight)},
{'FeatureName': 'acceleration',
'ValueAsString': str(acceleration)},
{'FeatureName': 'model_year',
'ValueAsString': str(model_year)},
{'FeatureName': 'origin',
'ValueAsString': str(origin)},
'ValueAsString': str(car_name)},
{'FeatureName': 'event_time',
'ValueAsString': str(int(round(time.time())))}]
featurestore_runtime.put_record(FeatureGroupName=feature_group_name,
Record=record)
If you have enabled both online and offline stores, as per our example, SageMaker automatically synchronizes features from an online store to an offline store. When we update the feature group with annual data, SageMaker appends the latest values to the offline store to give you a full history of values over time.
We have walked through how to ingest features into a feature group in SageMaker Feature Store in both batch and streaming fashion using the SageMaker Python SDK and the sagemaker-featurestore-runtime boto3 API respectively. Let's now take a look at another way of ingesting features into SageMaker Feature Store – from SageMaker Data Wrangler.
Ingesting from SageMaker Data Wrangler
If you have read Chapter 3, Data Preparation with SageMaker Data Wrangler, you may recall that at the end of the journey with SageMaker Data Wrangler, there is an option to export data to SageMaker Feature Store. SageMaker Data Wrangler creates a notebook with all the code automatically so that you can simply execute the cells to ingest data to a feature group. In the notebook, it shows you how SageMaker enables the ingestion by applying Amazon SageMaker Processing, which integrates with SageMaker Feature Store as an output destination. To do this, follow these steps:
- Open the flow file created in Chapter 3, Data Preparation with SageMaker Data Wrangler.
- Go to the Export tab to select the last transformation step in the flow.
- Click the Export step button in the top right, as shown in Figure 4.6, and choose Feature Store:

Figure 4.6 – Exporting transformed data to SageMaker Feature Store from SageMaker Data Wrangler
- A new notebook will pop up. Follow and execute the cells to start a SageMaker Processing job.
At the end of processing, a new feature group will be created and available in SageMaker Feature Store.
After we have created a feature group and ingested features to it, we can move on to see how we can interact with the feature store.
Accessing features from SageMaker Feature Store
Features in a feature store can be accessed programmatically when you are building a training dataset for ML modeling, and when your application is making inferences against a model and is in need of features that are associated with a data point. We will walk through these scenarios to show you how to access features from SageMaker Feature Store.
Accessing a feature group in the Studio UI
In the Studio UI, you can quickly browse through the feature groups in the account on the feature store page. In Figure 4.1, you can see a list of feature groups. You can double-click on the line to access further details, such as Feature group summary, Description, Feature definitions, and Feature group tags, as shown in Figure 4.7:

Figure 4.7 – Detailed information of a feature group in the Studio UI
Once you and your team start to use SageMaker Feature Store in more projects, you will have many feature groups in the account. You can use the search bar in the feature group list to search for a feature group of interest:

Figure 4.8 – Searching for a feature group in the Studio UI
To use the search bar, as shown in Figure 4.8, do the following:
- Type in the name of the column you want to search, for example, short description.
- Type in the search keyword; for example, I want to find out which feature group description contains the word horsepower.
- The filter is then applied, resulting in only one feature group that satisfies the search criteria.
- You can search by Tags or Feature group name as well.
Searching by tags is a flexible and powerful tool. In the Feature group tags tab, you can add tags on the fly with additional information that will help you identify a feature group. For example, in Figure 4.9, I can add up to 50 tags to a feature group to help me organize and search:

Figure 4.9 – Adding tags to a feature group in the Studio UI
The feature store page in the Studio helps us to identify the right feature group and learn more about feature definition and other configurations before we access the features programmatically. In the next section, we will learn how to access the features.
Accessing an offline store – building a dataset for analysis and training
When building a training dataset, we typically need to be able to access a large number of features, access features of a specific time or version, and combine information from multiple feature groups. The offline store is designed to support such activities.
After ingesting features to a feature group, SageMaker Feature Store stages the data into an S3 bucket, creates a data catalog in the AWS Glue Catalog, registers the catalog in Amazon Athena, exposes a simple API for a SQL-based query, and returns a pandas DataFrame. We can use the following snippet to turn a query into a pandas DataFrame:
query = feature_group.athena_query()
table_name = query.table_name
query_string = ('SELECT * FROM "%s"' % table_name)
query.run(
query_string=query_string,
output_location=f's3://{bucket}/{prefix}/query_results/')
query.wait()
dataset = query.as_DataFrame()
In this snippet, we use the athena_query() method from a feature group to create an AthenaQuery class instance, which allows us to run a query, saves the query output into an S3 location, and returns a pandas DataFrame. table_name refers to the name of the Athena table that we can use in the query string. Here, our query selects all rows and columns from the feature table. You can take a look at the returned dataset, which has 398 entries, and note that besides the features that we have defined, there are three additional columns – write_time, api_invocation_time, and is_deleted. These three are also not seen in the output of featurestore_runtime.get_record(). They are created specifically for the offline store to enable better governance around the features and versioning. We will see how they can be used later.
Now we understand how to interact and query against the feature store. Let's consider this use case: we want to build training data using all vehicles built before 1979. Our query would look like the following:
query_string_2 = '''
SELECT * FROM "%s" WHERE model_year < 79
''' % table_name
If we run the query, we get a DataFrame (dataset_2) of 280 entries, which is a subset of the full table (398).
Consider another scenario: we would like to build training data using all vehicles built before 1979 but considering only the specs from the latest model year. We can build a point-in-time query, as shown in the following code block. This is also called time travel (going back in time to get the features from that point):
query_string_3 = '''
SELECT *
FROM
(SELECT *,
row_number()
OVER (PARTITION BY car_name
ORDER BY event_time desc, Api_Invocation_Time DESC, write_time DESC) AS row_number
FROM "%s"
where event_time < %.f)
WHERE row_number = 1 and
NOT is_deleted
''' % (table_name, datetime.datetime(1979, 1, 1, 8, 0, 0).timestamp())
With this query, we get a DataFrame of 212 entries (dataset_3). We can compare the entries for the amc gremlin car in the last two DataFrames, as shown in Figure 4.10:

Figure 4.10 – A point-in-time query (dataset_3) returns the latest data for a vehicle as of 1979 instead of all entries prior to 1979 (dataset_2)
Thanks to the detailed time attribute that is stored in SageMaker Feature Store along with the features, we can perform sophisticated versioning and point-in-time queries against a feature group. We can see that dataset_3 contains only one entry for the vehicle, whereas dataset_2 has all the historical entries for the vehicle:
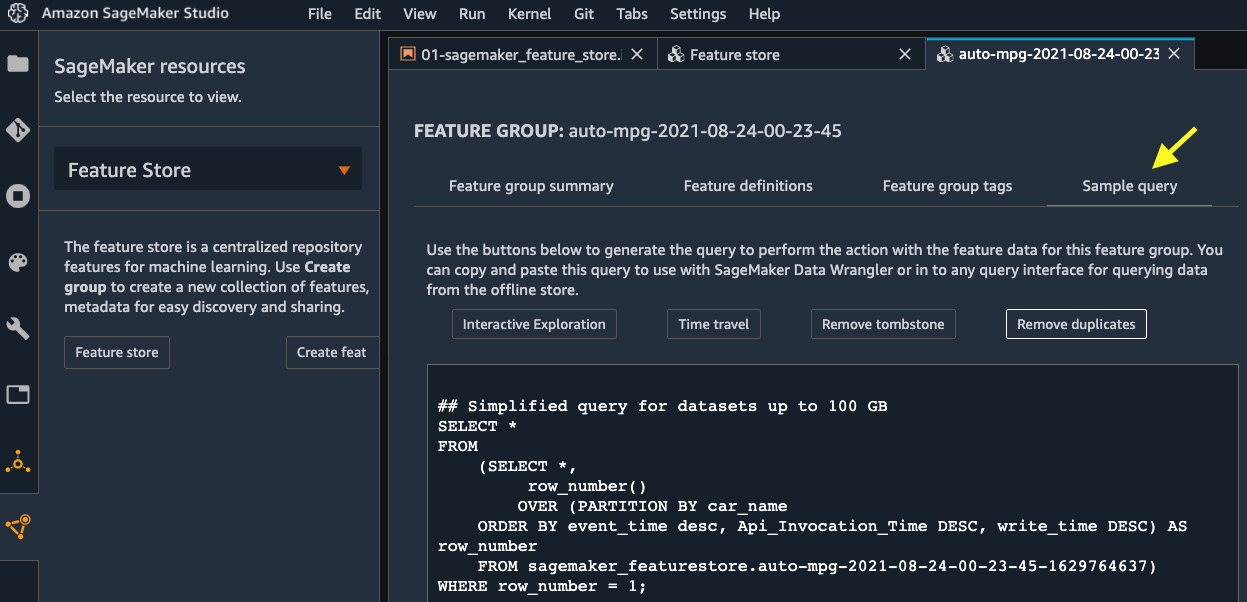
Figure 4.11 – Example queries that can help you perform common tasks with the offline store of a feature group
The offline store in SageMaker Feature Store can be very versatile. In the Feature Store UI, you can find a couple of query examples against the offline store on the Sample query tab, as shown in Figure 4.11.
Now, let's switch our focus to accessing features from the online store.
Accessing online store – low-latency feature retrieval
SageMaker Feature Store's online store capability offers single-digit millisecond latency and high throughput. This is suitable for use cases where the feature is ingested to the cloud with a streaming architecture and the model inference is of a real-time and streaming nature. Accessing the online store of a feature group can be achieved with the sagemaker-featurestore-runtime boto3 API, which is also what we used to verify the feature ingestion in the Ingesting data to SageMaker Feature Store section:
car_name = 'amc gremlin'
featurestore_runtime = sess.boto_session.client(service_name='sagemaker-featurestore-runtime', region_name=region)
amc_gremlin = featurestore_runtime.get_record(
FeatureGroupName=feature_group_name,
RecordIdentifierValueAsString=car_name
)
amc_gremlin['Record']
[{'FeatureName': 'mpg', 'ValueAsString': '20.0'},
{'FeatureName': 'cylinders', 'ValueAsString': '6'},
{'FeatureName': 'displacement', 'ValueAsString': '232.0'},
{'FeatureName': 'horsepower', 'ValueAsString': '100.0'},
{'FeatureName': 'weight', 'ValueAsString': '2914.0'},
{'FeatureName': 'acceleration', 'ValueAsString': '16.0'},
{'FeatureName': 'model_year', 'ValueAsString': '75'},
{'FeatureName': 'origin', 'ValueAsString': '1'},
{'FeatureName': 'car_name', 'ValueAsString': 'amc gremlin'},
{'FeatureName': 'event_time', 'ValueAsString': '157795200.0'}]
We take amc gremlin as an example vehicle to retrieve the features. We use the get_record API from boto3 to access the features for the vehicle. The output of the API (amc_gremlin) is a Python dictionary. The feature values are returned in the Record field. If you look closely, you will note that the model_year value for the vehicle is 75. This shows that the online store keeps only the latest entry.
We can also use the batch_get_record API to retrieve multiple records and features in a batch. We can retrieve multiple records with a list of car names and select a subset of features with a list of features that we need. If FeatureNames is not provided, all features are returned:
car_names = ['amc gremlin', 'amc concord', 'dodge colt']
feature_names = ['cylinders', 'displacement', 'horsepower']
sample_batch_records=featurestore_runtime.batch_get_record(
Identifiers=[
{'FeatureGroupName': feature_group_name,
'RecordIdentifiersValueAsString': car_names,
'FeatureNames': feature_names},
]
)
sample_batch_records['Records'][0]['Record'] # indexing first record
[{'FeatureName': 'cylinders', 'ValueAsString': '4'},
{'FeatureName': 'displacement', 'ValueAsString': '151.0'},
{'FeatureName': 'horsepower', 'ValueAsString': '90.0'}]
You can run these lines of code in your web applications to retrieve features for ML inference with single-digit millisecond latency. With SageMaker Feature Store, you can quickly retrieve features of a given data index quickly and make ML inference in the cloud.
Summary
In this chapter, we learned about the concept of a feature store from an ML perspective. We described the functionality of Amazon SageMaker Feature Store and walked through several feature store use cases when developing an ML model using a public automotive dataset. In the example code, we showed you how to create a feature group in SageMaker Feature Store and how to ingest and update features and data to a feature group. We also showed you how to access features from the offline store for model training purposes and how to perform a point-in-time (time travel) feature query, which is useful when you need to access features in the past. Finally, we showed you how to access features from the online store for ML inference purposes.
In the next chapter, we will move into the topic of building and training ML models with the SageMaker Studio IDE. Building and training ML models can be challenging in a typical ML life cycle, as it is time-consuming and is compute resource-intensive. You will learn ways to build and train ML models with ease using the SageMaker Studio IDE.