
Now, it's time to introduce one of the most used features of a versioning system: branching. This is a thing that you will use extensively and a thing that Git does well.
A branch is essentially another way your repository takes. While programming, you will use branches to experiment with changes, without breaking the working code. You will use them to keep track of some extensive work, such as the development of a new feature, to maintain different versions or releases of your project. To put it simply, you will use it always.
When in a Git repository, you are always in a branch. If you pay attention to the Bash shell, you can easily find the branch that you are on at the moment. It is always at the prompt, within brackets, as shown here:

The master branch is, conventionally, the default branch. When you do your first commit in a brand new repo, you actually do the first commit in the master branch.
During the course of the book, you will learn that the master branch will often assume an important role. We will only deploy code from that point, and we will never work directly in the master branch.
Let's start using the git branch command alone. If you do this, you will get a list of the branches included in the current repository:
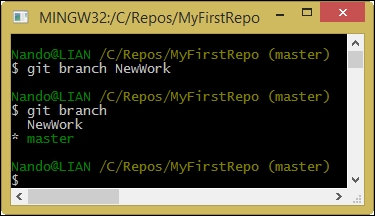
$ git branch
We will get the following response:

As expected, Git tells us that we have only the master branch. The branch is highlighted with a star and green font just because this is our actual branch, the branch in which we are located at the moment.
Now, let's start creating a new branch for a new activity.
Open the Bash shell in C:ReposMyFirstRepo and create a new branch from where you are using the git branch command, followed by the name of the branch we want to create. Let's assume that the name of the branch is NewWork:
$ git branch NewWork
Well, it seems nothing happened and we are still in the master branch as we can see in the following screenshot:

Git sometimes is a man of few words. Type the git branch command again to get a list of the actual branches:
The only thing we have to do now is to switch to the NewWork branch to begin working on this separate argument. To move around from one branch to another, we will use the git checkout command. Type this command followed by the branch name to switch to:
$ git checkout NewWork
This time, Git gave us a short message, informing us that we have switched to the NewWork branch. As you can see, NewWork is within brackets in place of master, indicating the actual branch to us:

At this point, nothing special seems to have happened. However, you will soon change your mind. Just to give you a visual aid, consider this figure:

Assume that our last commit on the master branch was the C3 commit. At this point, we now have two other pointers: the master branch pointer and the NewWork branch pointer.
If you have used Subversion or a similar versioning system earlier, at this point, you would probably look for a NewWork folder in C:ReposMyFirstRepo. However, unfortunately, you will not find it. Git is different, and now, we will see why.
Now, to better understand what a branch is for, add NewWorkFile.txt, stage it, and commit the work, as shown here:

At this point, we have a new commit in the NewWork branch. This commit is not a part of the master branch, because it has been created in another branch. So, the NewWork branch is ahead of the master branch, as shown in the following figure:

Working with Git in this kind of a situation is ordinary administration, just like it is in the day-to-day life of a developer. Creating a new branch is cheap and blazing fast even in large repositories, because all the work is done locally. You can derive multiple branches from a unique point, branch from a branch that branched into another branch, and so on, creating all the ramifications you can manage without going crazy.
Moving from a branch to another is easy. So, let's turn back to the master branch and see what happens:

If you have used Subversion earlier, at this time, you are probably wondering at least two things: why is there no NewWork folder containing files from that branch and, most of all, what was the fate of the NewWorkFile.txt file.
In Apache Subversion (SVN), every branch (or tag) you checked out resides in a separate folder (bloating your repository, after some time). In Git, there is a huge difference. Every time you check out a branch, files and folders of the previous branch are replaced with those contained in the new branch. Files and folders only on the destination branch are restored, and those only on the previous branch are deleted. Your working directory is constantly a mirror of the actual branch. To have a look at another branch, you basically have to switch to it.
This aspect might look bad to you the first time, because seeing files and folders disappear is scary at first. Then, you can't differentiate the two branches as we probably did earlier by simply comparing the content of the two folders with your preferred tool. If I can give you a piece of advice, don't lose heart about this (as I did at the beginning): soon you will forget what you lost and you will fall in love with what you gained.
So, let's go back once again to the NewWork branch and have a look at the situation with the aid of a visual tool, Git GUI. Open the C:ReposMyFirstRepo folder and right-click inside it. Choose Git GUI from the contextual menu. A dialog box will pop up as shown in the following screenshot:

Git GUI is not my preferred GUI tool, but you have it for free when installing Git. So, let's use it for the moment.
Go to Repository | Visualize All Branch History. A new window will open, and you will see the status of our current branches, as shown in the following screenshot:

We do not have the time to go into all the details here. As you become more confident with Git fundamentals, you will learn little by little all the things you see in the preceding picture.
If you don't want to leave the console to take a look, you could get a pretty output log even on the console. Try this articulated git log command:
$git log --graph --decorate --pretty=oneline --abbrev-commit

This is a more compact view, but it is as clear as what we saw earlier.
Before continuing, just a little warning. The last command we used is not the easiest thing to remember. To get around this nuisance, Git offers the possibility of creating your own commands, aliasing some of the verbose sequences.
To create an alias, we will use the git config command. So, let's try to create a tree alias for this command:
$ git config --global alias.tree 'log --graph --decorate --pretty=oneline --abbrev-commit'

So, the syntax to create aliases is as follows:
git config <level> alias.<alias name> '<your sequence of git commands>'
Using the --global option, we told Git to insert this alias at the user level so that any other repository for my user account on this computer will have this command available. We have three levels where we can apply config personalization:
- Repository level configs are only available for the current repo
- Global configs are available for all the repos for the current user
- System configs are available for all the users/repositories
To create a repository user-specific config, we used the --global option. For the system level, we will use the --system option. If you don't specify any of these two options, the config will take effect only in the repository that you are in now.
Now that we finally got in touch with branches, let's assume that our work in the NewWork branch is done and we want to bring it back to the master branch.
To merge two branches, we have to move to the branch that contains the other branch commits. So, if we want to merge the NewWork branch into the master branch, we would first have to check out the master branch. As seen earlier, to check out a branch we have to type the following command:
$ git checkout <branch name>;
If you want to check out the previous branch you were in, it's even simpler. Type this command:
$ git checkout –
With the git checkout – command, you will move in the previous branch without having to type its name again as explained in the following screenshot:

Now, let's merge the NewWork branch into master using the git merge command:
$ git merge NewWork
As you can see, merging is quite simple. With the git merge <branch to merge> command, you can merge all the modifications in a branch into the actual branch as shown in the following screenshot:

When we read console messages, we see that Git is telling us something interesting. Let's take a look.
When Git says Updating 986a6dc..a0c7d61, it is telling us that it is updating pointers. So now, we will have master, NewWork, and HEAD all pointing to the same commit:

Fast-forward is a concept that we will cover soon. When we tell Git to not apply this feature, in brief, this fast-forward feature (enabled by default) permits us to merge commits from different branches, as they were done subsequently in the same branch, obtaining a less-pronged repository.
Last, but not least, we have a complete report of what files are added, deleted, or modified. In our case, we had just one change (an insertion) and nothing else. When something is added, Git uses a green plus symbol +. When a deletion happens, Git uses a red dash symbol -.
This is a concept that sometimes raises some trouble. To avoid this, we will have a quick glimpse of it. You don't have to wait for the work to be done before merging another branch into your branch. Similarly, you don't have to think about merging as the last thing you will do before cutting off the other branch on which you worked.
On the contrary, it's better if you merge frequently from branches you depend on, because doing it after weeks or months can become a nightmare: too many changes in the same files, too many additions or deletions. Don't make a habit of this!
To understand some common merging scenarios, you can try to resolve these small exercises.
In this exercise we will learn how Git can handle automatically file modifications when they are not related to the same lines of text.
- You are in a new repository located in
C:ReposExercisesCh2-1. - You have a
masterbranch with two previous commits: the first commit with afile1.txtfile and the second commit with afile2.txtfile. - After the second commit, you created a new branch called
File2Split. You realized thatfile2.txtis too big, and you want to split its content by creating a newfile2a.txtfile. Do it, and then commit the modifications.
In this exercise we will learn how to resolve conflicts when Git cannot merge files automatically.
- You are in the same repository used earlier,
C:ReposExercisesCh2-1. - On the
masterbranch, you add thefile3.txtfile and commit it. - Then, you realize that it is better to create a new branch to work on
file3.txt, so you create theFile3Workbranch. You move in this branch, and you start to work on it, committing modifications. - The day after, you accidentally move to the
masterbranch and make some modifications on thefile3.txtfile, committing it. - Then, you try to merge it.
As mentioned earlier, if you come from SVN at this point, you would be a little confused. You don't "physically have on the disk" all the branches checked out on different folders. Because of this, you cannot easily differentiate two branches to take into account what a merge will cost in terms of conflicts to resolve.
Well, for the first problem, there is not an SVN-like solution. However, if you really want to differentiate two checked out branches, you could copy the working directory in a temp folder and check out the other branch. This is just a workaround, but the first time can be a less traumatic way to manage the mental shift Git applies in this field.
If you want to do it in a more Git-like way, you could use the git diff command. Let's give it a try by performing the following steps:
- Open
C:ReposMyFirstRepoand switch to themasterbranch. - Add some text to the existing
NewFile.txt, and then save it. - Add a
NewMasterFiles.txtfile with some text within it. At the end, add both files to the index and then commit them, as shown in the following screenshot:
Now, try to have a look at the differences between the master and NewWork repositories. Finding out the difference between the two branches is easy with the git diff command:
$ git diff master..NewWork
The syntax is simple: git diff <source branch>..<target branch>. The result, instead, is not probably the clearest thing you have ever seen:

However, with a little imagination, you can understand that the differences are described from the point of view of the NewWork branch. Git is telling us that some things on master (NewFile.txt modifications and NewMasterFile.txt) are not present in the NewWork branch.
If we change the point of view, the messages change to those shown in the following screenshot:

Note
To better understand these messages, you can take a look at the diff output at http://en.wikipedia.org/wiki/Diff_utility.
Another way to check differences is to use git log:
$ git log NewWork..master
This command lets you see commits that differ from the NewWork branch to the master branch.
There is even a git shortlog command to give you a more compact view, as shown in the following screenshot:

All these commands are useful for short change history. However, if you have a more long change list to scroll, things would quickly become complicated.
Git lets you use an external diff tool of choice. On other platforms (for example, Linux or Mac), a diff tool is usually present and configured, while on the Windows platform, it is generally not present.
To check this, type this command:
$ git mergetool
If you see a message like this, you would probably have to set your preferred tool:

As we have seen, merging branches is not a difficult task. However, in real-life scenarios, things are not that easy. We have conflicts, modifications on both branches, and other weird things to fight. In this section, we will take a look at some of them. However, first, remember one important thing: it needs a little bit of discipline to make the most of Git.
You have to avoid at least two things:
- Working hard on the same files on different branches
- Rarely merging branches
This is the most common kind of conflict: someone edited the same line in the same file on different branches, so Git can't auto merge them for you. When this happens, Git writes special conflict markers to the affected areas of the file. At this point, we have to manually solve the situation, editing that area to fit our needs.
Let's try this by performing the following steps:
- Open your repository located in
C:ReposMyRepos. - Switch to the
NewWorkbranch and editNewFile.txtby modifying the first lineAdded some text to the existing NewFileinText has been modified. - Add and commit the modification.
- Switch back to
masterand merge theNewWorkbranch.
As you can see, Git highlighted the conflict. A conflict-marked area begins with <<<<<<< and ends with >>>>>>>. The two conflicting blocks themselves are divided by a sequence of =======. To solve the conflict, you have to manually edit the file, deciding what to maintain, edit, or delete. After that, remove the conflict markers and commit changes to mark the conflict as resolved.

Once you resolve the conflicts, you are ready to add and commit:

Merge done, congratulations!
Removed file conflicts occur when you edit a file in a branch and another person deletes that file in their branch. Git does not know if you want to keep the edited file or delete it, so you have to take the decision. This example will show you how to resolve this both ways.
Try again using NewFile.txt. Remove it from the NewWork branch and then modify it in master:

After that, merge NewWork in the master branch. As said earlier, Git spots a conflict. Add NewFile.txt again in the master branch and commit it to fix the problem:

When resolving merge conflicts, try to commit without specifying a message, using only the git commit command. Git will open the Vim editor, suggesting a default merge message:

This can be useful to spot merge commits looking at the repository history in the future.