6
Structure and Layout with HTML
Aside from formatting text, HTML gives us a set of tools for defining areas of a webpage. While they don’t affect the way a page looks (that’s what CSS is for), it’s yet another way to apply semantic meaning to webpages for users and anything else that’s reading the page.
In this chapter, you’ll learn the kinds of areas you can create on a page, find out more about block versus inline elements, and get a preview of the CSS box model. Let’s dive in!
Webpage Layout
If you’ve been to any website, you’ll know that the items on a page are grouped into areas with specific functions, such as a header, a footer, a main area (which can contain several elements), and a sidebar. As an example, take a look at the home page of the New York Times with a box drawn around each item (FIGURE 6.1).

Figure 6.1 The layout for the New York Times home page
Each of these boxes is an area defined in HTML and styled with CSS. But the browser knows how to arrange the areas thanks to the HTML elements used to define them.
If you’d like to see how a page is structured in the Chrome browser, you can do so using the Web Developer extension. This extension adds a number of developer-friendly tools to Chrome, including options for drawing an outline around individual webpage elements.
You’ll start by downloading the extension from the Chrome Store and installing it.
To outline webpage elements in Chrome:
Open the Google Chrome web browser and go to the Extensions section of the Chrome Store: chrome.google.com/webstore/category/extensions (FIGURE 6.2).

Figure 6.2 The Chrome Store offers a wide range of extensions that add functionality to the browser.
Enter Web Developer into the Search field and press Return/Enter. The page displays the results of the search (FIGURE 6.3).

Figure 6.3 Searching for “Web Developer” returns a long list of results.
Find Web Developer by chrispederick.com in the results (it should be near the top) and click it to load its page into the browser (FIGURE 6.4).

Figure 6.4 The Web Developer page in the Chrome Store
Click the Add To Chrome button and follow the installation instructions.
When the installation is complete, you’ll notice a new cog icon in the toolbar
 .
.Click the cog icon. A tabbed set of controls appears.
Click the Outline tab. A menu lists sets of elements that can be outlined (FIGURE 6.5).

Figure 6.5 Select Outline Block Level Elements on the Outline tab to draw a box around each block-level element.
Click to select the elements you want to outline. Outline Block Level Elements is a good starting point, so select that item in the menu.
An outline is drawn around each block-level element on the page (FIGURE 6.6).

Figure 6.6 The home page of nytimes.com with elements outlined using the Web Developer extension in Chrome
Block vs. Inline Elements
Chapter 4 touched on this a bit, but there are essentially two kinds of HTML elements: block elements and inline elements. The best way to think about them is by how much page width they take up.
Block elements take up the full available width, thus creating their own block on a page. Style-wise, each element fits into the box model and has its own spacing. A paragraph is a block element (FIGURE 6.7).

Figure 6.7 A paragraph takes up the full available width.
Inline elements, on the other hand, take up only the width they need. Again, looking at this stylistically, by default there is no spacing applied directly to inline elements. <strong>, <em>, and <a> are all inline elements (FIGURE 6.8).

Figure 6.8 A link takes up only the width that it needs to take up.
All the elements that we consider “layout elements” in the next section are block elements.
Page Sections
Before diving into the actual elements, it’s important to define (at least loosely) the areas that will be included in the page design. A good way to get an idea of a page’s design and layout is to sketch out a wireframe. A wireframe is a blueprint or a general framework of a webpage. Its focus is on content priority and lacks the niceties of visual design, like text styling or colors. In short, it should tell us where content and elements go. A typical webpage layout includes a few basic areas (FIGURE 6.9).
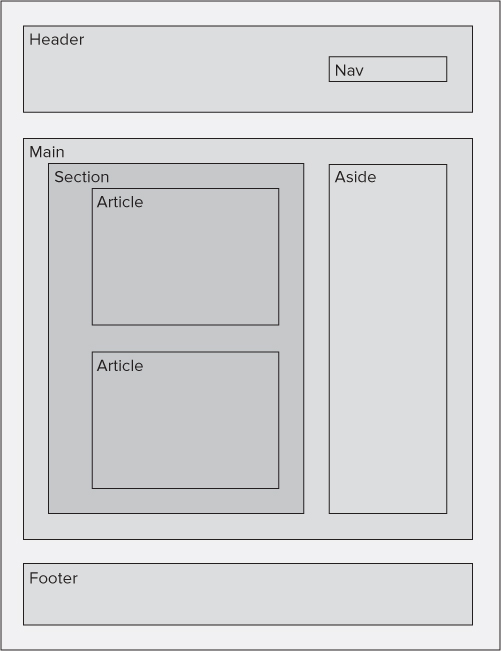
Figure 6.9 A wireframe of a webpage that uses common page sections
Now that you have a better understanding of how a page is laid out, here are the seven HTML elements that define these areas.
Header, footer, nav
The first areas to examine are the header, footer, and navigation. They are grouped because you can have each on a macro (site-wide) level and a micro (area-specific) level.
The header is the area that contains information at the top of a webpage or section of a webpage. A site’s header generally includes the site title and maybe a tagline or logo. Other elements, like articles, can also have a header tag, which might include the title, date, and author’s name. The navigation is also usually found in the header. The tag for this element is <header>.
The navigation includes links to other important pages on the site. On a micro level, groups of pages or articles can have their own navigation (if an article is spread across several pages, for example). Its tag is <nav>.
The footer is at the bottom of the page or section of a page and is generally used to provide extra information. For a section of a page, it could display the date it was published or tags or keywords. For the entire site, the footer can include additional links, copyrights, or other legal disclosures. You can get really creative with this section! Its tag is <footer>.
Both the header and footer can be pretty flexible as far as content and layout, but navigation tends to follow a more specific structure. That’s because unordered lists (which use the <ul> element) are recommended for navigation, since they are an unordered list of links!
Lists for Navigation
Over the years, the use of unordered lists for navigation has been hotly debated. There are several arguments for and against.
The recommendation here comes from the HTML5 specification explicitly using lists in their nav examples (html.spec.whatwg.org/multipage/sections.html#the-nav-element) and from accessibility experts stating their importance in relation to screen readers.
Several years ago, CSS-Tricks published an article about it that garnered a lot of strong opinions. Their postmortem on the article is a great summary of the pros and cons of lists in nav: css-tricks.com/wrapup-of-navigation-in-lists/.
A simple site navigation element might have links to the home, about, and contact pages (FIGURES 6.10 and 6.11).

Figure 6.10 The HTML markup for a simple navigation element

Figure 6.11 The simple navigation element as rendered in a web browser
To create simple site navigation:
For this task, assume there are three pages: a home page (index.html), an about page (about.html), and a contact page (contact.html).
Type
<navto create the opening of the navigation element.Type the attribute
role="main"because this will be the page’s primary navigation element.Type
>to close the opening tag.Type
<ul>to begin the unordered list of links to other pages in the site.Create a navigation item for the home page by typing
<li><a href="index.html">Home </a></li>.
Do the same for the about page; type
<li><a href="about.html">About </a></li>.
Add the last link, for the contact page. Type
<li><a href="contact.html"> Contact</a></li>.
Type
</ul>.Type
</nav>.
Section, article, aside, main
With the more general areas of a website covered, let’s move to the content that changes with each page.
A section (tag: <section>) is any discrete area of a website with related content. For example, on a home page there might be an “about me” section, an “articles” section, and a “photo gallery” section. You have a lot of flexibility here.
An article (tag: <article>) is an area that is often self-contained and can stand on its own (and is often related to syndication). Blog posts or a page’s main copy are usually described as articles.
An aside (tag: <aside>) is auxiliary information that’s related to, but not integral to, the main content. Asides are often described as “sidebars,” but they don’t need to be physically to the side of the content. The tips in this book can be considered asides.
To match the aside tag, there’s also a <main> tag, which would denote the main content of the page. This will likely be a wrapper for your articles or sections.
If you’re looking at other websites’ markup, you might have noticed a very common tag: <div>. This tag, short for “division,” predates the ones we’ve talked about and is often used for areas of a website that don’t have an otherwise clearly defined purpose. Really, it’s an all-purpose tag, if you’re not sure what to use.
Building a Blog Article Layout
Now that you have all the building blocks (pun totally intended), you can put together a simple blog article page (CODE 6.1). Anything not relevant to this chapter is omitted and replaced with three dots (...).
To create a page header:
Type
<headerto open theheadertag.Type
role="banner".Type
>to close the opening header tag.On a new line, type
<h1 id="site-title">Welcome to my Site!</h1>.We’ve added the ID
site-titleto tell browsers and search engines “this is the name of the site.”Add the navigation created earlier in this chapter.
Type
</header>to close the page header tag.
To create the main article section:
Open the wrapper for the content by typing
<div class="wrapper">.You’re opening the wrapper
divelement here, but you’ll close it when we create the<aside>element.Open the main section by typing
<main>.Type
<article>.Type
<header>to open the article’s header.Add a headline using the
<h2>tag: type<h2>10 Reasons HTML is so great!</h2>.Use an
h2tag here because the site title should be the onlyh1on the page.Type
</header>.Type all of the content for the article. This should include text like paragraphs, lists, images, and hyperlinks.
Type
<footer>to open the article’s footer.The publish date will go here. Type
<p>Published March 6 at 11:06pm</p>.Type
</footer>.Type
</article>and then</main>to close out the rest of the elements.
To create a sidebar:
Type
<aside>.Type the heading
<h3>Related Articles </h3>.Created an unordered list of articles. Type
<ul>.Add the first item: type
<li><a href= "/articles/css.html">Wait until you see CSS</a></li>.Add as many related articles as you’d like.
Type
</ul>.Type
</aside>to close theasideelement.Type
</div>to close the wrapperdiv.
To create a site footer:
Type
<footer>.Add one paragraph for the copyright line. Type
<p>Copyright [YOUR NAME]</p>.Type
</footer>.
For the complete markup, see Code 6.1. To see the page rendered in a browser, see FIGURE 6.12.

Figure 6.12 A sample blog article page containing a header, site navigation, a main article section, a sidebar, and a footer
Wrapping Up
You now have the basic HTML elements that are necessary to semantically lay out a page. You can find a complete list of semantic elements available in HTML5 at www.w3schools.com/html/html5_semantic_elements.asp.
Up until now we’ve focused a lot on text and how it’s laid out. Now let’s turn our attention to something more visually appealing: media.