


Replacing communication certificates in the IBM DS8900F
In this appendix, we describe how you can exchange the default self-signed security certificates with either another self-signed certificate, or a certificate that is signed by a CA of your choice.
We explain how to install CA-signed certificates by using the DS8000 Storage Manager GUI or the DS8000 Service Web User Interface.
Furthermore, we describe how to generate a Certificate Signing Request (CSR) and import the certificate that is issued by the CA.
|
Important: Installing a certificate requires a Hardware Management Console (HMC) restart, which might cause a short interruption or alerts in your management environment, for example, if you are using the IBM Copy Services Manager.
Attention: Replacing the existing certificate or CA chain of a DS8000 HMC might impact other components or systems that communicate with this HMC. You might need to update their secure communication setup (truststores and trusted certificates) to continue communication.
|
This appendix includes the following topics:
Installing a CA-signed certificate by using the Storage Manager GUI
In this section, we provide a way to install a CA-signed certificate with various pre-set certificate information settings. If you need more advanced certificate settings, see “Installing a CA-signed certificate by using the service web interface” on page 149.
In this section, we explain how to perform the following actions:
Navigating to the Communication Certificates window
You can install a CA-signed certificate by using the Storage Manager GUI while logged in with a user ID as an admin role.
To change the certificate settings, open the Communications Certificate window by selecting Settings → Security → Communications Certificate, as shown in Figure C-1. In this window, you can change the certificate for both HMCs, HMC1, and HMC2.

Figure C-1 Communication Certificate window in the DS8900 Storage Manager GUI
Creating a certificate signing request
To create a certificate signing request, complete the following steps:
1. From the Communication Certificate window that is shown in Figure C-1 on page 146, you can create a CSR. When you click Create Certificate Signing Requests, the window that is shown in Figure C-2 opens. You must complete the certificate-related information.
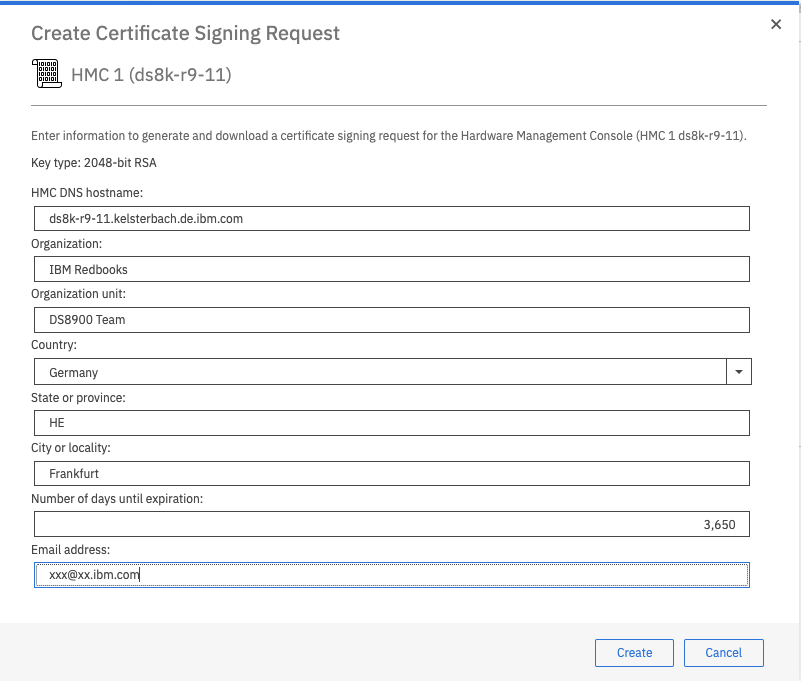
Figure C-2 DS8900 Storage Manager GUI Certificate Signing Request window
2. After you complete the details for the signing request and click Create, a File-Save dialog box opens. You can download the CSR.
3. Send the CSR file to the CA for signing. When placing the signing request with your CA, request that they return the certificate in Base64 (ASCII) format because s the DS8900 accepts only this format when importing the signed certificate.
Importing the signed certificate
After the CA returns the signed certificate, you can import it to the HMC by completing the following steps:
1. Go to the Communication Certificates window (as shown in Figure C-1 on page 146) and click Import Existing Certificates.

Figure C-3 DS8900 Storage Manager GUI: Import Existing Certificates
3. After you specify the certificate file, another window opens, as shown in Figure C-4. It informs that all connected users will be logged off and that the HMC will restart. Click Yes.

Figure C-4 DS8900 Storage Manager GUI: Confirmation for the HMC restart
The HMC restarts and uses the newly installed certificate during the restart of the communication services for the DS Storage Manager GUI, IBM Copy Services Manager, and the DS8000 Representational State Transfer (REST) API.
Installing a CA-signed certificate by using the service web interface
If you need more advanced certificate settings, you can follow the procedure that is described in this section by using the DS8000 Service Web User Interface (WUI).
Navigating to the service WUI
To go to the service WUI, complete the following steps:
1. On the DS8000 Storage Manager GUI login window, click the wrench symbol in the lower left, as shown in Figure C-5.
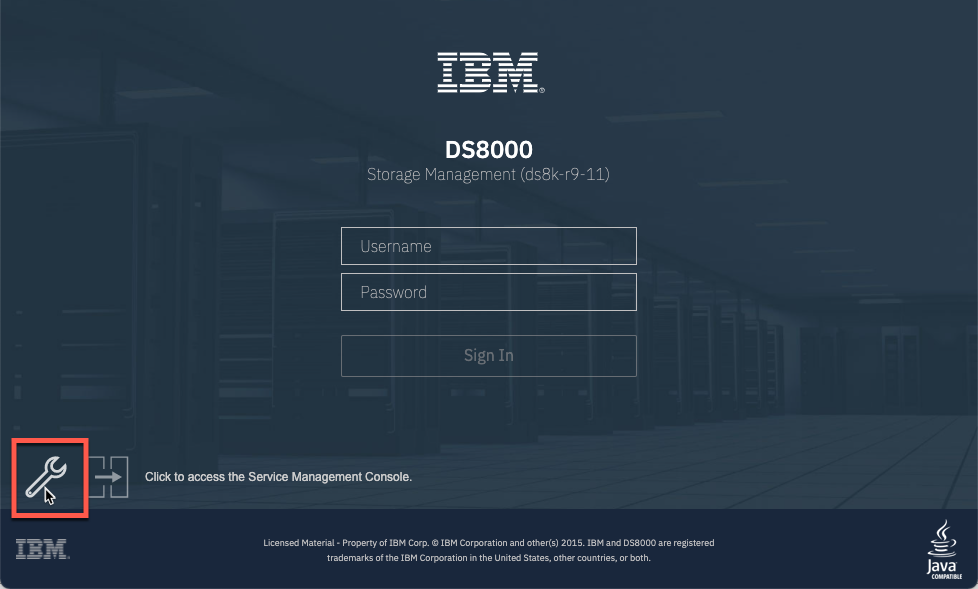
Figure C-5 DS8900 login window
2. You are diverted to home window of the Service interface. Click Log on and launch the Hardware Management Console web application. Log in with the user ID customer.
|
Note: The default password for the user ID customer is cust0mer. You must change this password the first time that you use this ID to log in.
|
3. Once you are authenticated, go the left pane and click HMC Management. In the HMC Management menu in the right pane, click Manage Certificates, as shown in Figure C-6.

Figure C-6 DS8900 Service WUI: HMC Management window
The Certificates Management window shows the details of the certificate, as shown in Figure C-7.

Figure C-7 DS8900 Service WUI Certificate Management
Creating a CSR
If you want to replace the certificate with a certificate that was signed by your internal CA, you must create a CSR.
1. In the Certificate Management window, select Create → New Certificate. Then, select Signed by a CA and click OK.
2. Enter the required values into the New Certificate dialog box, as shown in Figure C-8.

Figure C-8 Creating a Certificate Signing Request
3. After clicking OK, you are asked to store the signing request. Select The filesystem on the system running the browser, as shown in Figure C-9.

Figure C-9 Selecting the destination to save the CSR
4. In the following window, you click the link text Certificate Signing Request to save the CSR file to your local workstation. After you download the file, continue by clicking OK. Send the generated CSR file to your CA for signing.
5. You are asked whether you want to continue with a newly generated self-signed certificate until you get the signed certificate back from the CA. You can continue with the currently installed certificate.
Importing the signed certificate
After you received the signed certificate back from your CA, complete the following steps:
1. Go to the Certificate Management window, as shown in “Navigating to the service WUI” on page 149. From there, select Advanced → Import Server Certificate.
2. Click The filesystem on the system running the browser. In the next dialog box, open the file selection dialog box by clicking Choose File, as shown in Figure C-10. Select the signed certificate that you received from your CA.
|
Note: The certificate files must be in Base64 (ASCII) format. Otherwise, the import fails.
|

Figure C-10 Uploading the certificate file
3. If you have more files, for example, certificates from any intermediate CA and the root CA, you can import them. Click Yes in the dialog box. Otherwise, click No and the dialog box is skipped. In the dialog box that is shown in Figure C-11, you can select and upload multiple additional certificates that are required as part of the servers certificate chain.
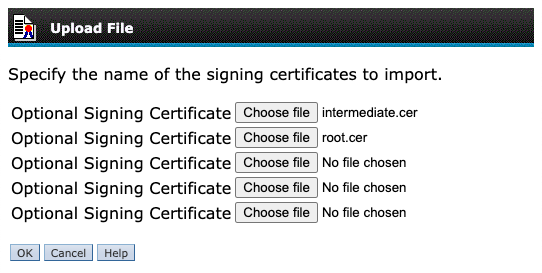
Figure C-11 Uploading more signing certificate files
After you upload all the certificates, the HMC indicates that all certificates were successfully imported. The HMC requires a restart to activate the newly installed certificates.
Creating a self-signed certificate on the DS8000
To create a self-signed certificate on the DS8000, you can use the DS Storage Manager GUI to complete the following steps:
1. Log on to the DS Storage Manager GUI.
2. Select Settings → Security.
3. Click the Communications Certificate tab.
4. Click Create Self-signed Certificates.
5. Enter the information that is requested about your organization.
6. Click Create. A warning message appears and states that the HMC will restart and any users that are connected will be automatically logged off.
7. Click Yes to continue with certificate creation. After creation, the certificate is automatically loaded at the HMC.
After creating a self-signed certificate, the HMC restarts to activate the new certificate.
..................Content has been hidden....................
You can't read the all page of ebook, please click here login for view all page.