


IBM Worklight for CICS
This chapter describes how to call a Customer Information Control System (CICS) JavaScript Object Notation (JSON) service hosted in CICS setup using IBM Worklight’s adapter and IBM Worklight's client JavaScript application programming interface (API), where the adapter and API run on the mobile device itself.
This chapter includes the following topics:
12.1 Creating a Worklight adapter
This process assumes that a blank empty Worklight project was created before creating a Worklight adapter.
To create a Worklight adapter, perform the following steps:
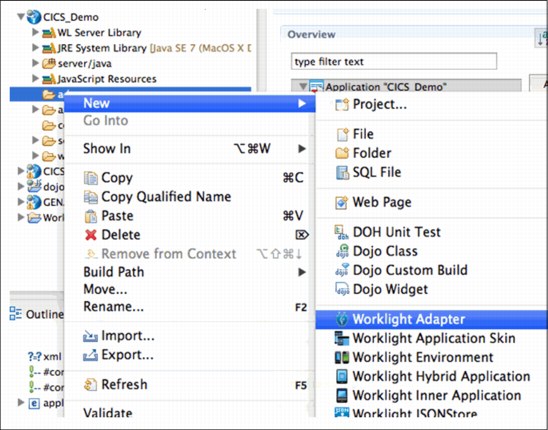
Figure 12-1 Worklight adapter selection
2. Select the Hypertext Transfer Protocol (HTTP) adapter as the type, because you are calling an HTTP JSON Service inside CICS. Give the adapter a name and select Finish. See Figure 12-2 on page 151.

Figure 12-2 Create a new adapter
3. The adapter rich page editor opens, providing for entry of the Domain and port for the service. Click Connectivity → Connection Policy to enter that data. See Figure 12-3.

Figure 12-3 Connection Policy
4. Use either the Basic HTTP Authentication or Secure Sockets Layer (SSL), following the guidelines in 7.3, “Worklight security configuration” on page 78.
5. Click Procedure "getStories", (shown in Figure 12-3 on page 151), then alter the name to match the operation of your service. In this example, the procedure is named addNewCustomer (as shown in Figure 12-4).

Figure 12-4 Procedure editing
6. Select Procedure "getStoriesFiltered" (shown in Figure 12-3 on page 151) and click Remove. This will remove the procedure seen in Figure 12-6 on page 153. You will notice there is a red cross on the adapter folder at this point, because the Extensible Markup Language (XML) configuration file for the adapter does not match the implementation .js file. Remove the filtered.xsl file, because it is not needed in this example.
7. Open the CreateNewCustomer-impl.js file and delete the getStoriesFiltered function.
8. Rename getStories to be addNewCustomer.
The CreateNewCustomer-impl.js should now look similar to that shown in Figure 12-5.

Figure 12-5 The addNewCustomer(customer) function
9. Now, add in some parameters to the addNewCustomer JavaScript function. The service requires a first name, last name, date of birth, ZIP code, cell number, and email address.
These parameters are then added into a JSON payload object, similar to Example 12-1.
Example 12-1 JSON web service payload
{
"cust_details": {
"first_name": "James", "last_name": "Smith",
Note: The content of the CustServiceREST_PUT command file is provided in the additional materials that accompany this IBM Redbook publication.
Chapter 11. JSON Schema to Language Structure Scenarios - RB 113
8161ch11.fm
Draft Document for Review July 23, 2013 4:53 pm
"date_of_birth": "2001-01-01",
"zipcode": "SO212JN",
"cell_number": "07756576667",
"email_address": "[email protected]"
} }
10. The request then needs to be posted to the CICS service that tells Worklight to expect a plain response payload. With this information, Worklight knows that a conversion of the Representational State Transfer (REST) response, which in this case is a line of text, needs to be converted back to a JSON object. See Figure 12-6.

Figure 12-6 Completed addNewCustomer function
12.2 Testing the Worklight adapter
The next step is to test the new Worklight adapter. Before continuing, it is important to ensure that the CICS service is installed and enabled correctly. Ensure also that the domain and port combinations, in the adapter's XML configuration file going to the service's hosting location, are accurate.
To test the service of the Worklight adapter, use the following steps:
1. Right-click the adapter folder CreateNewCustomer and select Run As → 3 Invoke Worklight Procedure. See Figure 12-7.

Figure 12-7 The Invoke Worklight procedure
2. This brings up a dialog asking for the procedure name to start, and the list of parameters to be passed to the adapter. At this point, select addNewCustomer from the Procedure name drop-down list.
3. Enter parameters (each enclosed within quotation marks because they are string variables). Next, click Run. See Figure 12-8.
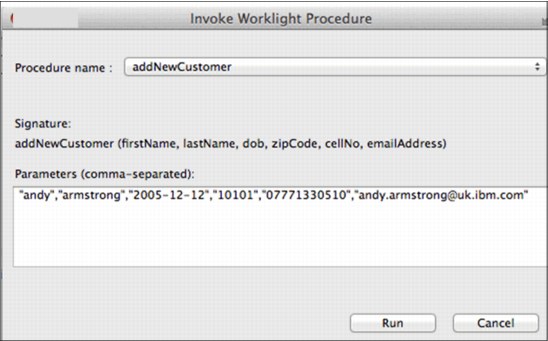
Figure 12-8 Start Worklight procedure parameters
4. Worklight will then start the back-end service and serve the response within a browser window (within the Eclipse view by default). See Figure 12-9.
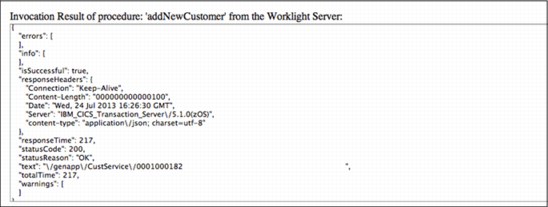
Figure 12-9 Back-end service response
The plain response from CICS was converted into a JSON object, with the text attribute being the Uniform Resource Locator (URL) for the newly created customer.
12.3 Calling the Worklight adapter from the Worklight client code
For the Worklight adapters to be useful, they have to be started from the Client application. Go to the apps/CICS_Demo/common/js folder, and you will notice that the CICS_Demo.js file was created. This is a JavaScript file that is imported by the CICS_Demo.html, which is our main client application starting point.
To import this, perform the following steps:
1. Open CICS_Demo.js and use the example in Figure 12-10 to write the adapter invocation call function.

Figure 12-10 Adapter invocation call function
There are two callbacks used when starting the procedure:
– The onSuccess function is called if the procedure call succeeded.
– The onFailure function is called if the procedure call failed.
2. The next step is to create a form on the CICS_Demo.html page, which starts this new JavaScript function to call the REST-conforming (RESTful) service hosted in CICS, to add a new customer. Open the CICS_Demo.html file and alter it to contain a set of fields for the input, a button to start the Worklight adapter, and a field for the URL response from CICS. See Figure 12-11 on page 157.

Figure 12-11 CICS_Demo.html file
3. The project was created and configured to use Dojo mobile (this example is using Dojo mobile widgets where applicable). The code snippet in Figure 12-11 contains Dojo widgets. Next, alter the CICS_Demo.js file to include the processNewCustomer() function. This function is called when the add New Customer button is pressed. This function gathers input from various fields using jQuery, and calls the addCustomerCall() function that was written earlier.
Select the CICS_App folder, then right-click and select Run As → Build all and deploy. This will compile the project.
4. After the compilation process has completed, go to the following web page to find the CICS_Demo application in the catalog:
http://<localhost>:10080/CICS_Demo/console/#catalog
5. To deploy the CreateNewCustomer adapter, right-click the adapters/CreateNewCustomer folder, and select Run As → 1 Deploy Worklight Adapter. See Figure 12-12.

Figure 12-12 Deploy Worklight adapter
6. Refresh the console web page and notice that the console now shows the CreateNewCustomer adapter.
7. Click Preview to open a mobile simulator within the web browser, then complete the fields.

Figure 12-13 CICS Worklight demonstration
This example is designed to provide quick how-to steps to set up a Worklight project to call a back-end service hosted in CICS.
..................Content has been hidden....................
You can't read the all page of ebook, please click here login for view all page.