In this chapter
| Introduction |
| Help system overview |
| Help content overview |
| Create content |
| Publish content |
| Troubleshoot the Help system |
Microsoft Dynamics AX 2012 introduces a new Help system that was designed to make it easier for customers and partners to create and publish custom Help.
In previous versions, the Help system consisted of .chm files that were installed individually on each client computer. To customize Help, you had to decompile the .chm file, create custom .html files, recompile the .chm file, and then reinstall the .chm file on each client computer. Customizations were overwritten by Help updates from Microsoft.
The new Help system solves these problems. Help content is installed once on a server and displayed in a viewer on each client. Help topics consist of .html files, so you don’t have to decompile and recompile .chm files. Although not required, separate folders that you create on the Help server can prevent customizations from being overwritten by Help updates from Microsoft.
You can customize the new Help system in the following ways:
Create new topics in any HTML editor, either from scratch or by using the templates that are included. You can give your topics a consistent look and feel by applying the same style sheet that is used for the Help system in Microsoft Dynamics AX.
Include references to user interface labels, fields, and menu items to ensure that your Help topics match the customizations that you’ve made to the user interface. Also, by using menu items, readers can open forms in Microsoft Dynamics AX directly from your Help topics.
Make your Help context-sensitive, so that your topic appears when a user presses F1 on a specific object in the user interface.
Replace an existing topic with a customized version of the topic, or display the customized topic alongside the existing one. You can display topics from multiple publishers or suppress topics from specific publishers.
Create a table of contents for your topics and append it to the default table of contents. You can add context-sensitive Help that appears when you press F1. You can also apply search keywords to your topics to make them more discoverable.
The Help system consists of these components:
Help server A centralized web service that responds to requests for Help documentation. You put your custom Help files on the Help server.
Help viewer An application that is installed with the Microsoft Dynamics AX client. The Help viewer displays topics when a user requests help from the application.
These components interact with the Microsoft Dynamics AX client and Application Object Server (AOS) to display Help topics. Figure 16-1 describes the sequence of events between a request for a Help topic and the display of the topic.

The following sections describe the components of the Help system in detail and explain how a request for a Help topic is processed.
When a user presses F1 or clicks the Help button in a form, the client performs the following actions:
The client identifies the Help topic to retrieve. The client obtains the ID of the form that is open when the user presses F1.
The client retrieves the URL of the Help server. The first time that a user requests help, the client contacts the AOS to retrieve the URL of the Help server. The client then caches the URL so that it can be used for additional Help requests.
The client calls the Help viewer. If the Help viewer is not already running, it starts. The call to the Help viewer includes the URL of the Help server and the ID of the form.
A user can click a link in the Help viewer to request a topic, or the user can search for topics. The Help viewer contacts the Help server and then retrieves and displays the specified topic.
If the Help server finds multiple topics for the specified ID, it displays a list of links to the topics on a summary page. If the user searches, the Help viewer lists links to the topics that are found. Figure 16-2 shows the Help viewer, which was designed to have the familiar look and feel of a web browser. The table of contents is displayed in the left pane and the Help topic is displayed in the right pane.

The Help server has the following components that respond to requests from a Help viewer.
The Help web service is an Internet Information Services (IIS) web server application that responds to Help viewer requests for Help topics. The Help web service receives the request, finds the topic that matches the request, retrieves the text for the topic’s labels from the AOS, and then sends the topic to the Help viewer.
Document files consist of XML and HTML files that are installed on the web server.
The XML files contain information for the table of contents that appears in the Help viewer.
Each HTML file contains a Help topic that appears in the Help viewer. Each HTML file also includes properties that uniquely identify the topic and provide additional information, such as the language and keywords, which aid in searches. These properties must be set properly for the topic to appear and be ranked appropriately in search results. When responding to a request, the Help web service searches for documents whose properties match the criteria sent by the Help viewer.
Document files are installed in a folder structure on the Help server. The default location is C:inetpubwwwrootDynamicsAX6HelpServercontent, but this location can be changed during installation.
Each organization or individual that creates and publishes content for the Help system is called a publisher. Upon installation, the Help system contains a folder for a single publisher: Microsoft. When you add topics to the Help system, you create a new folder structure beneath the content folder to hold your document files—for example:
C:inetpubwwwrootDynamicsAX6HelpServercontentMicrosoft
C:inetpubwwwrootDynamicsAX6HelpServercontentYourFolder
Each document file belongs to a document set, which is a named collection of related Help topics. You use document sets to associate a collection of Help documents with either the client or the Development Workspace. The Help system includes the following document sets:
ApplicationHelpOnTheWeb Provides Help on the web for users of the Microsoft Dynamics AX client. You cannot add new documents to this document set.
DeveloperDocumentation Provides Help on the web for users of the Development Workspace. You cannot add new documents to this document set.
Glossary Provides glossary entries for users of Microsoft Dynamics AX. You can add new documents to this document set.
SystemAdministratorHelpOnTheWeb Provides Help on the web for system administrators of Microsoft Dynamics AX. You cannot add new documents to this document set.
UserDocumentation Provides Help for users of the Microsoft Dynamics AX client. When you create custom topics, you add them to this document set.
Installing the Help web service enables Windows Search Service (WSS), which indexes the document files that are added to the Help server. The index includes the document properties of each HTML file.
When the Help web service receives a request, it queries the WSS to find the document files that match the criteria specified by the request. The Help web service uses the following order of precedence to match and rank the search results that are displayed in the Help viewer:
Keywords Matches the search request to keywords for the topic
Title Matches the search request to part of the title of the topic
Topic ID Matches the search request to the ID that uniquely identifies the topic
Content Matches the search request to one or more values found in the content of the topic
To support the Help system, the AOS performs the following actions:
Stores the URL of the Help server. Each Help viewer retrieves this URL before sending a request for content, so that changes to the URL are available to all clients of the AOS.
Returns the text associated with a label. The Help web service retrieves label text and adds that text to the HTML of the topic. This ensures that the text in the content matches the text in the user interface.
This section describes the concepts and components that are involved in customizing the Help system.
A topic is the content for a specific subject area. Microsoft Dynamics AX Help is organized by topic. Topic files are HTML files, and each topic has a unique ID. When you plan your customization, evaluate how your changes fit into the existing topic structure. You can either add topics or update topics.
Add a topic when you want to document a new process, form, or other component. You should add entries for new topics to the table of contents. For a context-sensitive topic, the topic ID must match the ID of the form or other component that you are documenting.
Update a topic when you want to document a change to an existing process, form, or other component. An updated topic supplements or replaces an existing topic. When you update a topic, your content must include the same topic ID as the existing content. For more information, see Update content from other publishers, later in this chapter.
A publisher is an individual or organization that has documentation on the Help server. Each content element includes a document property that specifies the ID of a publisher. The publisher ID is one of the document properties that you can use to replace documentation for an existing topic. The content from each publisher is organized in its own folder on the Help server.
The table of contents file is an XML file that contains a hierarchical list of topics that is displayed in the left pane of the Help viewer (see Figure 16-2). Each entry in the table of contents is a link to a topic.
You can add entries to the table of contents when you want your topic to be more easily discovered and viewed from the Help viewer. If you have several related topics, you can use the table of contents to display the topics in a hierarchical group.
A summary page is a list that the Help viewer displays when the requested content includes more than one topic. Figure 16-3 shows an example of a summary page. To view a specific topic, the user clicks the link for that topic.
Before you write a new topic or update an existing topic, use these guidelines to plan your work:
Decide what topics your documentation requires and what documents you have to include.
The Help server requires all topics to use the Extensible Hypertext Markup Language (XHTML) standard.
If you are updating an existing topic, determine the ID of the topic. If you are adding a new topic, decide whether to add an entry to the table of contents. Later sections in this chapter describe how to update existing contents and add topics to the table of contents.
Gather the information for the document properties that are required to identify the content. For more information, see the following section, Create a topic in HTML.

To quickly create documentation that matches the look of Microsoft Dynamics AX Help, you can use the templates that are included with the Help system. Each template contains a framework of elements, styles, and guidelines that can make creating content faster and simpler. To see the list of the templates, open the Help viewer, type Templates for Help Documentation in the search box, and then press Enter. There are templates for the following types of files:
HTML templates that resemble the Help documentation from Microsoft. These templates represent common topic types, such as orientation topics, procedure topics, key task topics, and form topics. The HTML templates are an excellent option if you are creating new topics. (If you are reusing HTML topics that already exist, you can publish them on the Help server so long as you add the correct metadata. For more information, see the following section, Create a topic in HTML)
A Microsoft Word template that can be used to create documentation with Word 2007 or a later version. Typically, a super user within an organization, such as an office manager, will use the Word template to publish organization-specific guidelines and processes related to work that users perform in Microsoft Dynamics AX. The Word template includes the capability to create the supplemental HTML file that is required for each Word file. For more information see the section Create non-HTML content, later in this chapter.
This section describes how to create an HTML file from scratch. You can use any HTML or text editor to create HTML files. For example, if you are using Microsoft Visual Studio, you would create a text file. In order for the file to appear in the Help viewer and look consistent with the Help that Microsoft provides, you’ll need to add specific metadata.
The following sections walk you through the process of creating a topic that contains the correct references and metadata.
After you first create the HTML file, use the information in this section to add the initial elements and metadata for the topic. When you complete this section, you will have a basic HTML document.
Add a <doctype> element, and specify the document type definition. The following table shows the document type declarations to use:
Declaration
Value
TopElement
html
Availability
PUBLIC
Document type definition
-//W3C//DTD XHTML 1.0 Transitional//EN
URL
The following HTML shows the declarations in the <doctype> element:
<!DOCTYPE html PUBLIC "-//W3C//DTD XHTML 1.0 Transitional//EN"
"http://www.w3.org/TR/xhtml1/DTD/xhtml1-transitional.dtd"[]>
Add an <html> element, add the dir attribute, and then set the attribute value to “ltr” (left-to-right).
Although the dir attribute is not required, the Help viewer uses its value to optimize the appearance of the document:
<!DOCTYPE html PUBLIC "-//W3C//DTD XHTML 1.0 Transitional//EN"
"http://www.w3.org/TR/xhtml1/DTD/xhtml1-transitional.dtd"[]>
<html dir="ltr">
</html>
Add the namespaces in the following table to the <html> element.
Important
These namespaces are required. If you do not include every namespace, your document might not appear in the Help viewer.
Namespace
URL/URN
xmlns:xlink
xmlns:dynHelp
xmlns:dynHelpAx
xmlns:MSHelp
xmlns:mshelp
xmlns:ddue
xmlns:msxsl
urn:schemas-microsoft-com:xslt
The following HTML shows the namespace declarations:
<html DIR="LTR" xmlns:xlink="http://www.w3.org/1999/xlink"
xmlns:dynHelp="http://schemas.microsoft.com/dynamicsHelp/2008/11"
xmlns:dynHelpAx="http://schemas.microsoft.com/dynamicsHelpAx/2008/11"
xmlns:MSHelp="http://msdn.microsoft.com/mshelp"
xmlns:mshelp="http://msdn.microsoft.com/mshelp"
xmlns:ddue="http://ddue.schemas.microsoft.com/authoring/2003/5"
xmlns:msxsl="urn:schemas-microsoft-com:xslt">
Add the HTML head and body elements to the document. The following example shows the HTML:
< <!DOCTYPE html PUBLIC "-//W3C//DTD XHTML 1.0 Transitional//EN"
"http://www.w3.org/TR/xhtml1/DTD/xhtml1-transitional.dtd"[]><html DIR="LTR"
xmlns:xlink="http://www.w3.org/1999/xlink"
xmlns:dynHelp="http://schemas.microsoft.com/dynamicsHelp/2008/11"
xmlns:dynHelpAx="http://schemas.microsoft.com/dynamicsHelpAx/2008/11"
xmlns:MSHelp="http://msdn.microsoft.com/mshelp"
xmlns:mshelp="http://msdn.microsoft.com/mshelp"
xmlns:ddue="http://ddue.schemas.microsoft.com/authoring/2003/5"
xmlns:msxsl="urn:schemas-microsoft-com:xslt">
   <head>
   </head>
   <body>
   </body>
</html>
The document head contains metadata, plus the document title that appears in the title bar of the Help viewer. The style sheets that you reference in the document head are the same style sheets referenced by the Help provided by Microsoft. By using these style sheets, you can give your documentation a look and feel that is consistent with the Microsoft Help.
Add two <meta> elements, and then set their attributes as follows:
The following example adds the <meta> elements. Notice how the first <meta> element specifies the document type. Also notice how the second <meta> element specifies that the document is saved to the session memory of the browser:
<meta http-equiv="Content-Type" content="text/html; charset=UTF-8"/>
<meta name="save" content="history"/>
Add a <title> element. This text appears in the title bar of the Help viewer as shown in Figure 16-4.
<title>Using Help for Microsoft Dynamics AX</title>
Add three <link> elements, and then use them to specify the style sheets to apply to your document:
Add a rel attribute to each <link> element, and then set the value of each to “stylesheet”.
Add a type attribute to each <link> element, and then set the value of each to “text/css”.
Add an href attribute to each <link> element, and then use the following table to specify the value of each:
Style Sheet
Description
AX.css
Specify a path from the folder on the Help server where you publish the document to the folder that contains the AX.css file. By default, the file is installed in the following folder:
C:/inetpub/wwwroot/<HelpServerName>/content/Microsoft/EN-US/local.
To use the relative path for the default installation folder, type ../local/AX.css.
presentation.css
Specify a path from the folder on the Help server where you publish the document to the folder that contains the presentation.css file. By default, the file is installed in the following folder: C:/inetpub/wwwroot/<HelpServerName>/content/Microsoft/EN-US/local. To use the relative path for the default installation folder, type ../local/presentation.css.
HxLink.css
Specify the URL of the of the HxLink.css file. To use the default location, type ms-help://Hx/HxRuntime/HxLink.css.
In the following example, notice how the href attributes specify the relative paths of the folders that contain the .css files, assuming that the content is published to the appropriate publisher and language folders. Also, the third <link>element specifies a URL for the HxLink.css file:
<link rel="stylesheet" type="text/css" href="../../Microsoft/EN-US /local/
presentation.css"/>
<link rel="stylesheet" type="text/css" href="../../Microsoft/EN-US /local/AX.css"/>
<link rel="stylesheet" type="text/css" href="ms-help://Hx/HxRuntime/HxLink.css"/>
Add nine <meta> elements, and then provide the required document properties. Add a name and content attribute to each element. For the name and content attribute of each element, specify values in the following table:
Name
Content
Title
The title of the topic; for example, “Using Help for Microsoft Dynamics AX.”
Microsoft.Help.Id
A unique ID for the topic. The ID value must be unique and cannot duplicate the ID of an existing topic. Typically, you use a globally unique identifier (GUID) to ensure that the ID value is unique, but you can use a text value for the ID.
ms.locale
The locale for the Help language; for example, EN-US.
publisher
The name of the publisher, generally the name of your company; for example, Contoso. For more information, see the section Publish content, later in this chapter.
documentSets
The name of the default document set: UserDocumentation. A Help topic can belong to multiple document sets.
Microsoft.Help.Keywords
Provide a semicolon-delimited list of keywords that will help users find your topic. For example, Contoso; customer.
suppressedPublishers
Leave the content attribute empty.
Microsoft.Help.F1
If you want the Help to be context-sensitive, add the ID of the element that you want to associate with the topic. For example, in Microsoft Dynamics AX, CustTable is the name of the Customers form. To create the Microsoft.Help.F1 element, add “Forms” and a period to the form name (Forms.CustTable). If you want to call the same Help topic from more than one form, add the ID for each element, separated by a semicolon. For more information, see the section Make a topic context-sensitive, later in this chapter.
Description
Provide a brief description of the topic.
In the following example, notice how the name and content attributes specify each document property and its value:
<meta http-equiv="Content-Type" content="text/html; charset=UTF-8" />
<meta name="save" content="history" />

<title>Contoso customer help information</title>

<link rel="stylesheet" type="text/css" href="../../Microsoft/EN-US /local/
presentation.css"/>
<link rel="stylesheet" type="text/css" href="../../Microsoft/EN-US /local/AX.css"/>
<link rel="stylesheet" type="text/css" href="ms-help://Hx/HxRuntime/HxLink.css"/>

<meta name="Title" content="Contoso customer help information"/>
<meta name="Microsoft.Help.Id" content="Contoso.Forms.CustTable"/>
<meta name="ms.locale" content="EN-US"/>
<meta name="publisher" content="Contoso"/>
<meta name="documentSets" content="UserDocumentation"/>
<meta name="Microsoft.Help.Keywords" content="Contoso; customer"/>
<meta name="suppressedPublishers" content=""/>
<meta name="Microsoft.Help.F1" content="Forms.CustTable"/>
<meta name="description" content="Describes Contoso customization to the Customers
form"/>

Between the open and close tags of the <body> element that you added earlier, add elements for controls, the document title, the main section, and links to related topics.
Add <input> elements for two hidden controls that the Help viewer uses to display topics. These controls are required.
Add a type, id, and class attribute to each element. Use the following values for the attributes:
Type
ID
Class
hidden
hiddenScrollOffset
Not applicable (This control does not require a class attribute.)
hidden
userDataCache
userDataStyle
In the following example, notice how the type attributes specify that each control is hidden, and the id attributes specify each control name. Also notice how the class attribute of the “userDataCache” control is set to “userDataStyle”:
<input type="hidden" id="userDataCache" class="userDataStyle" />
<input type="hidden" id="hiddenScrollOffset" />
Add the document header. Add a <div> element, and then set the id attribute to “header”, as shown in Step 4.
Add two <span> elements to the header section:
For the first one, set the id attribute to “runningHeaderText”.
For the second, set the id attribute to “nsrTitle”. To specify the title that appears in the Help viewer, type a title for the topic (“Contoso customer Help information” in the following example).
Add an <hr> element. To keep the title visible during scrolling, set the class attribute to “title-divider”. Notice that the <br> element adds an empty line above the title:
<div id="header">
   <br />
   <span id="runningHeaderText"> </span>
   <span id="nsrTitle">Contoso customer Help information</span>
   <hr class="title-divider" />
</div>
Add the main section. Add a <div> element, and then set the id attribute to “mainSection”.
Add a <div> element to the main section, and then set the id attribute to “mainBody”.
Add another <div> element, and then set the id attribute to “footer”:
<div id="mainSection">
   <div id="mainBody">
   </div>
   <div id="footer">
   </div>
</div>
In this section, add all the elements between the start and end tags of the main body. The following sections add an introduction, a description of a customization, and a list of links to related topics.
Add an introduction. Add a <div> element, set the class attribute to “introduction”, and then type an introduction for your topic within one or two <p> (paragraph) elements.
Important
The introduction is a required element. When a user searches for a topic, the introduction is used as an abstract on the summary page that displays search results. (See Figure 16-3.)
<div class="introduction">
   <p>
      This topic includes information about changes to the Customer form that have been
added by Contoso.
   </p>
   <p>
      You can use the Customer form to view additional information about each of your
customers.
   </p>
</div>
Create a section heading by adding an <h1> element, and then set the class attribute to “heading”. Between the start and end tags, type a heading for the section. If you do not want to use a heading for the section, you can leave the <h1> element empty, as in the example.
Add a <div> element, and then set the class attribute to “section”.
Add your Help content. You can add standard HTML tags to format your content. For example, you can use paragraphs, sections, headings, bulleted lists, ordered lists, tables, and formatting such as bold and italic. The following example shows the opening paragraph for a section:
<h1 class="heading"></h1>
<div class="section">
   <p>
      The Contoso customer add-ons enable you to view important information about your
relationship with your customer. To view the additional information, click one of the
following buttons:
   </p>
</div>
Most topics provided by Microsoft contain a “See also” section, which contains links to other topics that might help the user. Adding a “See also” section can help your custom documentation blend with the existing documentation from Microsoft. For information about how to find the ID of an existing topic to link to, see the section Update content from other publishers, later in this chapter.
Create a section heading by adding an <h1> element, and then set the class attribute to “heading”. Type See also between the start and end tags.
Add a <div> element, and then set the class attribute to “section”.
Add a <div> element between the start and end tags of the <div> element, and then set the class attribute to “seeAlsoStyle”.
Add a <span> element between the start and end tags of the “See also” section.
Add a <dynHelp:topicLink> element between the start and end tags of the <span> element. Type the topic title that you want to link to as the text of the link. Add the following attribute values:
Attribute
Value
topicId
The ID of the topic that you want to link to.
documentSet
UserDocumentation
The following example creates a “See also” section with a link to a topic named “Create a customer account”:
<h1 class="heading">See also</h1>
<div class="section">
   <div class="seeAlsoStyle">
      <span>
         <dynHelp:topicLink topicId="cc18943e-c00c-49e6-8bd2-03be6481b6dd" documentSet=
"UserDocumentation">Create a customer account</dynHelp:topicLink>
      </span>
   </div>
</div>To give your topics a look that’s consistent with existing Help topics, add a line to the footer section at the end of the document.
Add a <div> element between the start and end tags of the <div> element that has the id attribute set to “footer”, and then set the class attribute to “footerline”.
Add an <hr> element, add the style attribute, and then set the following values:
Property Name
Value
height
3px
color
Silver
<div id="footer">
   <div class="footerLine">
      <hr style="height:3px; color:Silver" />
   </div>
   <p />
</div>
You can enhance your Help by adding references to user interface labels. When you add a reference to a label, the label text is retrieved from the AOS and added to your Help topic at run time. This means that the user interface text that you refer to in your Help documentation will always match the text in the application.
The following table describes the types of labels that you can reference in your documentation:
Label Type | Description |
|---|---|
Labels | Text that appears in the user interface. These types of labels are found in a Microsoft Dynamics AX label file. |
Table fields | The user interface text that represents a field from a data table. |
Menu items | The user interface text for a menu item. |
The following restrictions can affect how labels appear in your documentation:
To retrieve the text of the label, the Help server queries AOS. Whoever requests the Help topic must have access permissions. Otherwise, the default text appears in the topic.
When the label appears in the Help viewer, the text appears in the same language that is used by the Microsoft Dynamics AX client that the request originated from.
The Help server does not support references to labels in non-HTML documents.
When you create a Help topic that describes a form, you can include a specific label that appears in the form by adding the ID of the label to the HTML of your topic.
In the Development Workspace, point to Tools > Development Tools > Label > Label Editor.
In the Find What field, type the text of the label whose ID you want to find, expand the In The Language list, click the language you want, and then click Find Now.
The Label Editor lists all the labels that include the specified text for the specified language.
In your Help topic, in the location where you want the label to appear, add a <dynHelpAx:label>element, and then specify values for the following attributes:
Attribute
Value
Description
axtype
“Label”
Set the attribute to “Label”.
id
The ID value of the label.
Specify the ID value that you retrieved by using the Label Editor.
<dynHelpAx:label axtype="Label" id="@SYS21829"> </dynHelpAx:label>
In the <dynHelpAx:label> element, specify default text. If the label cannot be retrieved, the text that you supply appears in the Help topic. In the following example, “Bank Account” is the default text:
<dynHelpAx:label axtype="Label" id="@SYS21829">Bank Account</ dynHelpAx:label>
You can add table field labels when you want your Help topic to include the text of a table field.
In the Application Object Tree (AOT), under Data DictionaryTables, click the table that contains the field, and then note the value of the Name property of the table.
Expand Fields, find the field that contains the label that you want to use, and then note the value of the Name property of the field.
In your Help topic, in the location where you want the label to appear, add a <dynHelpAx:label> element, and then specify values for the following attributes.
Attribute
Value
Description
axtype
“Field”
Set the attribute to “Field”.
axtable
The name of the table.
Specify the value of the Name property of the table that contains the field.
axfield
The name of the field.
Specify the value of the Name property for the field.
<dynHelpAx:label axtype="Field" axtable="DirPartyTable" axfield="Name">
</dynHelpAx:label>
Specify a default text value for the <dynHelpAx:label > element. If the label cannot be retrieved, the text that you specify appears in the Help topic. In the following example, “Name” is the default text:
<dynHelpAx:label axtype="Field" axtable="DirPartyTable" axfield="Name">Name
</dynHelpAx:label>
You can add a menu item label to your Help topic when you want to include the text of a menu item.
In the AOT, expand Menu Items, and then expand a menu item category.
Find the menu item, and then note the value of the Name property.
In your Help topic, in the location where you want the label to appear, add a <dynHelpAx:label> element, and then specify values for the following attributes:
Attribute
Value
Description
axtype
Set the attribute to “MenuItem”.
axmenutype
“Display”
Set the attribute to “Display”.
axmenuitem
The name of the menu item.
Specify the value of the Name property for the menu item.
<dynHelpAx:label axtype="MenuItem" axmenutype="Display" axmenuitem="SalesTable">
</dynHelpAx:label>
Specify a default text value for the <dynHelpAx:label> element. If the label cannot be retrieved, the text that you supply appears in the Help topic. In the following example, “Sales order” is the default text:
<dynHelpAx:label axtype="MenuItem" axmenutype="Display" axmenuitem ="SalesTable">
Sales order</dynHelpAx:label>
Context-sensitive Help provides documentation for specific objects in Microsoft Dynamics AX. When a user presses F1, the Help viewer displays documentation about the form, list page, or other object that you have open in the Microsoft Dynamics AX client or the Development Workspace.
Microsoft Dynamics AX Help supports the use of context-sensitive Help for the following client and Development Workspace object types:
When a user presses F1, the following actions occur:
The client sends the ID of each object that is currently open to the Help viewer. (The object ID is a string that identifies each object, such as CustTable.)
The Help viewer sends the object IDs to the Help server.
For each object ID, the Help server searches for content with a corresponding topic ID.
When an object ID matches a topic ID, the Help server returns the content for that topic.
The Help viewer receives and displays the content.
To make a topic content context-sensitive, you set the Microsoft.Help.F1 property of your content to the ID of the object. If multiple topics have the same value for the Microsoft.Help.F1 property, the Help viewer displays a list of multiple topic links that the user can choose among.
To find object IDs:
In the AOT, right-click the object in the AOT, and then point to Add-Ins > Help Properties. The Help Properties window opens and displays the ID.
In a form, open the form, right-click in a blank area of the form, click Personalize, and then click the Information tab. The Form name field displays the name of the form. To specify the ID, combine the element type, “Forms,” with the name of the form. For example, for the form called CustTable, you would specify Forms.CustTable as the object ID, as in the following example:
<meta name="Microsoft.Help.F1" content="Forms.CustTable"/>
At times, you might want to update or modify a topic that already exists on the Help server. For example, if your solution adds fields to an existing form, you might want to replace the default topic for that form with one of your own. To update an existing Help topic, you create a new topic to replace the existing one. The Help viewer then hides the existing topic by suppressing the publisher that you specify. The hidden topic remains on the Help server and can be accessed through search.
Caution
Do not edit or remove any files that were published to the Help server by another publisher. An update or reinstallation of the files from that publisher might overwrite the changes that you make.
To replace a topic, you obtain metadata from the topic that you want to replace and then add it to the new topic that you’ve created.
In the Help viewer, open the topic that you want to replace, right-click the topic, and then click View Source.
In the new topic that you created, do the following:
Tip
If you want to hide content from more than one publisher, use a semicolon to separate each publisher ID.
The following example sets the ID to the Microsoft topic to replace and adds “Microsoft” to the <suppressedPublishers> element:
<meta name="Microsoft.Help.F1" content="c3fc5774-6ed0-4760-86f5-7899e825ab25"/>

<meta name="suppressedPublishers" content="Microsoft"/>
Save the file, and then publish your content to the Help server.
The table of contents file is an XML file that contains a hierarchical representation of Help topics. Add entries to the table of contents when you add new Help topics that you want to appear in the table of contents. (By convention, Microsoft Help topics that contain conceptual information and procedures appear in the table of contents, but topics that describe forms, which appear when the user presses F1, do not.) The table of contents file must be named TableOfContents.xml. After you create the XML file, you publish it. For more information about publishing your table of contents file, see the section Publish content, later in this chapter.
Add the <xml> and <tableOfContents> elements to the file. The <tableOfContents> element requires XML namespace information.
<?xml version="1.0" encoding="utf-8"?>
<tableOfContents xmlns="http://schemas.microsoft.com/dynamicsHelp/2008/11" xmlns:xsi=
"http://www.w3.org/2001/XMLSchema-instance">
</tableOfContents>
Add metadata properties that specify a document set, language, and publisher.
The Help service uses these properties to identify the entries that appear in the Help viewer’s table of contents. The following table describes the properties:
Property
Required
Description
documentSet
Yes
Specify the ID of a document set. Typically, you set this property to “UserDocumentation”. The document set determines whether the entries appear in the table of contents for the application workspace, developer workspace, or both.
Ms.locale
Yes
Specify the language of the table of contents entries. Use a language code to identify the language. For example, use EN-US for U.S. English. The ms.locale property enables the Help viewer to display localized content.
publisher
No
Specify the ID of the publisher. Table of contents entries are grouped by publisher. For more information, see the section Publish content, later in this chapter.
<?xml version="1.0" encoding="utf-8"?>
<tableOfContents xmlns="http://schemas.microsoft.com/dynamicsHelp/2008/11" xmlns:xsi=
"http://www.w3.org/2001/XMLSchema-instance">
   <publisher>Contoso</publisher>
   <documentSet>UserDocumentation</documentSet>
   <ms.locale>EN-US</ms.locale>
</tableOfContents>
Add the <entries> element after the metadata, as shown in the following example:
<publisher>Contoso</publisher>
<documentSet>UserDocumentation</documentSet>
<ms.locale>EN-US</ms.locale>
<entries>
</entries>
Add an <entry> element for each topic that you want to add to the table of contents:
The <entry> elements must be child elements of the <entries> element. The following table describes the properties of an <entry> element:
Property
Required
Description
text
Yes
Specify the text that appears in the Help viewer.
Microsoft.Help.F1
No
Specify one or more topic IDs that are associated with the entry. When you click an entry in the table of contents, the Help viewer uses these IDs to request the content elements associated with that entry.
publisher
No
Specifying the publisher is optional.
<entries>
   <entry>
      <text>Sample help topic</text>
      <Microsoft.Help.F1>DEFAULT_TOPIC</Microsoft.Help.F1>
   </entry>
</entries>
If you want entries to appear under the current entry in the Help viewer in a hierarchical structure, add a <children> element, and then add entries to it:
<entry>
   <text>Sample help topic</text>
   <Microsoft.Help.F1>DEFAULT_TOPIC</Microsoft.Help.F1>
   <children>
      <entry>
         <text>Child help topic</text>
         <Microsoft.Help.F1>DEFAULT_TOPIC</Microsoft.Help.F1>
      </entry>
   </children>
</entry>
Figure 16-5 shows a table of contents hierarchy in the Help viewer.

Although the Help viewer cannot display a non-HTML file, it can open another application that can display the file; for example, it can use Word to open a .docx file.
To link to a non-HTML file from the Help viewer, you must have these components:
You must include an HTML file that contains the metadata properties that the Help system requires. This file must have the same name as the non-HTML file.
You must include a script that targets the non-HTML file. This file must be published to the same folder on the Help server as the file with the metadata properties.
Computers with the Help viewer installed must have an application that can display the non-HTML file. The application must be the default application for that type of file.
The following sections describe how to create non-HTML content and the required metadata file.
Open the application that you want to create the content with, and then create a new file. For example, open Word, and create a new document.
Tip
If you use Word, use one of the templates included with the Help system to quickly create content that resembles existing Help content. For information about accessing the Word templates, see the section Create content, earlier in this chapter.
Add content to the file—typically, a title, section headings, and paragraphs. Save the file, and note the file name. You will use this file name when you create the HTML file with the metadata.
Create a new file, and add the HTML for a basic webpage, as in the following example:
<html>
   <head>
   </head>
</html>
Add a <meta> element to the file for each of the following metadata properties:
Property | Required | Description |
|---|---|---|
description | No | A brief summary of the content. This appears in a list of search results. |
documentSets | Yes | Set this property to “UserDocumentation”. |
Microsoft.Help.F1 | Yes | A topic ID for the content. If the content applies to more than one topic, use a semicolon-delimited list of topic IDs. |
Microsoft.Help.Id | Yes | A text value that uniquely identifies the content. |
Microsoft.Help.Keywords | No | A semicolon-delimited list of keywords. Optional. |
ms.locale | Yes | The language for the content. For example, use “EN-US” for U.S. English. |
publisher | Yes | Your publisher ID. For more information, see the section Publish content, later in this chapter. |
suppressedPublishers | No | A semicolon-delimited list of publisher IDs. Hiding content produced by other publishers is optional. |
Title | Yes | The text that is displayed in the title bar of the Help viewer. |
The following example shows the metadata for the companion HTML file:
<head>
   <meta name="Title" content="Sample content" />
   <meta name="Microsoft.Help.Id" content="8D937F19-3A00-4F37-A316-0A48D052D627" />
   <meta name="ms.locale" content="En-Us" />
   <meta name="publisher" content="Microsoft" />
   <meta name="documentSets" content="UserDocumentation" />
   <meta name="Microsoft.Help.Keywords" content="" />
   <meta name="suppressedPublishers" content="" />
   <meta name="Microsoft.Help.F1" content="SampleContent" />
   <meta name="description" content="An example of non-HTML content that was published to the
Help system." />
</head>
Add a <script> element and specify the non-HTML file that you want to open. Specify the script type as javascript and use the window.location object to specify the file. The following HTML example shows a <script> element that opens the file SampleContent.docx:
<script type="text/javascript">
   <!--
      window.location="SampleContent.docx"
   //-->
</script>
When you save the file, the file name extension must be .htm.
To publish new or updated content and table of contents entries, you copy HTML or XML files to the Help server.
After creating or updating content, use these guidelines to ensure that you are ready to publish and to ensure that your content is visible on the Help server:
Maintain a separate set of folders for each publisher (see Figure 16-6). This will ensure that content from a particular publisher doesn’t get overwritten accidentally.
Make sure that you have the correct permissions on the Help server to add files and folders.
Add your publisher ID to the Web.config file of the Help server to determine where your documentation appears in the table of contents and in search results.
If you have non-HTML content, you must include an HTML file with the required properties. The HTML file must be in the same folder as the non-HTML document. For more information, see the section Create non-HTML content, earlier in this chapter.
Although this is not required, you can add subfolders to the content folder that specify your publisher ID and the language of your content, as shown in Figure 16-6. This can prevent files from other publishers from being overwritten—for example:
C:/inetpub/wwwroot/DynamicsAX6HelpServer/content/Contoso/EN-US

Details about the subfolders that you can add appear in the following table:
Folder Name | Recommended/Optional | Example | Description |
|---|---|---|---|
Publisher ID | Recommended | Contoso | Specify a unique name for the publisher—typically, your publisher ID from the metadata properties of your content. The publisher ID folder typically contains subfolders for the languages of your content. |
Language | Recommended | EN-US | Specify the language of your content—typically, the language from the metadata properties of your content. You cannot change the value of the Language metadata property of content by changing the name of the folder where it is published. |
Other | Optional | TOCResources | Add subfolders to help organize related content. |
To delete existing content, remove the file that contains the content from the Help server.
Tip
If you remove a topic, also update the topic from the table of contents and any cross-references.
Publication is completed when WSS adds metadata from your HTML or XML file to the search index. Make sure that WSS is running on the Help server.
The Help server uses the search service and its index to locate each topic that matches a Help request. You will not see newly published content in the Help viewer until that content is indexed.
Note
WSS is a low-priority service that runs after higher-priority services. The time between publishing and viewing your content can vary. If you publish just a few files to a Help server that was previously indexed, the new files should be immediately indexed.
After WSS has indexed your files, use the Help viewer to view your new content. If you cannot see your content, check to ensure that the content has been indexed.
To refine search results, summary pages, and table of contents entries, the Help server keeps a list of publishers in the Web.config file. You update this list to complete the following tasks:
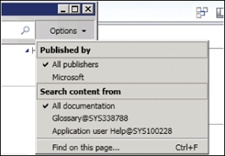
Add or remove a publisher from the Search Options menu of the Help viewer (Figure 16-7) to restrict your search to content created by the specified publisher.
List content from one publisher before or after content from another publisher. If your Help request includes content from more than one publisher, the summary page uses the publisher list to determine the sort order of the content.
Specify where a group of entries in the table of contents appears. The Help server groups entries by publisher. When the Help server sends the table of contents to the Help viewer, the server uses the publisher list in the Web.config file to determine the order of the entries.
Before making changes to the Web.config file, save a copy of the file.
If you do not add your publisher ID to the Web.config file, the Help server determines the location of your content.
To add a publisher to the Web.config file:
Open the Web.config file in a text editor. To change the file, you might have to copy the file to a separate working folder. The Web.config file is located here:
C:inetpubwwwrootDynamicsAX6HelpServer
Add a publisher to the list. The list of publishers is in the dynamicsHelpConfig section.
The following table specifies the required attributes of the <publisher> element:
Attribute Name
Value
publisherId
A value that uniquely identifies the publisher. The ID must match the publisher ID specified in the metadata for content elements and the table of contents.
name
The text to be displayed as the name of the publisher. The Search Options menu of the Help viewer displays this name.
Notice the order of the publishers in the following example. If a summary page includes content from both publishers, content from the first publisher is listed before content from the second:
<publishers>
   <add publisherId="Contoso" name="Contoso" />
   <add publisherId="Microsoft" name="Microsoft" />
</publishers>
Save your changes to the Web.config file. If the file is in a working folder, copy your updated Web.config file to the DynamicsAX6HelpServer folder on your Help server.
Before you add your content to the Help server, you can add subfolders to organize your files. Although not required, this can prevent files with similar names from other publishers from being overwritten. If you publish many files, you can add subfolders by subject to help organize your content.
Caution
When you publish, be careful not to accidentally overwrite existing files that have the same file name. If you overwrite a file, you lose the Help documentation that was contained in the original file.
To add folders to the file system of the Help server:
In Windows Explorer, open the content folder on the Help server—typically, here:
C:inetpubwwwrootDynamicsAX6HelpServercontent
Add a publisher folder, using your publisher ID or name as the folder name.
Add language folders for the languages of your content. Name folders by using the same language code that is used in the language metadata of your content files—for example, “EN-US” for U.S. English.
To publish content:
In Windows Explorer, copy the files that you want to publish to the appropriate folders, such as
C:inetpubwwwrootDynamicsAX6HelpServer content<publisher ID><language>
The following table summarizes the different files that accompany each type of content file:
If you add many files, WSS takes several minutes to index all the files.
Open each content topic in the Help viewer and verify that your content was published.
To publish table of contents entries:
In Windows Explorer, copy your TableOfContents.xml file to the folder on the Help server that matches the publisher and language metadata in the XML file, such as
C:inetpubwwwrootDynamicsAX6HelpServercontent<publisherID><language> TOCResources
Open the Help viewer and verify that your content was published.
A document set is a collection of content associated with a Microsoft Dynamics AX workspace—either the Microsoft Dynamics AX client or the Development Workspace. A workspace can be associated with only one document set. Typically, you use UserDocumentation as the document set for any content that you publish. If you add a new document set and associate it with a workspace, you will no longer see content from the document set that you replaced.
Document sets are located in an AOT node named Help Document Sets. Document sets have properties that help you manage the relationship between a workspace and a document set.
Property | Type | Description |
|---|---|---|
DocumentSetName | String | The unique name of the document set. The name is limited to 40 characters and cannot contain spaces. Use the value of this property when you set the value of the DocumentSets metadata in a content file. |
DocumentSetDescription | String | The text to display for the document set. This appears in the Search content from the list of the Options menu of the Help viewer. |
AddToApplicationHelpMenu | Boolean | Set to Yes when you want the document set to appear on the Help menu in the Microsoft Dynamics AX client. |
AddToDeveloperHelpMenu | Boolean | Set to Yes when you want the document set to appear on the Help menu of the Development Workspace. |
UserDocumentSet | Boolean | Set to Yes when you want to associate the document set with the Microsoft Dynamics AX client. If you set this property to No, you will not be able to view the context-sensitive (F1) Help that was published by Microsoft. |
DeveloperDocumentSet | Boolean | Set to Yes when you want to associate the document set with the Development Workspace. If you set this property to No, you will not be able to view the context-sensitive (F1) Help that was published by Microsoft. |
ContentLocation | Enumeration | An enumeration value that specifies where to retrieve documentation:
|
This section describes solutions to the two most common problems that might occur when customizing the Help system.
If the Help viewer cannot display content, check the following possible solutions.
If you use more than one Help server for development, testing, and production, make sure that the Help viewer connects to the server where you published your changes. To view the URL of the Help service in Microsoft Dynamics AX, click Administration > Setup > Help System Parameters.
Make sure that the web service and application pool for the Help service are running. Click Start > All Programs > Administrative Tools > Internet Information Services (IIS) Manager.
Content does not appear in the Help viewer until it has been indexed by WSS. Right-click the taskbar, click Start Task Manager, click the Services tab, and then, in the Name column, find Wsearch, and verify that “Running” appears in the Status column. If WSS is running, you might have to give indexing more time to find your content. Indexing slows or stops when the server is busy.
If WSS is not running, right-click Wsearch, and then click Start Service. Allow WSS to find and index the files that you published.
Check whether the Help server or WSS logged any error messages in the application log of the server. In Event Viewer, click Application Log.
Check whether the Help server can open and process the HTML file of your content. If the Help server cannot locate the file, or the file does not include the required metadata, the Help server does not send the content to the Help viewer.
Make sure that the HTML file is in the correct folder on the Help server.
Make sure that the content file includes all required metadata with the correct syntax.
Make sure that there are no errors in the XHTML of your content files.