Wireless Markup Language
One of the XML applications getting a lot of attention these days is Wireless Markup Language (WML). WML and its associated protocol, the Wireless Application Protocol (WAP), are targeted at handheld devices such as cellular phones, PDAs, and other devices with restricted hardware capabilities. WML represents a limited-syntax language that's relatively easy to implement for such devices, and the programs that use WML in those devices are often called microbrowsers.
The following list describes some WML resources:
http://www.wapforum.org. A great resource for all things WML. Acts as a clearinghouse for information.
http://wap.colorline.no/wap-faq/. An independent WAP FAQ, with lots of information, including a list of WAP service providers.
http://www.apachesoftware.com. All about Klondike, a popular WML browser.
http://hotfiles.zdnet.com/cgi-bin/texis/swlib/hotfiles/info.html?fcode=0018AV. Download site for Klondike.
http://www.apachesoftware.com/wml/wmldemo.wml. Klondike WML examples.
http://www.wap-uk.com/Developers/Tutorial.htm. A WML tutorial.
http://www.wapdesign.org.uk/tutorial.html. Another WML tutorial.
http://www.wapdesign.org.uk/server.html. Tutorial about serving WAP documents.
http://www.wapforum.org/DTD/wml_1.1.xml. The WML 1.1 (the current version) DTD. A great place to check to resolve syntax questions.
Table 20.3 lists all the WML elements and their attributes.
In addition, WML supports these character entities:
& is an ampersand (&)
' is an apostrophe (')
> is the greater than symbol (>)
< is the less than symbol (<)
is a nonbreaking space (' ')
" is a quotation mark (")
­ is a soft hyphen (-).
In the following sections, I use the popular Apache Klondike WML browser, which you can download for free from links at http://www.apachesoftware.com. It's a well-designed browser; if you want to follow along, I encourage you to install it.
Getting Starting with WML
Microbrowsers don't have a lot of display area to spare, so WML documents are divided into cards, which are displayed one at a time. A WML document is called a deck of such cards. A deck begins and ends with the <wml> tag, and each card in a deck begins and ends with the <card> tag. When a microbrowser reads a WML document, it reads the whole deck, although you see only one card at a time.
You start WML documents with the XML declaration:
<?xml version="1.0"?>
    .
    .
    .
Like XHTML, WML uses a <!DOCTYPE> element with a formal public identifier, except that the authorization body is the WAP Forum, not W3C:
<?xml version="1.0"?>
<!DOCTYPE wml PUBLIC "-//WAPFORUM//DTD WML 1.1//EN"
    "http://www.wapforum.org/DTD/wml_1.1.xml">
    .
    .
    .
The document, or deck, element is <wml>:
<?xml version="1.0"?>
<!DOCTYPE wml PUBLIC "-//WAPFORUM//DTD WML 1.1//EN"
    "http://www.wapforum.org/DTD/wml_1.1.xml">
<wml>
    .
    .
    .
</wml>
You create a card in this deck with the <card> element. In this case, I'll give this card the ID Card1 and the title First WML Example (which will appear in Klondike's title bar):
<?xml version="1.0"?>
<!DOCTYPE wml PUBLIC "-//WAPFORUM//DTD WML 1.1//EN"
    "http://www.wapforum.org/DTD/wml_1.1.xml">
<wml>
    <card id="Card1" title="First WML Example">
    .
    .
    .
    </card>
</wml>
You can use comments in WML just as you can in XML:
<?xml version="1.0"?>
<!DOCTYPE wml PUBLIC "-//WAPFORUM//DTD WML 1.1//EN"
    "http://www.wapforum.org/DTD/wml_1.1.xml">
<wml>
    <card id="Card1" title="First WML Example">
        <!-- This is a comment -->
        .
        .
        .
    </card>
</wml>
Every card must have a <p> (paragraph) element, and I'll place some greeting text in that element:
<?xml version="1.0"?>
<!DOCTYPE wml PUBLIC "-//WAPFORUM//DTD WML 1.1//EN"
    "http://www.wapforum.org/DTD/wml_1.1.xml">
<wml>
    <card id="Card1" title="First WML Example">
        <!-- This is a comment -->
        <p>
            Greetings from WML.
        </p>
    </card>
</wml>
That's all it takes. Figure 20.6 shows this WML document displayed in Klondike.

Setting Text Alignment
The <p> element has an align attribute, which is supported by Klondike and which is useful for aligning text. You can assign this attribute the value "left", "center", or "right". There's also a mode attribute that you can use to specify whether you want text wrapped by assigning values of "wrap" or "nowrap".
The following example demonstrates text alignment, using these attributes of the <p> element:
<?xml version="1.0"?>
<!DOCTYPE wml PUBLIC "-//WAPFORUM//DTD WML 1.1//EN"
    "http://www.wapforum.org/DTD/wml_1.1.xml">
<wml>
    <card id="Card1" title="Text Alignment">
        <p align="center"><b>Text Alignment</b></p>
        <p align="left">Left-aligned text</p>
        <p align="center">Center-aligned text</p>
        <p align="right">Right-aligned text</p>
        <p mode="nowrap">Non-wrapped text in a long line of text….</p>
    </card>
</wml>
Figure 20.7 shows this WML document in Klondike.

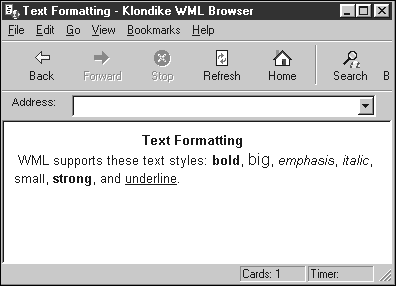
Basic Text Styling
WML also supports several basic text-styling elements modeled after HTML, such as <b> for bold text, <i> for italic text, <u> for underlined text, and so on. Here's an example putting these basic text-styling elements to work (note that not all microbrowsers will support all these styling elements):
<?xml version="1.0"?>
<!DOCTYPE wml PUBLIC "-//WAPFORUM//DTD WML 1.1//EN"
    "http://www.wapforum.org/DTD/wml_1.1.xml">
<wml>
    <card id="Card1" title="Text Formatting">
        <p align="center"><b>Text Formatting</b></p>
        <p>
            WML supports these text styles:
            <b>bold</b>,
            <big>big</big>,
            <em>emphasis</em>,
            <i>italic</i>,
            <small>small</small>,
            <strong>strong</strong>,
            and <u>underline</u>.
        </p>
    </card>
</wml>
Figure 20.8 shows the results displayed in the Klondike browser.
Buttons
You can create buttons in WML with the <do> element. For example, suppose that I want to let the user navigate to the WML document page at http://www.starpowder.com/planets.wml. In that case, I'd start with the <do> element, setting the type attribute to "accept" and adding a label with the label attribute to create the new button:
<?xml version="1.0"?>
<!DOCTYPE wml PUBLIC "-//WAPFORUM//DTD WML 1.1//EN"
    "http://www.wapforum.org/DTD/wml_1.1.xml">
<wml>
    <card id="Card1" title="Buttons">
        <p align="center"><b>Buttons</b></p>
        <do type="accept" label="Go to a new page…">
        .
        .
        .
        </do>
    </card>
</wml>
You can navigate to the new document with the <go> element, specifying the target URI with the href element:
<?xml version="1.0"?>
<!DOCTYPE wml PUBLIC "-//WAPFORUM//DTD WML 1.1//EN"
    "http://www.wapforum.org/DTD/wml_1.1.xml">
<wml>
    <card id="Card1" title="Buttons">
        <p align="center"><b>Buttons</b></p>
        <do type="accept" label="Go to a new page…">
            <go href="http://www.starpowder.com/planets.wml"/>
        </do>
    </card>
</wml>
Figure 20.9 shows the results of this WML document; the button appears in the browser. Clicking that button will make the browser navigate to http://www.starpowder.com/planets.wml.

As mentioned earlier, you can have multiple cards in a deck, but you see only one at a time. So how do you get to the others? You do so with buttons. In this case, you assign the ID of the target card to the href attribute in the <go> element.
Here's an example with two cards and a button that lets the user navigate from the first card to the second one—note that the href attribute of the button's <go> element points to the ID value of the target card:
<?xml version="1.0"?>
<!DOCTYPE wml PUBLIC "-//WAPFORUM//DTD WML 1.1//EN"
    "http://www.wapforum.org/DTD/wml_1.1.xml">
 <wml>
    <card id="Card1" title="Multiple Cards">
        <p align="center"><b>Multiple Cards</b></p>
        <do type="accept" label="Go to Card 2">
            <go href="#Card2"/>
        </do>
    </card>
    <card id="Card2" title="Card 2">
        <p>
            This is card 2.
        </p>
    </card>
</wml>
For the results of this WML, see Figure 20.10. When the user clicks the button, the browser navigates to card 2 in the deck. That's how you get from card to card in WML—with browser navigation techniques.

So, having navigated to card 2, how does the user get back to card 1? Take a look at the next topic.
The Back Button
WML supports a special button that you'll often see displayed—the Back button. To add a Back button to card 2, I use the WML <prev> element like this:
<?xml version="1.0"?>
<!DOCTYPE wml PUBLIC "-//WAPFORUM//DTD WML 1.1//EN"
    "http://www.wapforum.org/DTD/wml_1.1.xml">
 <wml>
    <card id="Card1" title="Multiple Cards">
        <p align="center"><b>Multiple Cards</b></p>
        <do type="accept" label="Go to Card 2">
            <go href="#Card2"/>
        </do>
    </card>
    <card id="Card2" title="Card 2">
        <p>
            This is card 2.
        </p>
        <do type="prev" label="Back">
            <prev/>
        </do>
    </card>
</wml>
That's all it takes. As Figure 20.11 shows, a Back button appears in card 2. When the user clicks this button, the browser navigates back to the previous card. Bear in mind that the user uses buttons to navigate from card to card in a deck, so it's a good idea to include a Back button on every card (microbrowsers typically won't have a built-in Back button, although Klondike does).

Hyperlinks
WML also supports an <a> element for hyperlinks. Like the HTML version of this element, you use the href attribute to specify the target URI to which you want to navigate. Here's an example that takes the user to the Apache WML example:
<?xml version="1.0"?>
<!DOCTYPE wml PUBLIC "-//WAPFORUM//DTD WML 1.1//EN"
    "http://www.wapforum.org/DTD/wml_1.1.xml">
 <wml>
    <card id="Card1" title="Hyperlinks">
        <p align="center"><b>Hyperlinks</b></p>
        <p>
            Want to see some WML examples?
            Take a look at the
            <a href="http://www.apachesoftware.com/wml/wmldemo.wml">
                Apache examples
            </a>.
        </p>
    </card>
    </card>
</wml>
Figure 20.12 shows the results. When the user clicks the hyperlink, Klondike navigates to the target URI.

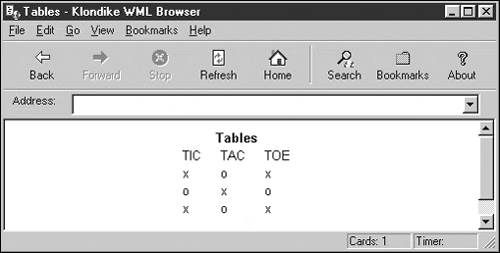
Tables
You can create tables in WML using markup that matches the HTML <table>, <tr> , and <td> elements (there are no <th>, <tbody>, <thead>, or <tfoot> elements). Notice how closely the following example resembles an HTML table:
<?xml version="1.0"?>
<!DOCTYPE wml PUBLIC "-//WAPFORUM//DTD WML 1.1//EN"
    "http://www.wapforum.org/DTD/wml_1.1.xml">
<wml>
    <card id="Card1" title="Tables">
        <p align="center"><b>Tables</b></p>
        <p align="center">
            <table columns="3">
                <tr>
                    <td>TIC</td>
                    <td>TAC</td>
                    <td>TOE</td>
                </tr>
                <tr>
                    <td>x</td>
                    <td>o</td>
                    <td>x</td>
                </tr>
                <tr>
                    <td>o</td>
                    <td>x</td>
                    <td>o</td>
                </tr>
                <tr>
                    <td>x</td>
                    <td>o</td>
                    <td>x</td>
                </tr>
            </table>
        </p>
    </card>
</wml>
Figure 20.13 shows the results of this WML.
Text Input
WML also supports an <input> element. If you set this element's type attribute to "text", you can display a text field, much like HTML text fields (not all microbrowsers support this element, however).
In this example, I'll let the user enter the URI of a local file in a text field. When the user clicks a button labeled Go, the browser navigates to that URI. I begin by creating the text field:
<?xml version="1.0"?>
<!DOCTYPE wml PUBLIC "-//WAPFORUM//DTD WML 1.1//EN"
    "http://www.wapforum.org/DTD/wml_1.1.xml">
<wml>
    <card id="Card1" title="Text Input">
        <p align="center"><b>Text Input</b></p>
        <p>
             Navigate to:
             <input type="text" name="uri"/>
    .
    .
    .
When the user clicks the Go button, I need some way to read what was entered in the text field. Here, I've given the text field the name uri. I can refer to the text in the text field as $(uri) this way in the Go button's <go> element:
<?xml version="1.0"?>
<!DOCTYPE wml PUBLIC "-//WAPFORUM//DTD WML 1.1//EN"
    "http://www.wapforum.org/DTD/wml_1.1.xml">
<wml>
    <card id="Card1" title="Text Input">
        <p align="center"><b>Text Input</b></p>
        <p>
             Navigate to:
             <input type="text" name="uri"/>
             <do type="accept" label="Go">
                 <go href="$(uri)"/>
             </do>
        </p>
    </card>
 </wml>
Figure 20.14 shows the results. When the user enters the URI of a local document in the text field—I'm using b.wml in this figure—and clicks the Go button, the browser reads the name of the document from the text field and opens that document.

This topic has also introduced us to the concept of WML variables, such as $(uri). Being capable of handling variables directly like this gives WML an interesting mix of markup and scripting capabilities. There's also a <setvar> element that lets you set the value of variables like this:
<setvar name="uri" value="b.wml" />
I'll put variables to work in the next topic.
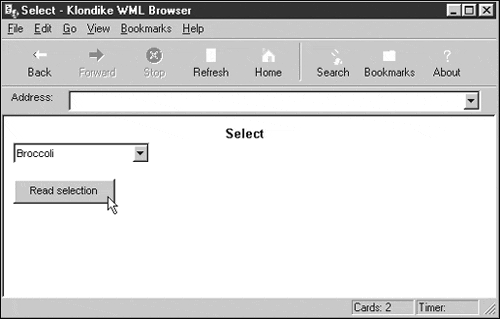
Select Elements
Like HTML, WML supports a <select> element to display a select control (which is like a drop-down list). As an example, I'll create a select control. After making a selection, the user can click a Read Selection button, which navigates to a new card that displays the selection.
I start by creating the select control and giving it the name "selection":
<?xml version="1.0"?>
<!DOCTYPE wml PUBLIC "-//WAPFORUM//DTD WML 1.1//EN"
    "http://www.wapforum.org/DTD/wml_1.1.xml">
<wml>
    <card id="Card1" title="Select">
        <p align="center"><b>Select</b></p>
        <select name="selection">
        .
        .
        .
        </select>
As in HTML, you specify the items in the select control with <option> elements:
<?xml version="1.0"?>
<!DOCTYPE wml PUBLIC "-//WAPFORUM//DTD WML 1.1//EN"
    "http://www.wapforum.org/DTD/wml_1.1.xml">
<wml>
    <card id="Card1" title="Select">
        <p align="center"><b>Select</b></p>
        <select name="selection">
            <option value="broccoli">Broccoli</option>
            <option value="green beans">Green Beans</option>
            <option value="spinach">Spinach</option>
        </select>
        .
        .
        .
Now I add the Read Selection button that will navigate to a new card, card 2:
<?xml version="1.0"?>
<!DOCTYPE wml PUBLIC "-//WAPFORUM//DTD WML 1.1//EN"
    "http://www.wapforum.org/DTD/wml_1.1.xml">
<wml>
    <card id="Card1" title="Select">
        <p align="center"><b>Select</b></p>
        <select name="selection">
            <option value="broccoli">Broccoli</option>
            <option value="green beans">Green Beans</option>
            <option value="spinach">Spinach</option>
        </select>
        <do type="accept" label="Read selection">
            <go href="#card2"/>
        </do>
    .
    .
    .
In card 2, I'll display the value in the select control, which I can refer to as $(selection). The value of a select control is the string in the value attribute of the currently selected item's <option> element. In card 2, here's the WML to display the current selection:
<?xml version="1.0"?>
<!DOCTYPE wml PUBLIC "-//WAPFORUM//DTD WML 1.1//EN"
"http://www.wapforum.org/DTD/wml_1.1.xml">
<wml>
<card id="Card1" title="Select">
<p align="center"><b>Select</b></p>
<select name="selection">
<option value="broccoli">Broccoli</option>
<option value="green beans">Green Beans</option>
<option value="spinach">Spinach</option>
</select>
<do type="accept" label="Read selection">
<go href="#card2"/>
</do>
</card>
<card id="card2" title="Card 2">
<p>
You selected $(selection).
</p>
</card>
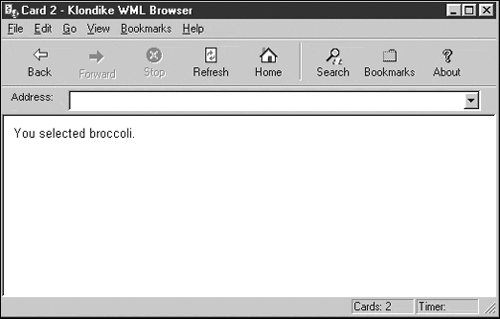
</wml>Figure 20.15 shows how this works; I've selected the item Broccoli.
Clicking the Read Selection button goes to card 2, which reports the selection, as shown in Figure 20.16.
Another useful aspect of select controls is the onpick attribute of <option> elements, which enables you to navigate to new URIs as soon as the user chooses an item in a select control. Here's an example. All I have to do is to set the onpick attribute of a number of <option> elements to URIs; when the user chooses one, the browser navigates to the corresponding URI:
<?xml version="1.0"?>
<!DOCTYPE wml PUBLIC "-//WAPFORUM//DTD WML 1.1//EN"
    "http://www.wapforum.org/DTD/wml_1.1.xml">
<wml>
    <card id="Card1" title="Select">
        <p align="center"><b>Select</b></p>
        <select name="selection">
           <option onpick="http://www.starpowder.com/mercury.wml">
               Mercury
           </option>
           <option onpick="http://www.starpowder.com/venus.wml">
               Venus
           </option>
           <option onpick="http://www.starpowder.com/earth.wml">
               Earth
           </option>
        </select>
    </card>
</wml>
Timers
In WML, you can use a timer to measure a time period, and the browser will undertake some action when that period has expired. For example, if I assign a card's ontimer attribute to the ID of another card, the browser navigates to that card when the timer finishes:
<?xml version="1.0"?>
<!DOCTYPE wml PUBLIC "-//WAPFORUM//DTD WML 1.1//EN"
    "http://www.wapforum.org/DTD/wml_1.1.xml">
<wml>
    <card id="Card1" ontimer="#card2" title="Timers">
    .
    .
    .
    </card>
    .
    .
    .
You create a timer with the <timer> element and give it a time period (measured in tenths of a second) with the value attribute. Here I'm giving this card's timer a period of 10 seconds:
<?xml version="1.0"?>
<!DOCTYPE wml PUBLIC "-//WAPFORUM//DTD WML 1.1//EN"
    "http://www.wapforum.org/DTD/wml_1.1.xml">
<wml>
    <card id="Card1" ontimer="#card2" title="Timers">
        <p align="center"><b>Timers</b></p>
        <timer value="100"/>
        <p>
            In ten seconds, you'll be redirected
            to the second card.
        </p>
    </card>
    .
    .
    .
All that remains is to add the targeted card, card2:
<?xml version="1.0"?>
<!DOCTYPE wml PUBLIC "-//WAPFORUM//DTD WML 1.1//EN"
    "http://www.wapforum.org/DTD/wml_1.1.xml">
<wml>
    <card id="Card1" ontimer="#card2" title="Timers">
        <p align="center"><b>Timers</b></p>
        <timer value="100"/>
        <p>
            In ten seconds, you'll be redirected
            to the second card.
        </p>
    </card>
    <card id="card2" title="Welcome">
        <p>
            Welcome to card 2.
        </p>
    </card>
</wml>
When you open this deck, card 1 is displayed, as shown in Figure 20.17. After 10 seconds, the browser navigates to card 2. Klondike features a timer counter at lower right; in the figure, the timer indicates that 7 seconds are left in the timer.

Connecting to the Server
You can also create forms in WML, which are much like HTML forms. The data in a WML form is encoded just as in HTML, so it can be uploaded to CGI scripts (not all microbrowsers support forms, however).
In the following example, I ask for user comments and send them back to a CGI script named comments.cgi. To start, I create a button with the label Upload Data, setting its method attribute to "post" and its href attribute to the URI to post to, "http://www.starpowder.com/comments.cgi", just as you might in an HTML form:
<?xml version="1.0"?>
<!DOCTYPE wml PUBLIC "-//WAPFORUM//DTD WML 1.1//EN"
    "http://www.wapforum.org/DTD/wml_1.1.xml">
<wml>
    <card id="Card1" title="Uploading">
        <p align="center"><b>Uploading</b></p>
        <do type="accept" label="Upload data">
            <go method="post"
                href="http://www.starpowder.com/comments.cgi">
                .
                .
                .
            </go>
            .
            .
            .
All that's left is to indicate the value of the data to upload and how to name that data. You do that with the <postfield> element's name and value attributes. In this case, I'll upload the text from a text field named "comments":
<?xml version="1.0"?>
<!DOCTYPE wml PUBLIC "-//WAPFORUM//DTD WML 1.1//EN"
    "http://www.wapforum.org/DTD/wml_1.1.xml">
<wml>
    <card id="Card1" title="Uploading">
        <p align="center"><b>Uploading</b></p>
        <do type="accept" label="Upload data">
            <go method="post"
                href="www.starpowder.com/comments.cgi">
                <postfield name="comments" value="$(comments)"/>
            </go>
        </do>
        <p>
        Please give us your comments:
            <input type="text" name="comments"/>
        </p>
    </card>
</wml>
That's all it takes. The CGI script can now read the uploaded data as it would from any HTML document. Note that when you send back a response, you should format that response in WML, which means setting the Content Type HTTP header item to the WML MIME type, "text/vnd.wap.wml".
Images
You can also display images in WMF, but there's a catch. Images must be in a special WBMP format, and that format doesn't exactly permit the rich depth of colors to which you may be accustomed. In fact, WBMP format is black and white with no grayscale—just 1 bit per pixel.
The following list describes some WBMP resources available online:
http://www.creationflux.com/laurent/wbmp.html. A shareware Adobe Photoshop plug-in for creating WBMP files.
http://www.gingco.de/wap/content/download.html. A downloadable image converter that converts images to WBMP format.
http://www.phnet.fi/public/jiikoo/ WAPDraw. A useful WBMP drawing program.
http://www.teraflops.com/wbmp Teraflops. An online converter that converts image files to WBMP files with a few simple clicks. Any HTML browser can download the resulting images—unless the browser understands WBMP format, in which case the image will be displayed.
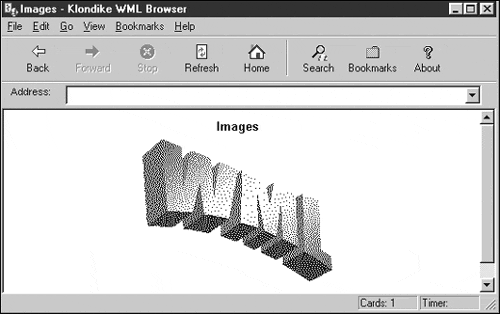
To display images, you probably won't be surprised to learn that WML has an <img> element. You set the alt, src, width, and height attributes of this element to display images, as in this example:
<?xml version="1.0"?>
<!DOCTYPE wml PUBLIC "-//WAPFORUM//DTD WML 1.1//EN"
    "http://www.wapforum.org/DTD/wml_1.1.xml">
<wml>
    <card id="Card1" title="Images">
        <p align="center"><b>Images</b></p>
        <p align="center">
            <img alt="WML Image"
                src="image.wbmp" width="217" height="164"/>
        </p>
    </card>
</wml>
Figure 20.18 shows this WML document, along with a WBMP image that I created for it to display.
And that's it for our exploration of WML—and XML. We've come far in this book, from the very beginning up through valid and well-formed documents, DTDs, schemas, parsing XML with JavaScript, data binding, CSS, XML and Java, DOM and SAX parsers, XSL transformations, XSL formatting objects, XLinks, Xpointers, XHTML, RDF, CDF, and VML, and now WML and XML with JSP, ASP, Java servlets, and Perl. All that remains now is for you is to put all this incredible technology to work for yourself.