Chapter 7. Testing, Quality, and Integration
Learning Objectives
• Understand how Agile methods can help improve product quality
• Learn how to use tools such as paired programming, test-driven development (TDD), and refactoring
• See an example of test-driven development and refactoring in action
• Understand manual, automated, and customer testing
• Read an interview with an Agile quality expert
In this chapter, we discuss how quality can be maintained and even enhanced using Agile tools. Sprints are short and do not offer extensive time for testing; therefore, incorporating testing and various testing tools is of critical importance. One of the key tenets of Agile is “frequent verification and validation” of working software, so this chapter focuses on different testing approaches, such as test-driven development, acceptance test-driven development, integrated testing, regression testing, and unit testing. We show how test-driven development and refactoring are done using an example of a blackjack game, and end the chapter by comparing manual, automated, and customer testing techniques.
Quality
The Agile Manifesto principle “Continuous attention to technical excellence and good design enhances agility” emphasizes that quality is a central theme for Agile development. Agile coach Tim Ottinger (personal communication, 2013) offers some important insight behind the philosophy of creating quality code:
Testing does enhance quality, but it is really more of a discipline for helping developers work safely on code in “brain-sized” chunks. It’s more about problem decomposition and managing cognitive load than about quality.
On the other hand, the tests abide after the programming is done, and all of those unit tests (microtests) we write while doing TDD are there to help us know if the code we are currently working on breaks any existing code.
Likewise, the acceptance test-driven development (ATDD) tests let us know if we’ve broken any behavior that the product’s sponsors or customers are counting on.
Since the difficulty and cost of fixing a mistake increase the longer the defect is undetected, this is primarily a cost-saving (and face-saving) measure.
And yet, it does increase quality.
Ottinger reminds us that creating quality software is more than just using a set of tools: Quality starts with creating an environment where team members can do their best work.
Creating a Quality-Focused Culture
Creating a culture that is relentlessly focused on quality requires a lot more than just writing a quality plan and tracking to that plan, as has been the norm with organizations using a Waterfall approach. Quality needs to be at the basis of the organization’s culture.
The most fundamental difference between Waterfall and Agile methodologies is that Waterfall takes a more reactionary approach, whereas Agile emphasizes that teams must be proactive about quality. For example, in many Waterfall projects, code from the various supporting areas such as the user interface and the back-end database may not be integrated until the development work is completed. Each individual area may have done unit testing on their specific code, but they have no sense of how well that code will work with the other code that is needed to make a working product. By the time it finally comes together in Waterfall, the code is no longer fresh in the minds of the developers and can often take longer to fix. The team of developers might also be suddenly overwhelmed with a huge backlog of defects that need to be fixed. Agile, on the other hand, advocates for daily builds that integrate all of the current code for the product. If the build breaks, the team is immediately alerted (often by a flashing light or other visual cue) and the developers can resolve the problem quickly, because the details of the code are fresh in their minds and there is a lot less new code to work through. This keeps defects backlogs at a much more manageable level for the team. Agile teams also use specific tools such as pair programming, test-driven development, and refactoring to continually manage product quality.
Pair Programming
Pair programming, an idea that was introduced by the XP methodology, consists of two programmers sitting side by side with a shared workstation. Each person in the pair is either the driver, the one writing the code, or the observer, who oversees the code as it is being written. Typically these roles are switched regularly during a pairing session. The driver is tasked with inputting quality working code while the observer thinks of ideas on how to optimize the code and points out any problems that arise. Developers are encouraged to pair with a variety of different people on the team for optimal learning and to familiarize themselves with all areas of the code. Testers and other functional areas can also benefit from participating in pair programming.
Pair programming offers several important benefits that contribute to the quality of the product. The first is that both programmers are learning from each other and becoming more familiar with different aspects of the product. This is important for continual improvement and cross-training, but also helps expedite code defects as they arise during the build. The second benefit is that pair programming allows each developer to focus on his or her specific role; there is a lot less cognitive overload when a developer can concentrate on getting the code working while letting the pairing partner focus on things such as performance optimization or possible bugs. Finally, pairing can also build trust and encourage more regular communication between team members.
Test-Driven Development (Unit Testing)
Test-driven development (TDD) originated with XP and has become a widely adopted approach for developers to test their code. Unlike traditional Waterfall approaches, where the developers first write the code and test it afterward, TDD requires that developers first write automated test cases and then write only the code necessary to make the test cases pass with no issues. This encourages the developers to think through the requirements before writing the code, encourages only the code that is needed is written, and ensures that each piece of the code has gone through an initial quality check before formal testing.
So how do you write a test for each individual piece of code that you intend to write?
1. Decide what language the code will be written in, and then ensure that you have the correct testing framework to use with that language. For example, if you are coding in Java, then you would use JUnit.
2. Start by writing a test for the simplest case that can be used for the method. If you run this test, it should fail because you have not written the code to make it pass.
3. Write the least amount of code possible to make the test pass.
4. If it passes, you can move on to the next test case for that method (or the next method if that one is complete). If it does not pass, you need to modify the code until the test passes.
This process is continued for all of the code that is written for the product. These test cases are used not only for unit testing code during development, but also to create an automated test suite used to regularly test the product.
Refactored Code
Fowler et al. (1999) authored the seminal book on refactoring, Refactoring: Improving the Design of Existing Code. The book defines refactoring as “the process of changing a software system in such a way that it does not alter the external behavior of the code yet improves its internal structure” (p. 16). Refactoring does not mean you are debugging your code, but rather cleaning it up so that extraneous code is removed and it complies with other patterns or structures that may exist in the product. Refactoring is a process to ensure that the least amount of code is written to pass a failing test.
The idea of refactoring originated from the mathematical term equivalence, where equations are continually reduced until no additional reductions can be made. The same is true with code: You are not ultimately changing the functions, but you are reducing them to the simplest form possible that keeps the code functioning as it was intended. Steve Wozniak, cofounder of Apple, used the idea of refactoring when they were creating the first Apple computer. He started with x number of parts, say 25, then he tried to build the same computer with 20 parts, then 15, and so on. He kept reducing the number until he was certain that he had the minimum parts, hence the fewest potential break points (see Figure 7.1).

The idea of coupling comes into play when you are refactoring code. Coupling is the extent to which a program module depends on other modules within the program. Martin (2008) encourages decoupling the code, or making each piece less dependent on other pieces and more individually testable. The primary benefit of decoupling is that it reduces the number of changes that are required if you want to use a different module. For example, if your product is dependent on an SQL database and your team decides they instead want to use a non-SQL database, then the rework required would be minimized and the likelihood of introducing new defects would be reduced.
A TDD and Refactoring Example
Let’s look at an example from Cayman Design that includes test-driven development and refactored code.
Cayman Design secured a new assignment to create a blackjack game for an online casino. It is important that the game is as problem-free as possible to gain the trust of online players and also so the casino does not lose money from a code defect.
Their plan involved starting the first sprint by incorporating the basic rules of blackjack into the program. Here are the basic blackjack requirements:
• The game always starts by the dealer and player each receiving two cards. The dealer has one card facing up and one card facing down.
• The goal is to get as close as possible to a card total of 21 without going over 21. The player that gets closest to 21 without going over wins the hand. If you go over 21 it is considered a “bust” and you lose the game.
• If the dealer and the player end up with the same total, then it is considered a “push” and neither player wins.
• The player or the dealer gets blackjack if his first two cards total 21. If both players have blackjack, then it is a push.
• Numerical cards are worth the number on the card. Face cards (jack, queen, king) are worth 10. An ace is worth either 1 or 11 points.
• After the first two cards are dealt, the player can either “stand” (not request additional cards) or “hit” (request one or more additional cards). A player can continue to hit until he thinks he has a number closer than the dealer to 21, he gets blackjack, or he busts. The dealer must continue to hit until he has a total of 17 or more.
Cayman Design assigns two of their strongest software engineers to pair program and to develop some initial working code for the customer to review; they want to ensure that the code passes the test-driven development cases that the developers prepared before writing the code. They agreed to start by confirming that all of the rules of blackjack for a player and a dealer are followed. Each test case is written in JUnit (www.junit.org), a popular testing framework for Java, because the team will be writing the blackjack game in Java code. The team will start by writing test cases for the playHand() method. This method plays a single hand of blackjack and returns the winning player. If it is a tie, the method returns a Java “null” object that in this case means there will not be a winner. The team starts by setting up the JUnit test parameters as described in the following steps:
1. Set up the JUnit test class.
@RunWith(MockitoJUnitRunner.class)
public class GameTest extends TestCase {
2. Create an artificial card deck using a mocking framework. This allows the tester to predetermine what cards will be drawn from the deck to support the test case. If this is not done, the card deck would contain random cards.
@Mock CardDeck mockDeck;
3. Create a mock user interface to allow the test to predetermine the user’s moves. A mock is used so that a tester can override the real methods on an object, which allows the tester to predetermine the results a method will return.
@Mock
private PlayerInterface playerInterface;
private Player player;
private Dealer dealer;
4. Define the class that is being tested; in this example, it is the Game class.
private Game classUnderTest;
5. Define the cards that will be used in the test.
//test data
private Card ace = new Card(14, Card.Suite.Hearts);
private Card queen = new Card(12, Card.Suite.Spades);
private Card two = new Card(2, Card.Suite.Spades);
private Card five = new Card(5, Card.Suite.Diamonds);
private Card nine = new Card(9, Card.Suite.Diamonds);
private Card four = new Card(4, Card.Suite.Hearts);
6. Set up the objects that are being used by other methods in the test. The @Before annotation tells JUnit to run the setUp method before running any of the other tests.
@Before
public void setUp() throws Exception {
player = new Player("testPlayer", 1000);
dealer = new Dealer("testDealer", mockDeck );
classUnderTest = new Game(player, dealer,
playerInterface);
Now that the setup is complete, the team is ready to write the first test. They work through the following scenarios to create tests to validate the method to play a single hand of blackjack. The simplest method that can be tested for the blackjack game is to deal two cards, so the first test written will test that the dealer successfully deals two cards to the player.
Create the first test by using the @Test annotation; this tells JUnit that the method is a test method. The method name should describe exactly what the test will be doing. Tests can be run individually or as a batch.
Test Scenario 1
Define the first test method after the @Test annotation. This annotation is required at the start of each test method you write; it tells JUnit to include the test in the current test suite. It is a best practice to make the method name as descriptive as possible so that any developer can read through the test case to easily understand what the code should be doing. In this case we name the method testDealFirstTwoCardsToPlayerSecondTwoCardsToDealer because the test validates the first two cards will go to the player and the second two cards will go to the dealer.
@Test
public void testDealFirstTwoCardsToPlayerSecondTwoCardsTo
Dealer(){
The next step is to set up two new variables; one will store the expected dealer’s hand and the other will store the expected player’s hand.
List expectedDealerHand = newArrayList(queen, nine);
List expectedPlayerHand = newArrayList(nine, four);
The when statement that follows defines the result of the getMoveFrom Player method on the mock playerInterface (see previous Player Interface mock). Now when the getMoveFromPlayer method is called in the code under test, it will always return the move “stand.” This ensures the player does not draw more than two cards for this test.
when(playerInterface.getMoveFromPlayer()).thenReturn
(Game.PlayerMove.stand);
The next when statement sets the results of the drawCard method to return the sequence of cards to match the expected dealer and player hands just defined. So, the first two cards drawn are four and nine and the second two are nine and queen.
when(mockDeck.drawCard()).thenReturn(four).
thenReturn(nine).thenReturn(nine).thenReturn(queen);
This line executes the playHand() method in the code under test with the mock objects previously defined. If the code is written correctly, it should result in the player drawing the first two cards (four and nine), and the dealer drawing the next two cards (queen and nine).
classUnderTest.playHand();
The first assertEquals statement checks that the player’s hand is equal to the expectedPlayerHand defined at the start of this test. In other words, it checks that the player gets the first two cards in the deck, which we set to be four and nine. If this is not true, the test will fail.
assertEquals(player.getHand(),expectedPlayerHand);
The final assertEquals does the same check to make sure the dealer gets the next two cards in the deck. If either of these asserts fails, then the whole test fails.
assertEquals(dealer.getHand(), expectedDealerHand);
}
Here is the code that passes the first test:
public Player playHand(){
The first two lines call the dealer’s dealCard method twice to deal the first two cards to the player face up. The dealCard method internally calls the drawCard() method on the mockDeck to get the cards. So, the dealer will deal the same cards we loaded the deck with in the test case. We pass the value false to the dealer’s dealCard method to indicate that the card is not dealt face down.
player.acceptNewCard(dealer.dealCard(false));
player.acceptNewCard(dealer.dealCard(false));
The second two lines call the dealer’s dealCards method to deal the second two cards to the dealer: one face up, and one face down.
dealer.acceptNewCard(dealer.dealCard(false));
dealer.acceptNewCard(dealer.dealCard(true));
For now, the playHand method just returns null because we are not concerned with the winner at this point.
return null;
}
In the next three test cases, we assume the dealer and the player both have two cards, and verify the playHand method behaves correctly in all possible blackjack scenarios: dealer and player have blackjack, dealer has blackjack, player has blackjack. You will also notice that we moved the code for dealing the first two cards into its own method called dealFirstTwoCards. This is a common type of code refactoring known as method extraction.
Test Scenario 2: Dealer and Player Both Have Blackjack
The expected action is that both players have blackjack, resulting in a push, and neither the player nor the dealer wins.
@Test
public void testPushWhenDealerAndPlayerBothHaveBlackjack()
throws Exception{
Tell the mock user interface to always return the move “stand” when “get move from player” is called.
when(playerInterface.getMoveFromPlayer()).thenReturn(Game
.PlayerMove.stand);
Tell the mock deck to first return a queen and an ace to the player, then return a queen and an ace to the dealer, resulting in two blackjacks.
when(mockDeck.drawCard()).thenReturn(queen).thenReturn(ace)
.thenReturn(queen).thenReturn(ace);
If the player wins, then the test should return a “player winner,” or if the dealer wins, it should return “dealer winner.” If there is no winner, as expected in this test, the playHand method should return null.
Player winner = classUnderTest.playHand();
assertNull checks that the winner equals null and if not, the test fails.
assertNull(winner);
}
This is the end of second test.
Here is the code that passes the second test:
public Player playHand(){
dealFirstTwoCards();
An if clause was added here to return null (signifying a tie or push) if the dealer and the player both have blackjack.
if (hasBlackjack(dealer) && hasBlackjack(player)) {
return null;
}
return null;
}
Note that the only code that was added from scenario 1 is the code that returns null if both the dealer and the player have blackjack.
Test Scenario 3: Dealer Has Blackjack and Player Does Not
The expected action for test scenario 3 is for the dealer to have blackjack and win the game and the player does not win.
@Test
public void testDealerWinsWhenDealerHasBlackjackAndPlayerDoes
Not() throws Exception{
Tell the mock user interface to always return the move “stand” when “get move from player” is called.
when(playerInterface.getMoveFromPlayer()).thenReturn(Game
.PlayerMove.stand);
Tell the mock deck to first return a queen and a nine to the player, then return a queen and an ace to the dealer, resulting in the dealer getting blackjack.
when(mockDeck.drawCard()).thenReturn(queen).thenReturn(nine)
.thenReturn(queen).thenReturn(ace);
Run the test on playHand.
Player winner = classUnderTest.playHand();
Check that the dealer is the winner. If not, the test will fail.
assertSame(winner, dealer);
}
Here is the code that passes the third test:
public Player playHand(){
dealFirstTwoCards();
if (hasBlackjack(dealer) && hasBlackjack(player)) {
return null;
}
A new if block is added here to check if the dealer has blackjack and to return the dealer as the winner if this is the case.
if (hasBlackjack(dealer)){
return dealer;
}
return null;
}
Note that the code from scenarios 1 and 2 has remained the same and the only thing added was the code to return that the dealer has won if the dealer has blackjack and the player does not.
Test Scenario 4: Player Has Blackjack and Dealer Does Not
The expected action for test scenario 4 is for the player to have blackjack and win the game and the dealer does not win.
@Test
public void testPlayerWinsWhenPlayerHasBlackjackAndDealerDoes
Not() throws Exception{
Here is the code that passes the fourth test:
public Player playHand(){
dealFirstTwoCards();
if (hasBlackjack(dealer) && hasBlackjack(player)) {
return null;
}
if (hasBlackjack(dealer)){
return dealer;
}
if (hasBlackjack(player)) {
return player;
}
return null;
}
More Complex Test Cases
The next set of test cases start to test what happens when the game moves past the initial hand and the player gets to decide whether to hit or stand. We can predetermine how many cards the player draws by mocking the getMove FromPlayer method. As always, we start with the simplest cases, where either the player or the dealer busts and then the game is over. In the remaining test cases, we assume the existence of two methods: one for dealing the cards to the player (dealCardsToPlayer), and one for dealing the cards to the dealer (drawDealerCards). The dealCardsToPlayer method prompts for the player’s move and keeps dealing cards until the player stands or busts. The drawDealerCards method is similar, but forces the dealer to draw on 16 and stand on 17 or above. Of course, the code for these methods should be test driven as well.
Test Scenario 5: Dealer Wins Because the Player Busts
In test scenario 5, the expected action is that the player busts and the dealer wins the game.
@Test
public void testDealerWinsWhenPlayerBusts() throws Exception{
The first move is to hit and the player busts because the cards total over 21.
when(playerInterface.getMoveFromPlayer()).thenReturn(Game
.PlayerMove.hit).thenReturn(Game.PlayerMove.stand);
As always, the first two cards go to the player, who gets a queen and a two. The second two cards go to the dealer, who also gets a queen and a two. The player takes the option to hit and draws a queen; at this point, the player is over 21 and busts. The dealer does not need to draw because the player busted.
when(mockDeck.drawCard()).thenReturn(queen).thenReturn(two)
.thenReturn(queen).thenReturn(two).thenReturn(queen);
Player winner = classUnderTest.playHand();
The test checks that the dealer wins. If not, the test fails.
assertSame(winner, dealer);
Here is the code that passes scenario 5:
public Player playHand(){
dealFirstTwoCards();
if (hasBlackjack(dealer) && hasBlackjack(player)) {
return null;
}
if (hasBlackjack(dealer)){
return dealer;
}
if (hasBlackjack(player)) {
return player;
}
We added the following code to call a method that deals new cards to the player. The method keeps prompting the player for a new move until the player chooses to stand or busts.
dealCardsToPlayer();
The following if block returns the dealer as the winner if the value of the player’s hand is over 21 (player busts).
if (isPlayerBusted(player)){
return dealer;
}
return null;
}
Test Scenario 6: Player Wins Because the Dealer Busts
In test scenario 6, the expected action is that the dealer busts and the player wins the game.
@Test
public void testPlayerWinsWhenDealerBusts() throws Exception{
when(playerInterface.getMoveFromPlayer()).thenReturn(Game
.PlayerMove.hit).thenReturn(Game.PlayerMove.stand);
when(mockDeck.drawCard()).thenReturn(queen).thenReturn(two)
.thenReturn(queen).thenReturn(two)
.thenReturn(five).thenReturn(queen);
Player winner = classUnderTest.playHand();
assertSame(winner, player);
}
Here is the code that passes scenario 6:
Public Player playHand() {
dealFirstTwoCards();
if (hasBlackjack(dealer) && hasBlackjack(player)) {
return null;
}
if (hasBlackjack(dealer)){
return dealer;
}
if (hasBlackjack(player)) {
return player;
}
dealCardsToPlayer();
if (isPlayerBusted(player)){
return dealer;
}
The following drawDealerCards method will continue drawing cards until the value of the dealer’s hand is greater than 16. The dealer must hit 16.
drawDealerCards();
The following if block returns the player as the winner if the dealer’s hand is over 21.
if (isPlayerBusted(dealer))
return player;
}
return null;
}
Test Cases to Compare
The remaining test cases cover what happens when we actually need to compare the value of the dealer’s hand to the value of the player’s hand to determine the winner. This needs to be done only if there are no blackjacks or busts. The code that is written to pass these test cases will be put into a private method named findWinnerBasedOnCardValue. This new method gets called at the end of the playHand method we have been working with all along. From this point on, we will focus on the changes to the new findWinnerBasedOnCardValue method because the playHand method does not change.
Test Scenario 7: Player Wins Because of a Higher Hand Value
The expected action is that the player wins because the player’s hand had a higher value than the dealer’s hand.
@Test
public void
testPlayerWinsWhenPlayerHasHigherHandValueAnd
NoBustsOrBlackjack() throws Exception {
when(playerInterface.getMoveFromPlayer()).thenReturn
(Game.PlayerMove.stand);
when(mockDeck.drawCard()).thenReturn(queen).thenReturn
(nine).thenReturn(queen).thenReturn(five)
.thenReturn(two);
Player winner = classUnderTest.playHand();
assertSame(winner, player);
}
The code that passes scenario 7 is the final version of the playHand method.
public Player playHand(){
dealFirstTwoCards();
if (hasBlackjack(dealer) && hasBlackjack(player)) {
return null;
}
if (hasBlackjack(dealer)){
return dealer;
}
if (hasBlackjack(player)) {
return player;
}
dealCardsToPlayer();
if (isPlayerBusted(player)){
return dealer;
}
drawDealerCards();
if (isPlayerBusted(dealer)) {
return player;
}
return findWinnerBasedOnCardValue();
}
private Player findWinnerBasedOnCardValue(){
The following lines of code compare the player’s hand to the dealer’s hand, and the method returns the player as the winner if the player has a higher hand.
if (player.getValueOfHand() > dealer.getValueOfHand() ) {
return player;
}
return null;
}
Test Scenario 8: Dealer Wins Because of a Higher Hand Value
The expected action is that the dealer wins because the dealer’s hand had a higher value than the player’s hand. The player starts off with a queen and a five. The dealer starts off with a queen and a nine. The player hits once and then stands on 17. The dealer wins with 19.
@Test
public void
testDealerWinsWhenDealerHasHigherHandValueAnd
NoBustsOrBlackjack() throws Exception {
when(playerInterface.getMoveFromPlayer()).thenReturn(Game
.PlayerMove.hit).thenReturn(Game.PlayerMove.stand);
when(mockDeck.drawCard()).thenReturn(queen).thenReturn(five)
.thenReturn(queen).thenReturn(nine)
.thenReturn(two);
Player winner = classUnderTest.playHand();
assertSame(winner, dealer);
}
The following code allows scenario 8 to pass.
private Player findWinnerBasedOnCardValue(Player player1,
Player player2){
if (player.getValueOfHand() > dealer.getValueOfHand() ) {
return player;
}
This line of code compares the player and dealer hand values again and returns the dealer if the player hand value is less than the dealer hand value.
else if (player.getValueOfHand() < dealer.getValueOfHand()) {
return dealer;
}
else {
return null;
}
}
Test Scenario 9: Dealer and Player Tie with the Same Hand Value
The expected action is that there is a tie between the dealer and the player, resulting in a push.
@Test
public void testPushWhenDealerAndPlayerHaveSameHandValue()
throws Exception {
when(playerInterface.getMoveFromPlayer()).thenReturn(Game
.PlayerMove.stand);
when(mockDeck.drawCard()).thenReturn(queen).thenReturn(nine)
.thenReturn(queen).thenReturn(nine);
Player winner = classUnderTest.playHand();
assertNull(winner);
}
}
The following example shows the code that passes scenario 9.
Note
There are no changes from the code for scenario 8 because we have already tested for two of the three possible outcomes. The tie case is the fall-through case that must be there for the code to compile.
private Player findWinnerBasedOnCardValue(Player player1,
Player player2){
if (player.getValueOfHand() > dealer.getValueOfHand() ) {
return player;
}
else if (player.getValueOfHand() < dealer.getValueOfHand()) {
return dealer;
}
This is the fall-through case that returns null (indicating a tie) when the player hand value is equal to the dealer hand value.
else {
return null;
Review 1
At this point, the reader should be able to answer Review Questions 1–5.
Minimizing Defect Backlog
The best-case scenario when creating a product is to carefully write the code so that defects are never introduced. Although most developers would prefer to spend all of their time writing new and innovative code, to err is human, and defects happen in even the most thoughtfully developed products.
To create a quality product, there has to be a continuous focus on defect detection during all phases of development, from finding a bug while pairing to running regular integration tests. Joel Spolsky (2000), blogger and former employee at Microsoft, writes about one of the early releases of Microsoft Word. The project was behind, and recovering the schedule became the highest priority. The developers threw together whatever code was necessary to make the features work, and often had to work late into the night. It comes as no surprise that this mode of operation introduced a lot of product defects that had to be fixed at the end of the cycle, which created an even greater delay in product delivery. The team held a lessons learned session (this was before the days of retrospectives) and as a result implemented a new rule that fixing defects always took priority over writing new code. Spolsky argues that the longer you wait to fix a bug, the more the organization will ultimately pay in time and money. Developers can usually find and fix bugs much faster if the code is fresh in their minds. If it has been months since a developer looked at a section of the code, then it is highly likely that another team member has modified that code, making it more difficult to fix. If a bug is found in the field, you risk a hit to product reputation and the loss of valuable customers.
Defects are typically found in the early phases of development during unit testing, where developers test their own code, through paired programming, or by using TDD. These are important points to find defects, but these bugs are found in isolated pieces of the code. Often many of the defects arise when the code from various parts of the product come together as an integrated product; this is known as integration build. Integration builds can happen whenever code is completed; however, many Waterfall projects have traditionally used weekly (or monthly) scheduled builds. The thought behind weekly builds was that they would collect all of the code that was changed or added for that week and come in Monday to review any bugs that may have been introduced. Some of the Waterfall teams used even less regular build schedules and waited until all of the code was completed before they did an integration build. You can imagine the defect backlog they were faced with when a month’s worth of development work finally came together.
Consistent with the Agile Manifesto, which states, “Working software is the primary measure of progress,” Agile promotes continual integration builds. This means that as soon as the code is checked in, it is integrated with the overall product build. This does not mean the updates are part of the live product; it simply means that a new integrated build is always available to the product development team for testing. Some Agile teams are so focused on finding defects quickly that they have implemented a system where a siren or alarm goes off when new code breaks a build; the siren alerts the entire team that there is a problem and allows them to respond immediately. Developers do not want their code to be the one that causes the embarrassing noise, so they are motivated to carefully test before they check anything in for a build.
Manual, Automated, and Customer Testing
A product development team has two options when testing whether the code is working as it was designed.
Manual Testing
The first is manual testing, where a human tester must progress through each step or look over the product to make sure nothing about the code or design is defective. Manual testing can be very time-consuming and is subject to human error, but is often necessary in cases where the feature cannot be automated or if it is a visual update such as a background color that must match the rest of the product. Manual testing is often used when validation of the user interface is required.
Automated Testing
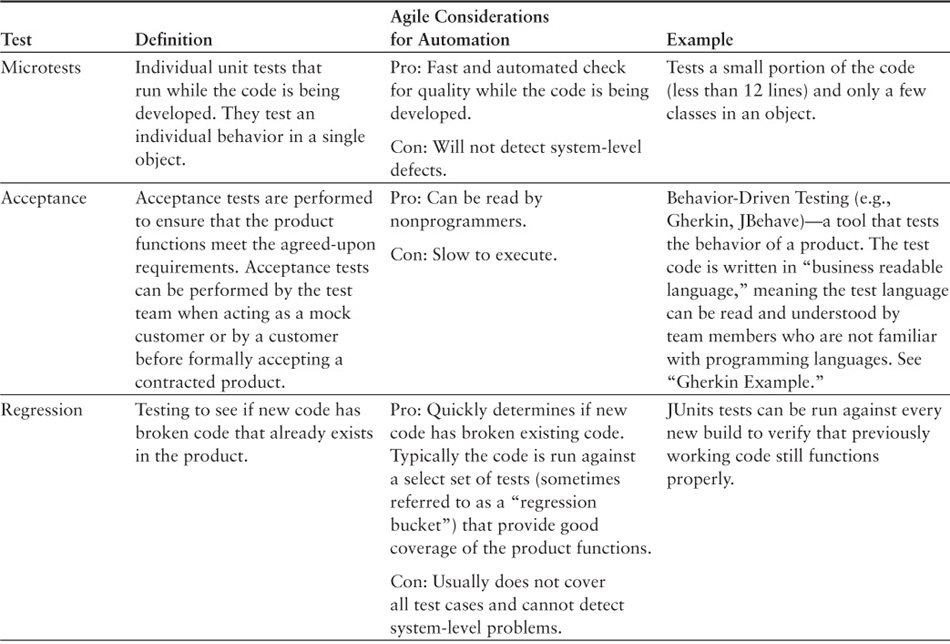
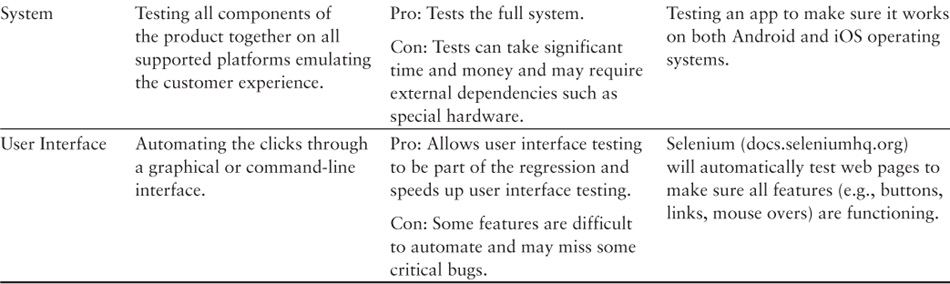
The other option is automated testing, which uses software that is independent of the software being tested to execute tests without human intervention and compare the results against the desired outcome. A single test or a string of tests can be automated, but running a series of tests tends to provide the most benefit. An automated test can be anything such as a series of clicks in a user interface, executing commands in a command-line interface, or checking that data is appropriately stored in a database. Table 7.1 summarizes the different types of testing that benefit from automation.
Gherkin Example
The testers at Cayman Design have agreed to use behavior-driven acceptance tests to confirm the blackjack game design with their business team. This allows their business counterparts to participate in the code design process without needing to have a deep knowledge of the code. They are starting with the scenarios used in the test-driven development cases that are based on the user stories their product owner created for their first sprint. To write the test in Gherkin language, they first need to describe the feature in the “Feature” line and the scenario they are testing in the “Scenario” line. From there they use the “Given” line to describe the current condition and the “And,” “When,” and “Then” lines to explain how the scenario proceeds from there.
Feature: The game returns a null winner when both the dealer and the player have blackjack.
Scenario: Both the dealer and the player have blackjack
Given the initial round of cards have been dealt
And neither player has busted
When the dealer and player review their cards
And the dealer has blackjack
And the player has blackjack
Then the game returns a null winner
And neither the dealer nor the player wins the game
Scenario: * Continue with the next scenario
The product owner and the business analyst agree that the code accurately represents their goals from the user story, and the developers proceed to include these tests in their automated system tests to ensure the product continues to operate as designed.
Customer Feedback
Customer feedback can take many forms. Alpha tests are used to allow customers to try early versions of the code. Beta tests are similar in that they allow customers to try out the product before it is released generally to the public, but the product has been through much more extensive testing by the development team. Usability testing involves observing the customer interacting with the product to understand where there may be opportunities to improve the ease of use.
Alpha, beta, and usability testing are not unique to Agile and have been used for years during software development projects. Agile does advocate for new techniques that involve regular engagement with the customer. In some of the more extreme cases, the customers are actually part of the development team. The teams that use this approach tend to be the development teams that are creating product for internal use, such as an insurance company including an insurance agent when they are developing a new tool for their sales team. It is more common to find customers involved on a weekly or monthly cadence depending on the length of the sprint or development cycle. Some companies use what is often called a customer council, where the development team meets with the customers to review ideas or working code. Other companies invite the customers to participate in the stakeholder feedback sessions; companies such as IBM started using a customer feedback method called transparent development. In projects using transparent development, the code is made available to customers on a server at all stages of development so they can provide feedback anytime they wish. No matter what approach you use to get customer feedback, it is important to remember the Agile Manifesto value that emphasizes, “It is more important that the customer become intimately involved with the product development team than to focus on the terms and conditions of the project.”
Review 2
At this point, the reader should be able to answer Review Questions 6–11.
Conclusion
One of the most important benefits of moving to a more Agile approach to developing software is the emphasis on quality. Tools such as pair programming, test-driven development, and refactoring offer techniques that build in quality from the beginning. Introducing automated testing and regular customer feedback are also best practices that help ensure issues are found early in the process and can be addressed quickly.
Summary
• Creating a quality culture is more than using new tools or techniques; it is also creating an environment where team members are not overwhelmed and can focus on creating the best product possible.
• As teams start to develop with more agility, it is important that they integrate new practices that allow them to find issues early and address them as quickly as possible.
• Pair programming is a technique where two team members sit together using a shared keyboard and screen to develop code. The driver is the person writing the code and the observer is providing real-time feedback.
• Test-driven development requires developers to first write automated test cases and then write only the code necessary to make the test cases pass with no issues.
• Refactoring does not mean you are debugging your code, but rather that you are cleaning it up so that extraneous code is removed and complies with other patterns or structures that may exist in the product.
• Agile approaches emphasize the importance of keeping the defect backlog to an absolute minimum.
• Manual testing requires step-by-step human intervention to execute each test case, and automated testing uses software that is independent of the software being tested to execute tests without human intervention and compare the results against the desired outcome.
• Customer testing can be performed in many ways, such as alpha, beta, or usability testing. Agile methodologies encourage early and regular feedback from customers during the development process.
Interview with Tim Ottinger

Tim Ottinger is a recognized Agile coach and author with more than 30 years of software development experience. He has shared his software development knowledge with both small and large corporations around the world and is a regular speaker at conferences.
Tim contributed his software development insight in Clean Code, Pragmatic Bookshelf magazine, the C++ Report, Software Quality Connection, and other publications. He coauthored Agile in a Flash, with Jeff Langr in 2011.
Kristin and Sondra: Which of the Agile tools that you’ve helped companies adopt have had the most positive influence on product quality?
Tim: The switch to TDD and the switch to pair programming are the most positive, transformative changes programmers can make. Code becomes clearer, easier to write, harder to get lost in, more certain to run . . . it’s amazing.
Unit testing frameworks, then, are of key importance. All of the xUnit frameworks are pretty good, and usually they are extendable enough that any project in any language can learn to make good use of them.
Microtests are the workhorse tests of the Agile project. Usually, 80% of the tests will be small, fast-running microtests, and they will be run many times every hour. Some tools like “Autotest” for Ruby, “sniffer” for Python, or “Infinitest” for Java will run microtests continually as you write your code. You don’t even have to push a button to get immediate feedback!
Integration/Acceptance/Behavior Testing
Acceptance tests are usually specified by a customer or business analyst (in Scrum it’s the product owner, in XP it is the customer, but often the tests are coauthored by test automation engineers or programmers). These tests are usually written before the code is written, to guide the programmers who are writing the code.
The tests are considered “executable specifications” and will typically be written in either an English-like language called “Gherkin” or else in something derived from Ward Cunningham’s Framework for Integrated Test (FIT) syntax for behavior-driven testing [http://fit.c2.com/wiki.cgi?IntroductionToFit].
Part of the value proposition of these tests is that they are writeable and readable by nonprogrammers. This is an important benefit if you have nonprogrammers involved with your teams, and can be good documentation even if you do not.
Some teams have only technical members, and will sometimes write system tests in their chosen programming language. If they do, they usually separate them in some way from the fast unit tests (microtests) because tests in this middle layer run much more slowly and require much more setup than microtests.
Often these tests are only run once or twice a day, sometimes only when code is otherwise considered “done,” or in some cases only by a build server running Jenkins or Hudson or Anthill (or another code integration tool). They tend to be slow, and that makes running the tests frequently an unattractive option.
System Testing
System testing tools are always useful, because they test a full, running system instead of testing just parts. However, they are troublesome for the same reason.
While I might run 10,000 unit tests in a minute, having to stand up a full system with its network components and databases and user interfaces will ensure that it takes many seconds (even minutes) to prepare a test bed (sandbox). A test bed is a development environment that allows for the isolated testing of a particular module outside a production environment.
This is worse if the test bed requires other external partners (or simulators) to be running.
Once the test bed is running our system, communicating through a user interface requires something like Selenium, Watir, LDTP, Squish, or Mechanize. These tools take time and resources to run also. Web testers have to spin up browsers or connect to the windowing system.
System tests tend to be fragile. If they are using the positioning or names of UI elements, then a change to naming or position will cause these expensive tests to break and need maintenance. This is particularly true of the “record and playback” tests.
The fragile test problem is worse when it comes to validating output. It is hard to avoid overspecifying (such as setting an entire report to be the expected result, instead of checking that it contains the right information). In a fragile test, even a change in the date or time might cause a test to fail.
Due to the systems requirements and the slowness of system tests, they often cannot be run on the developers’ desktops, and are only run on special equipment after all the microtests and integration tests have successfully completed.
System testing is important and has value, but it is expensive even if automated, and building robust enough tests is a whole skill set.
If the development team is building code to run on a mobile device or an embedded component of some larger system, it is necessary that the project have tests that run on actual target hardware. These tests are a bit harder to set up and a bit more expensive to run than system tests and may require special hardware rigs to make them run.
In Agile teams, we want all our code to pass automated tests on actual hardware as soon as possible, so that we can discover and address risks as soon as possible. After all, testing is a risk-management discipline even in Agile teams. The sooner we know we are in trouble, the sooner we can learn from it and adjust our techniques and designs.
It’s worth mentioning that a lot of manual testing is still done in Agile projects, but not the dull, repetitive work. Anything that can be better done by a machine is automated. What’s left is creative, destructive, clever human testing. Automated tests never approach the system with a misunderstanding of how to use it. Automated tests don’t care if the experience is not pleasant. Automated tests don’t notice that the screen has funky colors. Automated tests never surprise us by entering the wrong kind of data into an input field or by executing a gesture the programmers didn’t expect.
The idea is to leave as much room for manual, creative, human testing as possible by automating everything else.
Kristin and Sondra: If an organization is moving to Agile development methodologies, where should they start to improve the quality of their code?
Tim: It’s good to start with testing disciplines. Pair programming and TDD are good starting points, but there are a bunch of other disciplines that tie into doing those well. A team should educate itself about quality code and how to refactor.
One of Industrial Logic’s e-learning courses begins by teaching code smells (indications something may be wrong with the code), then how to refactor, then how to write microtests, and then how to test-drive code, and finally how to transform legacy code into testable code. I think it’s a very wise progression. A team doesn’t have to buy our products, but they will benefit from learning these disciplines, however possible.
There is a book written by the various Object Mentor employees and gathered, edited, and managed by Robert C. Martin; the book is called Clean Code. Developers could get a lot of help from reading and studying this book.
The other thing that I find helpful is to study code katas, which are programming exercises that help you practice your art through exercises and repetition. The word “kata” comes from the Japanese term for practicing detailed patterns of movement. The Internet is full of code katas, in video and written prose form, and each of them shows techniques of test-driving code from concept through to finished algorithm.
Kristin and Sondra: Automated testing is not unique to Agile. Teams using the Waterfall methodology have been using automated testing for many years. In your view, what is the major difference in how automated testing is used between the two methodologies?
Tim: The difference is that Agile processes encourage automation when it comes to testing, meaning that Agile teams prefer the test processes to be continual and without manual intervention. We probably don’t spend any more or less time than non-Agile teams who automate tests; we just run them all the time. We do spend a lot less time than teams who test all their code manually. Automated tests make testing and debugging much quicker.
References and Further Reading
Beck, Kent. (2002). Test-driven development: By example. Boston: Addison-Wesley.
Crispin, Lisa, and Gregory, Janet. (2009). Agile testing: A practical guide for testers and Agile teams. Boston: Addison-Wesley.
Fowler, Martin, Beck, Kent, Brant, John, Opdyke, William, and Roberts, Don. (1999). Refactoring: Improving the design of existing code. Boston: Addison-Wesley.
Gherkin. https://github.com/cucumber/cucumber/wiki/gherkin.
Langr, Jeff, and Ottinger, Tim. (2011). Agile in a flash: Speed learning Agile software development. Frisco, TX: Pragmatic Bookshelf.
Loveland, S., Miller, G., Prewitt, R., and Shannon, M. (2005). Software testing techniques: Finding the defects that matter. Hingham, MA: Charles River Media.
Martin, Robert. (2008). Clean code: A handbook of Agile software craftsmanship. Upper Saddle River, NJ: Prentice Hall.
Ottinger, Tim. (2013). Personal communication.
Spolsky, Joel. (2000). The Joel test: 12 steps to better code. http://www.joelonsoftware.com/articles/fog0000000043.html.
Review Questions
Review 1
1. Why is it better to find defects earlier rather than later in the product development cycle?
2. What are the benefits of pair programming?
3. How does test-driven development improve code quality?
4. What are the benefits of refactoring code?
5. What is the benefit of decoupling code?
7. What is the difference between alpha and beta testing?
8. What is the difference between manual and automated testing?
9. What is the difference between acceptance and system testing?
10. What is a “business readable language”?
11. How is customer testing different in Agile development environments?