
In this chapter, you will learn how to create the platform game Jumping Jack, shown in Figure 11-1, inspired by arcade and console games such as Donkey Kong and Super Mario Bros. New concepts introduced in this chapter include actors with multiple animations, platform physics, using extra actors as “sensors” to monitor the area around an actor for overlap and collision, jump-through platforms, and key-and-lock mechanics.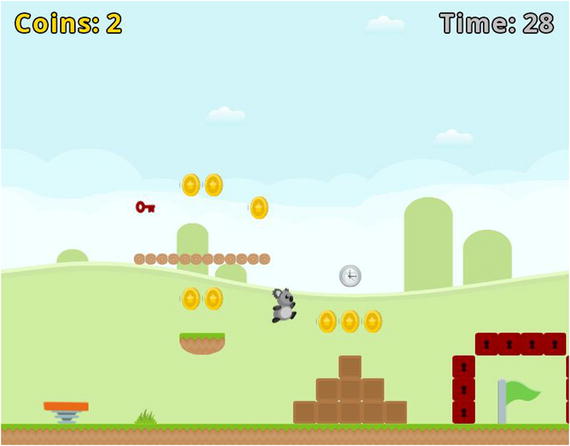
Figure 11-1.
The platform game Jumping Jack
Game Project: Jumping Jack
Jumping Jack
is an action game where the character, Jack the Koala, jumps around a level collecting as many coins as possible; he must reach the goal flag before time runs out. Collecting timer objects gives the koala more time to explore. Some of the surfaces in the game are jump-through platforms, which behave like solid objects except that the koala can jump up through them from below and land on top, or fall down through the platforms from above. There are also springboard objects, which launch the koala high into the sky if he lands on them from above. Finally, there are lock blocks, which may come in many colors and are impassable until the koala collects the key of the same color.
The player uses the left and right arrow keys
to walk back and forth and the spacebar key to jump (when the koala is standing on a solid object). The koala will automatically jump up through a platform from below, but to fall down through a platform, the player must hold the down arrow key while pressing the key to jump. The user interface displays the number of coins collected in the upper-left corner of the screen and the amount of time remaining in the upper-right. When any keys are collected, an image of a key with the corresponding color will appear in the top-center area of the screen. If the player reaches the goal flag or runs out of time, a message will appear in the center of the screen stating “You Win!” or “Time Up—Game Over,” respectively.
The game uses a vibrant, colorful, cartoonish art style. Most objects with which the player can interact involve either an image-based or a value-based animation to draw the player’s attention. Suggestions for additional special effects and audio will be discussed in the final section of this chapter to help establish the mood, provide player feedback, and enhance the interaction of game-world objects.
The chapter assumes that you are familiar with the concepts from Chapter 10, “Tilemaps,” and that you have installed the Tiled map-editor software. Beginning this project requires the same steps as in previous projects: creating a new project, creating an assets folder and a +libs folder (the latter not being necessary if you have set up the userlib directory), copying the custom framework files you created in the first part of this book (BaseGame.java, BaseScreen.java, BaseActor.java) as well as the TilemapActor.java class you developed in Chapter 10, and copying the graphics and audio for this project into your assets folder. As described previously, a BlueJ project named
Framework
has been created for your convenience and will be used as a starting point. To begin the first project:
- Download the source code files for this chapter.
- Make a copy of the downloaded Framework folder (and its contents) and rename it to Jumping Jack.
- Copy all the contents of the downloaded Jumping Jack project assets folder into your newly created Jumping Jack assets folder (and delete the +libs folder if you are using the BlueJ userlib folder).
- Open the BlueJ project in your Jumping Jack folder.
- In the CustomGame class, change the name of the class to JumpingJackGame (BlueJ will then rename the source code file to JumpingJackGame.java).
- In the Launcher class, change the contents of the main method to the following:Game my Game = new JumpingJackGame ();LwjglApplication launcher = new LwjglApplication(myGame, "Jumping Jack", 800, 640 )
Starting the Level
To begin, start the Tiled map-editor software
. Create a new map with a map size that has width of 50 tiles and height of 20 tiles, and a tile size with the width and height both set to 32 pixels. The resulting map will be 1600 pixels by 640 pixels. Click the Save As . . . button and save the file to your assets directory with the filename map.tmx.
Next, add an image layer and an object layer to your map and reorder the layers so that the tile layer appears in the middle of the list. In the Layers panel, select Image Layer 1, and in the Properties panel, set the image to background.png (whose dimensions match the size of the tilemap). Then, in the Tileset panel
, add a new tileset using the image platform-tileset.png (shown on the left side of Figure 11-2), setting the tile size to 32 by 32 and checking the box to embed the tileset in the map. Add another new tileset to the map, this time using the image object-tileset.png (shown on the right side of Figure 11-2), in the same way. Since the object tiles will be used to indicate where game-world objects should be spawned, you will need to specify the corresponding Java classes (which you will create later). In the Tileset panel, select object-tileset and click on the icon to edit the tileset. In the tab that appears, you will need to click on each tile (one at a time) and add a new custom property to each. The property should be called name; the corresponding values for the tiles (from left to right) are Coin, Flag, Timer, Springboard, Platform, Key, and Lock. In addition, for the key and lock object tiles, add a second custom property called color with the value red. (This default color can be overridden for specific instances later on in the tilemap editor).
Figure 11-2.
Tilesets for the tile layer (left) and object layer (right)
Return to the tab featuring the tilemap. In the Layers panel, select Tile Layer 1. In the Tileset panel, select platform-tileset and then press the B key to activate the
Stamp Brush tool
. Add tiles across the bottom row of the map, as well as some tiles representing solids to jump on, as well as some scenery. Note that the cloud graphic occupies two tiles, so you should add these tiles in adjacent pairs. One possible arrangement is shown in Figure 11-3 (which only displays part of the map, for clarity).
Figure 11-3.
Additions to the tile layer
It is important to note that the tile layer is being used only to simplify creating an image from tilesets; none of these tiles are returned when using the
getTileList method
in the TilemapActor class. Instead, for the regions covered by tiles that represent solid objects (in contrast to the tiles that represent scenery), you will add rectangles in the object layer to store the data corresponding to those regions. In the Layers panel, select Object Layer 1 and press R to activate the Rectangle tool. Draw rectangles around all the regions containing solid tiles; for simplicity, rectangles can be drawn that surround multiple tiles at once. To align rectangles with the grid, you may want to activate the Snap to Grid setting in the View menu if it isn’t already activated. For the design shown in Figure 11-3, you would add rectangles around the ground, the floating platform, and the staircase made out of boxes, but not the two tiles with pictures of grass. Each time you add one of these rectangles, you must also add a custom property called name with the value Solid (which will be used to initialize corresponding actors later), or you can create them all and then use the Select tool to give them all the same property at once. Finally, add a rectangle at the position where the koala should start the level and add a custom property called name with the value Start. Applying this process to the design shown in Figure 11-3 produces the result shown in Figure 11-4, where the rectangles are drawn with a gray border. Now would also be a good time to save your tilemap file!
Figure 11-4.
Adding rectangle objects
to indicate solid objects
Next, open the Jumping Jack project in BlueJ. You need a way to represent regions corresponding to solid objects. To this end, create a new class named Solid that contains the following code. Since no graphics are used for this object (the tilemap determines the graphics that will be appear in these areas), the size and boundary shape for these objects must be set directly, and the width and height values are passed in via the constructor. Note that this class also contains functionality to enable and disable the solid status of the object; this will be needed by the platform and lock objects
introduced later on in this chapter.
import com.badlogic.gdx.scenes.scene2d.Stage;
public class Solid extends BaseActor
{
private boolean enabled;
public Solid(float x, float y, float width, float height, Stage s)
{
super(x,y,s);
setSize(width,height);
setBoundaryRectangle();
enabled = true;
}
public void setEnabled(boolean b)
{
enabled = b;
}
public boolean isEnabled()
{
return enabled;
}
}
Next, in the LevelScreen class, add the following import statements:
import com.badlogic.gdx.maps.MapObject;
import com.badlogic.gdx.maps.MapProperties;
Then, add the following code to the initialize method to load the tilemap and generate the
Solid objects
corresponding to the rectangles in the tilemap:
TilemapActor tma = new TilemapActor("assets/map.tmx", mainStage);
for (MapObject obj : tma.getRectangleList("Solid") )
{
MapProperties props = obj.getProperties();
new Solid( (float)props.get("x"), (float)props.get("y"),
(float)props.get("width"), (float)props.get("height"),
mainStage );
}
At this point, you can test your project, although you will only see the leftmost part of the level. In the next section, you will add the player’s character (Jack the Koala), which will enable you to move around and see the rest of your level.
Platform Character Setup
In this section, you will create a class for the main character (the koala) that is controlled by the player. One new feature of this class is that it will contain multiple animations corresponding to different types of movement (standing, walking, and jumping). Due to the complexity of platform character movement, the physics-related methods
in the BaseActor class are insufficient for a game of this type. For example, platform characters typically have different maximum speeds for horizontal movement (walking) and vertical movement (jumping/falling). For this reason, the character’s act method will contain custom code for implementing physics-based movements. Before continuing, you may want to review the “Physics and Movement” section from Chapter 3, which contains an extensive discussion of physics-related concepts and calculations that will be revisited here.
To begin, create a new class called
Koala
containing the following code, which initializes two animations: stand, which consists of a single image, and walk, which contains multiple images.
import com.badlogic.gdx.scenes.scene2d.Stage;
import com.badlogic.gdx.graphics.g2d.Animation;
public class Koala extends BaseActor
{
private Animation stand;
private Animation walk;
public Koala(float x, float y, Stage s)
{
super(x,y,s);
stand = loadTexture( "assets/koala/stand.png" );
String[] walkFileNames =
{"assets/koala/walk-1.png", "assets/koala/walk-2.png",
"assets/koala/walk-3.png", "assets/koala/walk-2.png"};
walk = loadAnimationFromFiles(walkFileNames, 0.2f, true);
}
}
Next, you will begin to implement the custom physics. First, in the
BaseActor class
, change the access modifier of the variables accelerationVec and velocityVec from private to protected so that the Koala class can access these variables directly. Return to the
Koala class
and add the following import statements:
import com.badlogic.gdx.Gdx;
import com.badlogic.gdx.Input.Keys;
import com.badlogic.gdx.math.MathUtils;
import com.badlogic.gdx.math.Vector2;
Next, you need to add variables to store physics-related constants: acceleration and deceleration rates for walking, the maximum horizontal (walking) speed, the magnitude of the force of gravity that pulls the character downward, and the maximum possible vertical (jumping/falling) speed. To this end, add the following variable declarations
to the Koala class:
private float walkAcceleration;
private float walkDeceleration;
private float maxHorizontalSpeed;
private float gravity;
private float maxVerticalSpeed;
In the constructor method, add the following code to set the values of these variables:
maxHorizontalSpeed = 100;
walkAcceleration = 200;
walkDeceleration = 200;
gravity = 700;
maxVerticalSpeed = 1000;
Now, you will turn your attention to implementing platformer physics. First, in the Koala class, add the following method:
public void act(float dt)
{
super.act( dt );
}
All the code that follows is to be added to the act method until stated otherwise. The first order of business is to check for keyboard input. If the player is pressing the left arrow key or the right arrow key, then the acceleration vector is updated. Then, the effect of gravity is taken into account, and the acceleration vector
is used to update the velocity vector. To do so, add the following code:
if (Gdx.input.isKeyPressed(Keys.LEFT))
accelerationVec.add( -walkAcceleration, 0 );
if (Gdx.input.isKeyPressed(Keys.RIGHT))
accelerationVec.add( walkAcceleration, 0 );
accelerationVec.add(0, -gravity);
velocityVec.add( accelerationVec.x * dt, accelerationVec.y * dt );
Next, if the character is not accelerating (which happens when the player is not pressing left or right), then deceleration takes place. First, the amount of deceleration is calculated (which depends on dt, the amount of time that has elapsed). The walking direction (positive indicating right, negative indicating left) and the walking speed (the absolute value of the velocity) are stored in variables. The walk speed is decreased by the deceleration amount
, and if the value becomes negative, it is set to 0. After these adjustments, the velocity x value is recalculated from the walk speed and direction. See the following:
if ( !Gdx.input.isKeyPressed(Keys.RIGHT) && !Gdx.input.isKeyPressed(Keys.LEFT) )
{
float decelerationAmount = walkDeceleration * dt;
float walkDirection;
if ( velocityVec.x > 0 )
walkDirection = 1;
else
walkDirection = -1;
float walkSpeed = Math.abs( velocityVec.x );
walkSpeed -= decelerationAmount;
if (walkSpeed < 0)
walkSpeed = 0;
velocityVec.x = walkSpeed * walkDirection;
}
In addition to the effects of deceleration, the velocity in the x and y directions needs to stay within the bounds established by the variables that store the maximum speed in these directions. This can be accomplished by using the
MathUtils class clamp method
as follows:
velocityVec.x = MathUtils.clamp( velocityVec.x, -maxHorizontalSpeed, maxHorizontalSpeed );
velocityVec.y = MathUtils.clamp( velocityVec.y, -maxVerticalSpeed, maxVerticalSpeed );
Now that the final adjustments to the velocity have been performed, the velocity values are used to adjust the position, and the acceleration vector is reset to (0,0), via the following code:
moveBy( velocityVec.x * dt, velocityVec.y * dt );
accelerationVec.set(0,0);
You also want to make sure that the camera stays aligned with the koala, and that the koala stays on the screen at all times. To do this, add the following lines of code:
alignCamera();
boundToWorld();
Finally, you need to switch between the animations according to the velocity in the x direction; a velocity of 0 indicates the koala is standing still and should use the corresponding animation. Furthermore, if the koala is moving to the left, you want to use the mirror image of the textures so that the koala appears to be facing to the left. Reversing the image can be easily accomplished by setting the scale in the x direction to -1, and the image can be restored by setting the scale back to 1. To do so, add the following code.
if ( velocityVec.x == 0 )
setAnimation(stand);
else
setAnimation(walk);
if ( velocityVec.x > 0 ) // face right
setScaleX(1);
if ( velocityVec.x < 0 ) // face left
setScaleX(-1);
At this point, sufficiently many features have been added to the
Koala class
for you to be ready to add the koala to the game. In the LevelScreen class, add the following import statement:
import com.badlogic.gdx.math.Vector2;
Also add the following variable declaration
to the class:
Koala jack;
In the initialize method, add the following code to retrieve the start position specified in the tilemap, then initialize the Koala object at that position.
MapObject startPoint = tma.getRectangleList("start").get(0);
MapProperties startProps = startPoint.getProperties();
jack = new Koala( (float)startProps.get("x"), (float)startProps.get("y"), mainStage);
Next, collisions with solid objects (represented by the Solid class) are handled. The
preventOverlap method
is used to stop the koala from passing through any solid objects. A subtle issue that needs to be addressed is how the koala’s speed should be adjusted when this occurs. Not adjusting the speed at all can lead to glitchy behavior; for example, if the koala falls and collides with the ground and the vertical speed is not set to zero, then gravity will cause the speed to build up, and eventually the koala will pass through the solid object in a single frame, causing it to seemingly disappear from the game. If the velocity vector is set to (0,0) on all collisions, however, this also leads to problems: for example, if the koala were to hit the side of a wall while falling, the koala would appear to stop for an instant, and if the player were to hold down an arrow key that moved the koala against a solid (such as a wall) while it was falling, the koala would appear to slowly float down the side of the wall. To avoid problems such as these, the direction of the impact must be taken into account. You encountered a similar issue when creating the
Rectangle Destroyer game
in Chapter 8, in that you needed to know the side of an object that was hit. As before, you can resolve this issue by analyzing the displacement vector returned by the
preventOverlap method
to determine the direction in which collision occurred and then setting the velocity in that direction to 0. To implement all of this, in the update method, add the following code:
for (BaseActor actor : BaseActor.getList(mainStage, "Solid"))
{
Solid solid = (Solid)actor;
if ( jack.overlaps(solid) && solid.isEnabled() )
{
Vector2 offset = jack.preventOverlap(solid);
if (offset != null)
{
// collided in X direction
if ( Math.abs(offset.x) > Math.abs(offset.y) )
jack.velocityVec.x = 0;
else // collided in Y direction
jack.velocityVec.y = 0;
}
}
}
Finally, you will add the ability to jump to the
Koala class
. The most difficult part of this process is determining when the koala is on the ground and therefore able to jump. Checking if the velocity in the y direction equals 0 is insufficient, as this is also true at the instant when the koala is at the maximum height of a jump. The approach that will be used here is to create a small auxiliary object (named belowSensor) positioned directly below the koala at all times, as shown in Figure 11-5. If this object overlaps a solid object, then the koala will be able to jump. In the final version of the game, this sensor will be invisible, but for testing purposes, the box will be colored green or red, depending on whether the koala is on a solid or not.
Figure 11-5.
The koala and the sensor box
below to detect if the koala is standing on a solid object or not
To begin, add the following import statement to the
Koala class
:
import com.badlogic.gdx.graphics.Color;
Next, add the following variables to the class:
private Animation jump;
private float jumpSpeed;
private BaseActor belowSensor;
These objects are set up in the constructor (along with the collision polygon) by adding the following code. Note that belowSensor is slightly less wide than the koala in accordance with the collision polygon
that is being used:
jump = loadTexture( "assets/koala/jump.png");
jumpSpeed = 450;
setBoundaryPolygon(6);
belowSensor = new BaseActor(0,0, s);
belowSensor.loadTexture("assets/white.png");
belowSensor.setSize( this.getWidth() - 8, 8 );
belowSensor.setBoundaryRectangle();
belowSensor.setVisible(true);
To keep belowSensor in the correct position, in the act method, add the following code after the acceleration has been reset:
belowSensor.setPosition( getX() + 4, getY() - 8 );
To check if the koala is standing on a solid object, add the following pair of methods to the Koala class:
public boolean belowOverlaps(BaseActor actor)
{
return belowSensor.overlaps(actor);
}
public boolean isOnSolid()
{
for (BaseActor actor : BaseActor.getList( getStage(), "Solid" ))
{
Solid solid = (Solid)actor;
if ( belowOverlaps(solid) && solid.isEnabled() )
return true;
}
return false;
}
Jumping will be handled by the following method, which should also be added to the Koala class:
public void jump()
{
velocityVec.y = jumpSpeed;
}
Since jumping is a discrete action, it will be called from the
LevelScreen class
(similar to the shooting action in the Space Rocks game). To this end, in the LevelScreen class, add the following import statement:
import com.badlogic.gdx.Input.Keys;
Then, add the following method to the LevelScreen class:
public boolean keyDown(int keyCode)
{
if (keyCode == Keys.SPACE)
{
if ( jack.isOnSolid() )
{
jack.jump();
}
}
return false;
}
Finally, returning to the
Koala class
, in the act method, replace the if-else statement used to set the animation with the following improved code, which determines which of the three animations (stand, walk, or jump) should be used, as well as sets the color of
belowSensor
, for testing and visualization purposes:
if ( this.isOnSolid() )
{
belowSensor.setColor( Color.GREEN );
if ( velocityVec.x == 0 )
setAnimation(stand);
else
setAnimation(walk);
}
else
{
belowSensor.setColor( Color.RED );
setAnimation(jump);
}
You are now ready to test your game again. Press the spacebar key
(while the koala is on the ground) to jump and watch the color of the belowSensor rectangle change accordingly. Try pressing the spacebar key while the koala is in the air to verify that the koala cannot jump in this situation. Depending on how you designed your level in the Tiled map editor, you may find that you want to change the jump strength of the koala or adjust your level design. At this point, you have implemented the most difficult part of the platformer game. When you are finished testing, in the Koala class, set the visibility of belowSensor to false. In the following section, you will add a variety of objects for the koala to interact with (other than the ground).
Game-World Objects
Now, you will turn your attention to level design. Open your map.tmx file in the Tiled map-editor program. In the Layers panel, select Object Layer 1, and in the Tileset panel, select the object-tileset tab. Press T to activate the Insert Tile tool. Figure 11-6 illustrates a minimal level that features all the different object tiles; Figure 11-7 shows how your program would render that particular map. In the level portrayed, the goal flag is enclosed by red lock blocks, which require the player to obtain the red key. The key can be accessed either by jumping on the springboard to the left or by jumping onto the grassy tiles and then through the platform. Along the way, there are coins for the player to collect and a timer that can be collected to add extra time to reach the goal. Note that the springboard and flag objects will be larger than a single tile, and so the object tile indicates the lower-left corner of where the object will appear. Don’t forget to save your tilemap file regularly so that the changes you make are incorporated into your game project.

Figure 11-6.
Level design in the Tiled map editor
Figure 11-7.
Tilemap from Figure 11-6 as rendered during gameplay
User Interface
Before adding the code for the game-specific objects, you will set up the user interface. As described in the beginning of this chapter, across the top of the screen will be a label to display the number of coins collected, a table that contains images for collected keys, and a label to show the time remaining. In the center of the screen will be a label that appears when the game is over containing a message dependent on whether the player won or lost the game. To begin, in the LevelScreen class, add the following import statements:
import com.badlogic.gdx.graphics.Color;
import com.badlogic.gdx.scenes.scene2d.ui.Label;
import com.badlogic.gdx.scenes.scene2d.ui.Table;
Next, add the following variable declarations to the class:
boolean gameOver;
int coins;
float time;
Label coinLabel;
Table keyTable;
Label timeLabel;
Label messageLabel;
To set up all these variables, in the initialize method, add the following code:
gameOver = false;
coins = 0;
time = 60;
coinLabel = new Label("Coins: " + coins, BaseGame.labelStyle);
coinLabel.setColor(Color.GOLD);
keyTable = new Table();
timeLabel = new Label("Time: " + (int)time, BaseGame.labelStyle);
timeLabel.setColor(Color.LIGHT_GRAY);
messageLabel = new Label("Message", BaseGame.labelStyle);
messageLabel.setVisible(false);
To arrange the displays
in the user-interface table, add the following code to the end of the initialize method:
uiTable.pad(20);
uiTable.add(coinLabel);
uiTable.add(keyTable).expandX();
uiTable.add(timeLabel);
uiTable.row();
uiTable.add(messageLabel).colspan(3).expandY();
The Goal: Reach the Flag
The first code you will add corresponds to the flag
, which is fundamental to the gameplay, as it provides a goal for the player: a location in the level that the koala must reach. To begin, create a new class named Flag that contains the following code:
import com.badlogic.gdx.scenes.scene2d.Stage;
public class Flag extends BaseActor
{
public Flag(float x, float y, Stage s)
{
super(x,y,s);
loadAnimationFromSheet("assets/items/flag.png", 1, 2, 0.2f, true);
}
}
Next, to create an instance of the flag
based on the tilemap data, in the LevelScreen class, add the following code to the initialize method:
for (MapObject obj : tma.getTileList("Flag") )
{
MapProperties props = obj.getProperties();
new Flag( (float)props.get("x"), (float)props.get("y"), mainStage );
}
Finally, to handle what happens when Jack the Koala reaches the flag (ending the game, displaying the message, and removing the koala), at the beginning of the update method, add the following code:
if ( gameOver )
return;
for (BaseActor flag : BaseActor.getList(mainStage, "Flag"))
{
if ( jack.overlaps(flag) )
{
messageLabel.setText("You Win!");
messageLabel.setColor(Color.LIME);
messageLabel.setVisible(true);
jack.remove();
gameOver = true;
}
}
At this point
, even if you surrounded your goal flag with lock blocks, as seen in Figure 11-6, you could test out the goal-flag mechanic, since the lock blocks have not yet been implemented.
Coins
Next, you will implement the code for the coins, which provide an immediate sense of accomplishment and a measure of progress for the player, and many players will self-impose a secondary goal of collecting as many coins as possible (and, preferably, all the coins). To begin, create a new class called Coin that contains the following code:
import com.badlogic.gdx.scenes.scene2d.Stage;
public class Coin extends BaseActor
{
public Coin(float x, float y, Stage s)
{
super(x,y,s);
loadAnimationFromSheet("assets/items/coin.png", 1, 6, 0.1f, true);
}
}
Next, to create instances of the coin based on the tilemap data, in the LevelScreen class, add the following code to the initialize method:
for (MapObject obj : tma.getTileList("Coin") )
{
MapProperties props = obj.getProperties();
new Coin( (float)props.get("x"), (float)props.get("y"), mainStage );
}
Finally, to handle what happens when Jack the Koala collects a coin
(increasing the coin variable, updating the display, and removing the coin from the level), in the update method (after the conditional statement that checks if the game is over), add the following code:
for (BaseActor coin : BaseActor.getList(mainStage, "Coin"))
{
if ( jack.overlaps(coin) )
{
coins++;
coinLabel.setText("Coins: " + coins);
coin.remove();
}
}
At this point, you can test your game and verify that coin collecting works as intended, although depending on your level design, the koala might not be able to reach some of the coins yet.
Time and Timers
Next, you will add the time-based functionality, which provides a sense of urgency and tension in the game, depending on the amount of time available to the player. The timer objects will add a sense of relief to the player by increasing the amount of time available. Timer objects can also be used to create a set of forced checkpoints: if it is impossible for the player to reach the goal flag in the amount of time initially given, they will be forced to collect the timer objects along the way. If you opt for this design, don’t forget to test your level to make sure that it is possible to reach the goal! To begin, create a new class called Timer with the following code. Note that since there is no image-based animation, a value-based animation
(a pulsing action) is added to draw the player’s attention and indicate that this object is interactive.
import com.badlogic.gdx.scenes.scene2d.Stage;
import com.badlogic.gdx.scenes.scene2d.Action;
import com.badlogic.gdx.scenes.scene2d.actions.Actions;
public class Timer extends BaseActor
{
public Timer(float x, float y, Stage s)
{
super(x,y,s);
loadTexture("assets/items/timer.png");
Action pulse = Actions.sequence(
Actions.scaleTo(1.1f, 1.1f, 0.5f),
Actions.scaleTo(1.0f, 1.0f, 0.5f) );
addAction( Actions.forever(pulse) );
}
}
Next, to create instances of timers based on the tilemap data, in the LevelScreen class, add the following code to the initialize method:
for (MapObject obj : tma.getTileList("Timer") )
{
MapProperties props = obj.getProperties();
new Timer( (float)props.get("x"), (float)props.get("y"), mainStage );
}
Finally, you need to automatically
decrement the time variable, update the display, increase the time remaining when a timer is collected, and end the game when the time runs out. To do so, add the following code to the update method:
time -= dt;
timeLabel.setText("Time: " + (int)time);
for (BaseActor timer : BaseActor.getList(mainStage, "Timer"))
{
if ( jack.overlaps(timer) )
{
time += 20;
timer.remove();
}
}
if (time <= 0)
{
messageLabel.setText("Time Up - Game Over");
messageLabel.setColor(Color.RED);
messageLabel.setVisible(true);
jack.remove();
gameOver = true;
}
Once again, feel free to test your code to verify that the time-related functionality works as expected.
Springboards
Jumping is an integral part of any platformer game. However, the player’s character is typically unable to reach the top of the screen from the bottom with a single jump. To reach these higher locations, you could add a staircase-like series of solid tiles or, as an alternative, an object that launches the character high into the air (higher than a normal jump). In this spirit, this game features springboard objects, which appear to the player as bouncy platforms. If the koala lands on top of one, he will be launched high into the air. (Simply walking past the object will not trigger this effect, so as to give the player more agency in determining whether they want to make use of the springboard or not.) First, you need to create a class to represent this object. Create a new class called Springboard as follows:
import com.badlogic.gdx.scenes.scene2d.Stage;
public class Springboard extends BaseActor
{
public Springboard(float x, float y, Stage s)
{
super(x,y,s);
loadAnimationFromSheet("assets/items/springboard.png", 1, 3, 0.2f, true);
}
}
Next, in the Koala class, add the following methods, which will be used to determine if the koala is falling and then, if so, launch the koala into the air (similar to the jump method):
public boolean isFalling()
{
return (velocityVec.y < 0);
}
public void spring()
{
velocityVec.y = 1.5f * jumpSpeed;
}
Next, to set up the springboards
, in the LevelScreen class, add the following code to the initialize method. Also note the use of the toFront method, which will cause the koala to appear in front of the springboards (rather than behind) when walking by them.
for (MapObject obj : tma.getTileList("Springboard") )
{
MapProperties props = obj.getProperties();
new Springboard( (float)props.get("x"), (float)props.get("y"), mainStage );
}
jack.toFront();
Finally, as usual, you need specify what happens when Jack interacts with a springboard, which also includes the additional conditions just described. In the update method, add the following code:
for (BaseActor springboard : BaseActor.getList(mainStage, "Springboard"))
{
if ( jack.belowOverlaps(springboard) && jack.isFalling() )
{
jack.spring();
}
}
Feel free to test your project
and watch the koala fly high into the air!
Platforms
Next, you will add the jump-through platforms. These provide a way for a player to reach higher parts of the level (other than jumping on a springboard or jumping up a series of solid tiles). Creating a vertical arrangement of platform objects provides ladder-like functionality. The Platform class will be one of two classes that extend the Solid class, and the jump-through functionality is one of the reasons that the Solid class was designed with the enabled property built in. To begin, create a new class called Platform with the following code:
import com.badlogic.gdx.scenes.scene2d.Stage;
public class Platform extends Solid
{
public Platform(float x, float y, Stage s)
{
super(x,y,32,16,s);
loadTexture("assets/items/platform.png");
}
}
Next, in the Koala class, add the following method, which will be used to determine if the koala is jumping:
public boolean isJumping()
{
return (velocityVec.y > 0);
}
Creating the platform objects
is a straightforward process. As before, in the initialize method of the LevelScreen class, add the following code:
for (MapObject obj : tma.getTileList("Platform") )
{
MapProperties props = obj.getProperties();
new Platform( (float)props.get("x"), (float)props.get("y"), mainStage );
}
Typically, platforms function the same as solid objects, with two exceptions: the solid functionality is disabled when jumping up through the platform from below, or when jumping down through the platform from above. In both of these scenarios, the solid functionality of the platform in question must be re-enabled after the koala has passed through it. To begin, in the update method, locate the block of code that iterates over the list of Solid objects. Since the Platform class extends the Solid class, platform objects are included in the list. Directly after the line of code that casts the actor to the Solid class, add the following code, which completely handles the case where the koala jumps up through a platform:
if ( solid instanceof Platform )
{
if ( jack.isJumping() && jack.overlaps(solid) )
solid.setEnabled(false);
if ( jack.isJumping() && !jack.overlaps(solid) )
solid.setEnabled(true);
}
Jumping down through a solid
is slightly more complicated. The idea is this: when the player presses the spacebar to jump (which is handled by the keyDown method), if the player is also currently pressing the down arrow key, then any platforms underneath the koala (those which overlap the below sensor) should have their solid functionality disabled. Then, once the koala has completely fallen through the platform (which can be checked in the update method), the solid functionality will be re-enabled. To accomplish this, in the LevelScreen class, add the following import statement:
import com.badlogic.gdx.Gdx;
Then, change the keyDown method to the following:
public boolean keyDown(int keyCode)
{
if (gameOver)
return false;
if (keyCode == Keys.SPACE)
{
if ( Gdx.input.isKeyPressed(Keys.DOWN) )
{
for (BaseActor actor : BaseActor.getList(mainStage, "Platform"))
{
Platform platform = (Platform)actor;
if ( jack.belowOverlaps(platform) )
{
platform.setEnabled(false);
}
}
}
else if ( jack.isOnSolid() )
{
jack.jump();
}
}
return false;
}
This change takes care
of disabling the solid functionality when jumping down. To re-enable it, in the update method, in the block of code you recently added (that checks for instances of platforms), add the following code:
if ( jack.isFalling() && !jack.overlaps(solid) && !jack.belowOverlaps(solid) )
solid.setEnabled(true);
With these additions, jump-through functionality is complete.
Keys and Locks
This final addition to the Jumping Jack game involves key and lock objects. The locks are solid blocks that the koala cannot pass through until he collects a key with the same color. Locks can be used to surround the goal flag, wall off collections of coins, or block access to a shortcut or further progress in the level. Keys and locks and a puzzle-like element can be used to encourage backtracking and level exploration. In the tilemap, the object tiles representing the keys and locks have a custom property called color that can be set to any value desired; when reading in the data from the tilemap, this data can be used and the actor color set accordingly.
To begin, create a new class called
Key
with the following code. Since there is no image-based animation (as was also the case for the Timer object), a value-based animation is added to this object to make the key rotate back and forth by a small amount.
import com.badlogic.gdx.scenes.scene2d.Stage;
import com.badlogic.gdx.scenes.scene2d.Action;
import com.badlogic.gdx.scenes.scene2d.actions.Actions;
public class Key extends BaseActor
{
public Key(float x, float y, Stage s)
{
super(x,y,s);
loadTexture("assets/items/key.png");
rotateBy(10);
Action tilt = Actions.sequence(
Actions.rotateBy(-20, 0.5f),
Actions.rotateBy(20, 0.5f) );
addAction( Actions.forever(tilt) );
}
}
Next, create a new class called Lock with the following code. Since locks are solid, this class extends the Solid class (as was also the case for the Platform class).
import com.badlogic.gdx.scenes.scene2d.Stage;
public class Lock extends Solid
{
public Lock(float x, float y, Stage s)
{
super(x,y,32,32,s);
loadTexture("assets/items/lock.png");
}
}
Whenever a key is collected
, this is indicated by adding a corresponding-color key icon to the user interface. To keep track of the data (the colors of the keys that have been collected), an ArrayList will be used. When the koala comes into contact with a lock and has collected the corresponding-color key, the lock will fade out and then be removed from the game. To begin, in the LevelScreen class, add the following import statements:
import java.util.ArrayList;
import com.badlogic.gdx.scenes.scene2d.actions.Actions;
Then, add the following variable declaration to the class:
ArrayList<Color> keyList;
In the initialize method, initialize the list as follows:
keyList = new ArrayList<Color>();
To set up the keys and locks based on the tilemap data, add the following code. Note that in both cases, the value of the custom property named color needs to be determined, and according to that value, the color of the actor needs to be set.
for (MapObject obj : tma.getTileList("Key") )
{
MapProperties props = obj.getProperties();
Key key = new Key( (float)props.get("x"), (float)props.get("y"), mainStage );
String color = (String)props.get("color");
if ( color.equals("red") )
key.setColor(Color.RED);
else // default color
key.setColor(Color.WHITE);
}
for (MapObject obj : tma.getTileList("Lock") )
{
MapProperties props = obj.getProperties();
Lock lock = new Lock( (float)props.get("x"), (float)props.get("y"), mainStage );
String color = (String)props.get("color");
if ( color.equals("red") )
lock.setColor(Color.RED);
else // default color
lock.setColor(Color.WHITE);
}
Then, in the update method
, to handle the collecting of the keys, add the following code:
for (BaseActor key : BaseActor.getList(mainStage, "Key"))
{
if ( jack.overlaps(key) )
{
Color keyColor = key.getColor();
key.remove();
BaseActor keyIcon = new BaseActor(0,0,uiStage);
keyIcon.loadTexture("assets/key-icon.png");
keyIcon.setColor(keyColor);
keyTable.add(keyIcon);
keyList.add(keyColor);
}
}
Also in the update method
, locate the for loop that iterates over the list of Solid objects. Since the Lock class extends the Solid class, the locks are included in this list as well. Directly after the block of code corresponding to the conditional statement that checks if the solid is an instance of the Platform class, add the following code. This code checks if the solid is an instance of the Lock class, and, if so, disables and removes the lock if its color has previously been added to the keyList.
if ( solid instanceof Lock && jack.overlaps(solid) )
{
Color lockColor = solid.getColor();
if ( keyList.contains(lockColor) )
{
solid.setEnabled(false);
solid.addAction( Actions.fadeOut(0.5f) );
solid.addAction( Actions.after( Actions.removeActor() ) );
}
}
With this addition, the key-and-lock game mechanic is complete. Test your project to verify that the locks are initially solid. Then, collect the corresponding key, check that a key icon appears in the user interface
, and then make sure that the locks disappear when you come into contact with them thereafter.
At this point, you have finished implementing all the game mechanics described at the beginning of this chapter. Congratulations, and enjoy your game!
Summary and Next Steps
In this chapter, you learned how to create a platform game, including a main character that had animations for each of its actions (standing, walking, jumping), custom physics, and a “sensor” to determine when it was standing on a solid object and was therefore able to jump. You created a variety of objects for your character to interact with, including a flag to represent the goal, coins to collect, a timer to increase time remaining to complete the level, a springboard that launches the character into the air, platforms to jump through, and keys to remove locks that block the path ahead.
As always, there are more features you should add to the game. The largest omissions are a title screen and instructions screen, as well as audio. Background music should be included to set the mood. Sound effects should be added that correspond with player inputs (such as jumping), as well as game-object interaction (such as collecting an object, bouncing off a springboard, when a lock fades away, or when the game ends, either by reaching the goal flag or by running out of time). You may want to add a secondary obstacle, such as spikes, that penalize the player for coming into contact with them. The penalty could be that the player loses a life (perhaps starting with three lives) and has to restart the level, losing the game after all lives are lost. Alternatively, the player could lose a “health point” and continue on from that point, losing the game after all health points are lost. This alternative approach can be more complicated, however, as you will need to add an “invincibility” period after the character is damaged to give them an opportunity to move away from and escape the danger, otherwise all the character’s health points will be drained immediately.
In the next chapter, you will continue using your tilemap-based design skills by creating a top-down swordfighting adventure game called Treasure Quest.